Multi information display Lexus ES300h 2018 (OM33D45U) User Guide
[x] Cancel search | Manufacturer: LEXUS, Model Year: 2018, Model line: ES300h, Model: Lexus ES300h 2018Pages: 608, PDF Size: 10.67 MB
Page 92 of 608
92
ES300h_OM_OM33D45U_(U)2. Instrument cluster
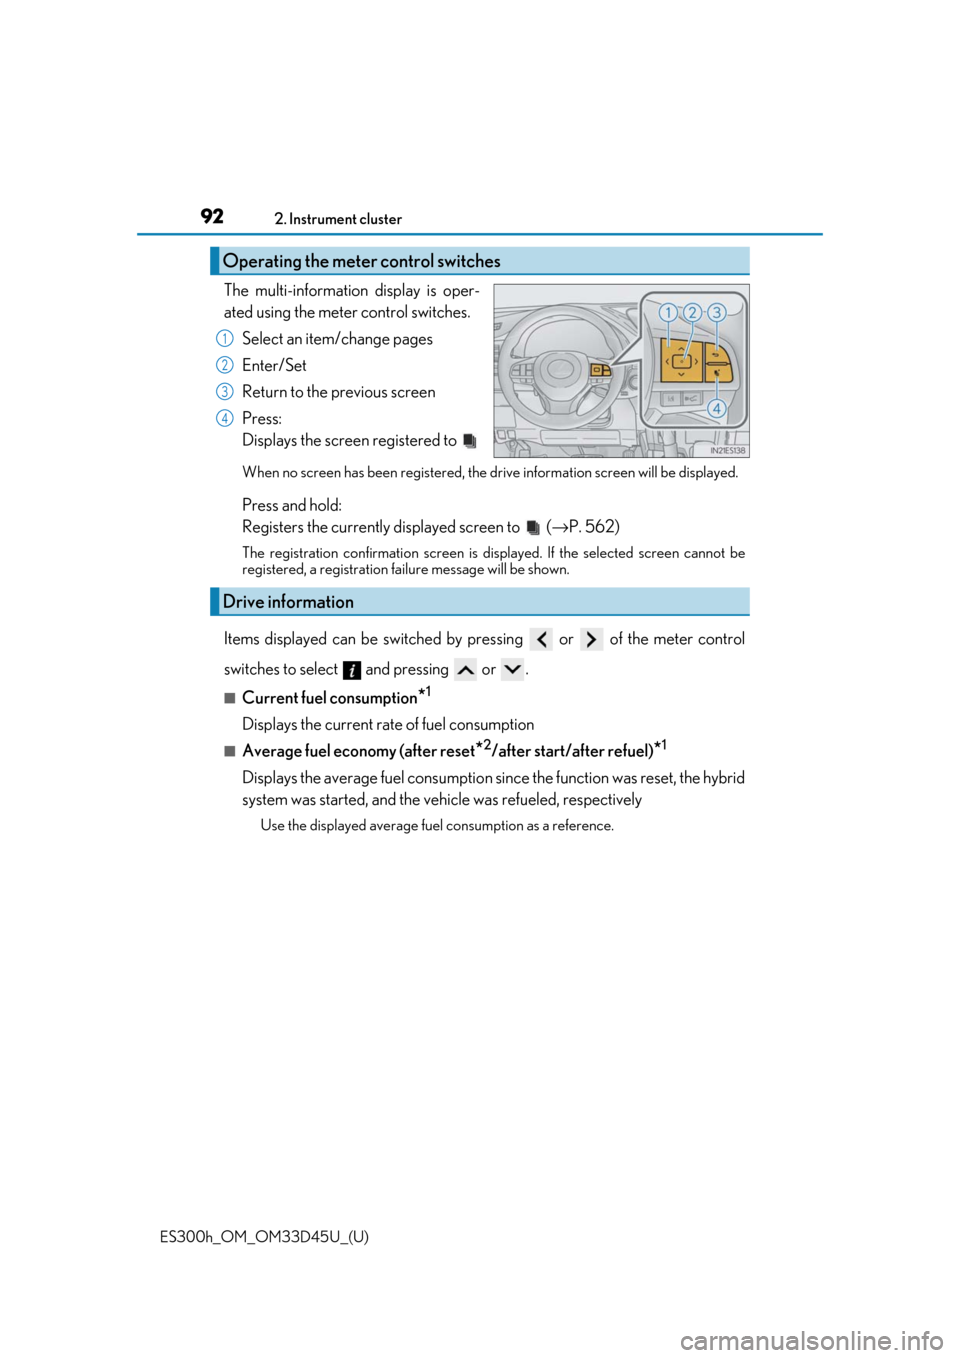
The multi-information display is oper-
ated using the meter control switches.
Select an item/change pages
Enter/Set
Return to the previous screen
Press:
Displays the screen registered to
When no screen has been registered, the dr ive information screen will be displayed.
Press and hold:
Registers the currently displayed screen to ( →P. 562)
The registration confirmation screen is displayed. If the selected screen cannot be
registered, a registration fa ilure message will be shown.
Items displayed can be switched by pr essing or of the meter control
switches to select and pressing or .
■Current fuel consumption*1
Displays the current rate of fuel consumption
■Average fuel economy (after reset*2/after start/after refuel)*1
Displays the average fuel consumption since the function was reset, the hybrid
system was started, and the vehicle was refueled, respectively
Use the displayed average fuel consumption as a reference.
Operating the meter control switches
1
2
3
4
Drive information
Page 94 of 608
94
ES300h_OM_OM33D45U_(U)2. Instrument cluster
The settings of the following items can be changed, refer to P. 560
For functions that can be enabled or disabled, the function switches between on and
off each time is pressed.
●(Lane Departure Alert with steering control) (
→P. 216)
●(Pre-Collision System) ( →P. 205)
●AFS (Adaptive Front-lighting System) (if equipped) ( →P. 183)
●Clock
Adjusts the hour and minute of the cl ock on the multi-information display.
●Ambient illumin.
Select to turn the ornament lights on and off.
●Vehicle Settings
• Scheduled Maintenance ( →P. 437)
• Oil Maintenance ( →P. 451)
●Meter Settings
• Language
Select to change the la nguage on the display.
•Units
Select to change the unit of measure.
•EV indicator
Select to activate/deact ivate the EV indicator.
• switch
Displays a procedure to regi ster a desired screen to .
You can register 1 screen as a shortcut , which can be displayed by pressing .
• Drive information 1/2/3
Select to select up to 2 items that will be displa yed on a Drive information
screen, up to 3 Drive info rmation screens can be set.
•Pop-up display
Select to set the pop-up displays, which may appear in some situations, on/off.
• Accent color
Select to change the accent colors on the screen, such as the cursor color.
•Tachometer
Select to set the tachometer display.
• Default settings
Registered or changed meter settings will be deleted or returned to their
default setting.
Settings display
Page 95 of 608
ES300h_OM_OM33D45U_(U)
952. Instrument cluster
2
Instrument cluster
■System check display
After turning the power switch to ON mode, opening image is displayed while system
operation is checked. When the system check is complete, the normal screen will return.
■Suspension of the settings display
In the following situations, the settings display using the meter control switches will be
suspended.
●When a warning message appears on the multi-information display
●When the vehicle begins to move
■Tire inflation pressure
●It may take a few minutes to display the tire inflation pressure after the power switch is
turned to ON mode. It may also take a few minutes to display the tire inflation pressure
after inflation pressure has been adjusted.
●“---” may be displayed if the tire information cannot be determined due to unfavorable
radio wave conditions.
●Tire inflation pressure changes with temperat ure. The displayed values may also be dif-
ferent from the values measured using a tire pressure gauge.
■When disconnecting and reconnect ing 12-volt battery terminals
The drive information will be reset.
■Liquid crystal display
→ P. 89
WARNING
■Caution for use while driving
For safety, avoid operating the meter control switch while driving as much as possible,
and do not look continuously at the multi- information display while driving. Stop the
vehicle and operate the meter control switch . Failure to do so may cause a steering
wheel operation error, resultin g in an unexpected accident.
■Cautions during setting up the display
As the hybrid system needs to be operating during setting up the display, ensure that
the vehicle is parked in a place with adequa te ventilation. In a closed area such as a
garage, exhaust gases including harmful carbon monoxide (CO) may collect and enter
the vehicle. This may lead to dea th or a serious health hazard.
NOTICE
■During setting up the display
To prevent 12-volt battery discharge, ensure that the hybrid system is operating while
setting up the display features.
Page 96 of 608
96
ES300h_OM_OM33D45U_(U)2. Instrument cluster
Energy monitor/consumption screen
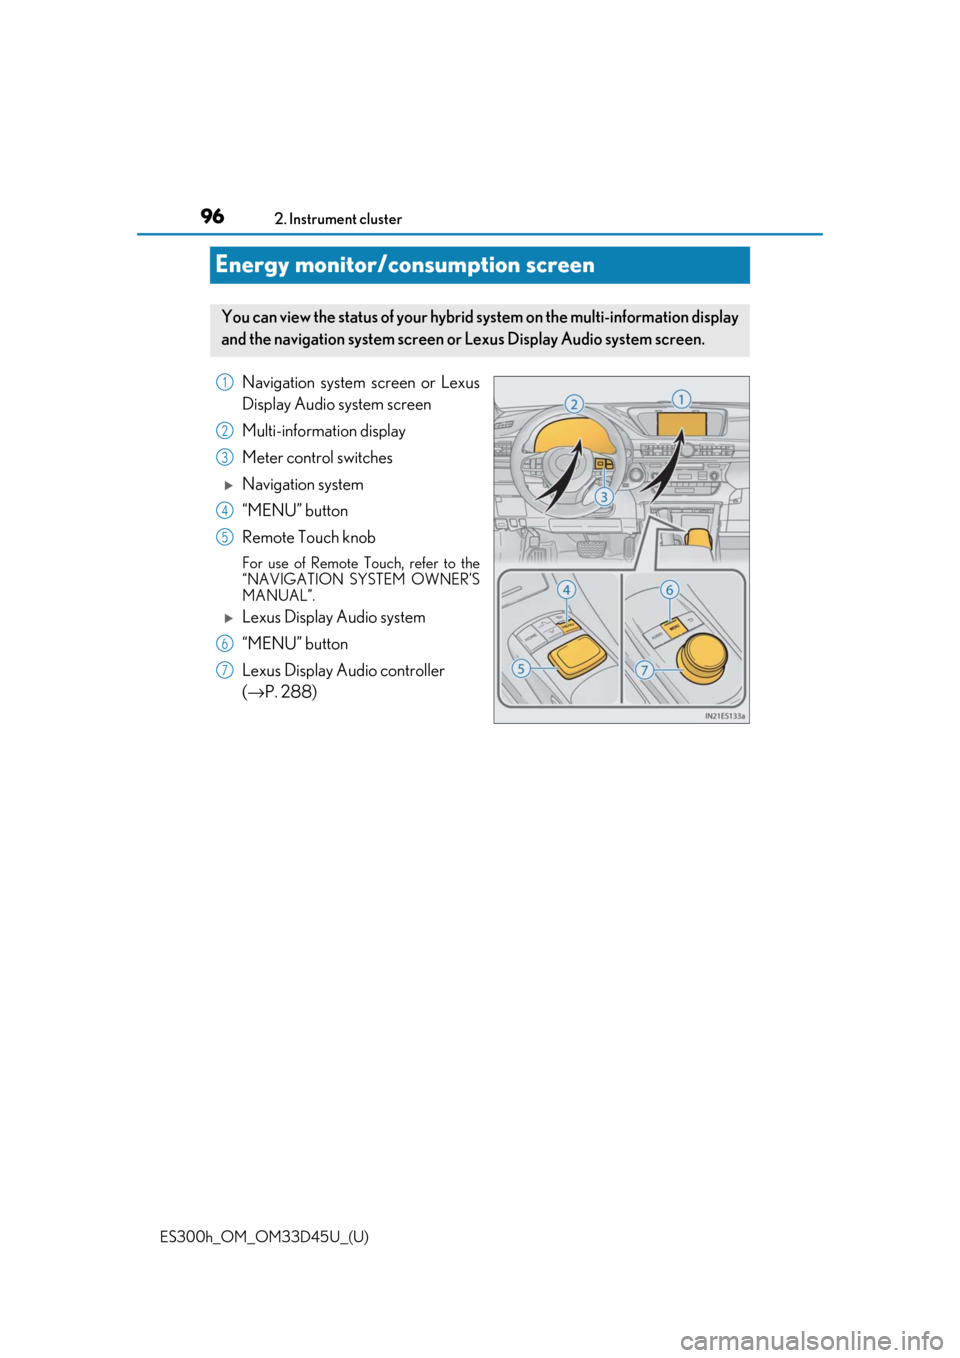
Navigation system screen or Lexus
Display Audio system screen
Multi-information display
Meter control switches
Navigation system
“MENU” button
Remote Touch knob
For use of Remote Touch, refer to the
“NAVIGATION SYSTEM OWNER’S
MANUAL”.
Lexus Display Audio system
“MENU” button
Lexus Display Au
dio controller
(→ P. 288)
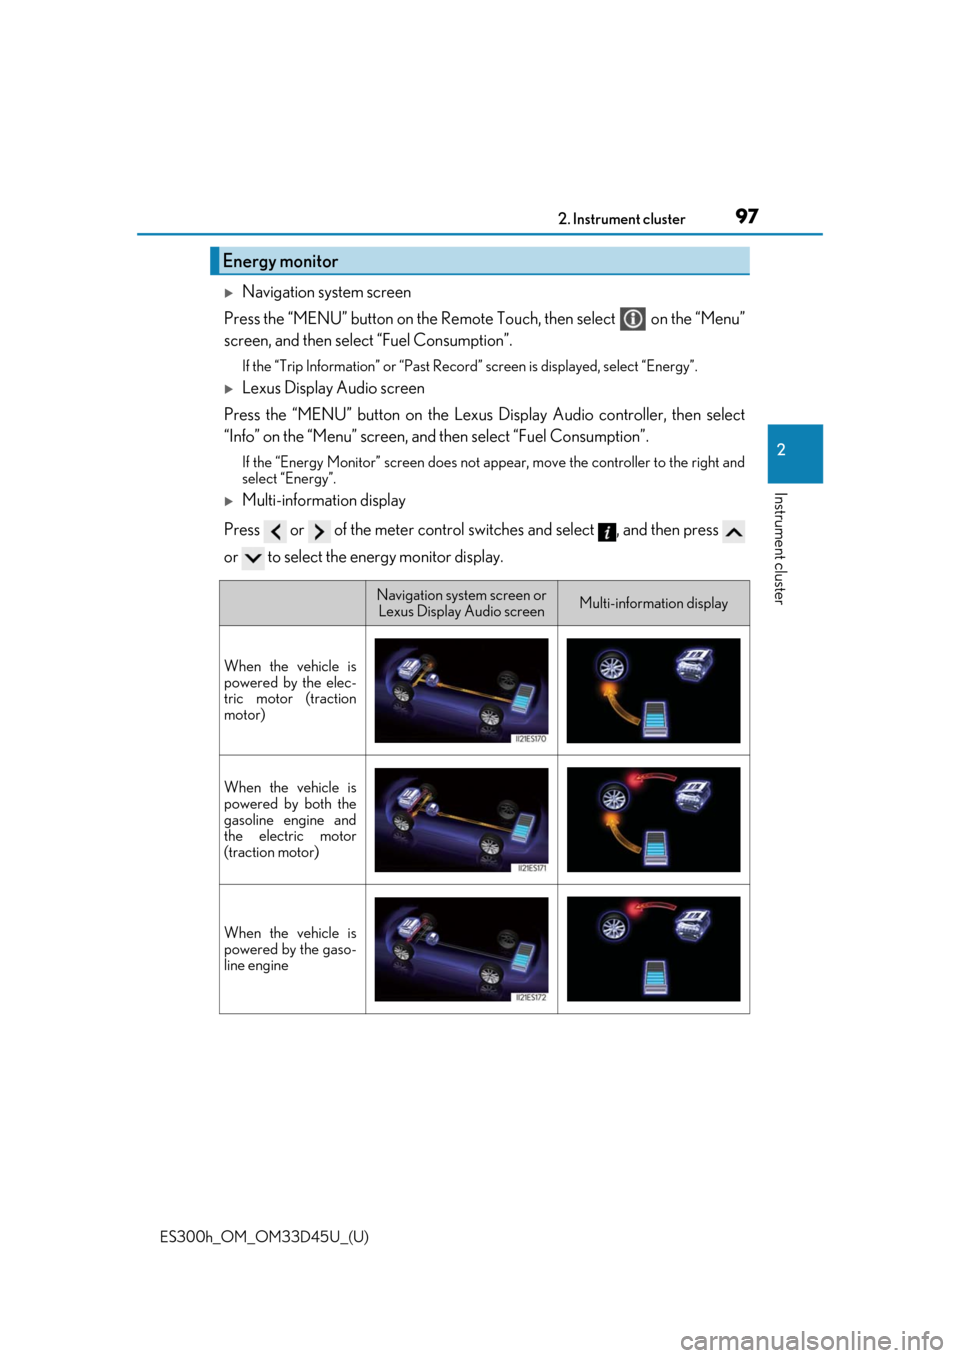
You can view the status of your hybrid system on the multi-information display
and the navigation system screen or Lexus Display Audio system screen.
1
2
3
4
5
6
7
Page 97 of 608
ES300h_OM_OM33D45U_(U)
972. Instrument cluster
2
Instrument cluster
Navigation system screen
Press the “MENU” button on the Remote Touch, then select on the “Menu”
screen, and then select “Fuel Consumption”.
If the “Trip Information” or “Past Record ” screen is displayed, select “Energy”.
Lexus Display Audio screen
Press the “MENU” button on the Lexus Display Audio controller, then select
“Info” on the “Menu” screen, and then select “Fuel Consumption”.
If the “Energy Monitor” screen does not ap pear, move the controller to the right and
select “Energy”.
Multi-information display
Press or of the meter control sw itches and select , and then press
or to select the energy monitor display.
Energy monitor
Navigation system screen or Lexus Display Audio screenMulti-information display
When the vehicle is
powered by the elec-
tric motor (traction
motor)
When the vehicle is
powered by both the
gasoline engine and
the electric motor
(traction motor)
When the vehicle is
powered by the gaso-
line engine
Page 98 of 608
98
ES300h_OM_OM33D45U_(U)2. Instrument cluster
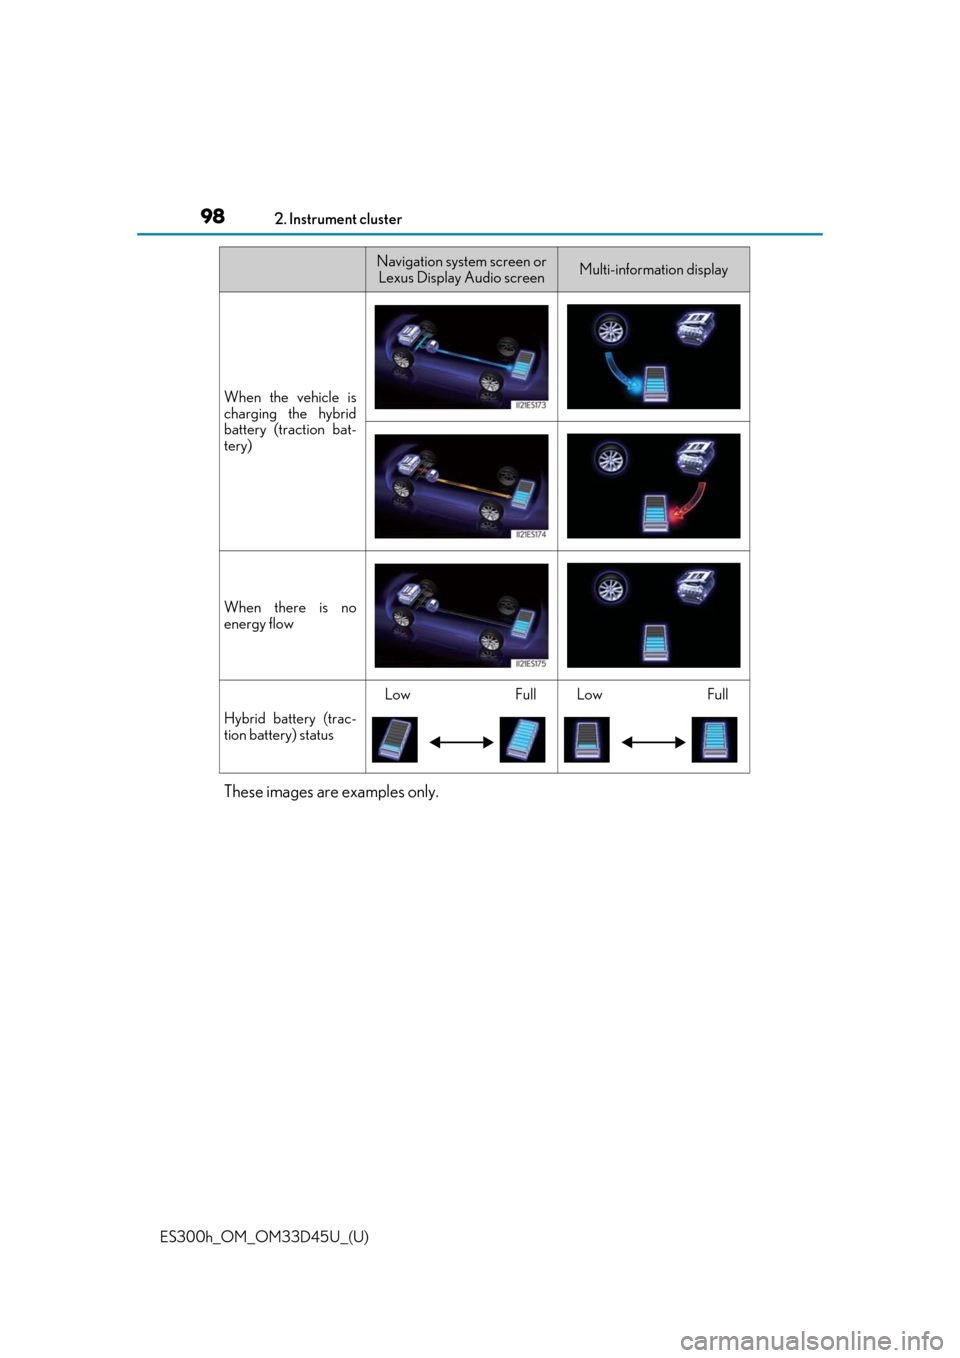
These images are examples only.
When the vehicle is
charging the hybrid
battery (traction bat-
tery)
When there is no
energy flow
Hybrid battery (trac-
tion battery) status
LowFullLowFull
Navigation system screen or
Lexus Display Audio screenMulti-information display
Page 106 of 608

106
ES300h_OM_OM33D45U_(U)3-1. Key information
■Electronic key battery depletion
●The standard battery life is 1 to 2 years.
●If the battery becomes low, an alarm will
sound in the cabin when the hybrid system
stops. ( →P. 478)
●As the electronic key always receives ra dio waves, the battery will become depleted
even if the electronic key is not used. The following symptoms indicate that the elec-
tronic key battery may be depleted. Replace the battery when necessary. ( →P. 478)
• The smart access system with push-button start or the wireless remote control does
not operate.
• The detection area becomes smaller.
• The LED indicator on the key surface does not turn on.
●To avoid serious deterioration, do not leave the electronic key within 3 ft. (1 m) of the
following electrical appliances that produce a magnetic field:
•TVs
• Personal computers
• Cellular phones, cordless phones and battery chargers
• Recharging cellular phones or cordless phones
•Table lamps
• Induction cookers
■If “Key Battery Low” is displayed on the multi-information display
The electronic key has a low battery. Replace the electronic key battery. (→P. 478)
■Replacing the battery
→ P. 478
■Confirmation of the registered key number
The number of keys already registered to the vehicle can be confirmed. Ask your Lexus
dealer for details.
■If a wrong key is used
The key cylinder rotates freely to isolate inside mechanism.
Page 112 of 608
112
ES300h_OM_OM33D45U_(U)3-2. Opening, closing and
locking the doors and trunk
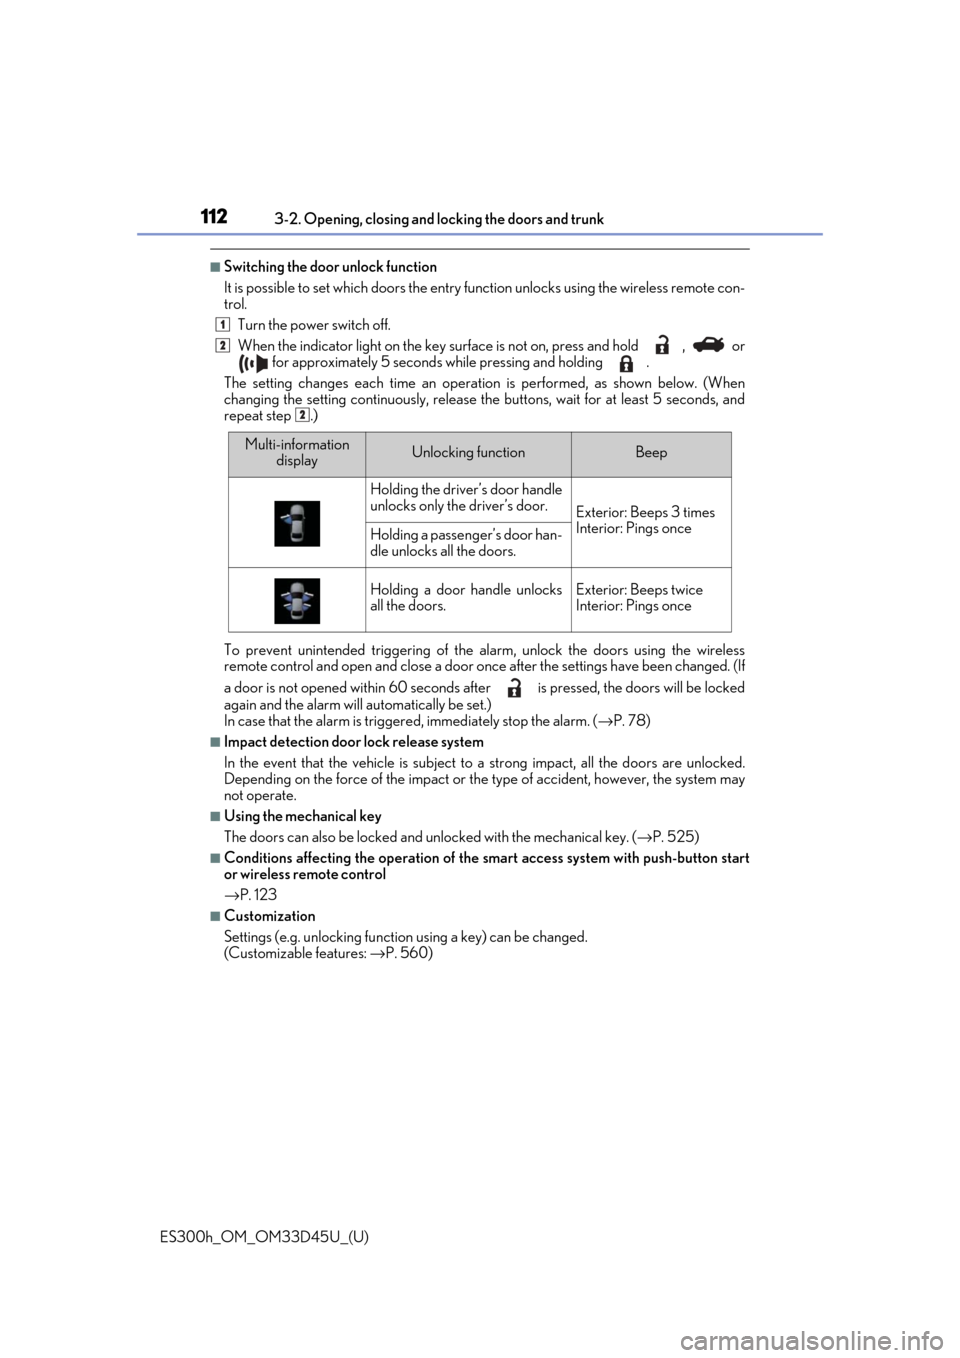
■Switching the door unlock function
It is possible to set which doors the entry function unlock s using the wireless remote con-
trol.
Turn the power switch off.
When the indicator light on the key surface is not on, press and hold , or
for approximately 5 seconds while pressing and holding .
The setting changes each time an operation is performed, as shown below. (When
changing the setting continuously, release the buttons, wait for at least 5 seconds, and
repeat step .)
To prevent unintended triggering of the alarm, unlock the doors using the wireless
remote control and open and close a door once after the settings have been changed. (If
a door is not opened within 60 seconds af ter is pressed, the doors will be locked
again and the alarm will automatically be set.)
In case that the alarm is triggere d, immediately stop the alarm. (→P. 78)
■Impact detection door lock release system
In the event that the vehicle is subject to a strong impact, all the doors are unlocked.
Depending on the force of the impact or the type of accident, however, the system may
not operate.
■Using the mechanical key
The doors can also be locked and unlocked with the mechanical key. ( →P. 525)
■Conditions affecting the oper ation of the smart access system with push-button start
or wireless remote control
→ P. 123
■Customization
Settings (e.g. unlocking function using a key) can be changed.
(Customizable features: →P. 560)
1
2
2
Multi-information
displayUnlocking functionBeep
Holding the driver’s door handle
unlocks only the driver’s door.
Exterior: Beeps 3 times
Interior: Pings once
Holding a passeng er’s door han-
dle unlocks all the doors.
Holding a door handle unlocks
all the doors.Exterior: Beeps twice
Interior: Pings once
Page 122 of 608
122
ES300h_OM_OM33D45U_(U)3-2. Opening, closing and
locking the doors and trunk
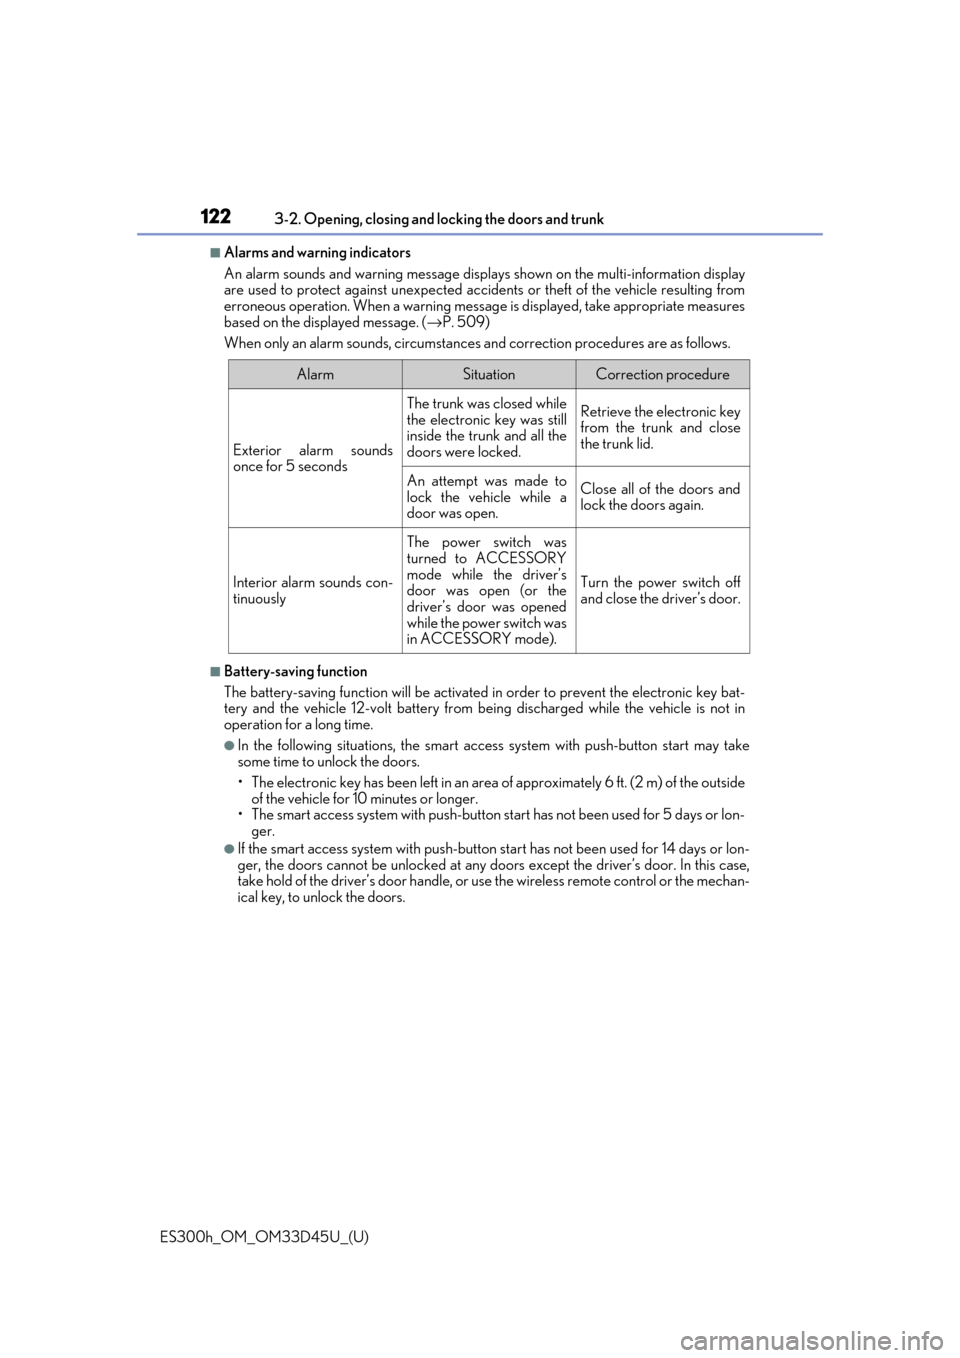
■Alarms and warning indicators
An alarm sounds and warning message displa ys shown on the multi-information display
are used to protect against unexpected accidents or theft of the vehicle resulting from
erroneous operation. When a warning messag e is displayed, take appropriate measures
based on the displayed message. ( →P. 509)
When only an alarm sounds, circumstances and correction procedures are as follows.
■Battery-saving function
The battery-saving function w ill be activated in order to prevent the electronic key bat-
tery and the vehicle 12-volt battery from being discharged while the vehicle is not in
operation for a long time.
●In the following situations, the smart acce ss system with push-button start may take
some time to unlock the doors.
• The electronic key has been le ft in an area of approximately 6 ft. (2 m) of the outside
of the vehicle for 10 minutes or longer.
• The smart access system with push-button st art has not been used for 5 days or lon-
ger.
●If the smart access system with push-button start has not been used for 14 days or lon-
ger, the doors cannot be unlocked at any doors except the driver’s door. In this case,
take hold of the driver’s d oor handle, or use the wireless remote control or the mechan-
ical key, to unlock the doors.
AlarmSituationCorrection procedure
Exterior alarm sounds
once for 5 seconds
The trunk was closed while
the electronic key was still
inside the trunk and all the
doors were locked.Retrieve the electronic key
from the trunk and close
the trunk lid.
An attempt was made to
lock the vehicle while a
door was open.Close all of the doors and
lock the doors again.
Interior alarm sounds con-
tinuously
The power switch was
turned to ACCESSORY
mode while the driver’s
door was open (or the
driver’s door was opened
while the power switch was
in ACCESSORY mode).
Turn the power switch off
and close the driver’s door.
Page 146 of 608

146
ES300h_OM_OM33D45U_(U)3-5. Opening, closing the windows and moon roof
■When the window cannot be opened or closed
When the jam protection functi
on or catch protection function operates unusually and
the door window cannot be opened or closed, perform the following operations with the
power window switch of that door.
●Stop the vehicle. With the power switch in ON mode, within 4 seconds of the jam pro-
tection function or catch pr otection function activating, continuously operate the
power window switch in the one-touch clos ing direction or one-touch opening direc-
tion so that the door window can be opened and closed.
●If the door window cannot be opened and closed even when performing the above
operations, perform the following procedure for function initialization.
Turn the power switch to ON mode.
Pull and hold the power window switch in the one-touch closing direction and com-
pletely close the door window.
Release the power window sw itch for a moment, resume pulling the switch in the
one-touch closing direction, and hold it there for approximately 6 seconds or more.
Press and hold the power window switch in the one-touch opening direction. After
the door window is completely opened, cont inue holding the switch for an additional
1 second or more.
Release the power window switch for a mo ment, resume pushing the switch in the
one-touch opening direction, and hold it there for approximately 4 seconds or
more.
Pull and hold the power window switch in the one-touch closing direction again.
After the door window is completely closed, continue holding the switch for a fur-
ther 1 second or more.
If you release the switch while the window is moving, start again from the beginning.
If the window reverses and cannot be fully cl osed or opened, have the vehicle inspected
by your Lexus dealer.
■Door lock linked window operation
●The power windows can be opened an d closed using the mechanical key.* (→ P. 525)
●The power windows can be opened using the wireless remote control.* (→ P. 108)
*: These settings must be cust omized at your Lexus dealer.
■When the 12-volt battery is disconnected
The window lock switch is disabled. If nece ssary, press the window lock switch after
reconnecting the 12-volt battery.
■Power windows open warning buzzer
The buzzer sounds and a message is shown on the multi-information display in the instru-
ment cluster when the power switch is turned off and the driver’s door is opened with the
power windows open.
■Customization
Settings (e.g. linked door lock operation) can be changed.
(Customizable features: →P. 560)
1
2
3
4
5
6