light Lexus ES300h 2018 (OM33D45U) Service Manual
[x] Cancel search | Manufacturer: LEXUS, Model Year: 2018, Model line: ES300h, Model: Lexus ES300h 2018Pages: 608, PDF Size: 10.67 MB
Page 112 of 608
112
ES300h_OM_OM33D45U_(U)3-2. Opening, closing and
locking the doors and trunk
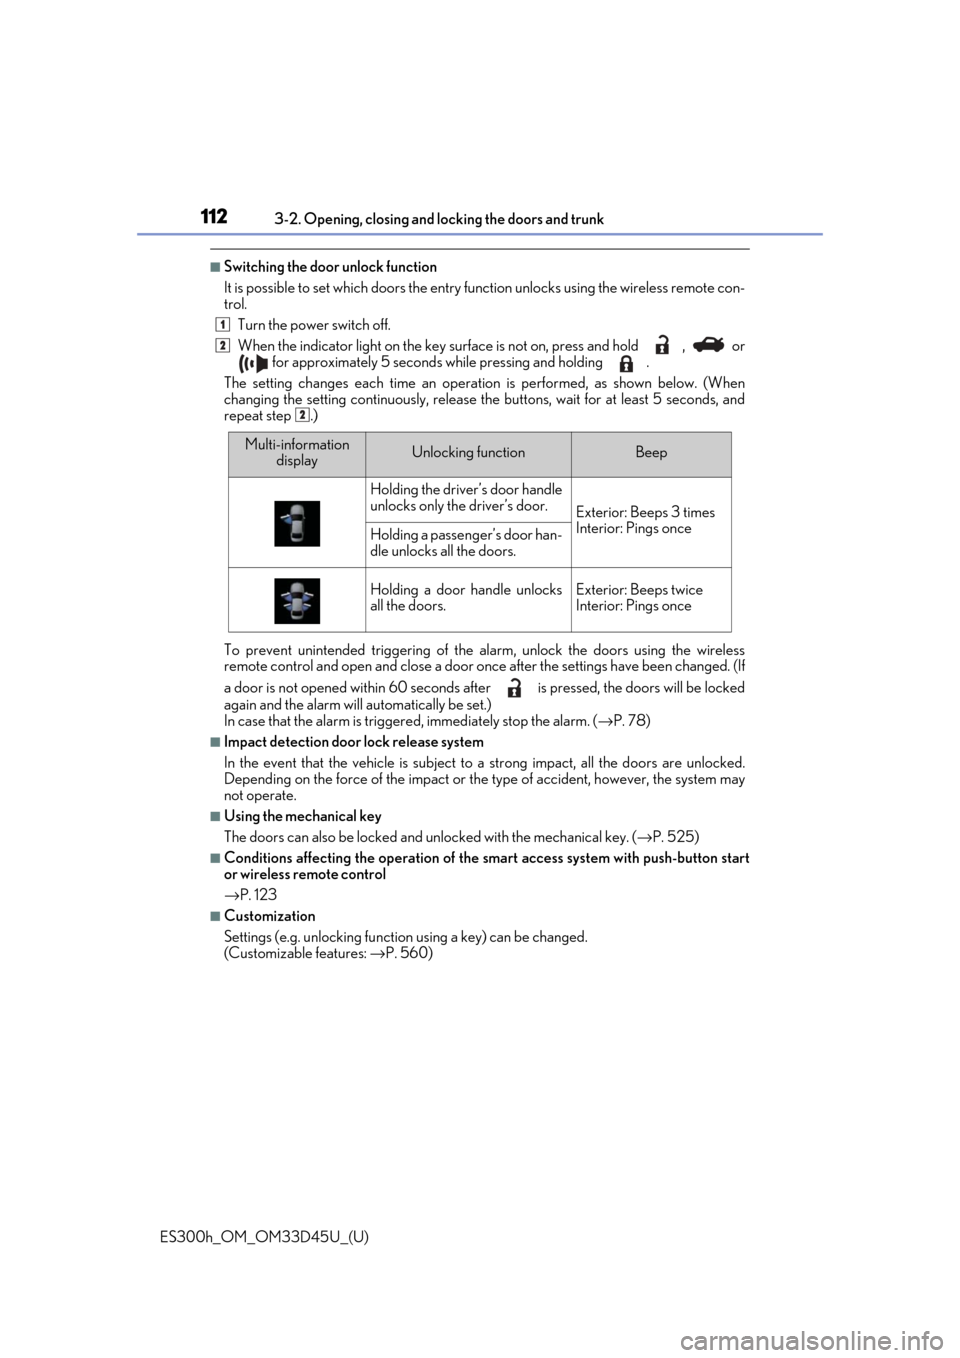
■Switching the door unlock function
It is possible to set which doors the entry function unlock s using the wireless remote con-
trol.
Turn the power switch off.
When the indicator light on the key surface is not on, press and hold , or
for approximately 5 seconds while pressing and holding .
The setting changes each time an operation is performed, as shown below. (When
changing the setting continuously, release the buttons, wait for at least 5 seconds, and
repeat step .)
To prevent unintended triggering of the alarm, unlock the doors using the wireless
remote control and open and close a door once after the settings have been changed. (If
a door is not opened within 60 seconds af ter is pressed, the doors will be locked
again and the alarm will automatically be set.)
In case that the alarm is triggere d, immediately stop the alarm. (→P. 78)
■Impact detection door lock release system
In the event that the vehicle is subject to a strong impact, all the doors are unlocked.
Depending on the force of the impact or the type of accident, however, the system may
not operate.
■Using the mechanical key
The doors can also be locked and unlocked with the mechanical key. ( →P. 525)
■Conditions affecting the oper ation of the smart access system with push-button start
or wireless remote control
→ P. 123
■Customization
Settings (e.g. unlocking function using a key) can be changed.
(Customizable features: →P. 560)
1
2
2
Multi-information
displayUnlocking functionBeep
Holding the driver’s door handle
unlocks only the driver’s door.
Exterior: Beeps 3 times
Interior: Pings once
Holding a passeng er’s door han-
dle unlocks all the doors.
Holding a door handle unlocks
all the doors.Exterior: Beeps twice
Interior: Pings once
Page 116 of 608
116
ES300h_OM_OM33D45U_(U)3-2. Opening, closing and
locking the doors and trunk
■Trunk light
The trunk light turns on when the trunk is opened.
■Trunk easy closer (vehicles with power trunk opener and closer)
In the event that the trunk lid is left slightly open, the trunk easy closer will automatically
close it to the fully closed position.
■Function to prevent the trunk being lo cked with the electronic key inside
●When all doors are being locked, closing the tr unk lid with the electronic key left inside
the trunk will sound an alarm.
In this case, the trunk lid can be opened pr essing the trunk release button on the trunk
lid.
●Even when the spare electronic key is put in the trunk with all the doors locked, the key
confinement prevention function can be activated so the trunk can be opened. In order
to prevent theft, take all electronic keys with you when leaving the vehicle.
●Even when the electronic key is put in the trunk with all the doors are locked, the key
may not be detected depending on the plac es and the surrounding radio wave condi-
tions. In this case, the key confinement prevention function cannot be activated, causing
the doors to lock when the trunk is closed. Make sure to check where the key is before
closing the trunk.
●The key confinement prevention function canno t be activated if any one of the doors is
unlocked. In this case, open the trunk using the trunk opener.
■Overload protection function (vehicles with power trunk opener and closer)
The trunk lid will not operate wh en excessive load is present on the top of the trunk lid.
■Fall-down protection function (vehicles with power trunk opener and closer)
While the trunk lid is opening automatically, ap plying excessive force to it will stop the
opening operation to prevent the tr unk lid from rapidly falling down.
■Jam protection function (vehicles with power trunk opener and closer)
While the trunk lid is closing automatically, the trunk lid will stop closing and open if
something gets caught.
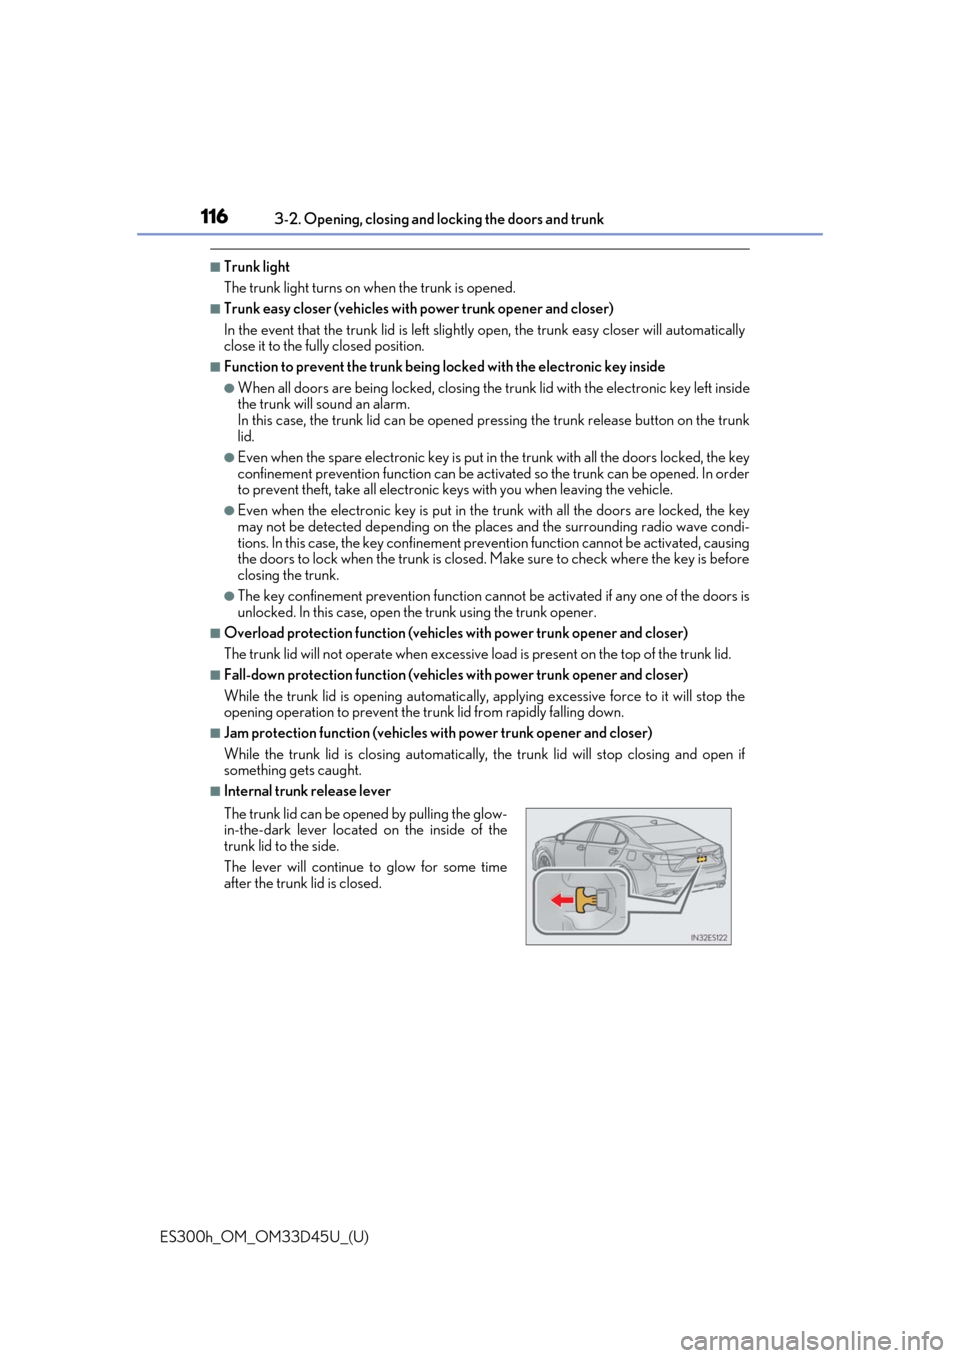
■Internal trunk release lever
The trunk lid can be open ed by pulling the glow-
in-the-dark lever located on the inside of the
trunk lid to the side.
The lever will continue to glow for some time
after the trunk lid is closed.
Page 118 of 608
118
ES300h_OM_OM33D45U_(U)3-2. Opening, closing and
locking the doors and trunk
WARNING
■Using the trunk
Observe the following precautions.
Failure to do so may cause parts of the body to be caught, resulting in serious injury.
●Remove any heavy loads, such as snow and ice, from the trunk lid before opening it.
Failure to do so may cause the trunk lid to suddenly shut again after it is opened.
●When opening or closing the trunk lid, thoroughly check to make sure the surround-
ing area is safe.
●If anyone is in the vicinity, make sure they are safe and let them know that the trunk is
about to open or close.
●Use caution when opening or closing the tr unk lid in windy weather as it may move
abruptly in strong wind.
●Do not attach any accessories other than genuine Lexus parts to the trunk lid. Such
additional weight on the trunk lid may cause the lid to suddenly shut again after it is
opened.
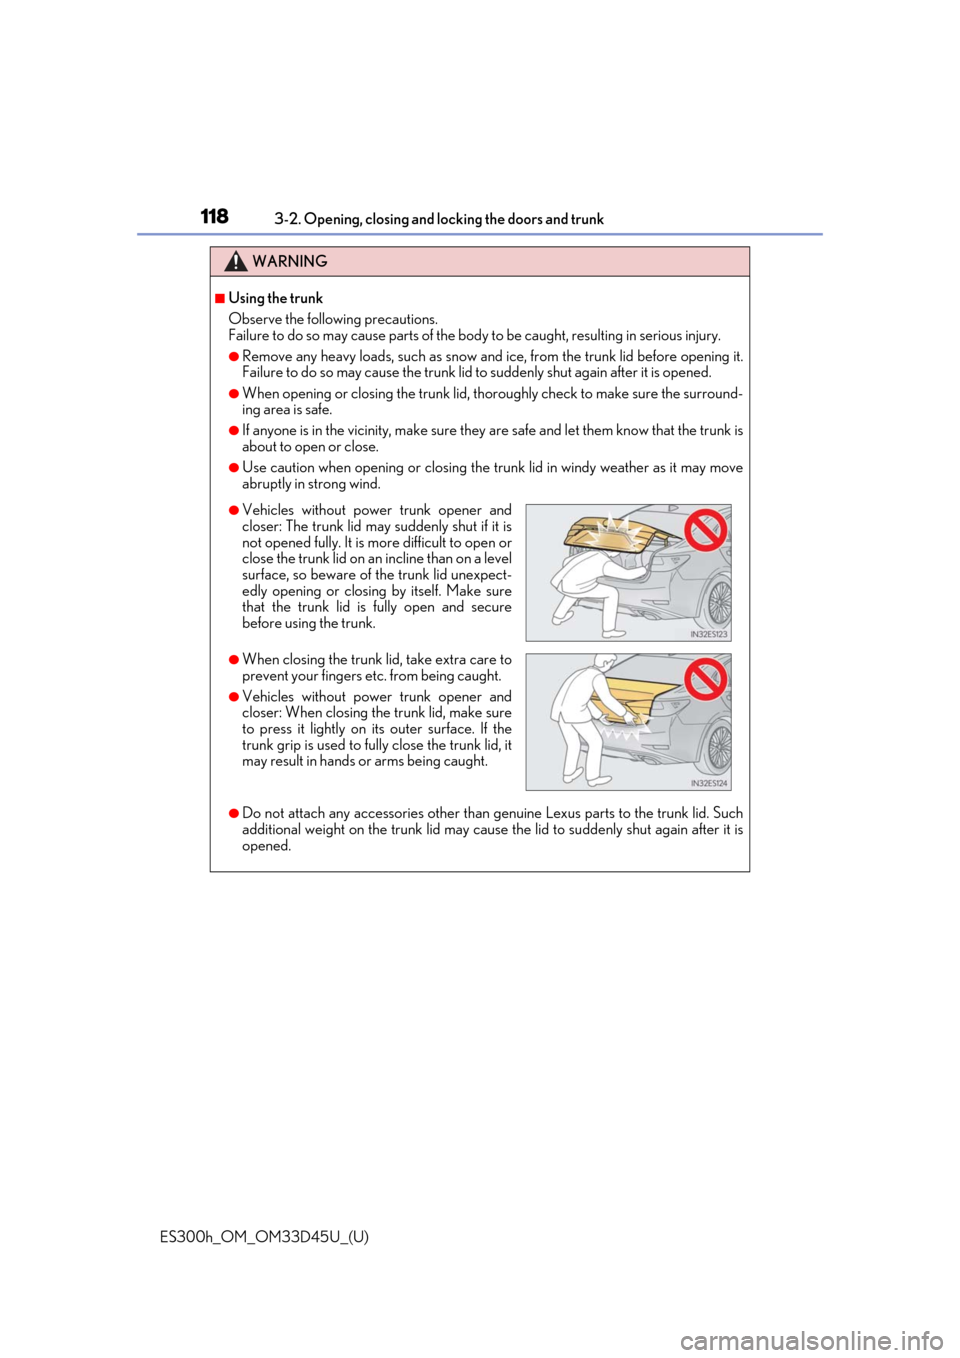
●Vehicles without power trunk opener and
closer: The trunk lid may suddenly shut if it is
not opened fully. It is more difficult to open or
close the trunk lid on an incline than on a level
surface, so beware of the trunk lid unexpect-
edly opening or closin g by itself. Make sure
that the trunk lid is fully open and secure
before using the trunk.
●When closing the trunk li d, take extra care to
prevent your fingers etc. from being caught.
●Vehicles without power trunk opener and
closer: When closing the trunk lid, make sure
to press it lightly on its outer surface. If the
trunk grip is used to fully close the trunk lid, it
may result in hands or arms being caught.
Page 119 of 608
ES300h_OM_OM33D45U_(U)
1193-2. Opening, closing and locking the doors and trunk
3
Operation of each component
WARNING
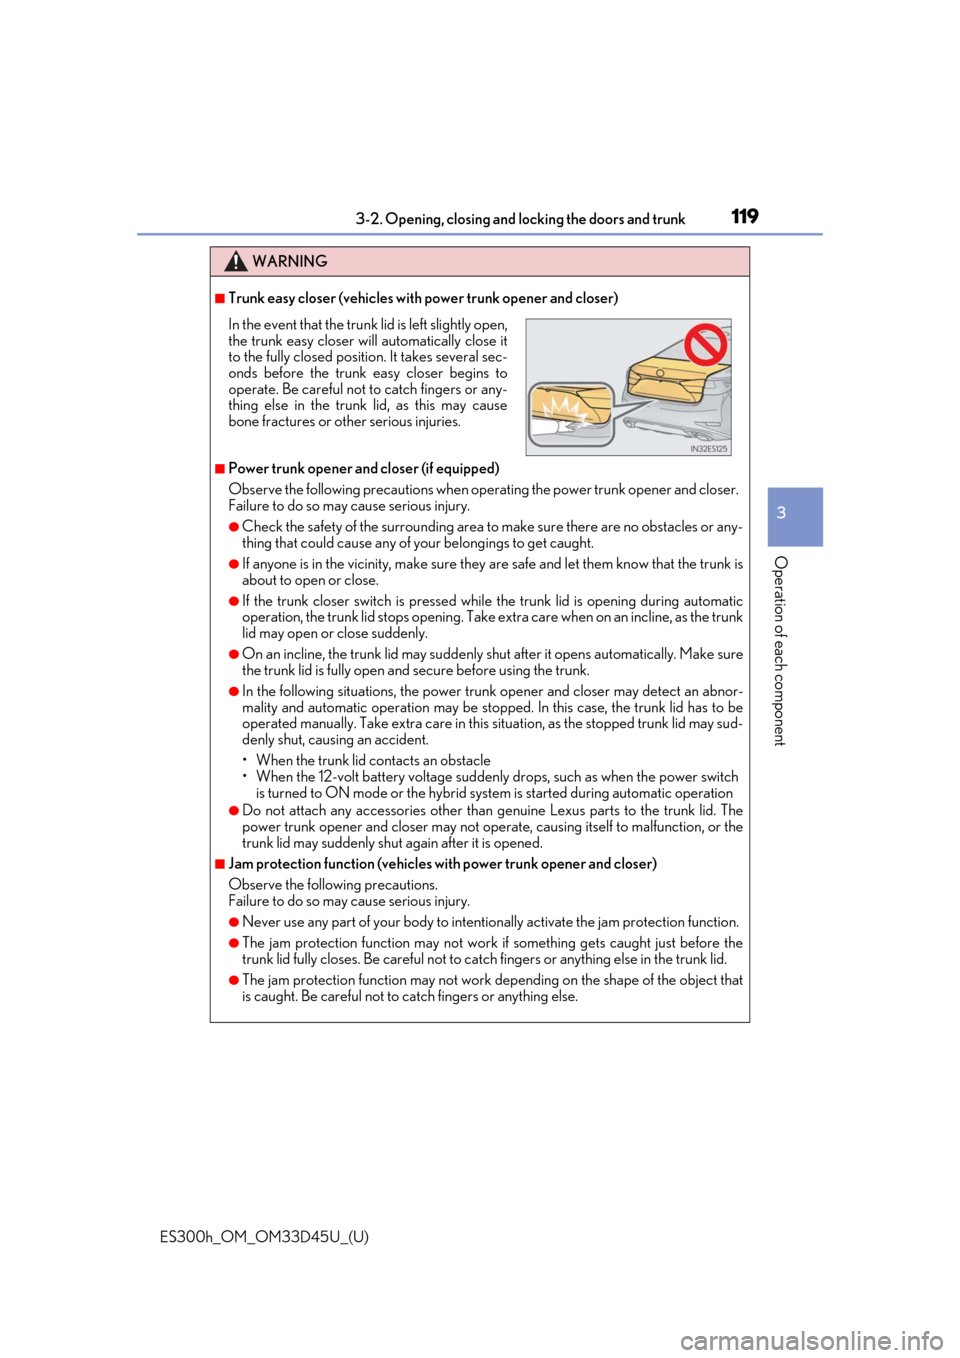
■Trunk easy closer (vehicles with power trunk opener and closer)
■Power trunk opener and closer (if equipped)
Observe the following precautions when operating the power trunk opener and closer.
Failure to do so may cause serious injury.
●Check the safety of the surrounding area to make sure there are no obstacles or any-
thing that could cause any of yo ur belongings to get caught.
●If anyone is in the vicinity, make sure they are safe and let them know that the trunk is
about to open or close.
●If the trunk closer switch is pressed while the trunk lid is opening during automatic
operation, the trunk lid stops opening. Take extra care when on an incline, as the trunk
lid may open or close suddenly.
●On an incline, the trunk lid may suddenly sh ut after it opens automatically. Make sure
the trunk lid is fully open and secure before using the trunk.
●In the following situations, the power trun k opener and closer may detect an abnor-
mality and automatic operation may be stoppe d. In this case, the trunk lid has to be
operated manually. Take extra care in this situation, as the stopped trunk lid may sud-
denly shut, causing an accident.
• When the trunk lid contacts an obstacle
• When the 12-volt battery voltage suddenly drops, such as when the power switch is turned to ON mode or the hybrid syst em is started during automatic operation
●Do not attach any accessories other than genuine Lexus parts to the trunk lid. The
power trunk opener and closer may not operate, causing itself to malfunction, or the
trunk lid may suddenly shut again after it is opened.
■Jam protection function (vehicles with power trunk opener and closer)
Observe the following precautions.
Failure to do so may cause serious injury.
●Never use any part of your body to intentionally activate the jam protection function.
●The jam protection function may not work if something gets caught just before the
trunk lid fully closes. Be careful not to catc h fingers or anything else in the trunk lid.
●The jam protection function may not work depending on the shape of the object that
is caught. Be careful not to catch fingers or anything else.
In the event that the trunk lid is left slightly open,
the trunk easy closer will automatically close it
to the fully closed position. It takes several sec-
onds before the trunk easy closer begins to
operate. Be careful not to catch fingers or any-
thing else in the trunk lid, as this may cause
bone fractures or other serious injuries.
Page 124 of 608

124
ES300h_OM_OM33D45U_(U)3-2. Opening, closing and
locking the doors and trunk
■Note for the entry function
●Even when the electronic key is within the effective range (detection areas), the system
may not operate properly in the following cases:
• The electronic key is too close to the window or outside door handle, near the ground, or in a high place when the doors are locked or unlocked.
• The electronic key is near the ground or in a high place, or too close to the rear
bumper center when the trunk is opened.
• The electronic key is on th e instrument panel, rear pack age tray or floor, or in the
door pockets or glove box when the hybrid system is started or power switch modes
are changed.
●Do not leave the electronic key on top of th e instrument panel or near the door pockets
when exiting the vehicle. Depending on the radio wave reception conditions, it may be
detected by the antenna outside the cabin an d the doors will become lockable from the
outside, possibly trapping the electronic key inside the vehicle.
●As long as the electronic key is within th e effective range, the doors may be locked or
unlocked by anyone. However, only the door s detecting the electronic key can be used
to unlock the vehicle.
●Even if the electronic key is not inside the vehicle, it may be possible to start the hybrid
system if the electronic key is near the window.
●The doors may unlock or lock if a large amou nt of water splashes on the door handle,
such as in the rain or in a car wash when the electronic ke y is within the effective range.
(The doors will automatically be locked af ter approximately 60 seconds if the doors
are not opened and closed.)
●If the wireless remote control is used to lo ck the doors when the electronic key is near
the vehicle, there is a possibility that the d oor may not be unlocked by the entry func-
tion. (Use the wireless remote control to unlock the doors.)
●Touching the door lock or unlock sensor while wearing gloves may prevent lock or
unlock operation.
●If the door handle becomes wet while the el ectronic key is within the effective range,
the door may lock and unlock repeatedly. In that case, follow the following correction
procedures to wash the vehicle:
• Place the electronic key in a location 6 ft. (2 m) or more away from the vehicle. (Take care to ensure that the key is not stolen.)
• Set the electronic key to battery-saving mode to disable the smart access system with push-button start. ( →P. 123)
●If the electronic key is inside the vehicle and a door handle becomes wet during a car
wash, a message may be shown on the mult i-information display and a buzzer will
sound outside the vehicle. To turn off the alarm, lock all the doors.
●The lock sensor may not work properly if it comes into contact with ice, snow, mud, etc.
Clean the lock sensor and attempt to operate it again, or use the lock sensor on the
lower part of the door handle.
●A sudden approach to the effective range or door handle may prevent the doors from
being unlocked. In this case, return the door handle to the original position and check
that the doors unlock before pulling the door handle again.
●Gripping the door handle when wearing a glove may not unlock the door.
●If there is another electronic key in the de tection area, it may take slightly longer to
unlock the doors after the door handle is gripped.
Page 132 of 608

132
ES300h_OM_OM33D45U_(U)3-3. Adjusting the seats
■To stop the position recall operation part-way through
Perform any of the following:
●Press the “SET” button.
●Press button “1”, “2” or “3”.
●Operate any of the seat adjustment switches (only cancels seat position recall).
●Operate the tilt and telescopic steering control switch
(only cancels steering wheel
position recall).
■Seat positions that can be memorized ( →P. 129)
The adjusted positions other than the position adjusted by lumbar support switch can be
recorded.
■Operating the driving position memory after turning the power switch off
Driver’s seat:
Recorded seat positions can be activated up to 180 seconds after the driver’s door is
opened and another 60 seconds after it is closed again.
Front passenger’s seat:
Recorded seat positions can be activated up to 180 seconds after the front passenger’s
door is opened.
■In order to correctly use the dr iving position memory function
If a seat position is already in the furthest po ssible position and the seat is operated in the
same direction, the recorded position may be slightly different when it is recalled.
Each electronic key can be registered to recall your preferred driving position.
■Registering procedure
Record your driving position to button “1”, “2” or “3” before performing the
following:
Carry only the key you want to regist er, and then close the driver’s door.
If 2 or more keys are in the vehicle, the driving position cannot be recorded
properly.
Check that the shift lever is in P.
Turn the power switch to ON mode.
Recall the driving position that you want to record.
Memory recall function (driver’s side only)
1
2
3
Page 133 of 608

ES300h_OM_OM33D45U_(U)
1333-3. Adjusting the seats
3
Operation of each component
While pressing the recalled but-
ton, press and hold the door lock
switch (either lock or unlock) until
the buzzer sounds.
If the button could not be registered,
the buzzer sounds continuously for
approximately 3 seconds.
■Recall procedureMake sure that the doors are locked before recalling the driving position.
Carry the electronic key that has been registered to the driving position,
and then unlock and open the driver’s door using the smart access system
with push-button start or wireless remote control.
The driving position will move to the recorded position (not including the steering
wheel). However, the seat will move to a position slightly behind the recorded posi-
tion in order to make entering the vehicle easier.
If the driving position is in a position th at has already been recorded, the seat and
outside rear view mirrors will not move.
Turn the power switch to ACCESSORY mode or ON mode, or fasten a
seat belt.
The seat and steering wheel will move to the recorded position.
■Cancelation procedure
Carry only the key you want to cance l and then close the driver’s door.
If 2 or more keys are in the vehicle, the driving position cannot be canceled
properly.
Turn the power switch to ON mode.
While pressing the “SET” button, pr ess and hold the door lock switch
(either lock or unlock) un til the buzzer sounds twice.
If the button could not be canceled, the buzzer sounds continuously for approxi-
mately 3 seconds.
■Recalling the driving position using the memory recall function
●Different driving positions can be registered for each electronic key. Therefore, the
driving position that is recalled may be di fferent depending on the key being carried.
●If a door other than the driver’s door is unlocked with the smart access system with
push-button start, the driving position cannot be recalled. In this case, press the driving
position button which has been set.
■Customization
The unlock door settings of the memo ry recall function can be customized.
(Customizable features: →P. 560)
4
1
2
1
2
Page 140 of 608

1403-4. Adjusting the steering wheel and mirrors
ES300h_OM_OM33D45U_(U)
Inside rear view mirror
The height of the rear view mirror can be adjusted to suit your driving posture.
Adjust the height of the rear view mir-
ror by moving it up and down.
Responding to the level of brightness of the headlights of vehicles behind, the
reflected light is automatically reduced.
Changing automatic anti-glare func-
tion mode
ON/OFF
When the automatic anti-glare function
is in ON mode, the indicator illuminates.
The function will set to ON mode each
time the power switch is turned to ON
mode.
Pressing the button turns the function to
OFF mode. (The indicator also turns
off.)
The rear view mirror’s position can be adjusted to enable sufficient confirma-
tion of the rear view.
Adjusting the height of rear view mirror
Anti-glare function
Indicator
Page 143 of 608

1433-4. Adjusting the steering wheel and mirrors
ES300h_OM_OM33D45U_(U)
3
Operation of each component
When the mirror select switch is in the L or R position, the outside rear view mir-
rors will automatically angle downwards wh en the vehicle is reversing in order to
give a better view of the ground.
To disable this function, move the mirror select switch to the neutral position
(between L and R).
■Adjusting the mirror angle when the vehicle is reversing
With the shift lever in R, adjust the mirror angle at a desired position. The
adjusted angle will be memorized and the mirror will automatically tilt to the
memorized angle whenever the shift leve r is shifted to R from next time.
The memorized downward tilt position of th e mirror is linked to the normal position
(angle adjusted with the shif t lever in other than R). Ther efore, if the normal posi-
tion is changed after adjustment, the tilt position w ill also change. When the normal
position is changed, readjust the angle in reversing.
■Mirror angle can be adjusted when
The power switch is in ACCESSORY or ON mode.
■When the mirrors are fogged up
The outside rear view mirrors can be cleare d using the mirror defoggers. Turn on the
rear window defogger to also defog the outside rear view mirrors. ( →P. 388)
■Automatic adjustment of the mirror angle (vehicles with driving position memory)
A desired mirror face angle can be entered to memory and recalled automatically by the
driving position memory. ( →P. 130)
■Auto anti-glare function
When the anti-glare inside re ar view mirror is set to automatic mode, the outside rear
view mirrors will activate in conjunction with the anti-glare inside rear view mirror to
reduce reflected light. ( →P. 140)
Linked mirror function when reversing (if equipped)
Page 145 of 608
145
ES300h_OM_OM33D45U_(U)3-5. Opening, closing the windows and moon roof
3
Operation of each component
Power windows
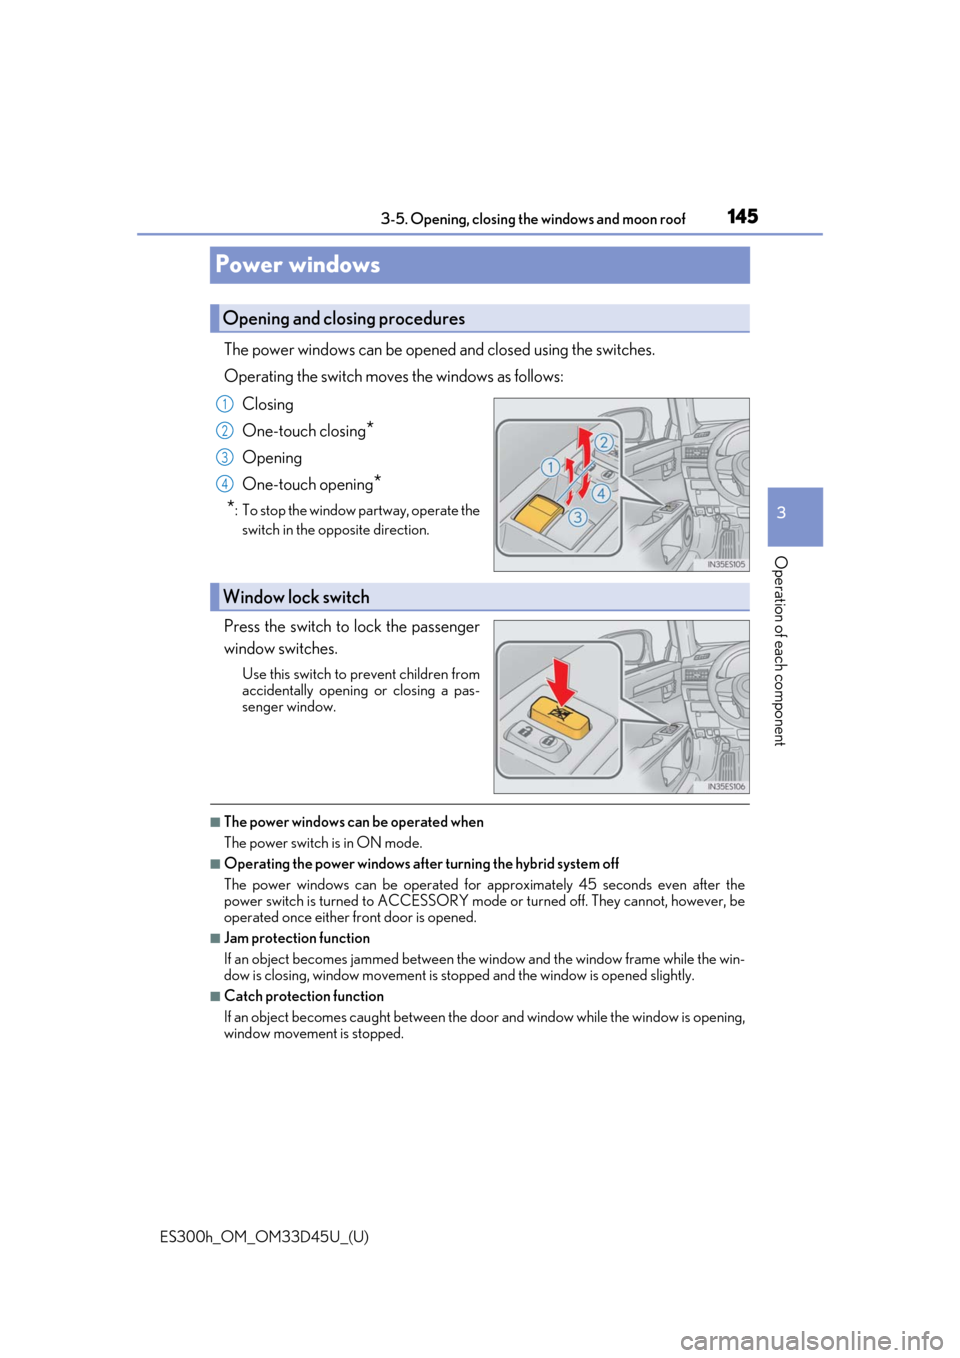
The power windows can be opened and closed using the switches.
Operating the switch move
s the windows as follows:
Closing
One-touch closing
*
Opening
One-touch opening
*
*
: To stop the window partway, operate the switch in the op posite direction.
Press the switch to lock the passenger
window switches.
Use this switch to prevent children from
accidentally opening or closing a pas-
senger window.
■The power windows can be operated when
The power switch is in ON mode.
■Operating the power windows after turning the hybrid system off
The power windows can be operated for ap proximately 45 seconds even after the
power switch is turned to ACCESSORY mode or turned off. They cannot, however, be
operated once either front door is opened.
■Jam protection function
If an object becomes jammed between the window and the window frame while the win-
dow is closing, window movement is stop ped and the window is opened slightly.
■Catch protection function
If an object becomes caught between the door and window while the window is opening,
window movement is stopped.
Opening and closing procedures
1
2
3
4
Window lock switch