display Lexus ES300h 2019 Owner's Manual (OM33E25U)
[x] Cancel search | Manufacturer: LEXUS, Model Year: 2019, Model line: ES300h, Model: Lexus ES300h 2019Pages: 456, PDF Size: 9.62 MB
Page 289 of 456
2895-6. Using the other interior features
5
Interior features
To recall the previous door operation
status, press and release either Home-
Link
® buttons and or and simultaneously. The
last recorded status will be displayed
for 3 seconds.
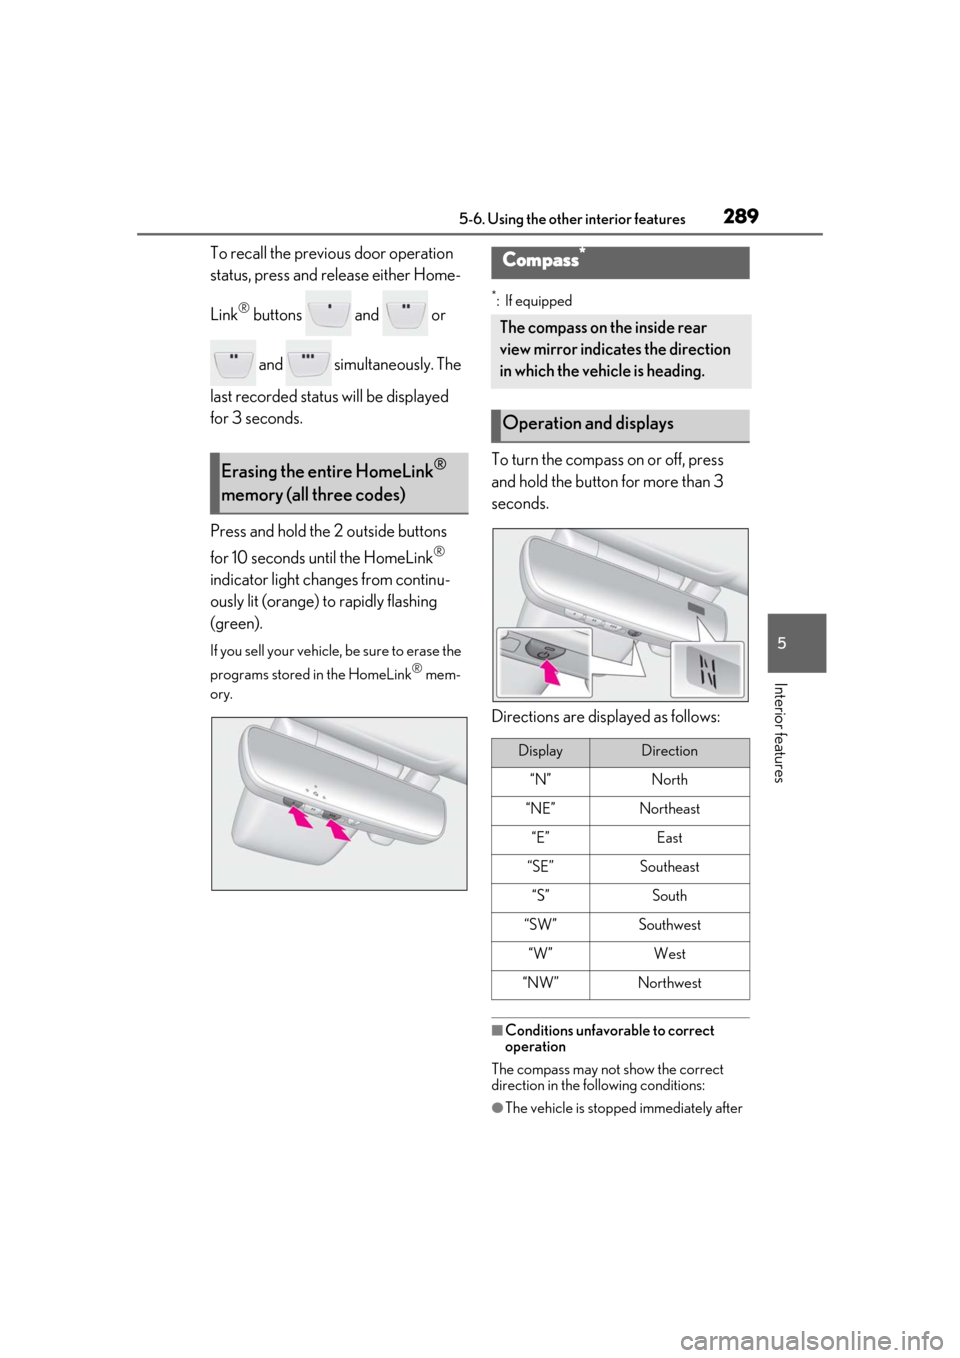
Press and hold the 2 outside buttons
for 10 seconds until the HomeLink
®
indicator light changes from continu-
ously lit (orange) to rapidly flashing
(green).
If you sell your vehicle, be sure to erase the
programs stored in the HomeLink
® mem-
ory.
*: If equipped
To turn the compass on or off, press
and hold the button for more than 3
seconds.
Directions are displayed as follows:
■Conditions unfavorable to correct
operation
The compass may not show the correct
direction in the fo llowing conditions:
●The vehicle is stopped immediately after
Erasing the entire HomeLink®
memory (all three codes)
Compass*
The compass on the inside rear
view mirror indicates the direction
in which the vehicle is heading.
Operation and displays
DisplayDirection
“N”North
“NE”Northeast
“E”East
“SE”Southeast
“S”South
“SW”Southwest
“W”West
“NW”Northwest
Page 290 of 456
2905-6. Using the other interior features
turning.
●The vehicle is on an inclined surface.
●The vehicle is in a place where the earth’s
magnetic field is subject to interference
by artificial magnetic fields (under-
ground car park/parking lot, under a
steel tower, between buildings, roof car
park/parking lot, near an intersection,
near a large vehicle, etc.).
●The vehicle has become magnetized.
(There is a magnet or metal object near
the inside rear view mirror.)
●The battery has been disconnected.
●A door is open.
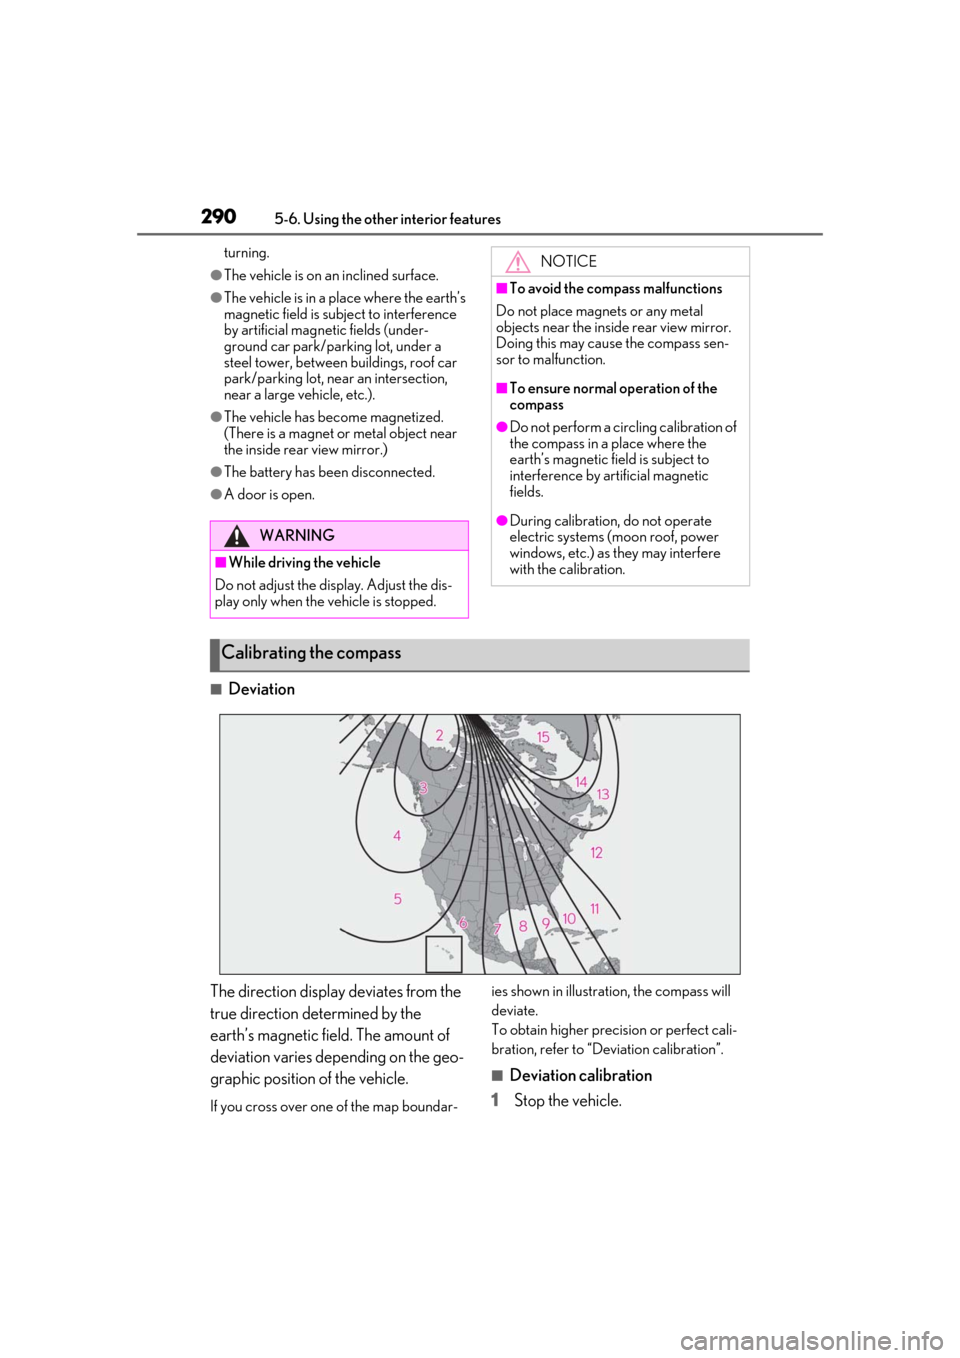
■Deviation
The direction display deviates from the
true direction determined by the
earth’s magnetic field. The amount of
deviation varies depending on the geo-
graphic position of the vehicle.
If you cross over one of the map boundar- ies shown in illustration, the compass will
deviate.
To obtain higher precision or perfect cali-
bration, refer to “D
eviation calibration”.
■Deviation calibration
1
Stop the vehicle.
WARNING
■While driving the vehicle
Do not adjust the display. Adjust the dis-
play only when the vehicle is stopped.
NOTICE
■To avoid the compass malfunctions
Do not place magnets or any metal
objects near the inside rear view mirror.
Doing this may cause the compass sen-
sor to malfunction.
■To ensure normal operation of the
compass
●Do not perform a circling calibration of
the compass in a place where the
earth’s magnetic field is subject to
interference by artificial magnetic
fields.
●During calibration, do not operate
electric systems (moon roof, power
windows, etc.) as they may interfere
with the calibration.
Calibrating the compass
Page 291 of 456
2915-6. Using the other interior features
5
Interior features
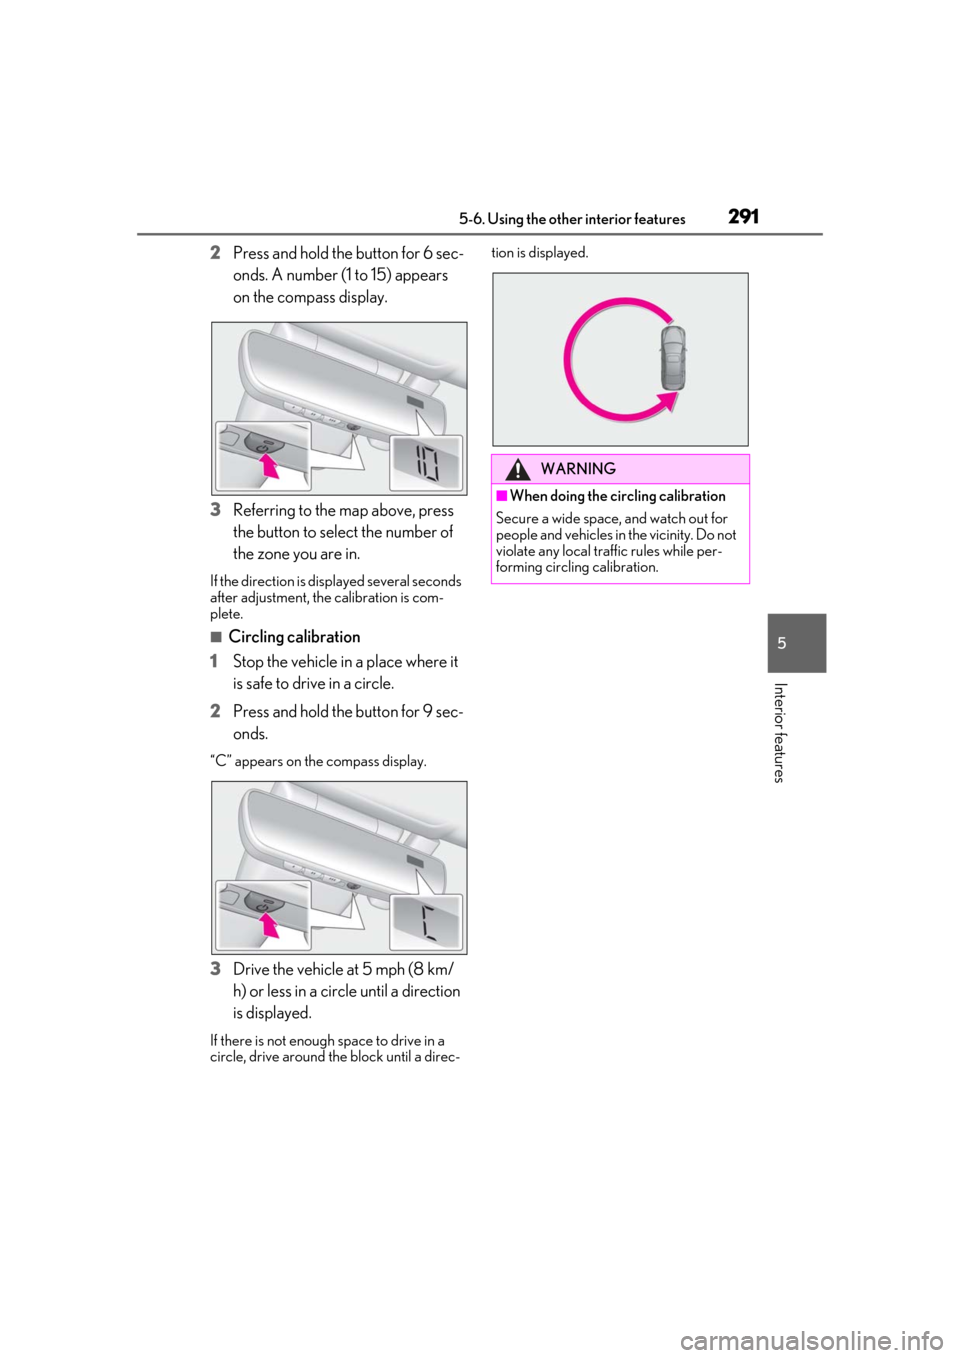
2Press and hold the button for 6 sec-
onds. A number (1 to 15) appears
on the compass display.
3
Referring to the map above, press
the button to select the number of
the zone you are in.
If the direction is di splayed several seconds
after adjustment, the calibration is com-
plete.
■Circling calibration
1
Stop the vehicle in a place where it
is safe to drive in a circle.
2
Press and hold the button for 9 sec-
onds.
“C” appears on th e compass display.
3Drive the vehicle at 5 mph (8 km/
h) or less in a circle until a direction
is displayed.
If there is not enough space to drive in a
circle, drive around the block until a direc- tion is displayed.
WARNING
■When doing the circling calibration
Secure a wide space, and watch out for
people and vehicles in the vicinity. Do not
violate any local traffic rules while per-
forming circling calibration.
Page 304 of 456
3046-1. Maintenance and care
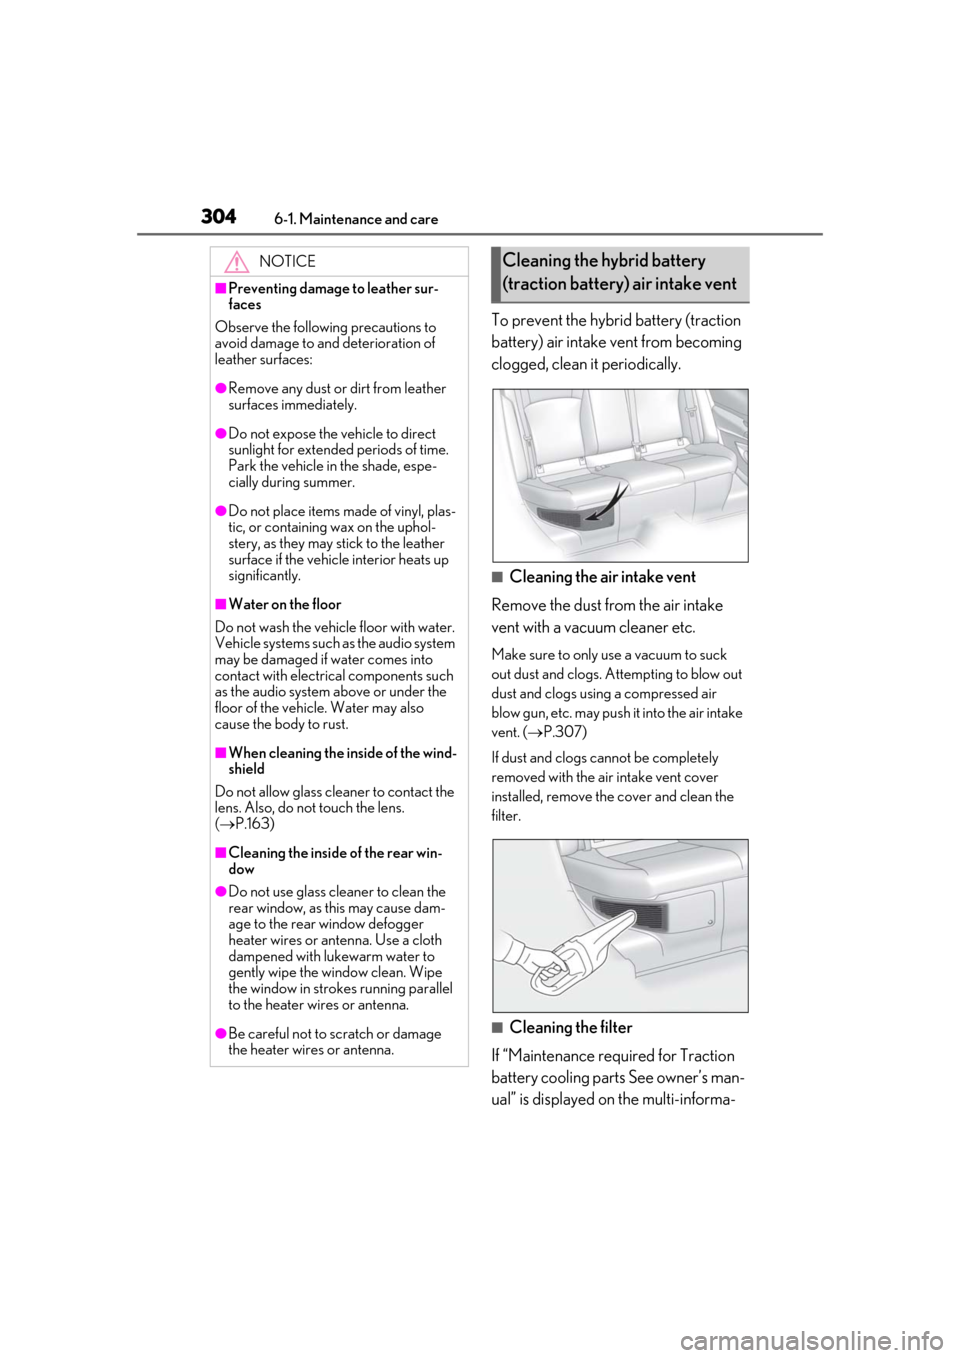
To prevent the hybrid battery (traction
battery) air intake vent from becoming
clogged, clean it periodically.
■Cleaning the air intake vent
Remove the dust from the air intake
vent with a vacuum cleaner etc.
Make sure to only use a vacuum to suck
out dust and clogs. Attempting to blow out
dust and clogs using a compressed air
blow gun, etc. may push it into the air intake
vent. ( P.307)
If dust and clogs cannot be completely
removed with the air intake vent cover
installed, remove the cover and clean the
filter.
■Cleaning the filter
If “Maintenance required for Traction
battery cooling parts See owner’s man-
ual” is displayed on the multi-informa-
NOTICE
■Preventing damage to leather sur-
faces
Observe the following precautions to
avoid damage to and deterioration of
leather surfaces:
●Remove any dust or dirt from leather
surfaces immediately.
●Do not expose the vehicle to direct
sunlight for extended periods of time.
Park the vehicle in the shade, espe-
cially during summer.
●Do not place items made of vinyl, plas-
tic, or containing wax on the uphol-
stery, as they may stick to the leather
surface if the vehicle interior heats up
significantly.
■Water on the floor
Do not wash the vehicle floor with water.
Vehicle systems such as the audio system
may be damaged if water comes into
contact with electrical components such
as the audio system above or under the
floor of the vehicle. Water may also
cause the body to rust.
■When cleaning the inside of the wind-
shield
Do not allow glass cleaner to contact the
lens. Also, do not touch the lens.
( P.163)
■Cleaning the inside of the rear win-
dow
●Do not use glass cleaner to clean the
rear window, as this may cause dam-
age to the rear window defogger
heater wires or antenna. Use a cloth
dampened with lukewarm water to
gently wipe the window clean. Wipe
the window in strokes running parallel
to the heater wires or antenna.
●Be careful not to scratch or damage
the heater wires or antenna.
Cleaning the hybrid battery
(traction battery) air intake vent
Page 305 of 456
3056-1. Maintenance and care
6
Maintenance and care
tion display, the filter may be clogged.
Remove the air intake vent cover and
clean the filter.
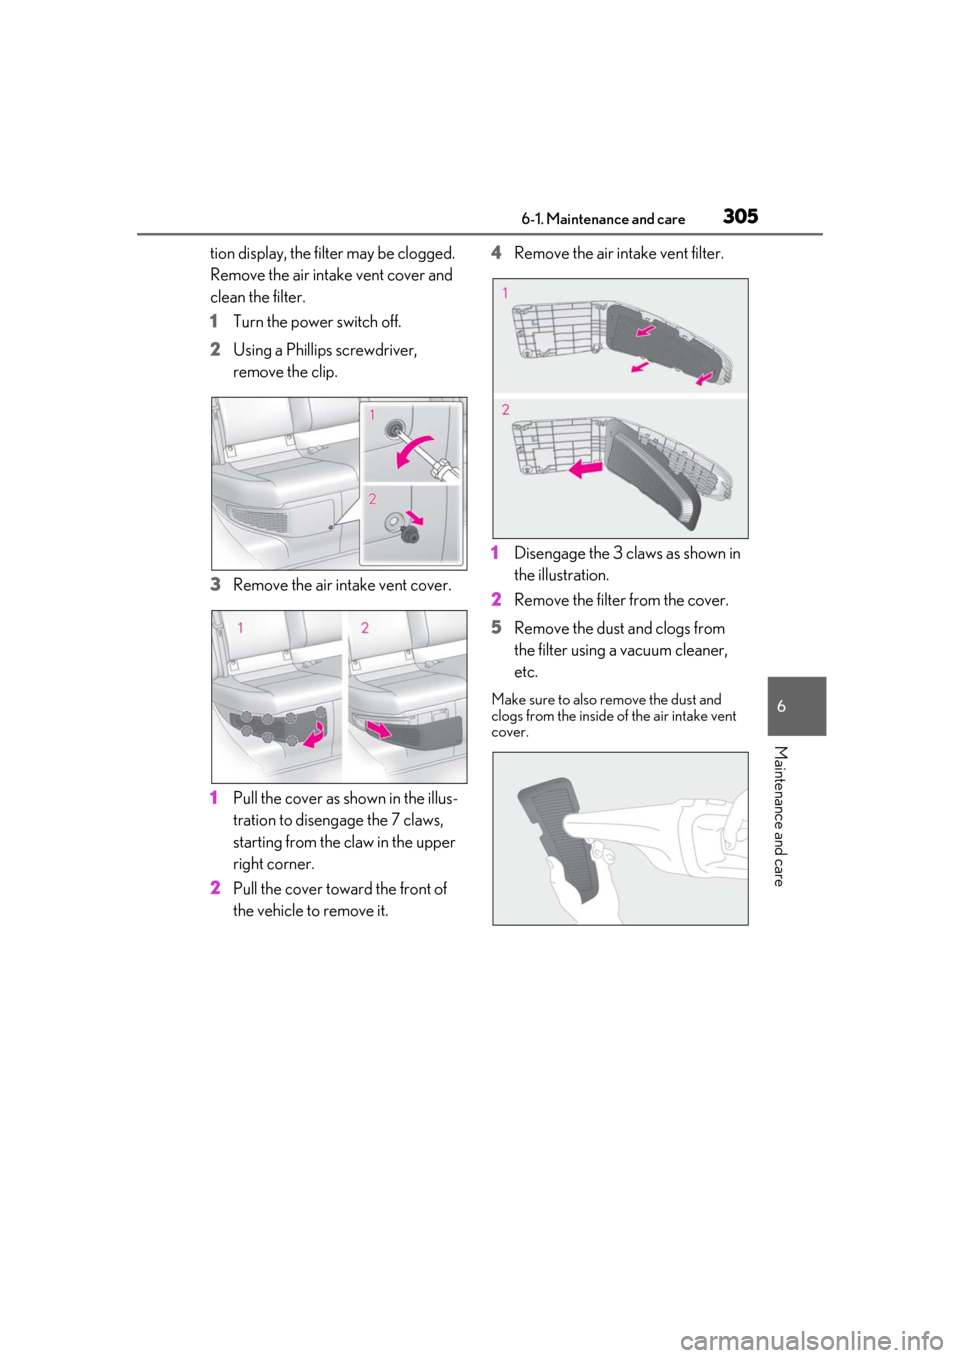
1Turn the power switch off.
2 Using a Phillips screwdriver,
remove the clip.
3 Remove the air intake vent cover.
1 Pull the cover as shown in the illus-
tration to disengage the 7 claws,
starting from the claw in the upper
right corner.
2 Pull the cover toward the front of
the vehicle to remove it. 4
Remove the air intake vent filter.
1 Disengage the 3 claws as shown in
the illustration.
2 Remove the filter from the cover.
5 Remove the dust and clogs from
the filter using a vacuum cleaner,
etc.
Make sure to also remove the dust and
clogs from the inside of the air intake vent
cover.
Page 307 of 456
3076-1. Maintenance and care
6
Maintenance and care
■If “Maintenance required for Traction
battery cooling parts See owner’s man-
ual” is displayed on the multi-informa-
tion display
●If this warning message is displayed on
the multi-information display, remove the
air intake vent cover and clean the filter.
●After cleaning the air intake vent, start
the hybrid system and check that the
warning message is no longer displayed.
After the hybrid system is started, it may
be necessary to drive the vehicle up to
approximately 20 minutes before the
warning message disappears. If the warn-
ing message does not disappear after
driving for appropriately 20 minutes,
have the vehicle inspected by your Lexus
dealer.
Remove dirt using a water-damp-
ened soft cloth or synthetic chamois.
Wipe the surface with a dry soft
cloth to remove any remaining
moisture.
WARNING
■When cleaning the hybrid battery
(traction battery) air intake vent/fil-
ter
●Do not use water or other liquids to
clean the air intake vent/filter. If water
is applied to the hybrid battery (trac-
tion battery) or other components, a
malfunction or fire may occur.
●When the air intake vent cover (under
the right side of the rear seat) is to be
removed, make sure to turn the power
switch off to stop the hybrid system.
■When removing the air intake vent
cover
Do not touch the service plug located
near the air intake vent. (P.57)
NOTICE
■When cleaning the air intake vent
Observe the following precautions. Fail-
ure to do so may cause damage to the
vehicle.
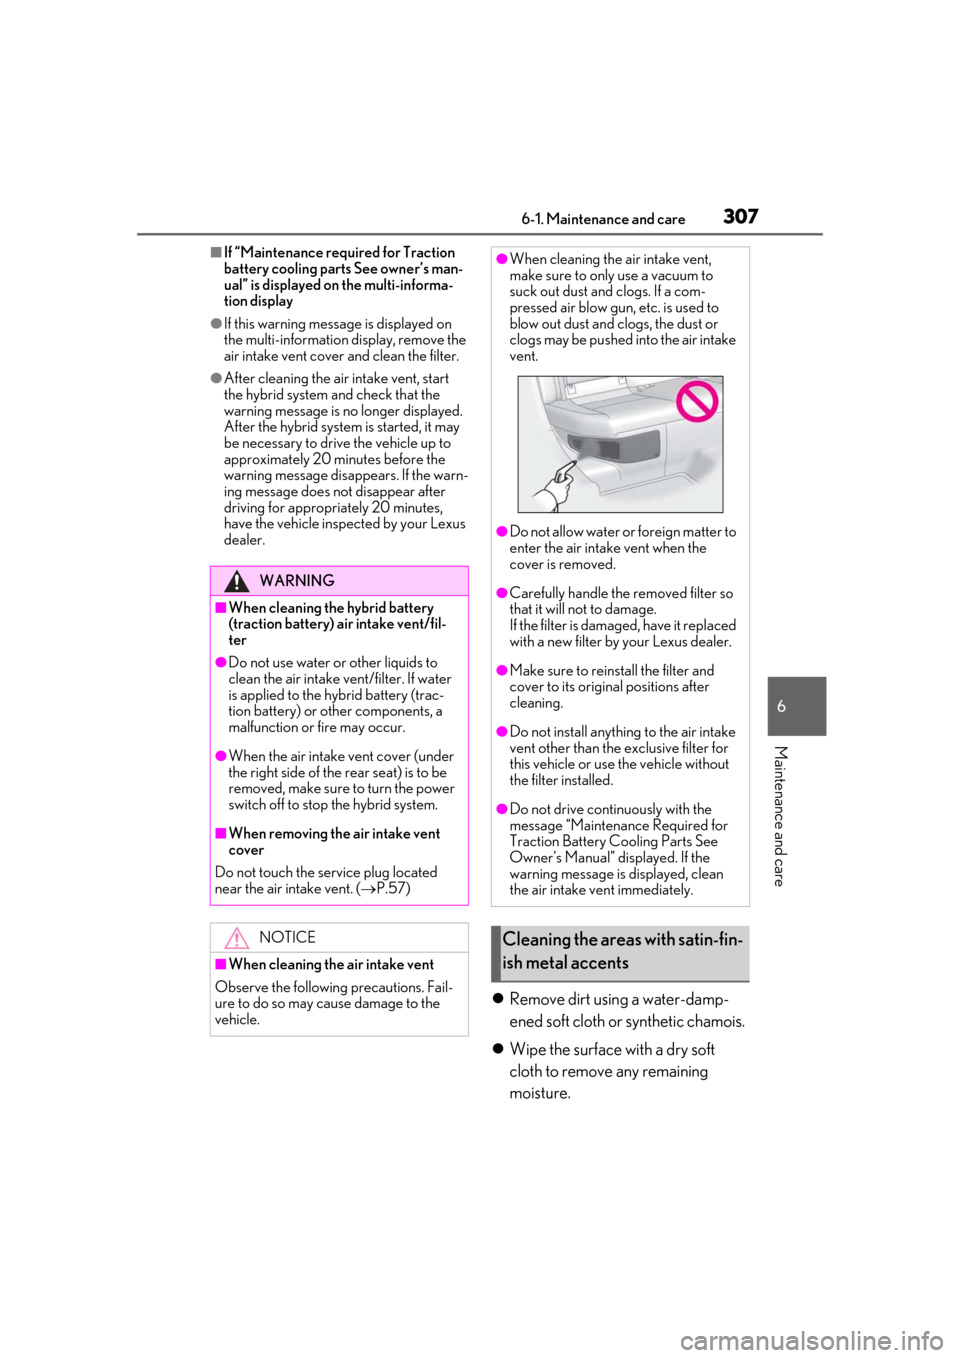
●When cleaning the air intake vent,
make sure to only use a vacuum to
suck out dust and clogs. If a com-
pressed air blow gun, etc. is used to
blow out dust and clogs, the dust or
clogs may be pushed into the air intake
vent.
●Do not allow water or foreign matter to
enter the air intake vent when the
cover is removed.
●Carefully handle the removed filter so
that it will not to damage.
If the filter is damaged, have it replaced
with a new filter by your Lexus dealer.
●Make sure to reinstall the filter and
cover to its original positions after
cleaning.
●Do not install anything to the air intake
vent other than the exclusive filter for
this vehicle or use the vehicle without
the filter installed.
●Do not drive continuously with the
message “Maintenance Required for
Traction Battery Cooling Parts See
Owner’s Manual” displayed. If the
warning message is displayed, clean
the air intake vent immediately.
Cleaning the areas with satin-fin-
ish metal accents
Page 315 of 456
3156-3. Do-it-yourself maintenance
6
Maintenance and care
Radiator and
condenser
( P.321)
Tire inflation
pressure
( P.334)• Tire pressure gauge
• Compressed air source
Washer fluid
( P.322)
• Water or washer fluid
containing antifreeze
(for winter use)
• Funnel (used only for adding water or washer
fluid)
WARNING
The engine compartment contains many
mechanisms and fluids that may move
suddenly, become hot, or become elec-
trically energized. To avoid death or seri-
ous injury, observe the following
precautions.
■When working on the engine com-
partment
●Make sure that the “IGNITION ON”
on the multi-information display and
the “READY” indicator are both off.
●Keep hands, clothi ng and tools away
from the moving fan and engine drive
belt.
●Be careful not to touch the engine,
power control unit, radiator, exhaust
manifold, etc. right after driving as they
may be hot. Oil and other fluids may
also be hot.
●Do not leave anything that may burn
easily, such as paper and rags, in the
engine compartment.
●Do not smoke, cause sparks or expose
an open flame to fuel. Fuel fumes are
flammable.
ItemsParts and tools■When working near the electric cool-
ing fan or radiator grille
Be sure the power switch is off.
With the power switch in ON mode, the
electric cooling fan may automatically
start to run if the air conditioning is on
and/or the coolant temperature is high.
( P.321)
■Safety glasses
Wear safety glasses to prevent flying or
falling material, fluid spray, etc. from get-
ting in your eyes.
NOTICE
■If you remove the air cleaner filter
Driving with the air cleaner filter
removed may cause excessive engine
wear due to dirt in the air.
Page 320 of 456
3206-3. Do-it-yourself maintenance
between oil maintenance intervals.
●When the engine is new, for example
directly after purchasing the vehicle or
after replacing the engine
●If low quality oil or oil of an inappropriate
viscosity is used
●When driving at high engine speeds or
with a heavy load, or when driving while
accelerating or decelerating frequently
●When leaving the engine idling for a long
time, or when driving frequently through
heavy traffic
■After changing the engine oil
The engine oil maintenance data should be
reset. Perform the following procedures:
1
While the vehicle is stopped, press
of the meter control switches.
2
Press or of the meter control
switches, and select .
3
Press or of the meter control
switches, select “Veh icle Settings”, and
then press “OK”.
4
Press or of the meter control
switches, select “Oil Maintenance”, and
then press “OK”.
5
Select “Yes” and then press “OK”.
A message will be displayed on the multi-
information display.
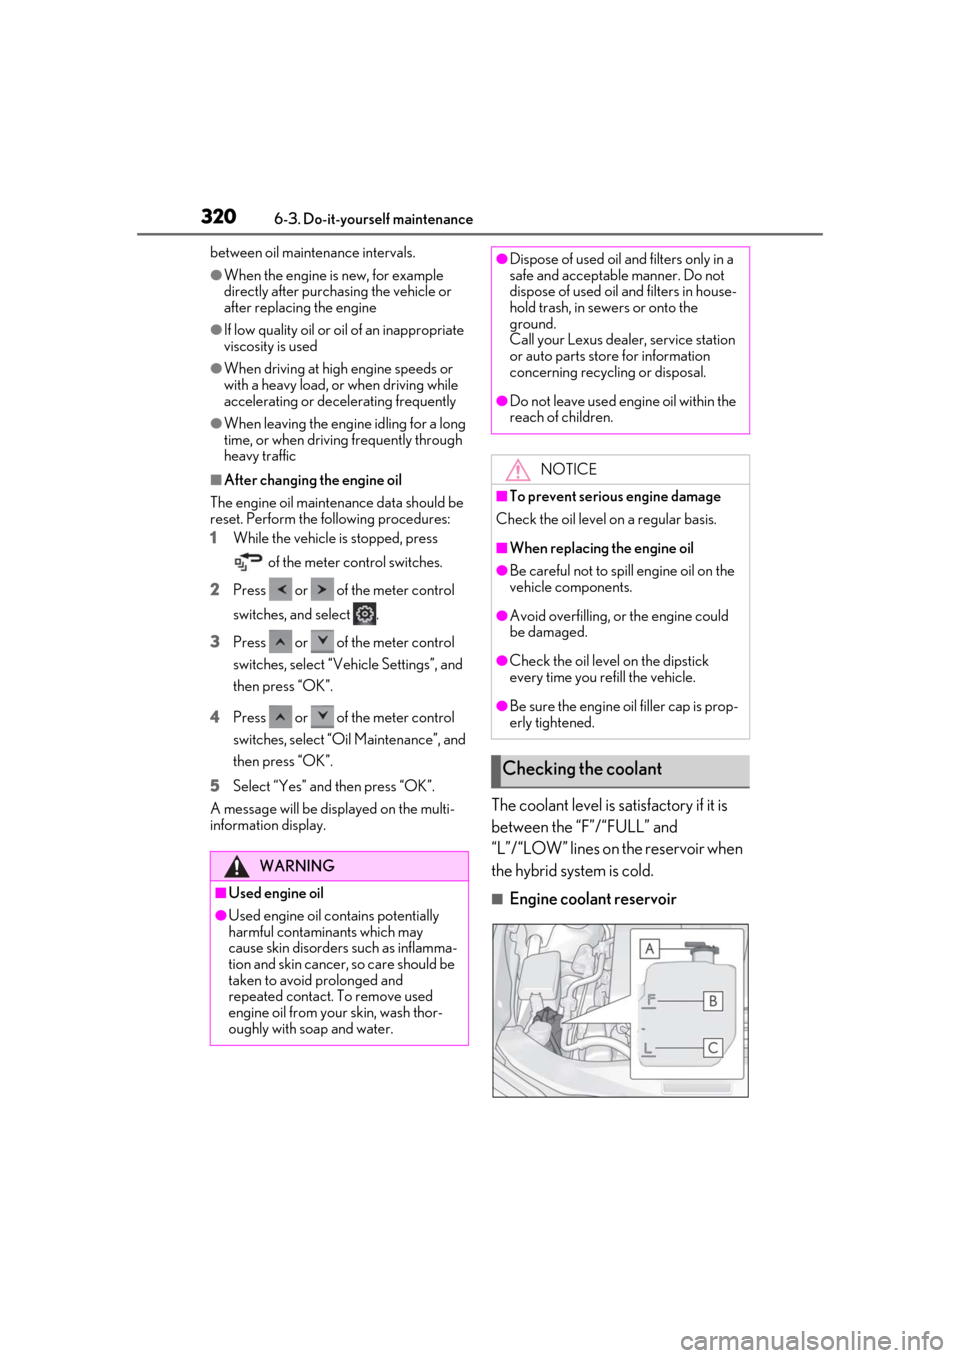
The coolant level is satisfactory if it is
between the “F”/“FULL” and
“L”/“LOW” lines on the reservoir when
the hybrid system is cold.
■Engine coolant reservoir
WARNING
■Used engine oil
●Used engine oil contains potentially
harmful contaminants which may
cause skin disorders such as inflamma-
tion and skin cancer, so care should be
taken to avoid prolonged and
repeated contact. To remove used
engine oil from your skin, wash thor-
oughly with soap and water.
●Dispose of used oil and filters only in a
safe and acceptable manner. Do not
dispose of used oil and filters in house-
hold trash, in sewers or onto the
ground.
Call your Lexus dealer, service station
or auto parts store for information
concerning recycling or disposal.
●Do not leave used engine oil within the
reach of children.
NOTICE
■To prevent serious engine damage
Check the oil level on a regular basis.
■When replacing the engine oil
●Be careful not to spill engine oil on the
vehicle components.
●Avoid overfilling, or the engine could
be damaged.
●Check the oil level on the dipstick
every time you refill the vehicle.
●Be sure the engine o il filler cap is prop-
erly tightened.
Checking the coolant
Page 322 of 456
3226-3. Do-it-yourself maintenance
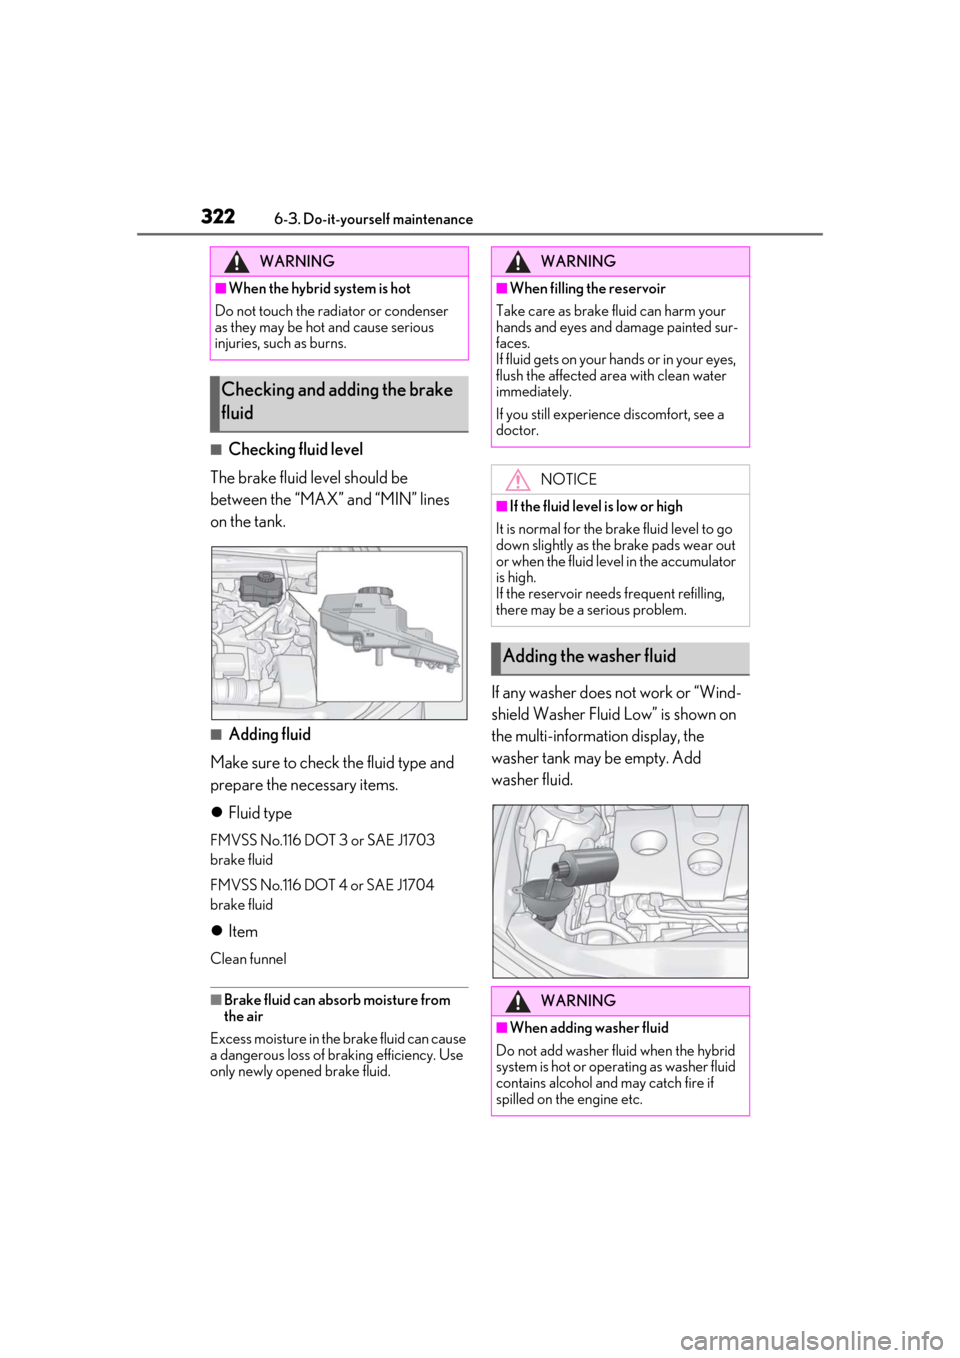
■Checking fluid level
The brake fluid level should be
between the “MAX” and “MIN” lines
on the tank.
■Adding fluid
Make sure to check the fluid type and
prepare the necessary items.
Fluid type
FMVSS No.116 DOT 3 or SAE J1703
brake fluid
FMVSS No.116 DOT 4 or SAE J1704
brake fluid
Item
Clean funnel
■Brake fluid can absorb moisture from
the air
Excess moisture in the brake fluid can cause
a dangerous loss of braking efficiency. Use
only newly opened brake fluid.
If any washer does not work or “Wind-
shield Washer Fluid Low” is shown on
the multi-information display, the
washer tank may be empty. Add
washer fluid.
WARNING
■When the hybrid system is hot
Do not touch the radiator or condenser
as they may be hot and cause serious
injuries, such as burns.
Checking and adding the brake
fluid
WARNING
■When filling the reservoir
Take care as brake fluid can harm your
hands and eyes and damage painted sur-
faces.
If fluid gets on your hands or in your eyes,
flush the affected area with clean water
immediately.
If you still experience discomfort, see a
doctor.
NOTICE
■If the fluid level is low or high
It is normal for the brake fluid level to go
down slightly as the brake pads wear out
or when the fluid leve l in the accumulator
is high.
If the reservoir need s frequent refilling,
there may be a serious problem.
Adding the washer fluid
WARNING
■When adding washer fluid
Do not add washer fluid when the hybrid
system is hot or operating as washer fluid
contains alcohol and may catch fire if
spilled on the engine etc.
Page 328 of 456
3286-3. Do-it-yourself maintenance
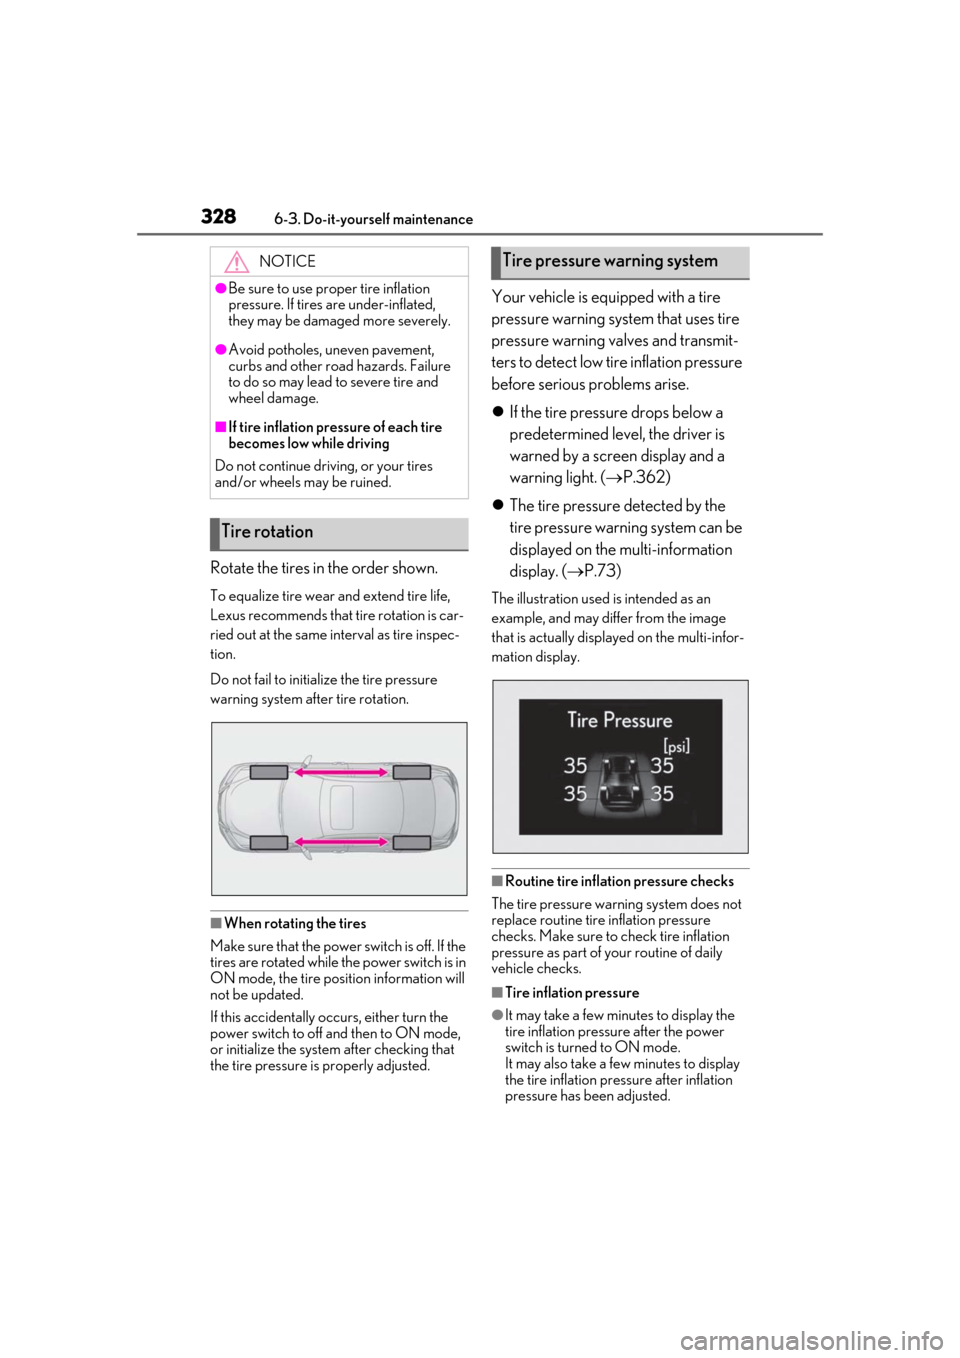
Rotate the tires in the order shown.
To equalize tire wear and extend tire life,
Lexus recommends that tire rotation is car-
ried out at the same interval as tire inspec-
tion.
Do not fail to initialize the tire pressure
warning system after tire rotation.
■When rotating the tires
Make sure that the power switch is off. If the
tires are rotated while the power switch is in
ON mode, the tire position information will
not be updated.
If this accidentally oc curs, either turn the
power switch to off and then to ON mode,
or initialize the system after checking that
the tire pressure is properly adjusted.
Your vehicle is equipped with a tire
pressure warning system that uses tire
pressure warning valves and transmit-
ters to detect low ti re inflation pressure
before serious problems arise.
If the tire pressure drops below a
predetermined level, the driver is
warned by a screen display and a
warning light. ( P.362)
The tire pressure detected by the
tire pressure warning system can be
displayed on the multi-information
display. ( P.73)
The illustration used is intended as an
example, and may differ from the image
that is actually displayed on the multi-infor-
mation display.
■Routine tire inflation pressure checks
The tire pressure warning system does not
replace routine tire inflation pressure
checks. Make sure to check tire inflation
pressure as part of your routine of daily
vehicle checks.
■Tire inflation pressure
●It may take a few minutes to display the
tire inflation pressure after the power
switch is turned to ON mode.
It may also take a few minutes to display
the tire inflation pre ssure after inflation
pressure has been adjusted.
NOTICE
●Be sure to use proper tire inflation
pressure. If tires are under-inflated,
they may be damaged more severely.
●Avoid potholes, uneven pavement,
curbs and other road hazards. Failure
to do so may lead to severe tire and
wheel damage.
■If tire inflation pres
sure of each tire
becomes low while driving
Do not continue driving, or your tires
and/or wheels may be ruined.
Tire rotation
Tire pressure warning system