AIr condition Lexus ES300h 2019 (OM33E25U) Workshop Manual
[x] Cancel search | Manufacturer: LEXUS, Model Year: 2019, Model line: ES300h, Model: Lexus ES300h 2019Pages: 456, PDF Size: 9.62 MB
Page 338 of 456
3386-3. Do-it-yourself maintenance
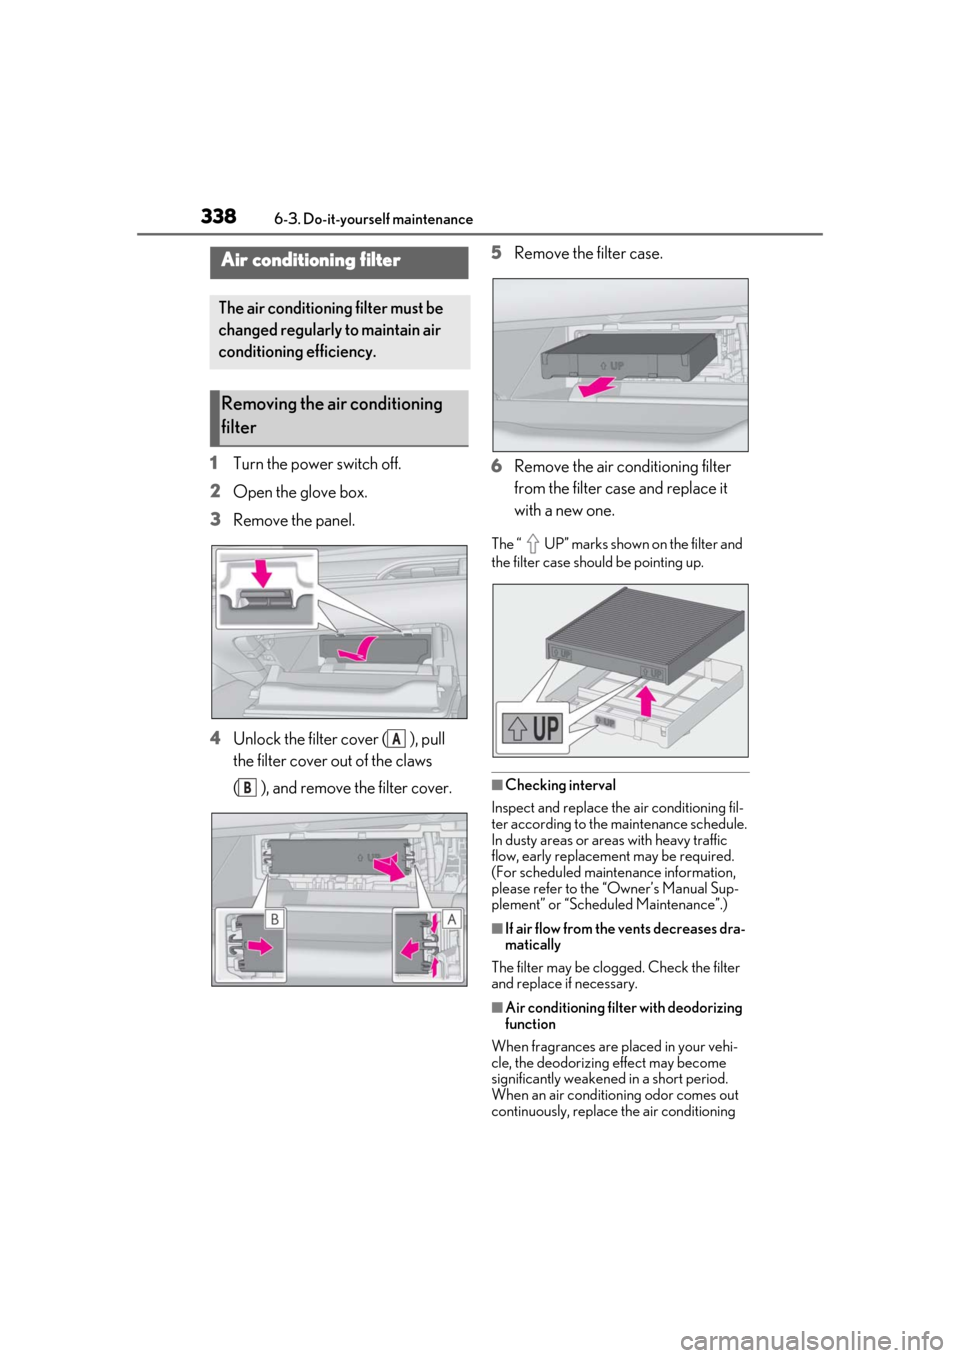
1Turn the power switch off.
2 Open the glove box.
3 Remove the panel.
4 Unlock the filter cover ( ), pull
the filter cover out of the claws
( ), and remove the filter cover. 5
Remove the filter case.
6 Remove the air conditioning filter
from the filter case and replace it
with a new one.
The “ UP” marks shown on the filter and
the filter case should be pointing up.
■Checking interval
Inspect and replace the air conditioning fil-
ter according to the maintenance schedule.
In dusty areas or areas with heavy traffic
flow, early replacement may be required.
(For scheduled maintenance information,
please refer to the “Owner’s Manual Sup-
plement” or “Scheduled Maintenance”.)
■If air flow from the vents decreases dra-
matically
The filter may be clogged. Check the filter
and replace if necessary.
■Air conditioning filt er with deodorizing
function
When fragrances are placed in your vehi-
cle, the deodorizing effect may become
significantly weakened in a short period.
When an air conditioning odor comes out
continuously, replace the air conditioning
Air conditioning filter
The air conditioning filter must be
changed regularly to maintain air
conditioning efficiency.
Removing the air conditioning
filter
A
B
Page 339 of 456
3396-3. Do-it-yourself maintenance
6
Maintenance and care
filter.
■If the electronic key battery is depleted
The following symptoms may occur:
●The smart access system with push-but-
ton start and wireless remote control will
not function properly.
●The operational range will be reduced.
Prepare the following before replacing
the battery:
Flathead screwdriver
Small flathead screwdriver
Lithium battery CR2032
■Use a CR2032 lithium battery
●Batteries can be purchased at your Lexus
dealer, local electrical appliance shops or
camera stores.
●Replace only with the same or equivalent
type recommended by the manufacturer.
●Dispose of used batteries according to
the local laws.
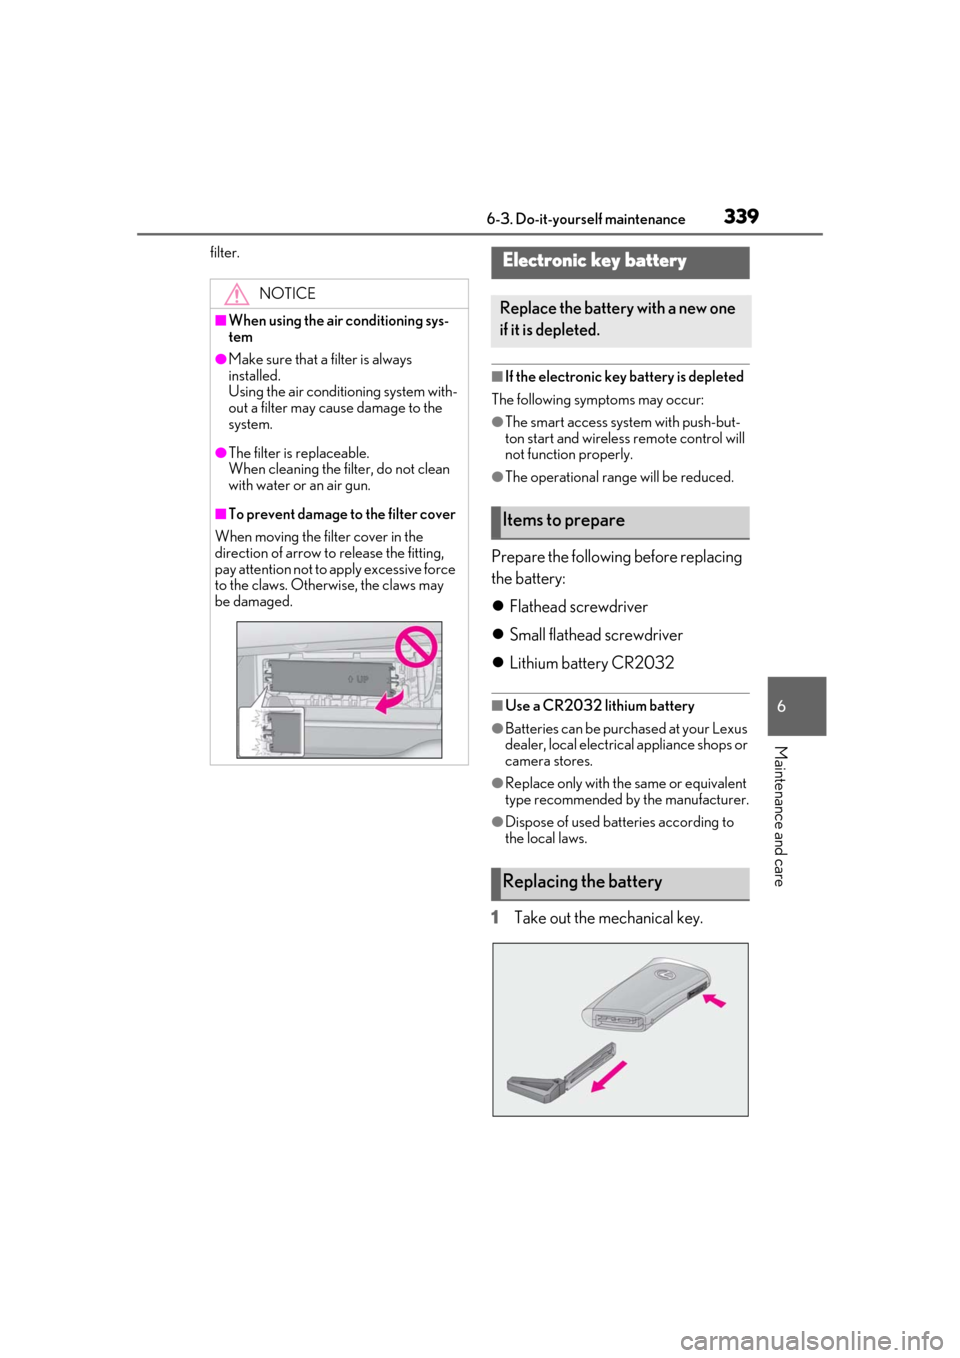
1Take out the mechanical key.
NOTICE
■When using the air conditioning sys-
tem
●Make sure that a filter is always
installed.
Using the air conditioning system with-
out a filter may cause damage to the
system.
●The filter is replaceable.
When cleaning the filter, do not clean
with water or an air gun.
■To prevent damage to the filter cover
When moving the filter cover in the
direction of arrow to release the fitting,
pay attention not to apply excessive force
to the claws. Otherwise, the claws may
be damaged.
Electronic key battery
Replace the battery with a new one
if it is depleted.
Items to prepare
Replacing the battery
Page 350 of 456
3507-1. Essential information
7-1.Essential information
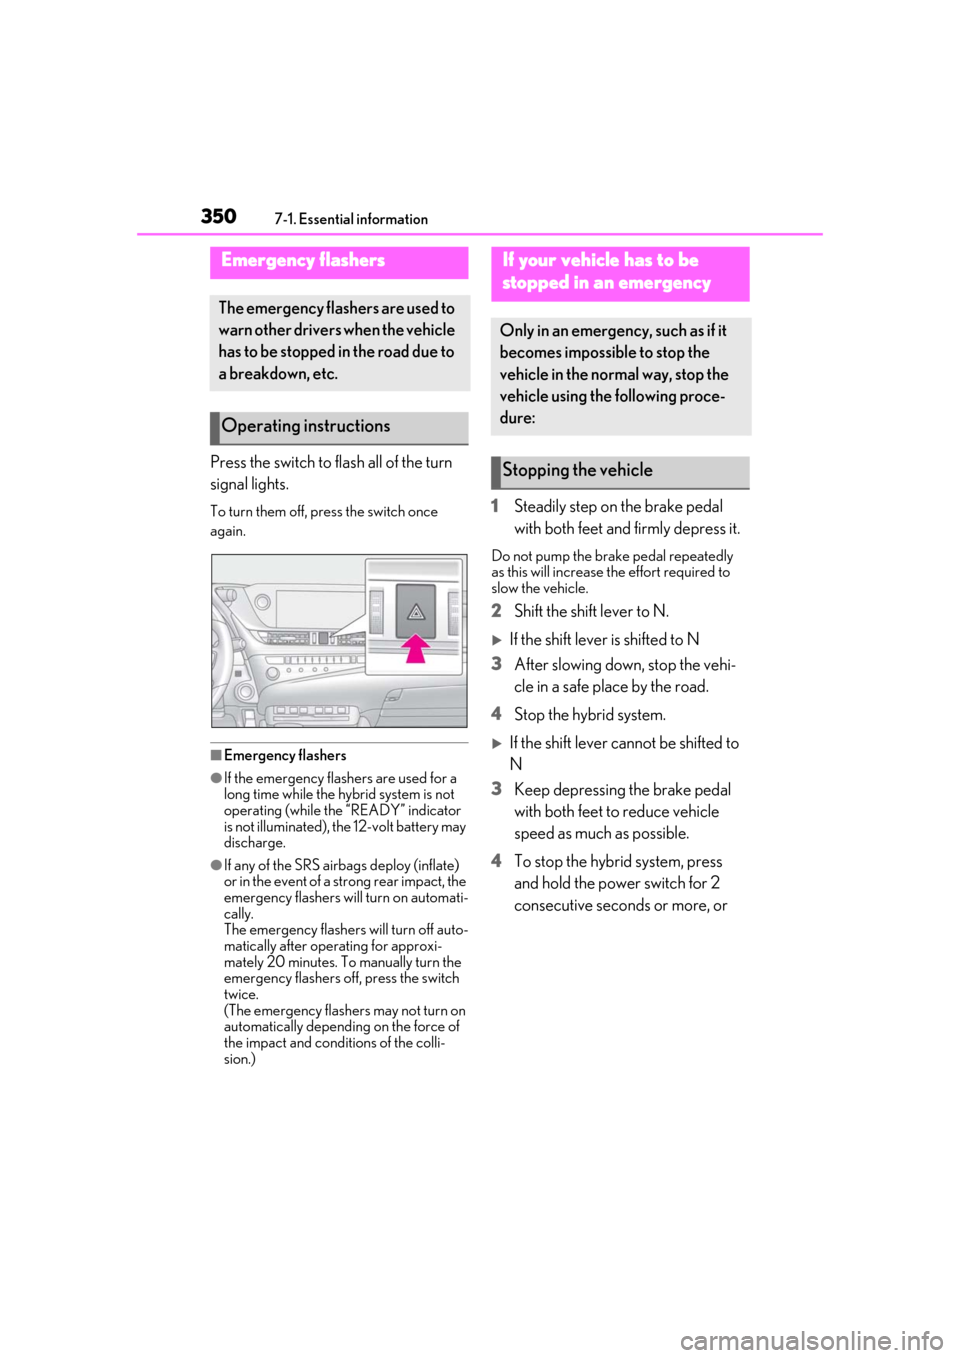
Press the switch to flash all of the turn
signal lights.
To turn them off, press the switch once
again.
■Emergency flashers
●If the emergency flashers are used for a
long time while the hybrid system is not
operating (while the “READY” indicator
is not illuminated), the 12-volt battery may
discharge.
●If any of the SRS airbags deploy (inflate)
or in the event of a strong rear impact, the
emergency flashers will turn on automati-
cally.
The emergency flashers will turn off auto-
matically after operating for approxi-
mately 20 minutes. To manually turn the
emergency flashers off, press the switch
twice.
(The emergency flashers may not turn on
automatically depending on the force of
the impact and conditions of the colli-
sion.)
1 Steadily step on the brake pedal
with both feet and firmly depress it.
Do not pump the brake pedal repeatedly
as this will increase the effort required to
slow the vehicle.
2Shift the shift lever to N.
If the shift lever is shifted to N
3 After slowing down, stop the vehi-
cle in a safe place by the road.
4 Stop the hybrid system.
If the shift lever cannot be shifted to
N
3 Keep depressing the brake pedal
with both feet to reduce vehicle
speed as much as possible.
4 To stop the hybrid system, press
and hold the power switch for 2
consecutive seconds or more, or
Emergency flashers
The emergency flashers are used to
warn other drivers when the vehicle
has to be stopped in the road due to
a breakdown, etc.
Operating instructions
If your vehicle has to be
stopped in an emergency
Only in an emergency, such as if it
becomes impossible to stop the
vehicle in the normal way, stop the
vehicle using the following proce-
dure:
Stopping the vehicle
Page 356 of 456
3567-2. Steps to take in an emergency
( P.373)
Fluid leaks under the vehicle. (Water
dripping from the air conditioning
after use is normal.)
Flat-looking tires or uneven tire
wear
Engine coolant temperature gauge
continually points higher than nor-
mal.
Changes in exhaust sound
Excessive tire squeal when corner-
ing
Strange noises related to the sus-
pension system
Pinging or other noises related to
the hybrid system
Engine missing, stumbling or run-
ning roughly
Appreciable loss of power
Vehicle pulls heavily to one side
when braking
If you think something is
wrong
If you notice any of the following
symptoms, your vehicle probably
needs adjustment or repair. Con-
tact your Lexus dealer as soon as
possible.
Visible symptoms
Audible symptoms
Operational symptoms
Page 366 of 456
3667-2. Steps to take in an emergency
■Electric power steering system warning
light (warning buzzer)
When the 12-volt battery charge becomes
insufficient or the voltage temporarily
drops, the electric po wer steering system
warning light may come on and the warning
buzzer may sound.
■When the tire pressure warning light
comes on
Inspect the tires to check if a tire is punc-
tured.
If a tire is punctured: P.372
If none of the tires are punctured:
Turn the power switch off then turn it to ON
mode. Check if the tire pressure warning
light comes on or blinks.
If the tire pressure warning light blinks for
approximately 1 minute then stays on
There may be a malfunction in the tire pres-
sure warning system. Have the vehicle
inspected by your Lexus dealer immedi-
ately.
If the tire pressure warning light comes
on
1
After the temperature of the tires has
lowered sufficiently, check the inflation
pressure of each tire and adjust them to
the specified level.
2
If the warning light does not turn off
even after several minutes have
elapsed, check that the inflation pres-
sure of each tire is at the specified level
and perform initialization. ( P.331)
■The tire pressure warning light may
come on due to natural causes
The tire pressure warning light may come
on due to natural causes such as natural air
leaks and tire inflation pressure changes
caused by temperature. In this case, adjust-
ing the tire inflation pressure will turn off the
warning light (after a few minutes).
■When a tire is replaced with a spare tire
The compact spare tire is not equipped with
a tire pressure warning valve and transmit-
ter. If a tire goes flat, the tire pressure warn-
ing light will not turn off even though the flat
tire has been replaced with the spare tire.
Replace the spare tire with the repaired tire and adjust the tire inflation pressure. The
tire pressure warning light will go off after a
few minutes.
■Conditions that the tire pressure warn-
ing system may not function properly
P.329
WARNING
■If both the ABS and the brake system
warning lights remain on
Stop your vehicle in a safe place immedi-
ately and contact your Lexus dealer.
The vehicle will become extremely
unstable during braking, and the ABS
system may fail, which could cause an
accident resulting in death or serious
injury.
■When the electric power steering
system warning light comes on
When the light comes on yellow, the
assist to the power st eering is restricted.
When the light comes on red, the assist
to the power steering is lost and handling
operations of the steering wheel become
extremely heavy.
When steering wheel operations are
heavier than usual, grip the steering
wheel firmly and operate it using more
force than usual.
■If the tire pressure warning light
comes on
Be sure to observe the following precau-
tions.
Failure to do so could cause a loss of
vehicle control and result in death or
serious injury.
●Stop your vehicle in a safe place as
soon as possible. Check and adjust the
tire inflation pre ssure immediately.
●If the tire pressure warning light comes
on even after tire inflation pressure
adjustment, it is prob able that you have
a flat tire. Check the tire s. If a tire is flat,
change it with the spare tire and have
the flat tire repaired by the nearest
Lexus dealer.
Page 388 of 456
3887-2. Steps to take in an emergency
If the engine coolant temperature
gauge enters the red zone or
“Engine Coolant Temp High Stop in
a Safe Place See Owner’s Manual”
is shown on the multi-information
display
1
Stop the vehicle in a safe place and
turn off the air conditioning system,
and then stop the hybrid system.
2
If you see steam:
Carefully lift the hood after the
steam subsides.
If you do not see steam:
Carefully lift the hood.
WARNING
■When exchanging the 12-volt battery
●When the vent plug and indicator are
close to the hold down clamp, the bat-
tery fluid (sulfuric acid) may leak.
●After exchanging, securely attach the
exhaust hose and exhaust hole plug to
the exhaust hole of the exchanged 12-
volt battery. If not properly installed,
gases (hydrogen) may leak into the
vehicle interior, and there is the possi-
ble danger of the gas igniting and
exploding.
NOTICE
■When handling jumper cables
When connecting the jumper cables,
ensure that they do not become entan-
gled in the cooling fan or engine drive
belt.
■To prevent damaging the vehicle
The exclusive jump starting terminal is to
be used when charging the 12-volt bat-
tery from another vehicle in an emer-
gency. It cannot be used to jump start
another vehicle.
If your vehicle overheats
The following may indicate that
your vehicle is overheating.
The engine coolant temperature
gauge ( P.70) is in the red zone
or a loss of hybrid system power is
experienced. (For example, the
vehicle speed does not increase.)
“Engine Coolant Temp High Stop
in a Safe Place See Owner’s
Manual” or “Hybrid system over-
heated Output power reduced” is
shown on the multi-information
display.
Steam comes out from under the
hood.
Correction procedures
Page 389 of 456
3897-2. Steps to take in an emergency
7
When trouble arises
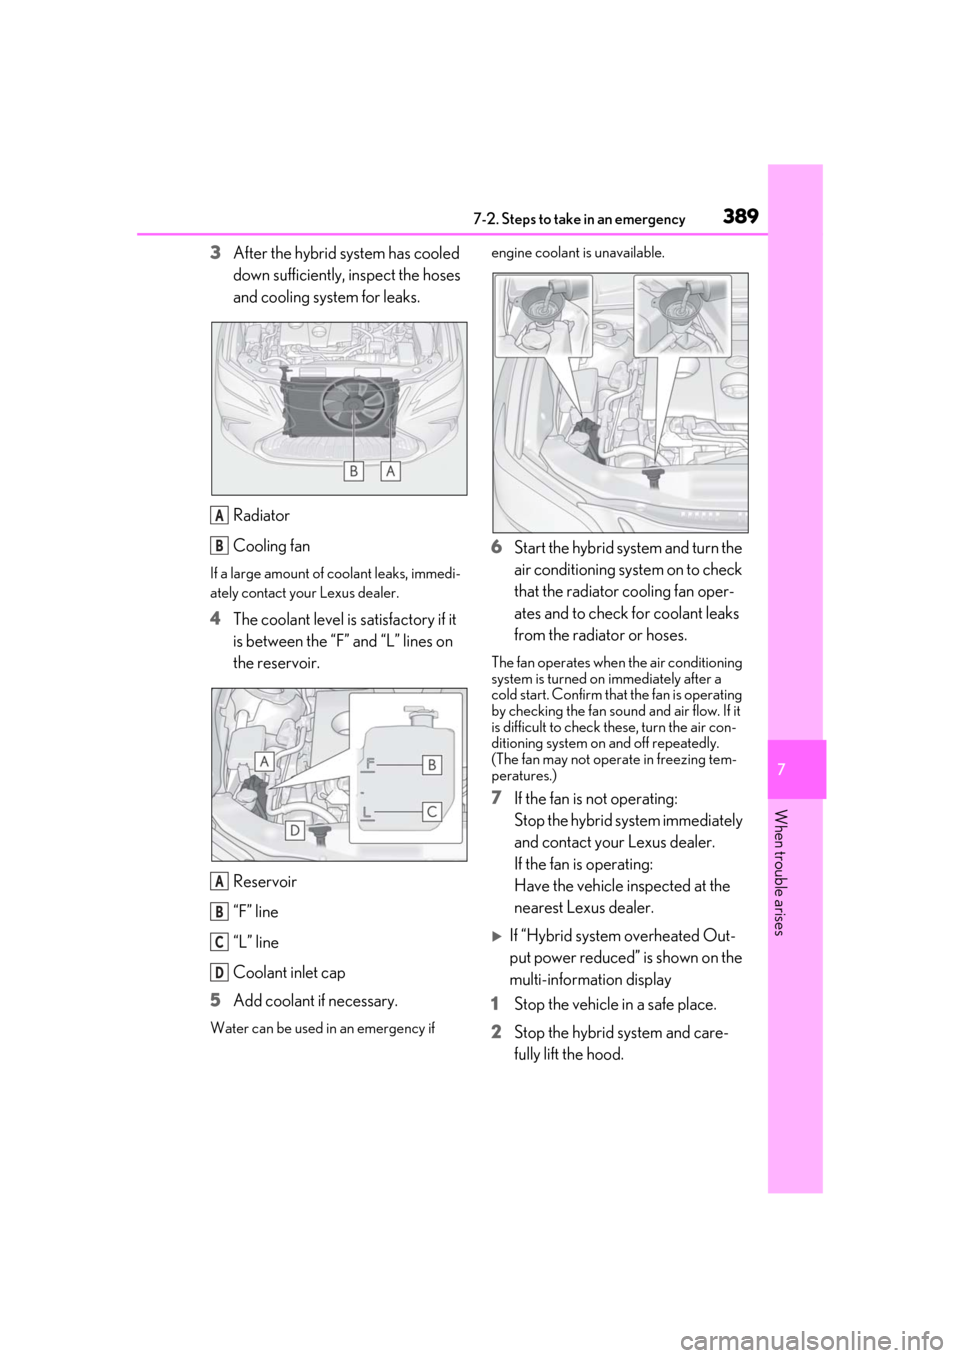
3After the hybrid system has cooled
down sufficiently, inspect the hoses
and cooling system for leaks.
Radiator
Cooling fan
If a large amount of coolant leaks, immedi-
ately contact your Lexus dealer.
4The coolant level is satisfactory if it
is between the “F” and “L” lines on
the reservoir.
Reservoir
“F” line
“L” line
Coolant inlet cap
5 Add coolant if necessary.
Water can be used in an emergency if engine coolant is unavailable.
6
Start the hybrid system and turn the
air conditioning system on to check
that the radiator cooling fan oper-
ates and to check for coolant leaks
from the radiator or hoses.
The fan operates when the air conditioning
system is turned on immediately after a
cold start. Confirm that the fan is operating
by checking the fan sound and air flow. If it
is difficult to check these, turn the air con-
ditioning system on and off repeatedly.
(The fan may not oper ate in freezing tem-
peratures.)
7 If the fan is not operating:
Stop the hybrid system immediately
and contact your Lexus dealer.
If the fan is operating:
Have the vehicle inspected at the
nearest Lexus dealer.
If “Hybrid system overheated Out-
put power reduced” is shown on the
multi-information display
1 Stop the vehicle in a safe place.
2 Stop the hybrid system and care-
fully lift the hood.
A
B
A
B
C
D
Page 407 of 456
4078-1. Specifications
8
Vehicle specifications
■Traction AA, A, B, C
The traction grades, from highest to
lowest, are AA, A, B and C, and they
represent the tire’s ability to stop on
wet pavement as measured under con-
trolled conditions on specified govern-
ment test surfaces of asphalt and
concrete.
A tire marked C may have poor traction
performance.
Warning: The traction grade assigned to
this tire is based on braking (straight
ahead) traction tests and does not include
cornering (turning) traction.
■Temperature A, B, C
The temperature grades are A (the
highest), B, and C, representing the
tire’s resistance to the generation of
heat and its ability to dissipate heat when tested under controlled condi-
tions on a specified indoor laboratory
test wheel.
Sustained high temperature can cause the
material of the tire to degenerate and
reduce tire life, and excessive temperature
can lead to sudd
en tire failure.
Grade C corresponds to a level of perfor-
mance which all passenger car tires must
meet under the Fede ral Motor Vehicle
Safety Standard No. 109.
Grades B and A represent higher levels of
performance on the laboratory test wheel
than the minimum required by law.
Warning: The temperature grades of a tire
assume that it is properly inflated and not
overloaded.
Excessive speed, unde rinflation, or exces-
sive loading, either separately or in combi-
nation, can cause heat buildup and
possible tire failure.
Glossary of tire terminology
Tire related termMeaning
Cold tire inflation
pressureTire pressure when the vehicle has been parked for three hours or
more, or has not been driven more than 1 mile or 1.5 km under that
condition
Maximum inflation
pressureThe maximum cold inflated pressure to which a tire may be inflated,
shown on the sidewall of the tire
Recommended
inflation pressureCold tire inflation pressure recommended by a manufacturer
Accessory weight
The combined weight (in excess of those standard items which may
be replaced) of hybrid transmission, power steering, power brakes,
power windows, power se ats, radio and heater, to the extent that
these items are available as factory-installed equipment (whether
installed or not)
Curb weight
The weight of a motor vehicle with standard equipment, including the
maximum capacity of fuel, oil and coolant, and if so equipped, air
conditioning and additional weight optional engine
Page 420 of 456
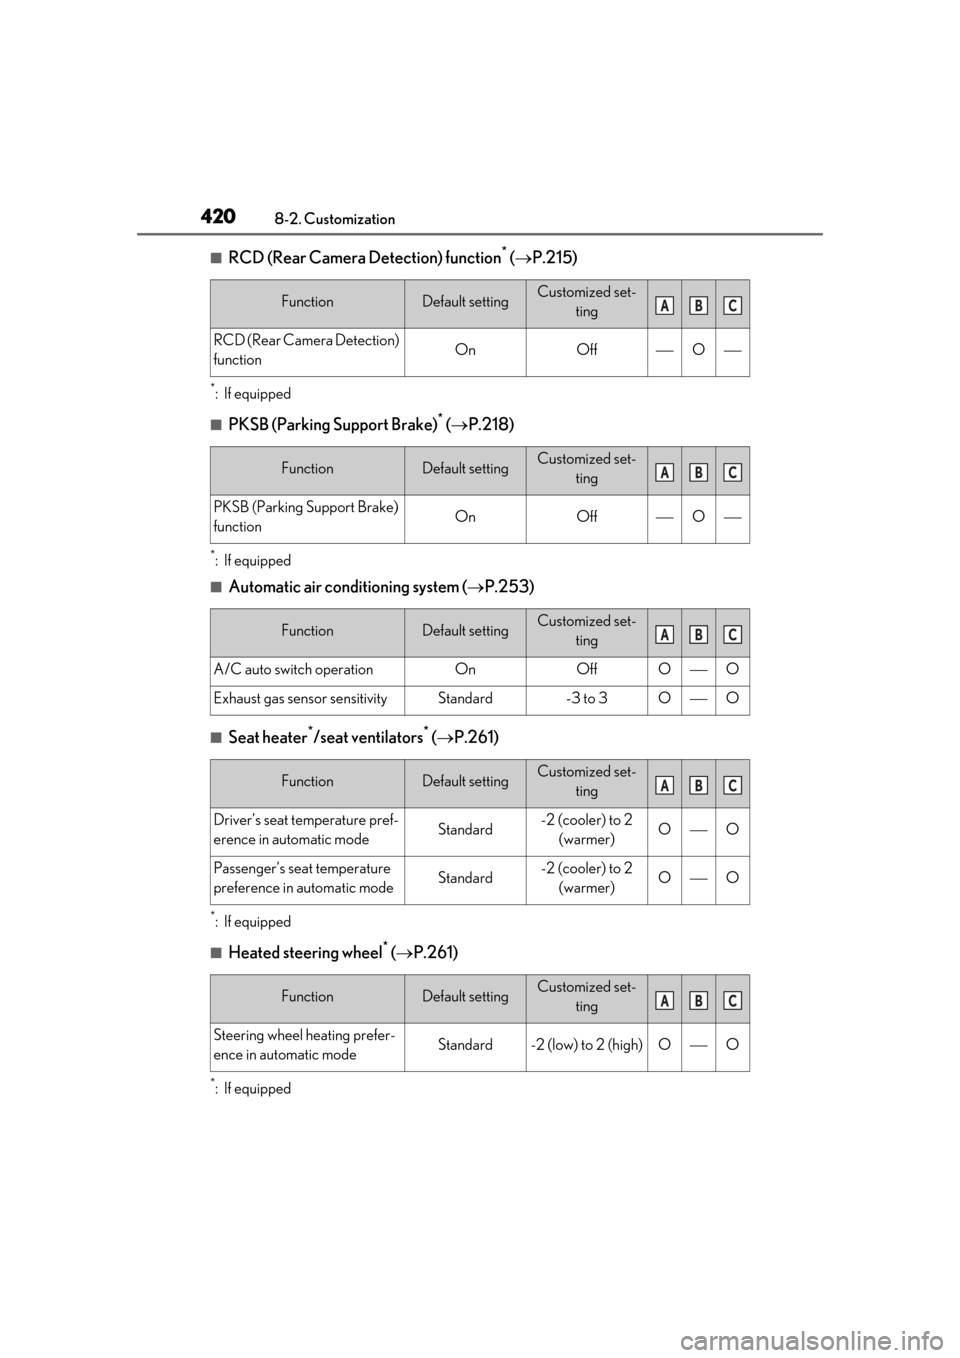
4208-2. Customization
■RCD (Rear Camera Detection) function* ( P.215)
*:If equipped
■PKSB (Parking Support Brake)* ( P.218)
*:If equipped
■Automatic air conditioning system ( P.253)
■Seat heater*/seat ventilators* ( P.261)
*:If equipped
■Heated steering wheel* ( P.261)
*:If equipped
FunctionDefault settingCustomized set-
ting
RCD (Rear Camera Detection)
functionOnOffO
FunctionDefault settingCustomized set-ting
PKSB (Parking Support Brake)
functionOnOffO
FunctionDefault settingCustomized set-ting
A/C auto switch operationOnOffOO
Exhaust gas sensor sensitivityStandard-3 to 3OO
FunctionDefault settingCustomized set-ting
Driver’s seat temperature pref-
erence in automatic modeStandard-2 (cooler) to 2 (warmer)OO
Passenger’s seat temperature
preference in automatic modeStandard-2 (cooler) to 2 (warmer)OO
FunctionDefault settingCustomized set- ting
Steering wheel heating prefer-
ence in automatic modeStandard-2 (low) to 2 (high)OO
ABC
ABC
ABC
ABC
ABC
Page 441 of 456

441What to do if... (Troubleshooting)441Alphabetical index
Alphabetical index
A
A/C ................................................................... 253Air conditioning filter ...............................338
Automatic air conditioning system ... 253
ABS (Anti-lock Brake System).............. 236 Function .......................................................... 236
Warning light ...............................................360
ACA (Active Cornering Assist) ........... 236
Active Cornering Assist (ACA) ........... 236
Adaptive Front-lighting System (AFS) .152
AFS (Adaptive Front-lighting System) .152
Airbags ............................................................... 28 Airbag operating conditions................... 30
Airbag precautions for your child ........ 33
Correct driving posture .............................23
Curtain shield airbag operating condi- tions .................................................................... 31
Curtain shield airbag precautions ....... 33
Front passenger occupant classification system ..............................................................37
General airbag precautions ................... 33
Locations of airbags.................................... 28
Modification and disposal of airbags . 35
Side airbag operating conditions ........... 31
Side airbag precautions ............................ 33
Side and curtain shield airbags operating conditions........................................................ 31
Side and curtain shield airbags precau- tions .................................................................. 33
SRS airbags ..................................................... 28
SRS warning light ......................................359
Air conditioning filter ................................. 338
Air conditioning system ............................ 253 Air conditioning filter ...............................338
Automatic air conditioning system ... 253
Alarm ................................................................... 62 Alarm .................................................................. 62
Warning buzzer ........................................ 358
Anchor brackets ...................................... 43, 51
Antennas (smart access system with push- button start) ..................................................102 Anti-lock Brake System (ABS).............. 236
Function ..........................................................236
Warning light .............................................. 360
Approach warning........................................193
Armrest..............................................................281
Assist grips .......................................................281
Audio system-linked display ...................... 75
Auto Glide Control .................................... 203
Automatic headlight leveling system ..... 151
Automatic High Beam ................................153
Automatic light control system............... 150
Auxiliary box.................................................. 270
Average fuel economy..................................74
Average vehicle speed .................................74
B
Back-up lights Replacing light bulbs ................................344
Battery (12-volt battery) ........................... 323 Battery checking ........................................ 323
If the 12-volt battery is discharged ... 384
Preparing and checking before winter.......................................................................... 242
Warning light .............................................. 359
Battery (traction batter y) ............................ 56
Blind Spot Monitor (BSM)......................... 197
Brake Brake hold ...................................................... 148
Fluid.................................................................. 398
Parking brake ............................................... 146
Regenerative braking ................................. 54
Warning light .............................................. 358
Brake assist .................................................... 236
Break-in tips..................................................... 127
Brightness control Instrument panel light control................. 72
BSM (Blind Spot Monitor)......................... 197
C
Care ...................................................... 300, 303 Aluminum wheels ..................................... 300