check engine Lexus ES300h 2020 User Guide
[x] Cancel search | Manufacturer: LEXUS, Model Year: 2020, Model line: ES300h, Model: Lexus ES300h 2020Pages: 462, PDF Size: 9.98 MB
Page 315 of 462
3136-2. Maintenance
6
Maintenance and care
3Press or of the meter control
switches and select “Scheduled Mainte-
nance”. Then press “OK”.
4
Select “Yes” and press “OK”.
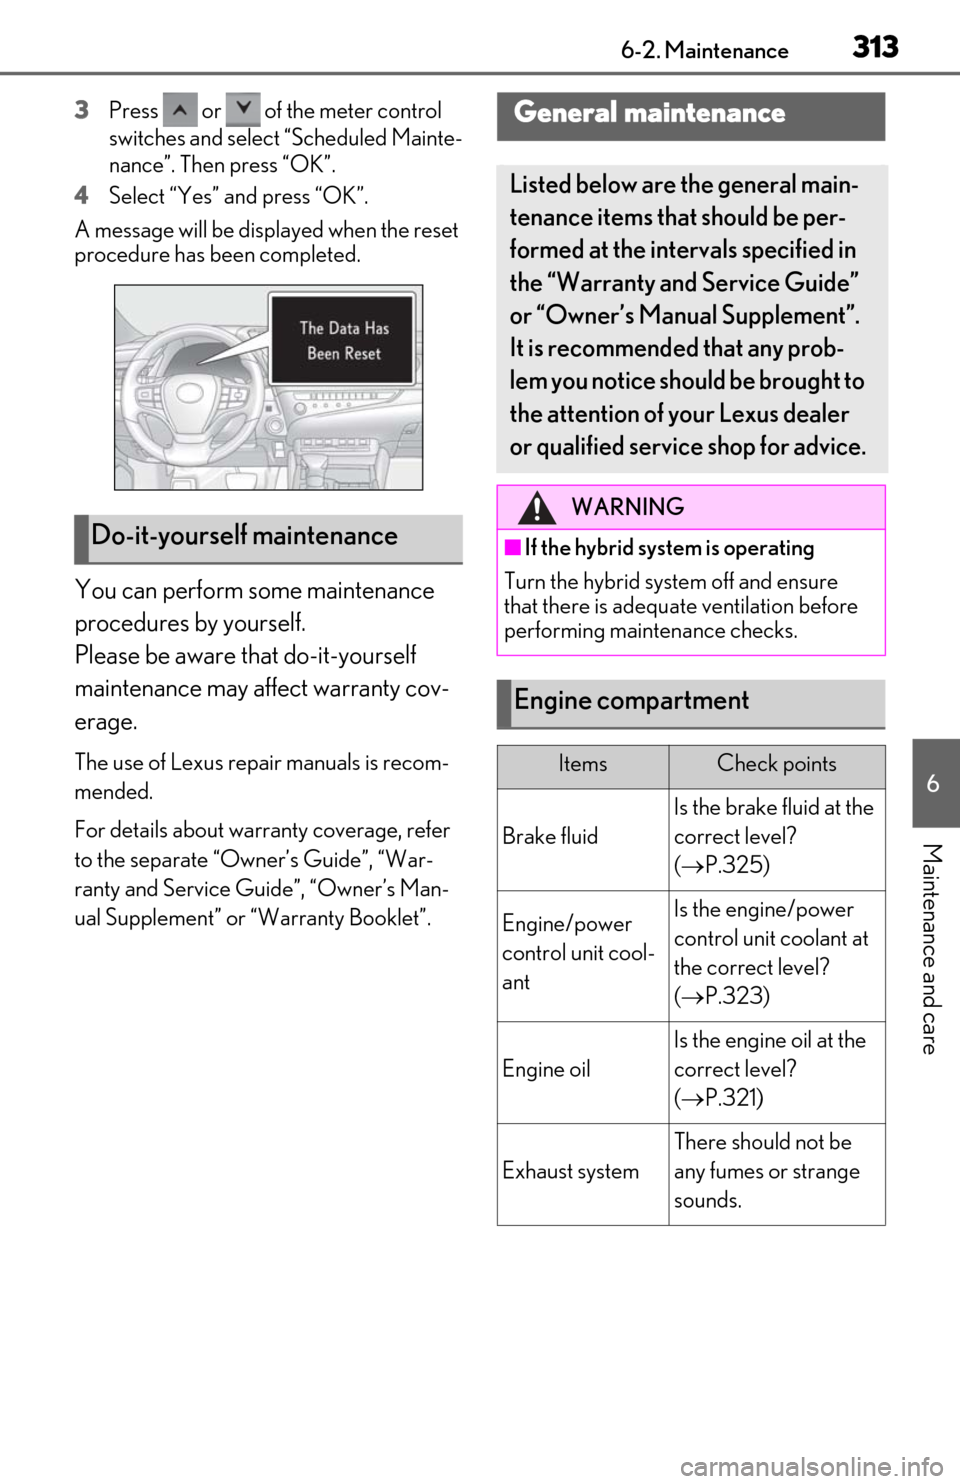
A message will be disp layed when the reset
procedure has been completed.
You can perform some maintenance
procedures by yourself.
Please be aware that do-it-yourself
maintenance may affect warranty cov-
erage.
The use of Lexus repair manuals is recom-
mended.
For details about warranty coverage, refer
to the separate “Owner’s Guide”, “War-
ranty and Service Guide”, “Owner’s Man-
ual Supplement” or “Warranty Booklet”.
Do-it-yourself maintenance
General maintenance
Listed below are the general main-
tenance items that should be per-
formed at the intervals specified in
the “Warranty and Service Guide”
or “Owner’s Manual Supplement”.
It is recommended that any prob-
lem you notice should be brought to
the attention of your Lexus dealer
or qualified service shop for advice.
WARNING
■If the hybrid system is operating
Turn the hybrid system off and ensure
that there is adequate ventilation before
performing maintenance checks.
Engine compartment
ItemsCheck points
Brake fluid
Is the brake fluid at the
correct level?
( P.325)
Engine/power
control unit cool-
antIs the engine/power
control unit coolant at
the correct level?
( P.323)
Engine oil
Is the engine oil at the
correct level?
( P.321)
Exhaust system
There should not be
any fumes or strange
sounds.
Page 317 of 462

3156-2. Maintenance
6
Maintenance and care
Seats• Do the seat controls operate properly?
Steering wheel
• Does the steering wheel rotate
smoothly?
• Does the steering wheel have the cor-
rect amount of free
play?
•There should not be any strange sounds
coming from the
steering wheel.
Vehicle exterior
ItemsCheck points
Doors/trunk• Do the doors/trunk operate smoothly?
Engine hood
•Does the engine hood lock system
work properly?
Fluid leaks
•There should not be any signs of fluid
leakage after the
vehicle has been
parked.
ItemsCheck points
Tires
• Is the tire inflation pressure correct?
• The tires should not be damaged or
excessively worn.
• Have the tires been rotated according to
the maintenance
schedule?
• The wheel nuts should not be loose.
Windshield wip-
ers
• The wiper blades should not show any
signs of cracking,
splitting, wear, con-
tamination or defor-
mation.
• The wiper blades should clear the
windshield without
streaking or skip-
ping.
ItemsCheck points
Page 323 of 462
3216-3. Do-it-yourself maintenance
6
Maintenance and care
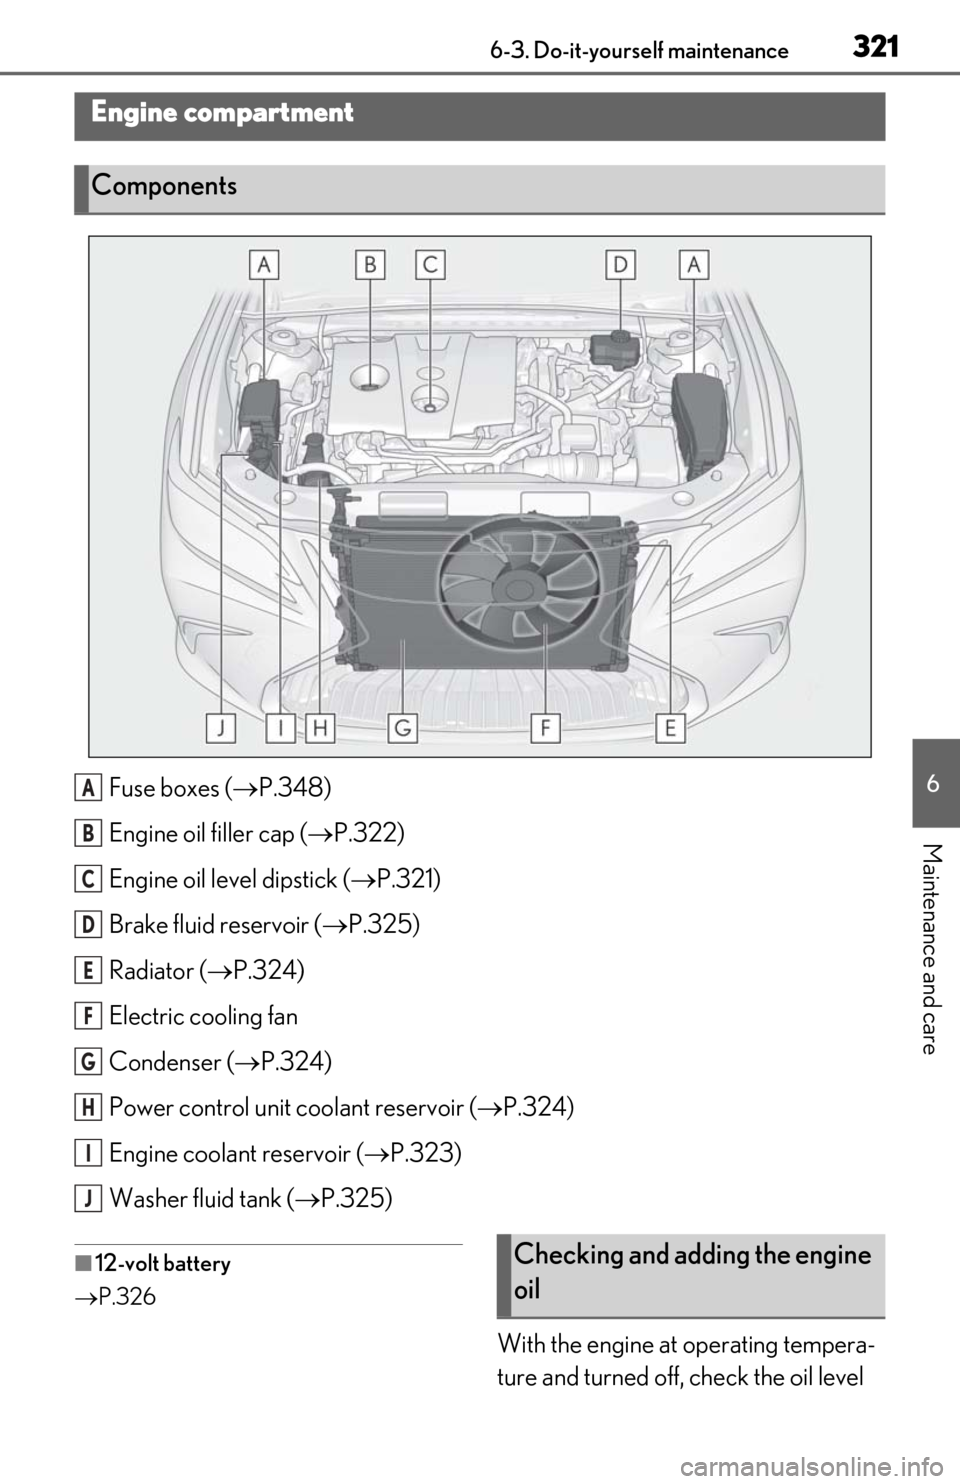
Fuse boxes (P.348)
Engine oil filler cap ( P.322)
Engine oil level dipstick ( P.321)
Brake fluid reservoir ( P.325)
Radiator ( P.324)
Electric cooling fan
Condenser ( P.324)
Power control unit coolant reservoir ( P.324)
Engine coolant reservoir ( P.323)
Washer fluid tank ( P.325)
■12-volt battery
P.326
With the engine at operating tempera-
ture and turned off, check the oil level
Engine compartment
Components
A
B
C
D
E
F
G
H
I
J
Checking and adding the engine
oil
Page 324 of 462
3226-3. Do-it-yourself maintenance
on the dipstick.
■Checking the engine oil
1 Park the vehicle on level ground.
After warming up the engine and turning
off the hybrid system, wait more than 5
minutes for the oil to drain back into the
bottom of the engine.
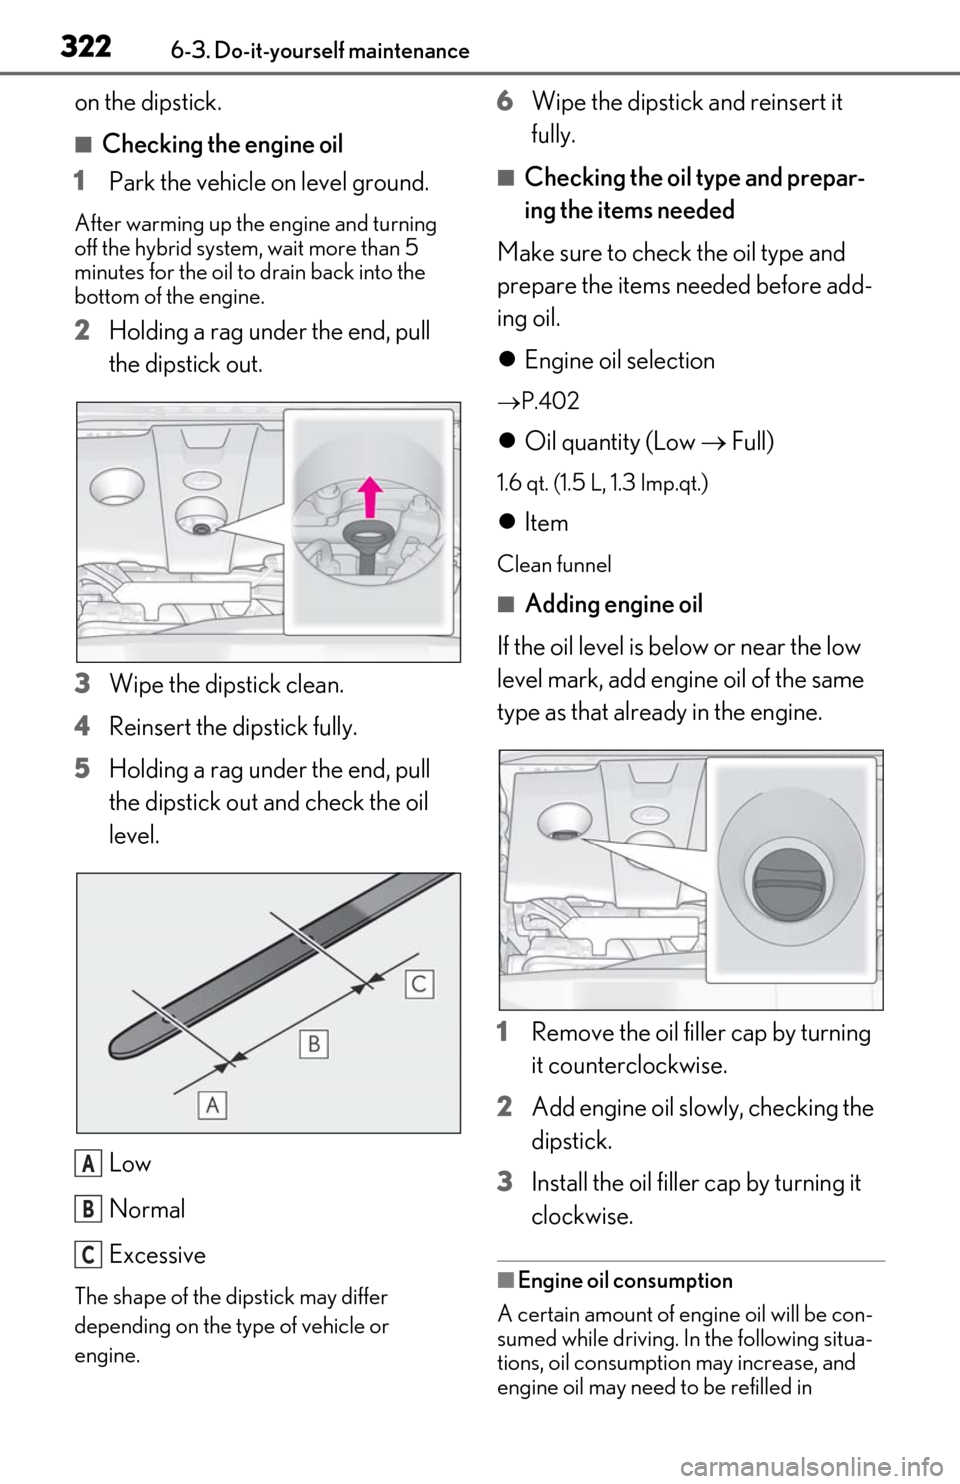
2Holding a rag under the end, pull
the dipstick out.
3 Wipe the dipstick clean.
4 Reinsert the dipstick fully.
5 Holding a rag under the end, pull
the dipstick out and check the oil
level.
Low
Normal
Excessive
The shape of the dipstick may differ
depending on the type of vehicle or
engine.
6Wipe the dipstick and reinsert it
fully.
■Checking the oil type and prepar-
ing the items needed
Make sure to check the oil type and
prepare the items needed before add-
ing oil.
Engine oil selection
P.402
Oil quantity (Low Full)
1.6 qt. (1.5 L, 1.3 Imp.qt.)
Item
Clean funnel
■Adding engine oil
If the oil level is below or near the low
level mark, add engine oil of the same
type as that already in the engine.
1 Remove the oil filler cap by turning
it counterclockwise.
2 Add engine oil slowly, checking the
dipstick.
3 Install the oil filler cap by turning it
clockwise.
■Engine oil consumption
A certain amount of engine oil will be con-
sumed while driving. In the following situa-
tions, oil consumption may increase, and
engine oil may need to be refilled in
A
B
C
Page 325 of 462
3236-3. Do-it-yourself maintenance
6
Maintenance and care
between oil maintenance intervals.
●When the engine is new, for example
directly after purchasing the vehicle or
after replacing the engine
●If low quality oil or oil of an inappropriate
viscosity is used
●When driving at high engine speeds or
with a heavy load, or when driving while
accelerating or decelerating frequently
●When leaving the engine idling for a long
time, or when driving frequently through
heavy traffic
■After changing the engine oil
The engine oil maintenance data should be
reset. Perform the following procedures:
1
While the vehicle is stopped, press
of the meter control switches.
2
Press or of the meter control
switches, and select .
3
Press or of the meter control
switches, select “Veh icle Settings”, and
then press “OK”.
4
Press or of the meter control
switches, select “Oil Maintenance”, and
then press “OK”.
5
Select “Yes” and then press “OK”.
A message will be displayed on the multi-
information display.
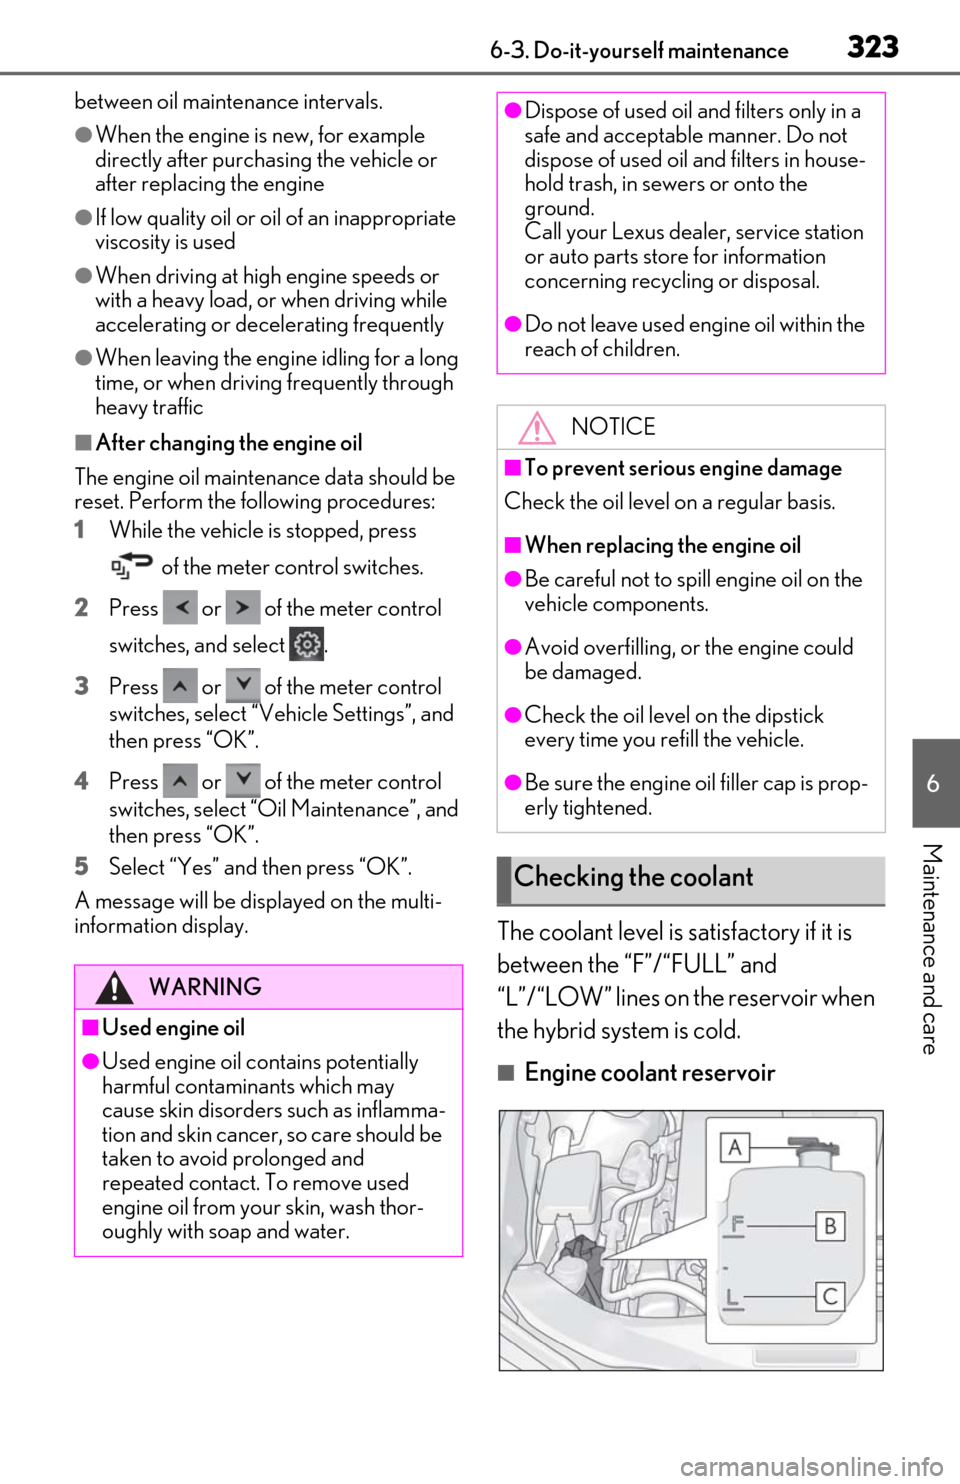
The coolant level is satisfactory if it is
between the “F”/“FULL” and
“L”/“LOW” lines on the reservoir when
the hybrid system is cold.
■Engine coolant reservoir
WARNING
■Used engine oil
●Used engine oil contains potentially
harmful contaminants which may
cause skin disorders such as inflamma-
tion and skin cancer, so care should be
taken to avoid prolonged and
repeated contact. To remove used
engine oil from your skin, wash thor-
oughly with soap and water.
●Dispose of used oil and filters only in a
safe and acceptable manner. Do not
dispose of used oil and filters in house-
hold trash, in sewers or onto the
ground.
Call your Lexus dealer, service station
or auto parts store for information
concerning recycling or disposal.
●Do not leave used engine oil within the
reach of children.
NOTICE
■To prevent serious engine damage
Check the oil level on a regular basis.
■When replacing the engine oil
●Be careful not to spill engine oil on the
vehicle components.
●Avoid overfilling, or the engine could
be damaged.
●Check the oil level on the dipstick
every time you refill the vehicle.
●Be sure the engine o il filler cap is prop-
erly tightened.
Checking the coolant
Page 326 of 462
3246-3. Do-it-yourself maintenance
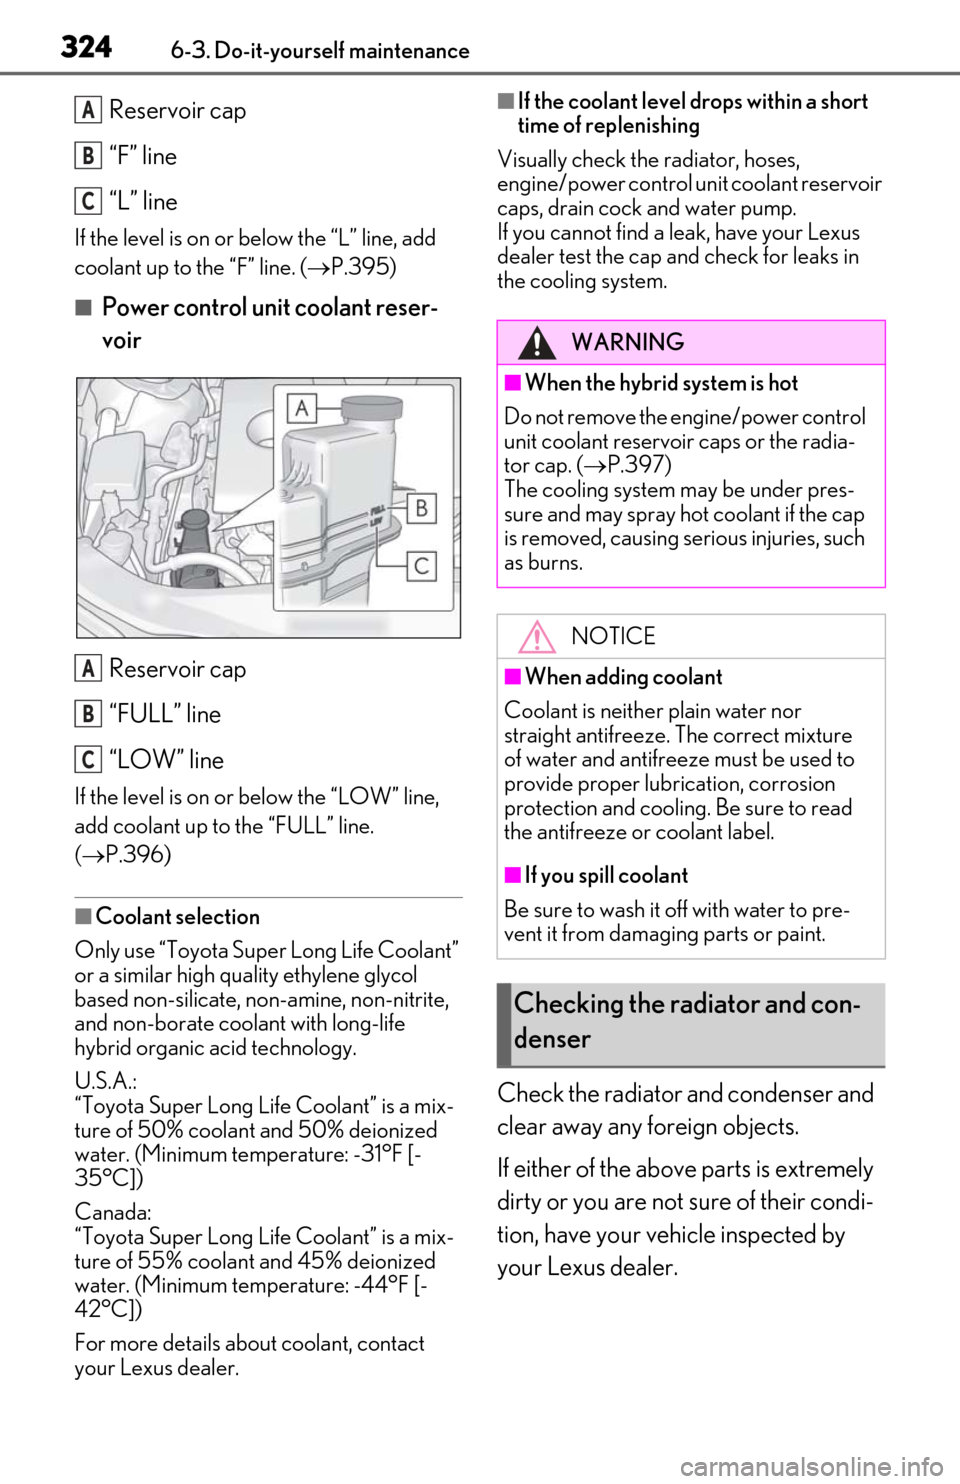
Reservoir cap
“F” line
“L” line
If the level is on or below the “L” line, add
coolant up to the “F” line. ( P.395)
■Power control unit coolant reser-
voir
Reservoir cap
“FULL” line
“LOW” line
If the level is on or below the “LOW” line,
add coolant up to the “FULL” line.
( P.396)
■Coolant selection
Only use “Toyota Super Long Life Coolant”
or a similar high quality ethylene glycol
based non-silicate, non-amine, non-nitrite,
and non-borate coolant with long-life
hybrid organic acid technology.
U.S.A.:
“Toyota Super Long Life Coolant” is a mix-
ture of 50% coolant and 50% deionized
water. (Minimum temperature: -31°F [-
35°C])
Canada:
“Toyota Super Long Life Coolant” is a mix-
ture of 55% coolant and 45% deionized
water. (Minimum temperature: -44°F [-
42°C])
For more details about coolant, contact
your Lexus dealer.
■If the coolant level drops within a short
time of replenishing
Visually check the radiator, hoses,
engine/power control unit coolant reservoir
caps, drain cock and water pump.
If you cannot find a leak, have your Lexus
dealer test the cap and check for leaks in
the cooling system.
Check the radiator and condenser and
clear away any foreign objects.
If either of the above parts is extremely
dirty or you are not sure of their condi-
tion, have your vehicle inspected by
your Lexus dealer.
A
B
C
A
B
C
WARNING
■When the hybrid system is hot
Do not remove the en gine/power control
unit coolant reservoir caps or the radia-
tor cap. ( P.397)
The cooling system may be under pres-
sure and may spray hot coolant if the cap
is removed, causing serious injuries, such
as burns.
NOTICE
■When adding coolant
Coolant is neither plain water nor
straight antifreeze. The correct mixture
of water and antifreeze must be used to
provide proper lubrication, corrosion
protection and cooling. Be sure to read
the antifreeze or coolant label.
■If you spill coolant
Be sure to wash it off with water to pre-
vent it from damaging parts or paint.
Checking the radiator and con-
denser
Page 327 of 462
3256-3. Do-it-yourself maintenance
6
Maintenance and care
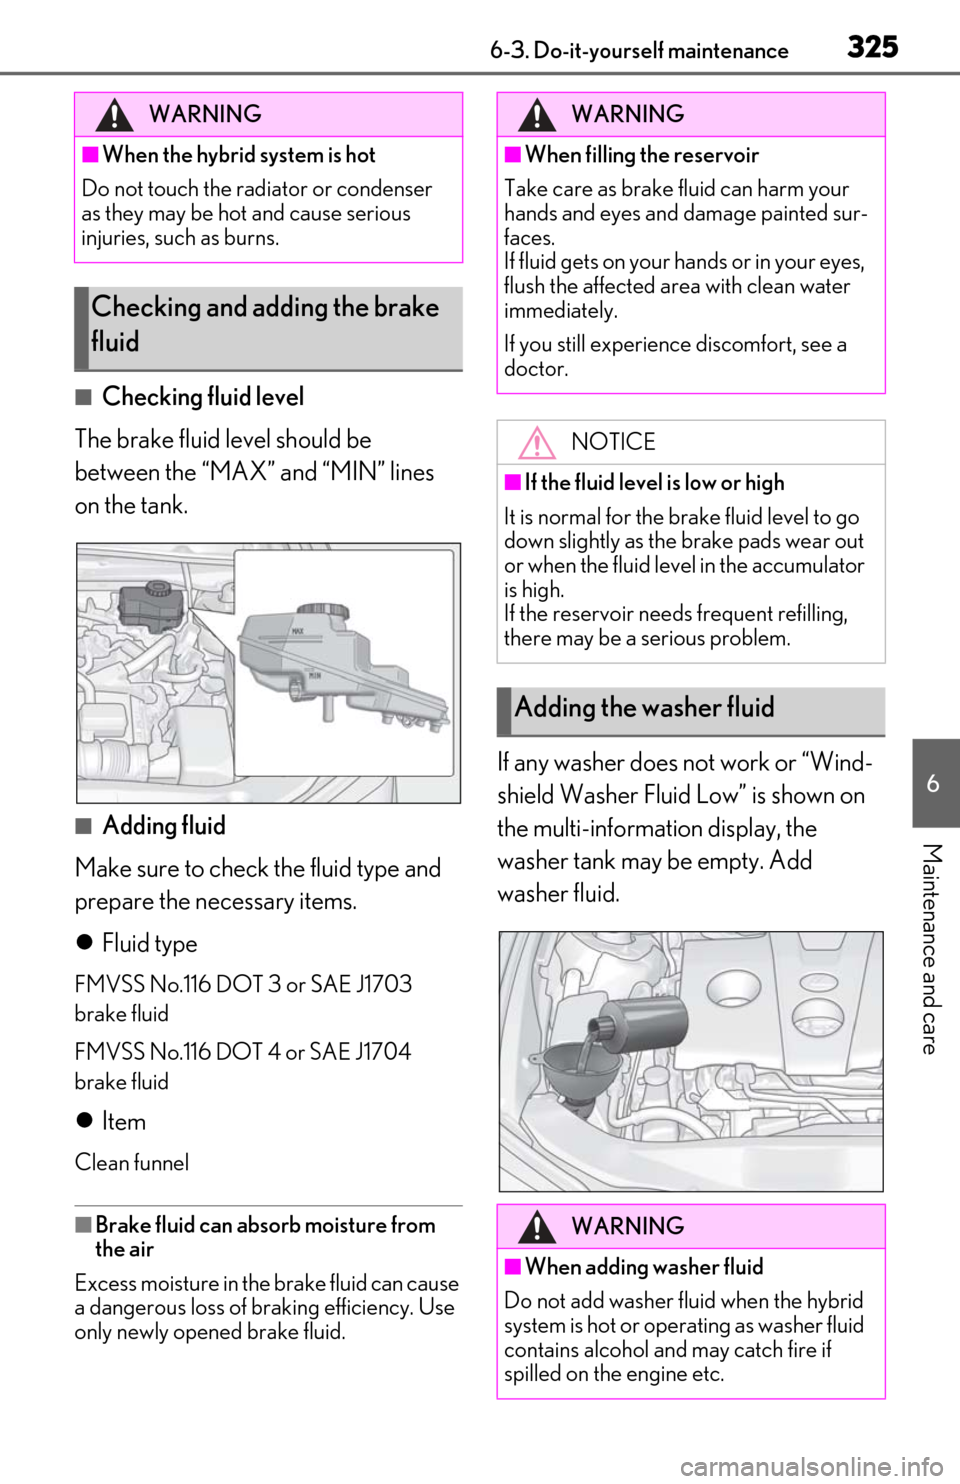
■Checking fluid level
The brake fluid level should be
between the “MAX” and “MIN” lines
on the tank.
■Adding fluid
Make sure to check the fluid type and
prepare the necessary items.
Fluid type
FMVSS No.116 DOT 3 or SAE J1703
brake fluid
FMVSS No.116 DOT 4 or SAE J1704
brake fluid
Item
Clean funnel
■Brake fluid can absorb moisture from
the air
Excess moisture in the brake fluid can cause
a dangerous loss of braking efficiency. Use
only newly opened brake fluid.
If any washer does not work or “Wind-
shield Washer Fluid Low” is shown on
the multi-information display, the
washer tank may be empty. Add
washer fluid.
WARNING
■When the hybrid system is hot
Do not touch the radiator or condenser
as they may be hot and cause serious
injuries, such as burns.
Checking and adding the brake
fluid
WARNING
■When filling the reservoir
Take care as brake fluid can harm your
hands and eyes and damage painted sur-
faces.
If fluid gets on your hands or in your eyes,
flush the affected area with clean water
immediately.
If you still experience discomfort, see a
doctor.
NOTICE
■If the fluid level is low or high
It is normal for the brake fluid level to go
down slightly as the brake pads wear out
or when the fluid leve l in the accumulator
is high.
If the reservoir need s frequent refilling,
there may be a serious problem.
Adding the washer fluid
WARNING
■When adding washer fluid
Do not add washer fluid when the hybrid
system is hot or operating as washer fluid
contains alcohol and may catch fire if
spilled on the engine etc.
Page 350 of 462
3486-3. Do-it-yourself maintenance
1Turn the power switch off.
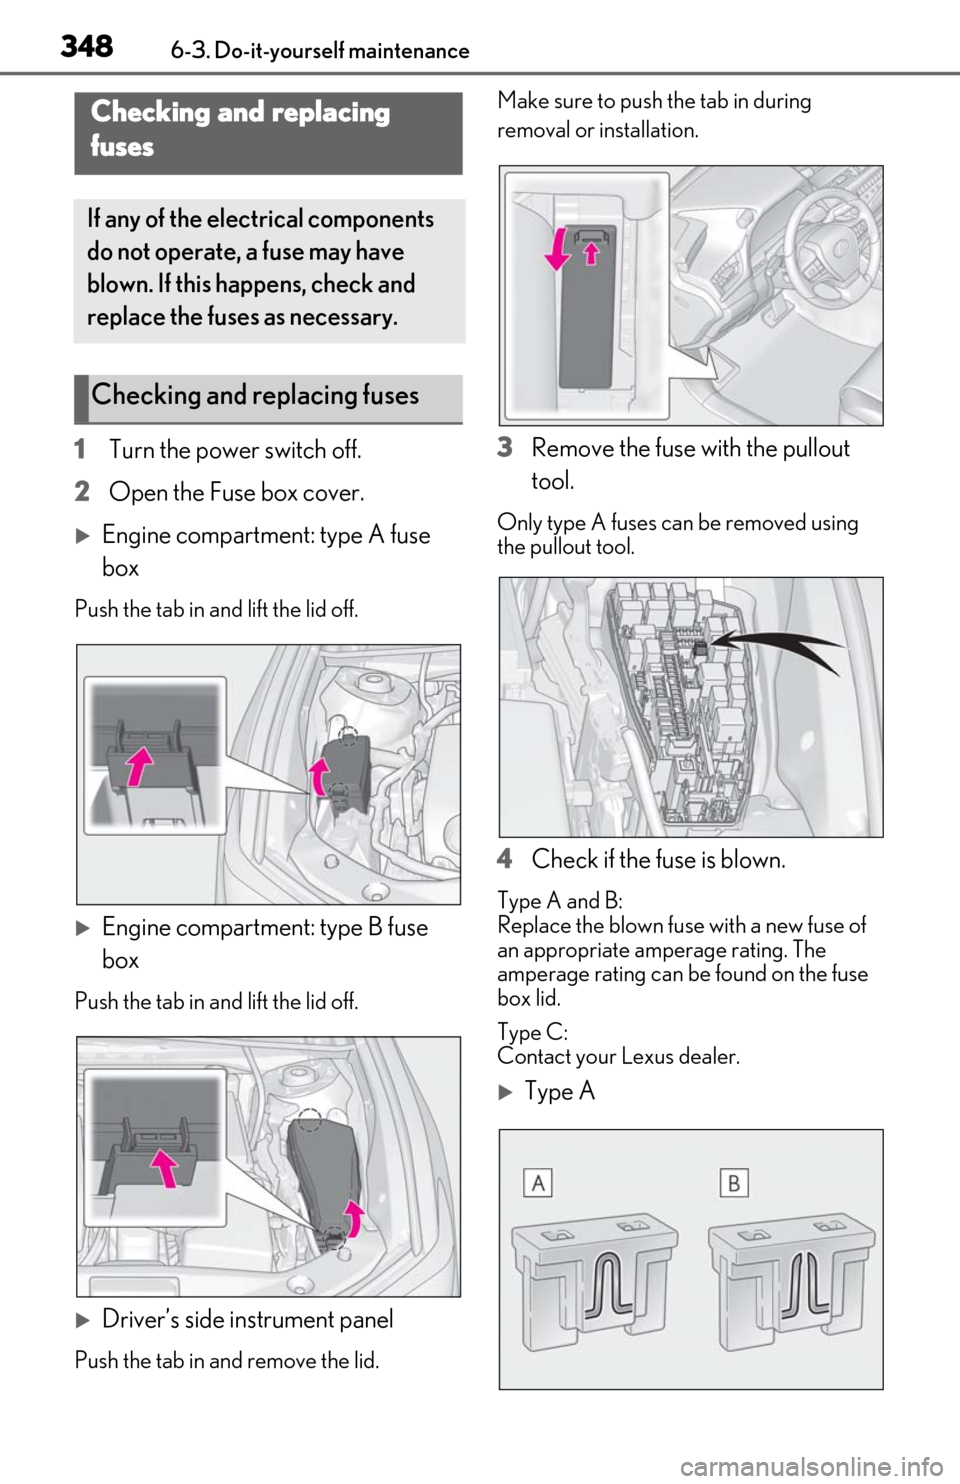
2 Open the Fuse box cover.
Engine compartment: type A fuse
box
Push the tab in and lift the lid off.
Engine compartment: type B fuse
box
Push the tab in and lift the lid off.
Driver’s side instrument panel
Push the tab in and remove the lid. Make sure to push the tab in during
removal or installation.
3
Remove the fuse with the pullout
tool.
Only type A fuses can be removed using
the pullout tool.
4Check if the fuse is blown.
Type A and B:
Replace the blown fuse with a new fuse of
an appropriate amperage rating. The
amperage rating can be found on the fuse
box lid.
Type C:
Contact your Lexus dealer.
Type A
Checking and replacing
fuses
If any of the electrical components
do not operate, a fuse may have
blown. If this happens, check and
replace the fuses as necessary.
Checking and replacing fuses
Page 377 of 462
3757-2. Steps to take in an emergency
7
When trouble arises
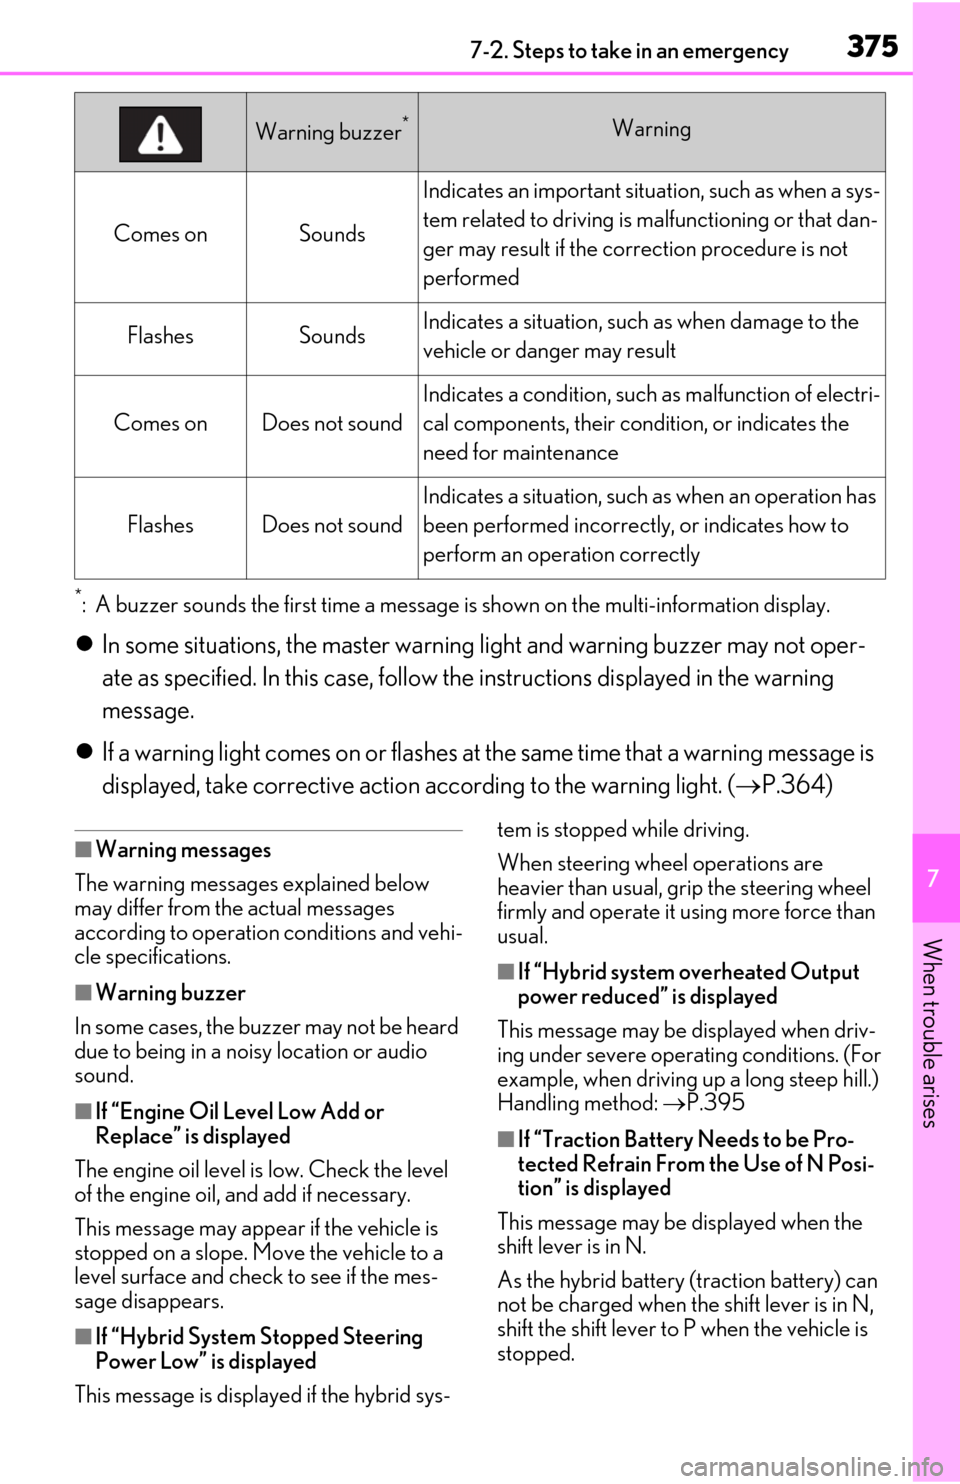
*: A buzzer sounds the first time a message is shown on the multi-information display.
In some situations, the master warning light and warning buzzer may not oper-
ate as specified. In this case, follow the instructions displayed in the warning
message.
If a warning light comes on or flashes at the same time that a warning message is
displayed, take corrective actio n according to the warning light. ( P.364)
■Warning messages
The warning messages explained below
may differ from the actual messages
according to operation conditions and vehi-
cle specifications.
■Warning buzzer
In some cases, the bu zzer may not be heard
due to being in a noisy location or audio
sound.
■If “Engine Oil Level Low Add or
Replace” is displayed
The engine oil level is low. Check the level
of the engine oil, and add if necessary.
This message may appear if the vehicle is
stopped on a slope. Move the vehicle to a
level surface and check to see if the mes-
sage disappears.
■If “Hybrid System Stopped Steering
Power Low” is displayed
This message is displayed if the hybrid sys- tem is stopped while driving.
When steering wheel operations are
heavier than usual, gr
ip the steering wheel
firmly and operate it using more force than
usual.
■If “Hybrid system overheated Output
power reduced” is displayed
This message may be displayed when driv-
ing under severe operat ing conditions. (For
example, when driving up a long steep hill.)
Handling method: P.395
■If “Traction Battery Needs to be Pro-
tected Refrain From the Use of N Posi-
tion” is displayed
This message may be displayed when the
shift lever is in N.
As the hybrid battery (traction battery) can
not be charged when the shift lever is in N,
shift the shift lever to P when the vehicle is
stopped.
Warning buzzer*Warning
Comes onSounds
Indicates an important situation, such as when a sys-
tem related to driving is ma lfunctioning or that dan-
ger may result if the co rrection procedure is not
performed
FlashesSoundsIndicates a situation, such as when damage to the
vehicle or danger may result
Comes onDoes not sound
Indicates a condition, such as malfunction of electri-
cal components, their condition, or indicates the
need for maintenance
FlashesDoes not sound
Indicates a situation, such as when an operation has
been performed incorrectly, or indicates how to
perform an operation correctly
Page 379 of 462
3777-2. Steps to take in an emergency
7
When trouble arises
the driven distance on the maintenance
schedule* should be performed soon.
Comes on approximately 4500 miles
(7200 km) after the message has been
reset. If necessary, perform maintenance.
Please reset the message after the mainte-
nance is performed. ( P.312)
*: Refer to the separa te “Scheduled Main-
tenance” or “Owner’s Manual Supple-
ment” for the maintenance interval
applicable to your vehicle.
■If “Maintenance Required Visit Your
Dealer” is displayed
Indicates that all maintenance is required to
correspond to the driven distance on the
maintenance schedule
*.
Comes on approximately 5000 miles
(8000 km) after the message has been
reset. (The indicator will not work properly
unless the message ha s been reset.) Per-
form the necessary maintenance. Please
reset the message after the maintenance is
performed. ( P.312)
*: Refer to the separa te “Scheduled Main-
tenance” or “Owner’s Manual Supple-
ment” for the maintenance interval
applicable to your vehicle.
■If “Oil Maintenance Required Soon” is
displayed
Indicates that the engine oil should be
scheduled to be changed.
Check the engine oil and change it if neces-
sary. After changing the engine oil, make
sure to reset the message. ( P.312)
■If “Oil Maintenance Required” is dis-
played
Indicates that the engine oil should be
changed.
Check and change the en gine oil, and oil fil-
ter by your Lexus deal er. After changing the
engine oil, make sure to reset the message.
( P.323)
■If a message that in dicates the need for
visiting your Lexus dealer is displayed
The system or part shown on the multi-
information display is malfunctioning. Have the vehicle inspected by your Lexus dealer
immediately.
■If a message that indicates the need for
referring to Owner’
s Manual is dis-
played
●If any of the following messages are
shown on the multi-information display,
follow the instructions.
• “Engine Coolant Temp High” ( P.395)
●If any of the following messages are
shown on the multi-info rmation display, it
may indicate a malf unction. Have the
vehicle inspected by your Lexus dealer
immediately.
• “Access System with Elec. Key Malfunc-
tion”
• “Hybrid system malfunction”
•“Check Engine”
• “Hybrid battery system malfunction”
• “Accelerator system malfunction”
●If any of the following messages are
shown on the multi-info rmation display, it
may indicate a malfun ction. Immediately
stop the vehicle and contact your Lexus
dealer.
• “Braking Power Low”
• “Charging System Malfunction”
• “Oil Pressure Low”
• “Hybrid system stopped”
• “Engine stopped”
●If “Low Auxiliary Battery” is shown
• When the display goes off after several
seconds
*:
Maintain the hybrid system operation for
more than 15 minutes and charge the 12-
volt battery.
• When the display does not go off:
Start up the hybrid system using the proce-
dures for “If the 12-volt battery is dis-
charged” ( P.390).
*: Displays for about 6 seconds
●If “Maintenance required for Traction bat-
tery cooling parts” is shown, the filter may
be clogged, the air intake vent may be
blocked, or there may be a gap in the
duct. Therefore, perform the following
correction procedure.
• If the air intake vent s and filters of the
hybrid battery (traction battery) are dirty,