front bumper Lexus ES300h 2020 User Guide
[x] Cancel search | Manufacturer: LEXUS, Model Year: 2020, Model line: ES300h, Model: Lexus ES300h 2020Pages: 462, PDF Size: 9.98 MB
Page 241 of 462

2394-5. Using the driving support systems
4
Driving
• If the vehicle is significantly tilted
• If the front of the vehicle is raised or low-ered due to the carried load
• If the orientation of a sensor has been
changed due to a collision or other
impact
• When equipment that may obstruct a
sensor is installed, such as a towing eye-
let, bumper protector (an additional trim
strip, etc.), bicycle carrier, or snow plow
• If the suspension has been modified or tires of a size other than specified are
installed
• If a sensor has been painted or covered with a sticker, etc.
Page 245 of 462

2434-5. Using the driving support systems
4
Driving
snow, dirt, etc.
●When it is raining heavily or water strikes
the vehicle
●When the detection area of a radar sen-
sor is obstructed by an adjacent vehicle
●If the vehicle is significantly tilted
●When equipment that may obstruct a
sensor is installed, such as a towing eye-
let, bumper protector (an additional trim
strip, etc.), bicycle carrier, or snow plow
●If the suspension has been modified or
tires of a size other than specified are
installed
●If the front of the vehicle is raised or low-
ered due to the carried load
●If a sticker or an electronic component,
such as a backlit license plate (especially
fluorescent type), fog light, fender pole or
wireless antenna is installed near a radar
sensor
●If the orientation of a radar sensor has
been changed
●When multiple vehicles are approaching
with only a small ga p between each vehi-
cle
●If a vehicle is approaching the rear of
your vehicle rapidly
●Situations in which the radar sensor may
not detect a vehicle
• When a vehicle approaches from the
right or left at the rear of the vehicle while
you are turning while backing up
• When turning while backing up
• When backing out of a shallow angle parking spot • When backing up on
a slope with a sharp
change in grade
• When a vehicle turns into the detection area
Page 308 of 462

3066-1. Maintenance and care
6-1.Maintenance and care
Working from top to bottom, liber-
ally apply water to the vehicle body,
wheel wells and underside of the
vehicle to remove any dirt and dust.
Wash the vehicle body using a
sponge or soft cloth, such as a
chamois.
For hard-to-remove marks, use car
wash soap and rinse thoroughly with
water.
Wipe away any water.
Wax the vehicle when the water-
proof coating deteriorates.
If water does not bead on a clean surface,
apply wax when the vehicle body is cool.
■Self-restoring coat
The vehicle body has a self-restoring coat-
ing that is resistant to small surface
scratches caused in a car wash etc.
●The coating lasts for 5 to 8 years from
when the vehicle is delivered from the
plant.
●The restoration time differs depending on
the depth of the scratch and outside tem-
perature.
The restoration time may become
shorter when the coating is warmed by
applying warm water.
●Deep scratches caused by keys, coins,
etc. cannot be restored.
●Do not use wax that contain abrasives.
■Automatic car washes
●Fold the mirrors befo re washing the vehi-
cle. Start washing from the front of the
vehicle. Make sure to extend the mirrors
before driving.
●Brushes used in automatic car washes
may scratch the vehicle body and dam-
age the paint.
●Rear spoiler may not be washable in
some automatic car washes. There may
also be an increased risk of damage to
vehicle.
■High pressure car washes
As water may enter the cabin, do not bring
the nozzle tip near the gaps around the
doors or perimeter of windows, or spray
these areas continuously.
■Notes for the smart access system with
push-button start
If the door handle becomes wet while the
electronic key is within the effective range,
the door may lock and unlock repeatedly. In
that case, follow the following correction
procedures to wash the vehicle:
●Place the key in a position 6 ft. (2 m) or
more separate from the vehicle while the
vehicle is being wash ed. (Take care to
ensure that the key is not stolen.)
●Set the electronic key to battery-saving
mode to disable the smart access system
with push-button start. ( P.111)
■Aluminum wheels
●Remove any dirt immediately by using a
neutral detergent.
●Wash detergent off with water immedi-
ately after use.
●To protect the paint from damage, make
sure to observe the following precau-
tions.
• Do not use acidic, alkaline or abrasive
detergent
• Do not use hard brushes
• Do not use detergent on the wheels when they are hot, such as after driving or park-
ing in hot weather
■Bumpers
Do not scrub with abrasive cleaners.
Cleaning and protecting the
vehicle exterior
Perform cleaning in a manner
appropriate to each component
and its material.
Cleaning instructions
Page 354 of 462

3526-3. Do-it-yourself maintenance
Cornering lights
Side turn signal lights
Outer foot lights
Tail lights
Stop lights
Rear turn signal lights
Rear side marker lights
Back-up lights
High mounted stoplight
License plate lights
■LED lights
The lights other than the front turn signal
lights (vehicles with single-beam head-
lights) and front side marker lights (vehicles
with single-beam head lights) each consist
of a number of LEDs. If any of the LEDs
burn out, take your vehicle to your Lexus
dealer to have the light replaced.
■Condensation build-up on the inside of
the lens
Temporary condensation build-up on the
inside of the headlight lens does not indi-
cate a malfunction. Contact your Lexus
dealer for more information in the following
situations:
●Large drops of water ha ve built up on the
inside of the lens.
●Water has built up inside the headlight.
■When replacing light bulbs
P.349
■Front turn signal lights (vehicles
with single-beam headlights)/front
side marker lights (vehicles with
single-beam headlights)
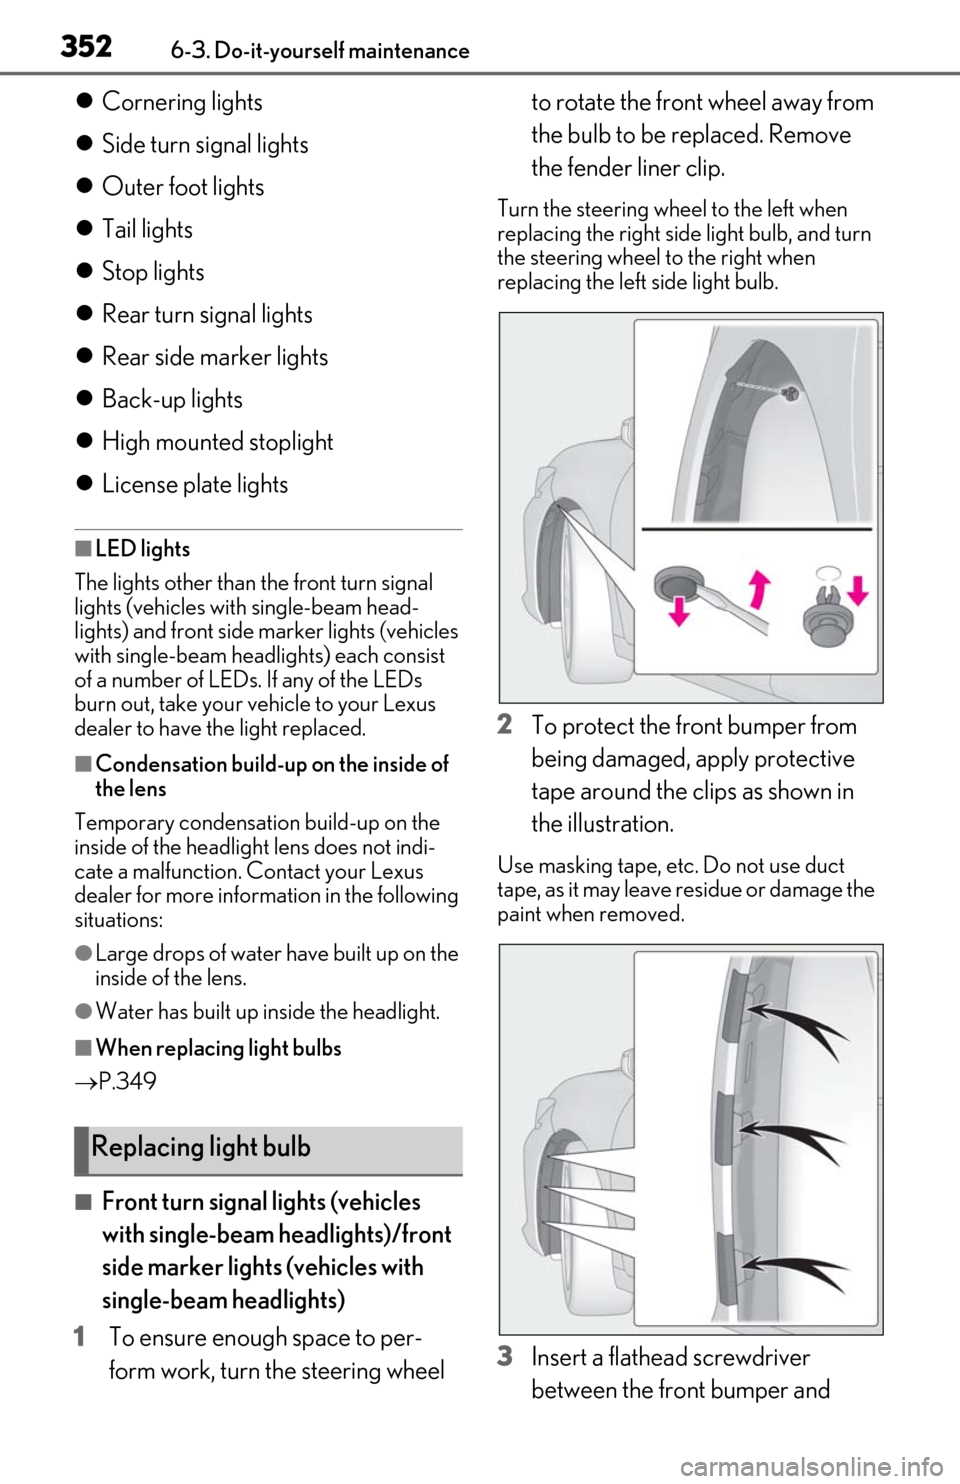
1 To ensure enough space to per-
form work, turn the steering wheel to rotate the front wheel away from
the bulb to be replaced. Remove
the fender liner clip.
Turn the steering wheel to the left when
replacing the right side light bulb, and turn
the steering wheel to the right when
replacing the left side light bulb.
2
To protect the front bumper from
being damaged, apply protective
tape around the clips as shown in
the illustration.
Use masking tape, etc. Do not use duct
tape, as it may leave residue or damage the
paint when removed.
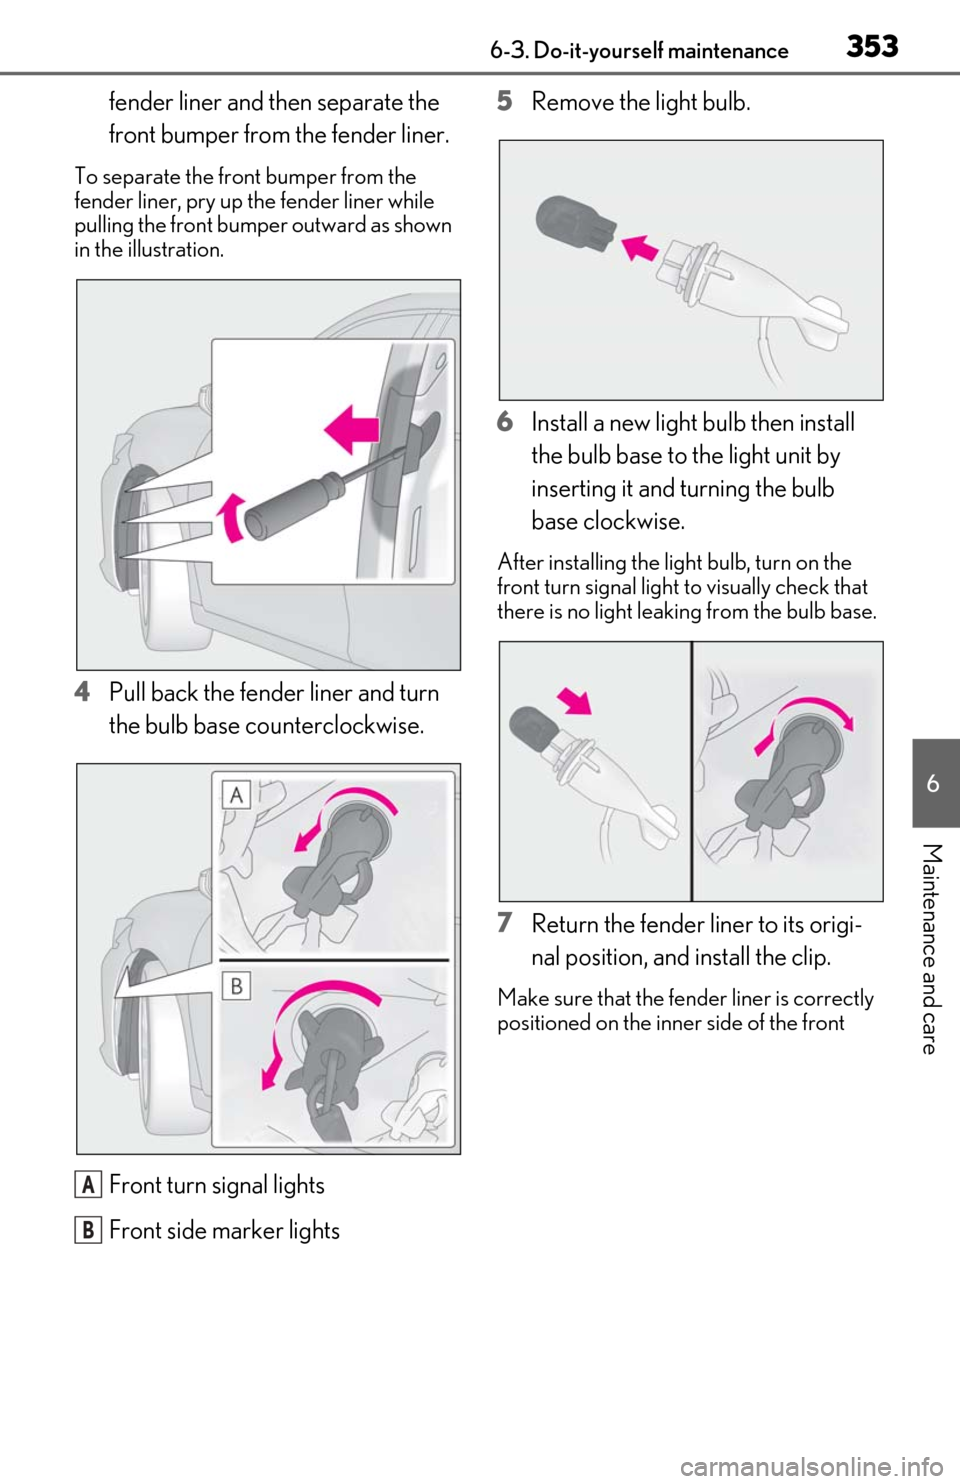
3Insert a flathead screwdriver
between the front bumper and
Replacing light bulb
Page 355 of 462

3536-3. Do-it-yourself maintenance
6
Maintenance and care
fender liner and then separate the
front bumper from the fender liner.
To separate the front bumper from the
fender liner, pry up the fender liner while
pulling the front bumper outward as shown
in the illustration.
4Pull back the fender liner and turn
the bulb base counterclockwise.
Front turn signal lights
Front side marker lights 5
Remove the light bulb.
6 Install a new light bulb then install
the bulb base to the light unit by
inserting it and turning the bulb
base clockwise.
After installing the light bulb, turn on the
front turn signal light to visually check that
there is no light leaking from the bulb base.
7 Return the fender liner to its origi-
nal position, and install the clip.
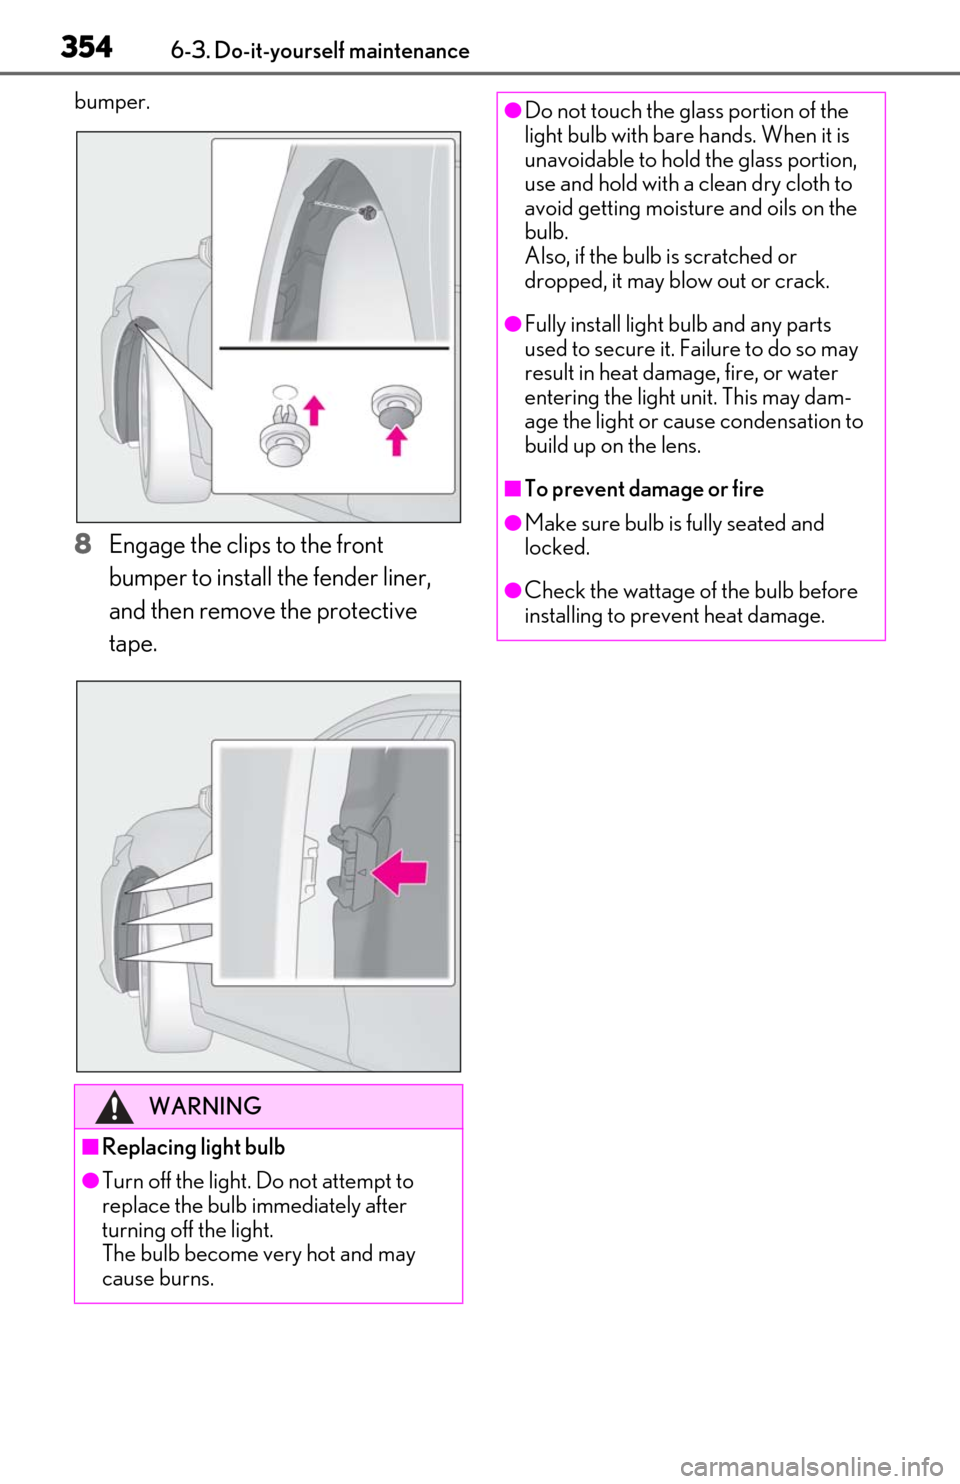
Make sure that the fend er liner is correctly
positioned on the inner side of the front
A
B
Page 356 of 462

3546-3. Do-it-yourself maintenance
bumper.
8Engage the clips to the front
bumper to install the fender liner,
and then remove the protective
tape.
WARNING
■Replacing light bulb
●Turn off the light. Do not attempt to
replace the bulb immediately after
turning off the light.
The bulb become very hot and may
cause burns.
●Do not touch the glass portion of the
light bulb with bare hands. When it is
unavoidable to hold the glass portion,
use and hold with a clean dry cloth to
avoid getting moisture and oils on the
bulb.
Also, if the bulb is scratched or
dropped, it may blow out or crack.
●Fully install light bulb and any parts
used to secure it. Failure to do so may
result in heat damage, fire, or water
entering the light unit. This may dam-
age the light or cause condensation to
build up on the lens.
■To prevent damage or fire
●Make sure bulb is fully seated and
locked.
●Check the wattage of the bulb before
installing to prevent heat damage.