rear view mirror Lexus ES300h 2020 User Guide
[x] Cancel search | Manufacturer: LEXUS, Model Year: 2020, Model line: ES300h, Model: Lexus ES300h 2020Pages: 462, PDF Size: 9.98 MB
Page 122 of 462
1203-3. Adjusting the seats
and then close the driver’s door.
If 2 or more keys are in the vehicle, the
driving position cannot be recorded
properly.
1Check that the shift lever is in P.
2 Turn the power switch to ON
mode.
3 Recall the driving position that you
want to record.
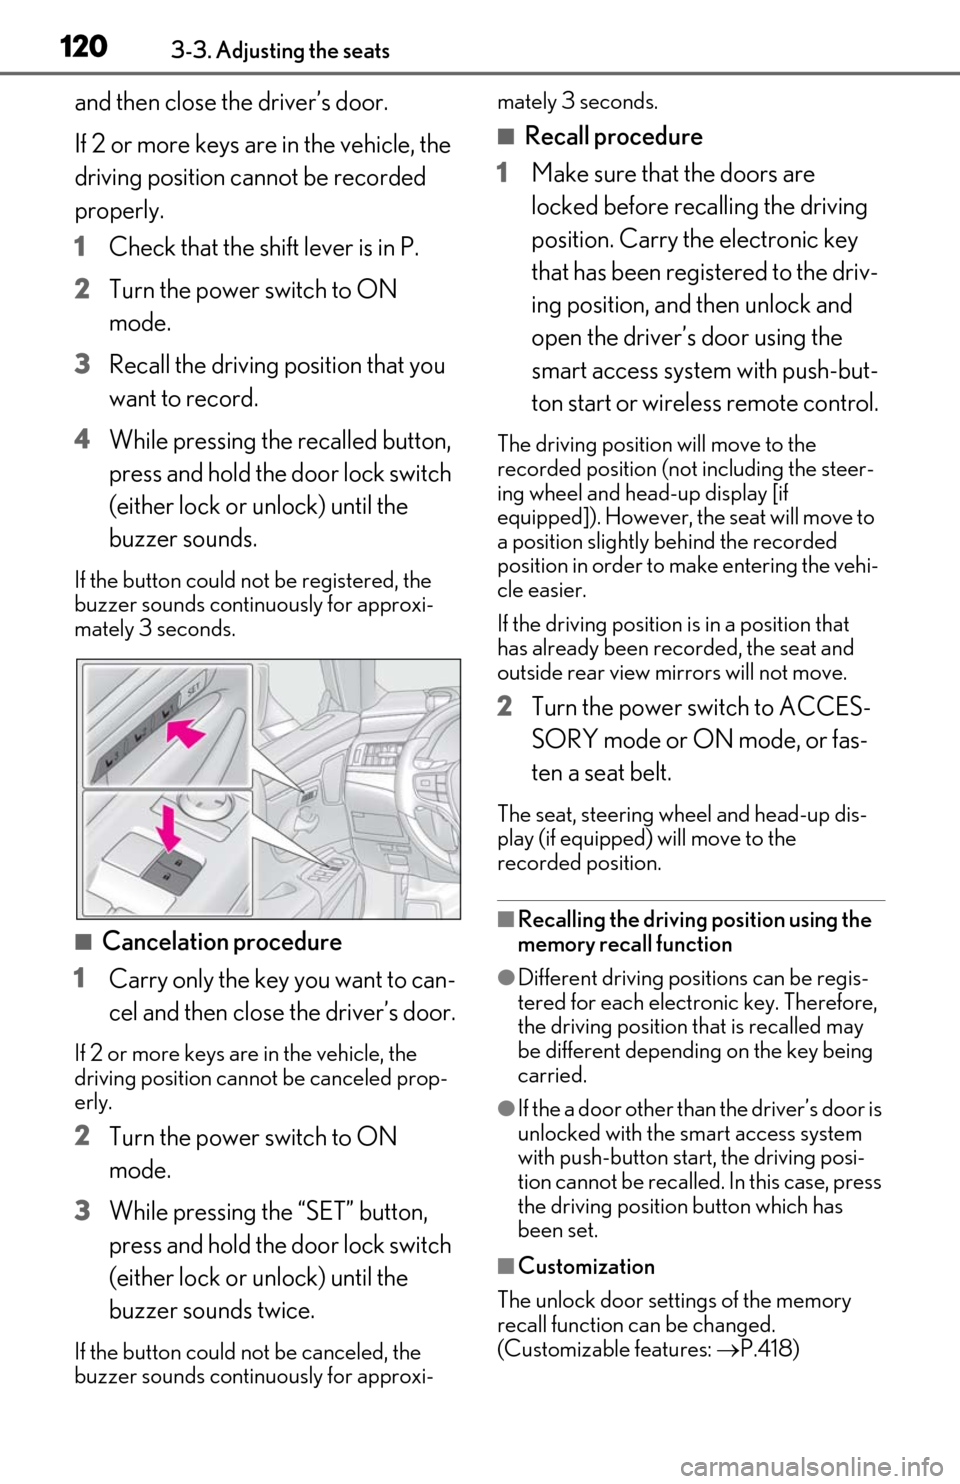
4 While pressing the recalled button,
press and hold the door lock switch
(either lock or unlock) until the
buzzer sounds.
If the button could not be registered, the
buzzer sounds continuously for approxi-
mately 3 seconds.
■Cancelation procedure
1 Carry only the key you want to can-
cel and then close the driver’s door.
If 2 or more keys are in the vehicle, the
driving position cannot be canceled prop-
erly.
2Turn the power switch to ON
mode.
3 While pressing the “SET” button,
press and hold the door lock switch
(either lock or unlock) until the
buzzer sounds twice.
If the button could not be canceled, the
buzzer sounds continuously for approxi- mately 3 seconds.
■Recall procedure
1 Make sure that the doors are
locked before recalling the driving
position. Carry the electronic key
that has been registered to the driv-
ing position, and then unlock and
open the driver’s door using the
smart access system with push-but-
ton start or wireless remote control.
The driving position will move to the
recorded position (not including the steer-
ing wheel and head-up display [if
equipped]). However, the seat will move to
a position slightly behind the recorded
position in order to make entering the vehi-
cle easier.
If the driving position is in a position that
has already been recorded, the seat and
outside rear view mirrors will not move.
2Turn the power switch to ACCES-
SORY mode or ON mode, or fas-
ten a seat belt.
The seat, steering wheel and head-up dis-
play (if equipped) will move to the
recorded position.
■Recalling the driving position using the
memory recall function
●Different driving positions can be regis-
tered for each electronic key. Therefore,
the driving position that is recalled may
be different depending on the key being
carried.
●If the a door other than the driver’s door is
unlocked with the smart access system
with push-button start, the driving posi-
tion cannot be recalled. In this case, press
the driving position button which has
been set.
■Customization
The unlock door sett ings of the memory
recall function can be changed.
(Customizable features: P.418)
Page 126 of 462
1243-4. Adjusting the steering wheel and mirrors
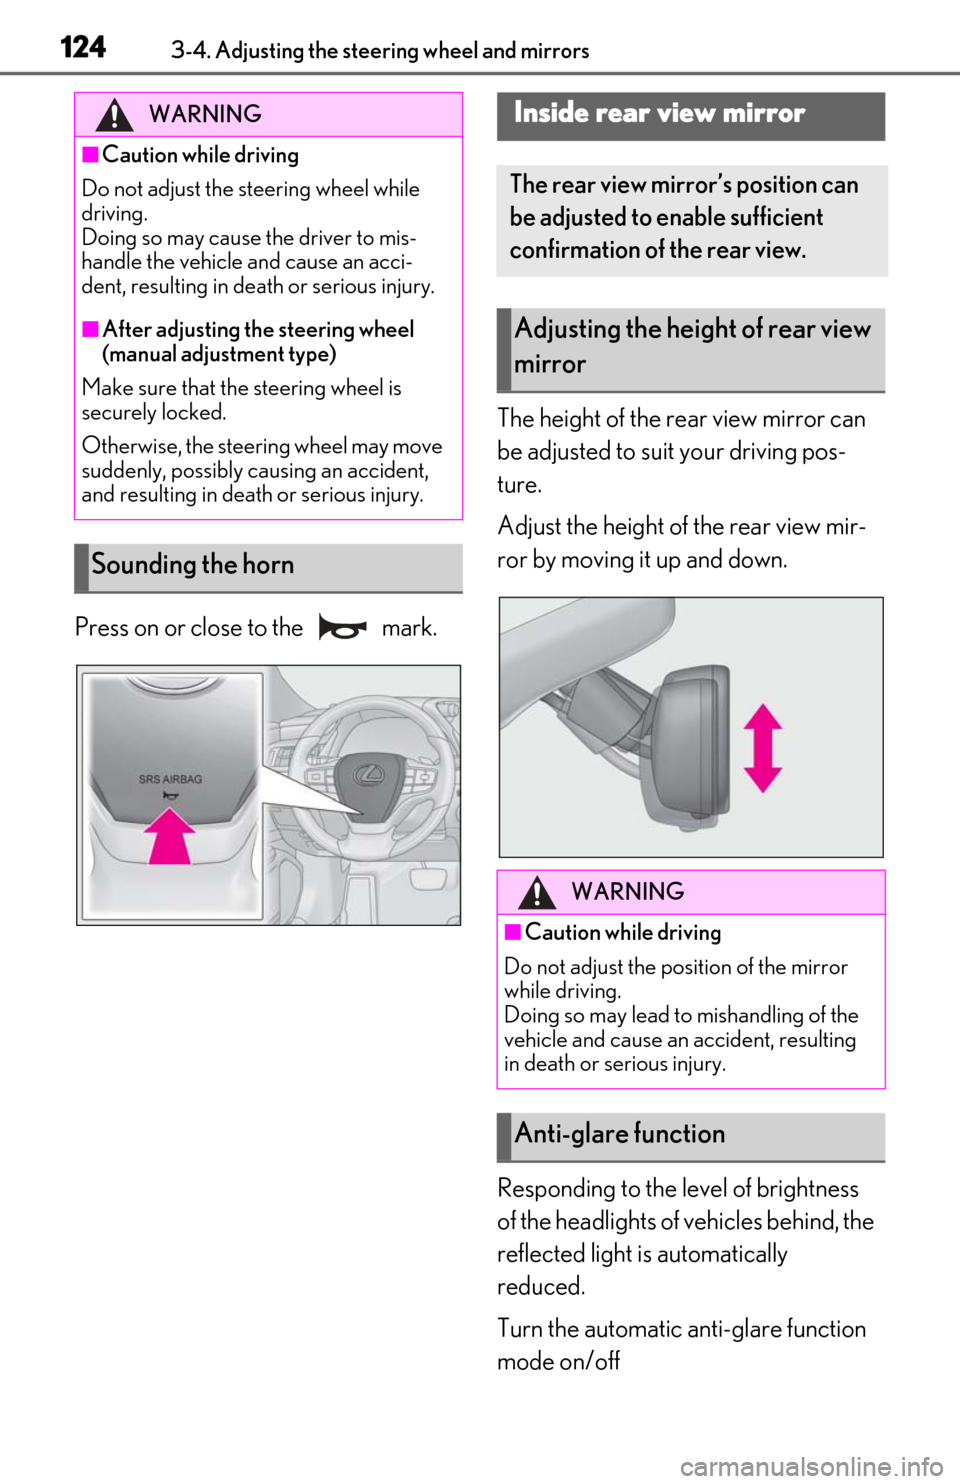
Press on or close to the mark.The height of the rear view mirror can
be adjusted to suit your driving pos-
ture.
Adjust the height of the rear view mir-
ror by moving it up and down.
Responding to the level of brightness
of the headlights of vehicles behind, the
reflected light is automatically
reduced.
Turn the automatic anti-glare function
mode on/off
WARNING
■Caution while driving
Do not adjust the steering wheel while
driving.
Doing so may cause the driver to mis-
handle the vehicle and cause an acci-
dent, resulting in death or serious injury.
■After adjusting the steering wheel
(manual adjustment type)
Make sure that the steering wheel is
securely locked.
Otherwise, the steering wheel may move
suddenly, possibly causing an accident,
and resulting in death or serious injury.
Sounding the horn
Inside rear view mirror
The rear view mirror’s position can
be adjusted to enable sufficient
confirmation of the rear view.
Adjusting the heig ht of rear view
mirror
WARNING
■Caution while driving
Do not adjust the position of the mirror
while driving.
Doing so may lead to mishandling of the
vehicle and cause an accident, resulting
in death or serious injury.
Anti-glare function
Page 127 of 462
1253-4. Adjusting the steering wheel and mirrors
3
Before driving
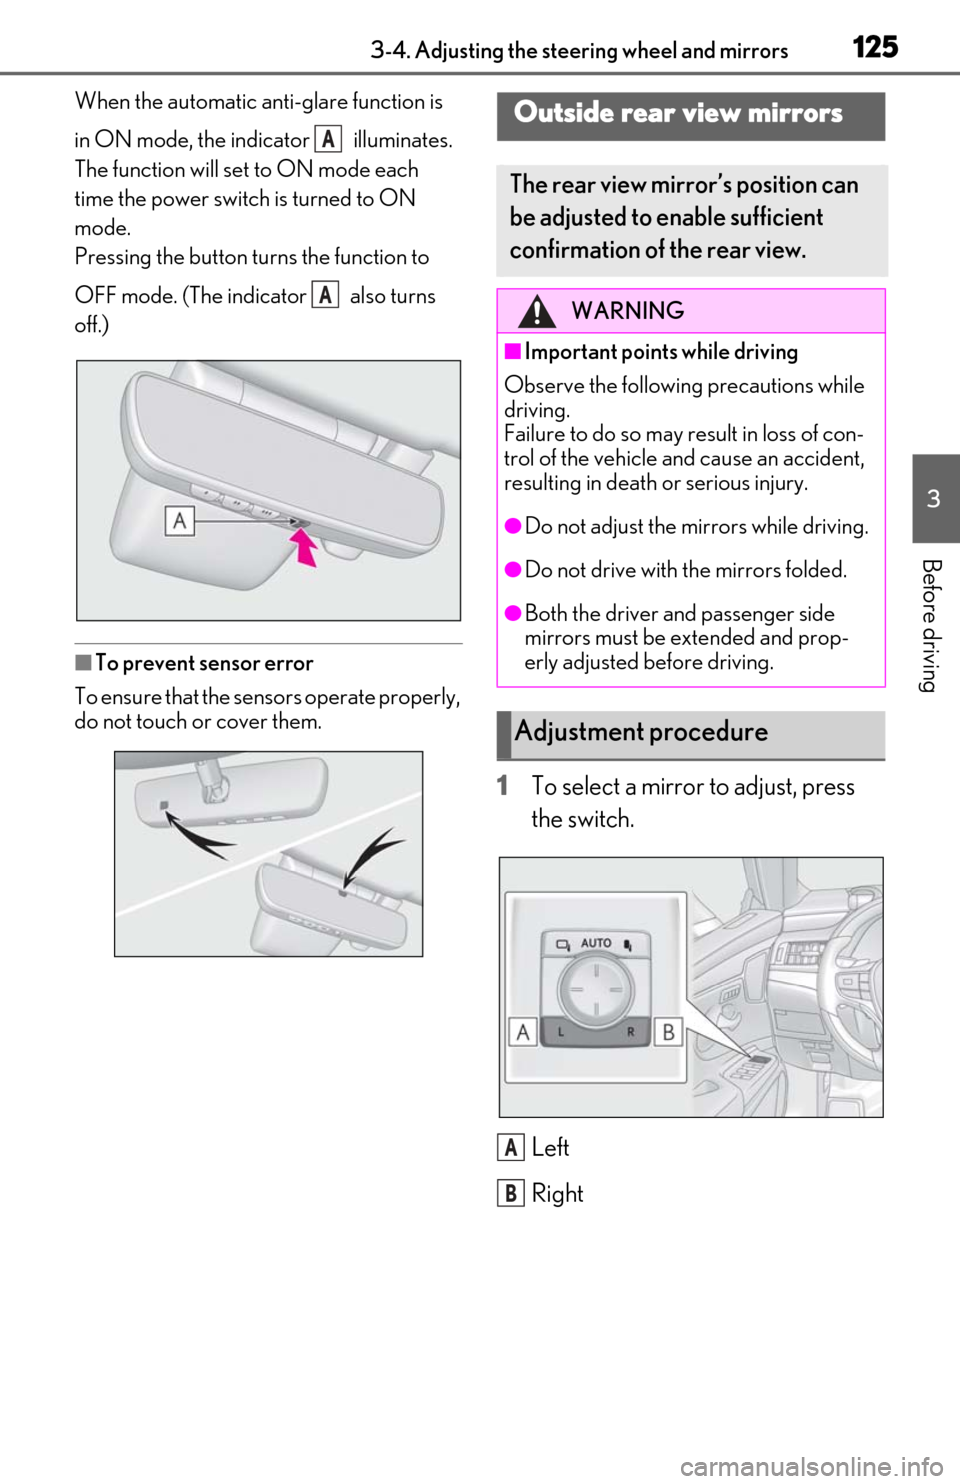
When the automatic anti-glare function is
in ON mode, the indicator illuminates.
The function will set to ON mode each
time the power switch is turned to ON
mode.
Pressing the button turns the function to
OFF mode. (The indicator also turns
off.)
■To prevent sensor error
To ensure that the sensors operate properly,
do not touch or cover them.
1To select a mirror to adjust, press
the switch.
Left
Right
A
A
Outside rear view mirrors
The rear view mirror’s position can
be adjusted to enable sufficient
confirmation of the rear view.
WARNING
■Important points while driving
Observe the following precautions while
driving.
Failure to do so may result in loss of con-
trol of the vehicle and cause an accident,
resulting in death or serious injury.
●Do not adjust the mirrors while driving.
●Do not drive with the mirrors folded.
●Both the driver and passenger side
mirrors must be extended and prop-
erly adjusted before driving.
Adjustment procedure
A
B
Page 128 of 462
1263-4. Adjusting the steering wheel and mirrors
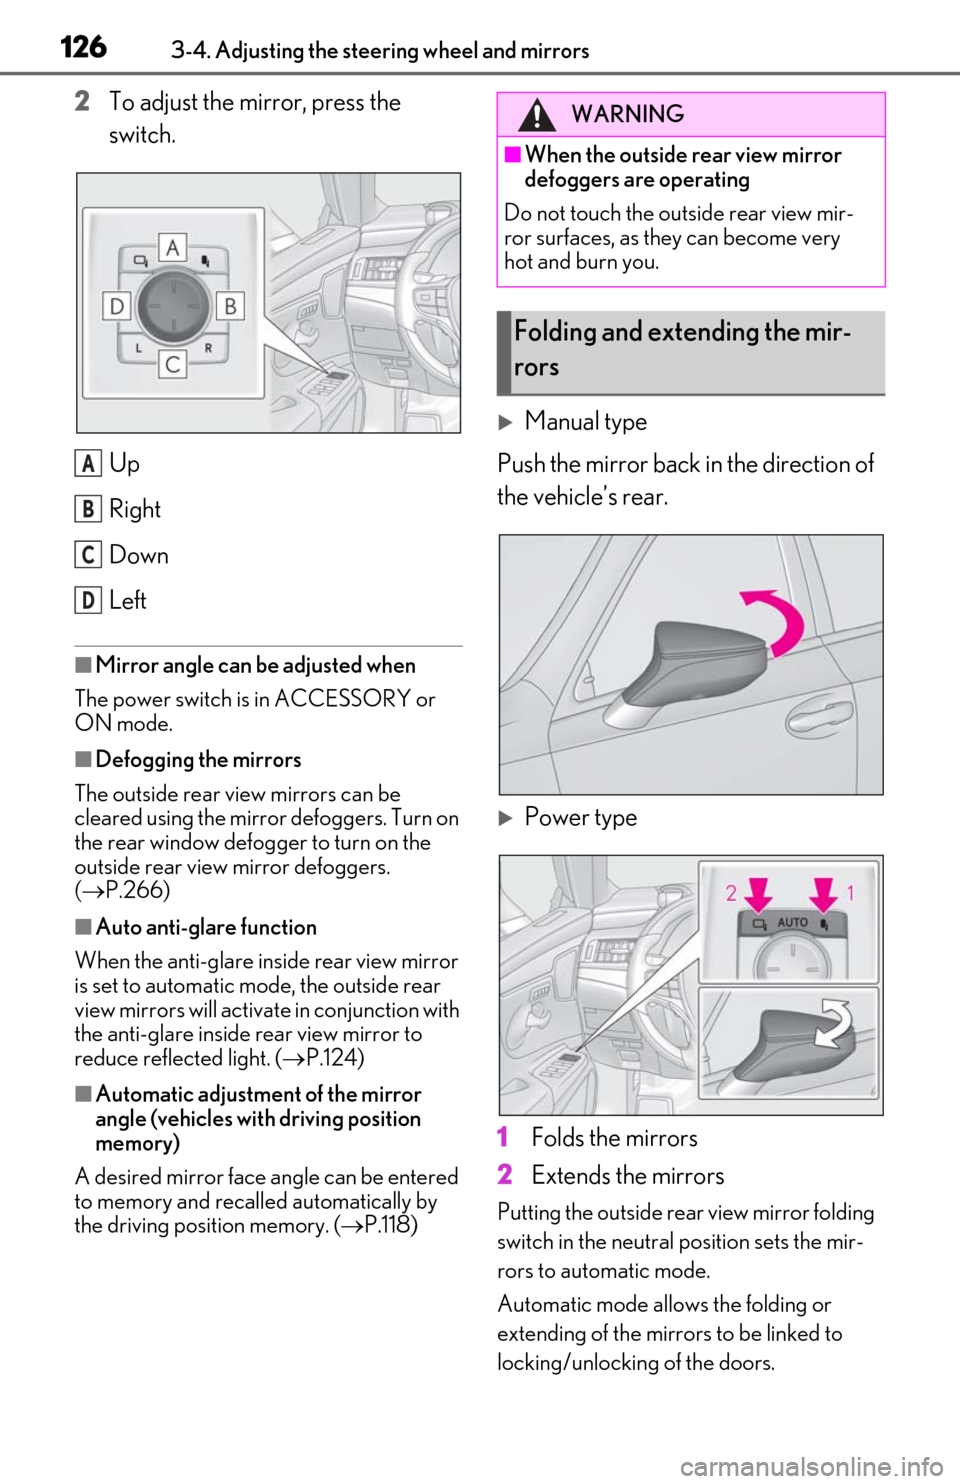
2To adjust the mirror, press the
switch.
Up
Right
Down
Left
■Mirror angle can be adjusted when
The power switch is in ACCESSORY or
ON mode.
■Defogging the mirrors
The outside rear view mirrors can be
cleared using the mirror defoggers. Turn on
the rear window defogger to turn on the
outside rear view mirror defoggers.
( P.266)
■Auto anti-glare function
When the anti-glare insi de rear view mirror
is set to automatic mode, the outside rear
view mirrors will activate in conjunction with
the anti-glare inside rear view mirror to
reduce reflected light. ( P.124)
■Automatic adjustment of the mirror
angle (vehicles with driving position
memory)
A desired mirror face angle can be entered
to memory and recalled automatically by
the driving position memory. ( P.118)
Manual type
Push the mirror back in the direction of
the vehicle’s rear.
Power type
1
Folds the mirrors
2
Extends the mirrors
Putting the outside rear view mirror folding
switch in the neutral position sets the mir-
rors to automatic mode.
Automatic mode allows the folding or
extending of the mirrors to be linked to
locking/unlocking of the doors.
A
B
C
D
WARNING
■When the outside rear view mirror
defoggers are operating
Do not touch the outside rear view mir-
ror surfaces, as they can become very
hot and burn you.
Folding and extending the mir-
rors
Page 129 of 462
1273-4. Adjusting the steering wheel and mirrors
3
Before driving
■Using automatic mode in cold weather
(power type)
When automatic mode is used in cold
weather, the door mirror could freeze up
and automatic stowing and return may not
be possible. In this case, remove any ice and
snow from the door mirror, then either
operate the mirror using manual mode or
move the mirror by hand.
■Customization
The automatic mirror fo lding and extending
operation can be changed.
(Customizable features: P.418)
When the mirror select switch is in the
“L” or “R” position, the outside rear
view mirrors will automatically angle
downwards when the vehicle is revers-
ing in order to give a better view of the
ground.
To disable this function, move the mir-
ror select switch to the neutral position
(between “L” or “R”).
■Adjusting the mirror angle when
the vehicle is reversing
With the shift lever in R, adjust the mir-
ror angle at a desired position. The
adjusted angle will be memorized and
the mirror will automatically tilt to the
memorized angle whenever the shift
lever is shifted to R from next time.
The memorized downward tilt position of
the mirror is linked to the normal position
(angle adjusted with th e shift lever in other
than R). Therefore, if the normal position is
changed after adjustment, the tilt position
will also change.
When the normal position is changed,
readjust the angle in reversing.
WARNING
■When a mirror is moving
To avoid personal injury and mirror mal-
function, be careful not to get your hand
caught by the moving mirror.
Linked mirror function when
reversing (vehicles with driving
position memory)
Page 138 of 462

1364-1. Before driving
WARNING
●During normal driving, do not turn off
the hybrid system. Turning the hybrid
system off while driving will not cause
loss of steering or braking control,
however, power assist to the steering
will be lost. This will make it more diffi-
cult to steer smoothly, so you should
pull over and stop the vehicle as soon
as it is safe to do so.
In the event of an emergency, such as if
it becomes impossible to stop the vehi-
cle in the normal way: P.356
●Use engine braking (downshift) to
maintain a safe speed when driving
down a steep hill.
Using the brakes continuously may
cause the brakes to overheat and lose
effectiveness. ( P.150)
●Do not adjust the positions of the
steering wheel, the seat, or the inside
or outside rear view mirrors while driv-
ing.
Doing so may result in a loss of vehicle
control.
●Always check that all passengers’
arms, heads or other parts of their
body are not outside the vehicle.
●Do not drive in excess of the speed
limit. Even if the legal speed limit per-
mits it, do not drive over 85 mph (140
km/h) unless your vehicle has high-
speed capability tires. Driving over 85
mph (140 km/h) may result in tire fail-
ure, loss of control and possible injury.
Be sure to consult a tire dealer to
determine whether the tires on your
vehicle are high-speed capability tires
or not before driving at such speeds.
■When driving on slippery road sur-
faces
●Sudden braking, acceleration and
steering may cause tire slippage and
reduce your ability to control the vehi-
cle.
●Sudden acceleration, engine braking
due to shifting, or changes in engine
speed could cause the vehicle to skid,
resulting in an accident.
●After driving through a puddle, lightly
depress the brake pedal to make sure
that the brakes are functioning prop-
erly. Wet brake pads may prevent the
brakes from functioning properly. If the
brakes on only one side are wet and
not functioning properly, steering con-
trol may be affected.
■When shifting the shift lever
●Do not let the vehicle roll backward
while the shift lever is in a driving posi-
tion, or roll forward while the shift lever
is in R.
Doing so may result in an accident or
damage to the vehicle.
●Do not shift the shif t lever to P while
the vehicle is moving.
Doing so can damage the transmission
and may result in a loss of vehicle con-
trol.
●Do not shift the shift lever to R while
the vehicle is moving forward.
Doing so can damage the transmission
and may result in a loss of vehicle con-
trol.
●Do not shift the shift lever to a driving
position while the vehicle is moving
backward.
Doing so can damage the transmission
and may result in a loss of vehicle con-
trol.
●Shifting the shift lever to N while the
vehicle is moving will disengage the
hybrid system. Engine braking is not
available when N is selected.
●Be careful not to shift the shift lever
with the accelerator pedal depressed.
Shifting the shift lever to a gear other
than P or N may lead to unexpected
rapid acceleration of the vehicle that
may cause an accident and result in
death or serious injury.
Page 176 of 462

1744-5. Using the driving support systems
WARNING
●If the part of the windshield in front of
the front camera is fogged up or cov-
ered with condensation, or ice, use the
windshield defogger to remove the
fog, condensation, or ice. (P.266)
●If water droplets cannot be properly
removed from the area of the wind-
shield in front of the front camera by
the windshield wipers, replace the
wiper insert or wiper blade.
If the wiper inserts or wiper blades
need to be replaced, contact your
Lexus dealer.
●Do not attach window tint to the wind-
shield.
●Replace the windshield if it is damaged
or cracked.
If the windshield needs to be replaced,
contact your Lexus dealer.
●Do not allow liquids to contact the
front camera.
●Do not allow bright lights to shine into
the front camera.
●Do not dirty or damage the front cam-
era.
When cleaning the inside of the wind-
shield, do not allow glass cleaner to
contact the lens of the front camera.
Also, do not touch the lens.
If the lens is dirty or damaged, contact
your Lexus dealer.
●Do not subject the front camera to a
strong impact.
●Do not change the installation position
or direction of the front camera or
remove it.
●Do not disassemble the front camera.
●Do not modify any components of the
vehicle around the front camera
(inside rear view mirror, etc.) or ceiling.
●Do not attach any accessories to the
hood, front grille or front bumper that
may obstruct the front camera. Con-
tact your Lexus dealer for details.
●If a surfboard or other long object is to
be mounted on the roof, make sure
that it will not obstruct the front cam-
era.
●Do not modify the headlights or other
lights.
Page 208 of 462
2064-5. Using the driving support systems
*: If equipped
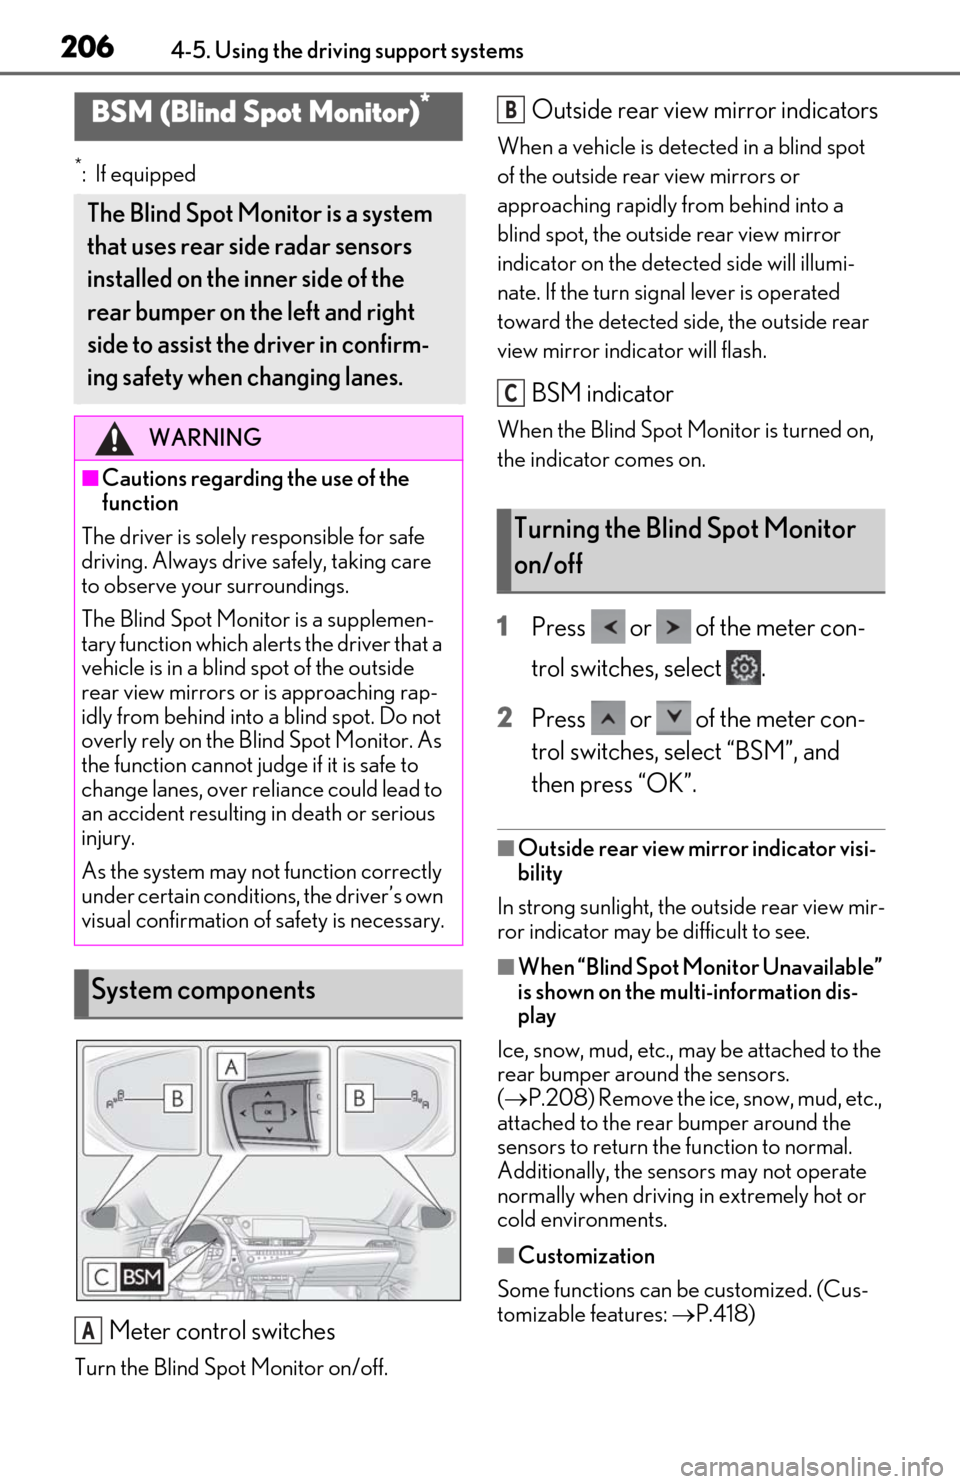
Meter control switches
Turn the Blind Spot Monitor on/off.
Outside rear view mirror indicators
When a vehicle is detected in a blind spot
of the outside rear view mirrors or
approaching rapidly from behind into a
blind spot, the outside rear view mirror
indicator on the detected side will illumi-
nate. If the turn signal lever is operated
toward the detected side, the outside rear
view mirror indicator will flash.
BSM indicator
When the Blind Spot Monitor is turned on,
the indicator comes on.
1Press or of the meter con-
trol switches, select .
2
Press or of the meter con-
trol switches, select “BSM”, and
then press “OK”.
■Outside rear view mirror indicator visi-
bility
In strong sunlight, the outside rear view mir-
ror indicator may be difficult to see.
■When “Blind Spot Monitor Unavailable”
is shown on the multi-information dis-
play
Ice, snow, mud, etc., may be attached to the
rear bumper around the sensors.
( P.208) Remove the ice, snow, mud, etc.,
attached to the rear bumper around the
sensors to return the function to normal.
Additionally, the sensors may not operate
normally when driving in extremely hot or
cold environments.
■Customization
Some functions can be customized. (Cus-
tomizable features: P.418)
BSM (Blind Spot Monitor)*
The Blind Spot Monitor is a system
that uses rear side radar sensors
installed on the inner side of the
rear bumper on the left and right
side to assist the driver in confirm-
ing safety when changing lanes.
WARNING
■Cautions regarding the use of the
function
The driver is solely responsible for safe
driving. Always driv e safely, taking care
to observe your surroundings.
The Blind Spot Monitor is a supplemen-
tary function which alerts the driver that a
vehicle is in a blind spot of the outside
rear view mirrors or is approaching rap-
idly from behind into a blind spot. Do not
overly rely on the Blind Spot Monitor. As
the function cannot judge if it is safe to
change lanes, over reliance could lead to
an accident resulting in death or serious
injury.
As the system may not function correctly
under certain conditions, the driver’s own
visual confirmation of safety is necessary.
System components
A
Turning the Blind Spot Monitor
on/off
B
C
Page 212 of 462
2104-5. Using the driving support systems
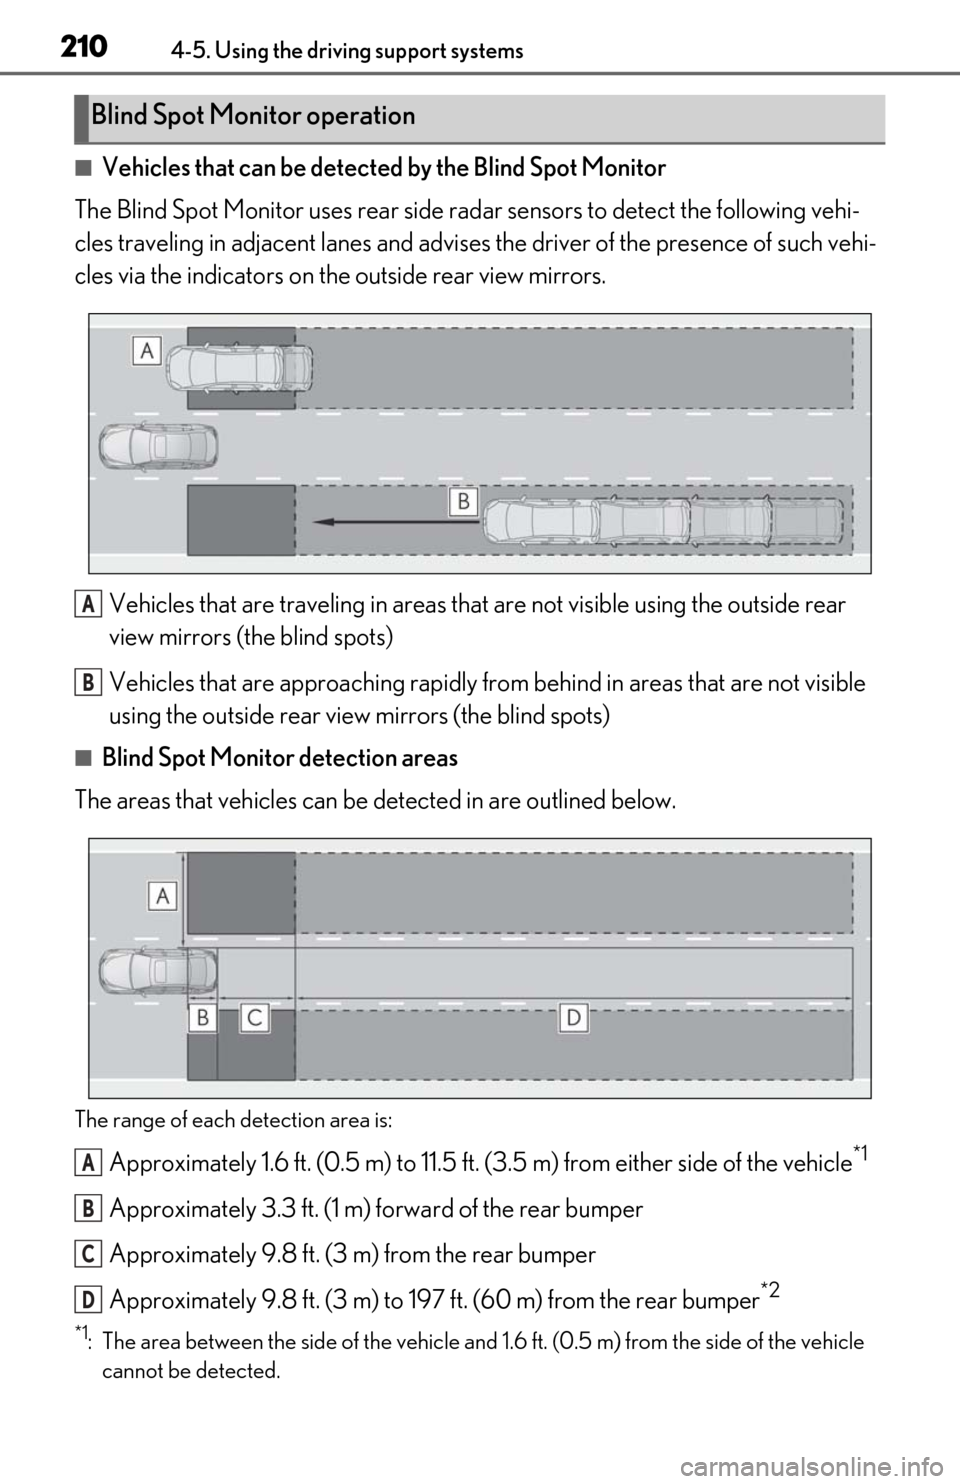
■Vehicles that can be detected by the Blind Spot Monitor
The Blind Spot Monitor uses rear side ra dar sensors to detect the following vehi-
cles traveling in adjacent lanes and advises the driver of the presence of such vehi-
cles via the indicators on th e outside rear view mirrors.
Vehicles that are traveling in areas that are not visible using the outside rear
view mirrors (the blind spots)
Vehicles that are approaching rapidly from behind in areas that are not visible
using the outside rear view mirrors (the blind spots)
■Blind Spot Monitor detection areas
The areas that vehicles can be detected in are outlined below.
The range of each detection area is:
Approximately 1.6 ft. (0.5 m) to 11.5 ft. (3.5 m) from either side of the vehicle*1
Approximately 3.3 ft. (1 m) forward of the rear bumper
Approximately 9.8 ft. (3 m) from the rear bumper
Approximately 9.8 ft. (3 m) to 19 7 ft. (60 m) from the rear bumper
*2
*1: The area between the side of the vehicle and 1.6 ft. (0.5 m) from the side of the vehicle
cannot be detected.
Blind Spot Monitor operation
A
B
A
B
C
D
Page 213 of 462

2114-5. Using the driving support systems
4
Driving
*2: The greater the difference in speed between your vehicle and the detected vehicle is, the farther away the vehicle will be detected, causing the outside rear view mirror indi-
cator to illuminate or flash.
■The Blind Spot Monitor is operational
when
The Blind Spot Monitor is operational when
all of the following conditions are met:
●The Blind Spot Monitor is on.
●The shift lever is in a position other than R.
●The vehicle speed is greater than approx-
imately 10 mph (16 km/h).
■The Blind Spot Monitor will detect a
vehicle when
The Blind Spot Monitor will detect a vehicle
present in the detection area in the follow-
ing situations:
●A vehicle in an adj acent lane overtakes
your vehicle.
●You overtake a vehicle in adjacent lane
slowly.
●Another vehicle enters the detection
area when it changes lanes.
■Conditions under wh ich the Blind Spot
Monitor will not detect a vehicle
The Blind Spot Monitor is not designed to
detect the following types of vehicles and/or
objects:
●Small motorcycles, bicycles, pedestrians,
etc.*
●Vehicles traveling in the opposite direc-
tion
●Guardrails, walls, signs, parked vehicles
and similar stationary objects*
●Following vehicles th at are in the same
lane*
●Vehicles traveling 2 lanes away from your
vehicle*
●Vehicles which are being overtaken rap-
idly by your vehicle.*
*
: Depending on the conditions, detection of a vehicle and/or object may occur.
■Conditions under which the Blind Spot
Monitor may not function correctly
●The Blind Spot Monitor may not detect
vehicles correctly in the following situa-
tions:
• When the sensor is misaligned due to a strong impact to the sensor or its sur-
rounding area
• When mud, snow, ice, a sticker, etc. is covering the sensor or surrounding area
on the rear bumper
• When driving on a road surface that is wet with standing water during bad
weather, such as heavy rain, snow, or fog
• When multiple vehicles are approaching with only a small gap between each vehi-
cle
• When the distance between your vehicle and a following vehicle is short
• When there is a significant difference in
speed between your vehicle and the vehi-
cle that enters the detection area
• When the difference in speed between
your vehicle and another vehicle is
changing
• When a vehicle enters a detection area
traveling at about the same speed as your
vehicle
• As your vehicle starts from a stop, a vehi-
cle remains in the detection area
• When driving up and down consecutive steep inclines, such as hills, dips in the
road, etc.
• When driving on roads with sharp bends, consecutive curves, or uneven surfaces
• When vehicle lanes are wide, or when driving on the edge of a lane, and the
vehicle in an adjacent lane is far away
from your vehicle
• When an accessory (such as a bicycle carrier) or towing eyelet is installed to the
rear of the vehicle
• When there is a significant difference in height between your vehicle and the
vehicle that enters the detection area
• Immediately after the Blind Spot Monitor is turned on
●Instances of the Blind Spot Monitor
unnecessarily detecting a vehicle and/or