Lexus ES300h 2020 Owner's Manual
Manufacturer: LEXUS, Model Year: 2020, Model line: ES300h, Model: Lexus ES300h 2020Pages: 462, PDF Size: 9.98 MB
Page 341 of 462
3396-3. Do-it-yourself maintenance
6
Maintenance and care
more than 1 mile or 1.5 km, you will get an
accurate cold tire inflation pressure read-
ing.
●Always use a tire pressure gauge.
It is difficult to judge if a tire is properly
inflated based only on its appearance.
●It is normal for the tire inflation pressure
to be higher after driving as heat is gen-
erated in the tire. Do not reduce tire infla-
tion pressure after driving.
●Never exceed the vehicle capacity
weight.
Passengers and luggage weight should
be placed so that the vehicle is balanced.
WARNING
■Proper inflation is critical to save tire
performance
Keep your tires properly inflated.
If the tires are not properly inflated, the
following conditions may occur which
could lead to an accident resulting in
death or serious injury:
●Excessive wear
●Uneven wear
●Poor handling
●Possibility of blowouts resulting from
overheated tires
●Air leaking from between tire and
wheel
●Wheel deformation and/or tire dam-
age
●Greater possibility of tire damage
while driving (due to road hazards,
expansion joints, sharp edges in the
road, etc.)
NOTICE
■When inspecting and adjusting tire
inflation pressure
Be sure to put the tire valve caps back on.
If a valve cap is not installed, dirt or mois-
ture may get into the valve and cause an
air leak, resulting in decreased tire infla-
tion pressure.
Page 342 of 462
3406-3. Do-it-yourself maintenance
When replacing wheels, care should
be taken to ensure that they are equiv-
alent to those removed in load capac-
ity, diameter, rim width and inset
*.
Replacement wheels are available at
your Lexus dealer.
*: Conventionally referred to as offset.
Lexus does not recommend using the
following:
Wheels of different sizes or types
Used wheels
Bent wheels that have been straight-
ened
■When replacing wheels
The wheels of your vehicle are equipped
with tire pressure warning valves and trans-
mitters that allow the tire pressure warning
system to provide advance warning in the
event of a loss in tire inflation pressure.
Whenever wheels are replaced, tire pres-
sure warning valves an d transmitters must
be installed. ( P.333) Use only Lexus wheel nuts and
wrenches designed for use with
your aluminum wheels.
When rotating, repairing or chang-
ing your tires, check that the wheel
nuts are still tight after driving 1000
miles (1600 km).
Vehicles with 17-inch tires: Be care-
ful not to damage the aluminum
wheels when using tire chains.
Use only Lexus genuine balance
weights or equivalent and a plastic
or rubber hammer when balancing
Wheels
If a wheel is bent, cracked or heavily
corroded, it should be replaced.
Otherwise, the tire may separate
from the wheel or cause a loss of
handling control.
Wheel selection
WARNING
■When replacing wheels
●Do not use wheels that are a different
size from those recommended in the
Owner’s Manual, as this may result in a
loss of handling control.
●Never use an inner tube in a leaking
wheel which is designed for a tubeless
tire. Doing so may result in an acci-
dent, causing death or serious injury.
■Use of defective wheels prohibited
Do not use cracked or deformed wheels.
Doing so could cause the tire to leak air
during driving, possibly causing an acci-
dent.
NOTICE
■Replacing tire pressure warning
valves and transmitters
●Because tire repair or replacement
may affect the tire pressure warning
valves and transmitters, make sure to
have tires serviced by your Lexus
dealer or other qua lified service shop.
In addition, make sure to purchase
your tire pressure warning valves and
transmitters at your Lexus dealer.
●Ensure that only genuine Lexus wheels
are used on your vehicle.
Tire pressure warning valves and trans-
mitters may not work properly with
non-genuine wheels.
Aluminum wheel precautions
Page 343 of 462
3416-3. Do-it-yourself maintenance
6
Maintenance and care
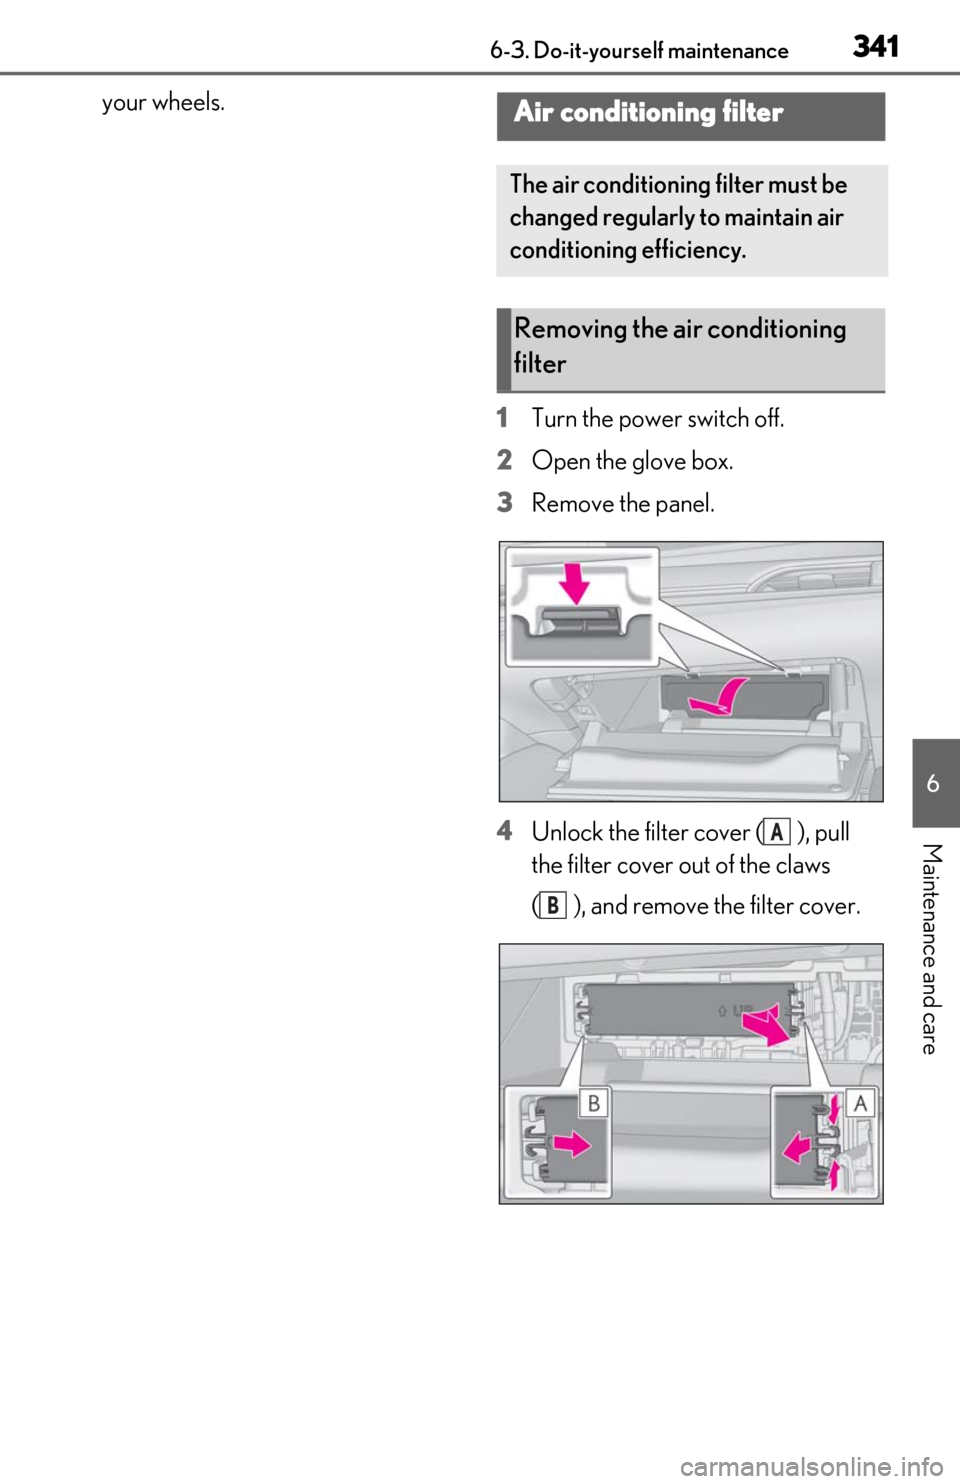
your wheels.1Turn the power switch off.
2 Open the glove box.
3 Remove the panel.
4 Unlock the filter cover ( ), pull
the filter cover out of the claws
( ), and remove the filter cover.Air conditioning filter
The air conditioning filter must be
changed regularly to maintain air
conditioning efficiency.
Removing the air conditioning
filter
A
B
Page 344 of 462
3426-3. Do-it-yourself maintenance
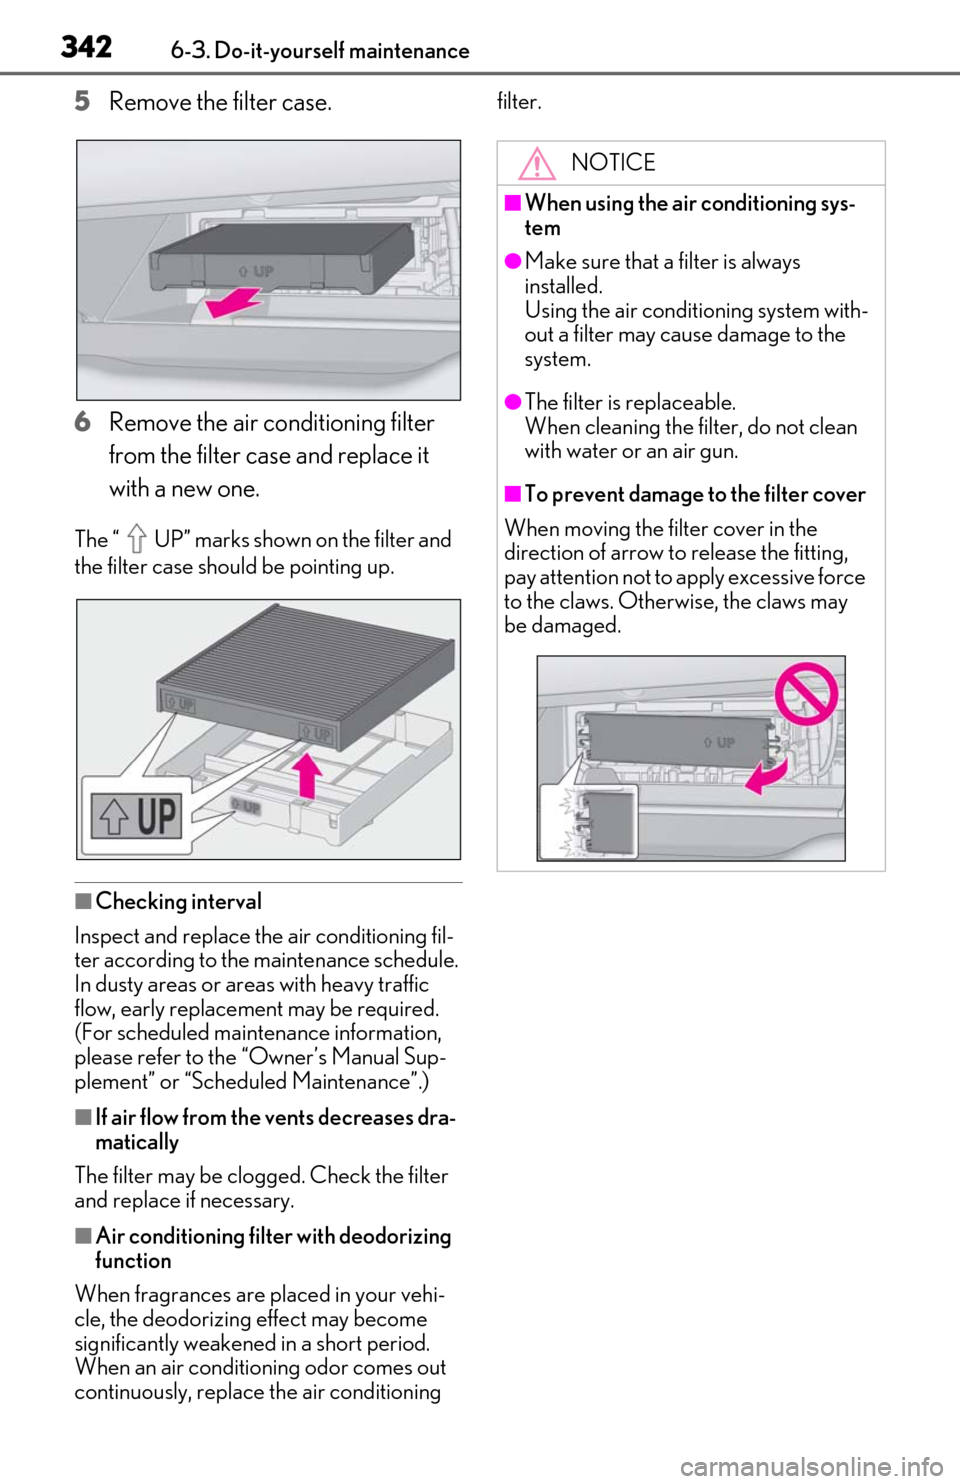
5Remove the filter case.
6
Remove the air conditioning filter
from the filter case and replace it
with a new one.
The “ UP” marks shown on the filter and
the filter case shou ld be pointing up.
■Checking interval
Inspect and replace the air conditioning fil-
ter according to the maintenance schedule.
In dusty areas or area s with heavy traffic
flow, early replacement may be required.
(For scheduled mainte nance information,
please refer to the “Owner’s Manual Sup-
plement” or “Scheduled Maintenance”.)
■If air flow from th e vents decreases dra-
matically
The filter may be clogged. Check the filter
and replace if necessary.
■Air conditioning filter with deodorizing
function
When fragrances are placed in your vehi-
cle, the deodorizing effect may become
significantly weakened in a short period.
When an air conditioning odor comes out
continuously, replace the air conditioning filter.
NOTICE
■When using the air conditioning sys-
tem
●Make sure that a filter is always
installed.
Using the air conditioning system with-
out a filter may cause damage to the
system.
●The filter is replaceable.
When cleaning the filter, do not clean
with water or an air gun.
■To prevent damage to the filter cover
When moving the filter cover in the
direction of arrow to release the fitting,
pay attention not to apply excessive force
to the claws. Otherwise, the claws may
be damaged.
Page 345 of 462

3436-3. Do-it-yourself maintenance
6
Maintenance and care
Remove the dust from the air intake
vent with a vacuum cleaner, etc.
Make sure to only use a vacuum to suck
out dust and clogs. Attempting to blow out
dust and clogs using an airgun, etc. may
push it into the air intake vent. ( P.345)
If dust and clogs cannot be completely
removed with the air intake vent cover
installed, remove the cover and clean the filter.
1
Turn the power switch off.
2 Using a Phillips screwdriver,
remove the clip.
3 Remove the air intake vent cover.
1 Pull the cover as shown in the illus-
tration to disengage the 7 claws,
starting from the claw in the upper
right corner.
2 Pull the cover toward the front of
the vehicle to remove it.
Cleaning the hybrid battery
(traction battery) air intake
vent and filter
To prevent the fuel economy from
being affected, visually inspect the
hybrid battery (traction battery) air
intake vent periodically for dust and
clogs. If it is dusty or clogged or if
“Maintenance Required for Trac-
tion Battery Cooling Parts See
Owner’s Manual” is displayed on
the multi-information display, clean
the air intake vent using the follow-
ing procedures:
Cleaning the air intake vent
If dust and clogs cannot be com-
pletely removed
Page 346 of 462
3446-3. Do-it-yourself maintenance
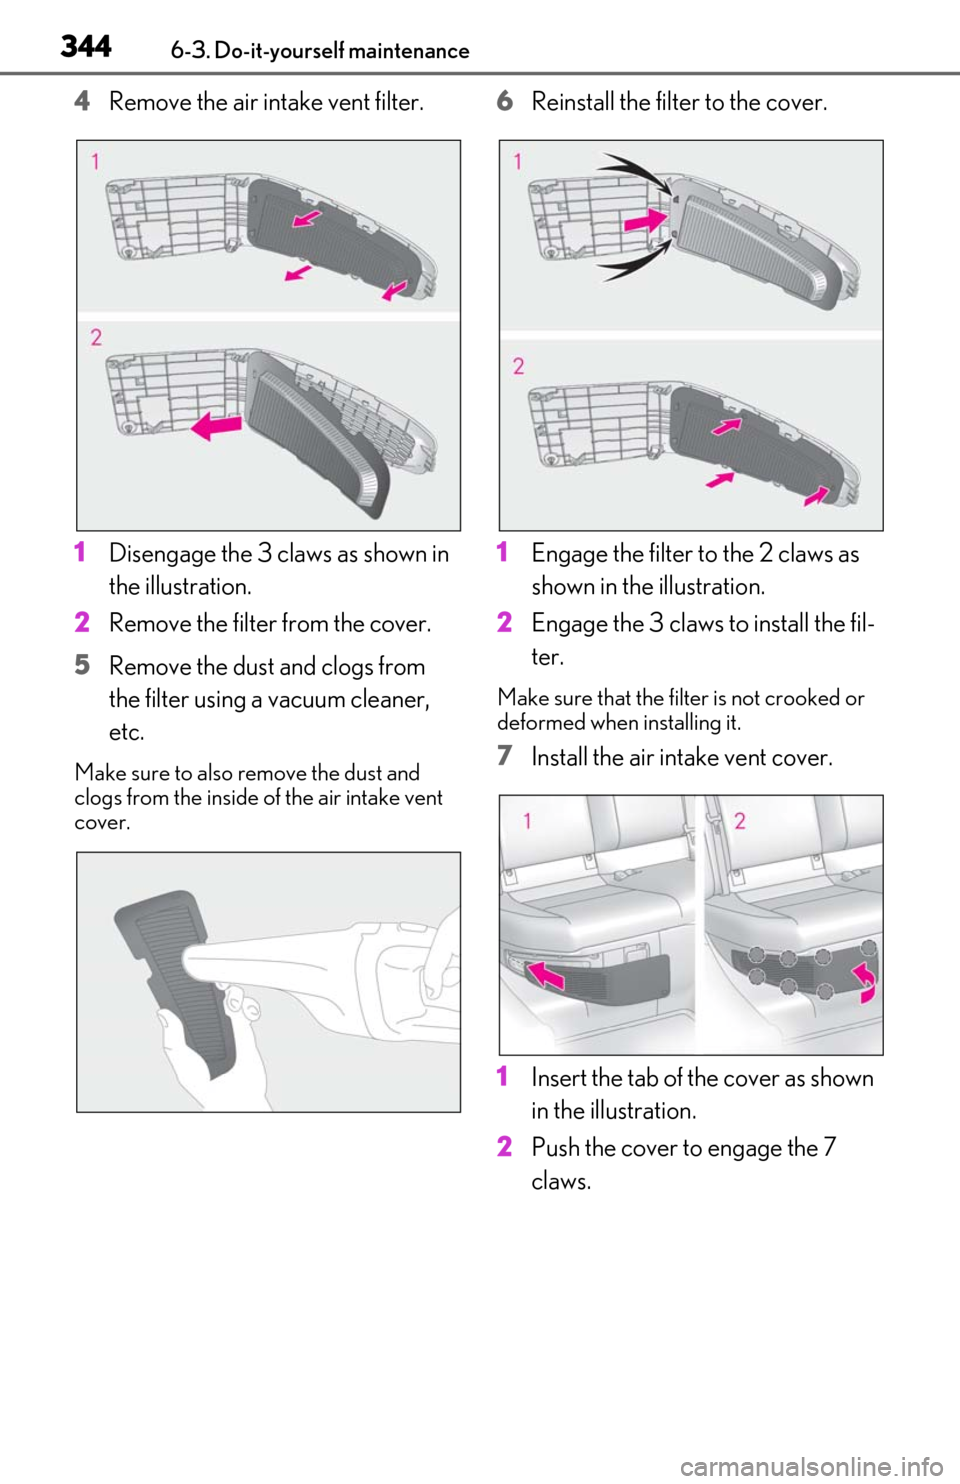
4Remove the air intake vent filter.
1 Disengage the 3 claws as shown in
the illustration.
2 Remove the filter from the cover.
5 Remove the dust and clogs from
the filter using a vacuum cleaner,
etc.
Make sure to also remove the dust and
clogs from the inside of the air intake vent
cover.
6Reinstall the filter to the cover.
1 Engage the filter to the 2 claws as
shown in the illustration.
2 Engage the 3 claws to install the fil-
ter.
Make sure that the filt er is not crooked or
deformed when installing it.
7 Install the air intake vent cover.
1 Insert the tab of the cover as shown
in the illustration.
2 Push the cover to engage the 7
claws.
Page 347 of 462
3456-3. Do-it-yourself maintenance
6
Maintenance and care
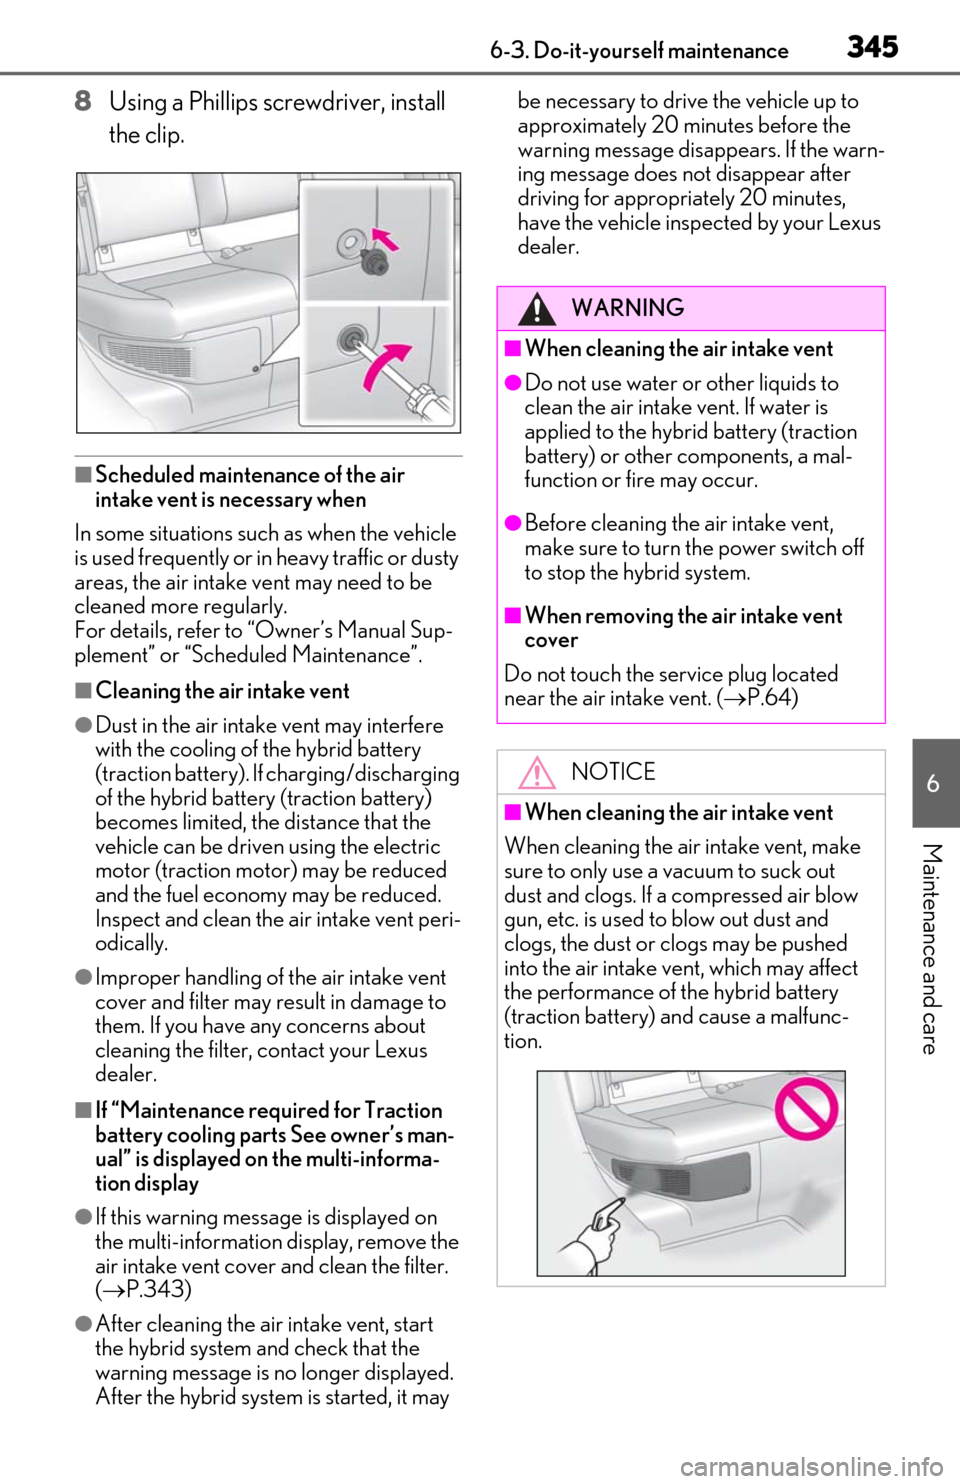
8Using a Phillips screwdriver, install
the clip.
■Scheduled maintenance of the air
intake vent is necessary when
In some situations such as when the vehicle
is used frequently or in heavy traffic or dusty
areas, the air intake vent may need to be
cleaned more regularly.
For details, refer to “Owner’s Manual Sup-
plement” or “Scheduled Maintenance”.
■Cleaning the air intake vent
●Dust in the air intake vent may interfere
with the cooling of the hybrid battery
(traction battery). If charging/discharging
of the hybrid battery (traction battery)
becomes limited, the distance that the
vehicle can be driven using the electric
motor (traction motor) may be reduced
and the fuel economy may be reduced.
Inspect and clean the air intake vent peri-
odically.
●Improper handling of the air intake vent
cover and filter may result in damage to
them. If you have any concerns about
cleaning the filter, contact your Lexus
dealer.
■If “Maintenance required for Traction
battery cooling parts See owner’s man-
ual” is displayed on the multi-informa-
tion display
●If this warning message is displayed on
the multi-information display, remove the
air intake vent cover and clean the filter.
( P.343)
●After cleaning the air intake vent, start
the hybrid system and check that the
warning message is no longer displayed.
After the hybrid system is started, it may be necessary to drive the vehicle up to
approximately 20 minutes before the
warning message disappears. If the warn-
ing message does not disappear after
driving for appropriately 20 minutes,
have the vehicle inspected by your Lexus
dealer.
WARNING
■When cleaning the air intake vent
●Do not use water or other liquids to
clean the air intake vent. If water is
applied to the hybrid battery (traction
battery) or other components, a mal-
function or fire may occur.
●Before cleaning the air intake vent,
make sure to turn the power switch off
to stop the hybrid system.
■When removing the air intake vent
cover
Do not touch the service plug located
near the air intake vent. ( P.64)
NOTICE
■When cleaning the air intake vent
When cleaning the air intake vent, make
sure to only use a vacuum to suck out
dust and clogs. If a compressed air blow
gun, etc. is used to blow out dust and
clogs, the dust or clogs may be pushed
into the air intake ve nt, which may affect
the performance of the hybrid battery
(traction battery) and cause a malfunc-
tion.
Page 348 of 462
3466-3. Do-it-yourself maintenance
■If the electronic key battery is depleted
The following symptoms may occur:
●The smart access system with push-but-
ton start and wireless remote control will
not function properly.
●The operational range will be reduced.
Prepare the following before replacing
the battery:
Flathead screwdriver
Small flathead screwdriver
Lithium battery CR2032
■Use a CR2032 lithium battery
●Batteries can be purchased at your Lexus
dealer, local electrical appliance shops or
camera stores.
●Replace only with the same or equivalent
type recommended by the manufacturer.
●Dispose of used batteries according to
the local laws.
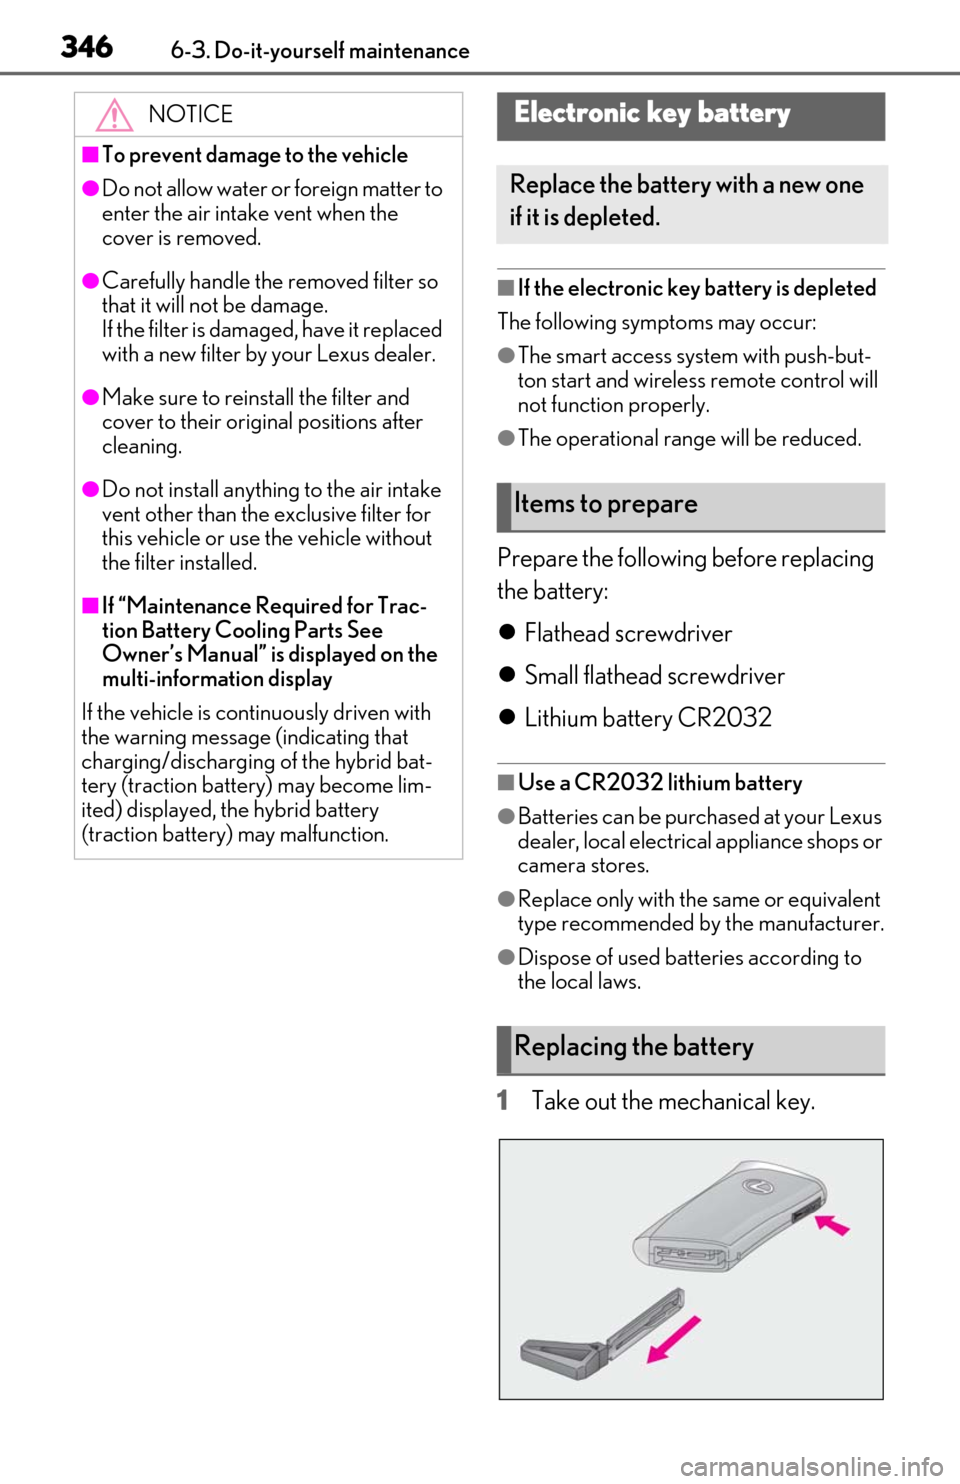
1Take out the mechanical key.
NOTICE
■To prevent damage to the vehicle
●Do not allow water or foreign matter to
enter the air intake vent when the
cover is removed.
●Carefully handle the removed filter so
that it will not be damage.
If the filter is damaged, have it replaced
with a new filter by your Lexus dealer.
●Make sure to reinstall the filter and
cover to their original positions after
cleaning.
●Do not install anything to the air intake
vent other than the exclusive filter for
this vehicle or use the vehicle without
the filter installed.
■If “Maintenance Required for Trac-
tion Battery Cooling Parts See
Owner’s Manual” is displayed on the
multi-information display
If the vehicle is continuously driven with
the warning message (indicating that
charging/discharging of the hybrid bat-
tery (traction battery) may become lim-
ited) displayed, the hybrid battery
(traction battery) may malfunction.
Electronic key battery
Replace the battery with a new one
if it is depleted.
Items to prepare
Replacing the battery
Page 349 of 462

3476-3. Do-it-yourself maintenance
6
Maintenance and care
2Remove the cover.
To prevent damage to the key, wrap the tip
of the screwdriver with tape.
3Remove the depleted battery.
Insert a new battery with the “+” terminal
facing up.
WARNING
■Removed battery and other parts
These parts are small and if swallowed by
a child, they can cause choking. Keep
away from children. Failure to do so
could result in death or serious injury.
NOTICE
■When replacing the battery
Use a screwdriver of appropriate size.
Applying excessive force may deform or
damage the cover.
■For normal operation after replacing
the battery
Observe the following precautions to
prevent accidents:
●Always work with dry hands.
Moisture may cause the battery to
rust.
●Do not touch or move any other com-
ponent inside the remote control.
●Do not bend either of the battery ter-
minals.
Page 350 of 462
3486-3. Do-it-yourself maintenance
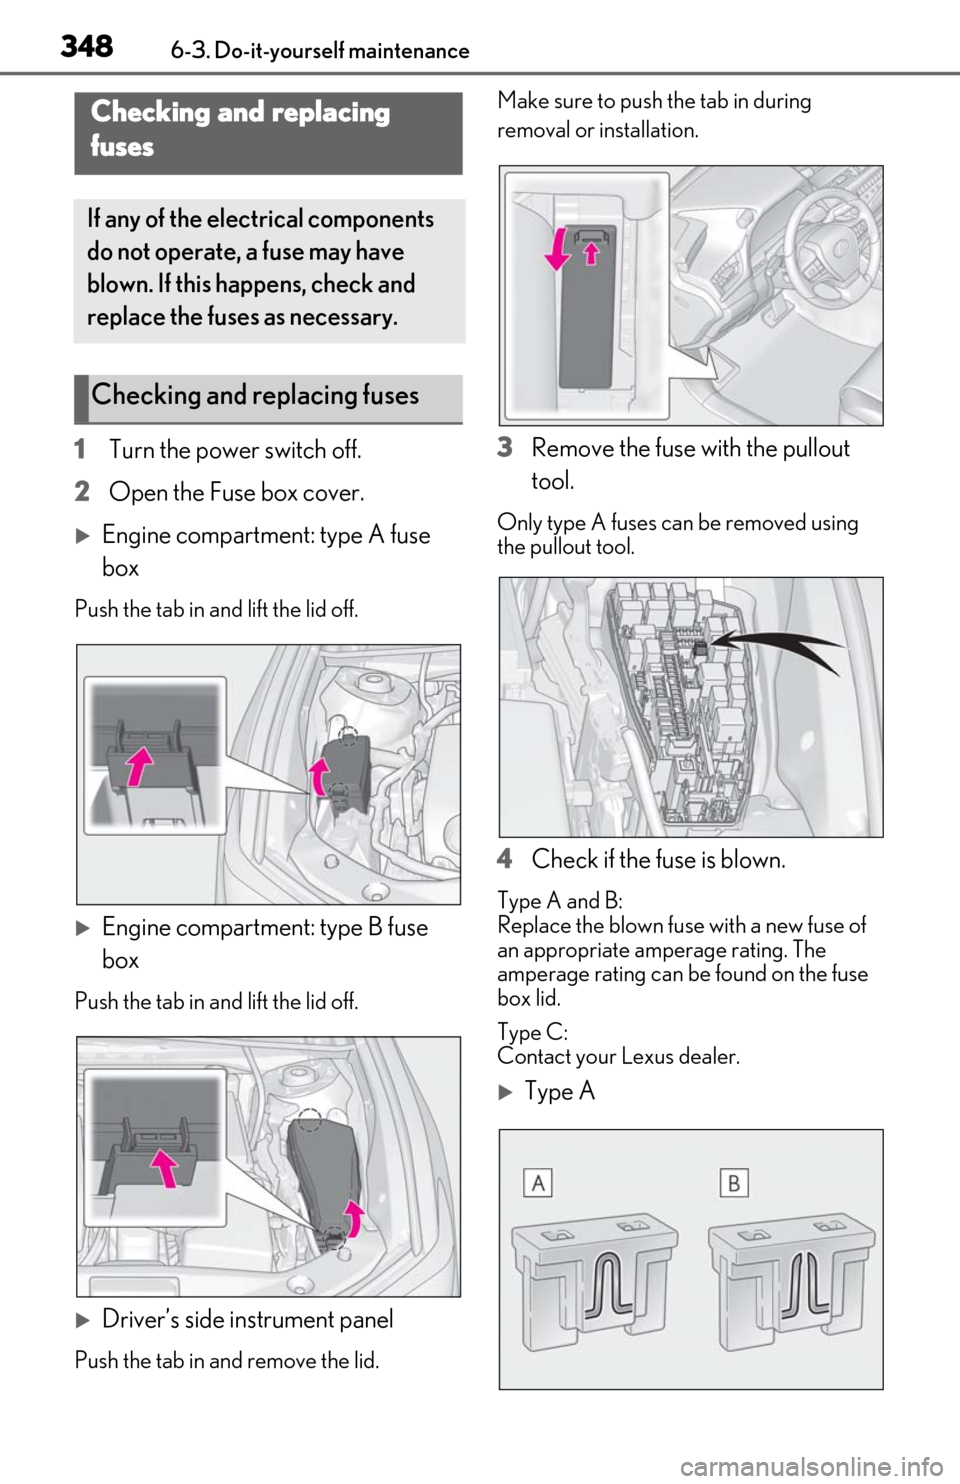
1Turn the power switch off.
2 Open the Fuse box cover.
Engine compartment: type A fuse
box
Push the tab in and lift the lid off.
Engine compartment: type B fuse
box
Push the tab in and lift the lid off.
Driver’s side instrument panel
Push the tab in and remove the lid. Make sure to push the tab in during
removal or installation.
3
Remove the fuse with the pullout
tool.
Only type A fuses can be removed using
the pullout tool.
4Check if the fuse is blown.
Type A and B:
Replace the blown fuse with a new fuse of
an appropriate amperage rating. The
amperage rating can be found on the fuse
box lid.
Type C:
Contact your Lexus dealer.
Type A
Checking and replacing
fuses
If any of the electrical components
do not operate, a fuse may have
blown. If this happens, check and
replace the fuses as necessary.
Checking and replacing fuses