headlight Lexus ES350 2008 Do-it-yourself maintenance
[x] Cancel search | Manufacturer: LEXUS, Model Year: 2008, Model line: ES350, Model: Lexus ES350 2008Pages: 57, PDF Size: 15.09 MB
Page 2 of 57
297
4-3. Do-it-yourself maintenance
4
Maintenance and care
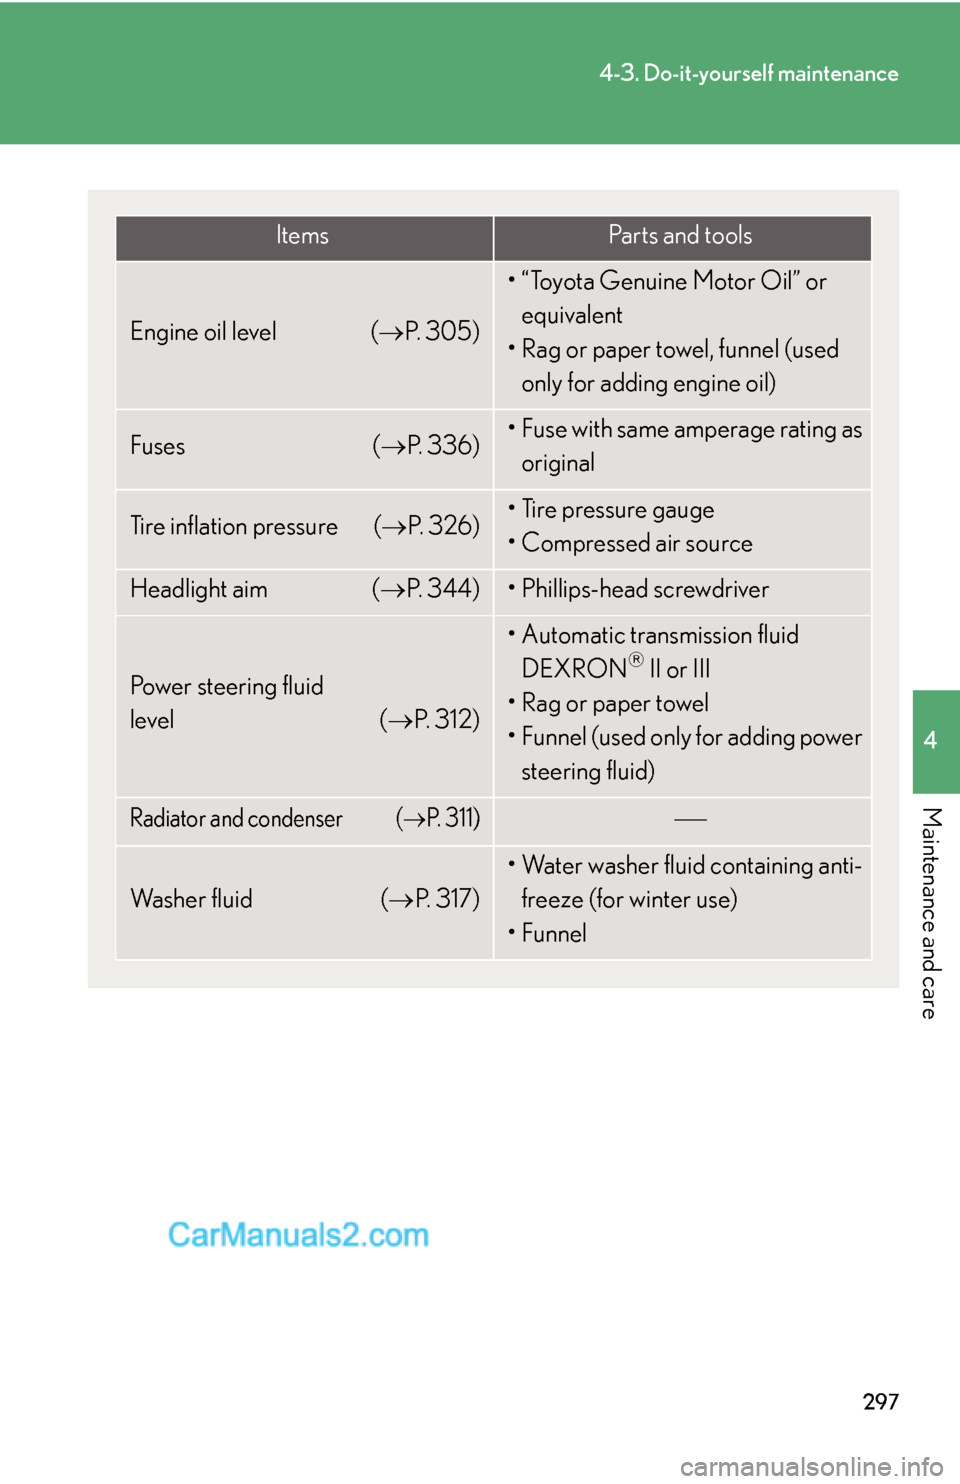
ItemsPa r t s a n d t o o l s
Engine oil level (→P. 3 0 5 )
• “Toyota Genuine Motor Oil” or
equivalent
• Rag or paper towel, funnel (used
only for adding engine oil)
Fuses (→P. 3 3 6 )• Fuse with same amperage rating as
original
Tire inflation pressure (→P. 3 2 6 )• Tire pressure gauge
• Compressed air source
Headlight aim (→P. 3 4 4 )• Phillips-head screwdriver
Power steering fluid
level (→P. 3 1 2 )
• Automatic transmission fluid
DEXRON® II or III
•Rag or paper towel
• Funnel (used only for adding power
steering fluid)
Radiator and condenser (→P. 3 1 1 )⎯
Wa s h e r f l u i d (→P. 3 1 7 )
• Water washer fluid containing anti-
freeze (for winter use)
•Funnel
Page 44 of 57
339
4-3. Do-it-yourself maintenance
4
Maintenance and care
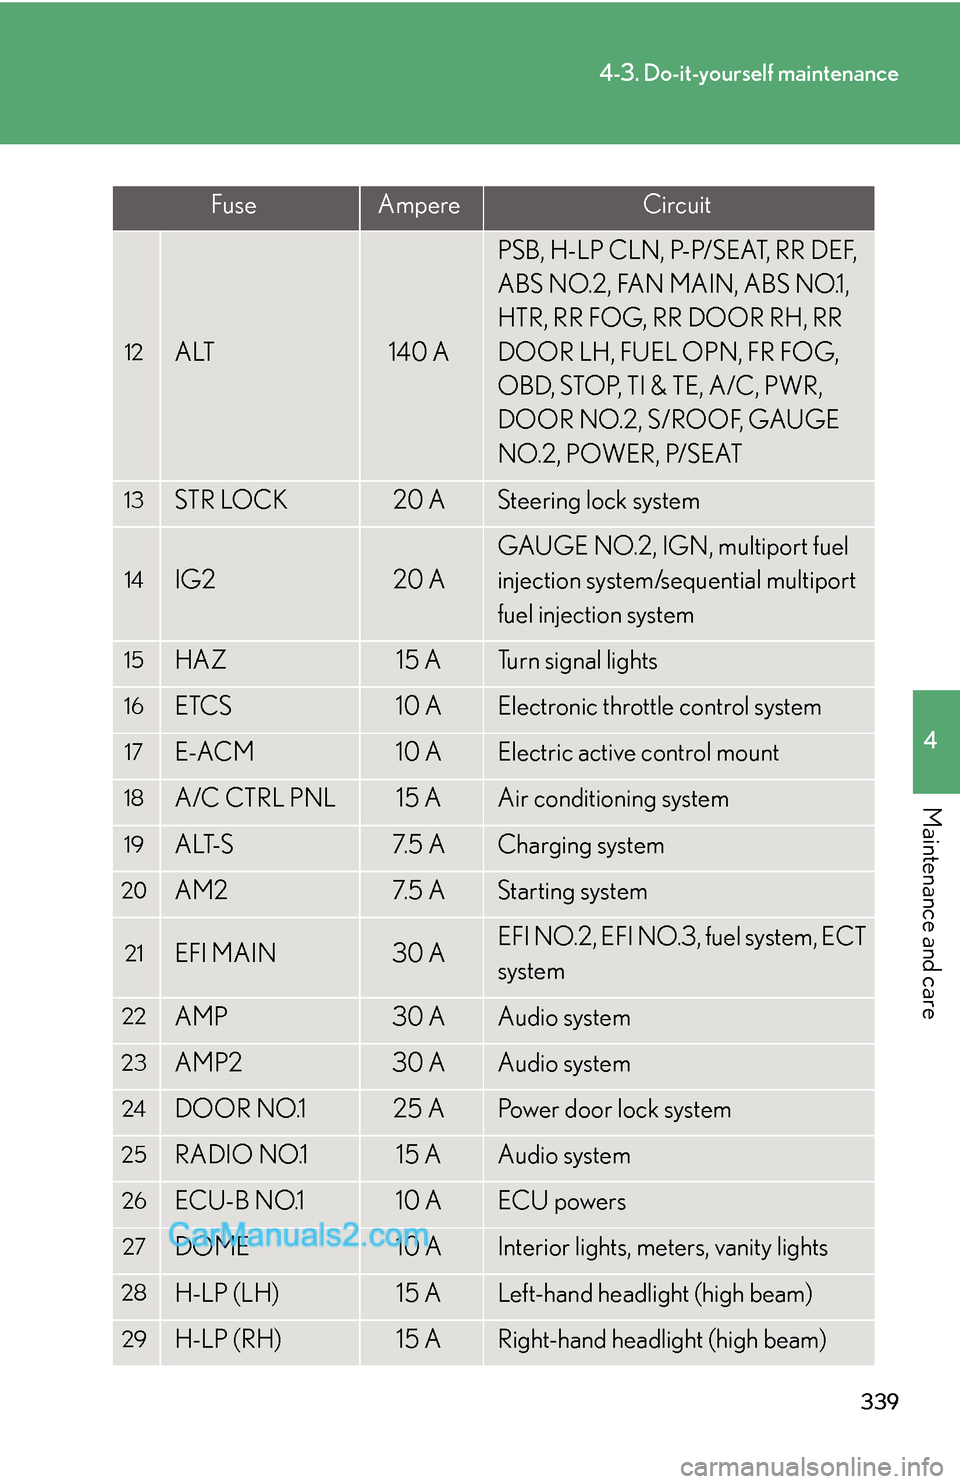
12ALT140 A
PSB, H-LP CLN, P-P/SEAT, RR DEF,
ABS NO.2, FAN MAIN, ABS NO.1,
HTR, RR FOG, RR DOOR RH, RR
DOOR LH, FUEL OPN, FR FOG,
OBD, STOP, TI & TE, A/C, PWR,
DOOR NO.2, S/ROOF, GAUGE
NO.2, POWER, P/SEAT
13STR LOCK20 ASteering lock system
14IG220 A
GAUGE NO.2, IGN, multiport fuel
injection system/sequential multiport
fuel injection system
15HAZ15 ATurn signal lights
16ETCS10 AElectronic throttle control system
17E-ACM10 AElectric active control mount
18A/C CTRL PNL15 AAir conditioning system
19ALT-S7. 5 ACharging system
20AM27. 5 AStarting system
21EFI MAIN30 AEFI NO.2, EFI NO.3, fuel system, ECT
system
22AMP30 AAudio system
23AMP230 AAudio system
24DOOR NO.125 APower door lock system
25RADIO NO.115 AAudio system
26ECU-B NO.110 AECU powers
27DOME10 AInterior lights, meters, vanity lights
28H-LP (LH)15 ALeft-hand headlight (high beam)
29H-LP (RH)15 ARight-hand headlight (high beam)
FuseAmpereCircuit
Page 45 of 57
340
4-3. Do-it-yourself maintenance
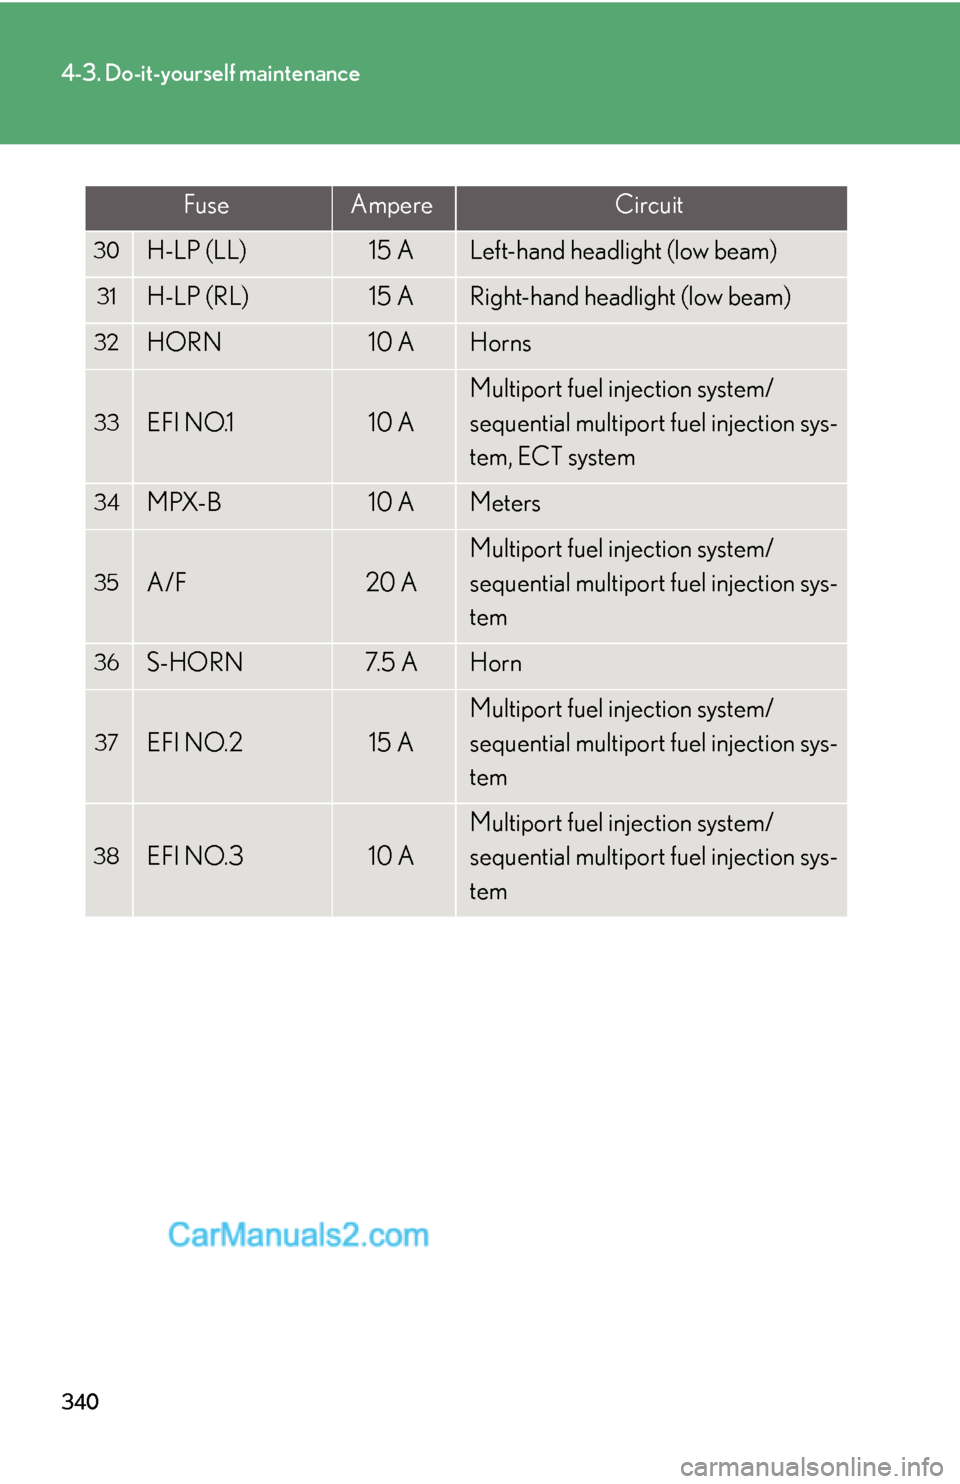
30H-LP (LL)15 ALeft-hand headlight (low beam)
31H-LP (RL)15 ARight-hand headlight (low beam)
32HORN10 AHorns
33EFI NO.110 A
Multiport fuel injection system/
sequential multiport fuel injection sys-
tem, ECT system
34MPX-B10 AMeters
35A/F20 A
Multiport fuel injection system/
sequential multiport fuel injection sys-
tem
36S-HORN7. 5 AHorn
37EFI NO.215 A
Multiport fuel injection system/
sequential multiport fuel injection sys-
tem
38EFI NO.310 A
Multiport fuel injection system/
sequential multiport fuel injection sys-
tem
FuseAmpereCircuit
Page 47 of 57
342
4-3. Do-it-yourself maintenance
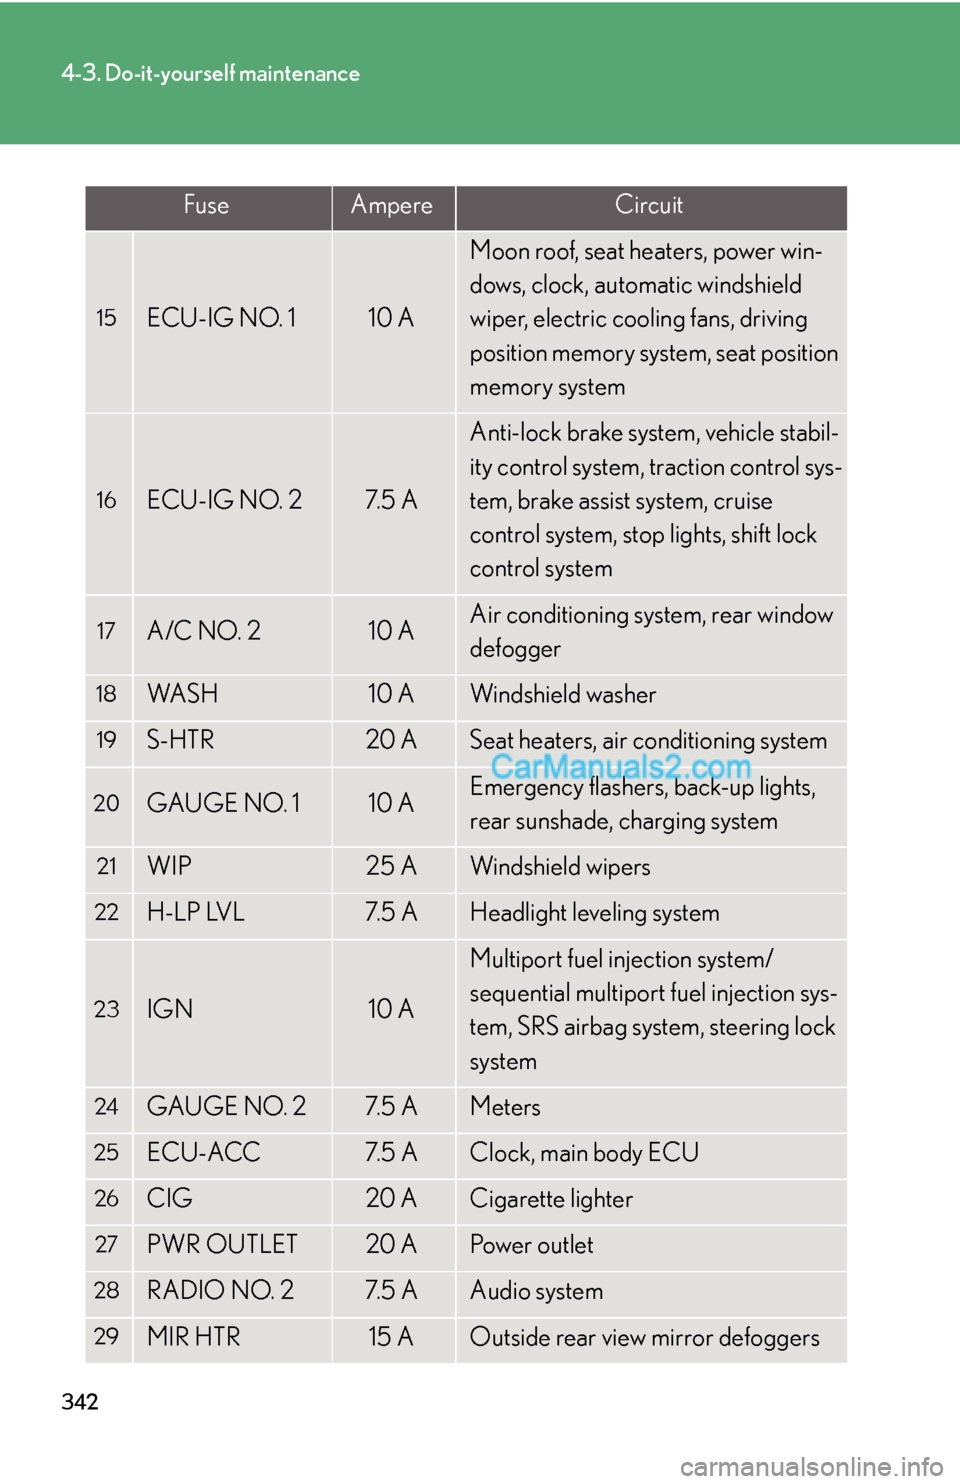
15ECU-IG NO. 110 A
Moon roof, seat heaters, power win-
dows, clock, automatic windshield
wiper, electric cooling fans, driving
position memory system, seat position
memory system
16ECU-IG NO. 27. 5 A
Anti-lock brake system, vehicle stabil-
ity control system, traction control sys-
tem, brake assist system, cruise
control system, stop lights, shift lock
control system
17A/C NO. 210 AAir conditioning system, rear window
defogger
18WA S H10 AWindshield washer
19S-HTR20 ASeat heaters, air conditioning system
20GAUGE NO. 110 AEmergency flashers, back-up lights,
rear sunshade, charging system
21WIP25 AWindshield wipers
22H-LP LVL7. 5 AHeadlight leveling system
23IGN10 A
Multiport fuel injection system/
sequential multiport fuel injection sys-
tem, SRS airbag system, steering lock
system
24GAUGE NO. 27. 5 AMeters
25ECU-ACC7. 5 AClock, main body ECU
26CIG20 ACigarette lighter
27PWR OUTLET20 APo w e r o u t l e t
28RADIO NO. 27. 5 AAudio system
29MIR HTR15 AOutside rear view mirror defoggers
FuseAmpereCircuit
Page 49 of 57
344
4-3. Do-it-yourself maintenance
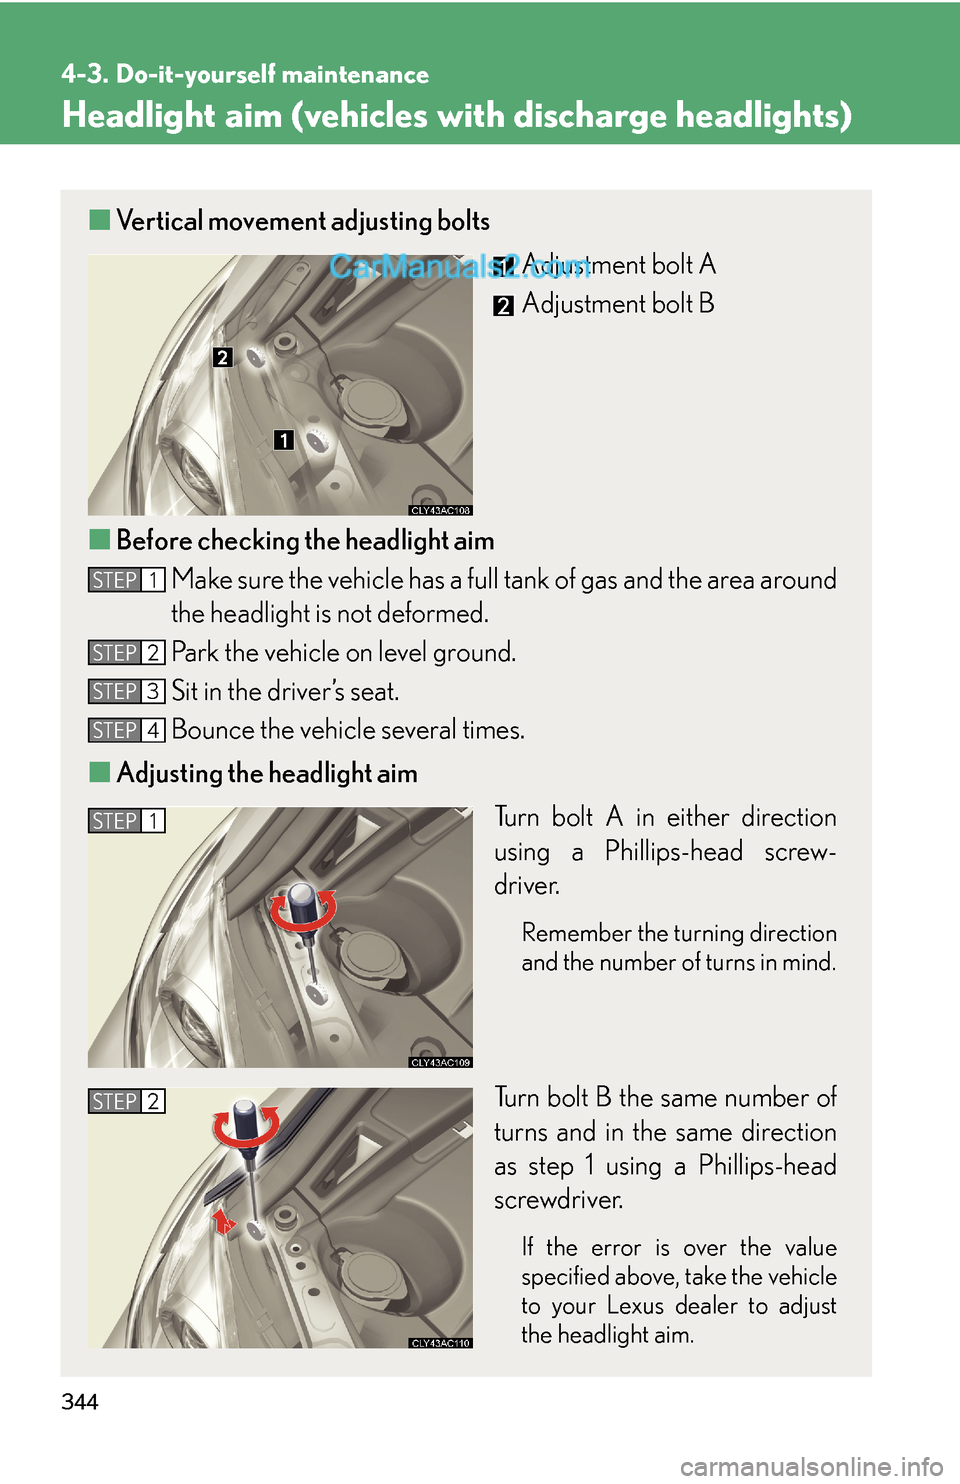
Headlight aim (vehicles with discharge headlights)
■Vertical movement adjusting bolts
Adjustment bolt A
Adjustment bolt B
■Before checking the headlight aim
Make sure the vehicle has a full tank of gas and the area around
the headlight is not deformed.
Park the vehicle on level ground.
Sit in the driver’s seat.
Bounce the vehicle several times.
■Adjusting the headlight aim
Turn bolt A in either direction
using a Phillips-head screw-
driver.
Remember the turning direction
and the number of turns in mind.
Turn bolt B the same number of
turns and in the same direction
as step 1 using a Phillips-head
screwdriver.
If the error is over the value
specified above, take the vehicle
to your Lexus dealer to adjust
the headlight aim.
STEP1
STEP2
STEP3
STEP4
STEP1
STEP2
Page 50 of 57
345
4-3. Do-it-yourself maintenance
4
Maintenance and care
Light bulbs
You may replace the following bulbs yourself. For more information about
replacing other light bulbs, contact your Lexus dealer.
■Prepare a replacement light bulb.
Check the wattage of the light bulb being replaced. (→P. 4 1 9 )
■Remove the engine compartment cover.
→P. 3 0 4
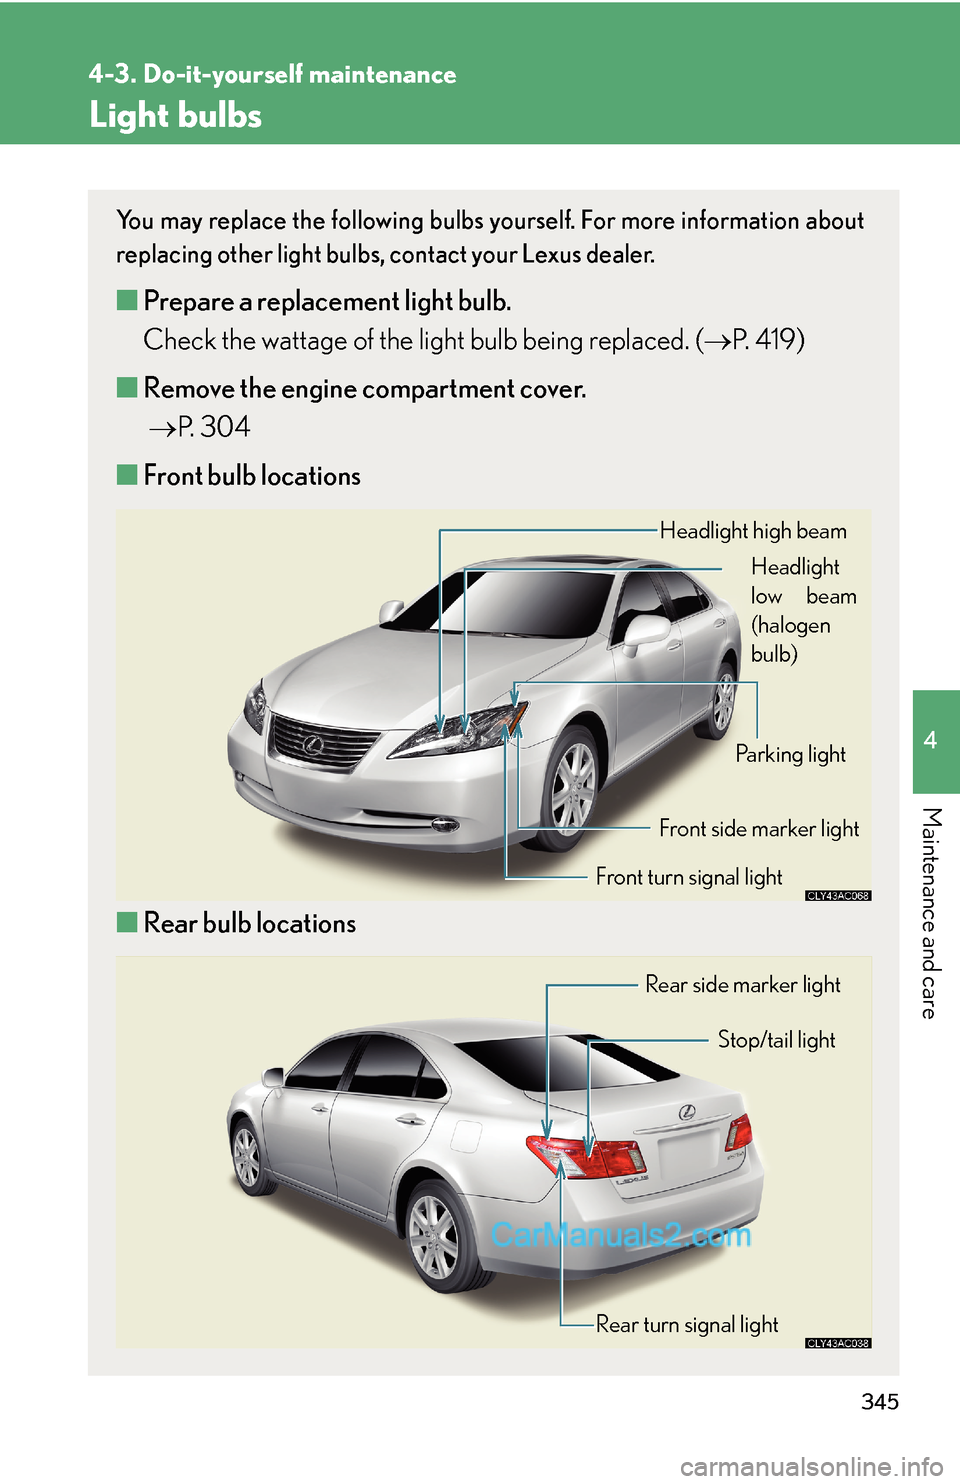
■Front bulb locations
■Rear bulb locations
Headlight high beam
Headlight
low beam
(halogen
bulb)
Front turn signal lightFront side marker light
Parking light
Rear turn signal lightStop/tail light
Rear side marker light
Page 51 of 57

346
4-3. Do-it-yourself maintenance
Replacing light bulbs
■Headlight low beams (for vehicles without discharge bulbs)
Unplug the connector.
Remove the cover.
Release the lock.
STEP1
STEP2
STEP3
Page 52 of 57

347
4-3. Do-it-yourself maintenance
4
Maintenance and care
Remove the light bulb.
■Headlight high beams
Turn the bulb base counterclock-
wise.
Unplug the connector while
depressing the lock release.
■Parking lights and front side marker lights, front turn signal lights
Remove the access hole cover.STEP4
STEP1
STEP2
STEP1
Page 55 of 57

350
4-3. Do-it-yourself maintenance
Rear turn signal light
Remove the light bulb.
Rear side marker light
Remove the light bulb.
■Bulbs other than the above
If any of the bulbs listed below has burnt out, have your Lexus dealer
replace it.
●Headlight low beams (discharge bulbs)
●Front fog lights
●Tail lights
●High mounted stoplight
●License plate lights
●Back-up lights
STEP3
STEP3
Page 56 of 57

351
4-3. Do-it-yourself maintenance
4
Maintenance and care
■Condensation build-up on the inside of the lens
Contact your Lexus dealer for more information in the following situations. Tempo-
rary condensation build-up on the inside of the headlight lens does not indicate a
malfunction.
●Large drops of water are built up on the inside of the lens.
●Water has built up inside the headlight.
■Discharge headlights
If voltage to the discharge bulbs is insufficient, the bulbs may not come on, or may
go out temporarily. The discharge bulbs will come on when normal power is
restored.
■LED stop lights
The high mounted stoplight consists of a number of LEDs. If any of the LEDs burn
out, take your vehicle to your Lexus dealer to have the light replaced.