ECU Lexus ES350 2012 Owner's Guide
[x] Cancel search | Manufacturer: LEXUS, Model Year: 2012, Model line: ES350, Model: Lexus ES350 2012Pages: 554, PDF Size: 6.43 MB
Page 341 of 554
340
3-7. Other interior features
ES350_U
Garage door opener
The garage door opener (HomeLink Universal Transceiver) is manufactured
under license from HomeLink.
Programming the HomeLink
The HomeLink compatible transceiver in your vehicle has 3 buttons
which can be programmed to operate 3 different devices. Refer to the
programming method below appropriate for the device.
Buttons
Indicator
■ Programming the HomeLink
(for U.S.A. owners)
Point the remote control transmit-
ter for the device 1 to 3 in. (25 to
75 mm) from the HomeLink
but-
tons.
Keep the HomeLink indicator
light in view while programming.
The garage door opener can be pr ogrammed to operate garage doors,
gates, entry doors, door locks, home lighting systems, and security systems,
and other devices.
STEP1
Page 344 of 554
343
3-7. Other interior features
3
Interior features
ES350_UTest the operation of the HomeLink
by pressing the newly pro-
grammed button. Check to see if the gate/device operates cor-
rectly.
Repeat the steps above to program another device for each of
the remaining HomeLink
buttons.
■ Programming other devices
To program other devices such as home security systems, home door
locks or lighting, contact your authorized Lexus dealer for assistance.
■ Reprogramming a button
The individual HomeLink
buttons cannot be erased but can be
reprogrammed. To reprogram a button, follow the “Reprogramming a
HomeLink
button” instructions.
Operating the HomeLink
Press the appropriate HomeLink button. The HomeLink indicator
light should come on.
The HomeLink compatible transceiver in your vehicle continues to send a
signal for up to 20 seconds as long as the button is pressed.
Reprogramming a HomeLink button
Press and hold the desired HomeLink
button. After 20 seconds, the
HomeLink indicator light will start flashing slowly. Next, while still press-
ing and holding the HomeLink button, press and hold the button on the
transmitter until the HomeLink indicator light changes from a slow to a
rapid flash.
STEP5
STEP6
Page 350 of 554
349
3-7. Other interior features
3
Interior features
ES350_U
■Conditions unfavorable to correct operation
The compass may not show the correct direction in the following conditions:
●The vehicle is stopped immediately after turning.
●The vehicle is on an inclined surface.
●The vehicle is in a place where the earth's magnetic field is subject to interfer-
ence by artificial magnetic fields (underground car park/parking lot, under a
steel tower, between buildings, roof car park/parking lot, near an intersection,
near a large vehicle, etc.).
●The vehicle has become magnetized.
(There is a magnet or metal object near the inside rear view mirror.)
●The battery has been disconnected.
●A door is open.
CAUTION
■While driving the vehicle
Do not adjust the display. Be sure to adjust the display only when the vehicle is
stopped.
■When doing the circling calibration
Be sure to secure a wide space, and watch out for people and vehicles in the neigh-
borhood. Do not violate any local traffic rules while performing circling calibration.
NOTICE
■To avoid compass malfunctions
Do not place magnets or any metal objects near the inside rear view mirror.
Doing this may cause a malfunction of the compass sensor.
■To ensure normal operation of the compass
●Do not perform circling calibration of the compass in a place where the earth's
magnetic field is subject to interference by artificial magnetic fields.
●During calibration, do not operate electric systems (moon roof, power windows,
etc.) as they may interfere with the calibration.
Page 351 of 554

350
3-7. Other interior features
ES350_U
Safety Connect∗
∗: If equipped
Safety Connect is a subscription-based telematics service that uses Global
Positioning System (GPS) data and embedded cellular technology to pro-
vide safety and security features to subscribers. Safety Connect is sup-
ported by Lexus’ designated response center, which operates 24 hours per
day, 7 days per week.
Safety Connect service is available by subscription on select, telematics
hardware-equipped vehicles.
By using the Safety Connect service, you are agreeing to be bound by the
Telematics Subscription Service Agreement and its Terms and Conditions,
as in effect and amended from time to time, a current copy of which is avail-
able at Lexus.com. All use of the Safety Connect service is subject to such
then-applicable Terms and Conditions.
■ System components
“SOS” button
Microphone
LED light indicators
Page 368 of 554
367
4-2. Maintenance
4
Maintenance and care
ES350_U
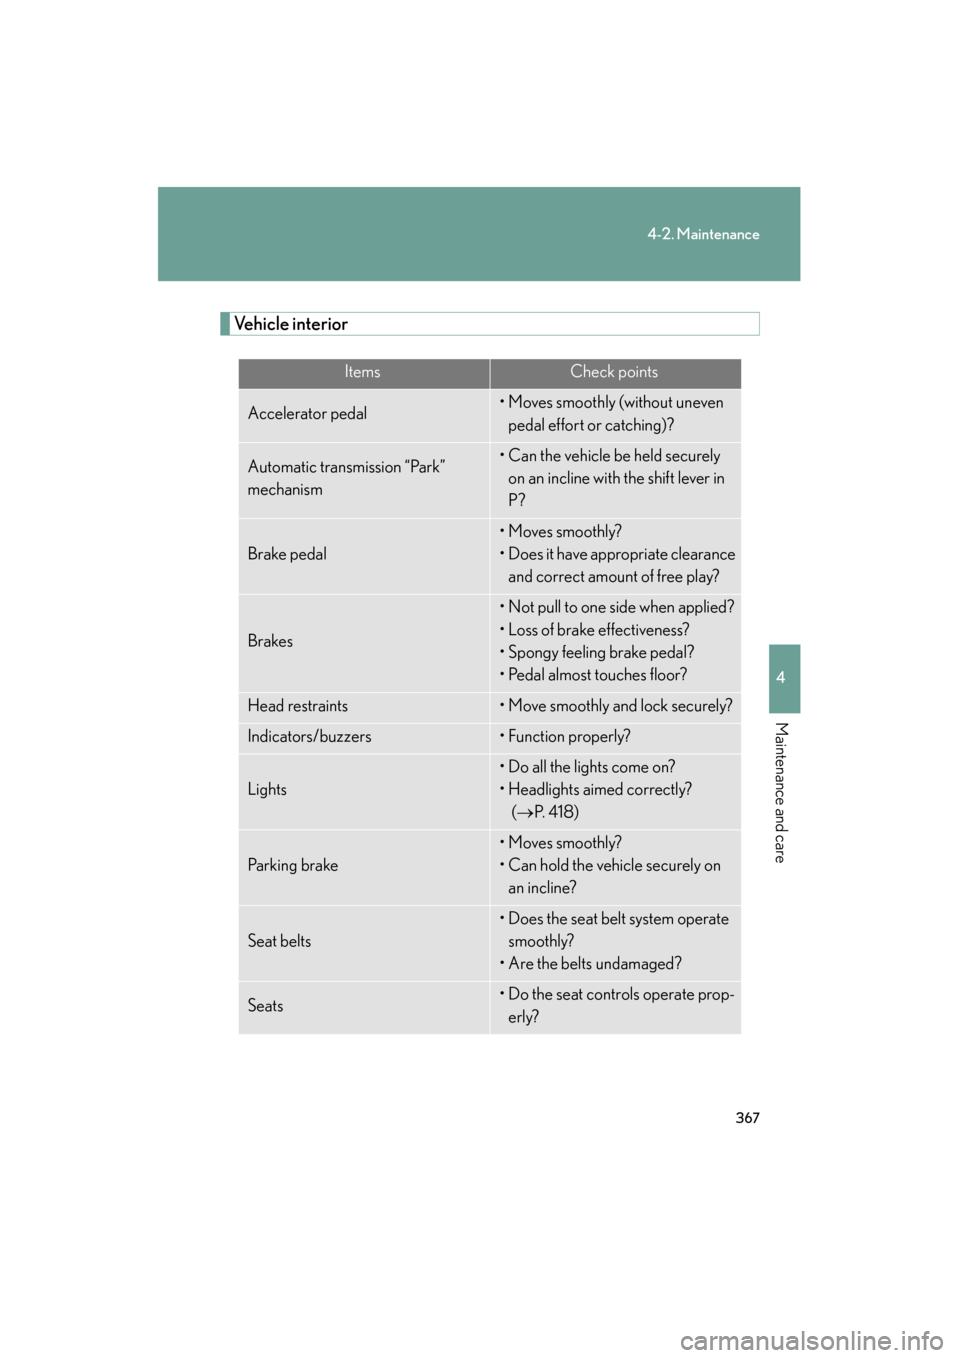
Vehicle interior
ItemsCheck points
Accelerator pedal• Moves smoothly (without uneven pedal effort or catching)?
Automatic transmission “Park”
mechanism• Can the vehicle be held securely on an incline with the shift lever in
P?
Brake pedal
• Moves smoothly?
• Does it have appropriate clearance and correct amount of free play?
Brakes
• Not pull to one side when applied?
• Loss of brake effectiveness?
• Spongy feeling brake pedal?
• Pedal almost touches floor?
Head restraints• Move smoothly and lock securely?
Indicators/buzzers•Function properly?
Lights
• Do all the lights come on?
• Headlights aimed correctly? (→ P. 4 1 8 )
Pa r k i n g b r a ke
• Moves smoothly?
• Can hold the vehicle securely on
an incline?
Seat belts
• Does the seat belt system operate smoothly?
• Are the belts undamaged?
Seats• Do the seat controls operate prop- erly?
Page 380 of 554
379
4-3. Do-it-yourself maintenance
4
Maintenance and care
ES350_U■
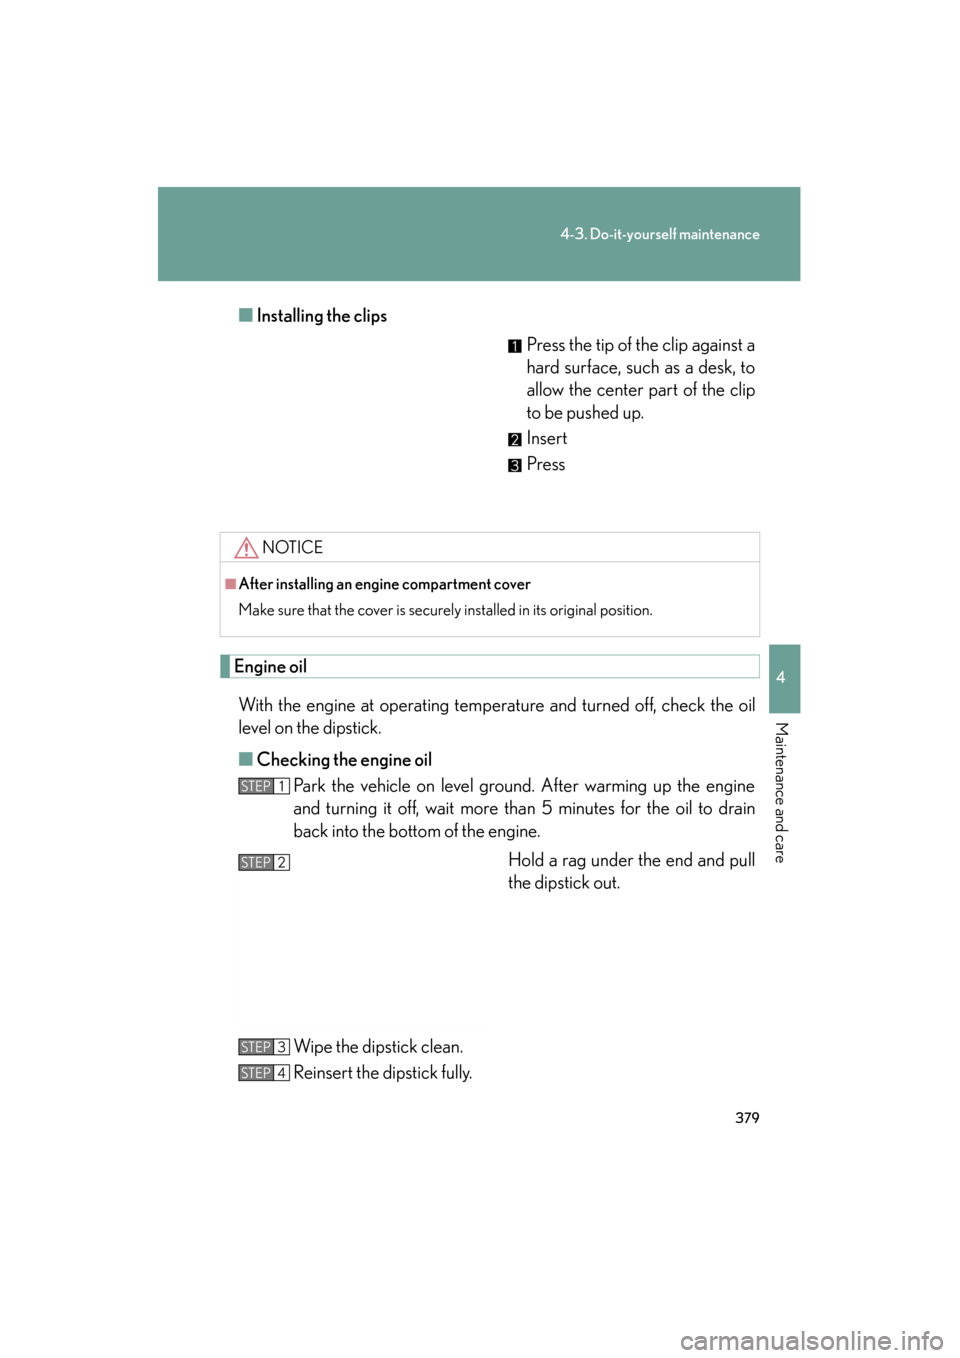
Installing the clips
Press the tip of the clip against a
hard surface, such as a desk, to
allow the center part of the clip
to be pushed up.
Insert
Press
Engine oil
With the engine at operating temperature and turned off, check the oil
level on the dipstick.
■ Checking the engine oil
Park the vehicle on level ground. After warming up the engine
and turning it off, wait more than 5 minutes for the oil to drain
back into the bottom of the engine.
Hold a rag under the end and pull
the dipstick out.
Wipe the dipstick clean.
Reinsert the dipstick fully.
NOTICE
■After installing an engine compartment cover
Make sure that the cover is securely installed in its original position.
STEP1
STEP2
STEP3
STEP4
Page 414 of 554
413
4-3. Do-it-yourself maintenance
4
Maintenance and care
ES350_U
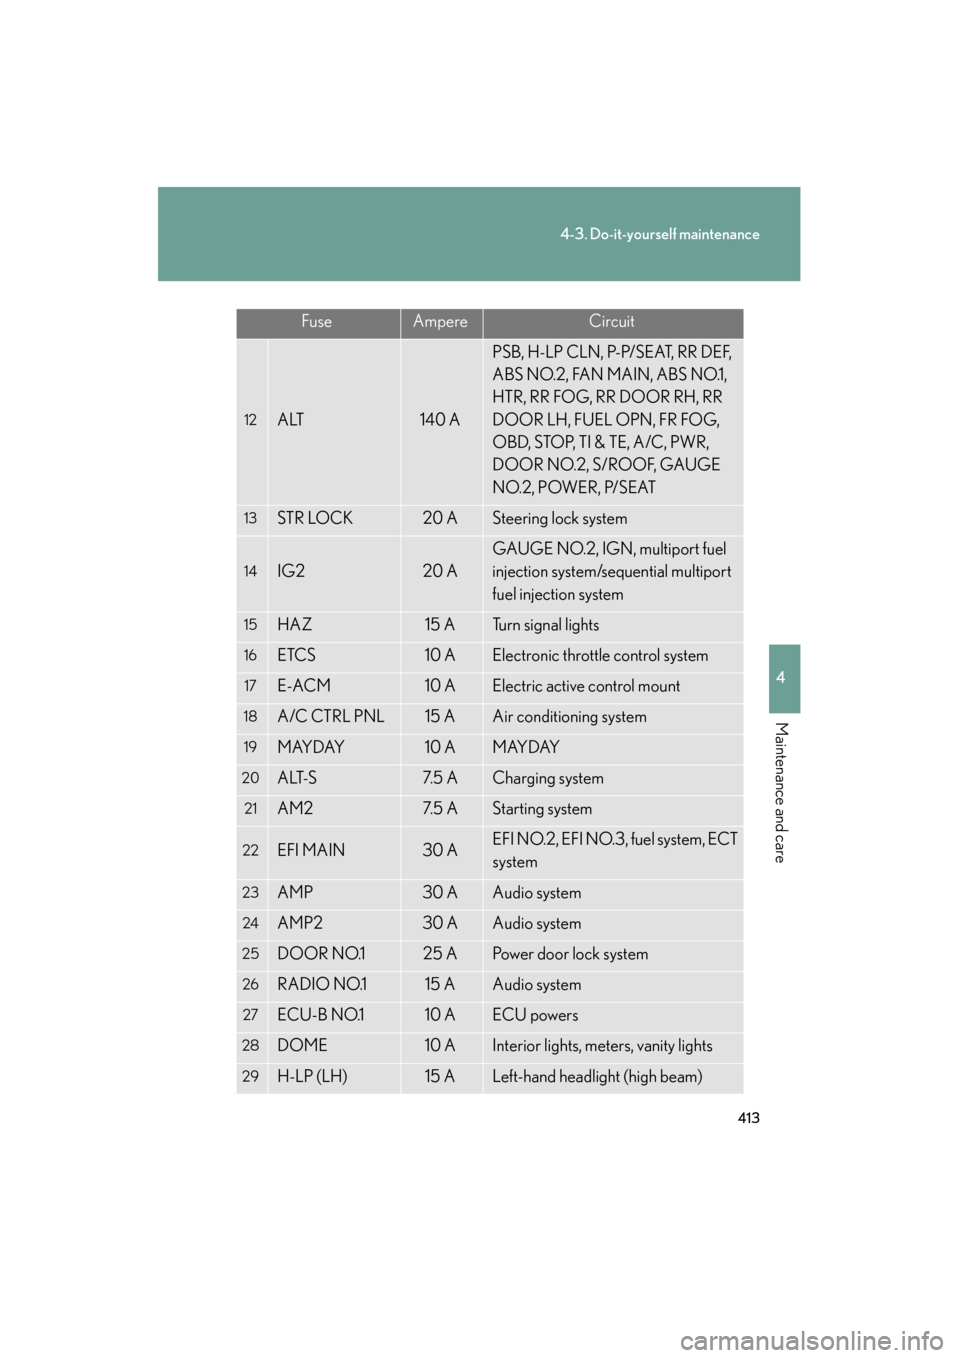
12ALT140 A
PSB, H-LP CLN, P-P/SEAT, RR DEF,
ABS NO.2, FAN MAIN, ABS NO.1,
HTR, RR FOG, RR DOOR RH, RR
DOOR LH, FUEL OPN, FR FOG,
OBD, STOP, TI & TE, A/C, PWR,
DOOR NO.2, S/ROOF, GAUGE
NO.2, POWER, P/SEAT
13STR LOCK20 ASteering lock system
14IG220 A
GAUGE NO.2, IGN, multiport fuel
injection system/sequential multiport
fuel injection system
15HAZ15 ATu r n s i g n a l l i g h t s
16ETCS10 AElectronic throttle control system
17E-ACM10 AElectric active control mount
18A/C CTRL PNL15 AAir conditioning system
19MAYDAY10 AMAYDAY
20ALT-S7. 5 ACharging system
21AM27. 5 AStarting system
22EFI MAIN30 AEFI NO.2, EFI NO.3, fuel system, ECT
system
23AMP30 AAudio system
24AMP230 AAudio system
25DOOR NO.125 APower door lock system
26RADIO NO.115 AAudio system
27ECU-B NO.110 AECU powers
28DOME10 AInterior lights, meters, vanity lights
29H-LP (LH)15 ALeft-hand headlight (high beam)
FuseAmpereCircuit
Page 416 of 554
415
4-3. Do-it-yourself maintenance
4
Maintenance and care
ES350_U■
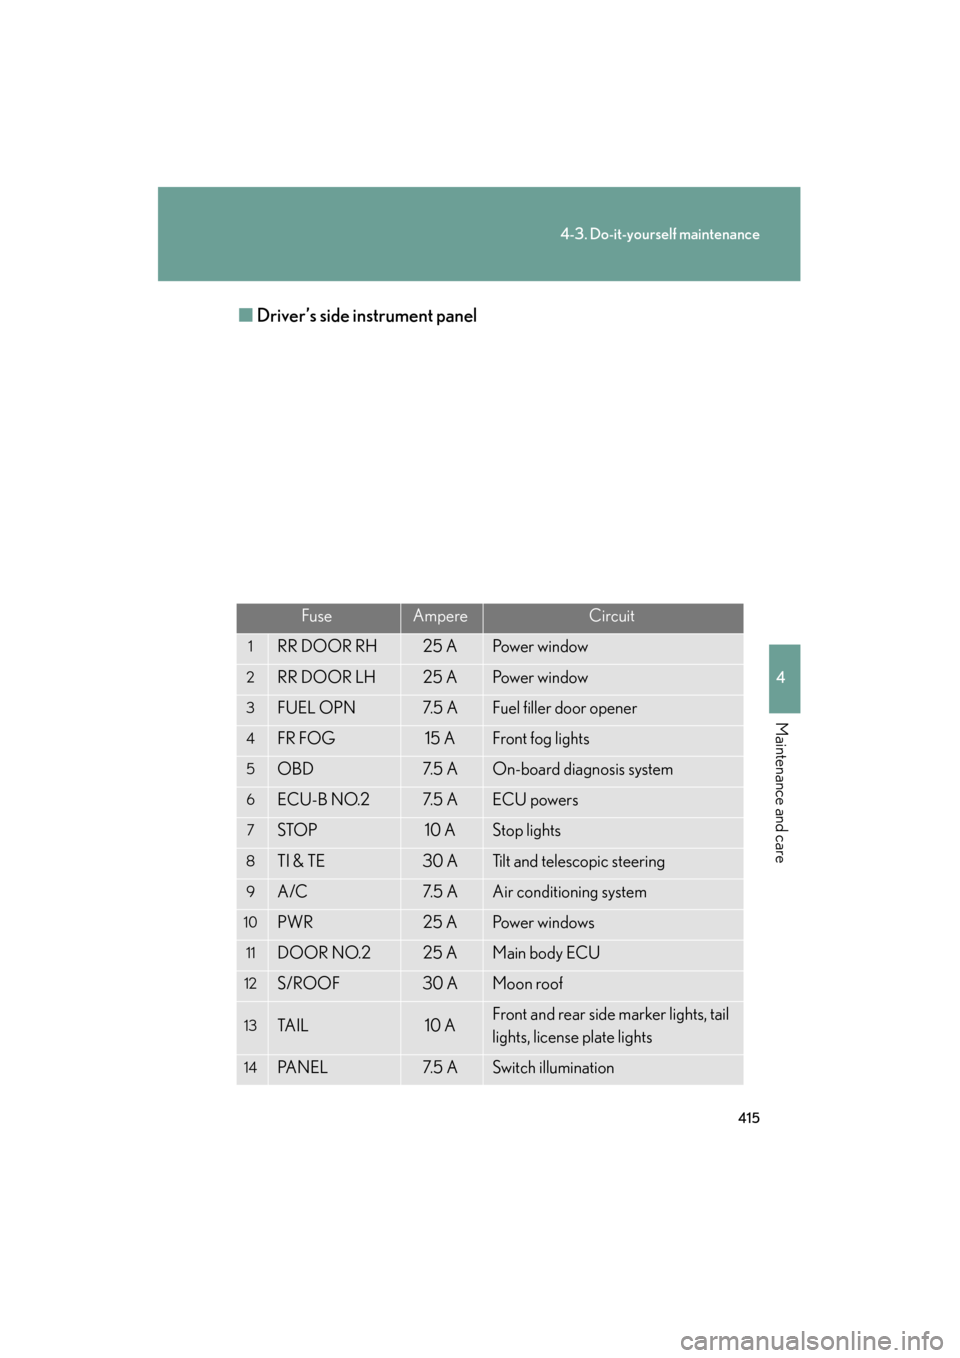
Driver’s side instrument panel
FuseAmpereCircuit
1RR DOOR RH25 APo w e r w i n d o w
2RR DOOR LH25 APo w e r w i n d o w
3FUEL OPN7. 5 AFuel filler door opener
4FR FOG15 AFront fog lights
5OBD7. 5 AOn-board diagnosis system
6ECU-B NO.27. 5 AECU powers
7STOP10 AStop lights
8TI & TE30 ATilt and telescopic steering
9A/C7. 5 AAir conditioning system
10PWR25 APo w e r w i n d o w s
11DOOR NO.225 AMain body ECU
12S/ROOF30 AMoon roof
13TA I L10 AFront and rear side marker lights, tail
lights, license plate lights
14PA N E L7. 5 ASwitch illumination
Page 417 of 554
416
4-3. Do-it-yourself maintenance
ES350_U
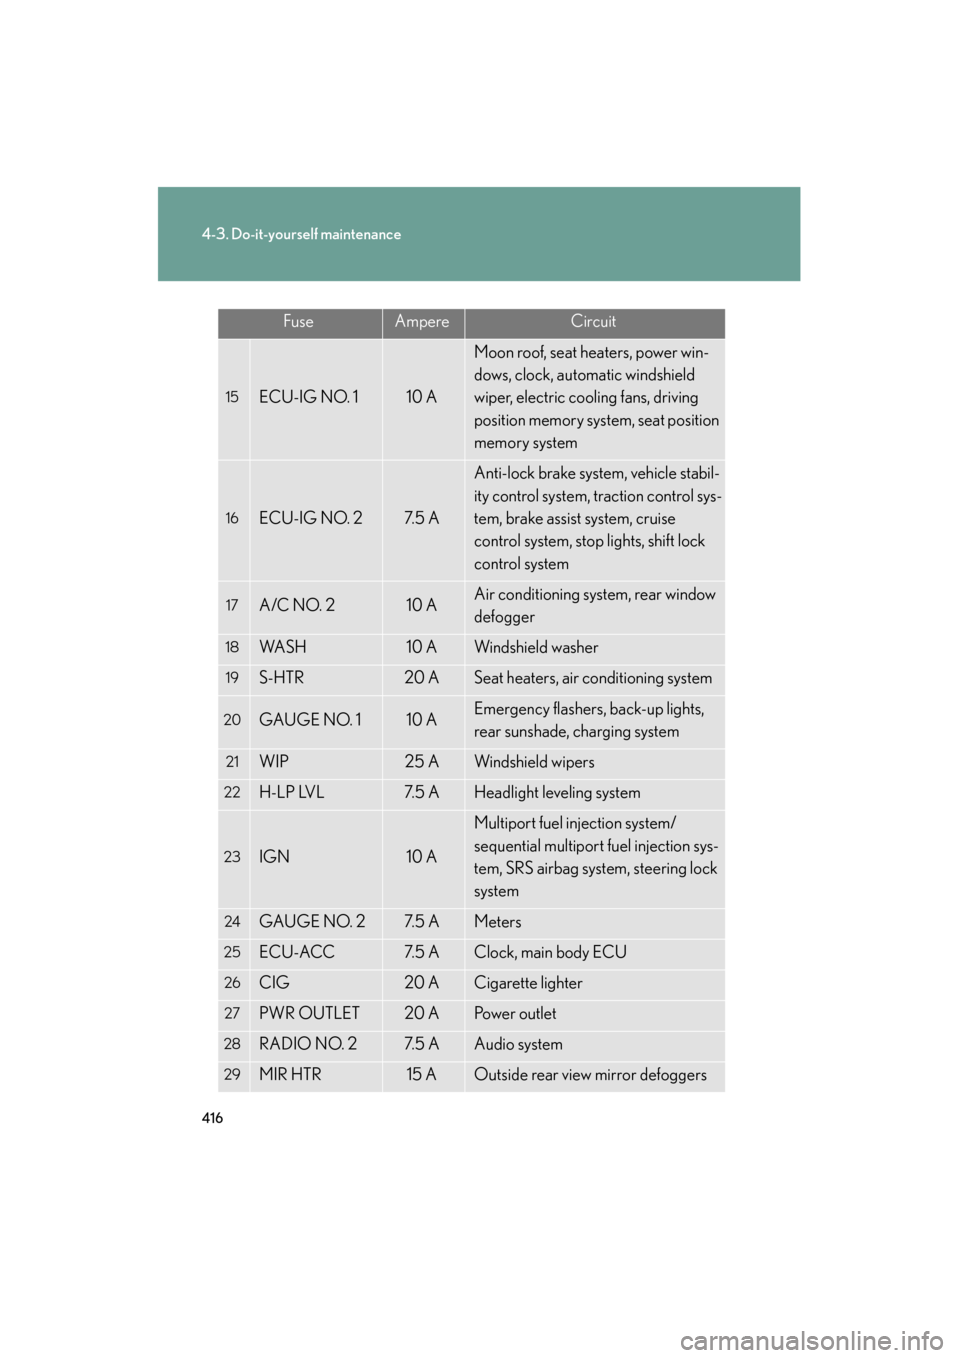
15ECU-IG NO. 110 A
Moon roof, seat heaters, power win-
dows, clock, automatic windshield
wiper, electric cooling fans, driving
position memory system, seat position
memory system
16ECU-IG NO. 27. 5 A
Anti-lock brake system, vehicle stabil-
ity control system, traction control sys-
tem, brake assist system, cruise
control system, stop lights, shift lock
control system
17A/C NO. 210 AAir conditioning system, rear window
defogger
18WA S H10 AWindshield washer
19S-HTR20 ASeat heaters, air conditioning system
20GAUGE NO. 110 AEmergency flashers, back-up lights,
rear sunshade, charging system
21WIP25 AWindshield wipers
22H-LP LVL7. 5 AHeadlight leveling system
23IGN10 A
Multiport fuel injection system/
sequential multiport fuel injection sys-
tem, SRS airbag system, steering lock
system
24GAUGE NO. 27. 5 AMeters
25ECU-ACC7. 5 AClock, main body ECU
26CIG20 ACigarette lighter
27PWR OUTLET20 APo w e r o u t l e t
28RADIO NO. 27. 5 AAudio system
29MIR HTR15 AOutside rear view mirror defoggers
FuseAmpereCircuit
Page 429 of 554
428
4-3. Do-it-yourself maintenance
ES350_U
CAUTION
■Replacing light bulbs
●Turn off the headlights. Do not attempt to replace the bulb immediately after turn-
ing off the headlights.
The bulbs become very hot and may cause burns.
●Do not touch the glass portion of the light bulb with bare hands. Hold the bulb by
the plastic or metal portion.
If the bulb is scratched or dropped it may blow out or crack.
●Fully install light bulbs and any parts used to secure them. Failing to do so may
result in heat damage, fire, or water entering the headlight unit. This may damage
the headlights or cause condensation to build up on the lens.
●Do not attempt to take apart or repair the low beam headlight bulbs, connectors,
power supply circuits, or related components.
Doing so could result in electric shock and serious injury or death.
■Discharge headlights
●Contact your Lexus dealer before replacing discharge headlights (including light
bulbs).
●Do not touch the high-intensity discharge headlight’s high voltage socket when
the headlights are turned on.
An extremely high voltage of 20000 V will be discharged and could result in
serious injury or death by electric shock.
■To prevent damage or fire
Make sure bulbs are fully seated and locked.