audio Lexus ES350 2013 REMOTE TOUCH (WITH NAVIGATION SYSTEM) / LEXUS 2013 ES300H,ES350 OWNERS MANUAL (OM33A01U)
[x] Cancel search | Manufacturer: LEXUS, Model Year: 2013, Model line: ES350, Model: Lexus ES350 2013Pages: 908, PDF Size: 11.09 MB
Page 476 of 908

476
ES350 300h_OM_OM33A01U_(U)
5-3. Using the Lexus Display Audio system
For PBAP incompatible Bluetooth® phones
Replace contacts
The phonebook data can be
replaced.
Add contacts
The phonebook can be added.
●
Deleting the phonebook data Display the “Phonebook Settings” screen. ( P. 4 74 )
Select “Manage Contacts” on th e “Phonebook Settings” screen.
Select “Delete Contacts”.
If your phone supports PBAP ser-
vice, “Automatically Download
Contacts” setting needs to be set to
“Off”. ( P. 475)
Choose the data to delete.
To delete all data, select “All
Delete”.
A confirmation message will be displa yed. If everything is correct,
select “Yes”.
1
2
1
2
3
4
5
Page 477 of 908

ES350 300h_OM_OM33A01U_(U)
4775-3. Using the Lexus Display Audio system
5
Interior features
■Phonebook data
Phonebook data is managed for every registered phone. When another phone is
connecting, you cannot read the registered data.
■Setting the phonebook in a different way (To display the “Contacts” screen)Display the “Phone” screen. ( P. 4 5 2 )
Select “Contacts” on the “Phone” screen.
Select “Options” on the “Contacts” screen.
Select “Manage Contacts” on the “Contacts” screen.
■When transferring a phone number
Transfer the phone number while engine is running
If your cellular phone is OPP or PBAP compatible, you may need to input “1234” by
your cellular phone for OBEX certification.
■When you have selected “Update Contacts” to transfer the phone number
●If your cellular phone does not support PB AP service, you cannot use this function.
●If your phone supports PBAP service, yo u can transfer the phonebook data with-
out operating your phone.
■When you have selected “Replace Contacts” or “Add Contacts” to transfer the
phone number
If your cellular phone does not support OP P service, you cannot use these functions.
You can transfer the phonebook data only by operating your phone.
■Transferring the phone number in a different way (To display the “Transfer Con-
tacts” screen)
Display the “Phone” screen. ( P. 4 5 2 )
Select “Contacts” on the “Phone” screen.
Select “Transfer” on the “Contacts” screen.
■Transferring the phone number while Bluetooth® audio is playing
Bluetooth
® audio will disconnect. It will reconnect automatically when data transfer
finishes. It will not be reconnected depending on the phone you are using.
1
2
3
4
1
2
3
Page 478 of 908

478
ES350 300h_OM_OM33A01U_(U)
5-3. Using the Lexus Display Audio system
■Deleting the phonebook data in a different wayDisplay the “Phone” screen. ( P. 4 5 2 )
Select “Contacts” on the “Phone” screen.
Choose the desired data from the list.
Select “Options” on the “Contact” screen.
Select “Delete” on the “Contact” screen.
A confirmation message will be displayed. If everything is correct, select “Yes”.
If your phone supports PBAP service, “Automatically Download Contacts” setting
needs to be set to “Off”. ( P. 475)
When you delete a Bluetooth
® phone, the phonebook data will be deleted at the
same time.
1
2
3
4
5
6
Page 479 of 908

ES350 300h_OM_OM33A01U_(U)
4795-3. Using the Lexus Display Audio system
5
Interior features
■Registering the speed dial from contacts
You can register the desired phone number from phonebook. Up to 18
numbers per phone can be registered.
Display the “Phonebook Settings” screen. ( P. 4 74 )
Select “Manage Speed Dials” on the “Phonebook Settings” screen.
Select “New Speed Dial from
Contacts”.
Choose the data to register.
Select the desired phone num-
ber.
Managing the speed dials
1
2
3
4
5
Page 480 of 908

480
ES350 300h_OM_OM33A01U_(U)
5-3. Using the Lexus Display Audio system
Select the switch you want to
register the number in.
If you select a switch you registered before, a confirmation message
will be displayed. If you want to replace it, select “Yes”.
■Registering the speed dial from call history
Display the “Phonebook Settings” screen. ( P. 4 74 )
Select “Manage Speed Dials” on the “Phonebook Settings” screen.
Select “New Speed Dial from Call History” on the “Speed Dials”
screen.
Choose the data to register.
Select the switch you want to
register the number in.
If you select a switch you regis tered before, a confirmation message
will be displayed. If you want to replace it, select “Yes”.
6
7
1
2
3
4
5
6
Page 481 of 908

ES350 300h_OM_OM33A01U_(U)
4815-3. Using the Lexus Display Audio system
5
Interior features
■Deleting the speed dialDisplay the “Phonebook Settings” screen. ( P. 4 74 )
Select “Manage Speed Dials” on the “Phonebook Settings” screen.
Select “Delete Speed Dials” on the “Speed Dials” screen.
Choose the data to delete.
To delete all data, select “All
Delete”.
A confirmation message will be displa yed. If everything is correct,
select “Yes”.
■Setting the speed dials in a differe nt way (From “Speed Dial” screen)
Display the “Phone” screen. ( P. 4 5 2 )
Select “Speed Dials” on the “Phone” screen.
Select “Options” on the “Speed Dial” screen.
■Setting the speed dials in a different way (From “Contacts” screen) Display the “Phone” screen. ( P. 4 5 2 )
Select “Contacts” on the “Phone” screen.
Select “Options” on the “Contacts” screen.
Select “Manage Speed Dials” on the “Contacts” screen.
1
2
3
4
5
1
2
3
1
2
3
4
Page 482 of 908

482
ES350 300h_OM_OM33A01U_(U)
5-3. Using the Lexus Display Audio system
■Registering the speed dial in a different way (From “Speed Dial” screen)
Display the “Phone” screen. ( P. 4 5 2 )
Select “Speed Dials” on the “Phone” screen.
Select “(add new)” on the “Speed Dial” screen.
Select “Contacts” or “History” to set new speed dial.
Select “Cancel” to cancel it.
Choose the desired data from the list.
Select the desired phone number.
■Registering the speed dial in a di fferent way (From “Contact” screen)
Display the “Phone” screen. ( P. 4 5 2 )
Select “Contacts” on the “Phone” screen.
Choose the desired data from the list.
Select “Options” on the “Contact” screen.
Select “Set Speed Dial” on the “Contact” screen.
Select the desired telephone number.
Follow the steps “Registering the speed dial from contacts” from
( P. 4 7 9 ) .
■Registering the speed dial in a differe nt way (From “Call History” screen)
Display the “Phone” screen. ( P. 4 5 2 )
Select “Call History” on the “Phone” screen.
Choose the desired data from the list.
Select “Add Speed Dial” on the “Call History” screen.
Follow the steps “Registering the speed dial from call history” from .
( P. 4 8 0 )
1
2
3
4
5
6
1
2
3
4
5
6
76
1
2
3
4
55
Page 483 of 908

ES350 300h_OM_OM33A01U_(U)
4835-3. Using the Lexus Display Audio system
5
Interior features
Display the “Phonebook Settings” screen. (P. 4 74 )
Select “Delete Call History” on the “Phonebook Settings” screen.
If your phone supports PBAP service, the “Automatically Download Contacts”
setting needs to be set to “Off”. ( P. 475)
Choose the desired history to
delete.
Choose the data to delete.
To delete all data, select “All
Delete”.
A confirmation message will be displa yed. If everything is correct,
select “Yes”.
■Deleting call history in a different way
Display the “Phone” screen. ( P. 4 5 2 )
Select “Call History” on the “Phone” screen.
Select “Delete” on the “Call History” screen.
Follow the steps “Deleting the call history” from . ( P. 4 8 3 )
Deleting the call history
1
2
3
4
5
1
2
3
44
Page 484 of 908

484
ES350 300h_OM_OM33A01U_(U)
5-3. Using the Lexus Display Audio system
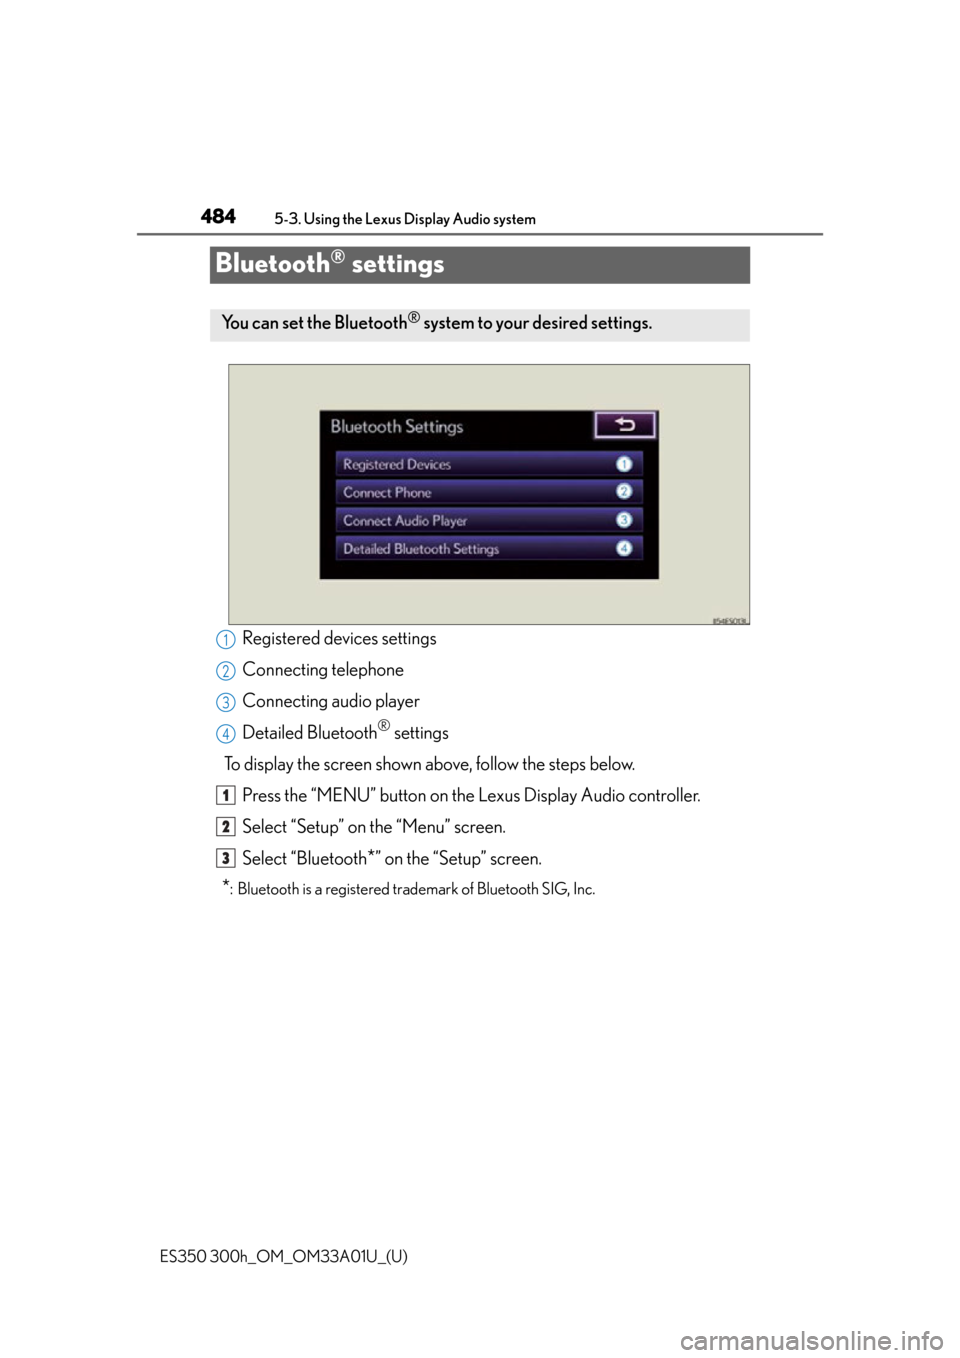
Bluetooth® settings
Registered devices settings
Connecting telephone
Connecting audio player
Detailed Bluetooth
® settings
To display the screen shown above, follow the steps below. Press the “MENU” button on the Lexus Display Audio controller.
Select “Setup” on the “Menu” screen.
Select “Bluetooth
*” on the “Setup” screen.
*: Bluetooth is a registered trademark of Bluetooth SIG, Inc.
You can set the Bluetooth® system to your desired settings.
1
2
3
4
1
2
3
Page 485 of 908

ES350 300h_OM_OM33A01U_(U)
4855-3. Using the Lexus Display Audio system
5
Interior features
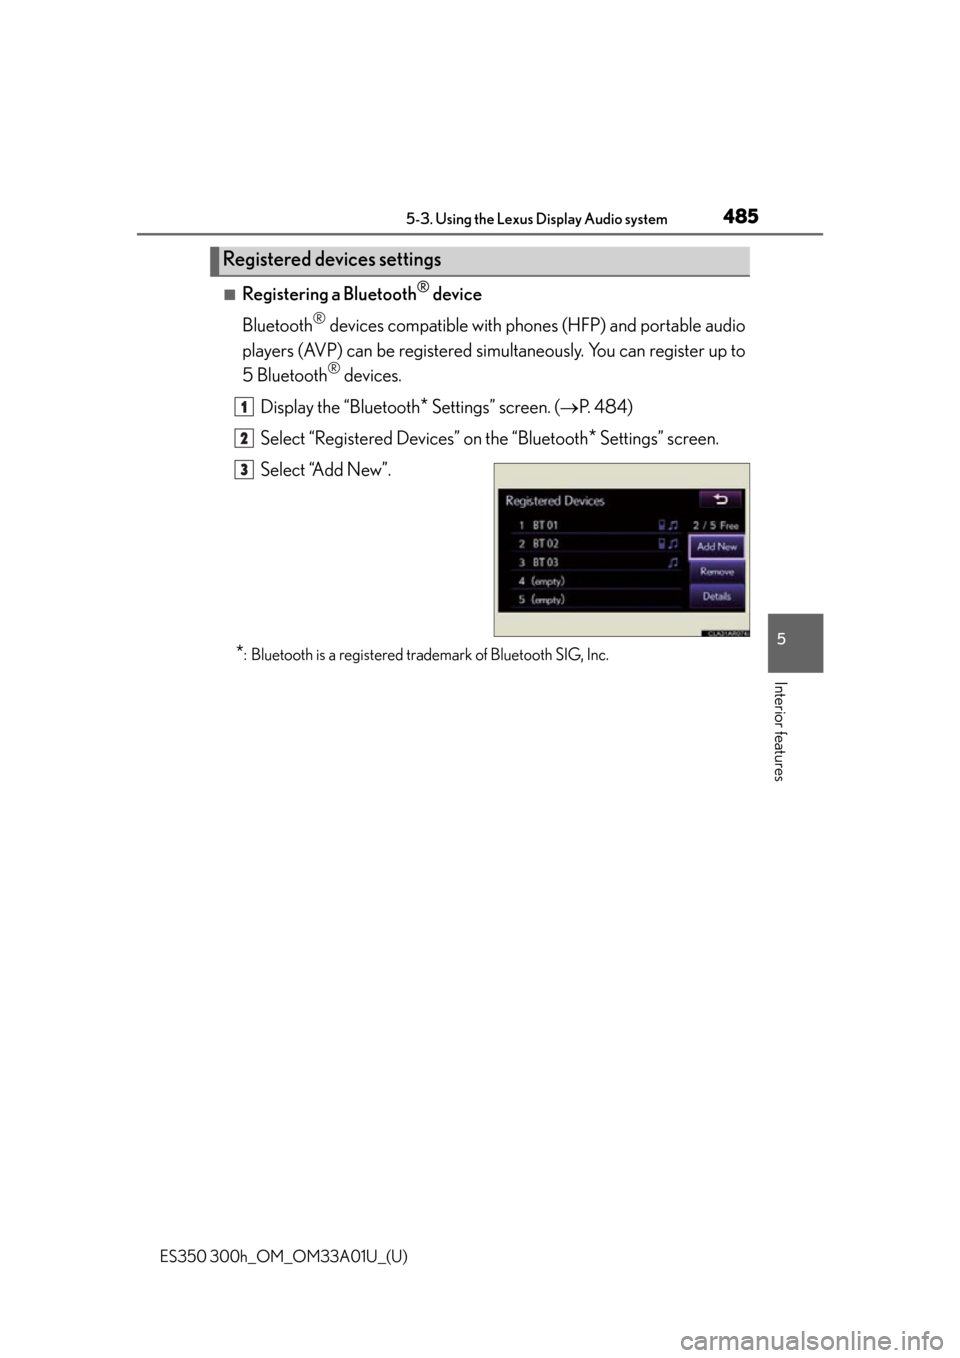
■Registering a Bluetooth® device
Bluetooth
® devices compatible with phon es (HFP) and portable audio
players (AVP) can be registered si multaneously. You can register up to
5 Bluetooth
® devices.
Display the “Bluetooth
* Settings” screen. ( P. 4 8 4 )
Select “Registered Devices” on the “Bluetooth
* Settings” screen.
Select “Add New”.
*: Bluetooth is a registered trademark of Bluetooth SIG, Inc.
Registered devices settings
1
2
3