ignition Lexus ES350 2013 REMOTE TOUCH (WITH NAVIGATION SYSTEM) / LEXUS 2013 ES300H,ES350 (OM33A01U) Owner's Manual
[x] Cancel search | Manufacturer: LEXUS, Model Year: 2013, Model line: ES350, Model: Lexus ES350 2013Pages: 908, PDF Size: 11.09 MB
Page 197 of 908

197
ES350 300h_OM_OM33A01U_(U)
4-2. Driving procedures
4
Driving
Engine (ignition) switch (gasoline vehicles)
Check that the parking brake is set.
Check that the shift lever is set in P.
Firmly depress the brake pedal.
will be displayed on the multi-information display.
If it is not displayed, the engine cannot be started.
Press the “START STOP
ENGINE” switch.
The engine will crank until it starts or
for up to 30 seconds, whichever is
less.
Continue depressing the brake pedal
until the engine is completely started.
The engine can be started from any
“START STOP ENGINE” switch
mode.
Performing the following operations when carrying the electronic key
on your person starts the engine or changes “START STOP ENGINE”
switch modes.
Starting the engine
1
2
3
4
Page 198 of 908

198
ES350 300h_OM_OM33A01U_(U)
4-2. Driving procedures
Stop the vehicle.
Shift the shift lever to P.
Set the parking brake. (P. 222)
Press the “START STOP ENGINE” switch.
Release the brake pedal and check that “POWER ON” on the multi-
information display is off.
Modes can be changed by pressing the “START STOP ENGINE” switch
with brake pedal released. (The mode changes each time the switch is
pressed.)
Off*
The emergency flashers can be used.
The multi-information display will not
be displayed.
ACCESSORY mode
Some electrical components such as
the audio system can be used.
“POWER ON” will be displayed on
the multi-information display.
IGNITION ON mode
All electrical components can be
used.
“POWER ON” will be displayed on
the multi-information display.
*: If the shift lever is in a position other
than P when turning off the engine, the
“START STOP ENGINE” switch will
be turned to ACCESSORY mode,
not to off.
Stopping the engine
Changing “START STOP ENGINE” switch modes
1
2
3
4
5
Page 200 of 908

200
ES350 300h_OM_OM33A01U_(U)
4-2. Driving procedures
■Auto power off function
If the vehicle is left in ACCESSORY mode for more than 20 minutes or IGNITION
ON mode (the engine is not running) for more than an hour with the shift lever in P,
the “START STOP ENGINE” switch will automatically turn off. However, this func-
tion cannot entirely prevent 12-volt batter y discharge. Do not leave the vehicle with
the “START STOP ENGINE” switch in ACCESSORY or IGNITION ON mode for
long periods of time when the engine is not running.
■Electronic key battery depletion
P. 1 3 4
■Conditions affecting operation
P. 1 3 0
■Notes for the entry function
P. 1 3 1
■If the engine does not start
●The engine immobilizer system may not have been deactivated. ( P. 8 0 )
Contact your Lexus dealer.
●Check that the shift lever is securely set in P. The engine may not start if the shift
lever is displaced out of P. “Shift to P position to Start” will be displayed on the multi-
information display.
■Steering lock
After turning the “START STOP ENGINE” switch off and opening and closing the
doors, the steering wheel will be locked due to the steering lock function. Operating
the “START STOP ENGINE” switch again automatically cancels the steering lock.
Page 204 of 908

204
ES350 300h_OM_OM33A01U_(U)
4-2. Driving procedures
Power (ignition) switch (hybrid vehicles)
Check that the parking brake is set.
Check that the shift lever is set in P.
Firmly depress the brake pedal.
will be displayed on the multi-information display.
If it is not displayed, the hybrid system cannot be started.
Press the “POWER” switch.
Continue depressing the brake pedal
until the hybrid system is completely
started.
The hybrid system can be started from
any “POWER” switch mode.
Check that the “READY” indica-
tor is on.
The vehicle will not move when the
“READY” indicator is off.
Performing the following operations when carrying the electronic key
on your person starts the hybrid system or changes “POWER” switch
modes.
Starting the hybrid system
1
2
3
4
5
Page 214 of 908

214
ES350 300h_OM_OM33A01U_(U)
4-2. Driving procedures
Automatic transmission (gasoline vehicles)
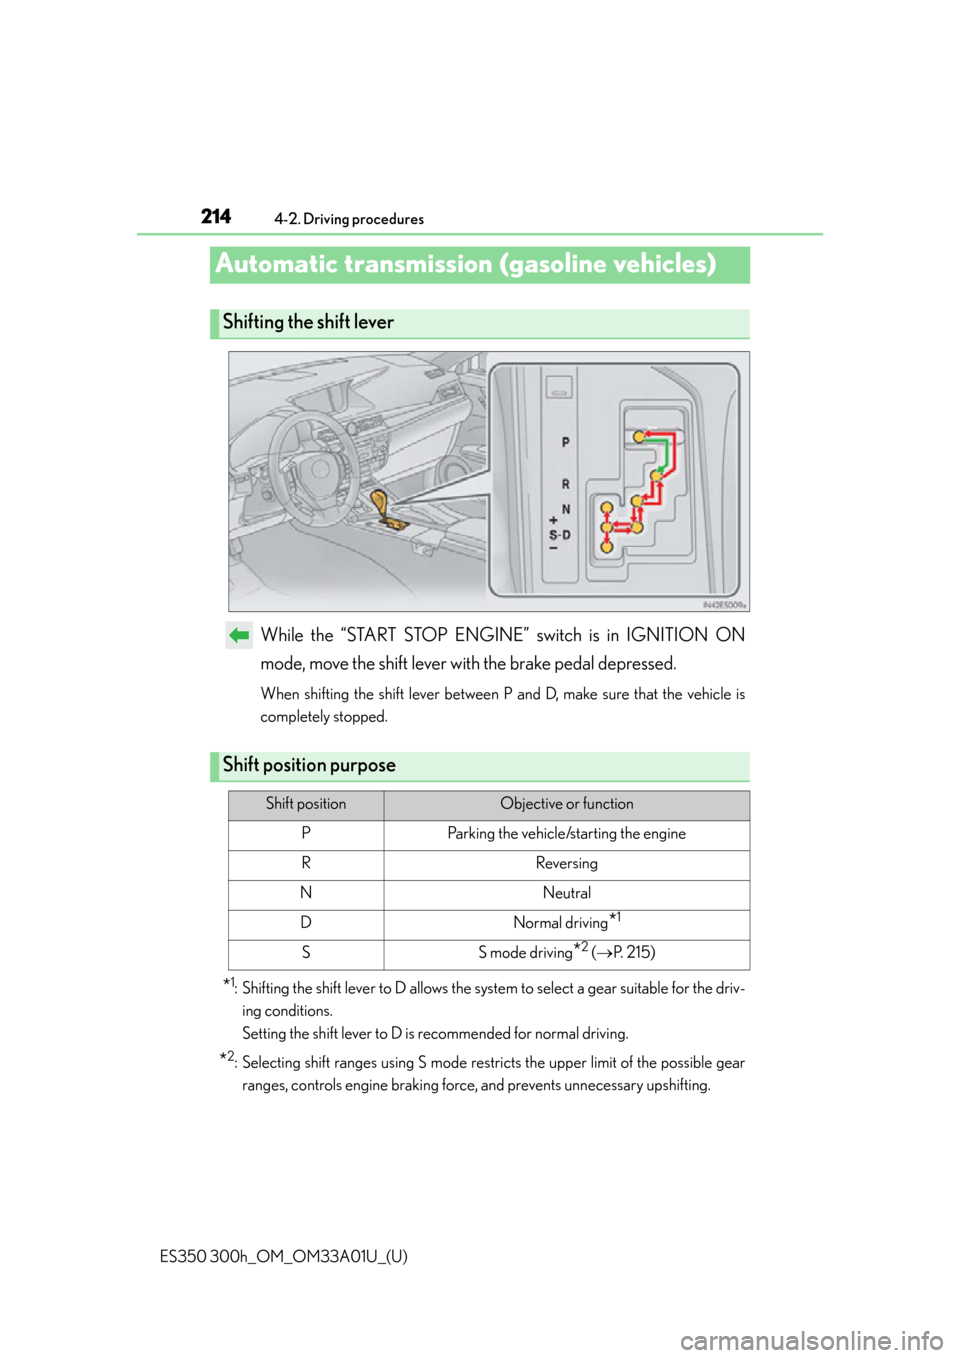
While the “START STOP ENGINE” switch is in IGNITION ON
mode, move the shift lever with the brake pedal depressed.
When shifting the shift lever between P and D, make sure that the vehicle is
completely stopped.
*1: Shifting the shift lever to D allows the system to select a gear suitable for the driv- ing conditions.
Setting the shift lever to D is recommended for normal driving.
*2: Selecting shift ranges using S mode rest ricts the upper limit of the possible gear
ranges, controls engine braking force, and prevents unnecessary upshifting.
Shifting the shift lever
Shift position purpose
Shift positionObjective or function
PParking the vehicle/starting the engine
RReversing
NNeutral
DNormal driving*1
SS mode driving*2 ( P. 2 1 5 )
Page 221 of 908

221
ES350 300h_OM_OM33A01U_(U)
4-2. Driving procedures
4
Driving
Turn signal lever
Right turn
Lane change to the right (move
the lever partway and then
release it)
The right hand signals will flash 3
times.
Lane change to the left (move the
lever partway and then release it)
The left hand signals will flash 3 times.
Left turn
■Turn signals can be operated when
The “START STOP ENGINE” <“POWER”> switch is in IGNITION ON
mode.
■If the indicator flashes faster than usual
Check that a light bulb in the front or re ar turn signal lights has not burned out.
■If the turn signals stop flashing before a lane change has been performed
Operate the lever again.
■To discontinue flashing of the tu rn signals during a lane change
Operate the lever in the opposite direction.
■Customization
The number of times the turn signals flash during a lane change can be changed.
( P. 8 5 2 )
Operating instructions
1
2
3
4
Page 224 of 908

224
ES350 300h_OM_OM33A01U_(U)
4-3. Operating the lights and wipers
Headlight switch
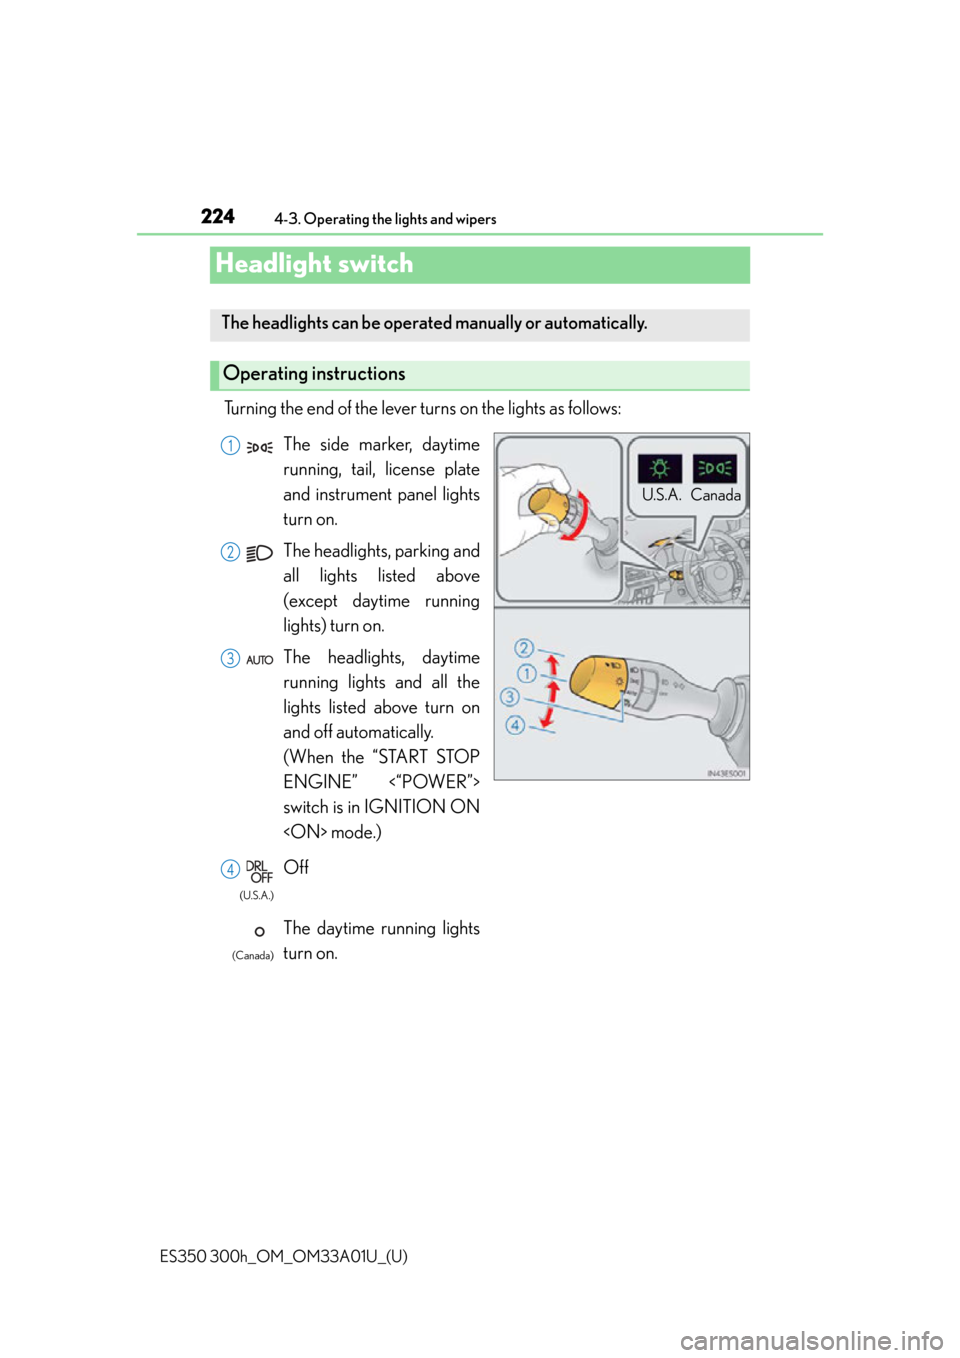
Turning the end of the lever turns on the lights as follows:
The headlights can be operated manually or automatically.
Operating instructions
U.S.A. Canada
The side marker, daytime
running, tail, license plate
and instrument panel lights
turn on.
The headlights, parking and
all lights listed above
(except daytime running
lights) turn on.
The headlights, daytime
running lights and all the
lights listed above turn on
and off automatically.
(When the “START STOP
ENGINE” <“POWER”>
switch is in IGNITION ON
Off
The daytime running lights
turn on.1
2
3
4
(U.S.A.)
(Canada)
Page 226 of 908

226
ES350 300h_OM_OM33A01U_(U)
4-3. Operating the lights and wipers
■Daytime running light system
●To make your vehicle more visible to other drivers, the parking lights turn on auto-
matically (at an increased intensity) whenever the engine
and the parking brake is released. Daytime running lights are not designed for use
at night.
For the U.S.A.: Daytime running lights can be turned off by operating the switch.
●Compared to turning on the headlights, the daytime running light system offers
greater durability and consumes less electricity, so it can help improve fuel econ-
omy.
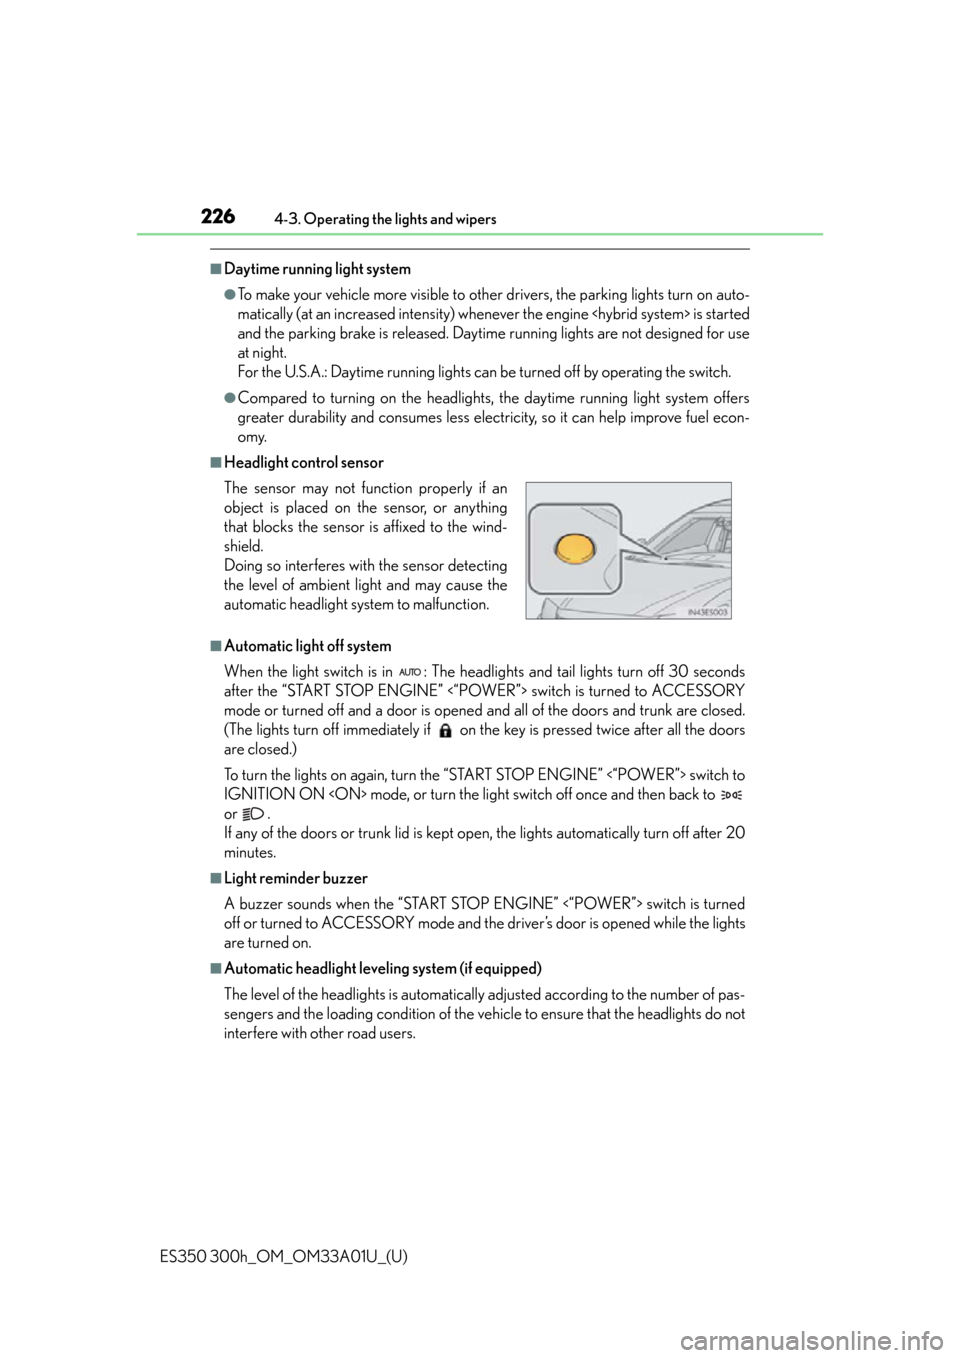
■Headlight control sensor
■Automatic light off system
When the light switch is in : The headlig hts and tail lights turn off 30 seconds
after the “START STOP ENGINE” <“POWER”> switch is turned to ACCESSORY
mode or turned off and a door is opened and all of the doors and trunk are closed.
(The lights turn off immediately if on th e key is pressed twice after all the doors
are closed.)
To turn the lights on again, turn the “START STOP ENGINE” <“POWER”> switch to
IGNITION ON
or .
If any of the doors or trunk lid is kept op en, the lights automatically turn off after 20
minutes.
■Light reminder buzzer
A buzzer sounds when the “START STOP ENGINE” <“POWER”> switch is turned
off or turned to ACCESSORY mode and the driver’s door is opened while the lights
are turned on.
■Automatic headlight leveling system (if equipped)
The level of the headlights is automatically adjusted according to the number of pas-
sengers and the loading conditio n of the vehicle to ensure that the headlights do not
interfere with other road users. The sensor may not func tion properly if an
object is placed on the sensor, or anything
that blocks the sensor is affixed to the wind-
shield.
Doing so interferes with the sensor detecting
the level of ambient light and may cause the
automatic headlight system to malfunction.
Page 231 of 908

ES350 300h_OM_OM33A01U_(U)
2314-3. Operating the lights and wipers
4
Driving
■The Automatic High Beam can be operated when
The “START STOP ENGINE” <“POWER”> switch is in IGNITION ON
mode.
■Camera sensor detection information
●High beam may not be automatically turned off in the following situations:
• When oncoming vehicles su ddenly appear from a curve
• When the vehicle is cut in front of by another
• When oncoming or preceding vehicles are hidden from sight due to repeated
curves, road dividers or roadside trees
• When oncoming vehicles appear fr om the faraway lane on wide road
• When oncoming or preceding vehicles have no lights
●High beam may be turned off if an oncoming vehicle that is using fog lights without
using the headlights is detected.
●House lights, street lights, red traffic signals, and illuminated billboards or signs may
cause the high beam to turn off.
●The following factors may affect the amount of time taken to turn high beam on or
off:
• The brightness of headligh ts, fog lights, and tail lights of oncoming and preced-
ing vehicles
• The movement and direction of oncoming and preceding vehicles
• When a oncoming or preceding vehicle on ly has operational lights on one side
• When a oncoming or preceding vehicle is a two-wheeled vehicle
• The condition of the road (gradient, curve, condition of the road surface etc.)
• The number of passengers and amount of luggage
●High beam may be turned on or off when unexpected by the driver.
Page 232 of 908

232
ES350 300h_OM_OM33A01U_(U)
4-3. Operating the lights and wipers
●In the situations below, the system may not be able to correctly detect the sur-
rounding brightness levels, and may flash or expose nearby pedestrians to the high
beam. Therefore, you should consider turning the high beams on or off manually
rather than relying on the Automatic High Beam system.
• In bad weather (rain, snow , fog, sandstorms etc.)
• The windshield is obscured by fog, mist, ice, dirt etc.
• The windshield is cracked or damaged.
• The camera sensor is deformed or dirty.
• Surrounding brightness levels are equal to those of headlights, tail lights or fog lights.
• Vehicles ahead have headlights or tail lights that are either switched off, dirty, are changing color, or are not aimed properly.
• When driving through an area of interm ittently changing brightness and dark-
ness.
• When frequently and repeatedly driving ascending/descending roads, or roads with rough, bumpy or uneven surfaces (such as stone-paved roads, gravel tracks
etc.).
• When frequently and repeatedly taking curves or driving on a winding road.
• There is a highly reflective object ahead of the vehicle, such as a sign or a mirror.
• The vehicle’s headlights are damaged or dirty, or are not aimed properly.
• The vehicle is listing or titling, due to a flat tire, a trailer being towed etc.
• The driver believes that the high beam may be causin g problems or distress to
other drivers or pedestrians nearby.
■Temporarily lowering sensor sensitivity
The sensitivity of the sensor can be temporarily lowered.
Turn the “START STOP ENGINE” <“POWER”> switch off while the following
conditions are met.
• The headlight switch is in or .
• The headlight switch lever is in high beam position.
• Automatic High Beam switch is on. Tu r n t h e “ S T A R T S T O P E N G I N E ” < “ POWER”> switch to IGNITION ON
Within 5 seconds after , repeat pulling the headlight switch lever to the origi-
nal position then pushing it to the high beam position quickly 9 times, then leave
the lever in high beam position.
Automatic High Beam (headlights) may turn on even the vehicle is stopped.
1
2
32