roof Lexus ES350 2019 / LEXUS 2019 ES350 (OM06130U) Owner's Guide
[x] Cancel search | Manufacturer: LEXUS, Model Year: 2019, Model line: ES350, Model: Lexus ES350 2019Pages: 444, PDF Size: 14.22 MB
Page 124 of 444
1243-5. Opening and closing the windows and moon roof
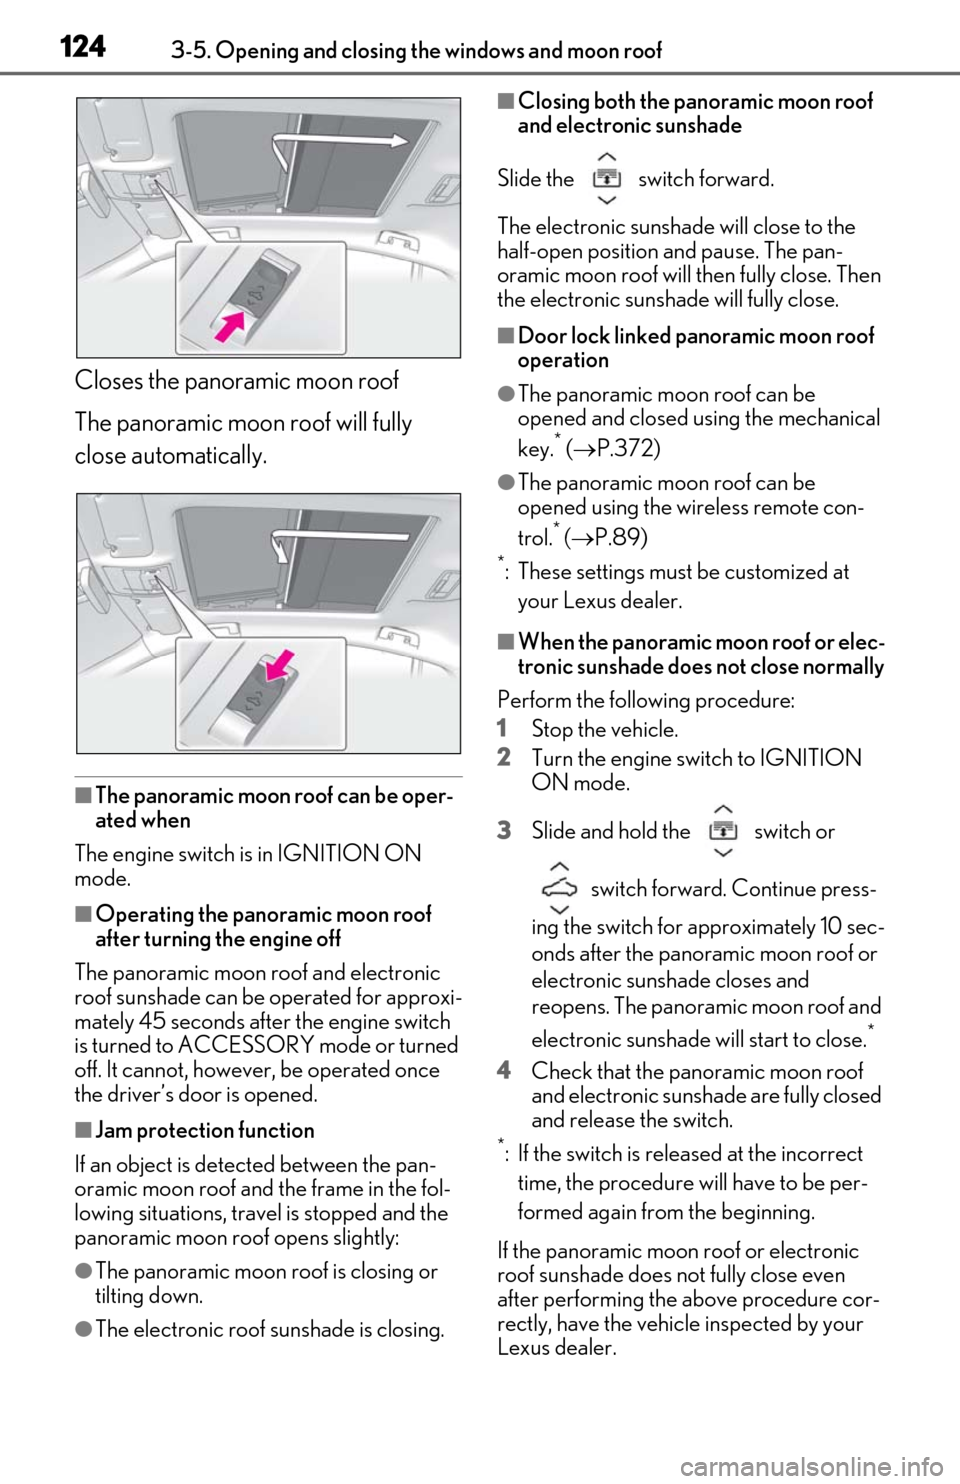
Closes the panoramic moon roof
The panoramic moon roof will fully
close automatically.
■The panoramic moon roof can be oper-
ated when
The engine switch is in IGNITION ON
mode.
■Operating the panoramic moon roof
after turning the engine off
The panoramic moon roof and electronic
roof sunshade can be operated for approxi-
mately 45 seconds afte r the engine switch
is turned to ACCESSORY mode or turned
off. It cannot, however, be operated once
the driver’s door is opened.
■Jam protection function
If an object is detected between the pan-
oramic moon roof and the frame in the fol-
lowing situations, travel is stopped and the
panoramic moon roof opens slightly:
●The panoramic moon roof is closing or
tilting down.
●The electronic roof sunshade is closing.
■Closing both the panoramic moon roof
and electronic sunshade
Slide the switch forward.
The electronic sunshade will close to the
half-open position and pause. The pan-
oramic moon roof will then fully close. Then
the electronic sunshade will fully close.
■Door lock linked panoramic moon roof
operation
●The panoramic moon roof can be
opened and closed using the mechanical
key.
* ( P.372)
●The panoramic moon roof can be
opened using the wireless remote con-
trol.
* ( P.89)*: These settings must be customized at
your Lexus dealer.
■When the panoramic moon roof or elec-
tronic sunshade does not close normally
Perform the following procedure:
1 Stop the vehicle.
2 Turn the engine switch to IGNITION
ON mode.
3 Slide and hold the switch or
switch forward. Continue press-
ing the switch for approximately 10 sec-
onds after the panoramic moon roof or
electronic sunshade closes and
reopens. The panoramic moon roof and
electronic sunshade will start to close.
*
4 Check that the panoramic moon roof
and electronic sunshade are fully closed
and release the switch.
*: If the switch is released at the incorrect
time, the procedure will have to be per-
formed again from the beginning.
If the panoramic moon roof or electronic
roof sunshade does not fully close even
after performing the above procedure cor-
rectly, have the vehicle inspected by your
Lexus dealer.
Page 125 of 444
1253-5. Opening and closing the windows and moon roof
3
Before driving
■Panoramic moon roof open warning
buzzer
A buzzer sounds and a message is shown
on the multi-information display when the
engine switch is turned off and the driver’s
door is opened with the panoramic moon
roof open.
■Customization
Settings (e.g. linked door lock operation)
can be changed. (Customizable fea-
tures: P.400)
WARNING
Observe the following precautions.
Failing to do so may cause death or seri-
ous injury.
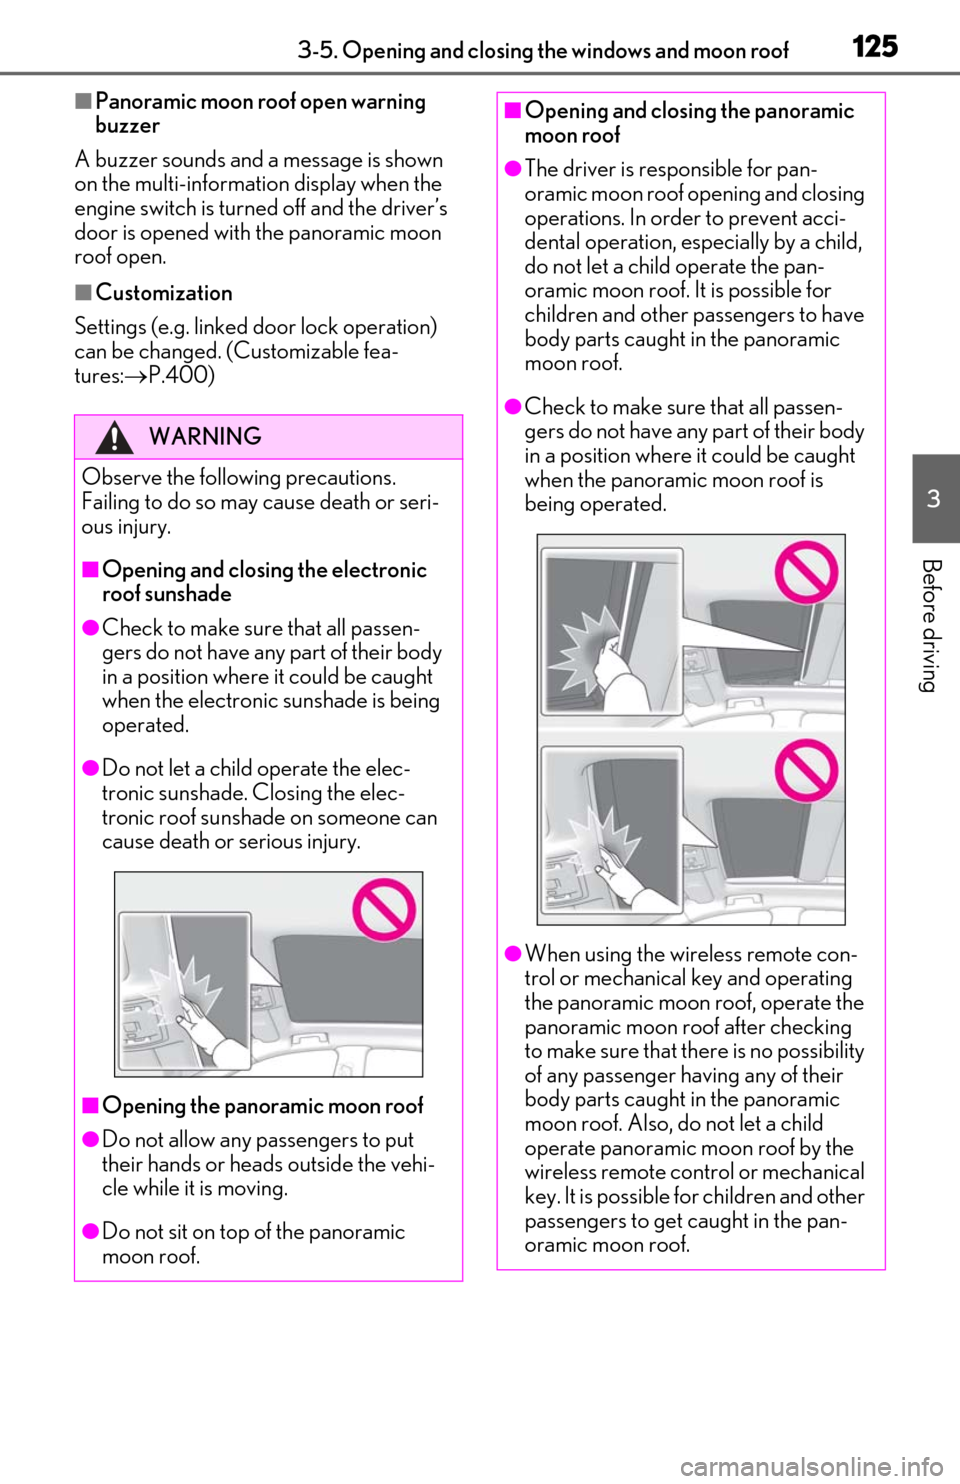
■Opening and closing the electronic
roof sunshade
●Check to make sure that all passen-
gers do not have any part of their body
in a position where it could be caught
when the electronic sunshade is being
operated.
●Do not let a child operate the elec-
tronic sunshade. Closing the elec-
tronic roof sunshade on someone can
cause death or serious injury.
■Opening the panoramic moon roof
●Do not allow any passengers to put
their hands or heads outside the vehi-
cle while it is moving.
●Do not sit on top of the panoramic
moon roof.
■Opening and closing the panoramic
moon roof
●The driver is responsible for pan-
oramic moon roof opening and closing
operations. In order to prevent acci-
dental operation, especially by a child,
do not let a child operate the pan-
oramic moon roof. It is possible for
children and other pa ssengers to have
body parts caught in the panoramic
moon roof.
●Check to make sure that all passen-
gers do not have any part of their body
in a position where it could be caught
when the panoramic moon roof is
being operated.
●When using the wireless remote con-
trol or mechanical key and operating
the panoramic moon roof, operate the
panoramic moon r oof after checking
to make sure that there is no possibility
of any passenger ha ving any of their
body parts caught in the panoramic
moon roof. Also, do not let a child
operate panoramic moon roof by the
wireless remote control or mechanical
key. It is possible for children and other
passengers to get caught in the pan-
oramic moon roof.
Page 126 of 444
1263-5. Opening and closing the windows and moon roof
WARNING
●When exiting the vehicle, turn the
engine switch off, carry the key and
exit the vehicle along with the child.
There may be accidental operation,
due to mischief, etc., that may possibly
lead to an accident.
■Jam protection function
●Never use any part of your body to
intentionally activate the jam protec-
tion function.
●The jam protection function may not
work if something gets caught just
before the panoramic moon roof or
electronic roof sunshade is fully
closed. Also, the jam protection func-
tion is not designed to operate while
the switch is being pressed. Take care
so that your fingers, etc. do not get
caught.
■To prevent burns or injuries
Do not touch the area between the
underside of the panoramic moon roof
and the electronic sunshade. Your hand
may get caught and you could injure
yourself. Also, if the vehi cle is left in direct
sunlight for a long time, the underside of
the panoramic moon roof could become
very hot and could cause burns.
NOTICE
■To prevent damage to the panoramic
moon roof
●Before opening the panoramic moon
roof, make sure that there are no for-
eign objects, such as stones or ice,
around the opening.
●Do not hit the surface or edge of the
panoramic moon roof with hard
objects.
■After the vehicle has been washed or
rained on
Before opening the panoramic moon
roof, wipe any water off the panoramic
moon roof. Otherwise, water may enter
the cabin when the panoramic moon roof
is opened.
Page 165 of 444
1654-5. Using the driving support systems
4
Driving
WARNING
●If the part of the windshield in front of
the front camera is fogged up or cov-
ered with condensation, or ice, use the
windshield defogger to remove the
fog, condensation, or ice. (P.252)
●If water droplets cannot be properly
removed from the area of the wind-
shield in front of the front camera by
the windshield wipers, replace the
wiper insert or wiper blade.
If the wiper inserts or wiper blades
need to be replaced, contact your
Lexus dealer.
●Do not attach window tint to the wind-
shield.
●Replace the windshield if it is damaged
or cracked.
If the windshield needs to be replaced,
contact your Lexus dealer.
●Do not allow liquids to contact the
front camera.
●Do not allow bright lights to shine into
the front camera.
●Do not dirty or damage the front cam-
era.
When cleaning the inside of the wind-
shield, do not allow glass cleaner to
contact the lens of the front camera.
Also, do not touch the lens.
If the lens is dirty or damaged, contact
your Lexus dealer.
●Do not subject the front camera to a
strong impact.
●Do not change the installation position
or direction of the front camera or
remove it.
●Do not disassemble the front camera.
●Do not modify any components of the
vehicle around the front camera
(inside rear view mirror, etc.) or ceiling.
●Do not attach any accessories to the
hood, front grille or front bumper that
may obstruct the front camera. Con-
tact your Lexus dealer for details.
●If a surfboard or other long object is to
be mounted on the roof, make sure
that it will not obstruct the front cam-
era.
●Do not modify the headlights or other
lights.
Page 241 of 444
2414-6. Driving tips
4
Driving
or move a wiper that is frozen. Pour
warm water over the frozen area to
melt the ice. Wipe away the water
immediately to prevent it from
freezing.
To ensure proper operation of the
climate control system fan, remove
any snow that has accumulated on
the air inlet vents in front of the
windshield.
Check for and remove any excess
ice or snow that may have accumu-
lated on the exterior lights, vehicle’s
roof, chassis, around the tires or on
the brakes.
Remove any snow or mud from the
bottom of your shoes before getting
in the vehicle.
■To protect the windshield wipers
P.158
Accelerate the vehicle slowly, keep a
safe distance between you and the
vehicle ahead, and drive at a reduced
speed suitable to road conditions.
Park the vehicle and move the shift
lever to P without setting the park-
ing brake. The parking brake may
freeze up, preventing it from being
released. If the vehicle is parked
without setting the parking brake,
make sure to block the wheels.
Failure to do so may be dangerous
because it may cause the vehicle to move unexpectedly, possibly lead-
ing to an accident.
If the vehicle is parked without set-
ting the parking brake, confirm that
the shift lever cannot be moved out
of P
*.
*: The shift lever will be locked if it is
attempted to be shifted from P to any
other position with out depressing the
brake pedal. If the shift lever can be
shifted from P, there may be a problem
with the shift lock system. Have the vehi-
cle inspected by your Lexus dealer
immediately.
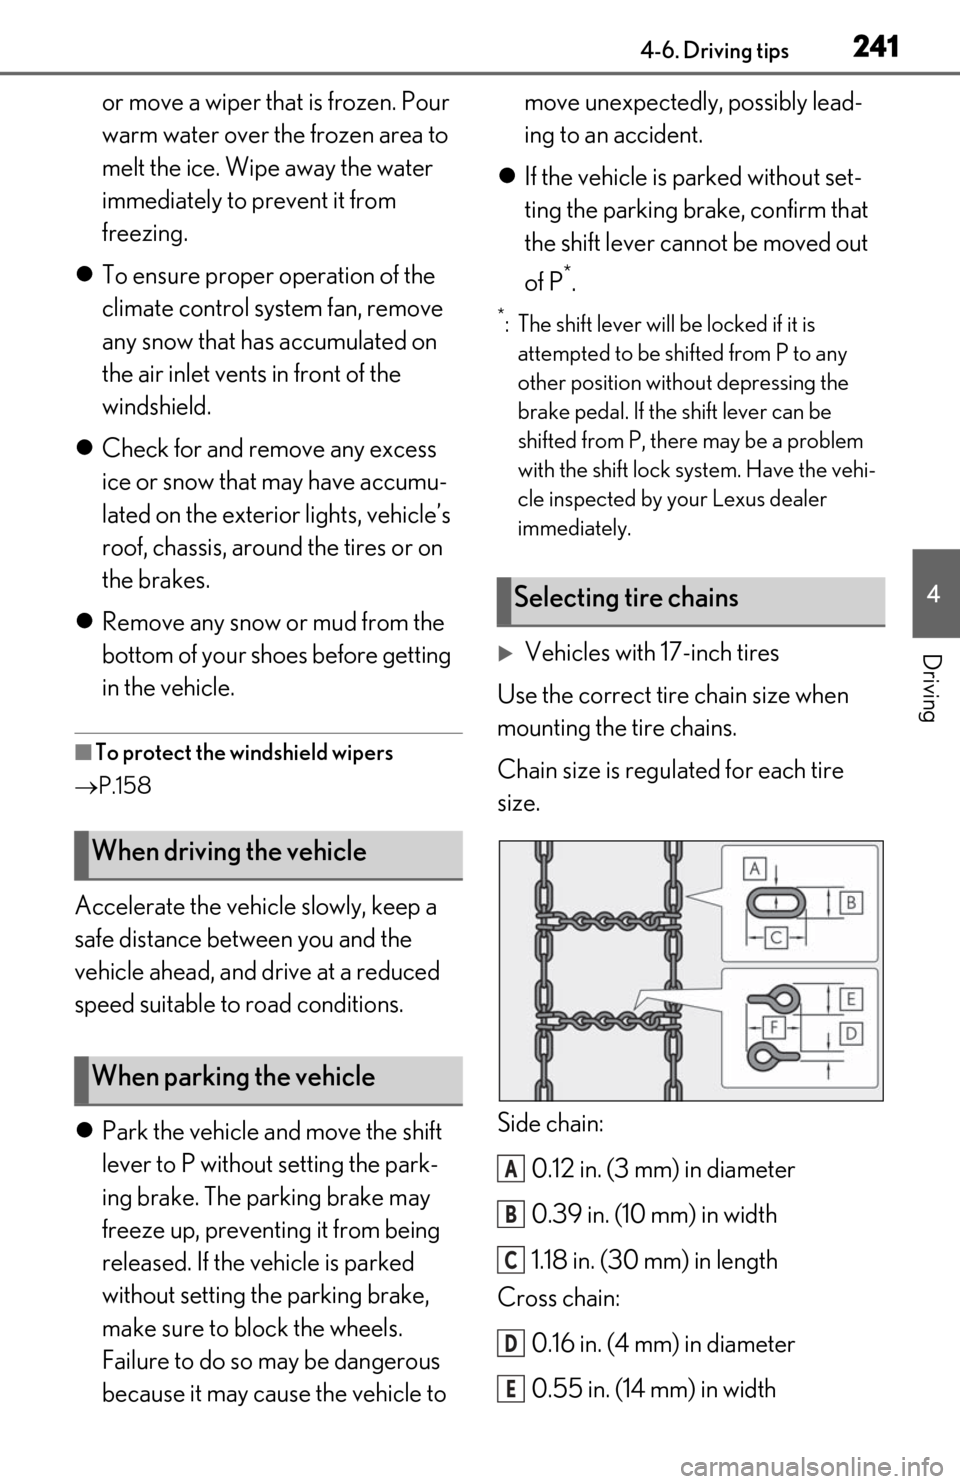
Vehicles with 17-inch tires
Use the correct tire chain size when
mounting the tire chains.
Chain size is regulated for each tire
size.
Side chain:
0.12 in. (3 mm) in diameter
0.39 in. (10 mm) in width
1.18 in. (30 mm) in length
Cross chain:
0.16 in. (4 mm) in diameter
0.55 in. (14 mm) in width
When driving the vehicle
When parking the vehicle
Selecting tire chains
A
B
C
D
E
Page 287 of 444
2875-6. Using the other interior features
5
Interior features
turning.
●The vehicle is on an inclined surface.
●The vehicle is in a place where the earth’s
magnetic field is subject to interference
by artificial magnetic fields (under-
ground car park/parking lot, under a
steel tower, between buildings, roof car
park/parking lot, near an intersection,
near a large vehicle, etc.).
●The vehicle has become magnetized.
(There is a magnet or metal object near
the inside rear view mirror.)
●The battery has been disconnected.
●A door is open.
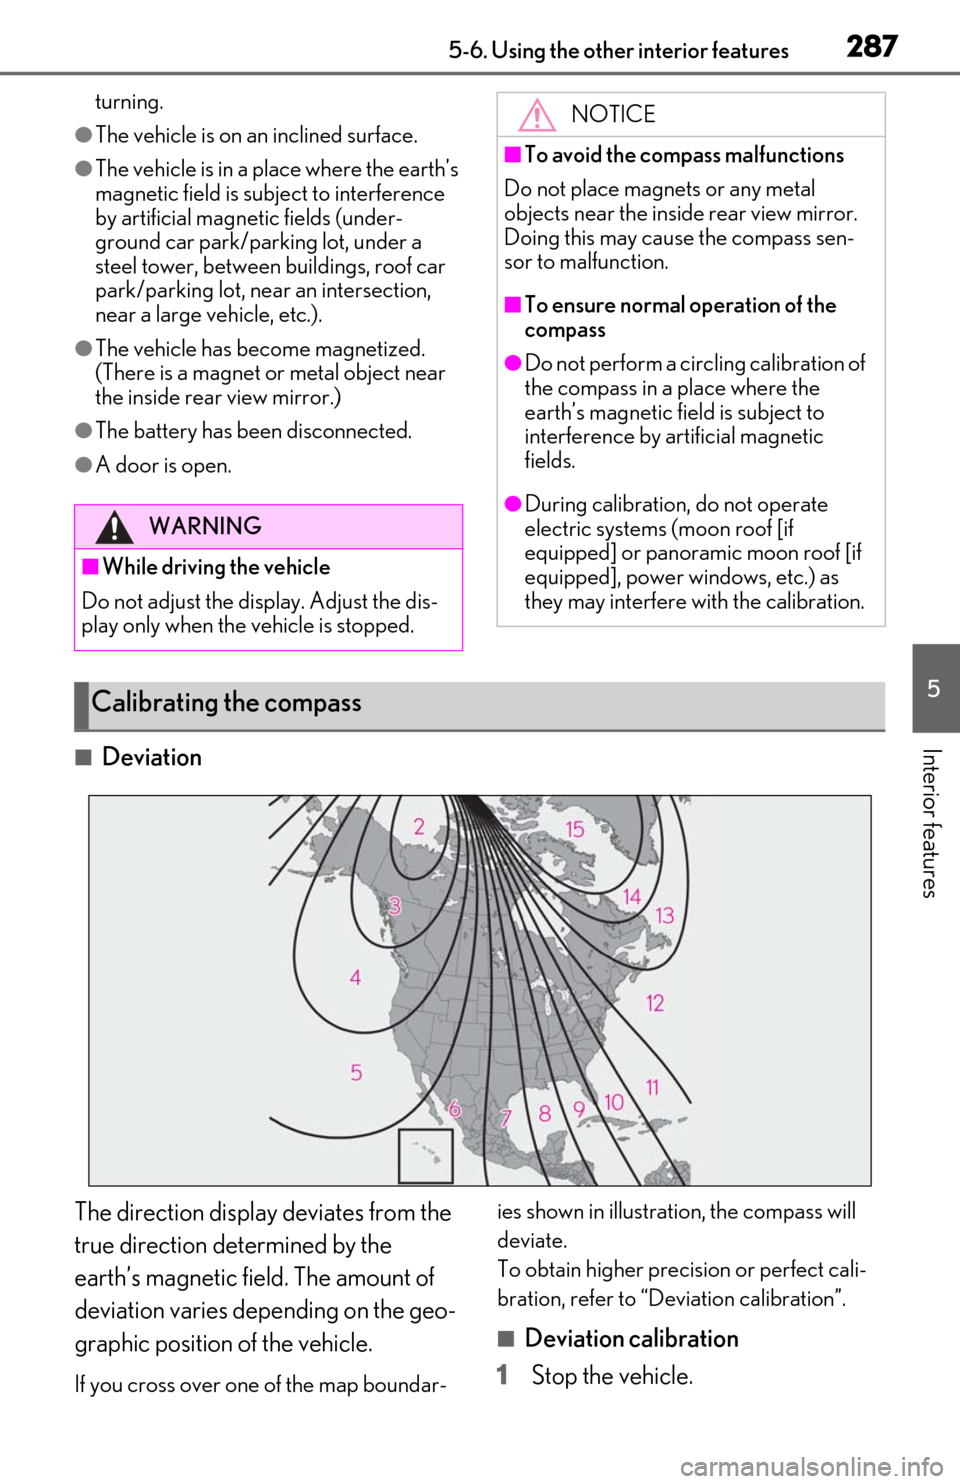
■Deviation
The direction display deviates from the
true direction determined by the
earth’s magnetic field. The amount of
deviation varies depending on the geo-
graphic position of the vehicle.
If you cross over one of the map boundar- ies shown in illustration, the compass will
deviate.
To obtain higher precision or perfect cali-
bration, refer to “D
eviation calibration”.
■Deviation calibration
1 Stop the vehicle.
WARNING
■While driving the vehicle
Do not adjust the display. Adjust the dis-
play only when the vehicle is stopped.
NOTICE
■To avoid the compass malfunctions
Do not place magnets or any metal
objects near the inside rear view mirror.
Doing this may cause the compass sen-
sor to malfunction.
■To ensure normal operation of the
compass
●Do not perform a circling calibration of
the compass in a place where the
earth’s magnetic field is subject to
interference by artificial magnetic
fields.
●During calibration, do not operate
electric systems (moon roof [if
equipped] or panoramic moon roof [if
equipped], power windows, etc.) as
they may interfere with the calibration.
Calibrating the compass
Page 296 of 444
2966-1. Maintenance and care
6-1.Maintenance and care
Working from top to bottom, liber-
ally apply water to the vehicle body,
wheel wells and underside of the
vehicle to remove any dirt and dust.
Wash the vehicle body using a
sponge or soft cloth, such as a
chamois.
For hard-to-remove marks, use car
wash soap and rinse thoroughly with
water.
Wipe away any water.
Wax the vehicle when the water-
proof coating deteriorates.
If water does not bead on a clean surface,
apply wax when the vehicle body is cool.
■Self-restoring coat
The vehicle body has a self-restoring coat-
ing that is resistant to small surface
scratches caused in a car wash etc.
●The coating lasts for 5 to 8 years from
when the vehicle is delivered from the
plant.
●The restoration time differs depending on
the depth of the scratch and outside tem-
perature.
The restoration time may become
shorter when the coating is warmed by
applying warm water.
●Deep scratches caused by keys, coins,
etc. cannot be restored.
●Do not use wax that contain abrasives.
■Automatic car washes
●Fold the mirrors befo re washing the vehi-
cle. Start washing from the front of the
vehicle. Make sure to extend the mirrors
before driving.
●Brushes used in automatic car washes
may scratch the vehicle body and dam-
age the paint.
●Rear spoiler (if equipped) may not be
washable in some automatic car washes.
There may also be an increased risk of
damage to vehicle.
■High pressure car washes
●Do not allow the nozzles of the car wash
to come within close proximity of the win-
dows.
●Before using the car wash, check that the
fuel filler door on your vehicle is closed
properly.
■Notes for the smart access system with
push-button start
If the door handle becomes wet while the
electronic key is within the effective range,
the door may lock and unlock repeatedly. In
that case, follow the following correction
procedures to wash the vehicle:
●Place the key in a position 6 ft. (2 m) or
more separate from the vehicle while the
vehicle is being wash ed. (Take care to
ensure that the key is not stolen.)
●Set the electronic key to battery-saving
mode to disable the smart access system
with push-button start. ( P.101)
■Aluminum wheels
●Remove any dirt immediately by using a
neutral detergent.
●Wash detergent off with water immedi-
ately after use.
●To protect the paint from damage, make
sure to observe the following precau-
tions.
• Do not use acidic, alkaline or abrasive
detergent
• Do not use hard brushes
• Do not use detergent on the wheels when they are hot, such as after driving or park-
ing in hot weather
Cleaning and protecting the
vehicle exterior
Perform cleaning in a manner
appropriate to each component
and its material.
Cleaning instructions
Page 373 of 444

3737-2. Steps to take in an emergency
7
When trouble arises
open.
■Key linked functions
1 Closes the windows and the moon roof
(if equipped) or panoramic moon roof
(if equipped) (turn and hold)
2 Opens the windows and the moon roof
(if equipped) or panoramic moon roof
(if equipped) (turn and hold)
These settings must be customized at your
Lexus dealer.
1 Ensure that the shift lever is in P and
depress the brake pedal.
2 Touch the Lexus emblem side of the
electronic key to the engine switch.
When the electronic key is detected, a
buzzer sounds and the engine switch will
turn to IGNITION ON mode.
When the smart access system with push-
button start is deactivated in customization
setting, the engine switch will turn to
ACCESSORY mode.
3Firmly depress the brake pedal and
check that is shown on the
multi-information display.
4 Press the engine switch shortly and
firmly.
In the event that the engine still cannot
be started, contact your Lexus dealer.
■Stopping the engine
Set the parking brake, shift the shift lever to
P and press the engine switch as you nor-
mally do when stopping the engine.
■Electronic key battery
As the above procedure is a temporary
measure, it is recommended that the elec-
tronic key battery be replaced immediately
when the battery is depleted. ( P.330)
■Changing engine switch modes
Release the brake pedal and press the
WARNING
■When using the mechanical key and
operating the power windows or
moon roof (if equipped) or panoramic
moon roof (if equipped)
Operate the power window, moon roof
or panoramic moon roof after checking
to make sure that there is no possibility of
any passenger having any of their body
parts caught in the window, moon roof or
panoramic moon roof.
Also, do not allow ch ildren to operate the
mechanical key. It is possible for children
and other passengers to get caught in
the power window, moon roof or pan-
oramic moon roof.
Starting the engine
Page 396 of 444
3968-1. Specifications
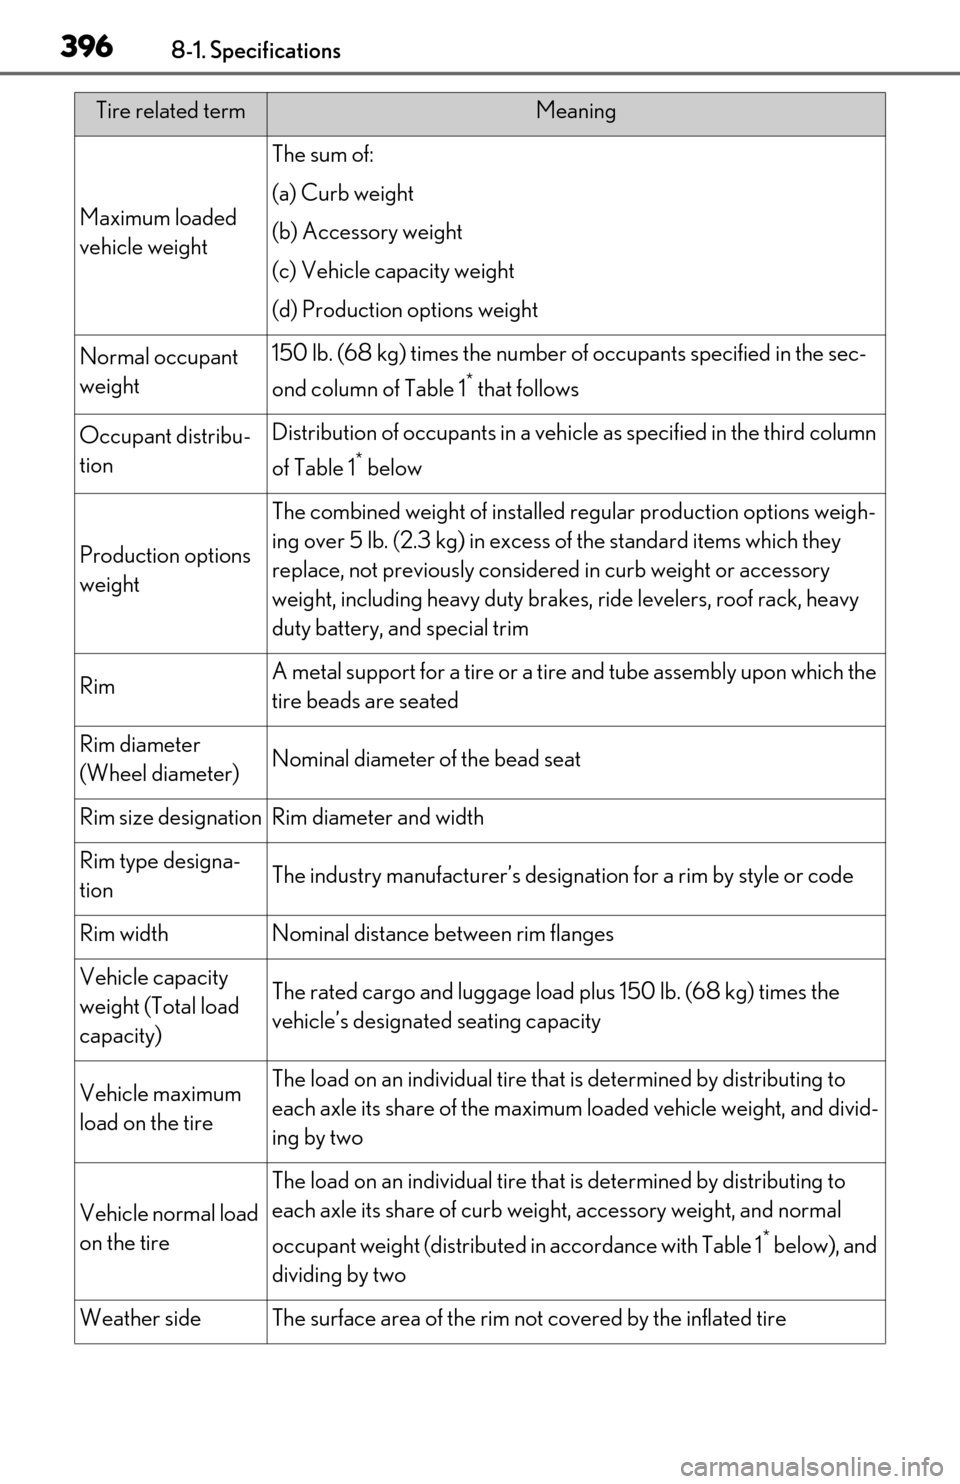
Maximum loaded
vehicle weight
The sum of:
(a) Curb weight
(b) Accessory weight
(c) Vehicle capacity weight
(d) Production options weight
Normal occupant
weight150 lb. (68 kg) times the number of occupants specified in the sec-
ond column of Table 1
* that follows
Occupant distribu-
tionDistribution of occupants in a vehicl e as specified in the third column
of Table 1
* below
Production options
weight
The combined weight of installed regular production options weigh-
ing over 5 lb. (2.3 kg) in excess of the standard items which they
replace, not previously considered in curb weight or accessory
weight, including heavy duty brakes , ride levelers, roof rack, heavy
duty battery, and special trim
RimA metal support for a tire or a tire and tube assembly upon which the
tire beads are seated
Rim diameter
(Wheel diameter)Nominal diameter of the bead seat
Rim size designationRim diameter and width
Rim type designa-
tionThe industry manufacturer’s designation for a rim by style or code
Rim widthNominal distance between rim flanges
Vehicle capacity
weight (Total load
capacity)The rated cargo and luggage load plus 150 lb. (68 kg) times the
vehicle’s designated seating capacity
Vehicle maximum
load on the tireThe load on an individual tire that is determined by distributing to
each axle its share of the maximum loaded vehicle weight, and divid-
ing by two
Vehicle normal load
on the tire
The load on an individual tire that is determined by distributing to
each axle its share of curb weight, accessory weight, and normal
occupant weight (distributed in accordance with Table 1
* below), and
dividing by two
Weather sideThe surface area of the rim not covered by the inflated tire
Tire related termMeaning
Page 404 of 444
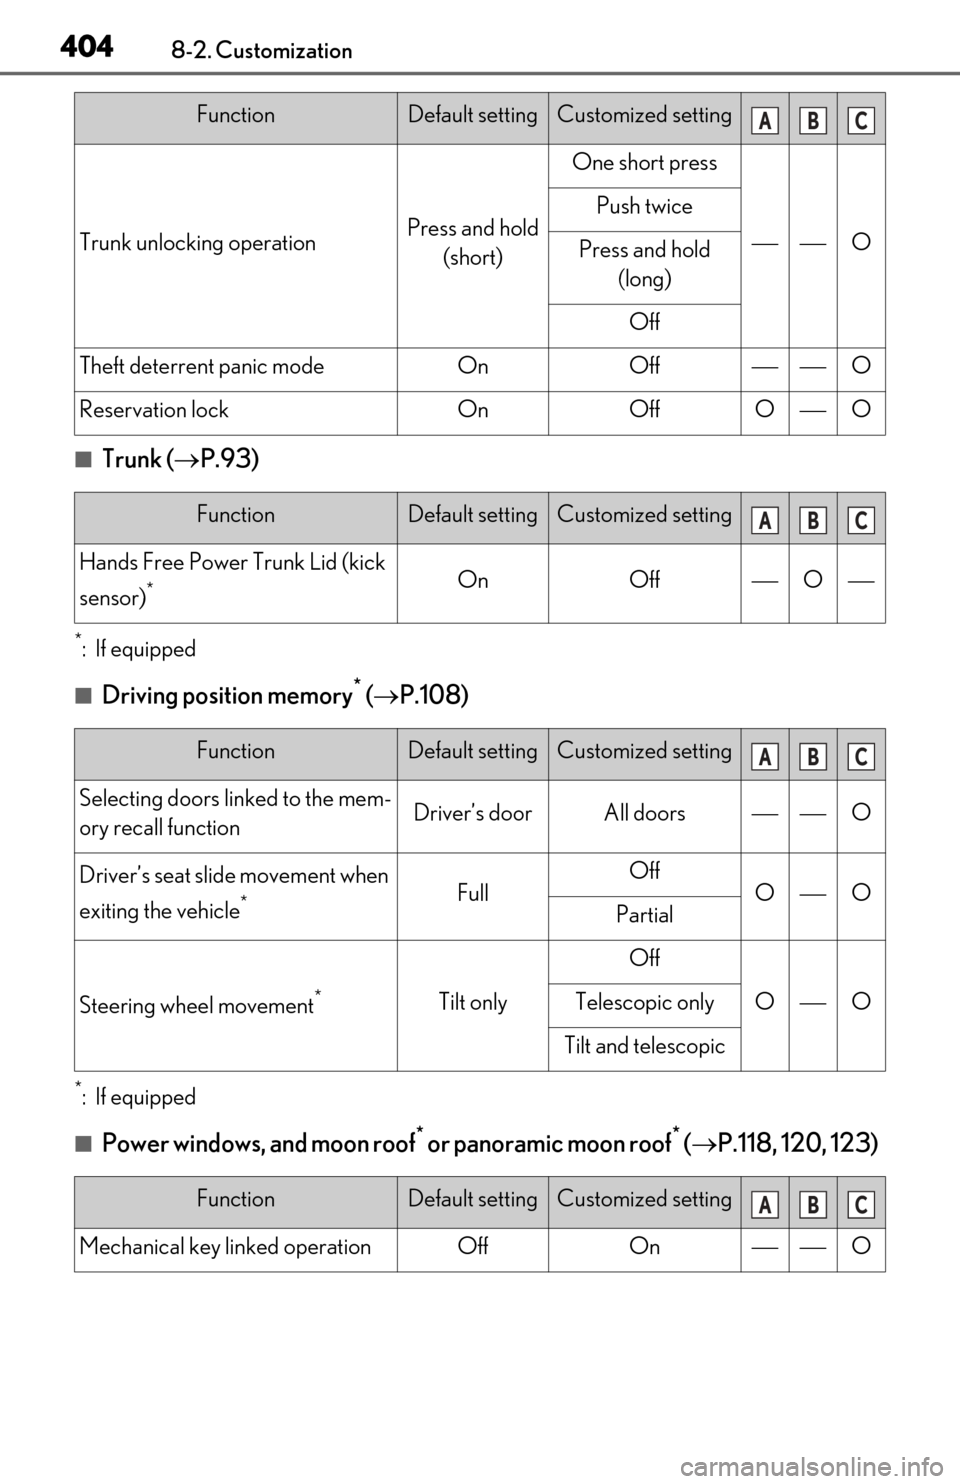
4048-2. Customization
■Trunk (P.93)
*:If equipped
■Driving position memory* ( P.108)
*:If equipped
■Power windows, and moon roof* or panoramic moon roof* ( P.118, 120, 123)
Trunk unlocking operationPress and hold
(short)
One short press
O
Push twice
Press and hold (long)
Off
Theft deterrent panic modeOnOffO
Reservation lockOnOffOO
FunctionDefault settingCustomized setting
Hands Free Power Trunk Lid (kick
sensor)
*OnOffO
FunctionDefault settingCustomized setting
Selecting doors linked to the mem-
ory recall functionDriver’s doorAll doorsO
Driver’s seat slide movement when
exiting the vehicle
*FullOffOOPartial
Steering wheel movement*Tilt only
Off
OOTelescopic only
Tilt and telescopic
FunctionDefault settingCustomized setting
Mechanical key linked operationOffOnO
FunctionDefault settingCustomized settingABC
ABC
ABC
ABC