seats Lexus ES350 2019 / LEXUS 2019 ES350 (OM06130U) Owner's Guide
[x] Cancel search | Manufacturer: LEXUS, Model Year: 2019, Model line: ES350, Model: Lexus ES350 2019Pages: 444, PDF Size: 14.22 MB
Page 107 of 444
1073-3. Adjusting the seats
3
Before driving
3-3.Adjusting the seats
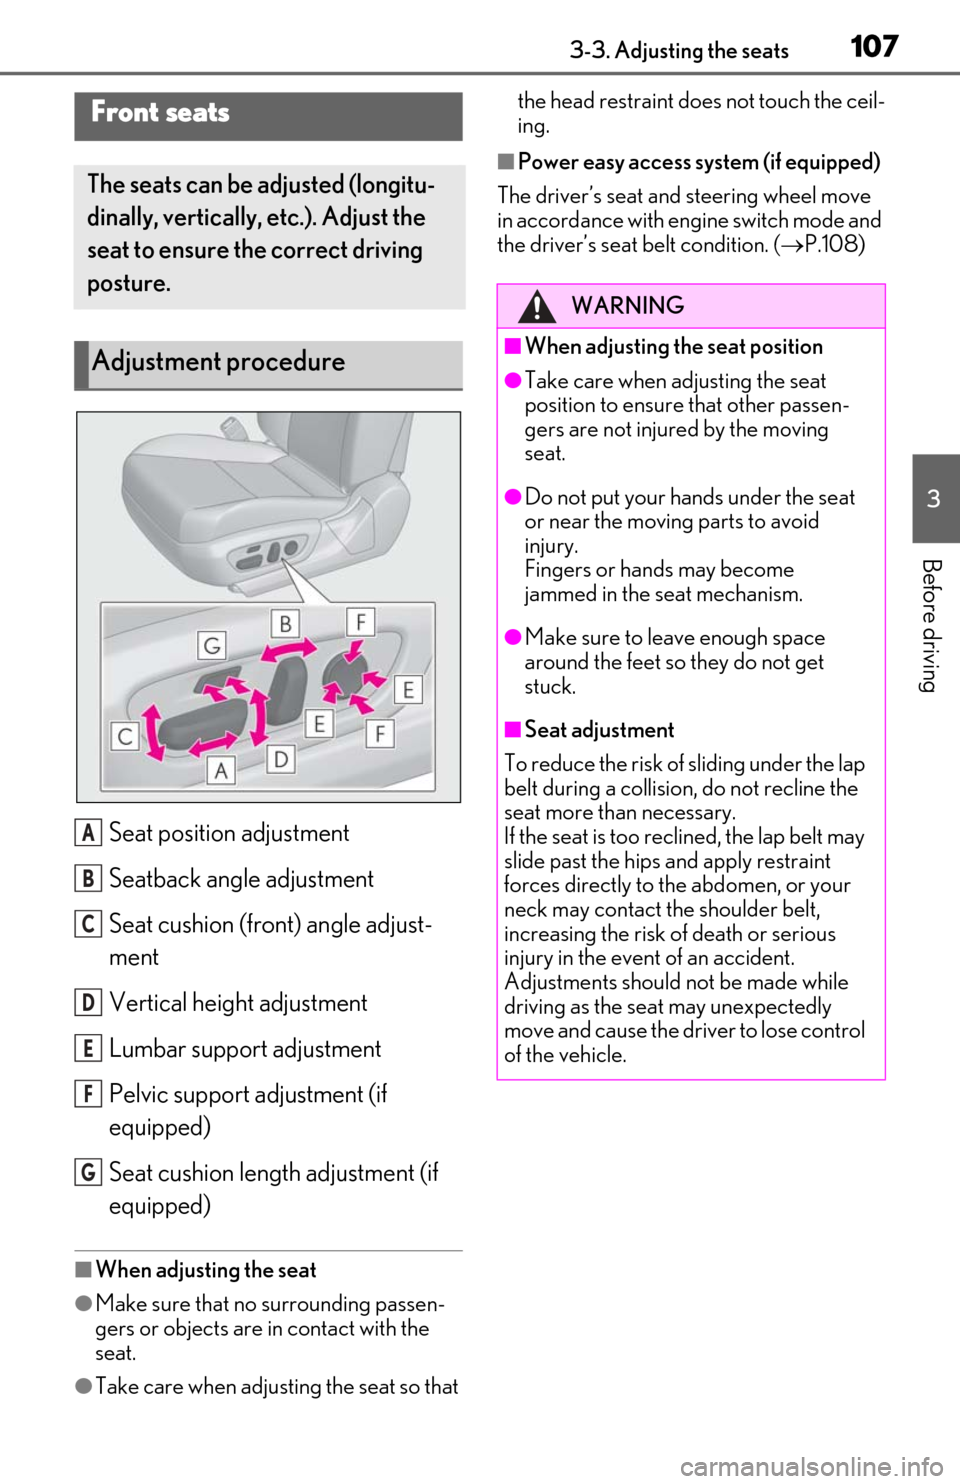
Seat position adjustment
Seatback angle adjustment
Seat cushion (front) angle adjust-
ment
Vertical height adjustment
Lumbar support adjustment
Pelvic support adjustment (if
equipped)
Seat cushion length adjustment (if
equipped)
■When adjusting the seat
●Make sure that no surrounding passen-
gers or objects are in contact with the
seat.
●Take care when adjusting the seat so that the head restraint does not touch the ceil-
ing.
■Power easy access system (if equipped)
The driver’s seat and steering wheel move
in accordance with engine switch mode and
the driver’s seat belt condition. ( P.108)
Front seats
The seats can be adjusted (longitu-
dinally, vertically, etc.). Adjust the
seat to ensure the correct driving
posture.
Adjustment procedure
A
B
C
D
E
F
G
WARNING
■When adjusting the seat position
●Take care when ad justing the seat
position to ensure that other passen-
gers are not injured by the moving
seat.
●Do not put your hands under the seat
or near the moving parts to avoid
injury.
Fingers or hands may become
jammed in the seat mechanism.
●Make sure to leave enough space
around the feet so they do not get
stuck.
■Seat adjustment
To reduce the risk of sliding under the lap
belt during a collision, do not recline the
seat more than necessary.
If the seat is too rec lined, the lap belt may
slide past the hips and apply restraint
forces directly to the abdomen, or your
neck may contact the shoulder belt,
increasing the risk of death or serious
injury in the event of an accident.
Adjustments should not be made while
driving as the seat may unexpectedly
move and cause the driver to lose control
of the vehicle.
Page 108 of 444
1083-3. Adjusting the seats
*:If equipped
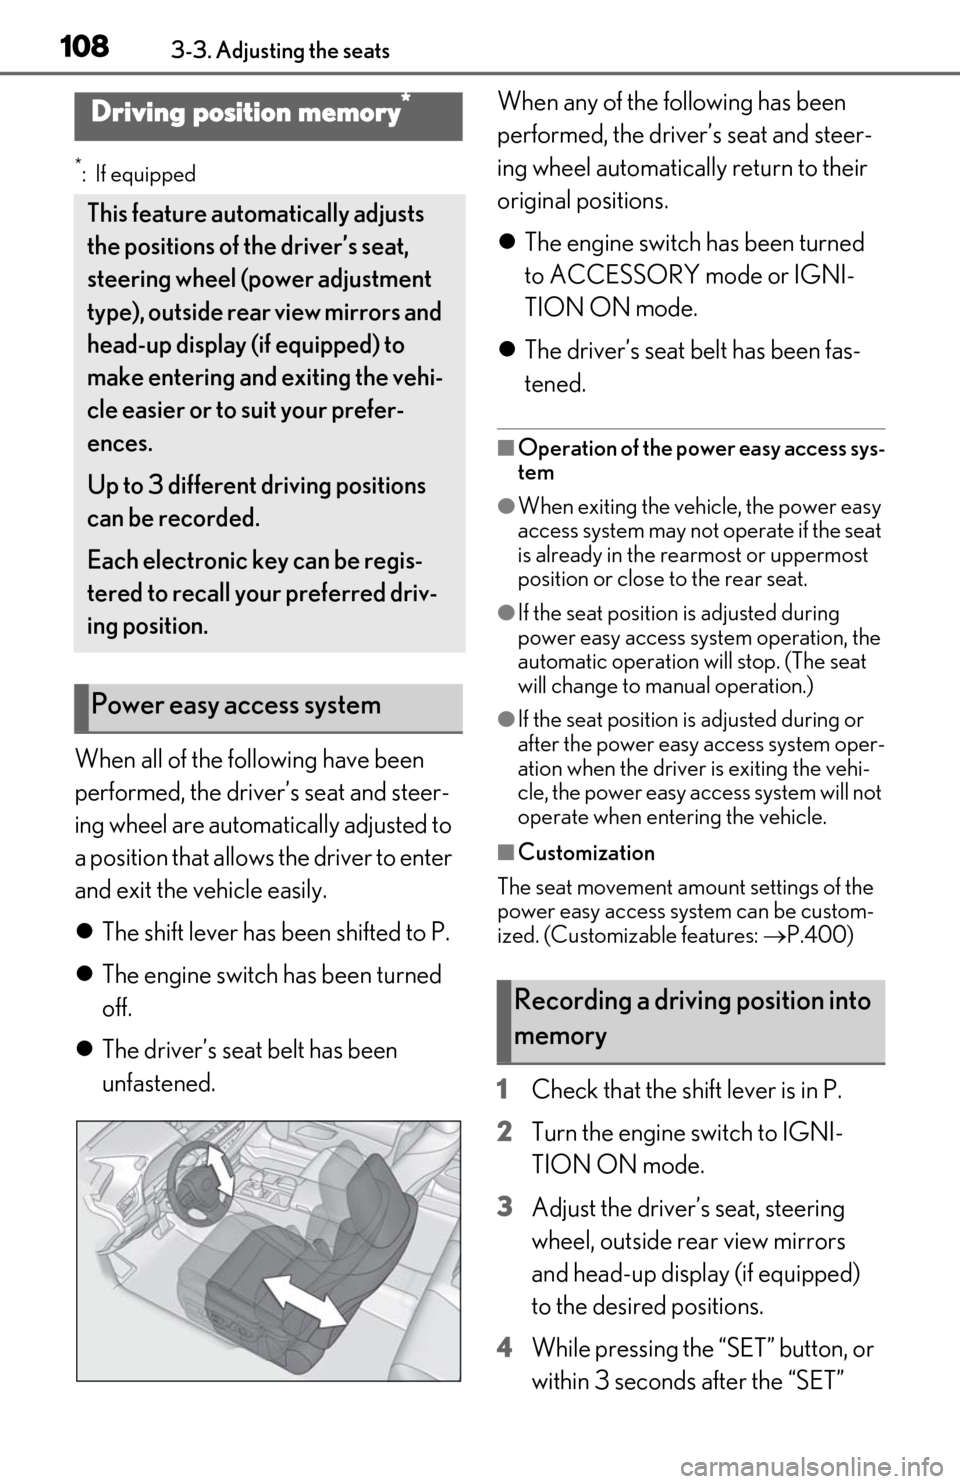
When all of the following have been
performed, the driver’s seat and steer-
ing wheel are automatically adjusted to
a position that allows the driver to enter
and exit the vehicle easily.
The shift lever has been shifted to P.
The engine switch has been turned
off.
The driver’s seat belt has been
unfastened. When any of the following has been
performed, the driver’s seat and steer-
ing wheel automatically return to their
original positions.
The engine switch has been turned
to ACCESSORY mode or IGNI-
TION ON mode.
The driver’s seat belt has been fas-
tened.
■Operation of the power easy access sys-
tem
●When exiting the vehicle, the power easy
access system may not operate if the seat
is already in the rearmost or uppermost
position or close to the rear seat.
●If the seat position is adjusted during
power easy access syst em operation, the
automatic operation will stop. (The seat
will change to manual operation.)
●If the seat position is adjusted during or
after the power easy access system oper-
ation when the driver is exiting the vehi-
cle, the power easy access system will not
operate when entering the vehicle.
■Customization
The seat movement amou nt settings of the
power easy access system can be custom-
ized. (Customizable features: P.400)
1 Check that the shift lever is in P.
2 Turn the engine switch to IGNI-
TION ON mode.
3 Adjust the driver’s seat, steering
wheel, outside rear view mirrors
and head-up display (if equipped)
to the desired positions.
4 While pressing the “SET” button, or
within 3 seconds after the “SET”
Driving position memory*
This feature auto matically adjusts
the positions of the driver’s seat,
steering wheel (power adjustment
type), outside rear view mirrors and
head-up display (if equipped) to
make entering and exiting the vehi-
cle easier or to suit your prefer-
ences.
Up to 3 different driving positions
can be recorded.
Each electronic key can be regis-
tered to recall your preferred driv-
ing position.
Power easy access system
Recording a driving position into
memory
Page 109 of 444
1093-3. Adjusting the seats
3
Before driving
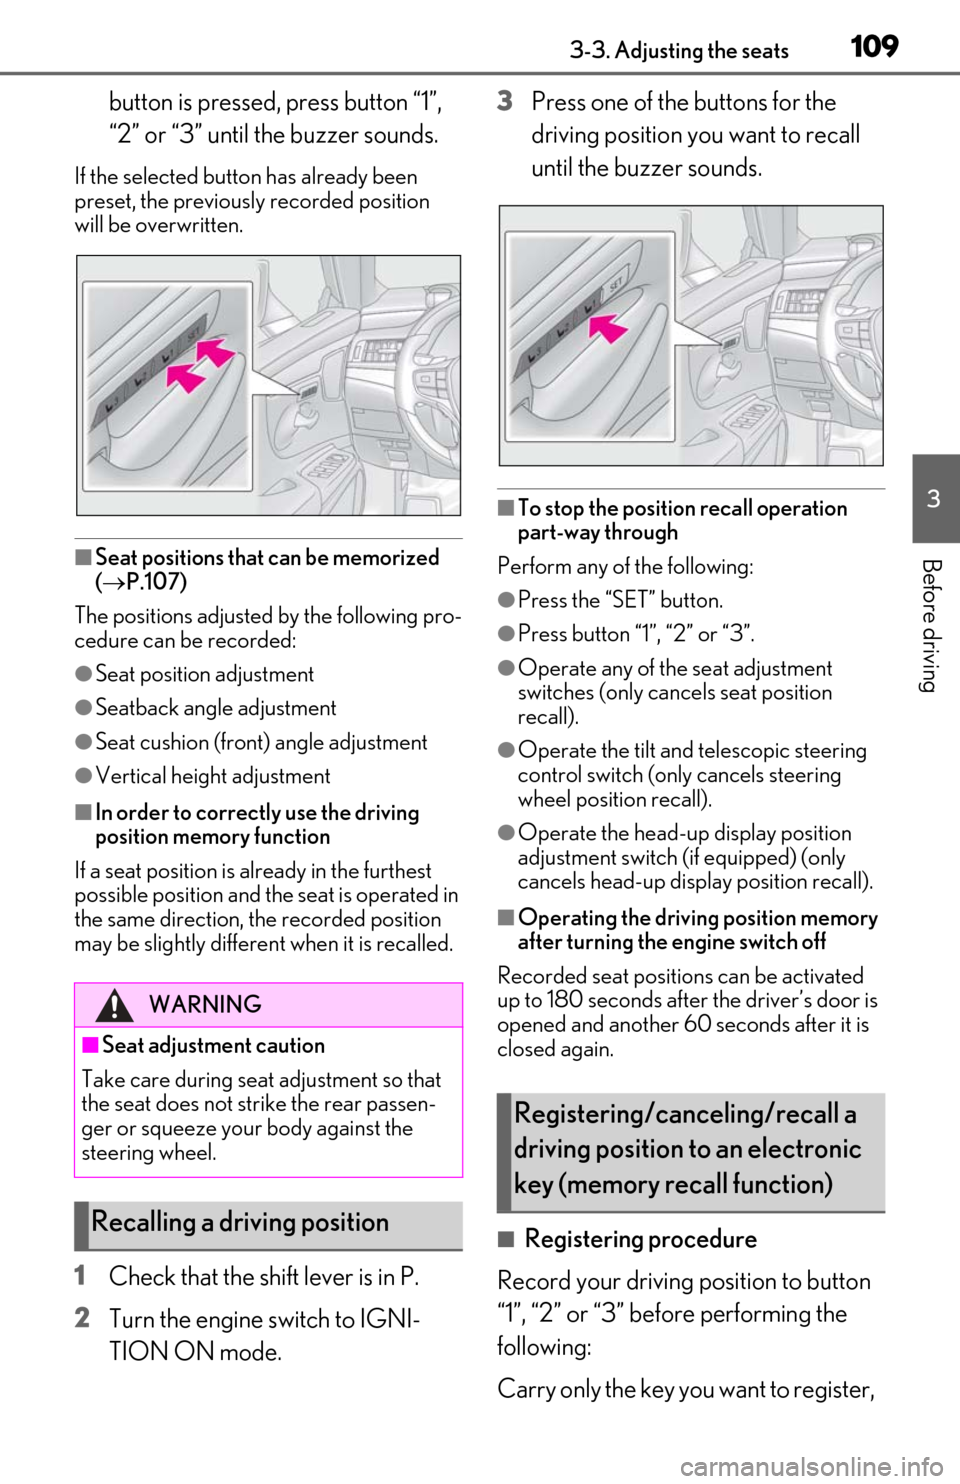
button is pressed, press button “1”,
“2” or “3” until the buzzer sounds.
If the selected button has already been
preset, the previously recorded position
will be overwritten.
■Seat positions that can be memorized
( P.107)
The positions adjusted by the following pro-
cedure can be recorded:
●Seat position adjustment
●Seatback angle adjustment
●Seat cushion (front) angle adjustment
●Vertical height adjustment
■In order to correctly use the driving
position memory function
If a seat position is already in the furthest
possible position and the seat is operated in
the same direction, the recorded position
may be slightly different when it is recalled.
1 Check that the shift lever is in P.
2 Turn the engine switch to IGNI-
TION ON mode. 3
Press one of the buttons for the
driving position you want to recall
until the buzzer sounds.
■To stop the position recall operation
part-way through
Perform any of the following:
●Press the “SET” button.
●Press button “1”, “2” or “3”.
●Operate any of the seat adjustment
switches (only cancels seat position
recall).
●Operate the tilt and telescopic steering
control switch (onl y cancels steering
wheel position recall).
●Operate the head-up display position
adjustment switch (if equipped) (only
cancels head-up display position recall).
■Operating the driving position memory
after turning the engine switch off
Recorded seat positions can be activated
up to 180 seconds after the driver’s door is
opened and another 60 seconds after it is
closed again.
■Registering procedure
Record your driving position to button
“1”, “2” or “3” before performing the
following:
Carry only the key yo u want to register,
WARNING
■Seat adjustment caution
Take care during seat adjustment so that
the seat does not strike the rear passen-
ger or squeeze your body against the
steering wheel.
Recalling a driving position
Registering/canceling/recall a
driving position to an electronic
key (memory recall function)
Page 110 of 444
1103-3. Adjusting the seats
and then close the driver’s door.
If 2 or more keys are in the vehicle, the
driving position cannot be recorded
properly.
1Check that the shift lever is in P.
2 Turn the engine switch to IGNI-
TION ON mode.
3 Recall the driving position that you
want to record.
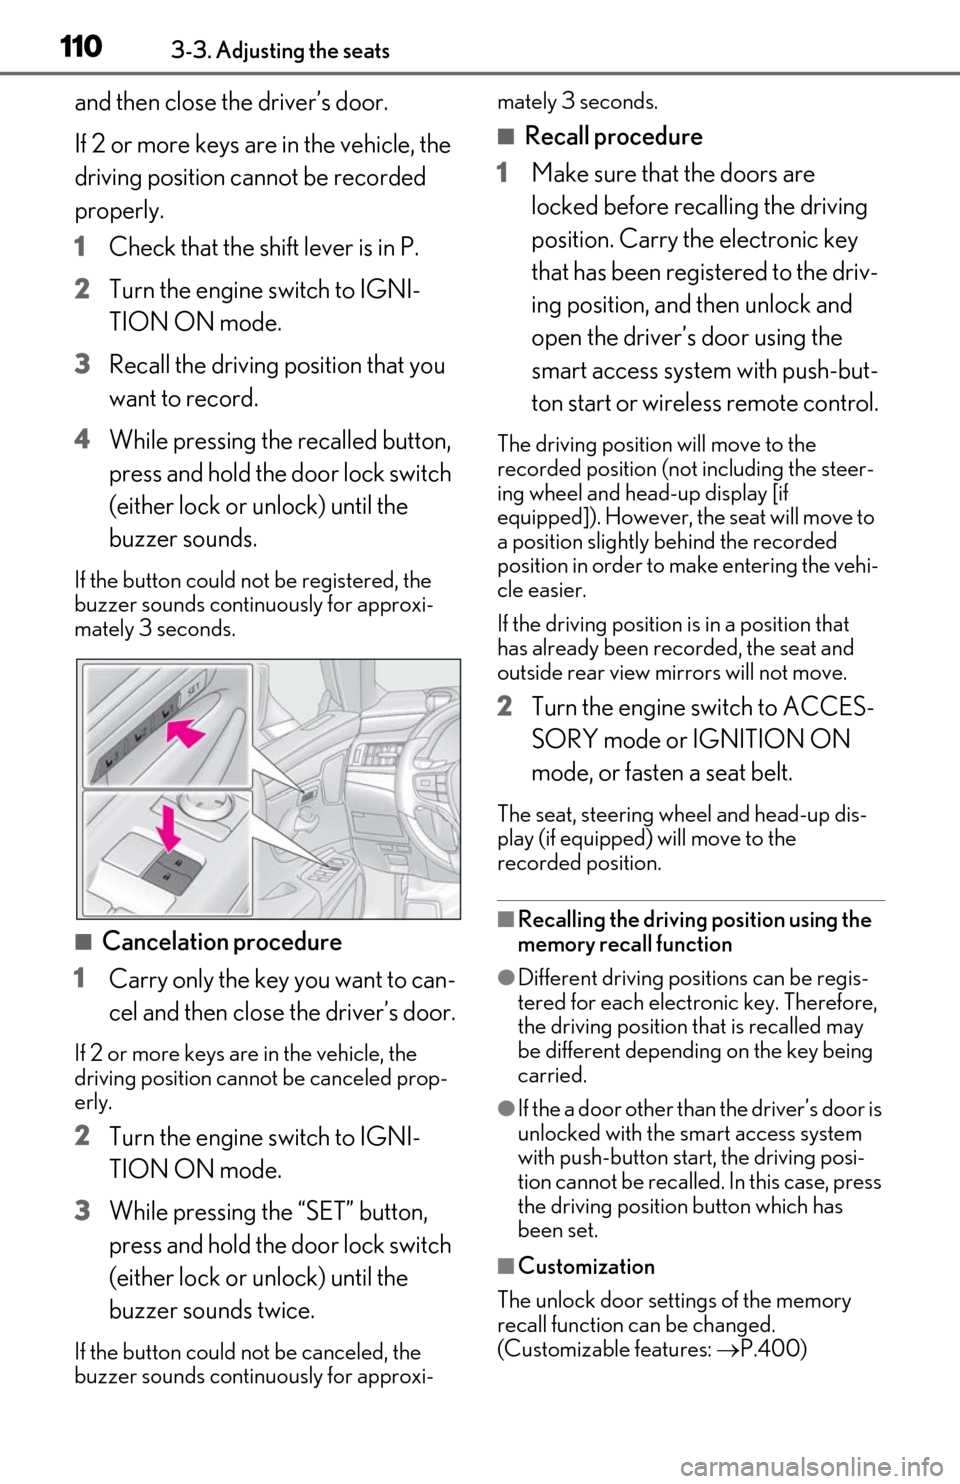
4 While pressing the recalled button,
press and hold the door lock switch
(either lock or unlock) until the
buzzer sounds.
If the button could not be registered, the
buzzer sounds continuously for approxi-
mately 3 seconds.
■Cancelation procedure
1 Carry only the key you want to can-
cel and then close the driver’s door.
If 2 or more keys are in the vehicle, the
driving position cannot be canceled prop-
erly.
2Turn the engine switch to IGNI-
TION ON mode.
3 While pressing the “SET” button,
press and hold the door lock switch
(either lock or unlock) until the
buzzer sounds twice.
If the button could not be canceled, the
buzzer sounds continuously for approxi- mately 3 seconds.
■Recall procedure
1 Make sure that the doors are
locked before recalling the driving
position. Carry the electronic key
that has been registered to the driv-
ing position, and then unlock and
open the driver’s door using the
smart access system with push-but-
ton start or wireless remote control.
The driving position will move to the
recorded position (not including the steer-
ing wheel and head-up display [if
equipped]). However, the seat will move to
a position slightly behind the recorded
position in order to make entering the vehi-
cle easier.
If the driving position is in a position that
has already been recorded, the seat and
outside rear view mirrors will not move.
2Turn the engine switch to ACCES-
SORY mode or IGNITION ON
mode, or fasten a seat belt.
The seat, steering wheel and head-up dis-
play (if equipped) will move to the
recorded position.
■Recalling the driving position using the
memory recall function
●Different driving positions can be regis-
tered for each electronic key. Therefore,
the driving position that is recalled may
be different depending on the key being
carried.
●If the a door other than the driver’s door is
unlocked with the smart access system
with push-button start, the driving posi-
tion cannot be recalled. In this case, press
the driving position button which has
been set.
■Customization
The unlock door sett ings of the memory
recall function can be changed.
(Customizable features: P.400)
Page 111 of 444
1113-3. Adjusting the seats
3
Before driving
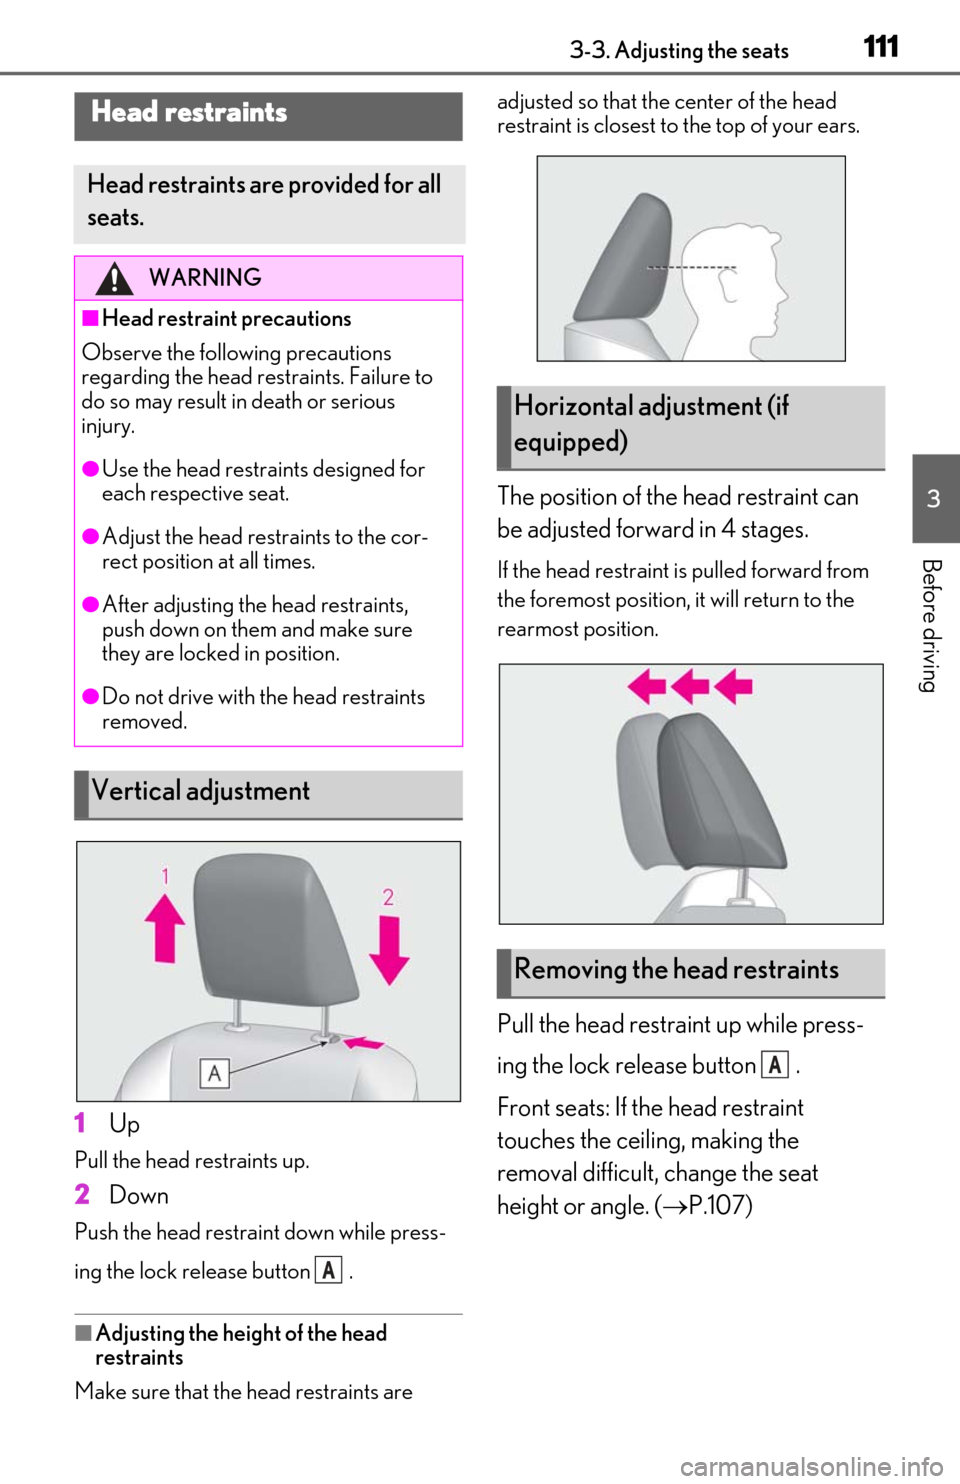
1Up
Pull the head restraints up.
2Down
Push the head restraint down while press-
ing the lock release button .
■Adjusting the height of the head
restraints
Make sure that the head restraints are adjusted so that the center of the head
restraint is closest to the top of your ears.
The position of the head restraint can
be adjusted forward in 4 stages.
If the head restraint
is pulled forward from
the foremost position, it will return to the
rearmost position.
Pull the head restraint up while press-
ing the lock release button .
Front seats: If the head restraint
touches the ceiling, making the
removal difficult, change the seat
height or angle. ( P.107)
Head restraints
Head restraints are provided for all
seats.
WARNING
■Head restraint precautions
Observe the following precautions
regarding the head re straints. Failure to
do so may result in death or serious
injury.
●Use the head restraints designed for
each respective seat.
●Adjust the head restraints to the cor-
rect position at all times.
●After adjusting the head restraints,
push down on them and make sure
they are locked in position.
●Do not drive with the head restraints
removed.
Vertical adjustment
A
Horizontal adjustment (if
equipped)
Removing the head restraints
A
Page 112 of 444
1123-3. Adjusting the seats
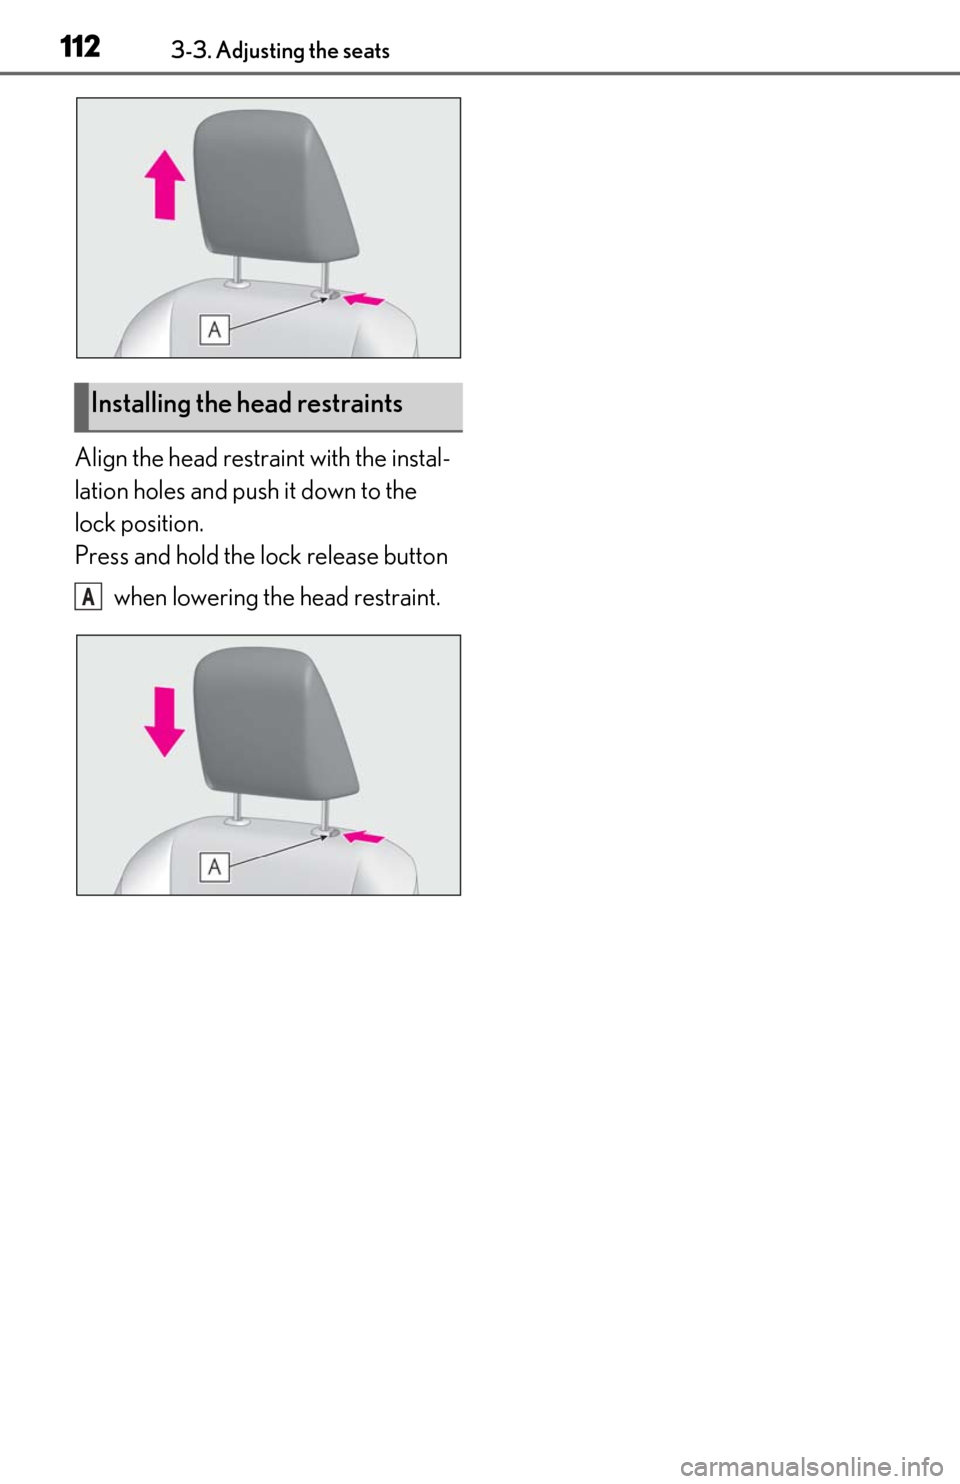
Align the head restraint with the instal-
lation holes and push it down to the
lock position.
Press and hold the lock release button when lowering the head restraint.
Installing the head restraints
A
Page 133 of 444
1334-1. Before driving
4
Driving
Cargo capacity depends on the total
weight of the occupants.
(Cargo capacity) = (Total load capac-
ity) (Total weight of occupants)Steps for Determining Correct Load
Limit
(1) Locate the statement “The com-
bined weight of occupants and cargo
should never exceed XXX kg or XXX
lbs.” on your vehicle’s placard.
(2) Determine the combined weight of
the driver and passengers that will be
riding in your vehicle.
(3) Subtract the combined weight of
the driver and passengers from XXX
kg or XXX lbs.
(4) The resulting figure equals the
available amount of cargo and luggage
load capacity.
For example, if the “XXX” amount
equals 1400 lbs. and there will be five
150 lb passengers in your vehicle, the
amount of available cargo and luggage
load capacity is 650 lbs. (1400 − 750
(5 150) = 650 lbs.)
(5) Determine the combined weight of
luggage and cargo being loaded on
the vehicle. That weight may not safely
exceed the available cargo and lug-
gage load capacity calculated in Step
4.
(6) If your vehicle will be towing a
trailer, load from your trailer will be
transferred to your vehicle. Consult
this manual to determine how this
reduces the available cargo and lug-
gage load capacity of your vehicle.
( P.135)Lexus does not recommend towing a
trailer with your vehicle. Your vehicle is not
designed for trailer towing.
Cargo and luggage
Take notice of the following infor-
mation about storage precautions,
cargo capacity and load:
WARNING
■Things that must not be carried in the
trunk
The following things may cause a fire if
loaded in the trunk:
●Receptacles containing gasoline
●Aerosol cans
■Storage precautions
Observe the following precautions.
Failure to do so may prevent the pedals
from being depressed properly, may
block the driver’s vision, or may result in
items hitting the driver or passengers,
possibly causing an accident.
●Stow cargo and luggage in the trunk
whenever possible.
●Do not place cargo or luggage in or on
the following locations.
• At the feet of the driver
• On the front passenger or rear seats (when stacking items)
• On the package tray
• On the instrument panel
•On the dashboard
• In front of the Center Display
●Secure all items in the occupant com-
partment.
Capacity and distribution
Page 254 of 444
2545-3. Using the air conditioning system
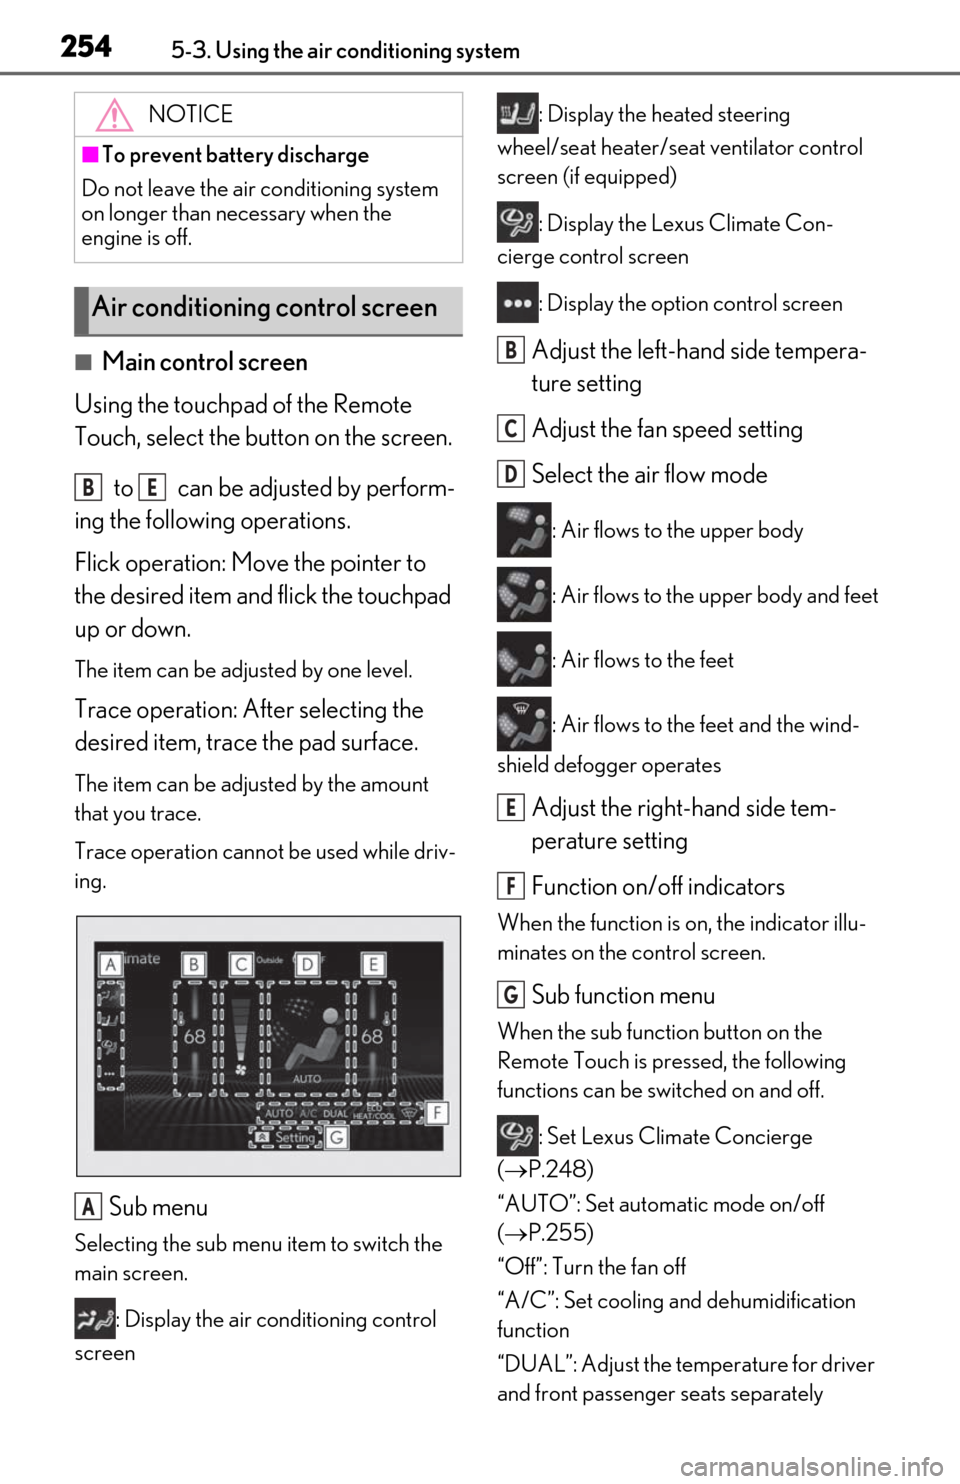
■Main control screen
Using the touchpad of the Remote
Touch, select the button on the screen.
to can be adjusted by perform-
ing the following operations.
Flick operation: Move the pointer to
the desired item and flick the touchpad
up or down.
The item can be adjusted by one level.
Trace operation: After selecting the
desired item, trace the pad surface.
The item can be adjusted by the amount
that you trace.
Trace operation cannot be used while driv-
ing.
Sub menu
Selecting the sub menu item to switch the
main screen.
: Display the air conditioning control
screen : Display the heated steering
wheel/seat heater/sea t ventilator control
screen (if equipped)
: Display the Lexus Climate Con-
cierge control screen
: Display the option control screen
Adjust the left-hand side tempera-
ture setting
Adjust the fan speed setting
Select the air flow mode
: Air flows to the upper body
: Air flows to the upper body and feet
: Air flows to the feet
: Air flows to the feet and the wind-
shield defogger operates
Adjust the right-hand side tem-
perature setting
Function on/off indicators
When the function is on, the indicator illu-
minates on the control screen.
Sub function menu
When the sub function button on the
Remote Touch is pressed, the following
functions can be switched on and off.
: Set Lexus Climate Concierge
( P.248)
“AUTO”: Set automatic mode on/off
( P.255)
“Off”: Turn the fan off
“A/C”: Set cooling and dehumidification
function
“DUAL”: Adjust the temperature for driver
and front passenger seats separately
NOTICE
■To prevent battery discharge
Do not leave the air conditioning system
on longer than necessary when the
engine is off.
Air conditioning control screen
BE
A
B
C
D
E
F
G
Page 255 of 444
2555-3. Using the air conditioning system
5
Interior features
(“DUAL” mode) (P.255)
: Set eco air conditioning mode
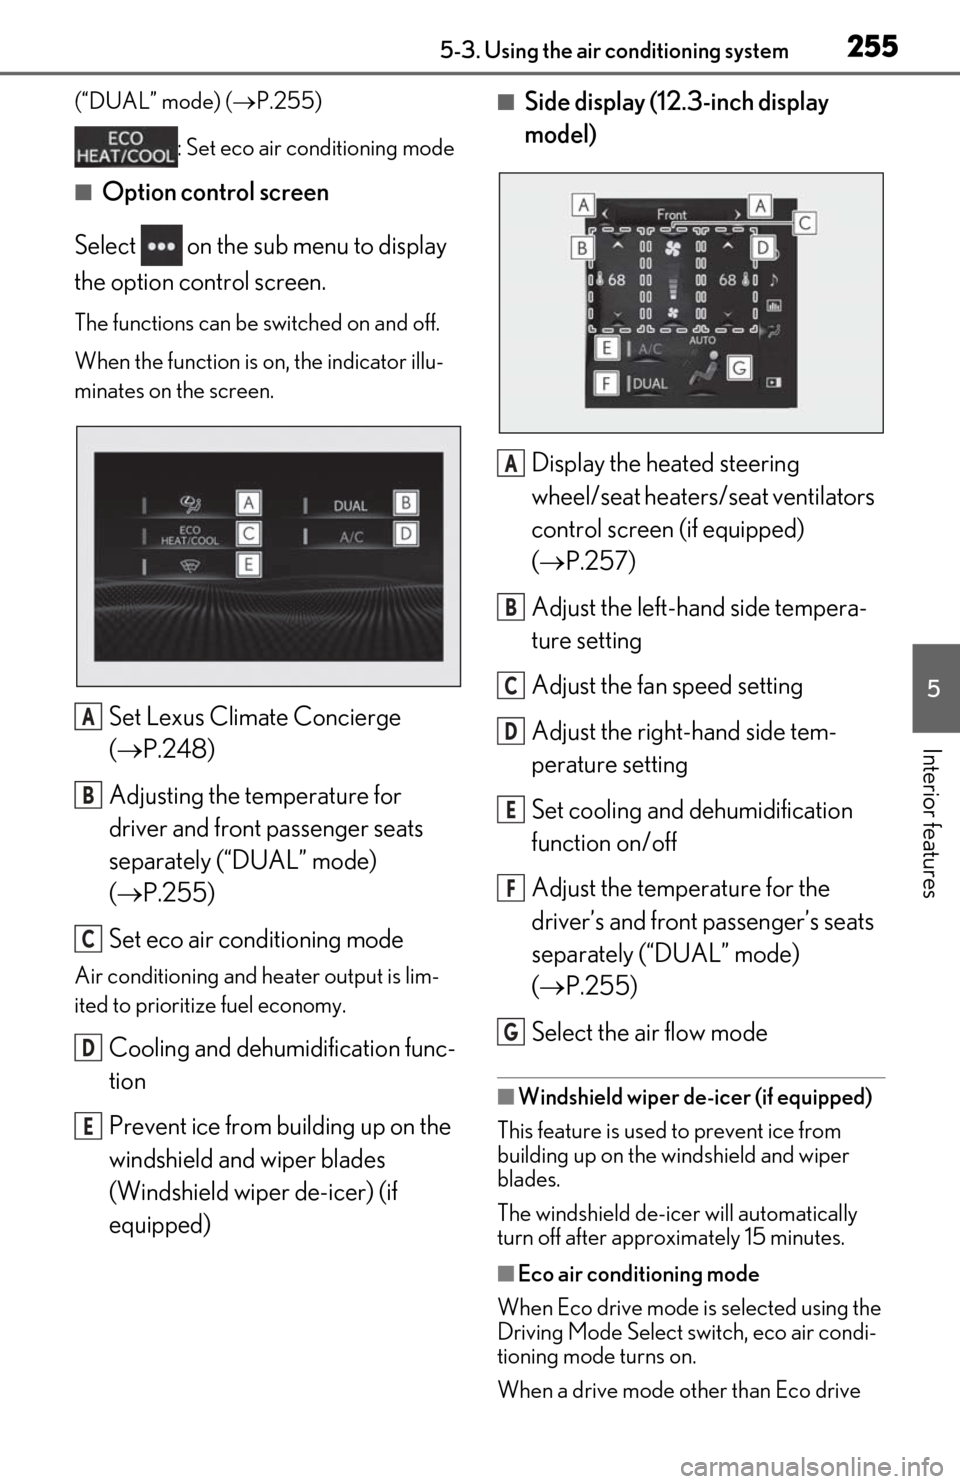
■Option control screen
Select on the sub menu to display
the option control screen.
The functions can be switched on and off.
When the function is on, the indicator illu-
minates on the screen.
Set Lexus Climate Concierge
( P.248)
Adjusting the temperature for
driver and front passenger seats
separately (“DUAL” mode)
( P.255)
Set eco air conditioning mode
Air conditioning and heater output is lim-
ited to prioritize fuel economy.
Cooling and dehumidification func-
tion
Prevent ice from building up on the
windshield and wiper blades
(Windshield wiper de-icer) (if
equipped)
■Side display (12.3-inch display
model)
Display the heated steering
wheel/seat heaters/seat ventilators
control screen (if equipped)
( P.257)
Adjust the left-hand side tempera-
ture setting
Adjust the fan speed setting
Adjust the right-hand side tem-
perature setting
Set cooling and dehumidification
function on/off
Adjust the temperature for the
driver’s and front passenger’s seats
separately (“DUAL” mode)
( P.255)
Select the air flow mode
■Windshield wiper de-icer (if equipped)
This feature is used to prevent ice from
building up on the windshield and wiper
blades.
The windshield de-icer will automatically
turn off after approximately 15 minutes.
■Eco air conditioning mode
When Eco drive mode is selected using the
Driving Mode Select switch, eco air condi-
tioning mode turns on.
When a drive mode other than Eco drive
A
B
C
D
E
A
B
C
D
E
F
G
Page 256 of 444
2565-3. Using the air conditioning system
mode is selected, eco air conditioning
mode may turn off.
1Press the automatic mode switch or
select “AUTO” on the sub function
menu. ( P.253)
2 Press the outside/recirculated air
mode switch to switch to automatic
air intake mode.
The air conditioning system automatically
switches between outside air and recircu-
lated air modes.
3Adjust the temperature setting.
4 To stop the operation, press the off
switch or select “Off” on the sub
function menu. ( P.253)
If the fan speed setting or air flow
modes are operated , the automatic
mode indicator goes off. However,
automatic mode for functions other
than that operated is maintained.
■Using automatic mode
Fan speed is adjusted automatically accord-
ing to the temperature setting and the
ambient conditions.
Therefore, the fan may stop for a while until
warm or cool air is ready to flow immedi-
ately after the automatic mode switch is
pressed or “AUTO” is selected.
Cool air may blow around the upper body
even when the heater is on due to sunlight.
■Automatic mode for air intake control
In automatic mode, the system detects
exhaust gas and other pollutants and auto-
matically switches between outside air and
recirculated air modes.
When the dehumidification function is off,
and the fan is operating, turning automatic
mode on will activate the dehumidification
function. The next time the dehumidification
function is turned off, the AUTO mode for
switching between outside air and recircu-
lated air modes is canceled.
To turn on the “DUAL” mode, perform
any of the following procedures:
Select “DUAL” on the sub function
menu. ( P.254)
Select “DUAL” on the option con-
trol screen.
Adjust the front passenger’s side
temperature setting.
The indicator on the main control screen
comes on when the “DUAL” mode is on.
■Location of air outlets
The air outlets and air volume changes
according to the selected air flow
mode.
WARNING
■To prevent burns (vehicles with wind-
shield wiper de-icer)
Do not touch the glass at lower part of
the windshield or to the side of the front
pillars when the wind shield wiper de-icer
is on.
Using automatic modeAdjusting the temperature for
driver and passenger seats sepa-
rately (“DUAL” mode)
Air outlet layout and operations