Lexus ES350 2019 Owner's Manual / LEXUS 2019 ES350 OWNER'S MANUAL (OM06130U)
Manufacturer: LEXUS, Model Year: 2019, Model line: ES350, Model: Lexus ES350 2019Pages: 444, PDF Size: 14.22 MB
Page 361 of 444

3617-2. Steps to take in an emergency
7
When trouble arises
speed range system is suspended tempo-
rarily or until the problem shown in the mes-
sage is resolved. (causes and coping
methods: P.167)
■If “Radar Cruise Control Unavailable” is
displayed
The dynamic radar cruise control with full-
speed range system cannot be used tempo-
rarily. Use the system when it becomes
available again.
■If “Front Camera Unavailable” is dis-
played
The following systems may be suspended
until the problem shown in the message is
resolved. ( P.167, 354)
●PCS (Pre-Collision System)
●LTA (Lane Tracing Assist)
●Automatic High Beam
●RSA (Road Sign Assist) (if equipped)
●Dynamic radar cruise control with full-
speed range
■If “Maintenance Required Soon” is dis-
played
Indicates that all maintenance according to
the driven distance on the maintenance
schedule
* should be performed soon.
Comes on approximately 4500 miles
(7200 km) after the message has been
reset. If necessary, perform maintenance.
Please reset the message after the mainte-
nance is performed. ( P.301)
*: Refer to the separa te “Scheduled Main-
tenance” or “Owner’s Manual Supple-
ment” for the maintenance interval
applicable to your vehicle.
■If “Maintenance Required Visit Your
Dealer” is displayed
Indicates that all maintenance is required to
correspond to the driven distance on the
maintenance schedule
*.
Comes on approximately 5000 miles
(8000 km) after the message has been
reset. (The indicator will not work properly
unless the message ha s been reset.) Per-
form the necessary maintenance. Please
reset the message after the maintenance is performed. (
P.301)
*: Refer to the separate “Scheduled Main-
tenance” or “Owner’s Manual Supple-
ment” for the main tenance interval
applicable to your vehicle.
■If “Oil Maintenance Required Soon” is
displayed
Indicates that the engine oil should be
scheduled to be changed.
Check the engine oil an d change it if neces-
sary. After changing th e engine oil, make
sure to reset the message. ( P.312)
■If “Oil Maintenance Required” is dis-
played
Indicates that the engine oil should be
changed.
Check and change the en gine oil, and oil fil-
ter by your Lexus dealer. After changing the
engine oil, make sure to reset the message.
( P.312)
■If a message that indicates the need for
visiting your Lexus dealer is displayed
The system or part shown on the multi-
information display is malfunctioning. Have
the vehicle inspected by your Lexus dealer
immediately.
■If a message that indicates the need for
referring to Owner’ s Manual is dis-
played
●If any of the following messages are
shown on the multi-information display,
follow the instructions.
• “Engine Coolant Temp High” ( P.377)
●If any of the following messages are
shown on the multi-info rmation display, it
may indicate a malfunction. Have the
vehicle inspected by your Lexus dealer
immediately.
• “Access System with Elec. Key Malfunc- tion”
●If any of the following messages are
shown on the multi-info rmation display, it
may indicate a malfun ction. Immediately
stop the vehicle and contact your Lexus
dealer.
• “Braking Power Low”
• “Charging System Malfunction”
• “Oil Pressure Low”
Page 362 of 444
3627-2. Steps to take in an emergency
Stop the vehicle in a safe place on a
hard, flat surface.
Set the parking brake.
Shift the shift lever to P.
Stop the engine.
Turn on the emergency flashers.
( P.340)
NOTICE
■If “High Power Consumption Power
to Climate Temporarily Limited” is
displayed frequently
There is a possible malfunction relating
to the charging system or the battery
may be deteriorating. Have the vehicle
inspected by your Lexus dealer.
If you have a flat tire
Your vehicle is equipped with a
spare tire. The flat tire can be
replaced with the spare tire.
For details about tires: P.316
WARNING
■If you have a flat tire
Do not continue driving with a flat tire.
Driving even a short distance with a flat
tire can damage the tire and the wheel
beyond repair, which could result in an
accident.
Before jacking up the vehicle
Page 363 of 444
3637-2. Steps to take in an emergency
7
When trouble arises
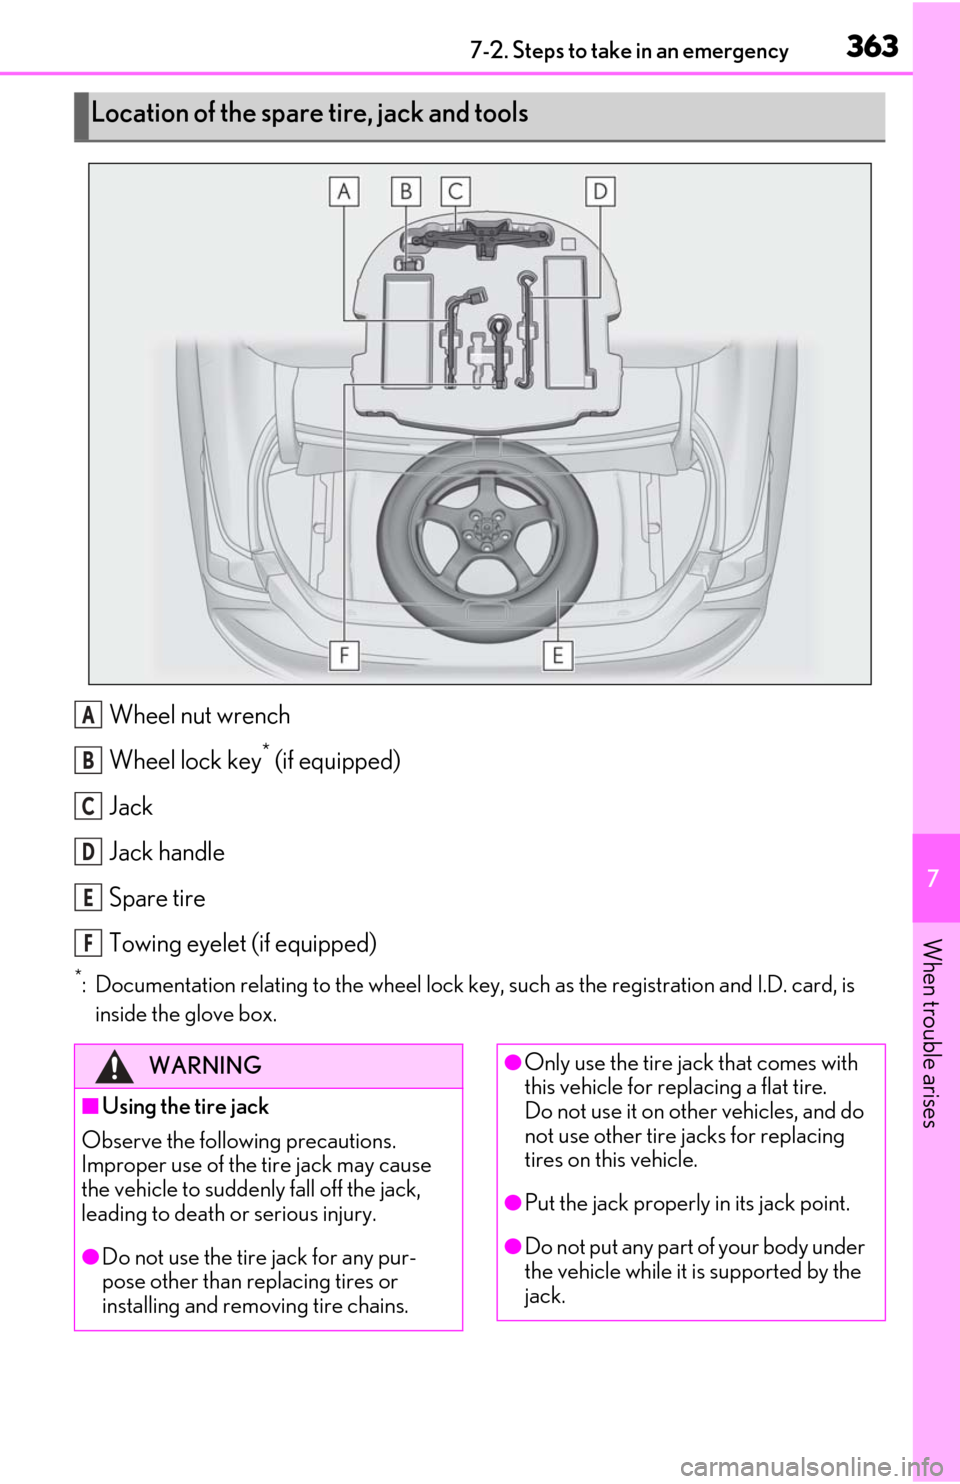
Wheel nut wrench
Wheel lock key
* (if equipped)
Jack
Jack handle
Spare tire
Towing eyelet (if equipped)
*: Documentation relating to the wheel lock key, such as the registration and I.D. card, is
inside the glove box.
Location of the spare tire, jack and tools
A
B
C
D
E
F
WARNING
■Using the tire jack
Observe the following precautions.
Improper use of the tire jack may cause
the vehicle to suddenly fall off the jack,
leading to death or serious injury.
●Do not use the tire jack for any pur-
pose other than replacing tires or
installing and removing tire chains.
●Only use the tire jack that comes with
this vehicle for replacing a flat tire.
Do not use it on other vehicles, and do
not use other tire jacks for replacing
tires on this vehicle.
●Put the jack properly in its jack point.
●Do not put any part of your body under
the vehicle while it is supported by the
jack.
Page 364 of 444
3647-2. Steps to take in an emergency
When replacing tires on a vehicle with
wheel lock nuts, use the following pro-
cedures to remove and install the
wheel lock nuts. The wheel lock key is
stored in the tray inside the luggage
compartment. Always return the wheel
lock key to its original position after
use, so that it does not get lost.
■Removal
For ease of removal, the wheel lock nut
should always be the first one loos-
ened.
1 Place the wheel lock key on top of
the wheel lock nut, turning until the
wheel lock key and wheel lock nut
patterns engage.
2 Place the wheel nut wrench on the
wheel lock key, and while applying pressure on the wheel lock key,
loosen the wheel lock nut.
■Installation
For ease of installation, the wheel lock
nut should always be the last one tight-
ened.
1 By hand, install a wheel lock nut on
each wheel.
2 Place the wheel lock key on top of
the wheel lock nut, turning until the
wheel lock key and wheel lock nut
patterns engage.
3 Place the wheel nut wrench on the
wheel lock key, and while applying
pressure on the wheel lock key,
tighten the wheel lock nut to the
recommended torque.
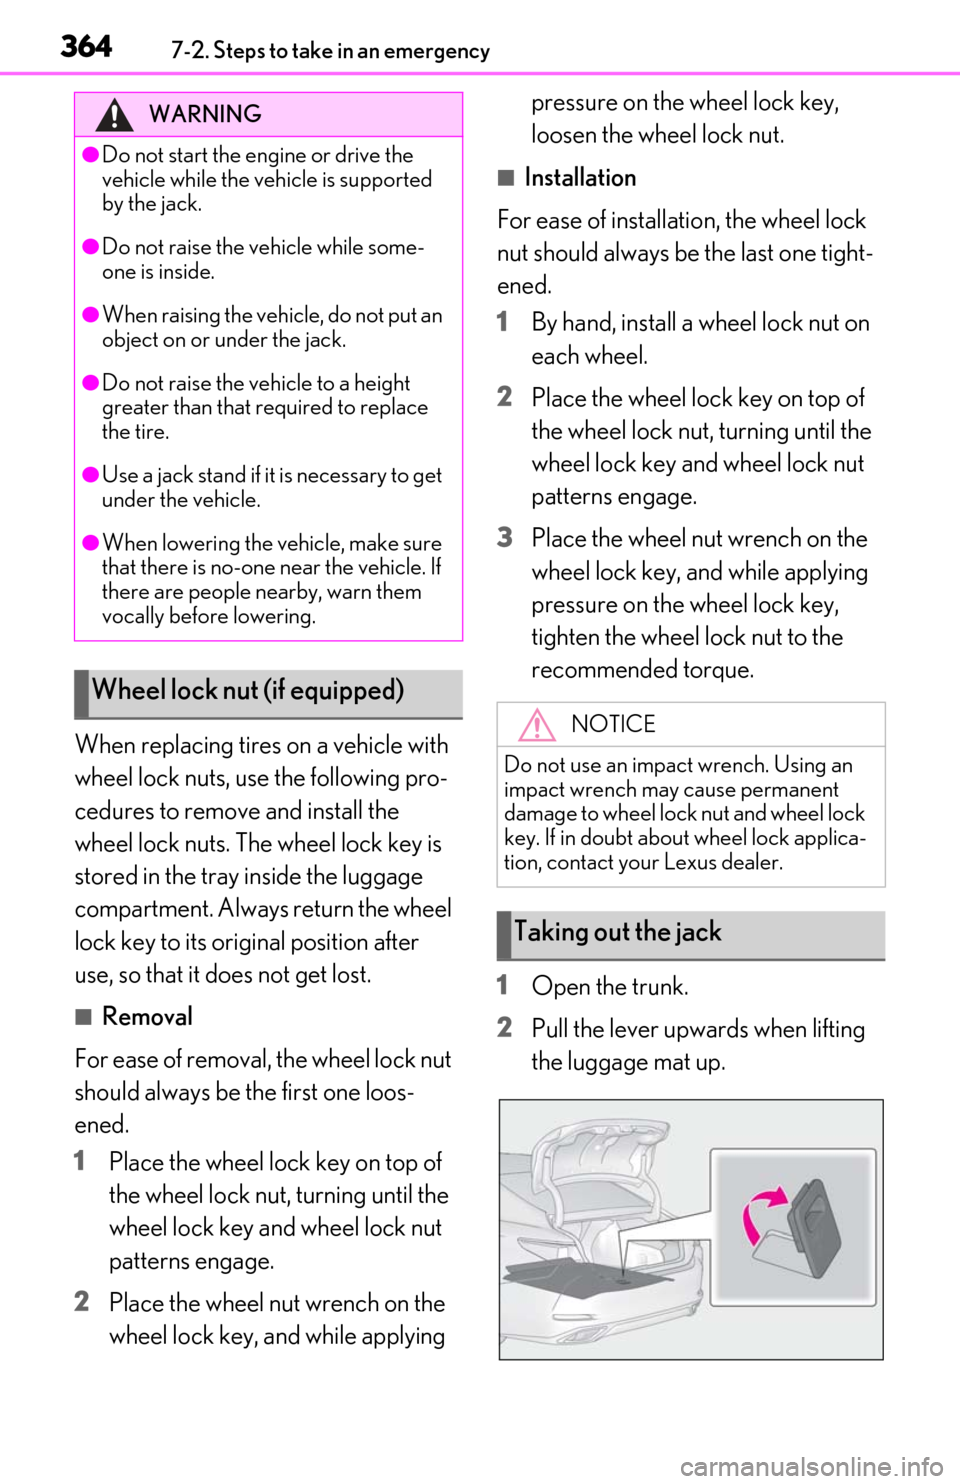
1 Open the trunk.
2 Pull the lever upwards when lifting
the luggage mat up.
WARNING
●Do not start the engine or drive the
vehicle while the vehicle is supported
by the jack.
●Do not raise the vehicle while some-
one is inside.
●When raising the vehicle, do not put an
object on or under the jack.
●Do not raise the vehicle to a height
greater than that required to replace
the tire.
●Use a jack stand if it is necessary to get
under the vehicle.
●When lowering the vehicle, make sure
that there is no-one near the vehicle. If
there are people nearby, warn them
vocally before lowering.
Wheel lock nut (if equipped)
NOTICE
Do not use an impact wrench. Using an
impact wrench may cause permanent
damage to wheel lock nut and wheel lock
key. If in doubt about wheel lock applica-
tion, contact your Lexus dealer.
Taking out the jack
Page 365 of 444
3657-2. Steps to take in an emergency
7
When trouble arises
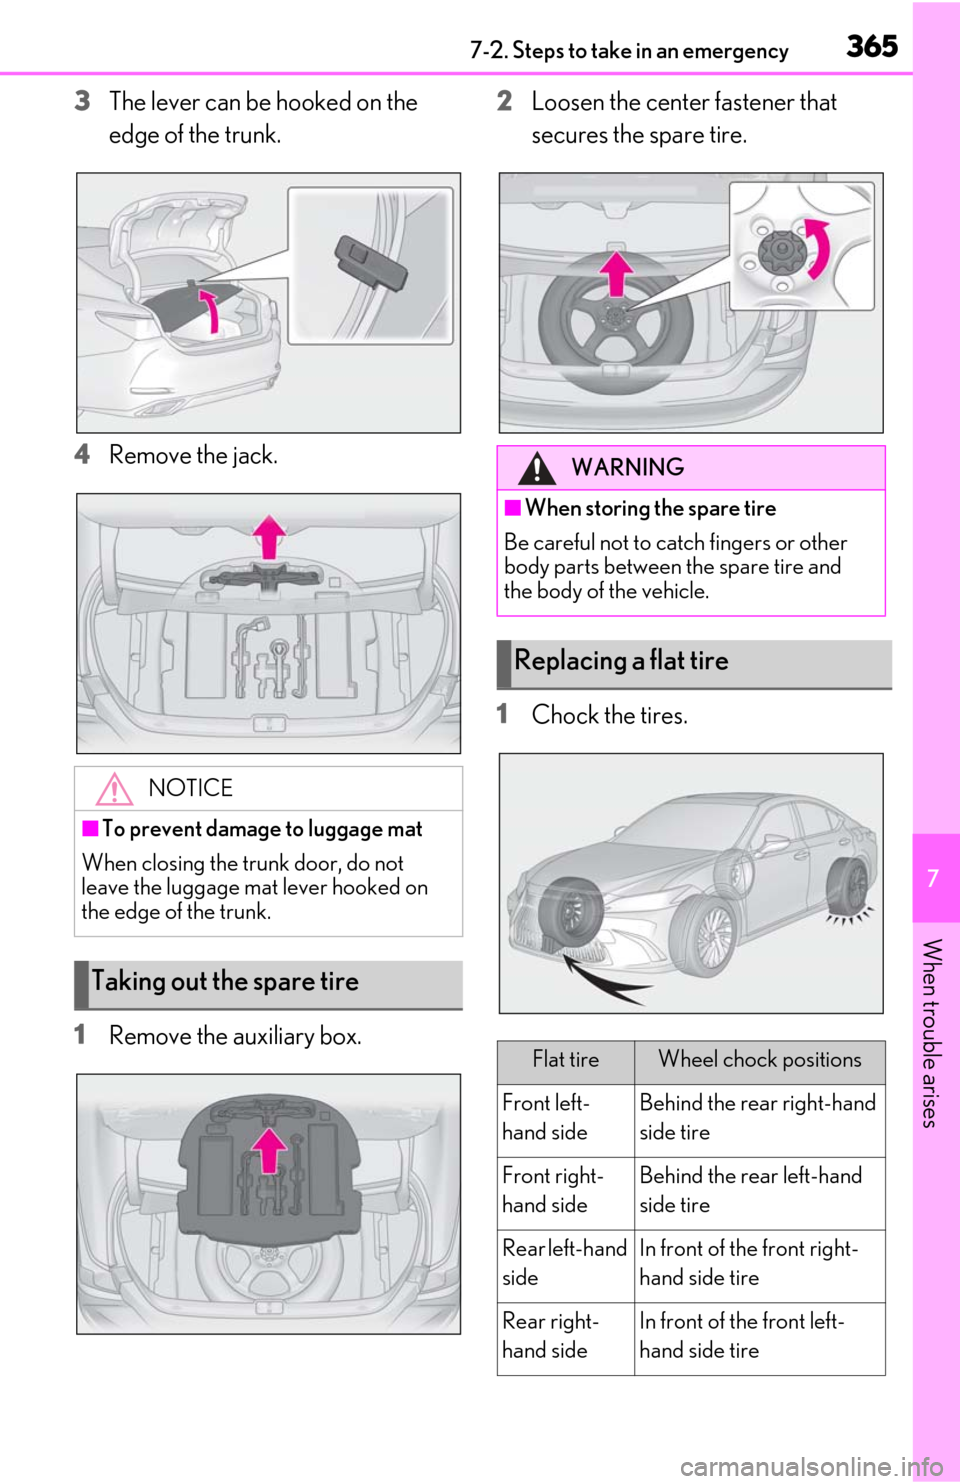
3The lever can be hooked on the
edge of the trunk.
4 Remove the jack.
1 Remove the auxiliary box. 2
Loosen the center fastener that
secures the spare tire.
1 Chock the tires.
NOTICE
■To prevent damage to luggage mat
When closing the trunk door, do not
leave the luggage mat lever hooked on
the edge of the trunk.
Taking out the spare tire
WARNING
■When storing the spare tire
Be careful not to catch fingers or other
body parts between the spare tire and
the body of the vehicle.
Replacing a flat tire
Flat tireWheel chock positions
Front left-
hand sideBehind the rear right-hand
side tire
Front right-
hand sideBehind the rear left-hand
side tire
Rear left-hand
sideIn front of the front right-
hand side tire
Rear right-
hand sideIn front of the front left-
hand side tire
Page 366 of 444
3667-2. Steps to take in an emergency
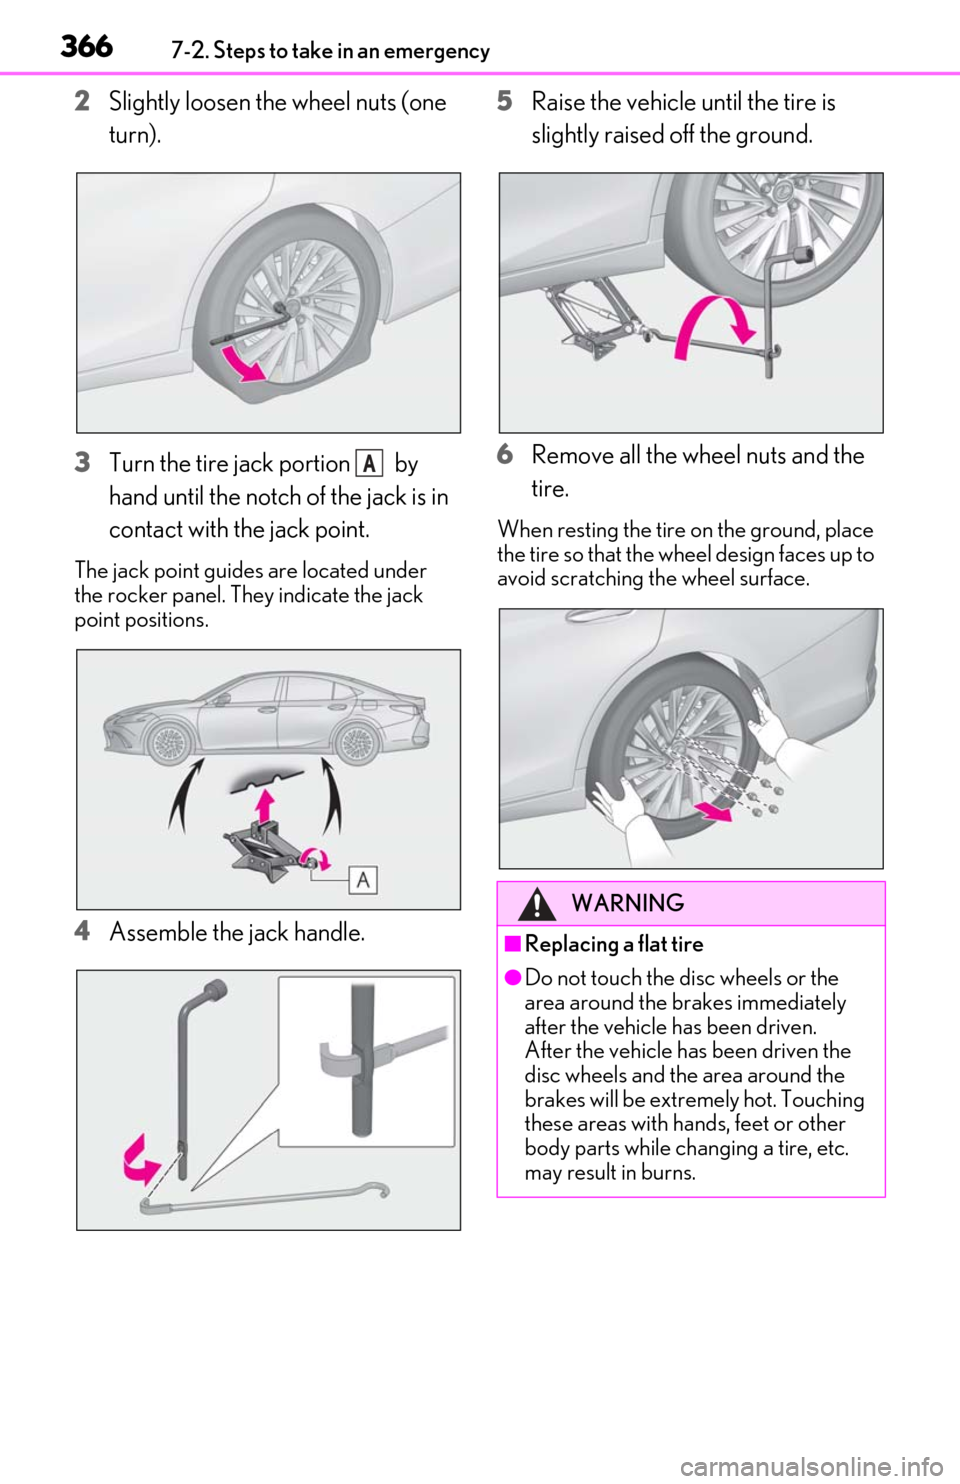
2Slightly loosen the wheel nuts (one
turn).
3 Turn the tire jack portion by
hand until the notch of the jack is in
contact with the jack point.
The jack point guides are located under
the rocker panel. They indicate the jack
point positions.
4Assemble the jack handle. 5
Raise the vehicle until the tire is
slightly raised off the ground.
6 Remove all the wheel nuts and the
tire.
When resting the tire on the ground, place
the tire so that the wheel design faces up to
avoid scratching the wheel surface.
A
WARNING
■Replacing a flat tire
●Do not touch the disc wheels or the
area around the brakes immediately
after the vehicle has been driven.
After the vehicle has been driven the
disc wheels and the area around the
brakes will be extremely hot. Touching
these areas with hands, feet or other
body parts while changing a tire, etc.
may result in burns.
Page 367 of 444
3677-2. Steps to take in an emergency
7
When trouble arises
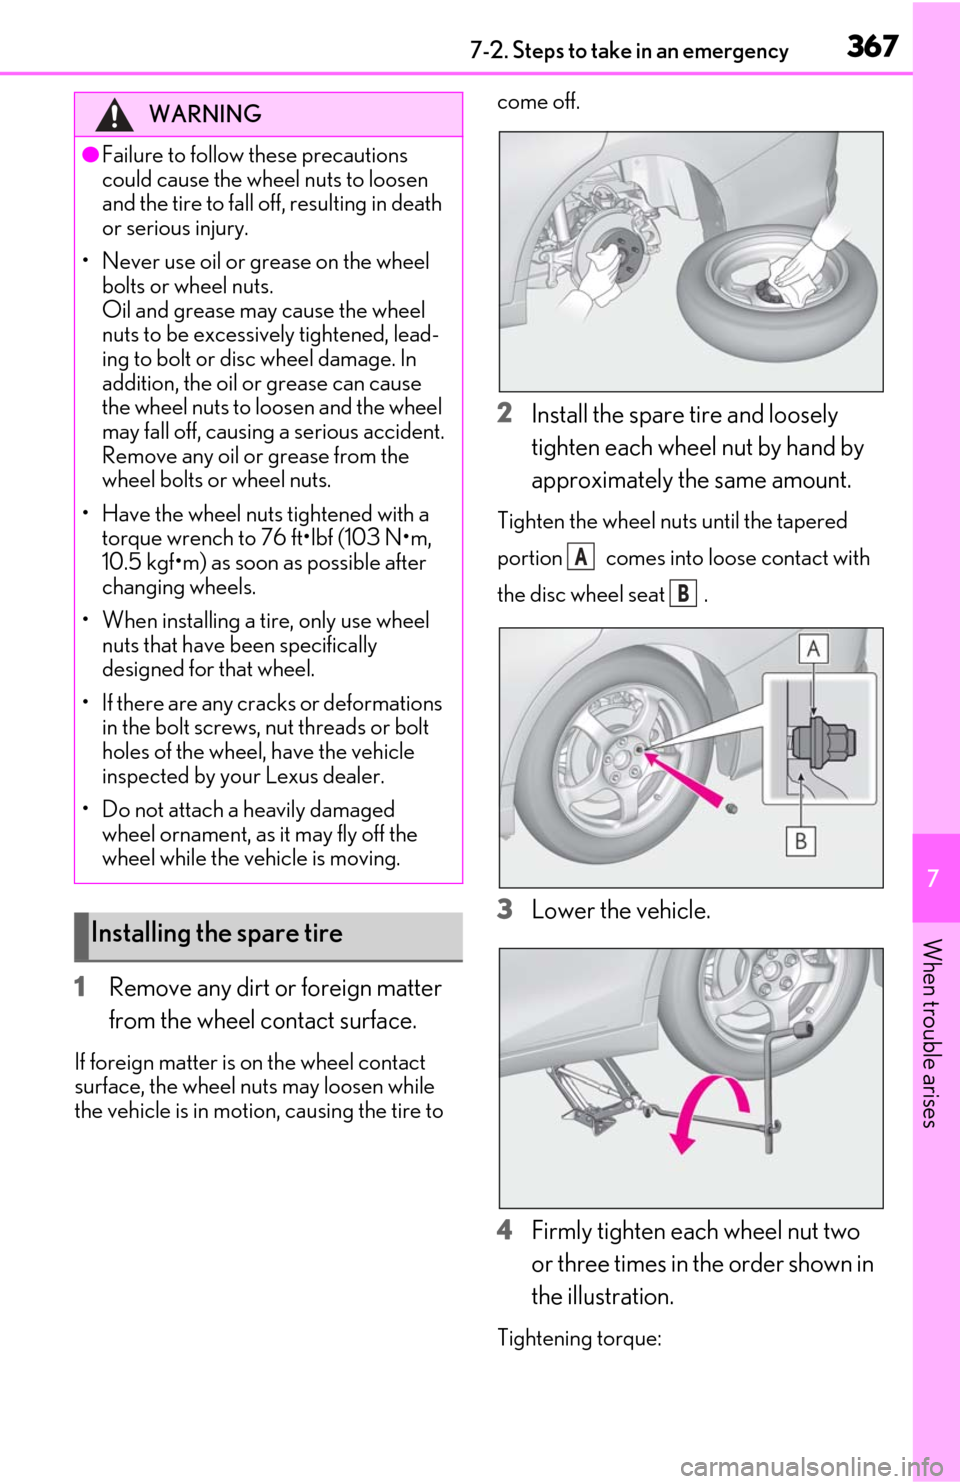
1Remove any dirt or foreign matter
from the wheel contact surface.
If foreign matter is on the wheel contact
surface, the wheel nuts may loosen while
the vehicle is in motion, causing the tire to come off.
2
Install the spare tire and loosely
tighten each wheel nut by hand by
approximately the same amount.
Tighten the wheel nuts until the tapered
portion comes into loose contact with
the disc wheel seat .
3Lower the vehicle.
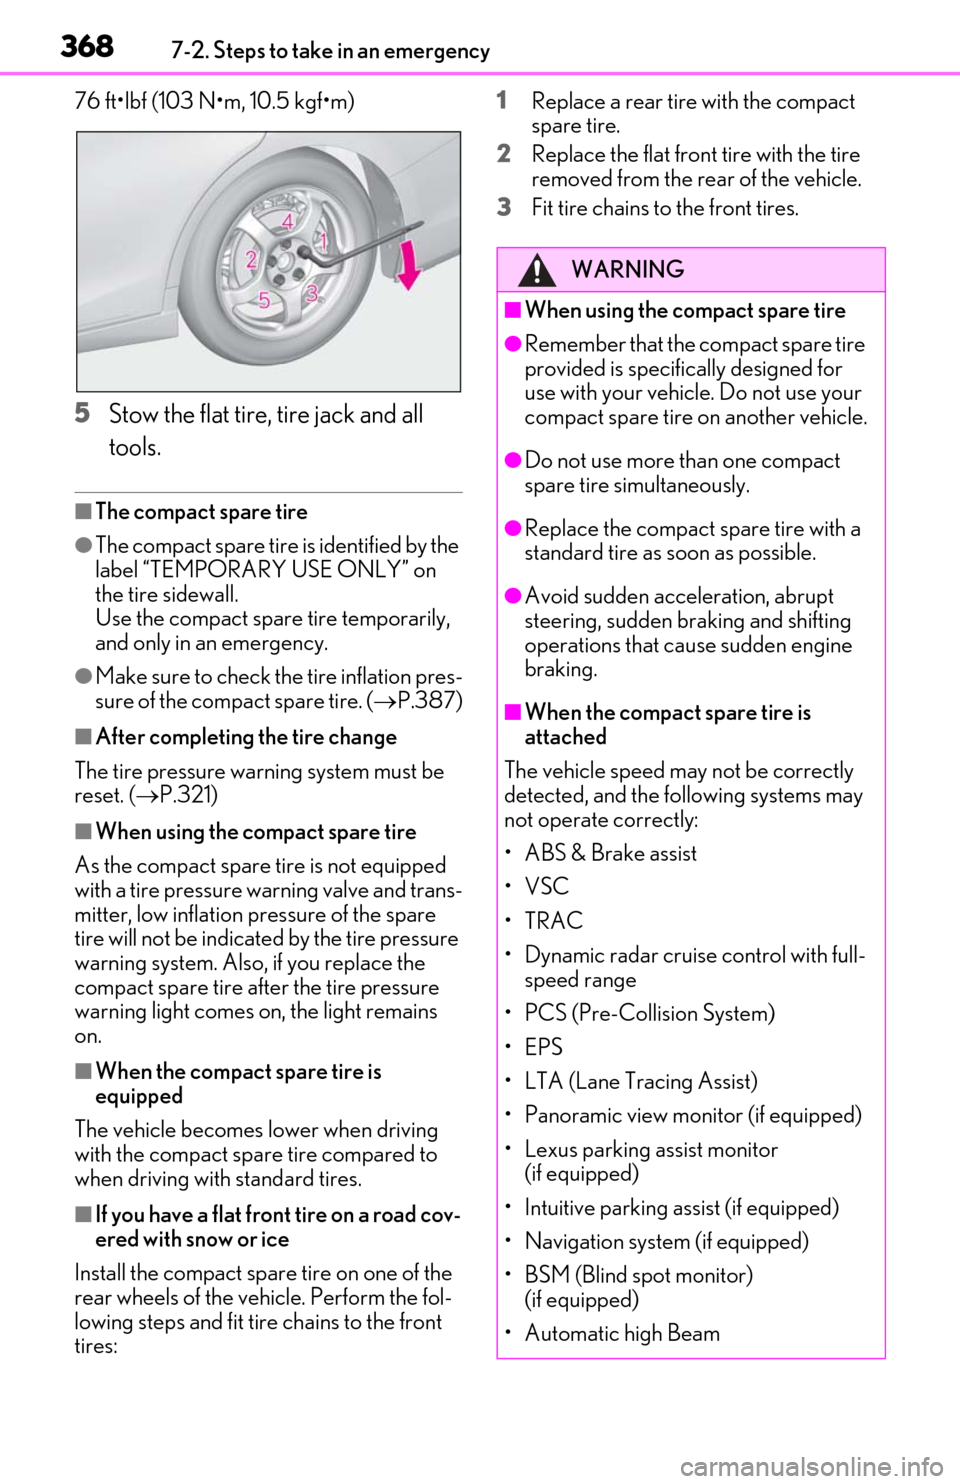
4 Firmly tighten each wheel nut two
or three times in the order shown in
the illustration.
Tightening torque:
WARNING
●Failure to follow these precautions
could cause the wheel nuts to loosen
and the tire to fall of f, resulting in death
or serious injury.
• Never use oil or grease on the wheel bolts or wheel nuts.
Oil and grease may cause the wheel
nuts to be excessively tightened, lead-
ing to bolt or disc wheel damage. In
addition, the oil or grease can cause
the wheel nuts to loosen and the wheel
may fall off, causing a serious accident.
Remove any oil or grease from the
wheel bolts or wheel nuts.
• Have the wheel nuts tightened with a torque wrench to 76 ft•lbf (103 N•m,
10.5 kgf•m) as soon as possible after
changing wheels.
• When installing a tire, only use wheel nuts that have been specifically
designed for that wheel.
• If there are any cracks or deformations in the bolt screws, nut threads or bolt
holes of the wheel, have the vehicle
inspected by your Lexus dealer.
• Do not attach a heavily damaged wheel ornament, as it may fly off the
wheel while the vehicle is moving.
Installing the spare tire
A
B
Page 368 of 444
3687-2. Steps to take in an emergency
76 ft•lbf (103 N•m, 10.5 kgf•m)
5Stow the flat tire, tire jack and all
tools.
■The compact spare tire
●The compact spare tire is identified by the
label “TEMPORARY USE ONLY” on
the tire sidewall.
Use the compact spare tire temporarily,
and only in an emergency.
●Make sure to check the tire inflation pres-
sure of the compact spare tire. ( P.387)
■After completing the tire change
The tire pressure warning system must be
reset. ( P.321)
■When using the compact spare tire
As the compact spare tire is not equipped
with a tire pressure warning valve and trans-
mitter, low inflation pressure of the spare
tire will not be indicated by the tire pressure
warning system. Also, if you replace the
compact spare tire after the tire pressure
warning light comes on, the light remains
on.
■When the compact spare tire is
equipped
The vehicle becomes lower when driving
with the compact spar e tire compared to
when driving with standard tires.
■If you have a flat fron t tire on a road cov-
ered with snow or ice
Install the compact spare tire on one of the
rear wheels of the vehicle. Perform the fol-
lowing steps and fit tire chains to the front
tires: 1
Replace a rear tire with the compact
spare tire.
2 Replace the flat front tire with the tire
removed from the rear of the vehicle.
3 Fit tire chains to the front tires.
WARNING
■When using the compact spare tire
●Remember that the compact spare tire
provided is specific ally designed for
use with your vehicle. Do not use your
compact spare tire on another vehicle.
●Do not use more than one compact
spare tire simultaneously.
●Replace the compact spare tire with a
standard tire as soon as possible.
●Avoid sudden acceleration, abrupt
steering, sudden braking and shifting
operations that cause sudden engine
braking.
■When the compact spare tire is
attached
The vehicle speed may not be correctly
detected, and the following systems may
not operate correctly:
• ABS & Brake assist
•VSC
•TRAC
• Dynamic radar cruise control with full- speed range
• PCS (Pre-Collision System)
•EPS
• LTA (Lane Tracing Assist)
• Panoramic view monitor (if equipped)
• Lexus parking assist monitor (if equipped)
• Intuitive parking assist (if equipped)
• Navigation system (if equipped)
• BSM (Blind spot monitor) (if equipped)
• Automatic high Beam
Page 369 of 444
3697-2. Steps to take in an emergency
7
When trouble arises
One of the following may be the cause
of the problem:
The electronic key may not be func-
tioning properly. ( P.373)
There may not be sufficient fuel in
the vehicle’s tank.
Refuel the vehicle. ( P.161)
The engine may be flooded.
Try to restart the engine again fol-
lowing correct starting procedures.
( P.137)
There may be a malfunction in the
engine immobilizer system.
( P.54)
There may be a malfunction in the
steering lock system.
One of the following may be the cause
of the problem:
The battery may be discharged.
WARNING
■Speed limit when using the compact
spare tire
Do not drive at speeds in excess of 50
mph (80 km/h) when a compact spare
tire is installed on the vehicle.
The compact spare tire is not designed
for driving at high speeds. Failure to
observe this precaution may lead to an
accident causing deat h or serious injury.
■After using the tools and jack
Before driving, make sure all the tools
and jack are securely in place in their
storage location to reduce the possibility
of personal injury during a collision or
sudden braking.
NOTICE
■Be careful when driving over bumps
with the compact spare tire installed
on the vehicle
The vehicle becomes lower when driving
with the compact spare tire compared to
when driving with standard tires. Be
careful when driving over uneven road
surfaces.
■Driving with tire chains and the com-
pact spare tire
Do not fit tire chains to the compact
spare tire.
Tire chains may damage the vehicle body
and adversely affect driving perfor-
mance.
■When replacing the tires
When removing or fitting the wheels,
tires or the tire pressure warning valve
and transmitter, contact your Lexus
dealer as the tire pr essure warning valve
and transmitter may be damaged if not
handled correctly.
If the engine will not start
If the engine will not start even
though correct starting procedures
are being followed ( P.137), con-
sider each of the following points:
The engine will not start even
though the starter motor oper-
ates normally.
The starter motor turns over
slowly, the interior lights and
headlights are dim, or the horn
does not sound or sounds at a low
volume.
Page 370 of 444
3707-2. Steps to take in an emergency
( P.374)
The battery terminal connections
may be loose or corroded.
The engine starting system may be
malfunctioning due to an electrical
problem such as electronic key battery
depletion or a blown fuse. However, an
interim measure is available to start the
engine.
One of the following may be the cause
of the problem:
One or both of the battery terminals
may be disconnected.
The battery may be discharged.
( P.374)
There may be a malfunction in the
steering lock system.
Contact your Lexus dealer if the problem
cannot be repaired, or if repair procedures
are unknown.
When the engine does not start, the
following steps can be used as an
interim measure to start the engine if
the engine switch is functioning nor-
mally: 1
Press the parking brake switch to
check that the parking brake is set.
(P.146)
Parking brake indicator will come on.
2 Shift the shift lever to P.
3 Turn the engine switch to ACCES-
SORY mode.
4 Press and hold the engine switch
for about 15 seconds while
depressing the brake pedal firmly.
Even if the engine can be started using
the above steps, the system may be
malfunctioning. Have the vehicle
inspected by your Lexus dealer.The starter motor does not turn
over
The starter motor does not turn
over, the interior lights and head-
lights do not turn on, or the horn
does not sound.
Starting the engine in an emer-
gency