steering Lexus ES350 2019 / LEXUS 2019 ES350 (OM06130U) Workshop Manual
[x] Cancel search | Manufacturer: LEXUS, Model Year: 2019, Model line: ES350, Model: Lexus ES350 2019Pages: 444, PDF Size: 14.22 MB
Page 254 of 444
2545-3. Using the air conditioning system
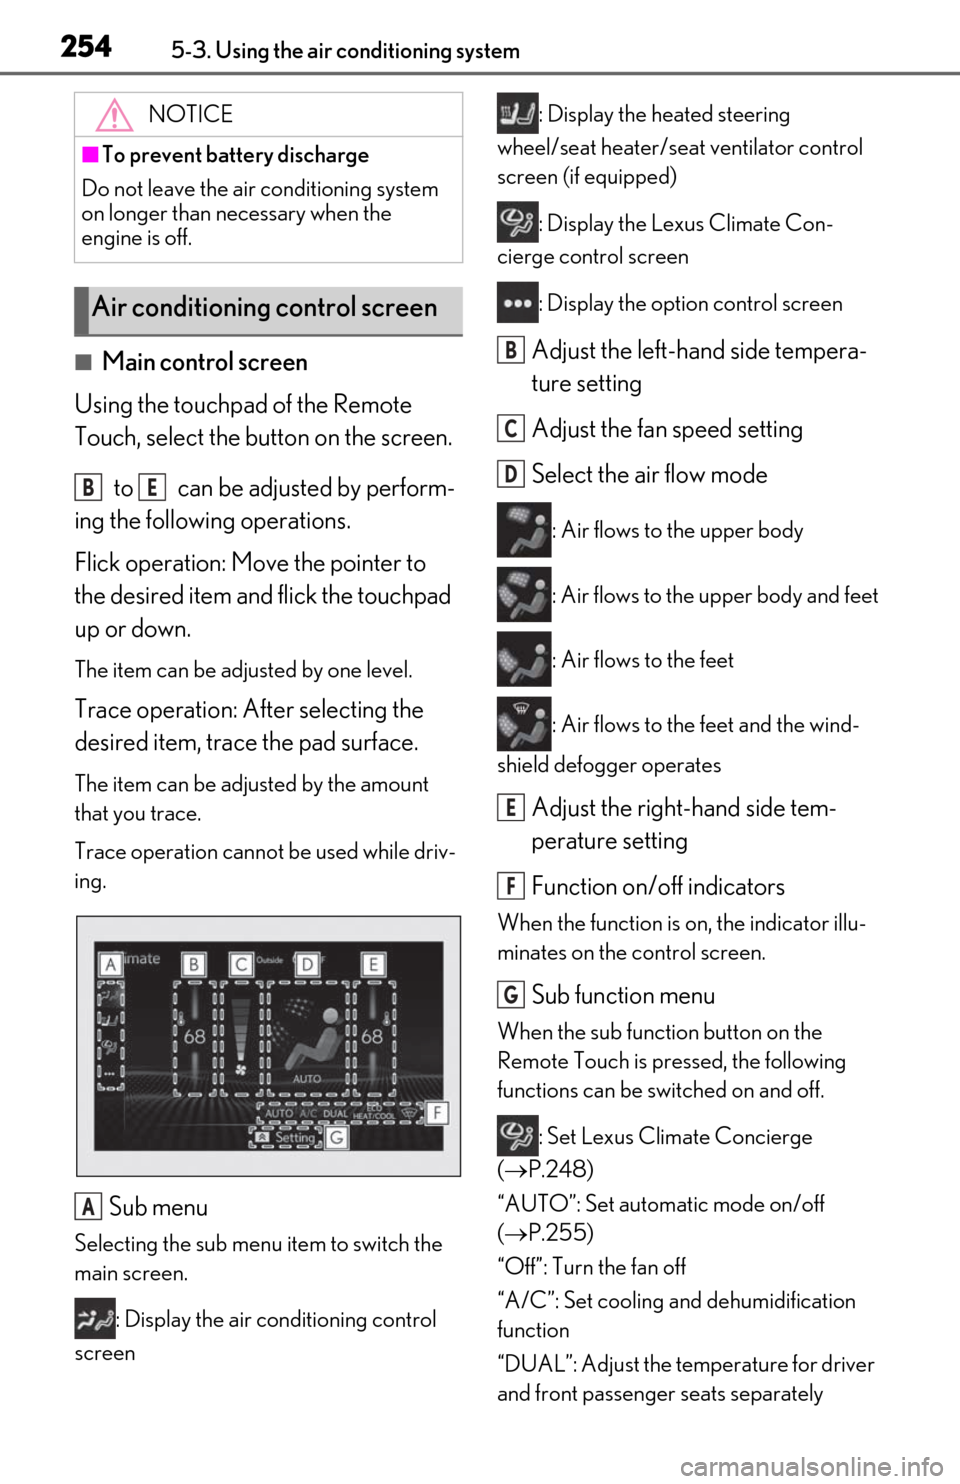
■Main control screen
Using the touchpad of the Remote
Touch, select the button on the screen.
to can be adjusted by perform-
ing the following operations.
Flick operation: Move the pointer to
the desired item and flick the touchpad
up or down.
The item can be adjusted by one level.
Trace operation: After selecting the
desired item, trace the pad surface.
The item can be adjusted by the amount
that you trace.
Trace operation cannot be used while driv-
ing.
Sub menu
Selecting the sub menu item to switch the
main screen.
: Display the air conditioning control
screen : Display the heated steering
wheel/seat heater/sea t ventilator control
screen (if equipped)
: Display the Lexus Climate Con-
cierge control screen
: Display the option control screen
Adjust the left-hand side tempera-
ture setting
Adjust the fan speed setting
Select the air flow mode
: Air flows to the upper body
: Air flows to the upper body and feet
: Air flows to the feet
: Air flows to the feet and the wind-
shield defogger operates
Adjust the right-hand side tem-
perature setting
Function on/off indicators
When the function is on, the indicator illu-
minates on the control screen.
Sub function menu
When the sub function button on the
Remote Touch is pressed, the following
functions can be switched on and off.
: Set Lexus Climate Concierge
( P.248)
“AUTO”: Set automatic mode on/off
( P.255)
“Off”: Turn the fan off
“A/C”: Set cooling and dehumidification
function
“DUAL”: Adjust the temperature for driver
and front passenger seats separately
NOTICE
■To prevent battery discharge
Do not leave the air conditioning system
on longer than necessary when the
engine is off.
Air conditioning control screen
BE
A
B
C
D
E
F
G
Page 255 of 444
2555-3. Using the air conditioning system
5
Interior features
(“DUAL” mode) (P.255)
: Set eco air conditioning mode
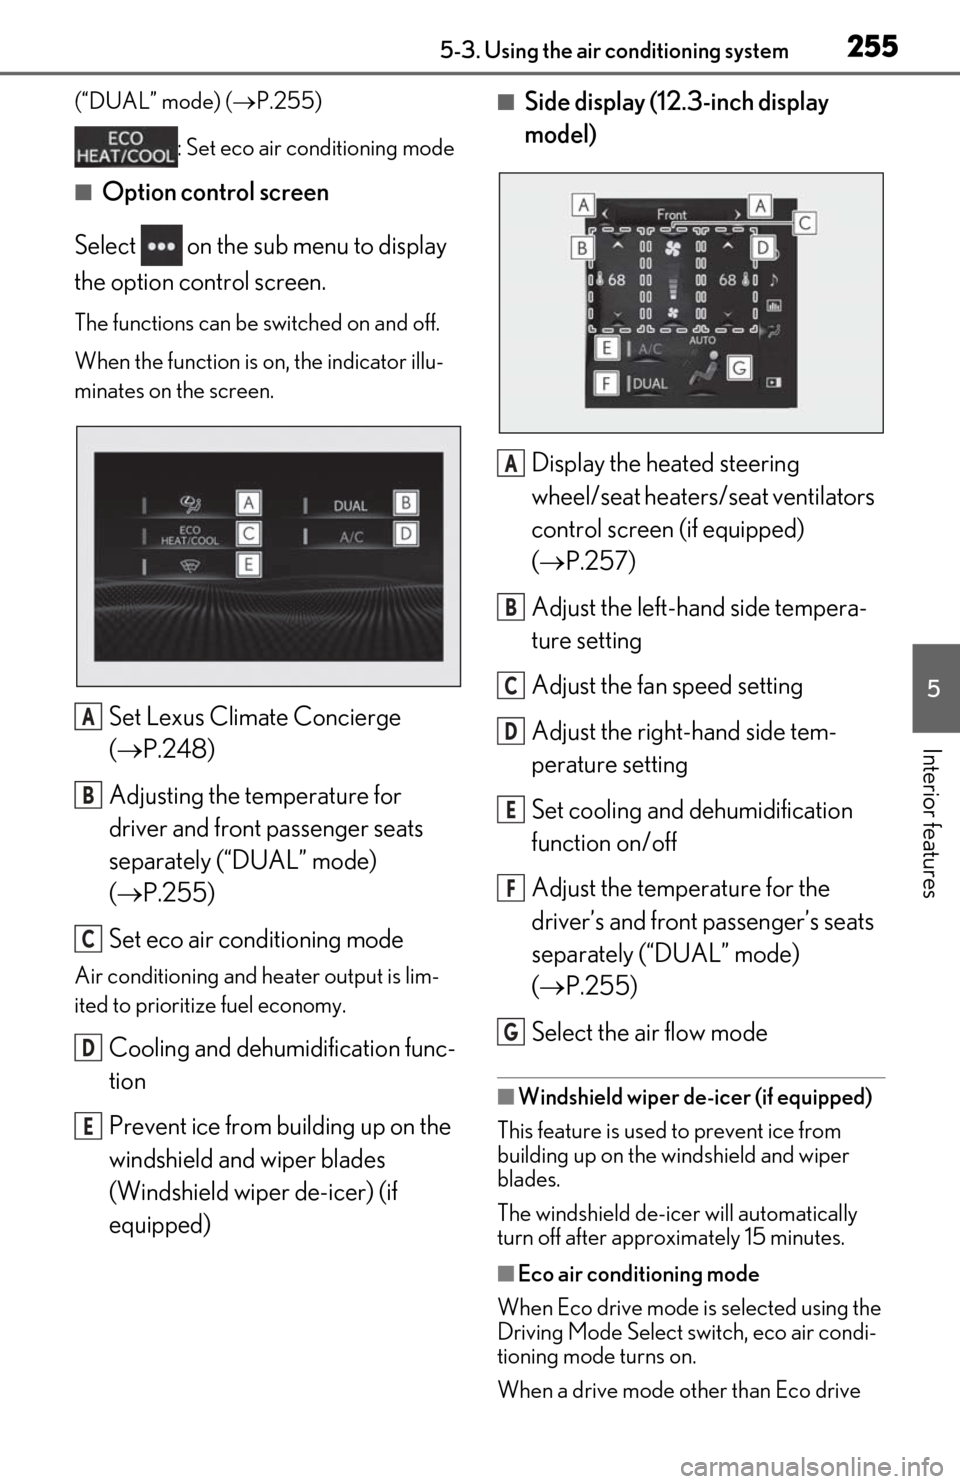
■Option control screen
Select on the sub menu to display
the option control screen.
The functions can be switched on and off.
When the function is on, the indicator illu-
minates on the screen.
Set Lexus Climate Concierge
( P.248)
Adjusting the temperature for
driver and front passenger seats
separately (“DUAL” mode)
( P.255)
Set eco air conditioning mode
Air conditioning and heater output is lim-
ited to prioritize fuel economy.
Cooling and dehumidification func-
tion
Prevent ice from building up on the
windshield and wiper blades
(Windshield wiper de-icer) (if
equipped)
■Side display (12.3-inch display
model)
Display the heated steering
wheel/seat heaters/seat ventilators
control screen (if equipped)
( P.257)
Adjust the left-hand side tempera-
ture setting
Adjust the fan speed setting
Adjust the right-hand side tem-
perature setting
Set cooling and dehumidification
function on/off
Adjust the temperature for the
driver’s and front passenger’s seats
separately (“DUAL” mode)
( P.255)
Select the air flow mode
■Windshield wiper de-icer (if equipped)
This feature is used to prevent ice from
building up on the windshield and wiper
blades.
The windshield de-icer will automatically
turn off after approximately 15 minutes.
■Eco air conditioning mode
When Eco drive mode is selected using the
Driving Mode Select switch, eco air condi-
tioning mode turns on.
When a drive mode other than Eco drive
A
B
C
D
E
A
B
C
D
E
F
G
Page 258 of 444
2585-3. Using the air conditioning system
*:If equipped
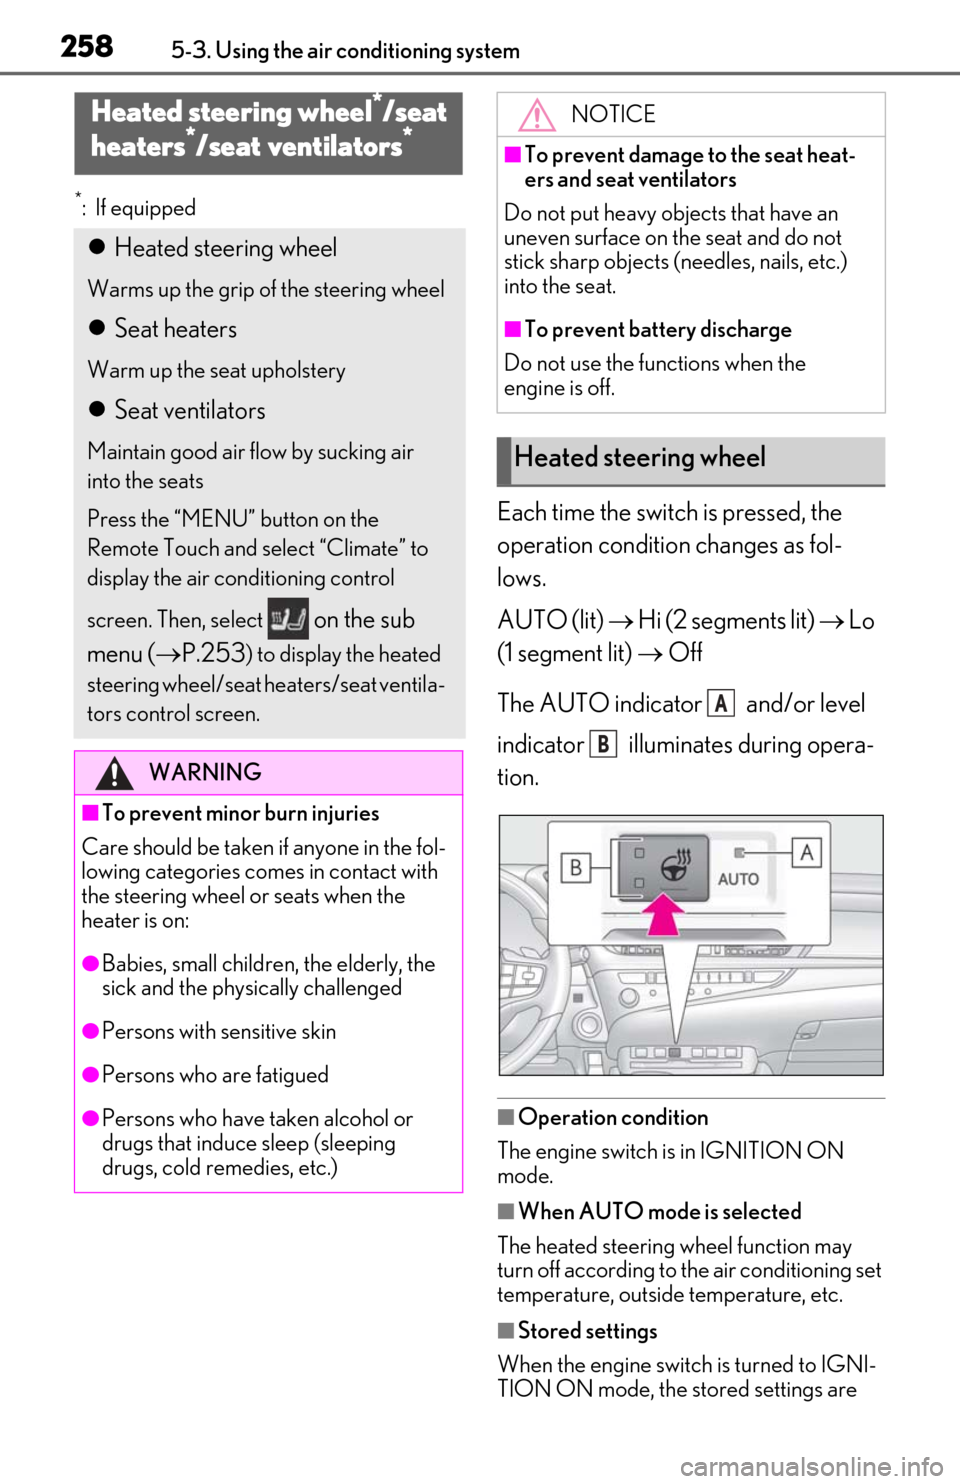
Each time the switch is pressed, the
operation condition changes as fol-
lows.
AUTO (lit) Hi (2 segments lit) Lo
(1 segment lit) Off
The AUTO indicator and/or level
indicator illuminates during opera-
tion.
■Operation condition
The engine switch is in IGNITION ON
mode.
■When AUTO mode is selected
The heated steering wheel function may
turn off according to the air conditioning set
temperature, outside temperature, etc.
■Stored settings
When the engine switch is turned to IGNI-
TION ON mode, the stored settings are
Heated steering wheel*/seat
heaters*/seat ventilators*
Heated steering wheel
Warms up the grip of the steering wheel
Seat heaters
Warm up the seat upholstery
Seat ventilators
Maintain good air flow by sucking air
into the seats
Press the “MENU” button on the
Remote Touch and select “Climate” to
display the air conditioning control
screen. Then, select
on the sub
menu ( P.253
) to display the heated
steering wheel/seat heaters/seat ventila-
tors control screen.
WARNING
■To prevent minor burn injuries
Care should be taken if anyone in the fol-
lowing categories comes in contact with
the steering wheel or seats when the
heater is on:
●Babies, small children, the elderly, the
sick and the phys ically challenged
●Persons with sensitive skin
●Persons who are fatigued
●Persons who have taken alcohol or
drugs that induce sleep (sleeping
drugs, cold remedies, etc.)
NOTICE
■To prevent damage to the seat heat-
ers and seat ventilators
Do not put heavy objects that have an
uneven surface on the seat and do not
stick sharp objects (n eedles, nails, etc.)
into the seat.
■To prevent battery discharge
Do not use the functions when the
engine is off.
Heated steering wheel
A
B
Page 260 of 444
2605-3. Using the air conditioning system
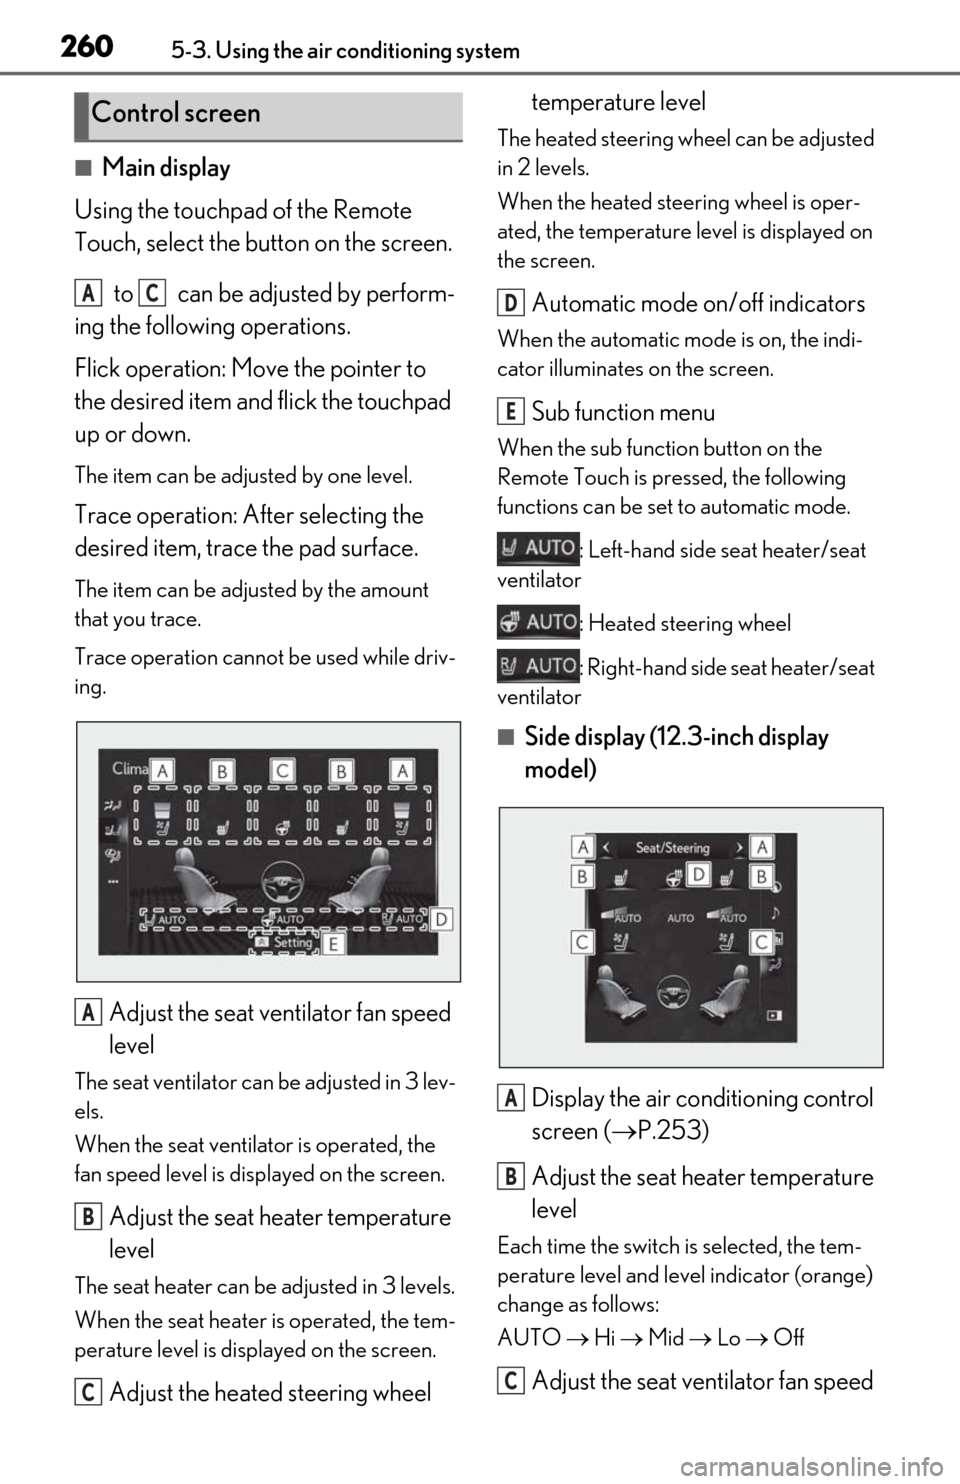
■Main display
Using the touchpad of the Remote
Touch, select the button on the screen.
to can be adjusted by perform-
ing the following operations.
Flick operation: Move the pointer to
the desired item and flick the touchpad
up or down.
The item can be adjusted by one level.
Trace operation: After selecting the
desired item, trace the pad surface.
The item can be adjusted by the amount
that you trace.
Trace operation cannot be used while driv-
ing.
Adjust the seat ventilator fan speed
level
The seat ventilator can be adjusted in 3 lev-
els.
When the seat ventilator is operated, the
fan speed level is disp layed on the screen.
Adjust the seat heater temperature
level
The seat heater can be adjusted in 3 levels.
When the seat heater is operated, the tem-
perature level is displayed on the screen.
Adjust the heated steering wheel temperature level
The heated steering wheel can be adjusted
in 2 levels.
When the heated steering wheel is oper-
ated, the temperature le
vel is displayed on
the screen.
Automatic mode on/off indicators
When the automatic mode is on, the indi-
cator illuminates on the screen.
Sub function menu
When the sub function button on the
Remote Touch is pressed, the following
functions can be set to automatic mode.
: Left-hand side seat heater/seat
ventilator
: Heated steering wheel
: Right-hand side seat heater/seat
ventilator
■Side display (12.3-inch display
model)
Display the air conditioning control
screen ( P.253)
Adjust the seat heater temperature
level
Each time the switch is selected, the tem-
perature level and level indicator (orange)
change as follows:
AUTO Hi Mid Lo Off
Adjust the seat ventilator fan speed
Control screen
AC
A
B
C
D
E
A
B
C
Page 261 of 444

2615-3. Using the air conditioning system
5
Interior features
level
Each time the switch is selected, the fan
speed level and level indicator (blue)
change as follows:
AUTO Hi Mid Lo Off
Adjust the heated steering wheel
temperature level
Each time the switch is selected, the tem-
perature level and le vel indicator change
as follows:
AUTO Hi Lo Off
■Customization
Steering wheel heating preference in auto-
matic mode and the automatic mode set-
tings for the seat heat ers and ventilators can
be changed. (Customizable features:
P.400)
D
Page 298 of 444

2986-1. Maintenance and care
WARNING
■Precaution regarding the rear
bumper with Blind Spot Monitor (if
equipped)
If the paint of the rear bumper is chipped
or scratched, the system may malfunc-
tion. If this occurs, consult your Lexus
dealer.
NOTICE
■To prevent paint deterioration and
corrosion on the body and compo-
nents (aluminum wheels etc.)
●Wash the vehicle immediately in the
following cases:
• After driving near the sea coast
• After driving on salted roads
• If coal tar, pollen or tree sap is present on the paint surface
• If dead insects, in sect droppings or
bird droppings are present on the
paint surface
• After driving in an area contaminated with soot, oily smoke, mine dust, iron
powder or chemical substances
• If the vehicle becomes heavily soiled with dust or mud
• If liquids such as benzene and gasoline are spilled on the paint surface
●If the paint is chip ped or scratched,
have it repaired immediately.
●To prevent the wheels from corroding,
remove any dirt and store in a place
with low humidity when storing the
wheels.
■Cleaning the exterior lights
●Wash carefully. Do not use organic
substances or scrub with a hard brush.
This may damage the surfaces of the
lights.
●Do not apply wax to the surfaces of the
lights.
Wax may cause damage to the lenses.
■When using an automatic car wash
(vehicles with rain-sensing windshield
wipers)
Set the wiper switch to the off position.
If the wiper switch is in “AUTO”, the wip-
ers may operate and the wiper blades
may be damaged.
■When using a high-pressure car wash
●When washing the vehicle, do not let
water of the high-p ressure washer hit
directly or the vicinity of the camera.
Due to the shock from the high-pres-
sure water, it is possible the device may
not operate as normal.
●Do not bring the nozzle tip close to
boots (rubber or resin manufactured
cover), connectors or the following
parts. The parts may be damaged if
they come into contact with high-pres-
sure water.
• Traction related parts
•Steering parts
• Suspension parts
• Brake parts
●Keep the cleaning nozzle at least 11.9
in. (30 cm) away from the vehicle
body. Otherwise resin section, such as
molding and bumpers, may be
deformed and damaged.
Also, do not continuously hold the
nozzle in the same place.
Page 304 of 444
3046-2. Maintenance
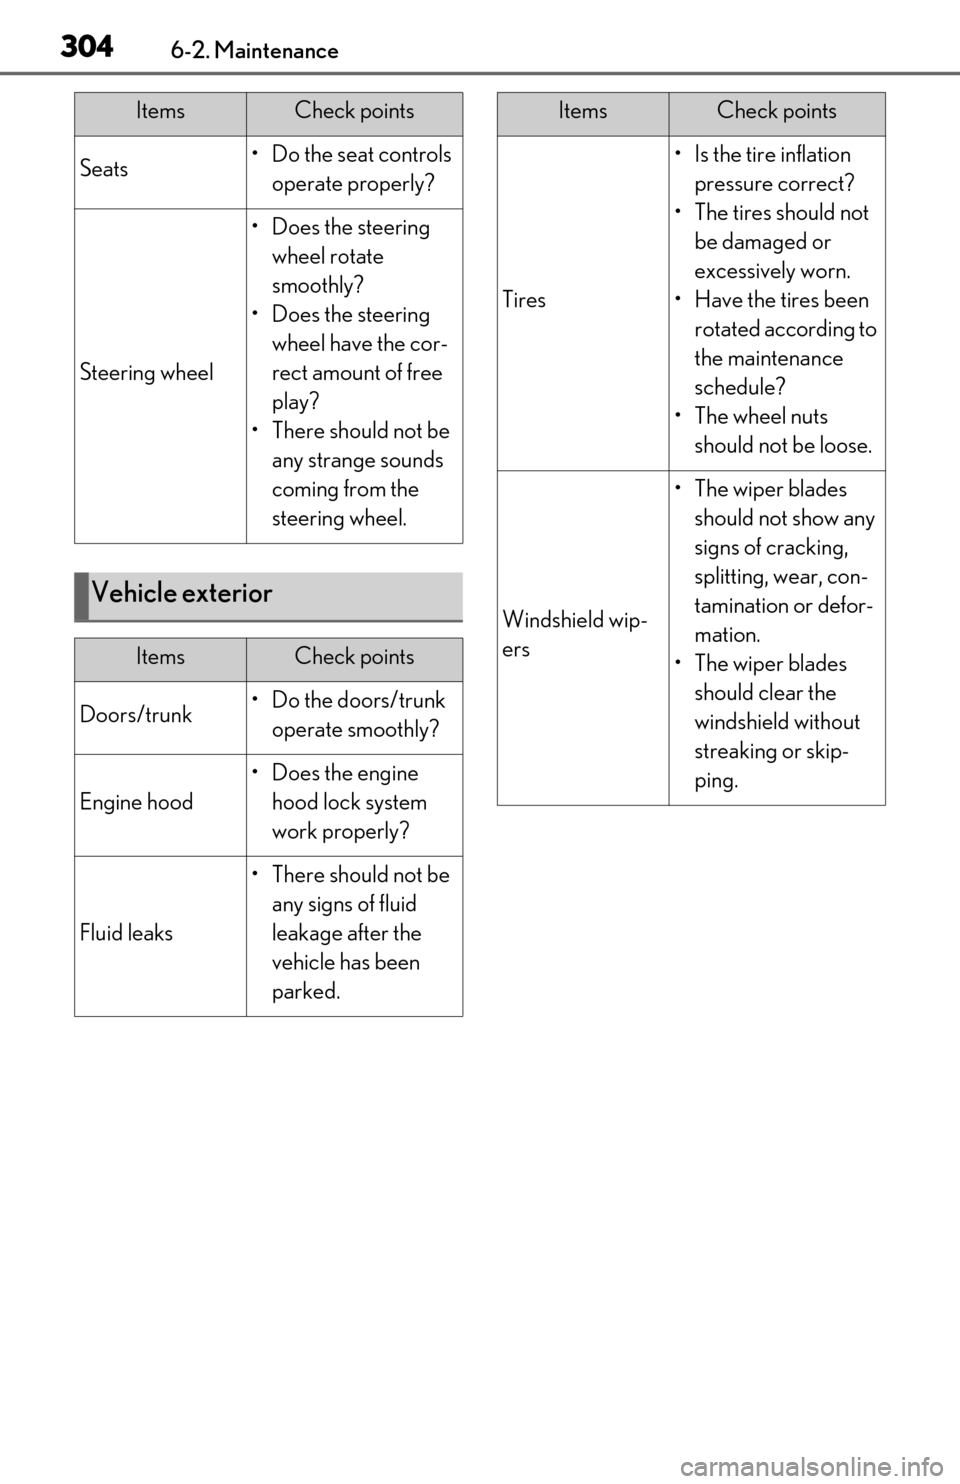
Seats• Do the seat controls operate properly?
Steering wheel
• Does the steering wheel rotate
smoothly?
• Does the steering wheel have the cor-
rect amount of free
play?
•There should not be any strange sounds
coming from the
steering wheel.
Vehicle exterior
ItemsCheck points
Doors/trunk• Do the doors/trunk operate smoothly?
Engine hood
•Does the engine hood lock system
work properly?
Fluid leaks
•There should not be any signs of fluid
leakage after the
vehicle has been
parked.
ItemsCheck points
Tires
• Is the tire inflation pressure correct?
• The tires should not be damaged or
excessively worn.
• Have the tires been rotated according to
the maintenance
schedule?
• The wheel nuts should not be loose.
Windshield wip-
ers
• The wiper blades should not show any
signs of cracking,
splitting, wear, con-
tamination or defor-
mation.
• The wiper blades should clear the
windshield without
streaking or skip-
ping.
ItemsCheck points
Page 335 of 444
3356-3. Do-it-yourself maintenance
6
Maintenance and care
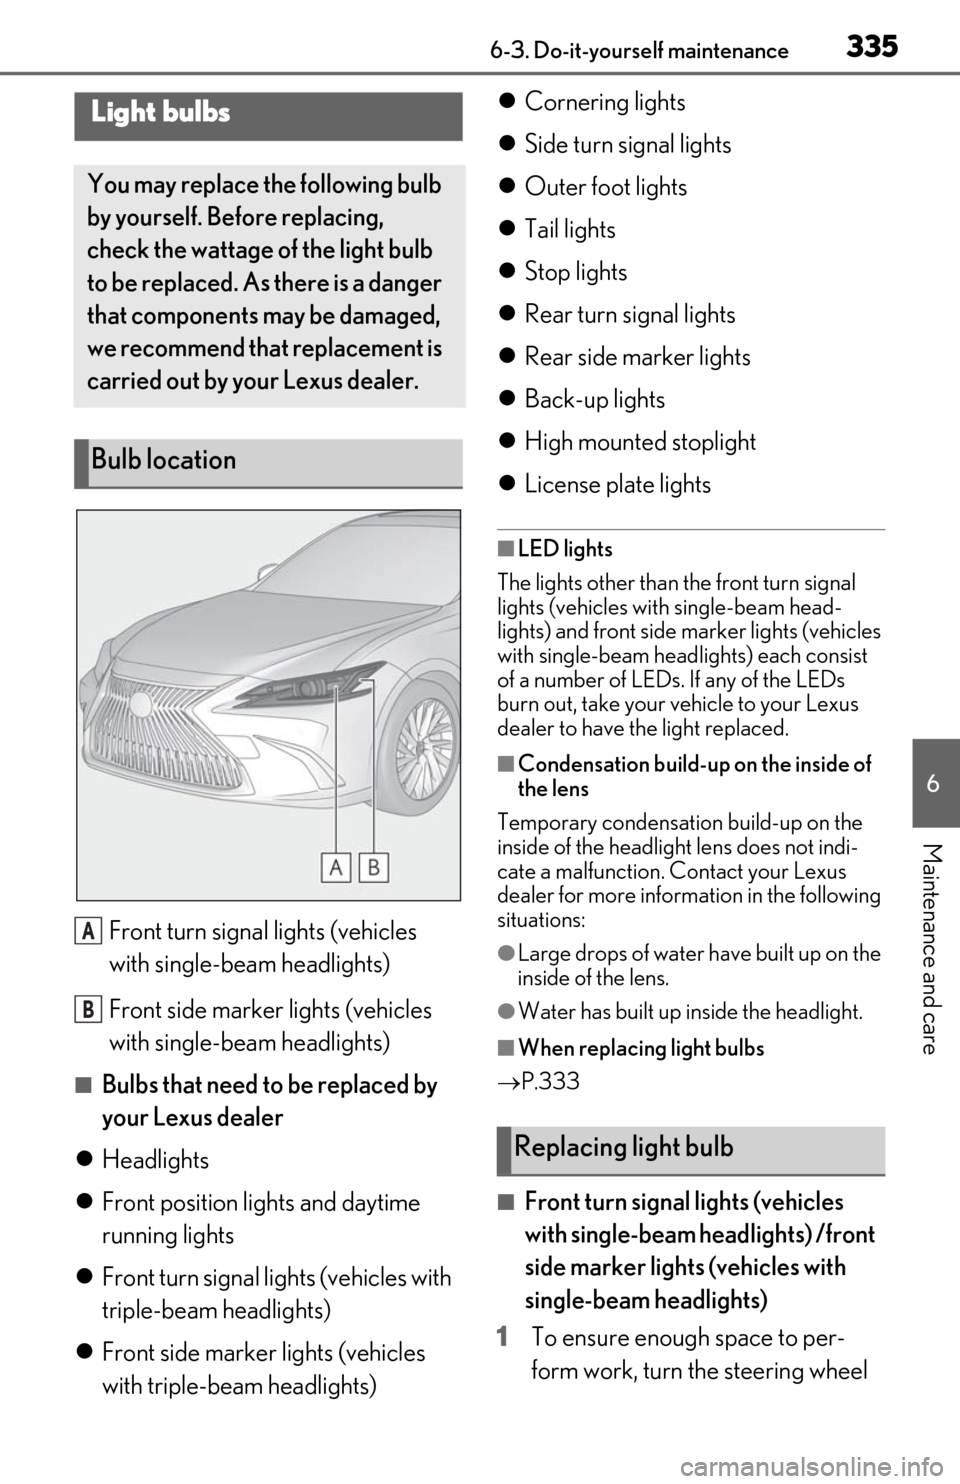
Front turn signal lights (vehicles
with single-beam headlights)
Front side marker lights (vehicles
with single-beam headlights)
■Bulbs that need to be replaced by
your Lexus dealer
Headlights
Front position lights and daytime
running lights
Front turn signal lights (vehicles with
triple-beam headlights)
Front side marker lights (vehicles
with triple-beam headlights)
Cornering lights
Side turn signal lights
Outer foot lights
Tail lights
Stop lights
Rear turn signal lights
Rear side marker lights
Back-up lights
High mounted stoplight
License plate lights
■LED lights
The lights other than the front turn signal
lights (vehicles with single-beam head-
lights) and front side ma rker lights (vehicles
with single-beam head lights) each consist
of a number of LEDs. If any of the LEDs
burn out, take your vehicle to your Lexus
dealer to have the light replaced.
■Condensation build-up on the inside of
the lens
Temporary condensation build-up on the
inside of the headlight lens does not indi-
cate a malfunction. Contact your Lexus
dealer for more information in the following
situations:
●Large drops of water have built up on the
inside of the lens.
●Water has built up inside the headlight.
■When replacing light bulbs
P.333
■Front turn signal lights (vehicles
with single-beam headlights) /front
side marker lights (vehicles with
single-beam headlights)
1 To ensure enough space to per-
form work, turn the steering wheel
Light bulbs
You may replace the following bulb
by yourself. Before replacing,
check the wattage of the light bulb
to be replaced. As there is a danger
that components may be damaged,
we recommend that replacement is
carried out by your Lexus dealer.
Bulb location
A
B
Replacing light bulb
Page 336 of 444
3366-3. Do-it-yourself maintenance
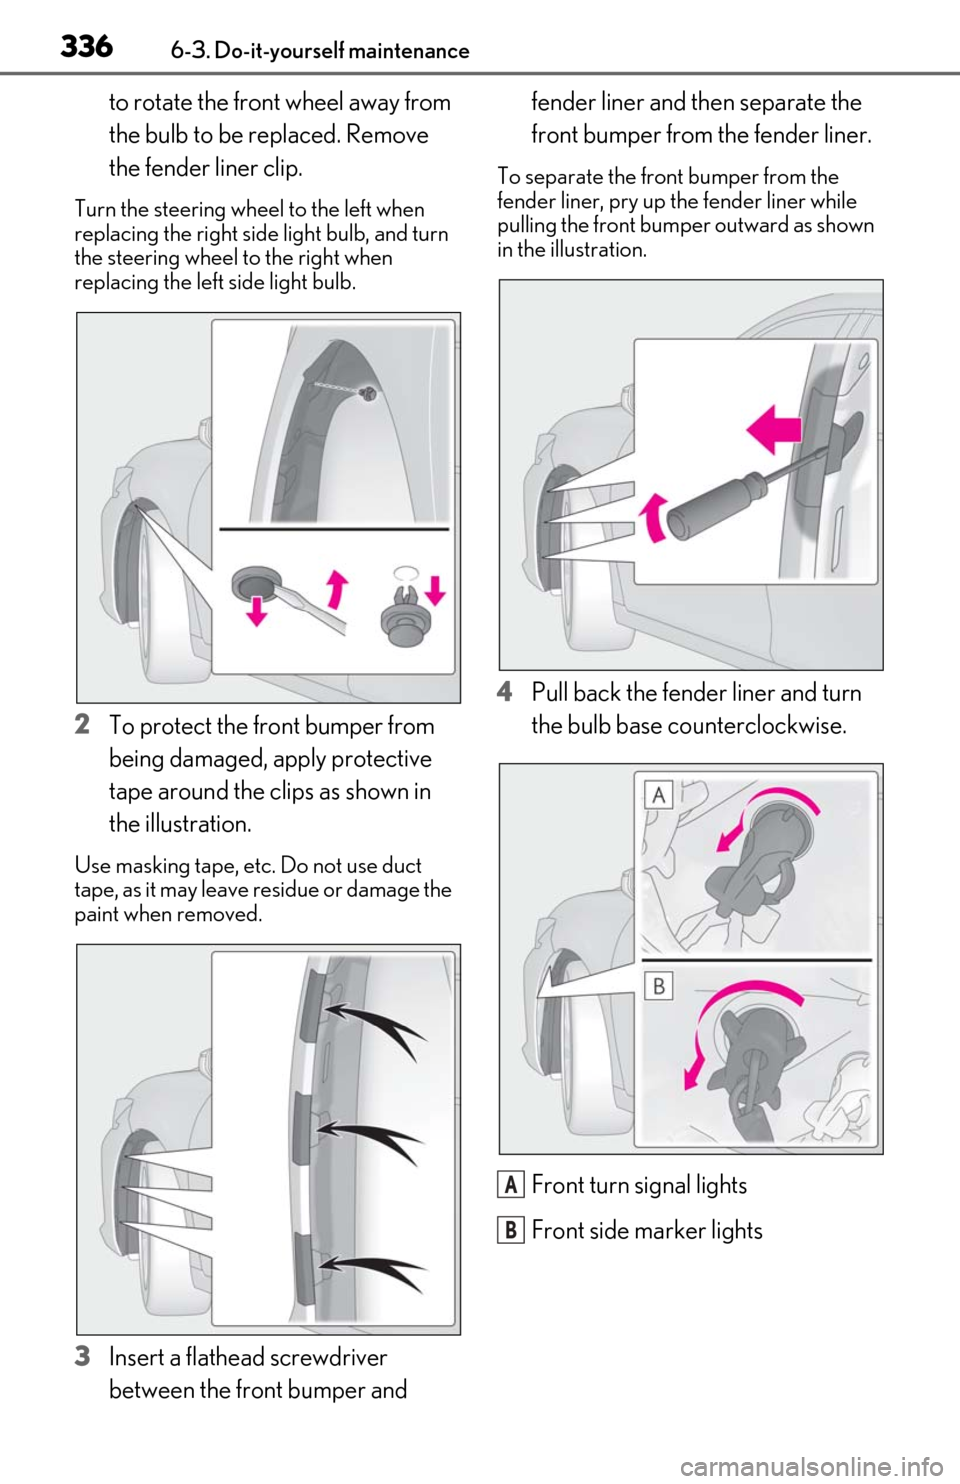
to rotate the front wheel away from
the bulb to be replaced. Remove
the fender liner clip.
Turn the steering wheel to the left when
replacing the right side light bulb, and turn
the steering wheel to the right when
replacing the left side light bulb.
2To protect the front bumper from
being damaged, apply protective
tape around the clips as shown in
the illustration.
Use masking tape, etc. Do not use duct
tape, as it may leave residue or damage the
paint when removed.
3Insert a flathead screwdriver
between the front bumper and fender liner and then separate the
front bumper from the fender liner.
To separate the front bumper from the
fender liner, pry up
the fender liner while
pulling the front bumper outward as shown
in the illustration.
4 Pull back the fender liner and turn
the bulb base counterclockwise.
Front turn signal lights
Front side marker lights
A
B
Page 341 of 444
3417-1. Essential information
7
When trouble arises
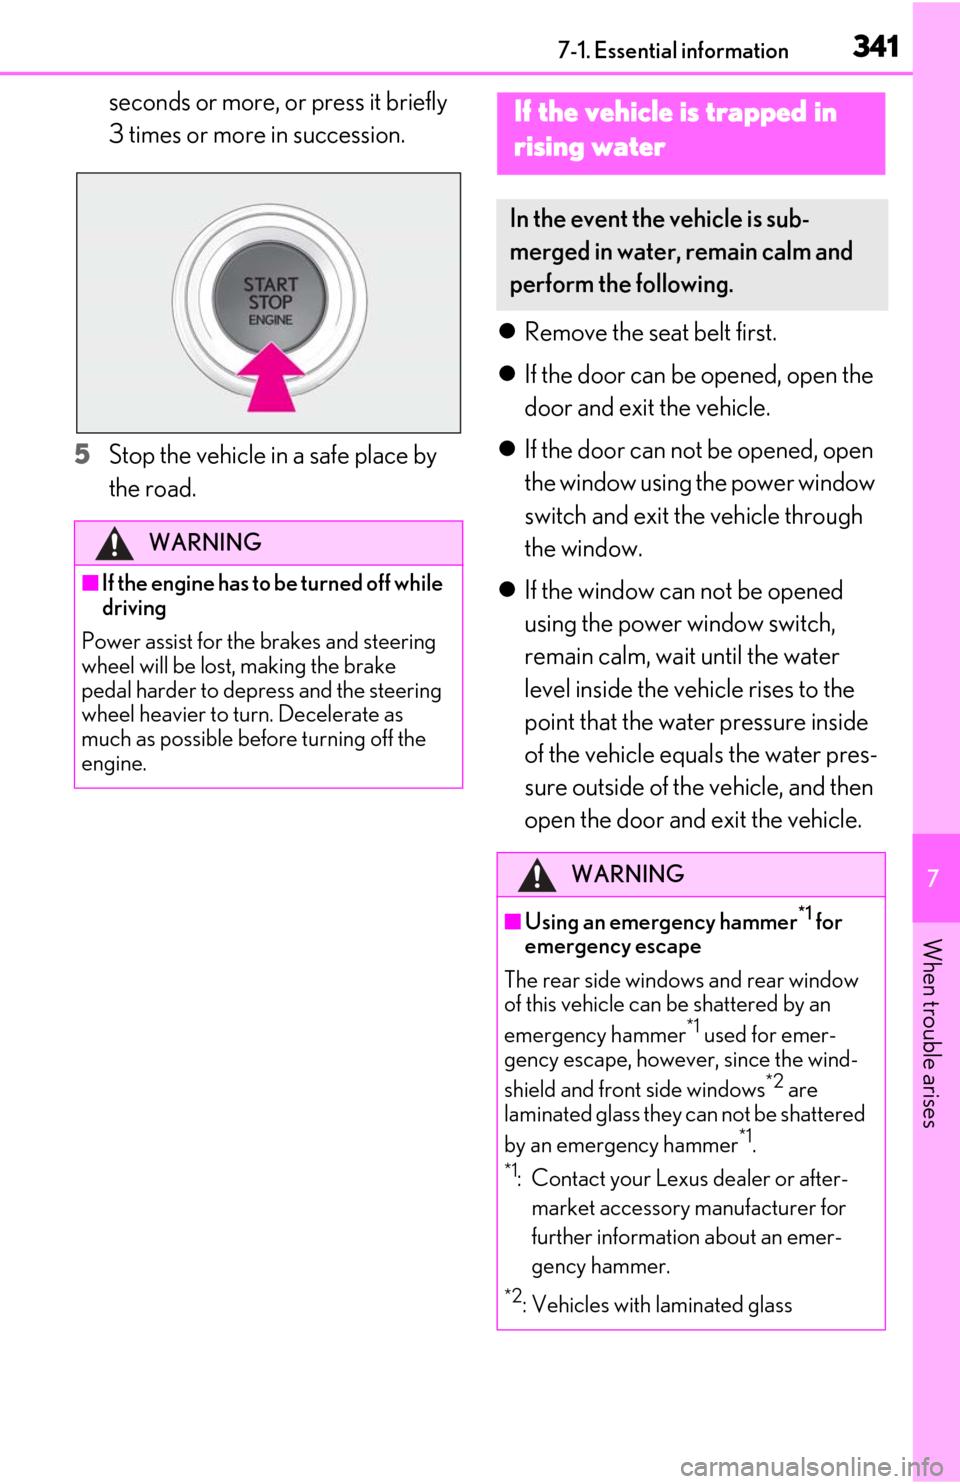
seconds or more, or press it briefly
3 times or more in succession.
5 Stop the vehicle in a safe place by
the road.
Remove the seat belt first.
If the door can be opened, open the
door and exit the vehicle.
If the door can not be opened, open
the window using the power window
switch and exit the vehicle through
the window.
If the window can not be opened
using the power window switch,
remain calm, wait until the water
level inside the vehicle rises to the
point that the water pressure inside
of the vehicle equals the water pres-
sure outside of the vehicle, and then
open the door and exit the vehicle.
WARNING
■If the engine has to be turned off while
driving
Power assist for the brakes and steering
wheel will be lost, making the brake
pedal harder to depress and the steering
wheel heavier to turn. Decelerate as
much as possible before turning off the
engine.
If the vehicle is trapped in
rising water
In the event the vehicle is sub-
merged in water, remain calm and
perform the following.
WARNING
■Using an emergency hammer*1 for
emergency escape
The rear side windows and rear window
of this vehicle can be shattered by an
emergency hammer
*1 used for emer-
gency escape, however, since the wind-
shield and front side windows
*2 are
laminated glass they can not be shattered
by an emergency hammer
*1.
*1: Contact your Lexus dealer or after-
market accessory manufacturer for
further information about an emer-
gency hammer.
*2: Vehicles with laminated glass