clock Lexus ES350 2019 Owner's Manual / LEXUS 2019 ES350 OWNER'S MANUAL (OM06130U)
[x] Cancel search | Manufacturer: LEXUS, Model Year: 2019, Model line: ES350, Model: Lexus ES350 2019Pages: 444, PDF Size: 14.22 MB
Page 64 of 444
642-1. Instrument cluster
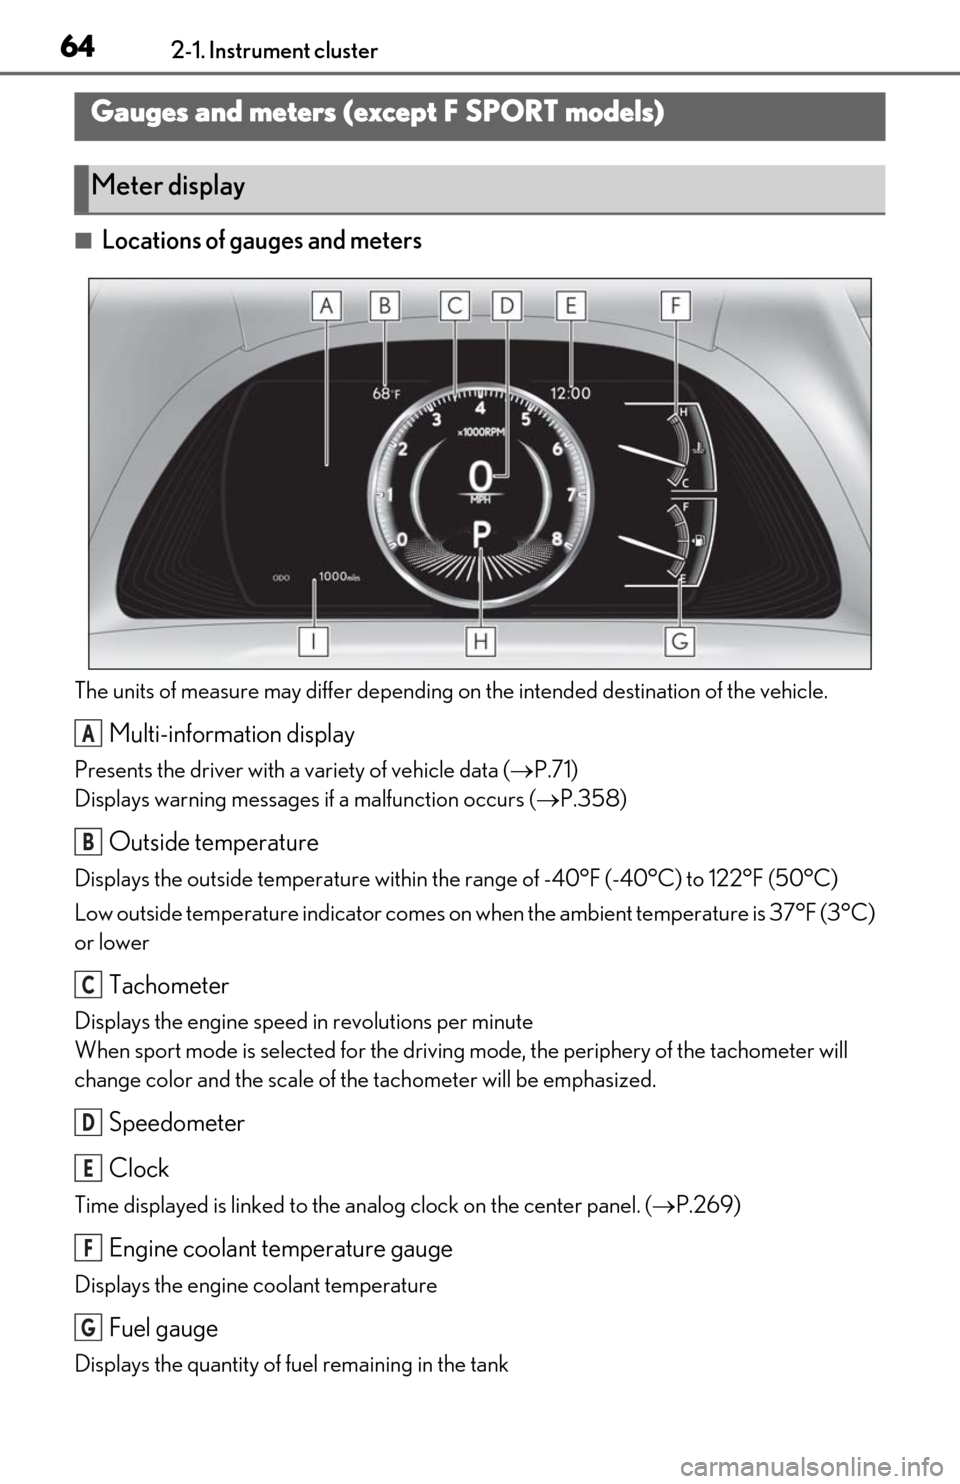
■Locations of gauges and meters
The units of measure may differ depending on the intended destination of the vehicle.
Multi-information display
Presents the driver with a variety of vehicle data ( P.71)
Displays warning messages if a malfunction occurs ( P.358)
Outside temperature
Displays the outside temperature within the range of -40°F (-40°C) to 122°F (50°C)
Low outside temperature indicator comes on wh en the ambient temperature is 37°F (3°C)
or lower
Tachometer
Displays the engine speed in revolutions per minute
When sport mode is se lected for the driving mode, the periphery of the tachometer will
change color and the scale of the tachometer will be emphasized.
Speedometer
Clock
Time displayed is linked to the analog clock on the center panel. (P.269)
Engine coolant temperature gauge
Displays the engine coolant temperature
Fuel gauge
Displays the quantity of fuel remaining in the tank
Gauges and meters (except F SPORT models)
Meter display
A
B
C
D
E
F
G
Page 68 of 444
682-1. Instrument cluster
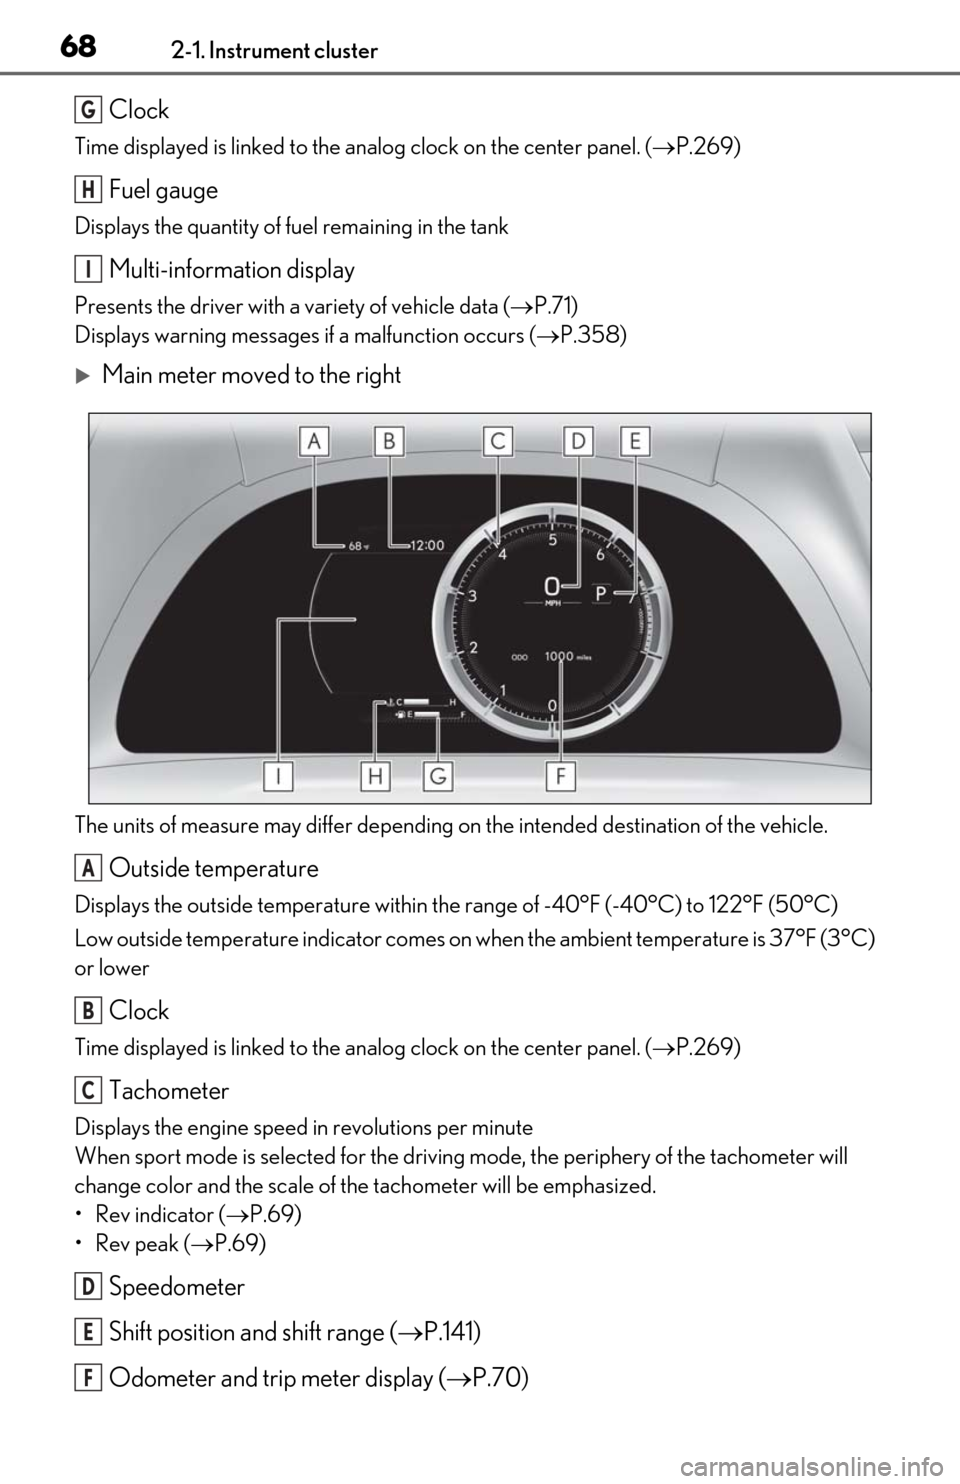
Clock
Time displayed is linked to the analog clock on the center panel. (P.269)
Fuel gauge
Displays the quantity of fuel remaining in the tank
Multi-information display
Presents the driver with a variety of vehicle data ( P.71)
Displays warning messages if a malfunction occurs ( P.358)
Main meter moved to the right
The units of measure may differ depending on the intended destination of the vehicle.
Outside temperature
Displays the outside temperature within the range of -40°F (-40°C) to 122°F (50°C)
Low outside temperature indicator comes on wh en the ambient temperature is 37°F (3°C)
or lower
Clock
Time displayed is linked to the analog clock on the center panel. (P.269)
Tachometer
Displays the engine speed in revolutions per minute
When sport mode is se lected for the driving mode, the periphery of the tachometer will
change color and the scale of the tachometer will be emphasized.
• Rev indicator ( P.69)
•Rev peak ( P.69)
Speedometer
Shift position and shift range ( P.141)
Odometer and trip meter display ( P.70)
G
H
I
A
B
C
D
E
F
Page 76 of 444
762-1. Instrument cluster
Select to display the operational status
of the following systems:
LTA (Lane Tracing Assist) ( P.176)
Dynamic radar cruise control with
full-speed range ( P.187)
RSA (Road Sign Assist) (if
equipped) ( P.185)
■Meter display settings that can be
changed
Language
Select to change th e language displayed.
Units
Select to change the units of measure dis-
played.
Speedometer display (except F
SPORT models)
Select to set the display of the speedome-
ter to digital/analog/both digital and ana-
log.
Drive information 1/Drive informa-
tion 2
Select to select up to 2 items ( P.73) that
will be displayed on ea ch Drive information
screen (Drive information 1 screen and
Drive information 2 sc reen) respectively.
Clock
Select to switch be tween 12-hour display
and 24-hour display.
Pop-up display
Select to enable/disable pop-up displays
for each relevant system.
Accent color
Select to change the accent color on the
screen, such as the cursor color.
Rev indicator (F SPORT models)
• Select to enable/disable the rev indica-
tor.
• Select to set the engine speed at which the rev indicator (amber) will begin to be
displayed.
Rev peak (F SPORT models)
Select to enable/disable the rev peak.
Eco Driving Indicator Light
Select to enable/disable the Eco Driving
Indicator Light.
Default setting
Select to reset the meter display settings to
the default setting.
■Vehicle functions and settings that
can be changed
P.400
■Suspension of the settings display
●Some settings cannot be changed while
driving. When changing settings, park
the vehicle in a safe place.
●If a warning message is displayed, opera-
tion of the settings display will be sus-
pended.
Driving support system informa-
tion display
Settings display
WARNING
■Cautions during setting up the dis-
play
As the engine needs to be running
during setting up the display, en sure that
the vehicle is parked in a place with ade-
quate ventilation. In a closed area such as
a garage, exhaust gases including harm-
ful carbon monoxide (CO) may collect
and enter the vehicle. This may lead to
death or a serious health hazard.
Page 262 of 444
2625-4. Using the interior lights
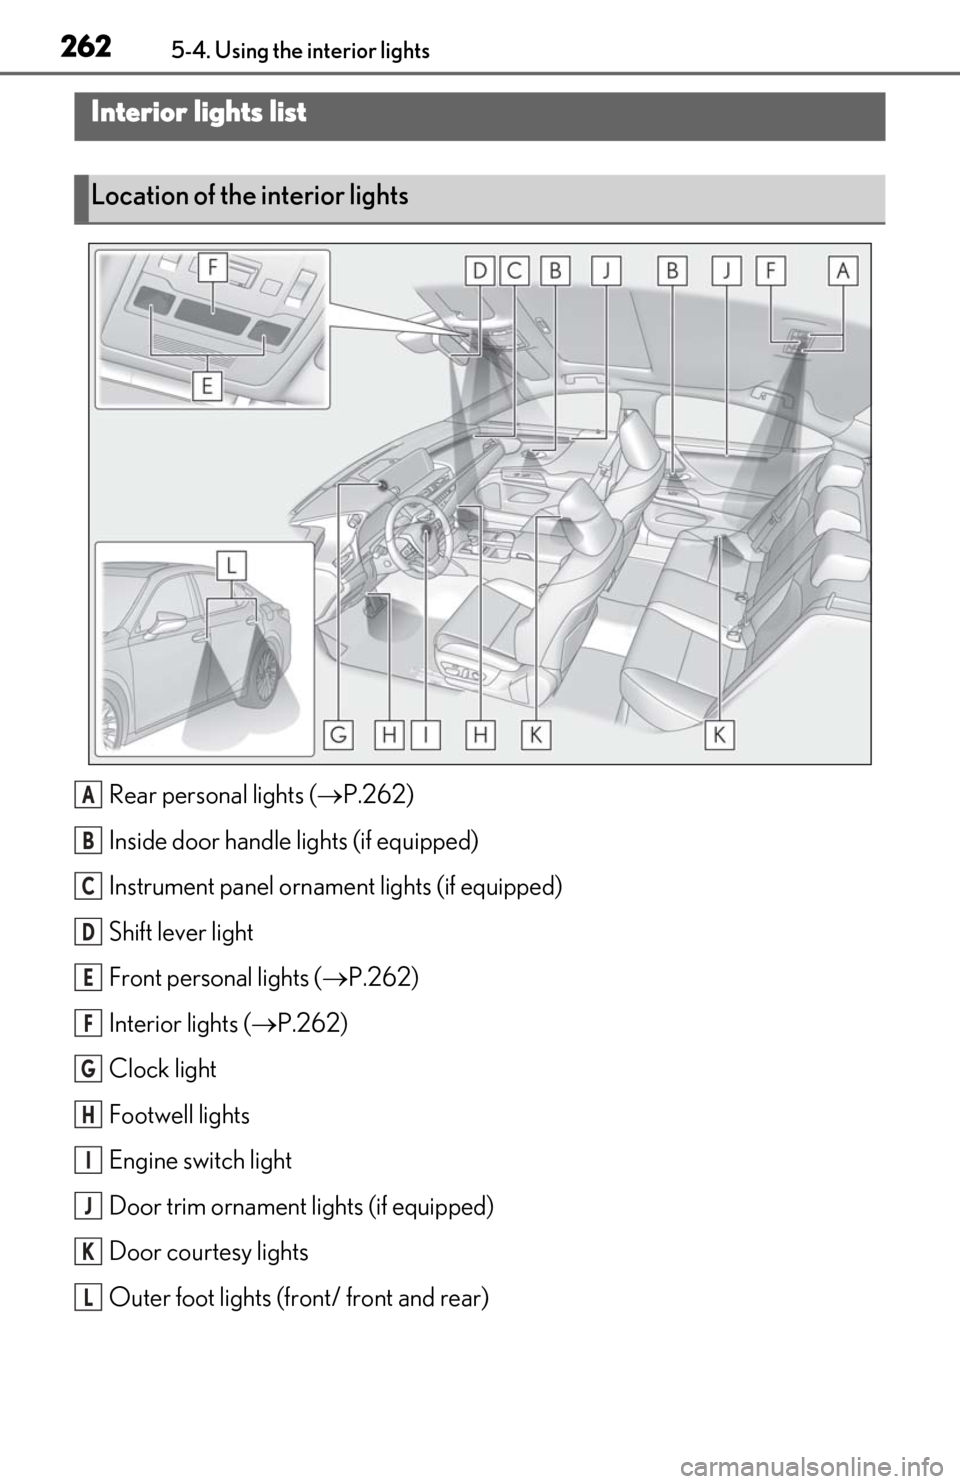
5-4.Using the interior lights
Rear personal lights ( P.262)
Inside door handle lights (if equipped)
Instrument panel orname nt lights (if equipped)
Shift lever light
Front personal lights ( P.262)
Interior lights ( P.262)
Clock light
Footwell lights
Engine switch light
Door trim ornament lights (if equipped)
Door courtesy lights
Outer foot lights (front/ front and rear)
Interior lights list
Location of the interior lights
A
B
C
D
E
F
G
H
I
J
K
L
Page 269 of 444
2695-6. Using the other interior features
5
Interior features
5-6.Using the other interior features
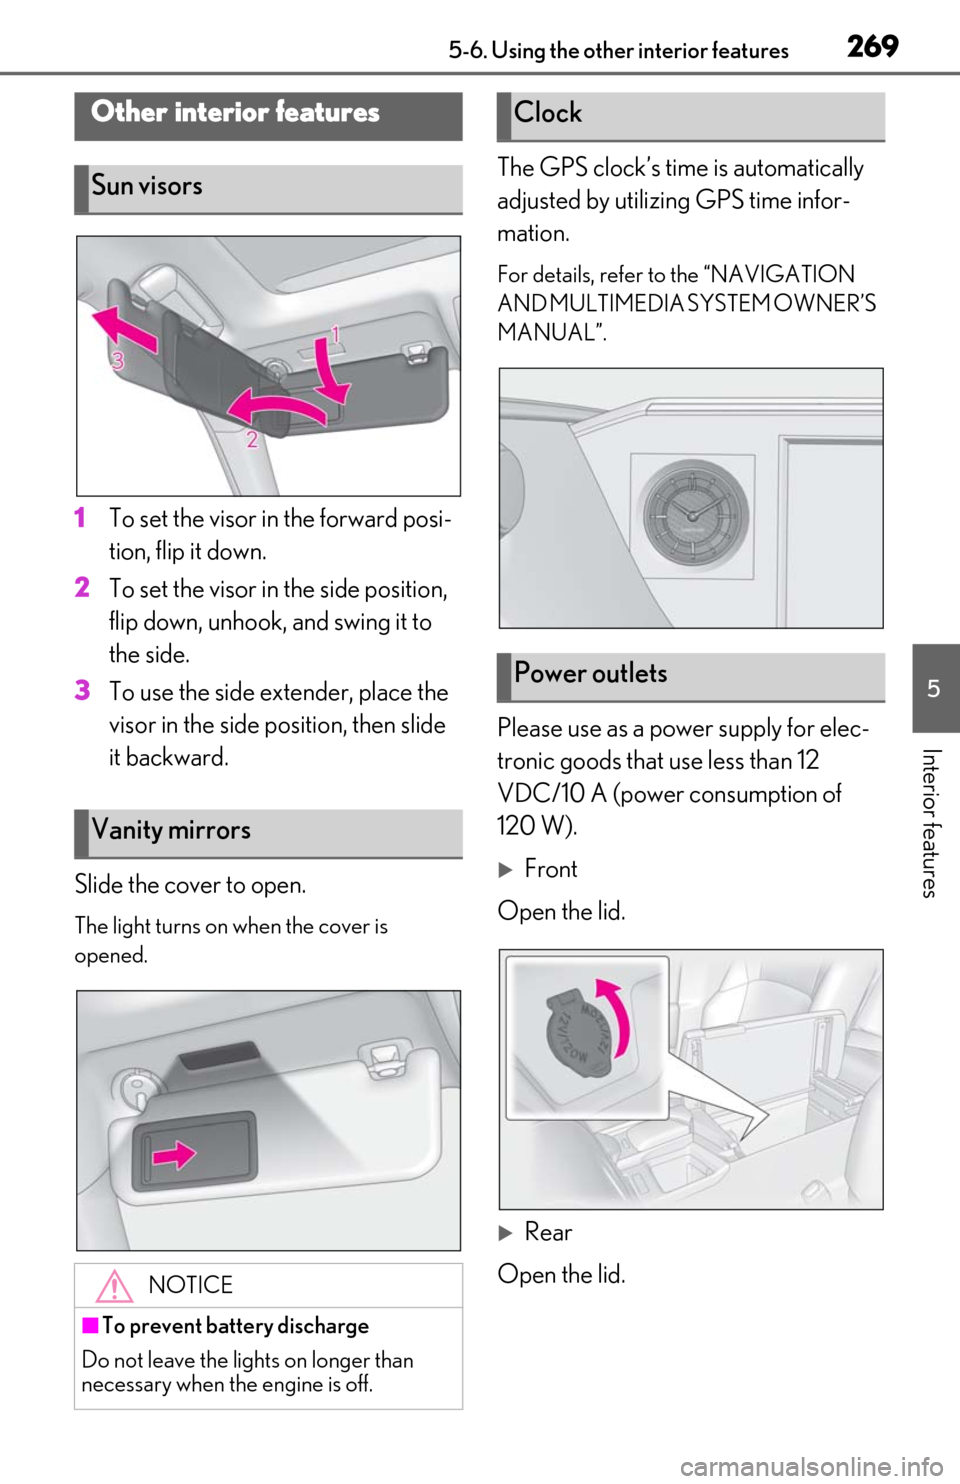
1To set the visor in the forward posi-
tion, flip it down.
2 To set the visor in the side position,
flip down, unhook, and swing it to
the side.
3 To use the side extender, place the
visor in the side position, then slide
it backward.
Slide the cover to open.
The light turns on when the cover is
opened.
The GPS clock’s time is automatically
adjusted by utilizing GPS time infor-
mation.
For details, refer to the “NAVIGATION
AND MULTIMEDIA SYSTEM OWNER’S
MANUAL”.
Please use as a power supply for elec-
tronic goods that use less than 12
VDC/10 A (power consumption of
120 W).
Front
Open the lid.
Rear
Open the lid.
Other interior features
Sun visors
Vanity mirrors
NOTICE
■To prevent battery discharge
Do not leave the lights on longer than
necessary when the engine is off.
Clock
Power outlets
Page 311 of 444
3116-3. Do-it-yourself maintenance
6
Maintenance and care
off, wait more than 5 minutes for the oil to
drain back into the bottom of the engine.
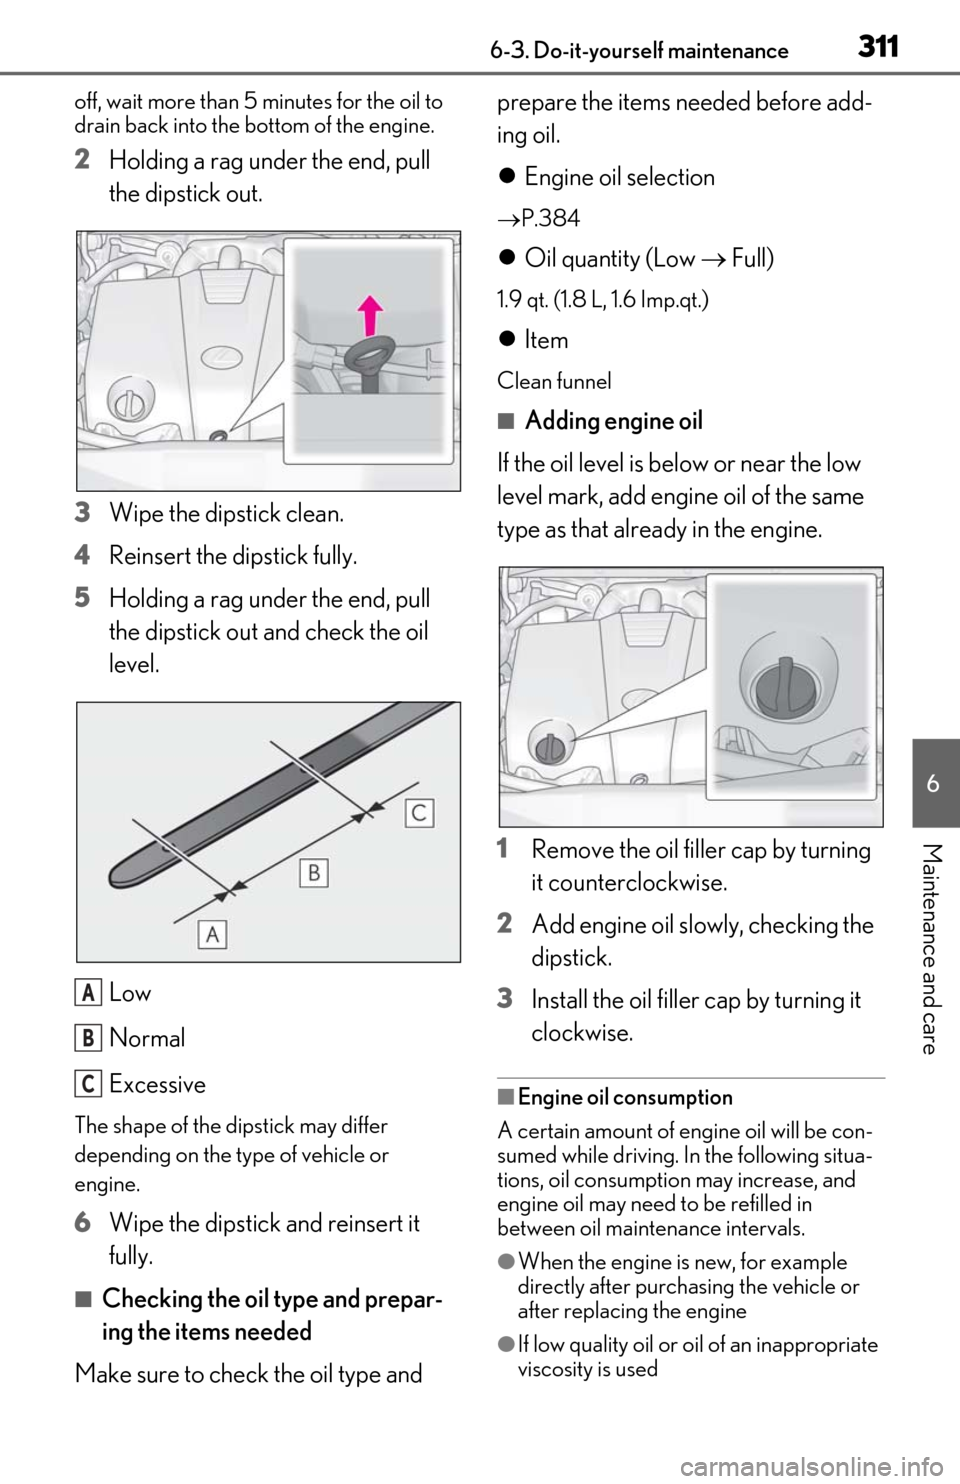
2Holding a rag under the end, pull
the dipstick out.
3 Wipe the dipstick clean.
4 Reinsert the dipstick fully.
5 Holding a rag under the end, pull
the dipstick out and check the oil
level.
Low
Normal
Excessive
The shape of the dipstick may differ
depending on the type of vehicle or
engine.
6Wipe the dipstick and reinsert it
fully.
■Checking the oil type and prepar-
ing the items needed
Make sure to check the oil type and prepare the items needed before add-
ing oil.
Engine oil selection
P.384
Oil quantity (Low Full)
1.9 qt. (1.8 L, 1.6 Imp.qt.)
Item
Clean funnel
■Adding engine oil
If the oil level is below or near the low
level mark, add engine oil of the same
type as that already in the engine.
1 Remove the oil filler cap by turning
it counterclockwise.
2 Add engine oil slowly, checking the
dipstick.
3 Install the oil filler cap by turning it
clockwise.
■Engine oil consumption
A certain amount of engine oil will be con-
sumed while driving. In the following situa-
tions, oil consumption may increase, and
engine oil may need to be refilled in
between oil maintenance intervals.
●When the engine is new, for example
directly after purchasing the vehicle or
after replacing the engine
●If low quality oil or oil of an inappropriate
viscosity is used
A
B
C
Page 336 of 444
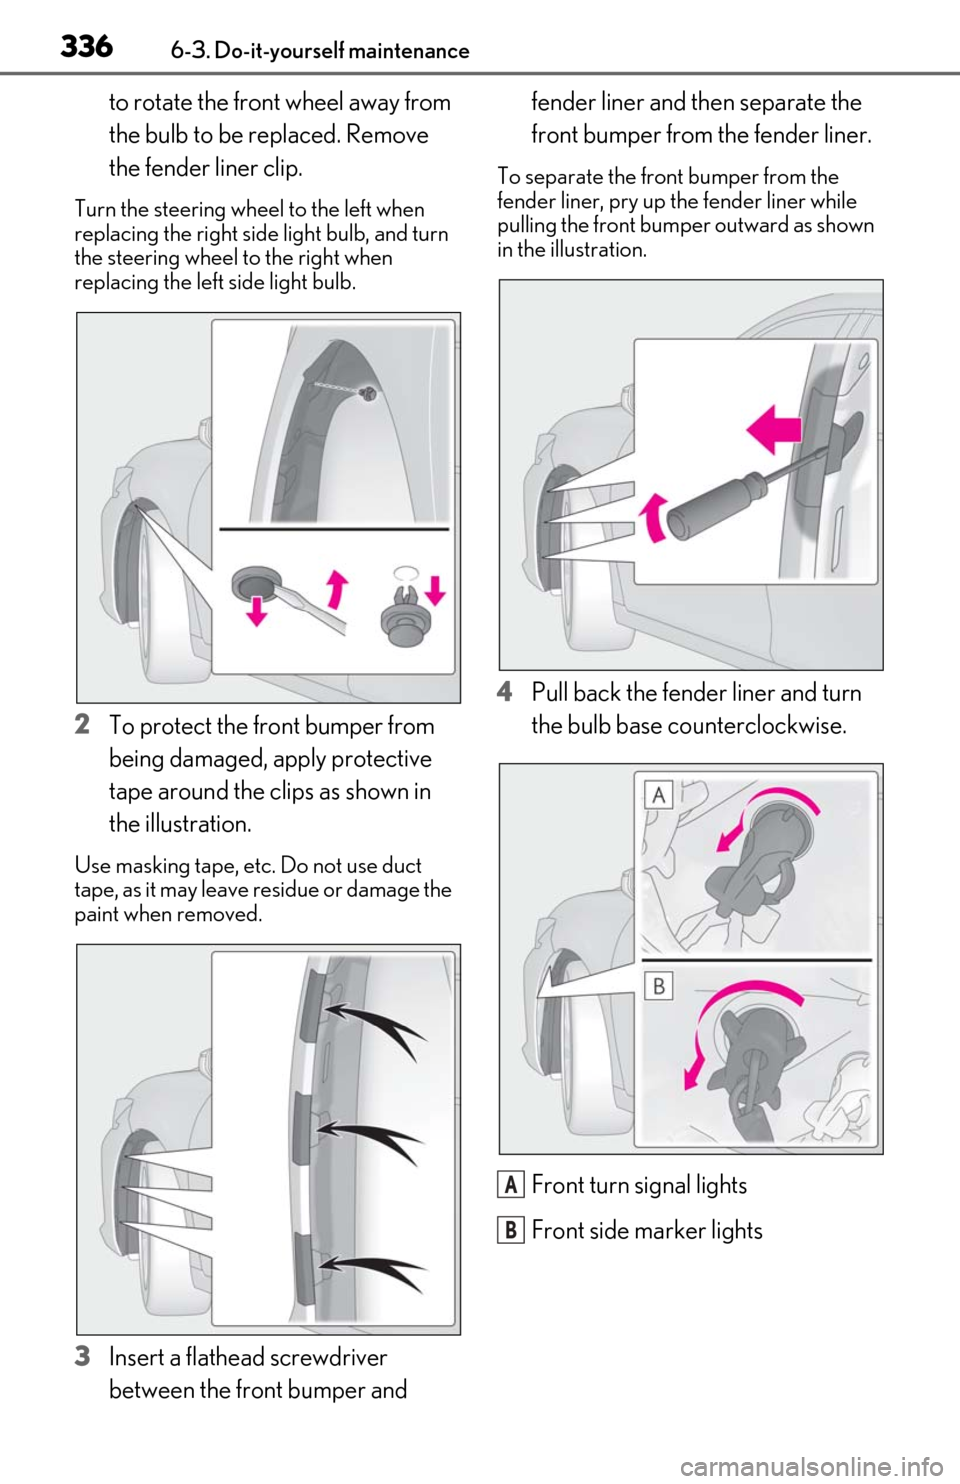
3366-3. Do-it-yourself maintenance
to rotate the front wheel away from
the bulb to be replaced. Remove
the fender liner clip.
Turn the steering wheel to the left when
replacing the right side light bulb, and turn
the steering wheel to the right when
replacing the left side light bulb.
2To protect the front bumper from
being damaged, apply protective
tape around the clips as shown in
the illustration.
Use masking tape, etc. Do not use duct
tape, as it may leave residue or damage the
paint when removed.
3Insert a flathead screwdriver
between the front bumper and fender liner and then separate the
front bumper from the fender liner.
To separate the front bumper from the
fender liner, pry up
the fender liner while
pulling the front bumper outward as shown
in the illustration.
4 Pull back the fender liner and turn
the bulb base counterclockwise.
Front turn signal lights
Front side marker lights
A
B
Page 337 of 444
3376-3. Do-it-yourself maintenance
6
Maintenance and care
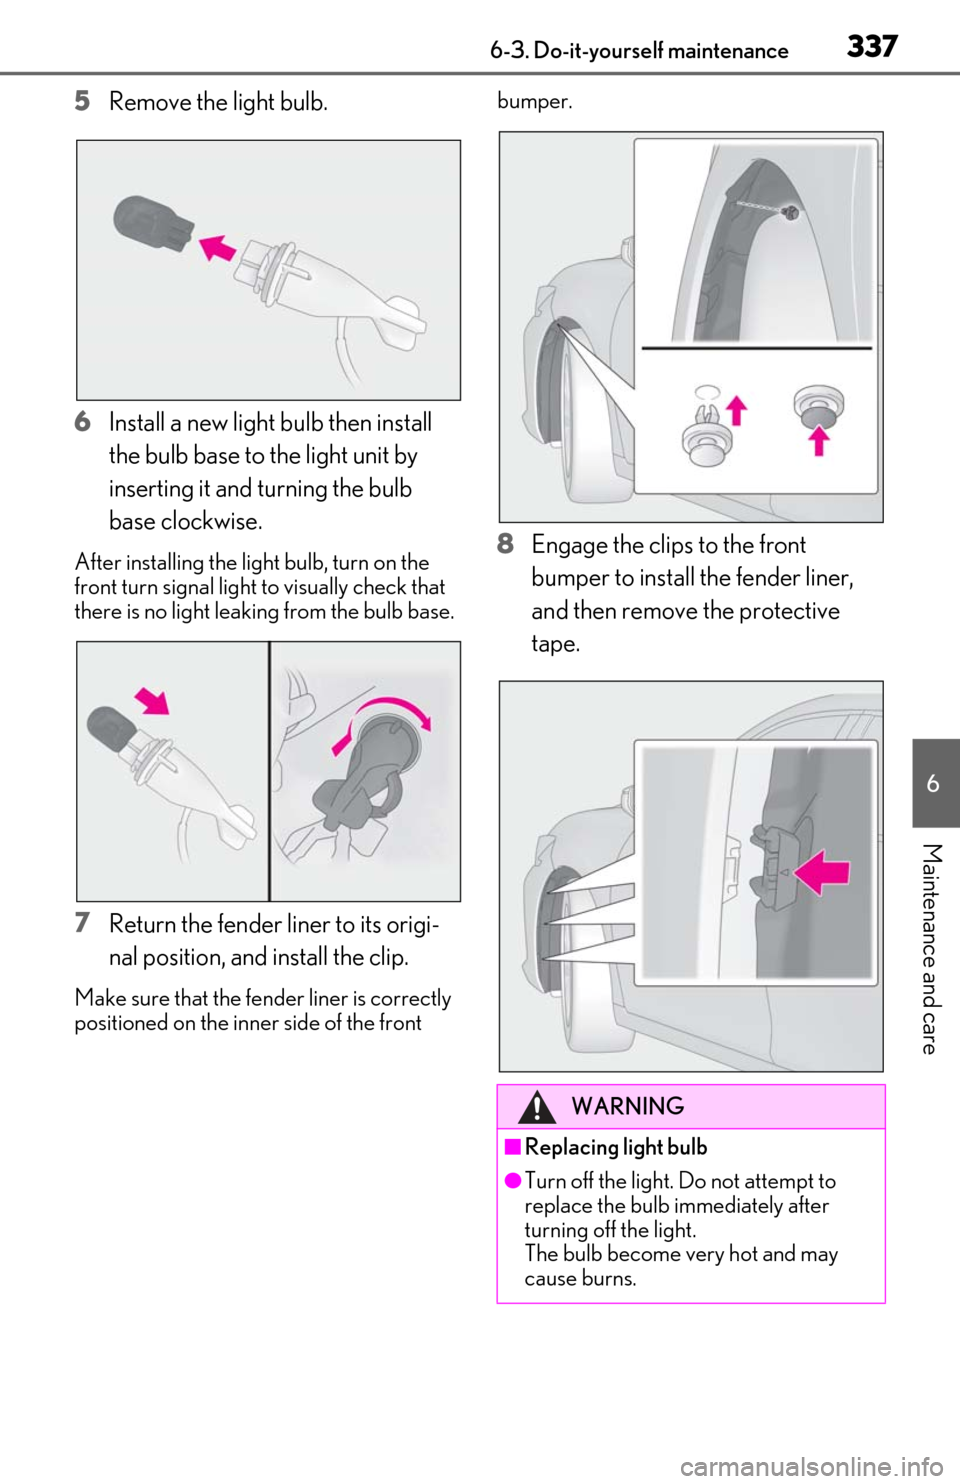
5Remove the light bulb.
6 Install a new light bulb then install
the bulb base to the light unit by
inserting it and turning the bulb
base clockwise.
After installing the light bulb, turn on the
front turn signal light to visually check that
there is no light leakin g from the bulb base.
7Return the fender liner to its origi-
nal position, and install the clip.
Make sure that the fender liner is correctly
positioned on the inner side of the front bumper.
8
Engage the clips to the front
bumper to install the fender liner,
and then remove the protective
tape.
WARNING
■Replacing light bulb
●Turn off the light. Do not attempt to
replace the bulb immediately after
turning off the light.
The bulb become very hot and may
cause burns.
Page 372 of 444
3727-2. Steps to take in an emergency
■When the electronic key does not work
properly
●Make sure that the smart access system
with push-button start has not been deac-
tivated using the Remote Touch or at your
Lexus dealer. If it is off, turn the function
on.
●Check if battery-saving mode is set. If it is
set, cancel the function. ( P.101)
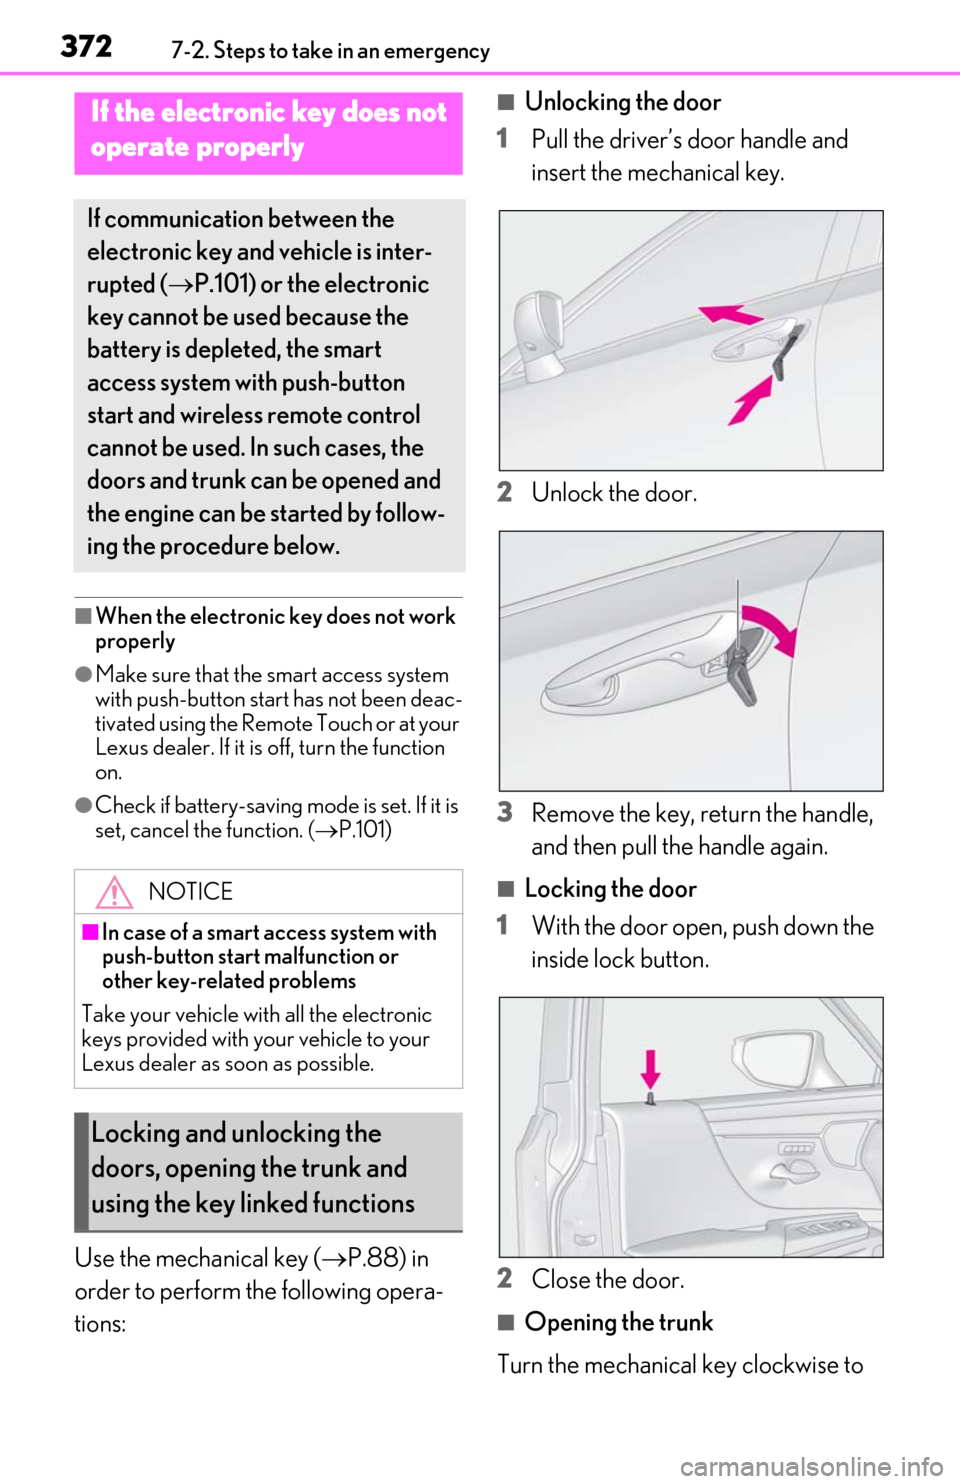
Use the mechanical key ( P.88) in
order to perform the following opera-
tions:
■Unlocking the door
1 Pull the driver’s door handle and
insert the mechanical key.
2 Unlock the door.
3 Remove the key, return the handle,
and then pull the handle again.
■Locking the door
1 With the door open, push down the
inside lock button.
2 Close the door.
■Opening the trunk
Turn the mechanical key clockwise to
If the electronic key does not
operate properly
If communication between the
electronic key and vehicle is inter-
rupted ( P.101) or the electronic
key cannot be used because the
battery is depleted, the smart
access system with push-button
start and wireless remote control
cannot be used. In such cases, the
doors and trunk can be opened and
the engine can be started by follow-
ing the procedure below.
NOTICE
■In case of a smart access system with
push-button start malfunction or
other key-related problems
Take your vehicle with all the electronic
keys provided with your vehicle to your
Lexus dealer as soon as possible.
Locking and unlocking the
doors, opening the trunk and
using the key linked functions
Page 401 of 444
4018-2. Customization
8
Vehicle specifications
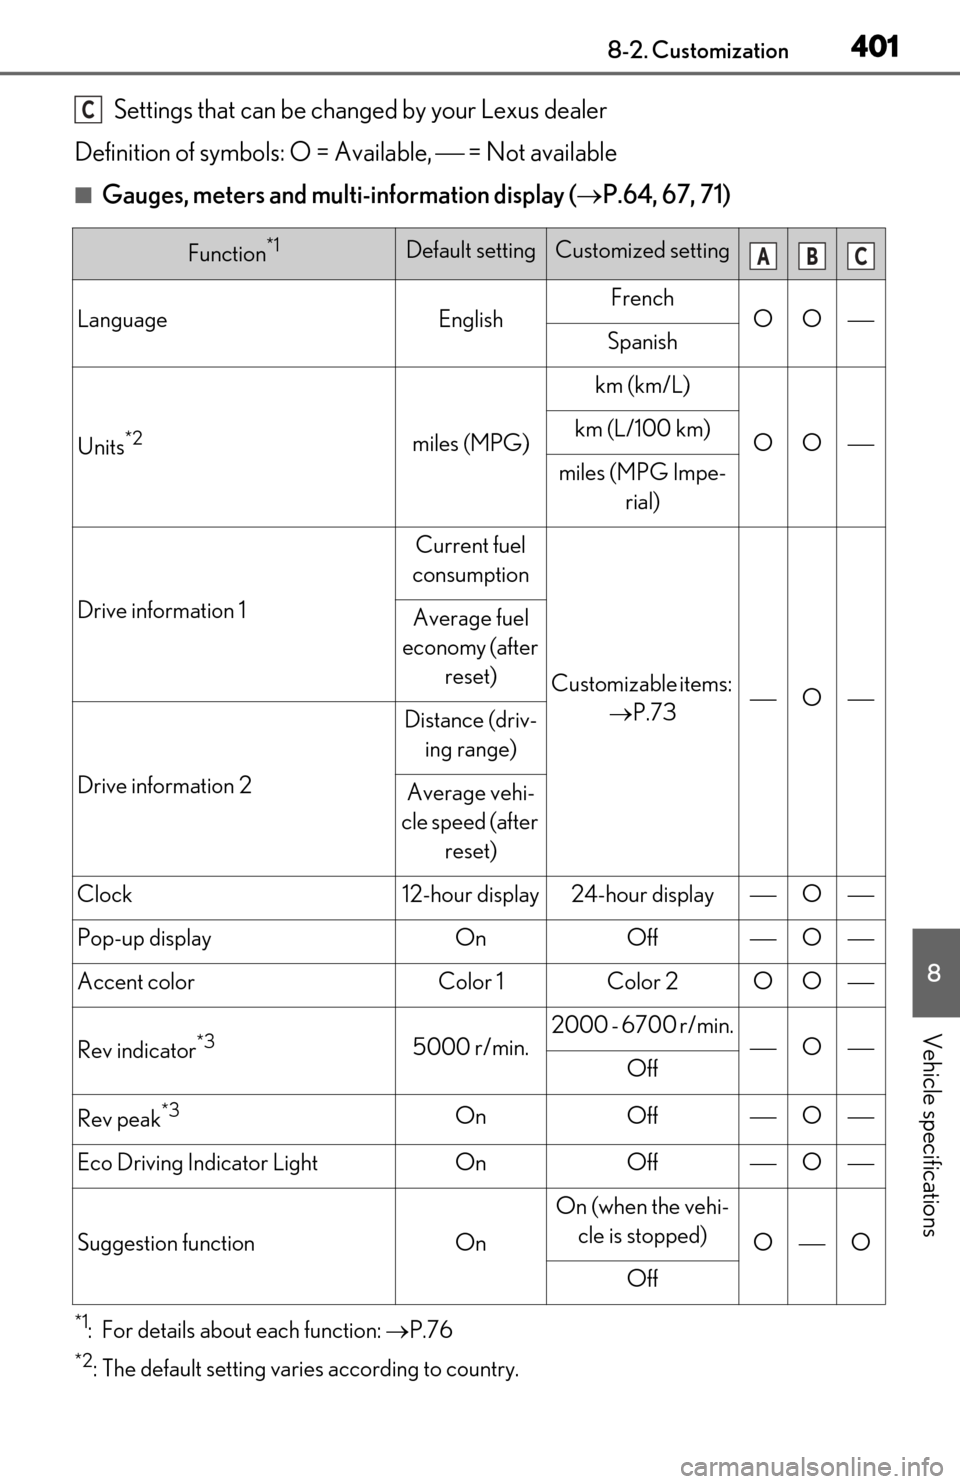
Settings that can be changed by your Lexus dealer
Definition of symbols: O = Available, = Not available
■Gauges, meters and multi-information display ( P.64, 67, 71)
*1: For details about each function: P.76
*2: The default setting varies according to country.
Function*1Default settingCustomized setting
LanguageEnglishFrenchOOSpanish
Units*2miles (MPG)
km (km/L)
OOkm (L/100 km)
miles (MPG Impe-
rial)
Drive information 1
Current fuel
consumption
Customizable items: P.73O
Average fuel
economy (after
reset)
Drive information 2
Distance (driv-ing range)
Average vehi-
cle speed (after reset)
Clock12-hour display24-hour displayO
Pop-up displayOnOffO
Accent colorColor 1Color 2OO
Rev indicator*35000 r/min.2000 - 6700 r/min.OOff
Rev peak*3OnOffO
Eco Driving Indicator LightOnOffO
Suggestion functionOn
On (when the vehi-cle is stopped)
OO
Off
C
ABC