display Lexus ES350 2020 / LEXUS 2020 ES350 FROM OCT. 2019 PROD. QUICK GUIDE (OM06198U) User Guide
[x] Cancel search | Manufacturer: LEXUS, Model Year: 2020, Model line: ES350, Model: Lexus ES350 2020Pages: 94, PDF Size: 1.94 MB
Page 27 of 94
27
ES350_QG_OM06198U_(U)
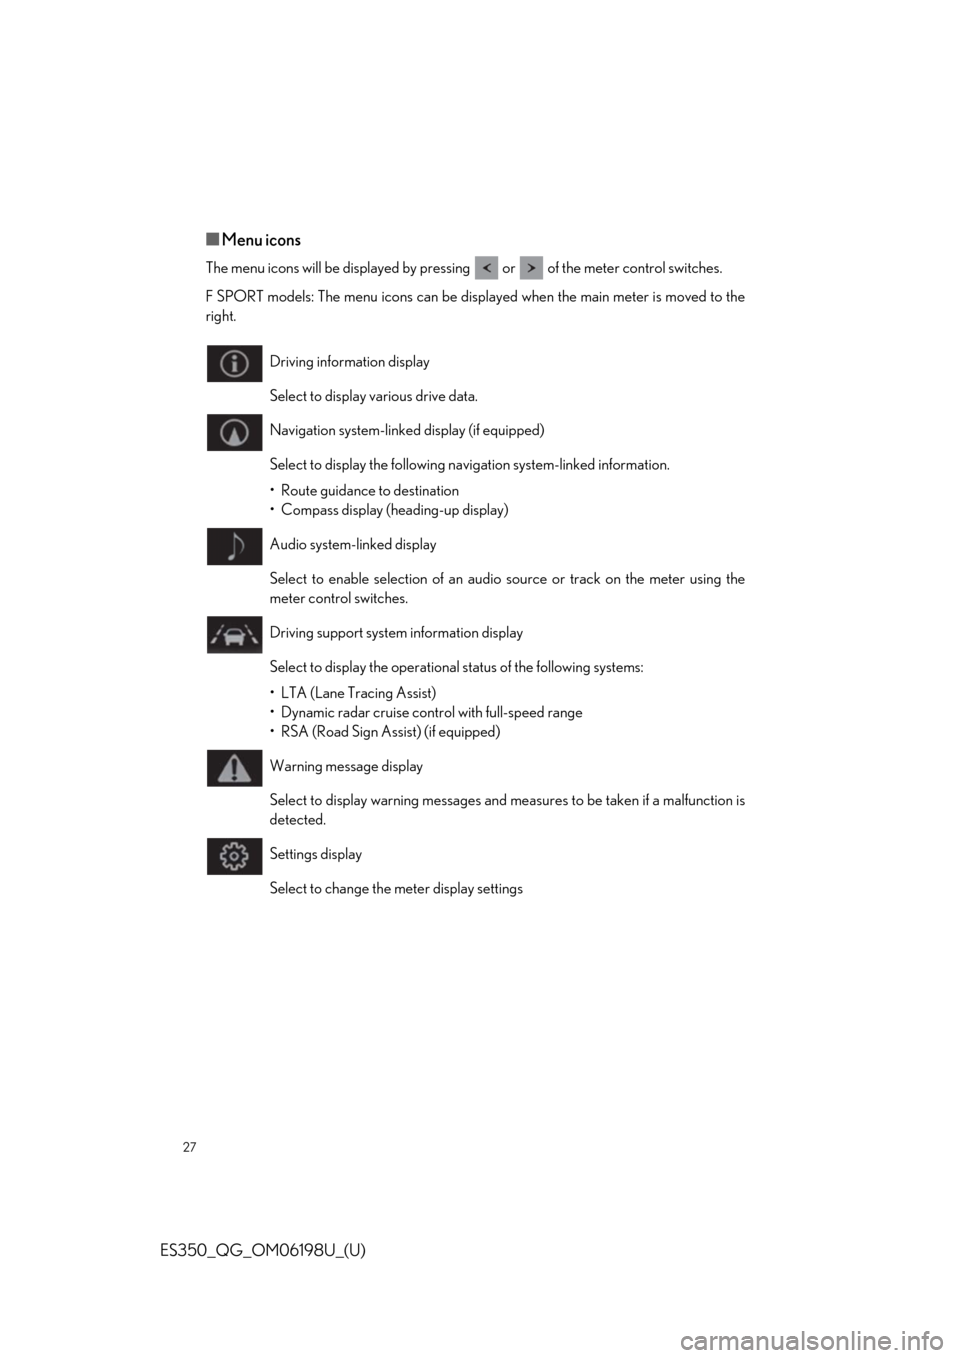
■Menu icons
The menu icons will be displayed by pressing or of the meter control switches.
F SPORT models: The menu icons can be displayed when the main meter is moved to the
right.
Driving information display
Select to display various drive data.
Navigation system-linked display (if equipped)
Select to display the following navigation system-linked information.
• Route guidance to destination
• Compass display (heading-up display)
Audio system-linked display
Select to enable selection of an audio source or track on the meter using the
meter control switches.
Driving support system information display
Select to display the operational status of the following systems:
• LTA (Lane Tracing Assist)
• Dynamic radar cruise cont rol with full-speed range
• RSA (Road Sign Assist) (if equipped)
Warning message display
Select to display warning messages and me asures to be taken if a malfunction is
detected.
Settings display
Select to change the meter display settings
Page 28 of 94
28
ES350_QG_OM06198U_(U)
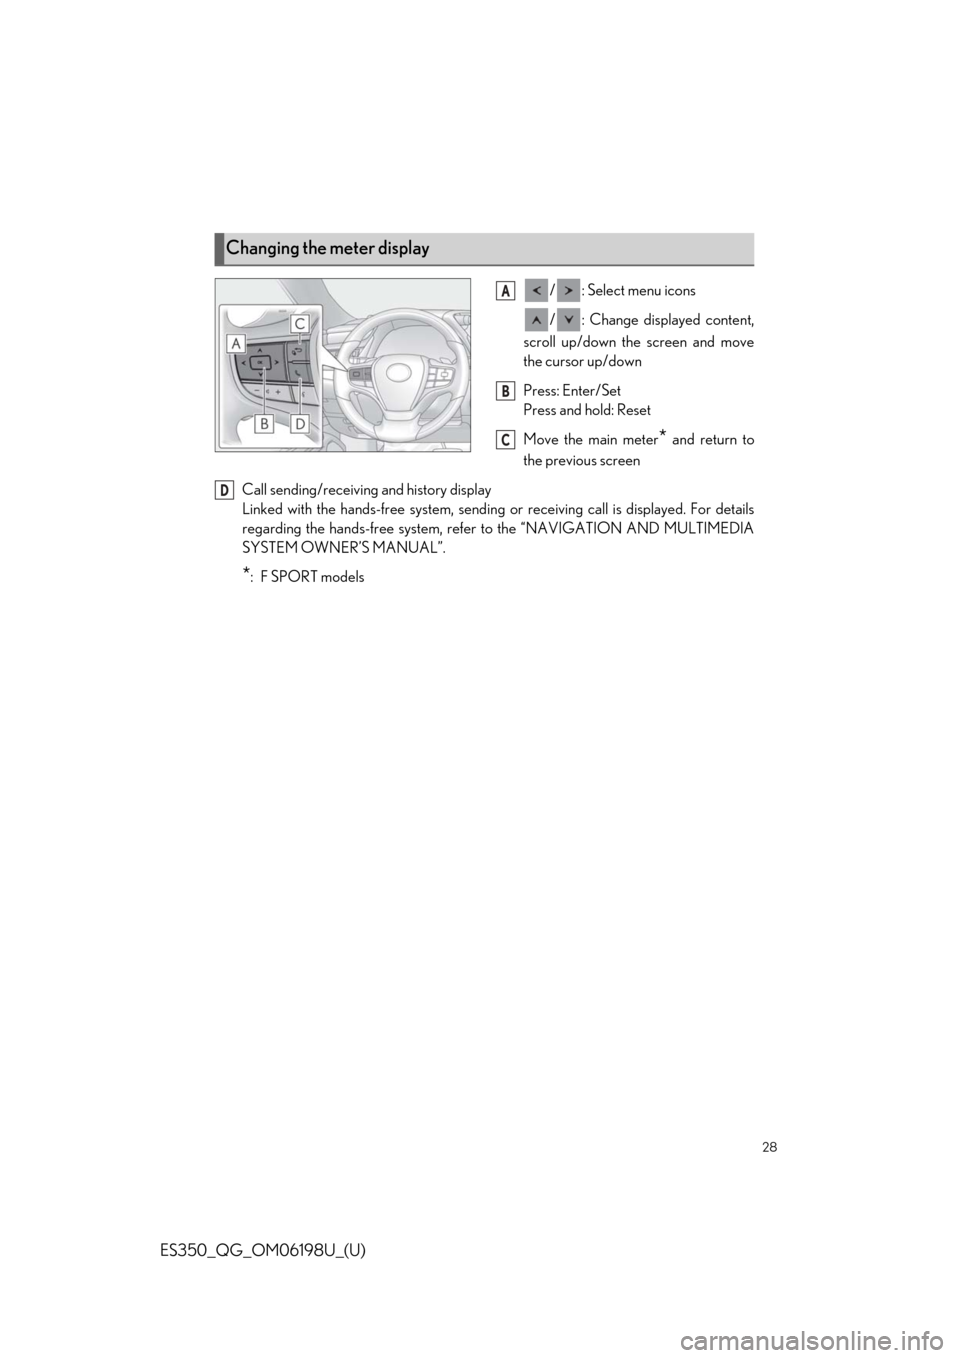
/ : Select menu icons
/ : Change displayed content,
scroll up/down the screen and move
the cursor up/down
Press: Enter/Set
Press and hold: Reset
Move the main meter
* and return to
the previous screen
Call sending/receiving and history display
Linked with the hands-free sy stem, sending or receiving call is displayed. For details
regarding the hands-free system, refer to the “NAVIGATION AND MULTIMEDIA
SYSTEM OWNER’S MANUAL”.
*:F SPORT models
Changing the meter display
A
B
C
D
Page 29 of 94
29
ES350_QG_OM06198U_(U)
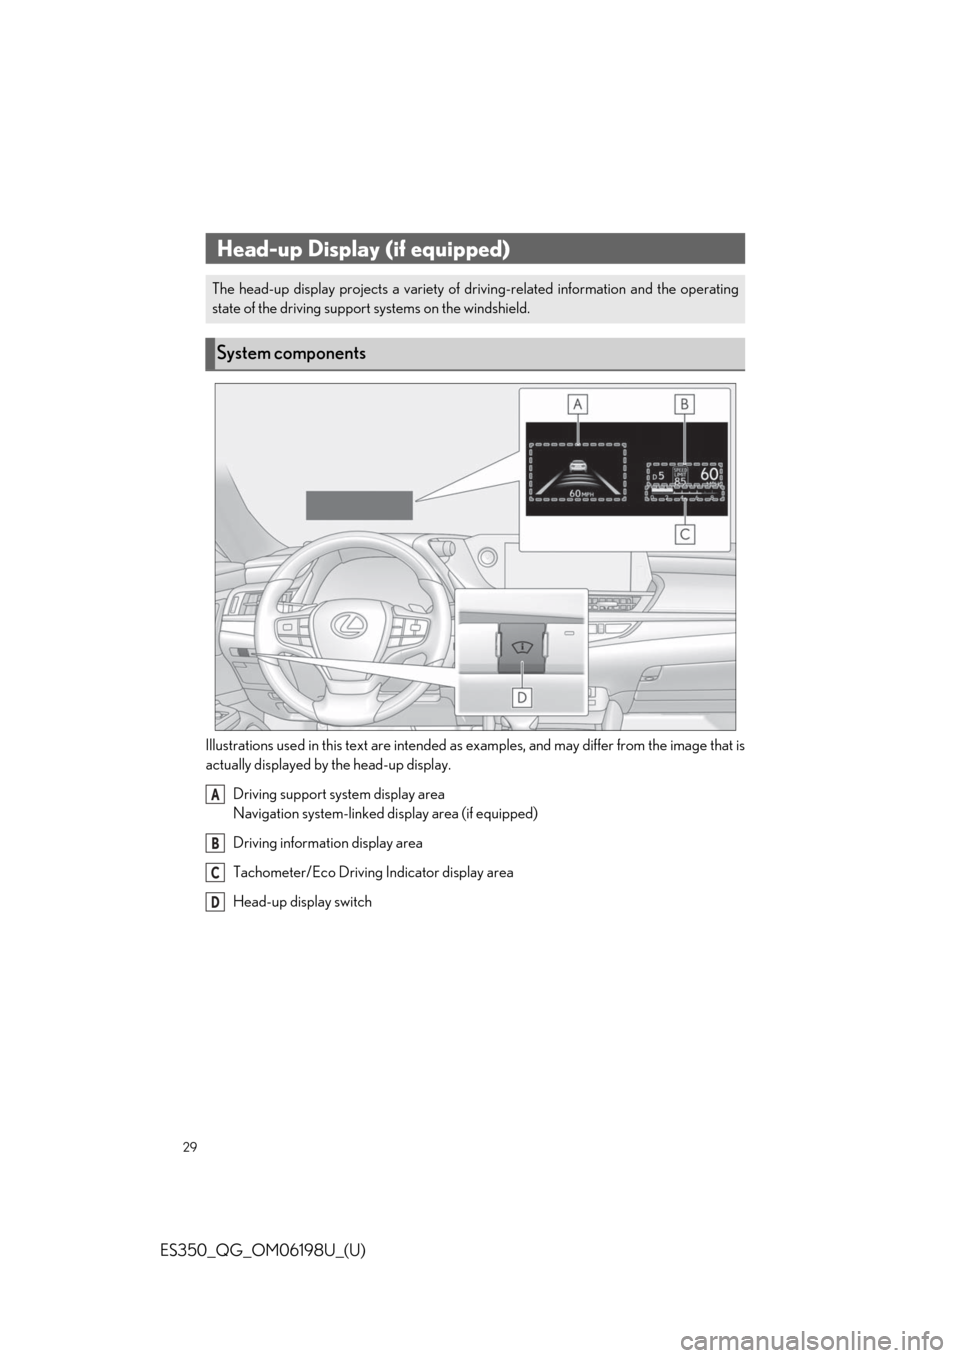
Illustrations used in this text are intended as examples, and may differ from the image that is
actually displayed by the head-up display.Driving support system display area
Navigation system-linked di splay area (if equipped)
Driving information display area
Tachometer/Eco Driving Indicator display area
Head-up display switch
Head-up Display (if equipped)
The head-up display projects a variety of dr iving-related information and the operating
state of the driving support systems on the windshield.
System components
A
B
C
D
Page 30 of 94
30
ES350_QG_OM06198U_(U)
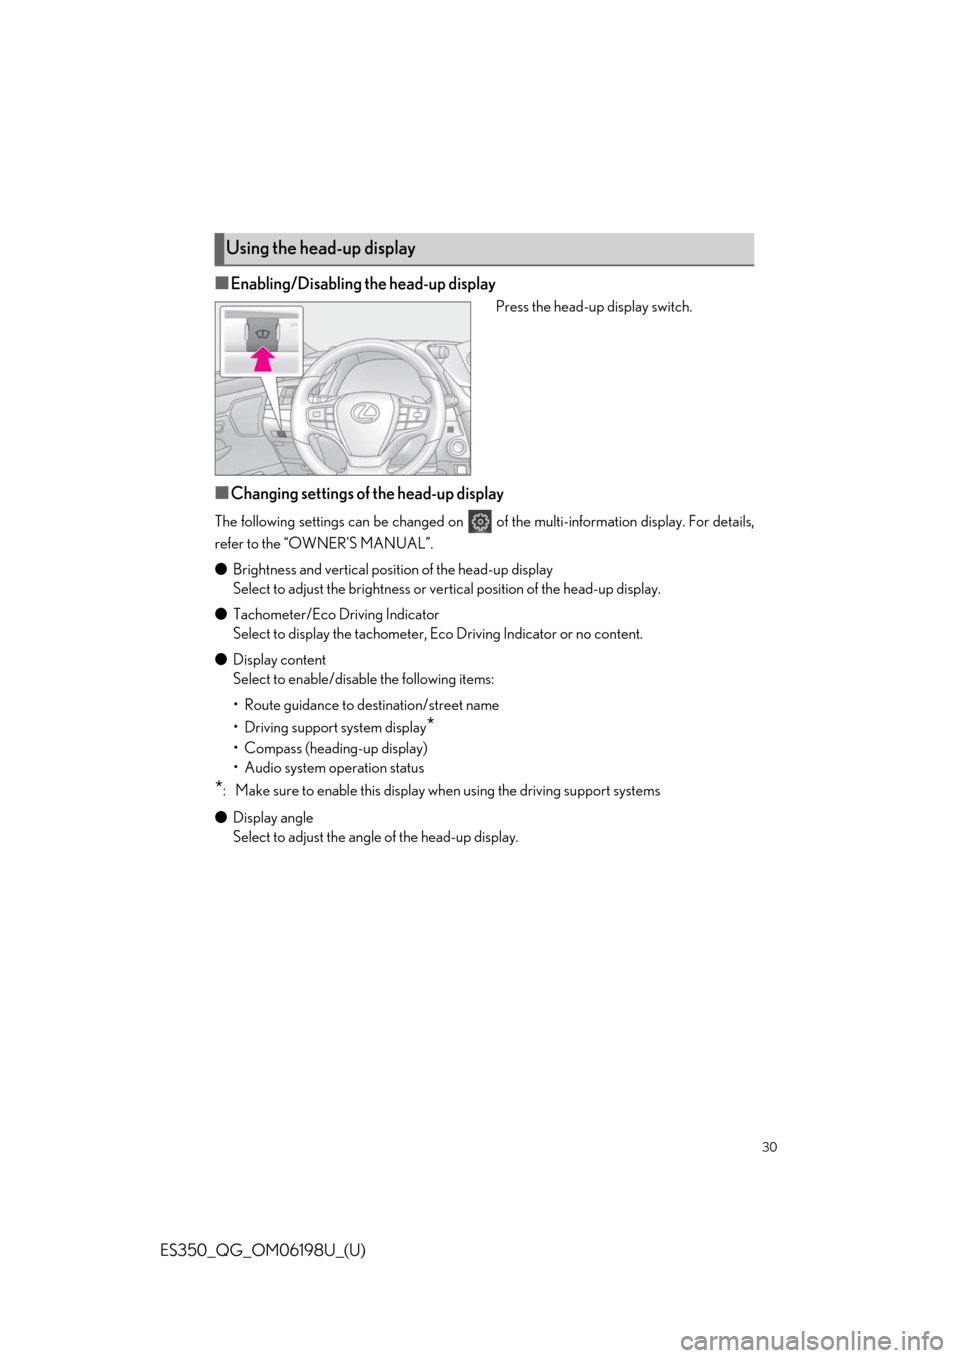
■Enabling/Disabling the head-up display
Press the head-up display switch.
■Changing settings of the head-up display
The following settings can be changed on of the multi-information display. For details,
refer to the “OWNER’S MANUAL”.
● Brightness and vertical position of the head-up display
Select to adjust the brightness or ve rtical position of the head-up display.
● Tachometer/Eco Driving Indicator
Select to display the tachometer, Ec o Driving Indicator or no content.
● Display content
Select to enable/disab le the following items:
• Route guidance to destination/street name
• Driving support system display
*
• Compass (heading-up display)
• Audio system operation status
*: Make sure to enable this display wh en using the driving support systems
● Display angle
Select to adjust the angle of the head-up display.
Using the head-up display
Page 31 of 94
31
ES350_QG_OM06198U_(U)
■Tachometer
Displays the engine speed in revolutions per minute.
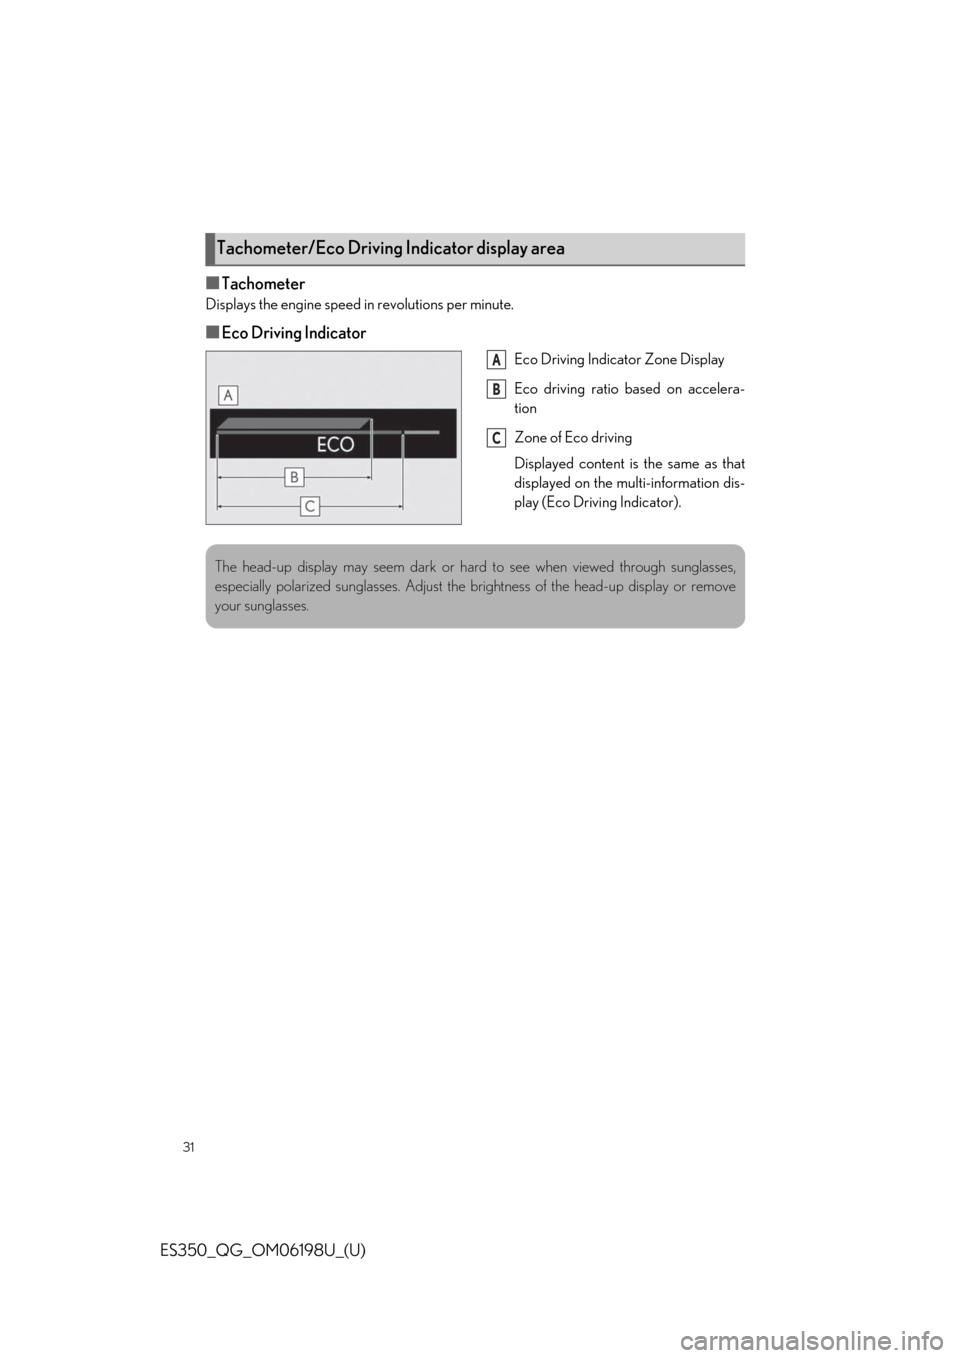
■Eco Driving Indicator
Eco Driving Indicator Zone Display
Eco driving ratio based on accelera-
tion
Zone of Eco driving
Displayed content is the same as that
displayed on the multi-information dis-
play (Eco Driving Indicator).
Tachometer/Eco Driving Indicator display area
A
B
C
The head-up display may seem dark or hard to see when viewed through sunglasses,
especially polarized sunglasses. Adjust the brightness of the head-up display or remove
your sunglasses.
Page 37 of 94
37
ES350_QG_OM06198U_(U)
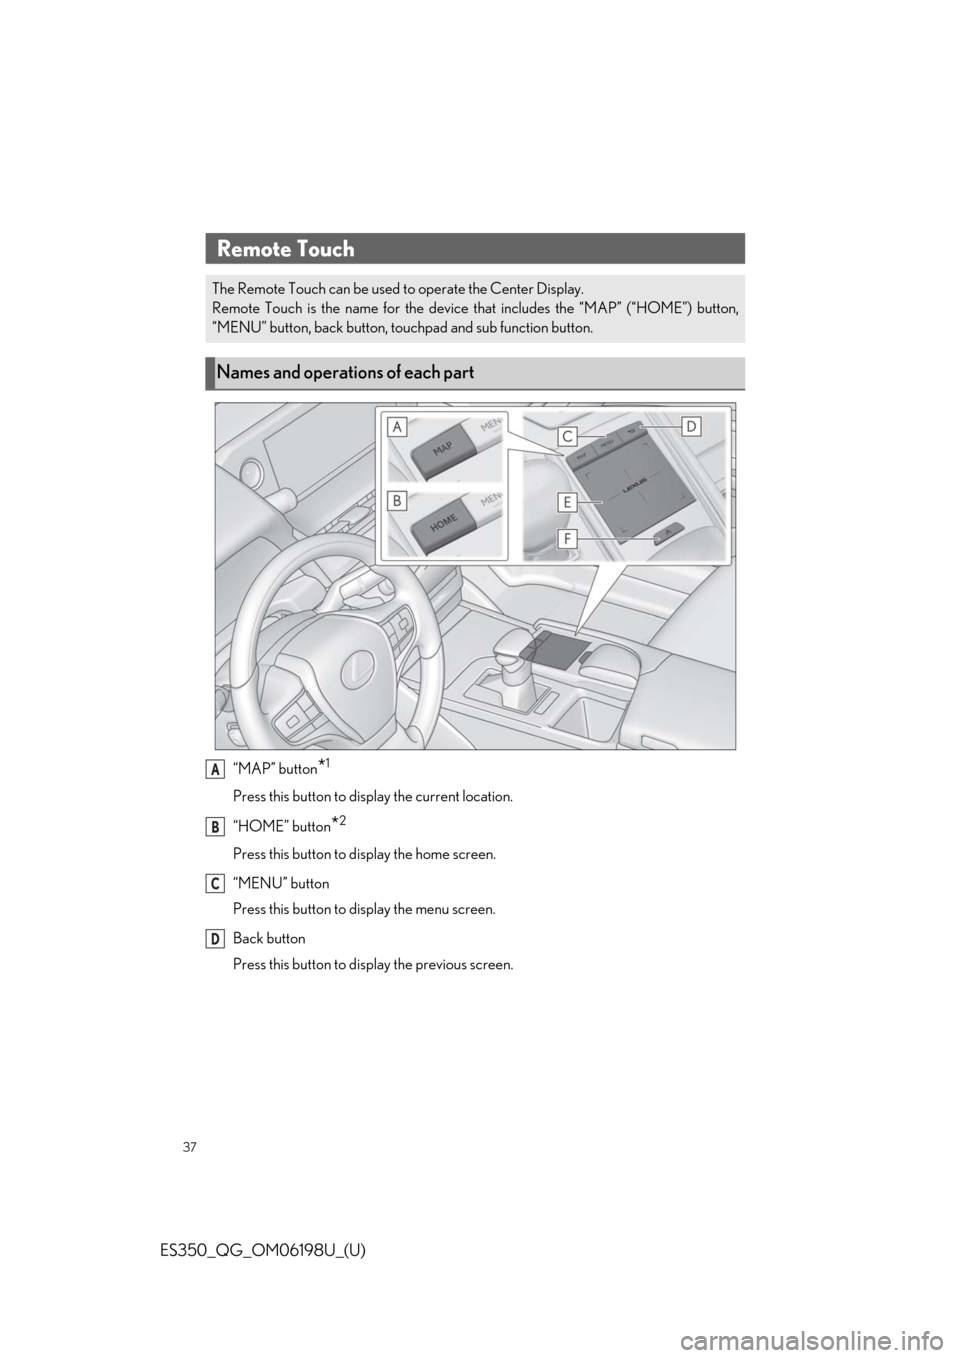
“MAP” button*1
Press this button to display the current location.
“HOME” button
*2
Press this button to display the home screen.
“MENU” button
Press this button to display the menu screen.
Back button
Press this button to display the previous screen.
Remote Touch
The Remote Touch can be used to operate the Center Display.
Remote Touch is the name for the device that includes the “MAP” (“HOME”) button,
“MENU” button, back button, touchpad and sub function button.
Names and operations of each part
A
B
C
D
Page 38 of 94

38
ES350_QG_OM06198U_(U)
Touchpad
Slide your finger on the touchpad and move the pointer to select a function, letter and
screen button.
Press the touchpad to enter the selected function, letter or screen button. Certain fin-
ger movements on the touchpad can perform functions, such as changing map scalings
and scrolling list screens.
Sub function button
When is displayed on the screen, a function screen assigned to the screen can be
displayed.
*1: 12.3-inch display model
*2:8-inch display model
E
F
Page 39 of 94
39
ES350_QG_OM06198U_(U)
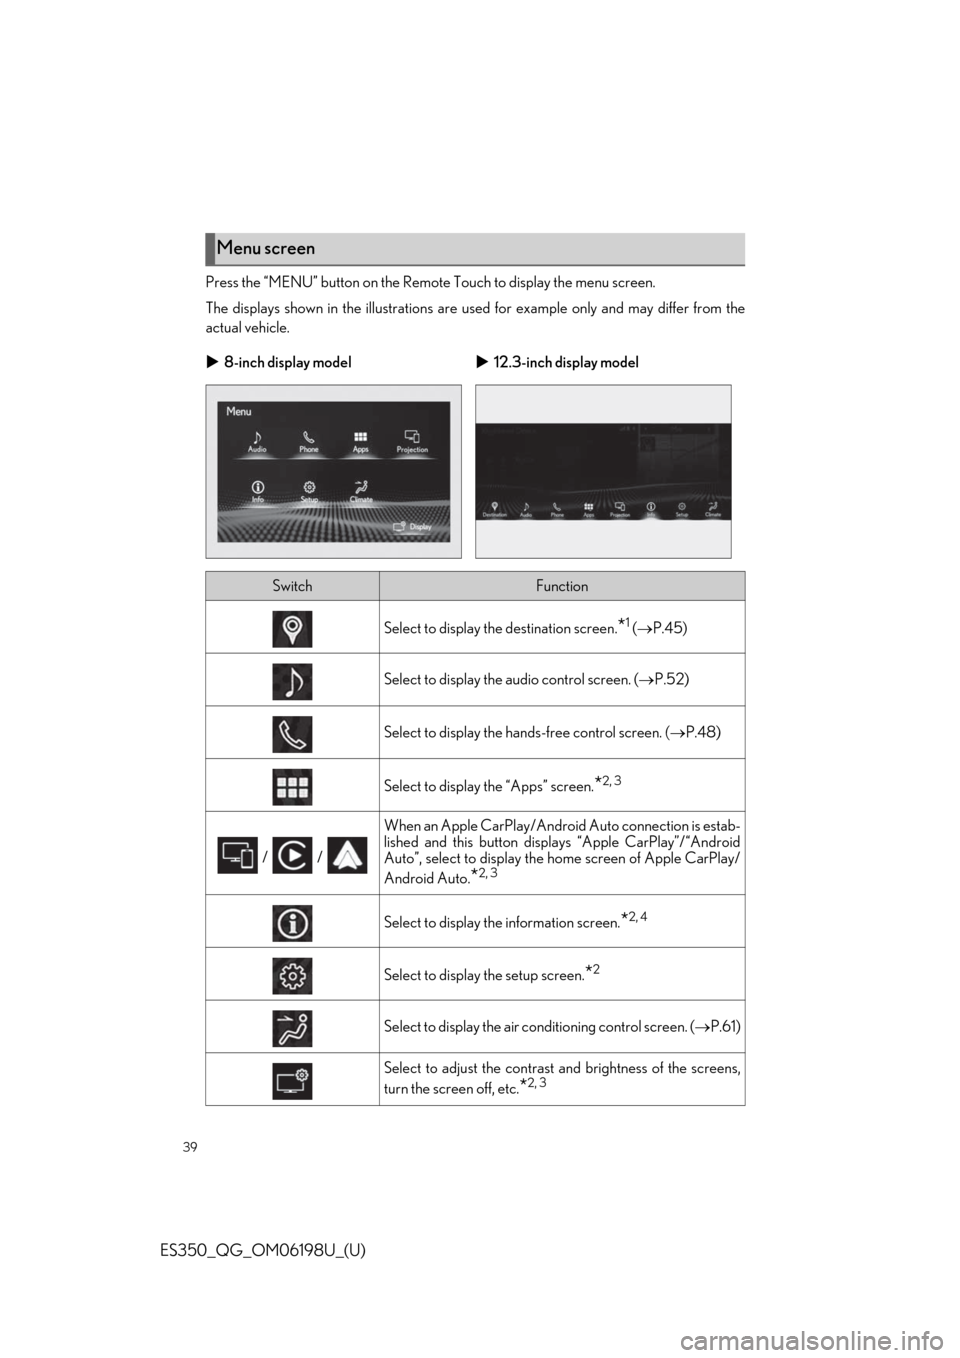
Press the “MENU” button on the Remote Touch to display the menu screen.
The displays shown in the illustrations are used for example on ly and may differ from the
actual vehicle.
Menu screen
8-inch display model 12.3-inch display model
SwitchFunction
Select to display th e destination screen.*1 ( P.45)
Select to display the audio control screen. ( P.52)
Select to display the hands-free control screen. ( P.48)
Select to display the “Apps” screen.*2, 3
/ /
When an Apple CarPlay/Android Auto connection is estab-
lished and this button displa ys “Apple CarPlay”/“Android
Auto”, select to display the home screen of Apple CarPlay/
Android Auto.
*2, 3
Select to display th e information screen.*2, 4
Select to display the setup screen.*2
Select to display the air conditioning control screen. ( P.61)
Select to adjust the contrast and brightness of the screens,
turn the screen off, etc.
*2, 3
Page 41 of 94
41
ES350_QG_OM06198U_(U)
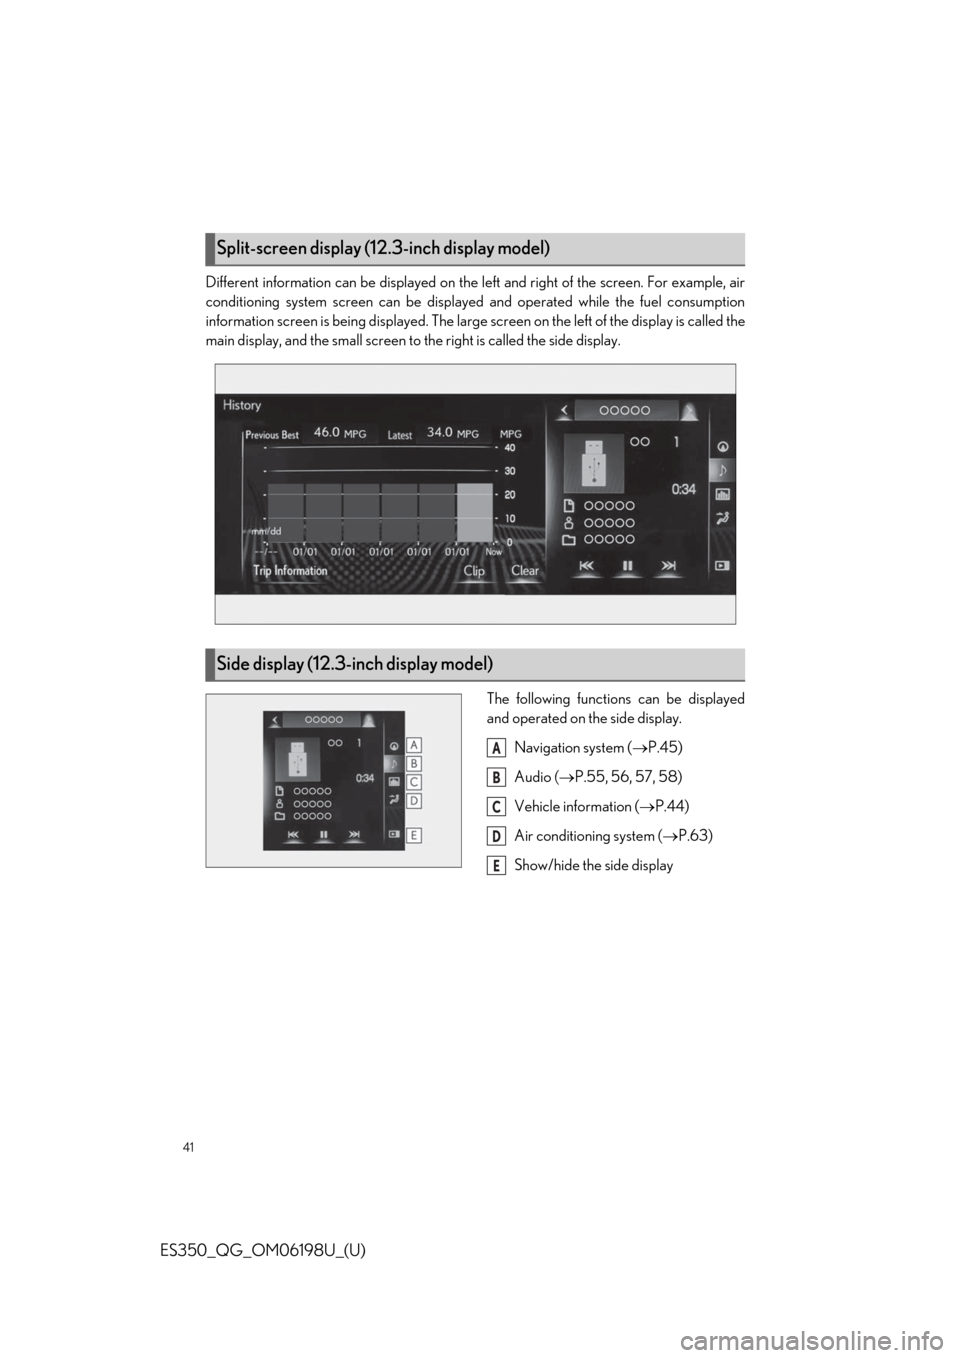
Different information can be displayed on the left and right of the screen. For example, air
conditioning system screen can be displayed and operated while the fuel consumption
information screen is being displayed. The large screen on the left of the display is called the
main display, and the small screen to the right is called the side display.
The following functions can be displayed
and operated on the side display.Navigation system ( P.45)
Audio ( P.55, 56, 57, 58)
Vehicle information ( P.44)
Air conditioning system ( P.63)
Show/hide the side display
Split-screen display (12. 3-inch display model)
Side display (12.3-inch display model)
A
B
C
D
E
Page 42 of 94
42
ES350_QG_OM06198U_(U)
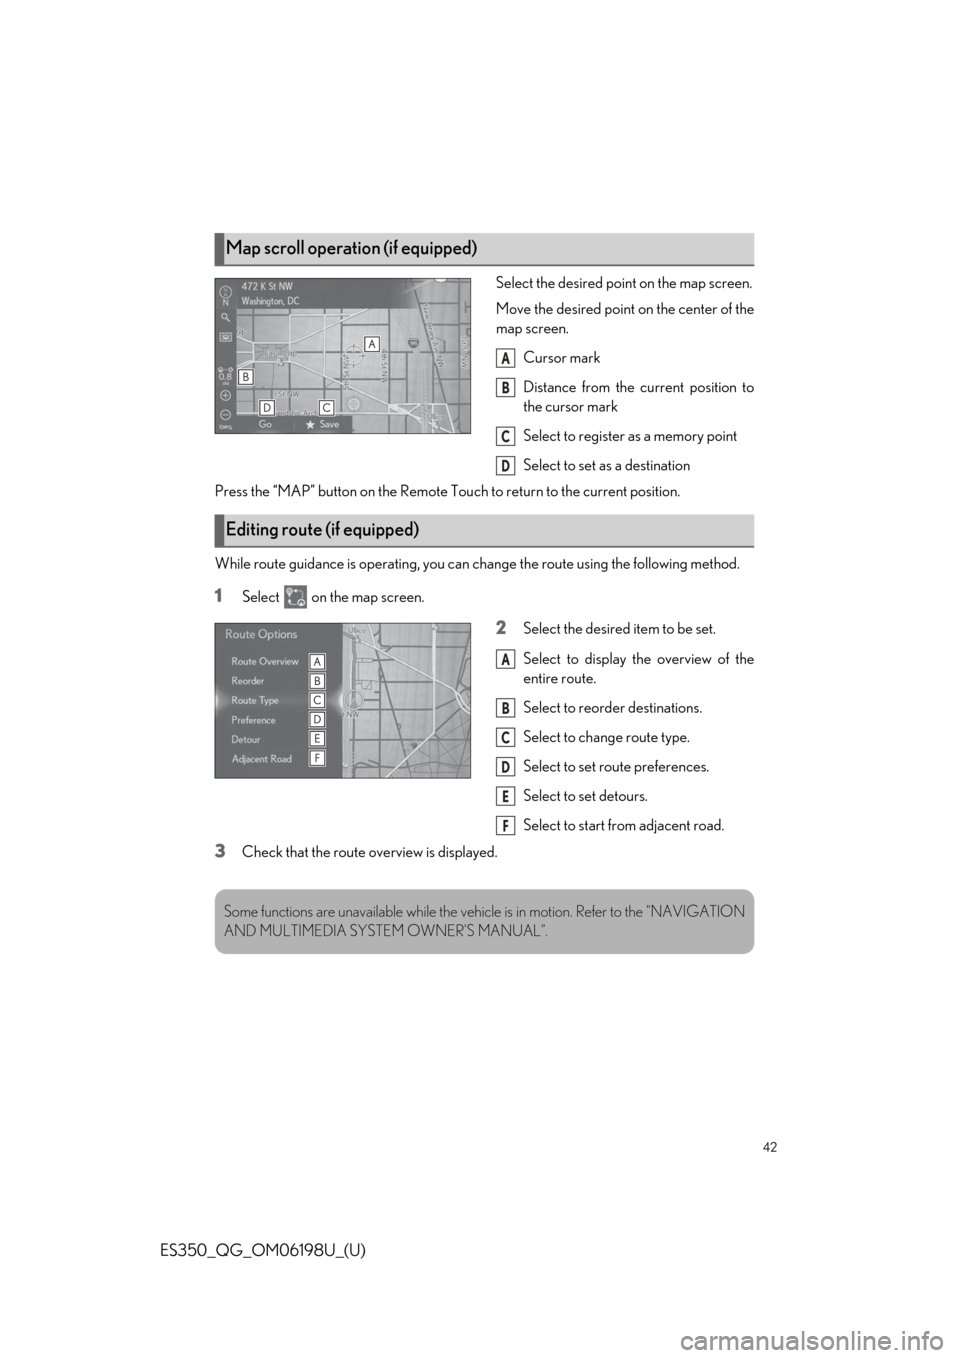
Select the desired point on the map screen.
Move the desired point on the center of the
map screen.Cursor mark
Distance from the current position to
the cursor mark
Select to register as a memory point
Select to set as a destination
Press the “MAP” button on the Remote Touch to return to the current position.
While route guidance is operating, you can change the route using the following method.
1Select on the map screen.
2Select the desired item to be set.
Select to display the overview of the
entire route.
Select to reorder destinations.
Select to change route type.
Select to set route preferences.
Select to set detours.
Select to start from adjacent road.
3Check that the route overview is displayed.
Map scroll operation (if equipped)
A
B
C
D
Editing route (if equipped)
A
B
C
D
E
F
Some functions are unavailable while the vehi cle is in motion. Refer to the “NAVIGATION
AND MULTIMEDIA SYSTE M OWNER’S MANUAL”.