engine Lexus GS F 2016 Owners Manual
[x] Cancel search | Manufacturer: LEXUS, Model Year: 2016, Model line: GS F, Model: Lexus GS F 2016Pages: 628, PDF Size: 8.83 MB
Page 227 of 628

GS350_200t_GS F_OM_OM30E86U_(U)
2254-3. Operating the lights and wipers
4
Driving
The wipers can be used as intermittent windshield wipers, which operate regard-
less of vehicle speed or amount of raindrops. The intermittent windshield wiper
operation can be switched when the vehicle is stopped and the wiper is off. The
wiper operation cannot be switched during AUTO mode or while the intermit-
tent windshield wipers are operating.
Press and hold until the AUTO
mode indicator stops flashing.
If is pressed and held until the
AUTO mode indicator stops flashing
again, it will return to its previous state.
■The windshield wiper and washer can be operated when
The engine switch is in IGNITION ON mode.
■Dripping prevention wiper sweep
After washing and wiping operation several times, the wipers operate one more time
after a short delay to prevent dripping.
However, the last sweep will not happen while the vehicle is moving.
■Effects of vehicle speed on wiper operation
●Intermittent windshield wipers interval changes when the vehicle is stopped.
●With low speed operation selected, wiper op eration will be switched from low speed to
intermittent operation only when the vehicle is stationary.
■Raindrop sensor
●If AUTO mode is selected while the engine switch is in IGNITION ON mode, the wip-
ers will operate once to show that AUTO mode is activated.
●If the temperature of the raindrop sensor is 185°F (85°C) or higher, or -22°F
(-30°C) or lower, automatic operation may not occur. In this case, operate the
wipers in any mode other than AUTO mode.
Switching between the intermittent windshield wipers and rain-sensing
windshield wipers (vehicles with rain-sensing windshield wipers)
●The raindrop sensor judges the amount of
raindrops.
An optical sensor is adopted. It may not oper-
ate properly when sunlight from the rising or
setting of the sun intermittently strikes the
windshield, or if bugs etc. are present on the
windshield.
Page 229 of 628

227
GS350_200t_GS F_OM_OM30E86U_(U)4-4. Refueling
4
Driving
Opening the fuel tank cap
●Turn the engine switch off and ensure that all the doors and windows are
closed.
●Confirm the type of fuel.
■Fuel types
→
P. 555
■Fuel tank opening for unleaded gasoline
To help prevent incorrect fueling, your vehicle has a fuel tank opening that only accom-
modates the special nozzle on unleaded fuel pumps.
Perform the following steps to open the fuel tank cap:
Before refueling the vehicle
WA R N I N G
■When refueling the vehicle
Observe the following precautions while refueling the vehicle. Failure to do so may
result in death or serious injury.
●After exiting the vehicle and before opening the fuel door, touch an unpainted metal
surface to discharge any static electricity. It is important to discharge static electricity
before refueling because sparks resulting fr om static electricity can cause fuel vapors
to ignite while refueling.
●Always hold the grips on the fuel tank cap and turn it slowly to remove it.
A whooshing sound may be heard when the fuel tank cap is loosened. Wait until the
sound cannot be heard before fully removing the cap. In hot weather, pressurized fuel
may spray out the filler neck and cause injury.
●Do not allow anyone that has not discharged static electricity from their body to come
close to an open fuel tank.
●Do not inhale vaporized fuel.
Fuel contains substances that are harmful if inhaled.
●Do not smoke while refueling the vehicle.
Doing so may cause the fuel to ignite and cause a fire.
●Do not return to the vehicle or touch any person or object that is statically charged.
This may cause static electricity to build up , resulting in a possible ignition hazard.
■When refueling
Observe the following precautions to prevent fuel overflowing from the fuel tank:
●Securely insert the fuel nozzle into the fuel filler neck.
●Stop filling the tank after the fuel nozzle automatically clicks off.
●Do not top off the fuel tank.
Page 241 of 628

GS350_200t_GS F_OM_OM30E86U_(U)
2394-5. Using the driving support systems
4
Driving
WA R N I N G
■Pre-collision braking*3
●The pre-collision braking function may not operate if certain operations are per-
formed by the driver. If the accelerator pedal is being depressed strongly or the steer-
ing wheel is being turned, the system may de termine that the driver is taking evasive
action and possibly prevent the pre-collis ion braking function from operating.
●In some situations, while the pre-collision br aking function is operating, operation of
the function may be canceled if the accele rator pedal is depressed strongly or the
steering wheel is turned and the system dete rmines that the driver is taking evasive
action.
●A large amount of braking force is applied while the pre-collision braking function is
operating. As the pre-collision braking functi on will be canceled after the vehicle has
been stopped for approximately 2 seconds, the driver should depress the brake
pedal as necessary.
●If the brake pedal is being depressed, the system may determine that the driver is tak-
ing evasive action and possibly delay the op eration timing of the pre-collision braking
function.
*3: Depending on the region in which the vehicle was sold, the pre-collision braking
function may not be available.
■When to disable the pre-collision system
In the following situations, disable the system, as it may not operate properly, possibly
leading to an accident resulting in death or serious injury:
●When the vehicle is being towed
●When your vehicle is towing another vehicle
●When transporting the vehicle via truck, boat, train or similar means of transportation
●When the vehicle is raised on a lift with the engine running and the tires are allowed to
rotate freely
●When inspecting the vehicle using a drum tester such as a chassis dynamometer or
speedometer tester, or when using an on vehicle wheel balancer
●When a strong impact is applied to the fr ont bumper or front grille, due to an accident
or other reasons
●If the vehicle cannot be driven in a stable manner, such as when the vehicle has been
in an accident or is malfunctioning
●When the vehicle is driven in a sporty manner or off-road
●When the tires are not properly inflated
●When the tires are very worn
●When tires of a size other than specified are installed
●When tire chains are installed
●GS350/GS200t: When a compact spare tire or an emergency tire puncture repair
kit is used
●GS F: When a spare tire or an emergency tire puncture repair kit is used
Page 242 of 628

240
GS350_200t_GS F_OM_OM30E86U_(U)4-5. Using the driving support systems
■Enabling/disabling the pre-collision system
The pre-collision system can be enabled/disabled on (
→P. 1 0 0 ,
108) of the multi-information display.
The system is automatically enabled each time the engine switch is turned to IGNI-
TION ON mode.
If the system is disabled, the PCS
warning light will turn on and a mes-
sage will be displayed on the multi-
information display.
■Changing the pre-col lision warning timing
The pre-collision warning timing can be changed on ( →P. 100, 108)
of the multi-information display.
The operation timing setting is retained when the engine switch is turned off.
Far
The warning will begin to operate
earlier than with the default timing.
Middle
This is the default setting.
Near
The warning will begin to operate
later than with the default timing.
Changing settings of th e pre-collision system
1
2
3
Page 249 of 628

GS350_200t_GS F_OM_OM30E86U_(U)
2474-5. Using the driving support systems
4
Driving
• After the engine has started the vehicle has not been driven for a certain amount oftime
• While making a left/right turn and for a few seconds after making a left/right turn
• While driving on a curve and for a few seconds after driving on a curve
• If your vehicle is skidding
• If the front of the vehicle is raised or lowered
• If the wheels are misaligned
• If a wiper blade is blocking the camera sensor
• The vehicle is wobbling.
• The vehicle is being driven at extremely high speeds.
• When driving on a hill
• If the radar sensor or ca mera sensor is misaligned
●In some situations such as the following, sufficient braking force may not be obtained,
preventing the system from performing properly:
• If the braking functions cannot operate to their full extent, such as when the brake
parts are extremely cold, extremely hot, or wet
• If the vehicle is not properly maintained (brakes or tires are excessively worn,
improper tire inflation pressure, etc.)
• When the vehicle is being driven on a gravel road or other slippery surface
●Some pedestrians such as the following may not be detected by the radar sensor and
camera sensor, preventing the system from operating properly
*4:
• Pedestrians shorter than approximately 3.2 ft. (1 m) or taller than approximately 6.5 ft. (2 m)
• Pedestrians wearing oversized clothing (a rain coat, long skirt, etc.), making their sil-
houette obscure
• Pedestrians who are carrying large baggage, holding an umbrella, etc., hiding part of their body
• Pedestrians who are bending forward or squatting
• Pedestrians who are pushing a stroller, wheelchair, bicycle or other vehicle
• Groups of pedestrians which are close together
• Pedestrians who are wearing white and look extremely bright
• Pedestrians in the dark, such as at night or while in a tunnel
• Pedestrians whose clothing appears to be nearly the same color or brightness as their surroundings
• Pedestrians near walls, fences, guardrails, or large objects
• Pedestrians who are on a metal object (manhole cover, steel plate, etc.) on the road
• Pedestrians who are walking fast
• Pedestrians who are changing speed abruptly
• Pedestrians running out from behind a vehicle or a large object
• Pedestrians who are extremely close to the side of the vehicle (outside rear view mirror, etc.)
*4: Depending on the region in which the vehicle was sold, the pedestrian detection
function may not be available.
Page 255 of 628

GS350_200t_GS F_OM_OM30E86U_(U)
2534-5. Using the driving support systems
4
Driving
Press the LKA switch to turn the LKA
system on.
The LKA indicator illuminates and a
message is displayed on the multi-infor-
mation display.
Press the LKA switch again to turn the
LKA system off.
When the LKA system is turned on or
off, operation of the LKA system contin-
ues in the same condition the next time
the engine is started.
LKA indicator
The illumination condition of the
indicator informs the driver of the
system operation status.
Illuminated in white:
LKA system is operating.
Illuminated in green:
Steering wheel assistance of the lane
departure control function or lane-
keeping assist function is operating.
Flashing in orange:
Lane departure alert function is operat-
ing.
Operation display of steering wheel
operation support
Indicates that steering wheel assistance of the lane departure control function
or lane centering function is operating.
Turning LKA system on
Indications on multi-information display
1
2
Page 263 of 628

GS350_200t_GS F_OM_OM30E86U_(U)
2614-5. Using the driving support systems
4
Driving
Press the LDA switch to turn the LDA
system on.
The LDA indicator illuminates and a
message is displayed on the multi-infor-
mation display.
Press the LDA switch again to turn the
LDA system off.
When the LDA system is turned on or
off, operation of the LDA system contin-
ues in the same condition the next time
the engine is started.
LDA indicator
The illumination condition of the
indicator informs the driver of the
system operation status.
Illuminated in white:
LDA system is operating.
Illuminated in green:
Steering wheel assistance of the steer-
ing control function is operating.
Flashing in orange:
Lane departure alert function is operat-
ing.
Operation display of steering wheel
operation support
Indicates that steering wheel assistance of the steering control function is
operating.
Turning LDA system on
Indications on multi-information display
1
2
Page 274 of 628

272
GS350_200t_GS F_OM_OM30E86U_(U)4-5. Using the driving support systems
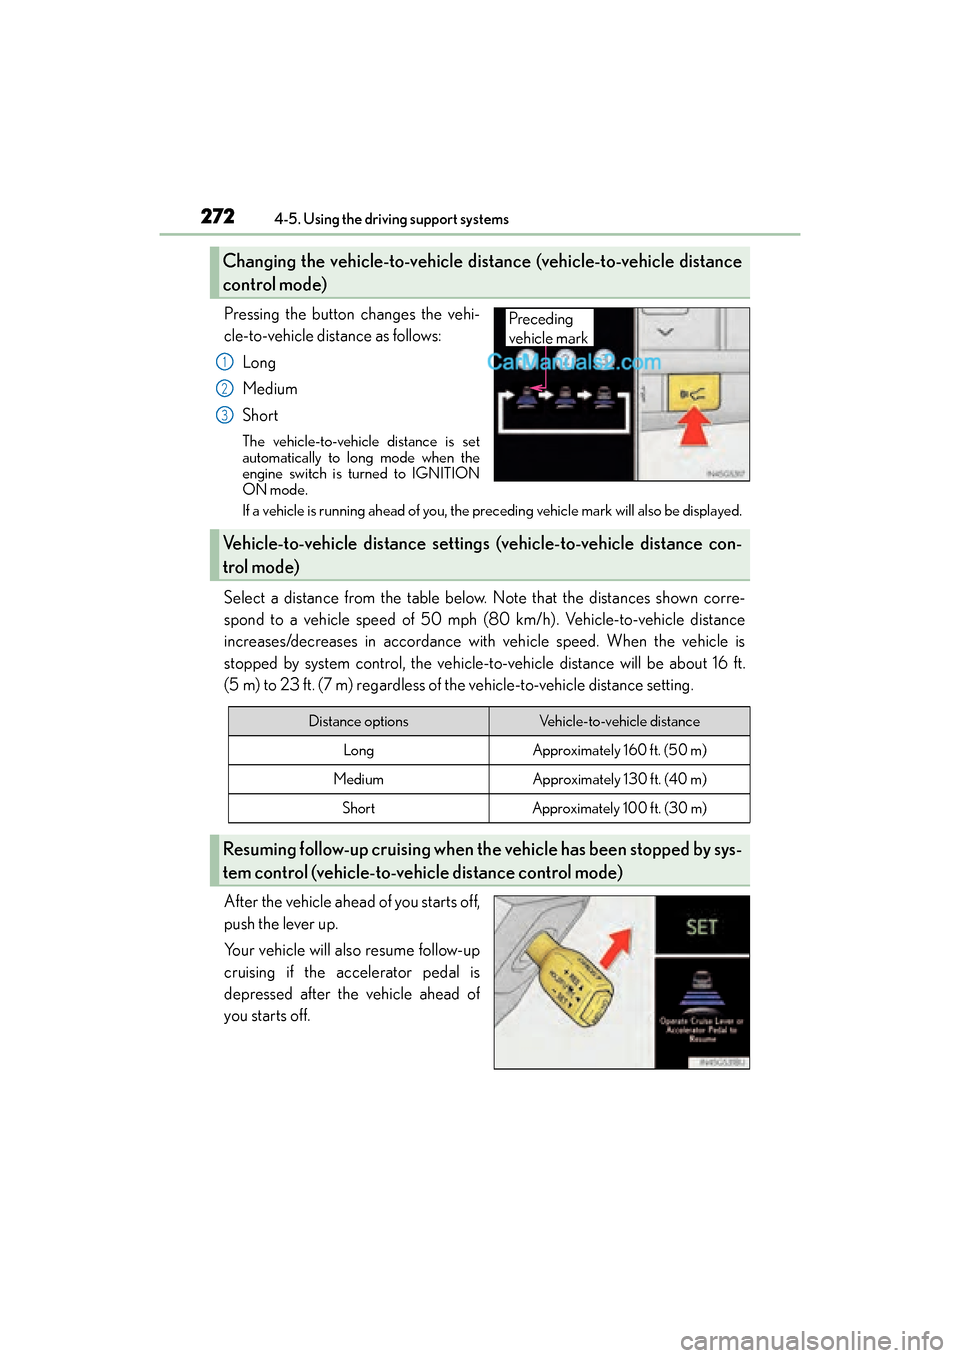
Pressing the button changes the vehi-
cle-to-vehicle distance as follows:
Long
Medium
Short
The vehicle-to-vehicle distance is set
automatically to long mode when the
engine switch is turned to IGNITION
ON mode.
If a vehicle is running ahead of you, the preceding vehicle mark will also be displayed.
Select a distance from the table below. Note that the distances shown corre-
spond to a vehicle speed of 50 mph (80 km/h). Vehicle-to-vehicle distance
increases/decreases in accordance with vehicle speed. When the vehicle is
stopped by system control, the vehicle-to-vehicle distance will be about 16 ft.
(5 m) to 23 ft. (7 m) regardless of the vehicle-to-vehicle distance setting.
After the vehicle ahead of you starts off,
push the lever up.
Your vehicle will also resume follow-up
cruising if the accelerator pedal is
depressed after the vehicle ahead of
you starts off.
Changing the vehicle-to-vehicle di stance (vehicle-to-vehicle distance
control mode)
Preceding
vehicle mark
1
2
3
Vehicle-to-vehicle distance setting s (vehicle-to-vehicle distance con-
trol mode)
Distance optionsVehicle-to-vehicle distance
LongApproximately 160 ft. (50 m)
MediumApproximately 130 ft. (40 m)
ShortApproximately 100 ft. (30 m)
Resuming follow-up cruising when th e vehicle has been stopped by sys-
tem control (vehicle-to-vehicle distance control mode)
Page 286 of 628

284
GS350_200t_GS F_OM_OM30E86U_(U)4-5. Using the driving support systems
Pressing the button changes the vehi-
cle-to-vehicle distance as follows:
Long
Medium
Short
The vehicle-to-vehicle distance is set
automatically to long mode when the
engine switch is turned to IGNITION
ON mode.
If a vehicle is running ahead of you, the preceding vehicle mark will also be displayed.
Select a distance from the table below. Note that the distances shown corre-
spond to a vehicle speed of 50 mph (80 km/h). Vehicle-to-vehicle distance
increases/decreases in accordance with vehicle speed.
Changing the vehicle-to-vehicle di stance (vehicle-to-vehicle distance
control mode)
Preceding
vehicle mark
1
2
3
Vehicle-to-vehicle distance setting s (vehicle-to-vehicle distance con-
trol mode)
Distance optionsVehicle-to-vehicle distance
LongApproximately 160 ft. (50 m)
MediumApproximately 130 ft. (40 m)
ShortApproximately 100 ft. (30 m)
Page 295 of 628

293
GS350_200t_GS F_OM_OM30E86U_(U)4-5. Using the driving support systems
4
Driving
Driving mode select switch
�XGS350/GS200t (vehicles without Adaptive Variable Suspension system)
Normal mode
For normal driving.
Press the switch to change the driving mode to normal mode when selected to Eco
drive mode or sport mode.
Eco drive mode
Use Eco drive mode to help achieve low fuel consumption during trips that
involve frequent accelerating.
When not in Eco drive mode an
d the driving mode select switch is turned to the left,
the “ECO” indicator comes on in the multi-information display.
Sport mode
Assists acceleration response by controlling the transmission, engine and
steering. Suitable for when precise handling is desirable, for example when
driving on mountain roads.
When not in sport mode and the driving mode select switch is turned to the right, the
“SPORT” indicator comes on in the multi-information display.
The driving modes can be selected to suit driving condition.
1
2
3