Valve Lexus GS F 2017 User Guide
[x] Cancel search | Manufacturer: LEXUS, Model Year: 2017, Model line: GS F, Model: Lexus GS F 2017Pages: 676, PDF Size: 67.73 MB
Page 572 of 676

5727-2. Steps to take in an emergency
GS350_200t_GS F_OM_OM30F83E_(EE)
NOTICE
■Be careful when driving over bumps with the spare tire installed on the vehicle.
(GS350/GS200t with compact spare tire, and GS F)
The vehicle may become lower when driving with the spare tire compar ed to when
driving with standard tires. Be careful when driving over uneven road surfaces.
■Driving with tire chains and the spare tire (GS350/GS200t with compact spare tire,
and GS F)
Do not fit tire chains to the spare tire.
Tire chains may damage the vehicle body and adversely affect driving performance.
■When replacing the tires (vehicles with the tire pressure warning system)
When removing or fitting the wheels, tires or the tire pressure warning valve and trans-
mitter, contact any authorized Lexus retailer or Lexus authorized repairer, or any reli-
able repairer as the tire pressure warning valve and transmitter may be damaged if not
handled correctly.
Page 579 of 676

579
7-2. Steps to take in an emergency
7
When trouble arises
GS350_200t_GS F_OM_OM30F83E_(EE)
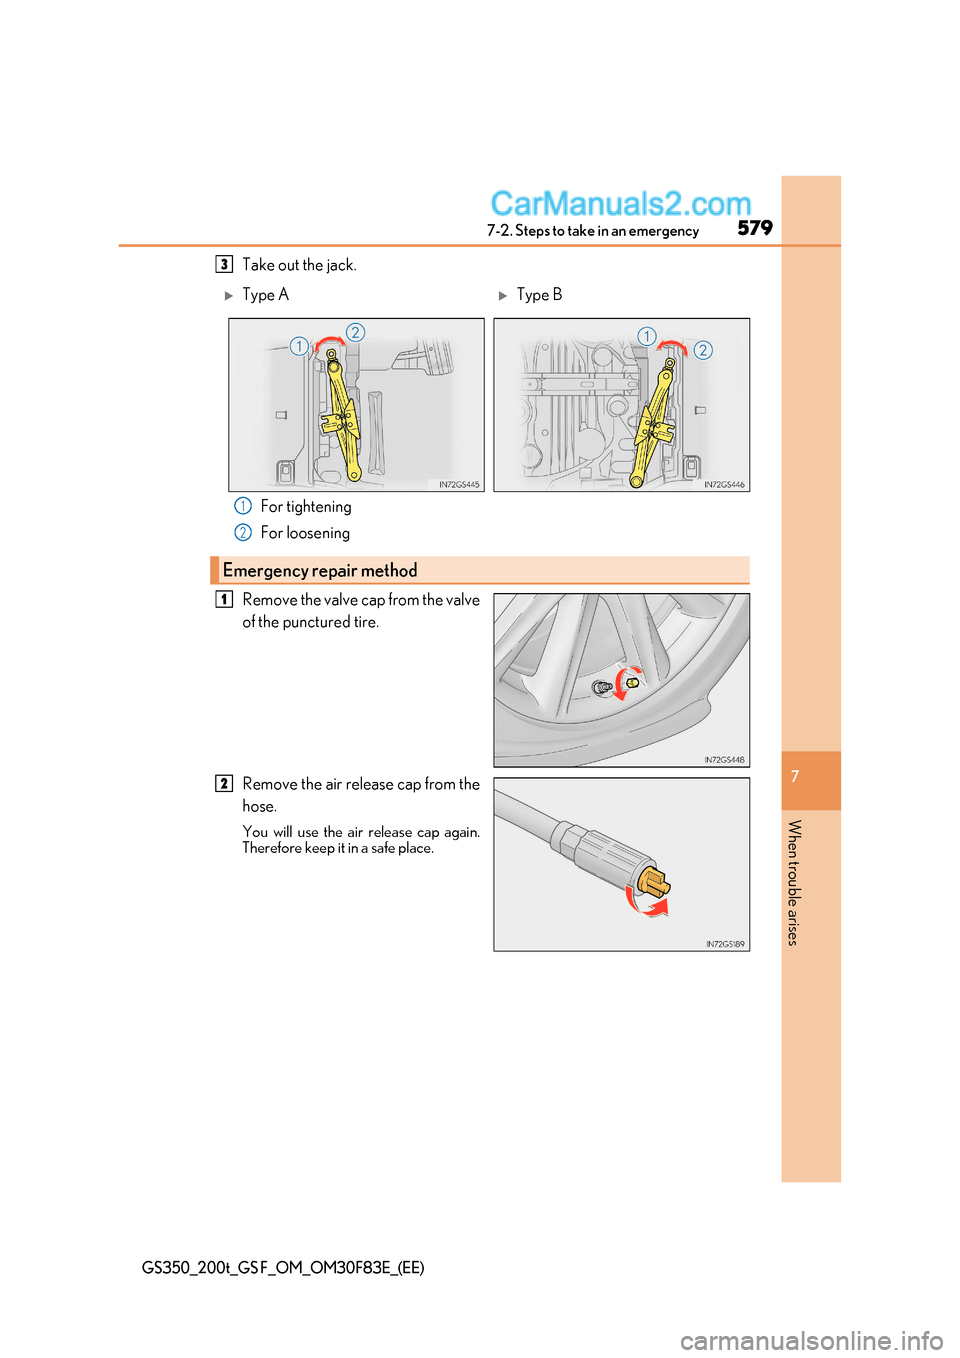
Take out the jack.
For tightening
For loosening
Remove the valve cap from the valve
of the punctured tire.
Remove the air release cap from the
hose.
You will use the air release cap again.
Therefore keep it in a safe place.3
Type AType B
1
2
Emergency repair method
1
2
Page 580 of 676

5807-2. Steps to take in an emergency
GS350_200t_GS F_OM_OM30F83E_(EE)
Connect the hose to the valve.
Screw the end of the hose clockwise as
far as possible.
Make sure that the compressor
switch is off.
Remove the rubber stopper from the
compressor.
Connect the power plug to the power outlet socket.3
4
5
6
Inside of console boxBackside of console box
Page 586 of 676

5867-2. Steps to take in an emergency
GS350_200t_GS F_OM_OM30F83E_(EE)
■Emergency tire puncture repair kit
●The sealant has a limited lifespa n. The expiry date is shown on the bottle. The sealant
should be replaced before the expiry date. Contact any authorized Lexus retailer or
Lexus authorized repairer, or any reliable repairer for replacement.
●The sealant stored in the emergency tire puncture repair kit can be used only once to
temporarily repair a single tire. If the sealant has been used and need to be purchased,
contact any authorized Lexus retailer or Lexus authorized repairer, or any reliable
repairer.
●The sealant can be used when the outside temperature is from -40 C (-40 F) to
60 C (140 F).
●The repair kit is exclusively designed for size and type of tires originally installed on your
vehicle. Do not use it for tires that a different size than the original ones, or for any other
purposes.
●If the sealant gets on your clothes, it may stain.
●If the sealant adheres to a wheel or the surface of the vehicle body, the stain may not be
removable if it is not cleaned at once. Immediately wipe away the sealant with a wet
cloth.
●During operation of the repair kit, a loud operation noise is produced. This does not
indicate a malfunction.
●Do not use the emergency tire puncture repair kit to check or to adjust the tire pres-
sure.
■If the tire is inflated to mo re than the recommended level
Disconnect the hose from the valve.
Disconnect the hose from the valve, remove the air release cap from the hose and then
reconnect the hose.
Turn the compressor switch on and wait for se veral seconds, and then turn it off. Check
that the air pressure indicator shows the recommended level. ( P. 629)
If the air pressure is lower than the reco mmended level, turn the compressor switch on
again and repeat the inflation procedure un til the recommended pressure is reached.
Install the air release cap to the end of the
hose and push the protrusion on the air
release cap into the tire valve to let some air
out.
1
2
3
4
Page 587 of 676

587
7-2. Steps to take in an emergency
7
When trouble arises
GS350_200t_GS F_OM_OM30F83E_(EE)
■After a tire is repaired with the emergency tire puncture repair kit
●The tire pressure warning valve an d transmitter should be replaced.
●Vehicles with the tire pressure warning system: Even if the tire inflation pressure is at the
recommended level, the tire pressure warning light may come on/flash.
■Note for checking the emergency tire puncture repair kit
Check the sealant expiry date occasionally.
The expiry date is shown on the bottle.
Do not use sealant whose expiry date has already passed. Otherwise, repairs conducted
using the emergency tire puncture repair kit may not be performed properly.
WARNING
■Caution while driving
Observe the following precautions.
Failure to do so may cause an accident.
●The emergency tire puncture repair kit is made exclusively for your vehicle. Do not
use it on other vehicles.
●Do not use the emergency tire puncture repair kit for tires that are a different size
than the specified ones or fo r any other purpose. Doing so may cause the tires to not
be repaired properly.
■Precautions for use of the sealant
●Ingesting the sealant is hazardous to your health. If you ingest sealant, consume as
much water as possible, and then immediately consult a doctor.
●If sealant gets in eyes or adheres to skin, i mmediately wash it off with water. If discom-
fort persists, consult a doctor.
Page 588 of 676

5887-2. Steps to take in an emergency
GS350_200t_GS F_OM_OM30F83E_(EE)
WARNING
■When fixing the flat tire
●Stop your vehicle in a safe and flat area.
●Do not touch the wheels or the area around the brakes immediately after the vehicle
has been driven.
After the vehicle has been driven, the wheels and the area around the brakes may be
extremely hot. Touching these areas with hands, feet or other bo dy parts may result in
burns.
●Connect the valve and hose securely with the tire installed on the vehicle.
●If the hose is not properly connected to the valve, air leakage may occur or sealant
may be sprayed out.
●If the hose comes off the valve while inflating the tire, there is a risk that the hose will
move abruptly due to air pressure.
●After inflation of the tire has completed, the sealant may splatter when the hose is dis-
connected or some air is let out of the tire.
●Follow the operation procedure to repair the tire. If the procedures not followed, the
sealant may spray out.
●Keep back from the tire while it is being repaired, as there is a chance of it bursting
while the repair operation is being performe d. If you notice any cracks or deforma-
tion of the tire, turn off the compressor switch and stop the repair operation immedi-
ately.
●The repair kit may overheat if operated for a long period of ti me. Do not operate the
repair kit continuously for more than 35 minutes.
●Parts of the repair kit become hot during op eration. Be careful handling the repair kit
during and after operation. Do not touch the metal part connecting the bottle and the
compressor. It will be extremely hot.
●Do not attach the vehicle speed warning sticker to an area other than the one indi-
cated. If the sticker is attached to an area where an SRS airbag is located, such as the
pad of the steering wheel, it may prevent the SRS air bag from operating properly.
■Driving to spread the liquid sealant evenly
●Drive the vehicle carefully at a low speed. Be especially careful when turning and cor-
nering.
●If the vehicle does not drive straight or you feel a pull through the steering wheel, stop
the vehicle and check the following:
Page 589 of 676

589
7-2. Steps to take in an emergency
7
When trouble arises
GS350_200t_GS F_OM_OM30F83E_(EE)
NOTICE
■When performing an emergency repair
●Perform the emergency repair without removing the nail or screw that has punctured
the tread of the tire. If the object that has punctured the tire is r emoved, repair by the
emergency tire puncture repair kit may not be possible.
●The repair kit is not waterproof. Make sure that the repair kit is not exposed to water,
such as when it is being used in the rain.
●Do not put the repair kit directly onto dusty ground such as sand at the side of the
road. If the repair kit vacuums up dust etc., a malfunction may occur.
■Handling the emergency tire puncture repair kit
●The repair kit power source should be 12 V DC suitable for vehicle use. Do not con-
nect the repair kit to any other source.
●If gasoline splatters on the repair kit, the repair kit may deteriorate. Take care not to
allow gasoline to contact it.
●Store the emergency tire puncture repair kit in the trunk.
The kit may be thrown around during sudden braking and so forth, damaging the kit.
●Store the repair kit in the trunk out of reach of children.
●Do not disassemble or modify the repair kit. Do not subject parts such as the air pres-
sure indicator to impacts. This may cause a malfunction.
■To avoid damage to the tire pressure warning valves and transmitters (vehicles with
the tire pressure warning system)
When a tire is repaired with liquid sealants, the tire pressure warning valve and trans-
mitter may not operate properly. If a liquid sealant is used, contact any authorized
Lexus retailer or Lexus authorized repairer, or any reliable repairer or other qualified
service shop as soon as possible. Make sure to replace the tire pressure warning valve
and transmitter when repairin g or replacing the tire. (P. 473)
Page 616 of 676

6168-1. Specifications
GS350_200t_GS F_OM_OM30F83E_(EE)
GS350
GS200t
Engine
Model2GR-FKS
Type6-cylinder V type, 4-cycle, gasoline
Bore and stroke94.0 83.0 mm (3.70 3.27 in.)
Displacement3456 cm 3
(210.9 cu.in.)
Valve clearanceAutomatic adjustmentDrive belt tension
Model8AR-FTS
Type4-cylinder in line, 4-cycle, gasoline
(with turbocharger)
Bore and stroke86.0 86.0 mm (3.39 3.39 in.)
Displacement1998 cm 3
(121.9 cu.in.)
Valve clearanceAutomatic adjustmentDrive belt tension
Page 617 of 676

617
8
8-1. Specifications
Vehicle specifications
GS350_200t_GS F_OM_OM30F83E_(EE)
GS F
* : If unleaded gasoline with an octane rating of 98 RON is not available, unleaded gaso-
line with an octane rating of 95 RON may be used with no detriment to engine dura-
bility or driveability.
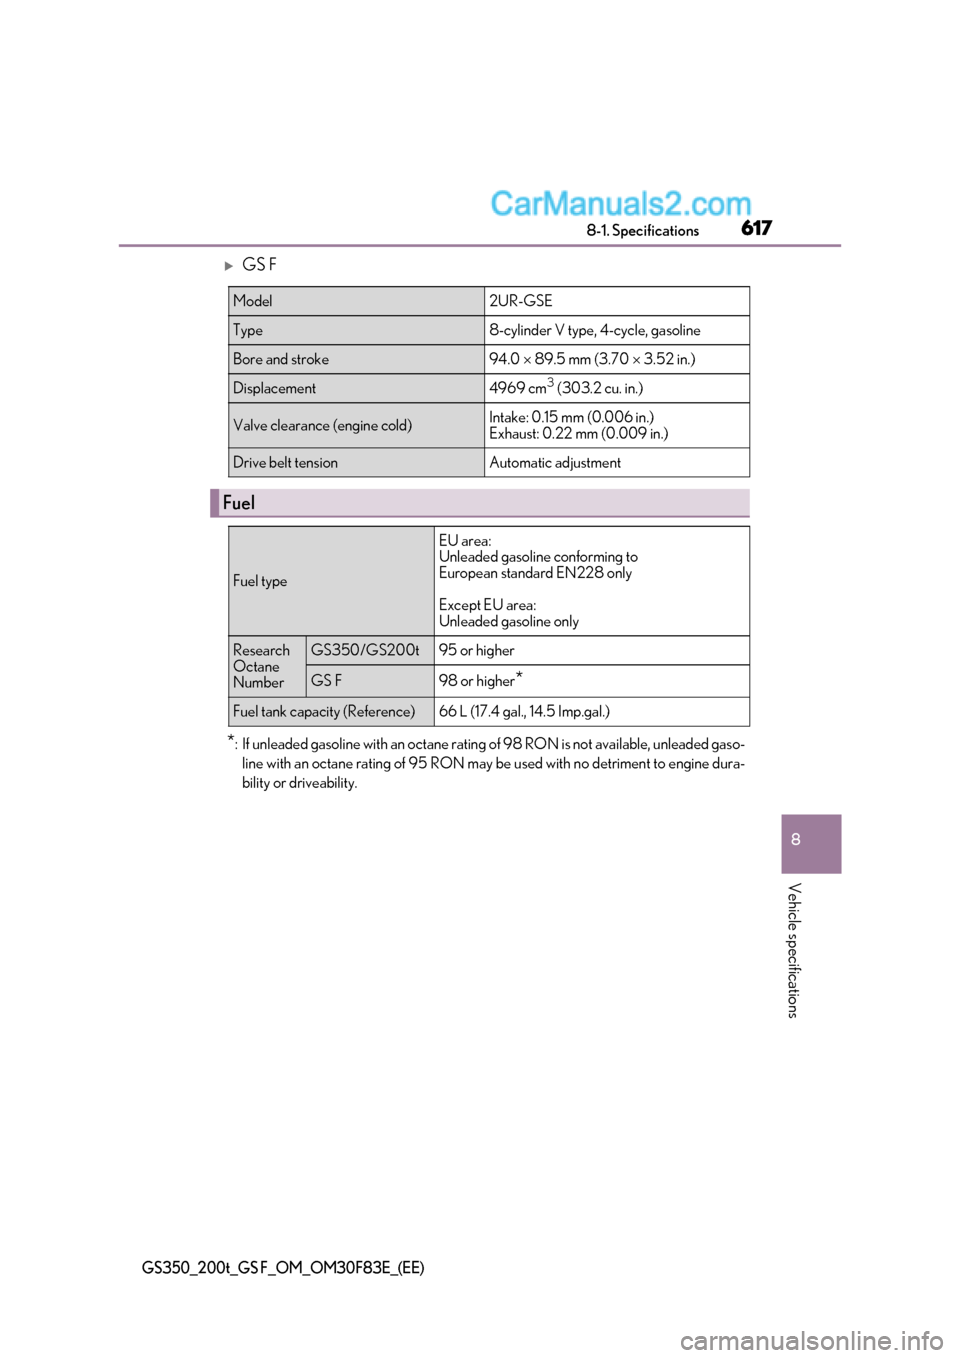
Model2UR-GSE
Type8-cylinder V type, 4-cycle, gasoline
Bore and stroke94.0 89.5 mm (3.70 3.52 in.)
Displacement4969 cm 3
(303.2 cu. in.)
Valve clearance (engine cold)Intake: 0.15 mm (0.006 in.)
Exhaust: 0.22 mm (0.009 in.)
Drive belt tensionAutomatic adjustment
Fuel
Fuel type
EU area:
Unleaded gasoline conforming to
European standard EN228 only
Except EU area:
Unleaded gasoline only
Research
Octane
NumberGS350/GS200t95 or higher
GS F98 or higher *
Fuel tank capacity (Reference)66 L (17.4 gal., 14.5 Imp.gal.)
Page 672 of 676

672Alphabetical index
GS350_200t_GS F_OM_OM30F83E_(EE)
LKA (Lane-Keeping Assist)
switch....................................................... 311
Meter control switches .......... 122, 130
Moon roof switches ........................... 217
Outside rear view mirror switches...................................................211
Paddle shift switches ........................ 248
Parking brake switches................... 256
Power door lock switch ...................162
Power window switches .................. 214
Rear sunshade switch........................431
Rear window and outside rear view mirror defoggers
switch.................................................... 402
Seat heater switches .......................... 412
Seat ventilator switches .................... 412
Snow mode switch ........................... 247
Talk switch *
Telephone switches *
Tilt and telescopic steering
control switch................................... 207
Tire pressure warning reset
switch.................................................... 474
Trunk closer switch .............................167
Trunk opener switch ......................... 166
Trunk opener main switch ............. 168
TVD (Torque Vectoring Differential) switch ......................... 373
Vehicle-to-vehicle distance button ....................................... 337, 349
VSC OFF switch ............................... 377
Window lock switch........................... 214
Windshield wipers and washer switch ......................... 276 Tachometer .....................................108, 113
Variable red zone ................................ 118
Tail lights................................................... 262
Light switch............................................262
Replacing light bulbs ....................... 504
Welcome light illumination control ...................................................160
Talk switch *
Telephone switches *
Theft deterrent system Alarm ...........................................................92
Double locking system ........................ 91
Engine immobilizer system ............. 86
Intrusion sensor and tilt sensor...... 95
Tire inflation pressure ......................... 485
Maintenance data ............................. 629
Tire inflation pressure display function ................................................473
Warning light......................................... 521
Warning message ............................ 524
Tire pressure warning system ......... 473
Function...................................................473
Initializing ................................................473
Installing tire pressure warning valves and transmitters ................473
Registering ID codes........................474
Warning light......................................... 521
Warning message ............................ 524T