buttons Lexus GS F 2017 Quick Guide
[x] Cancel search | Manufacturer: LEXUS, Model Year: 2017, Model line: GS F, Model: Lexus GS F 2017Pages: 96, PDF Size: 3.88 MB
Page 6 of 96
5
GS F_QG_OM30G10U_(U)
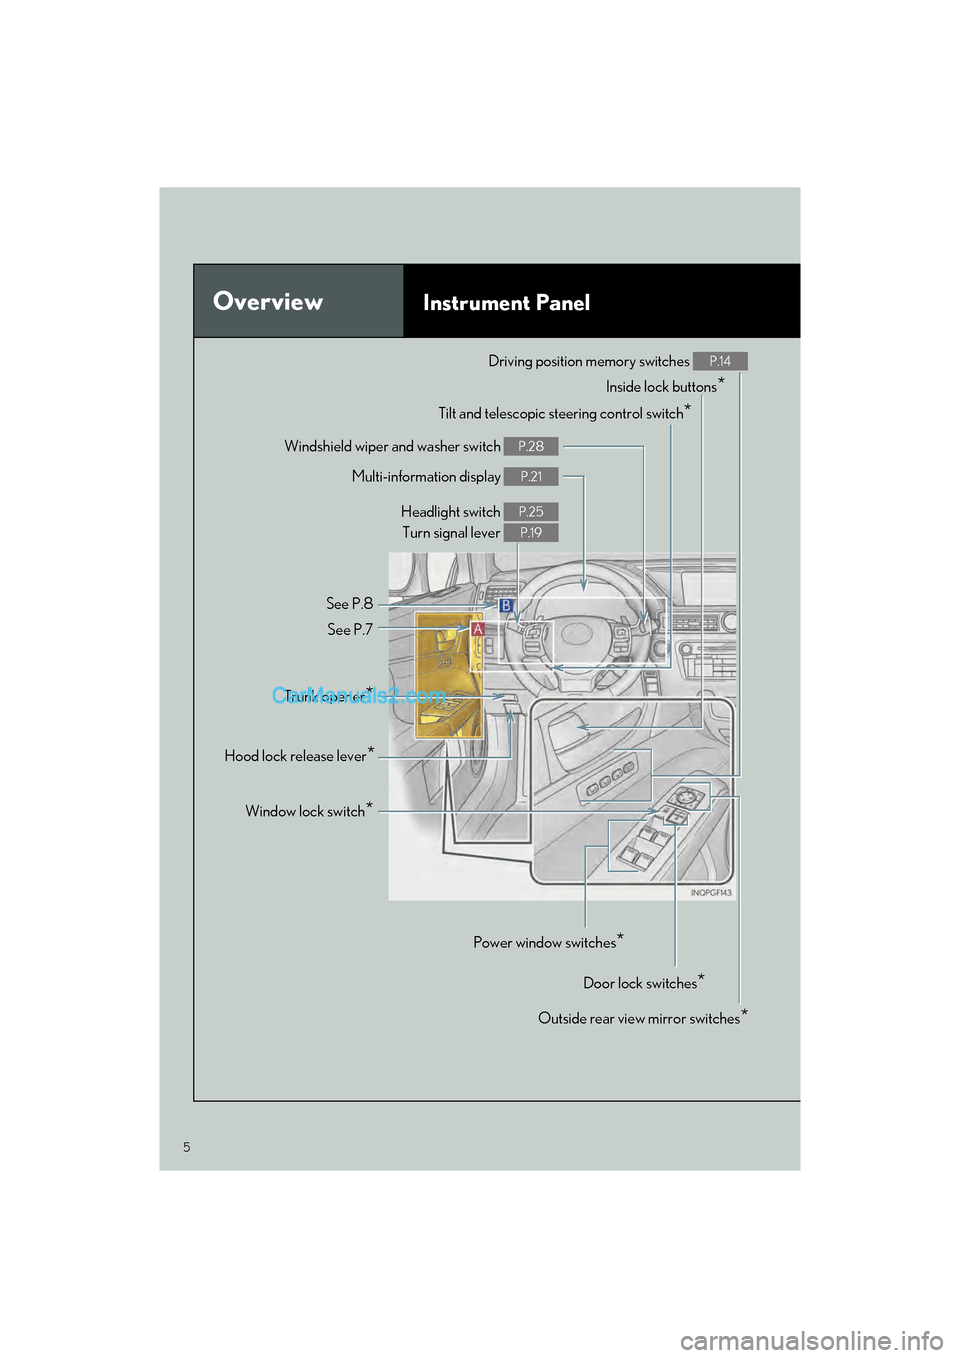
OverviewInstrument Panel
Windshield wiper and washer switch P.28
Multi-information display P.21
Headlight switch Turn signal lever P.25
P.19
See P.8
See P.7
Inside lock buttons*
Driving position memory switches P.14
Outside rear view mirror switches*
Door lock switches*
Power window switches*
Window lock switch*
Trunk opener*
Hood lock release lever*
Tilt and telescopic steering control switch*
Page 15 of 96
14
GS F_QG_OM30G10U_(U)
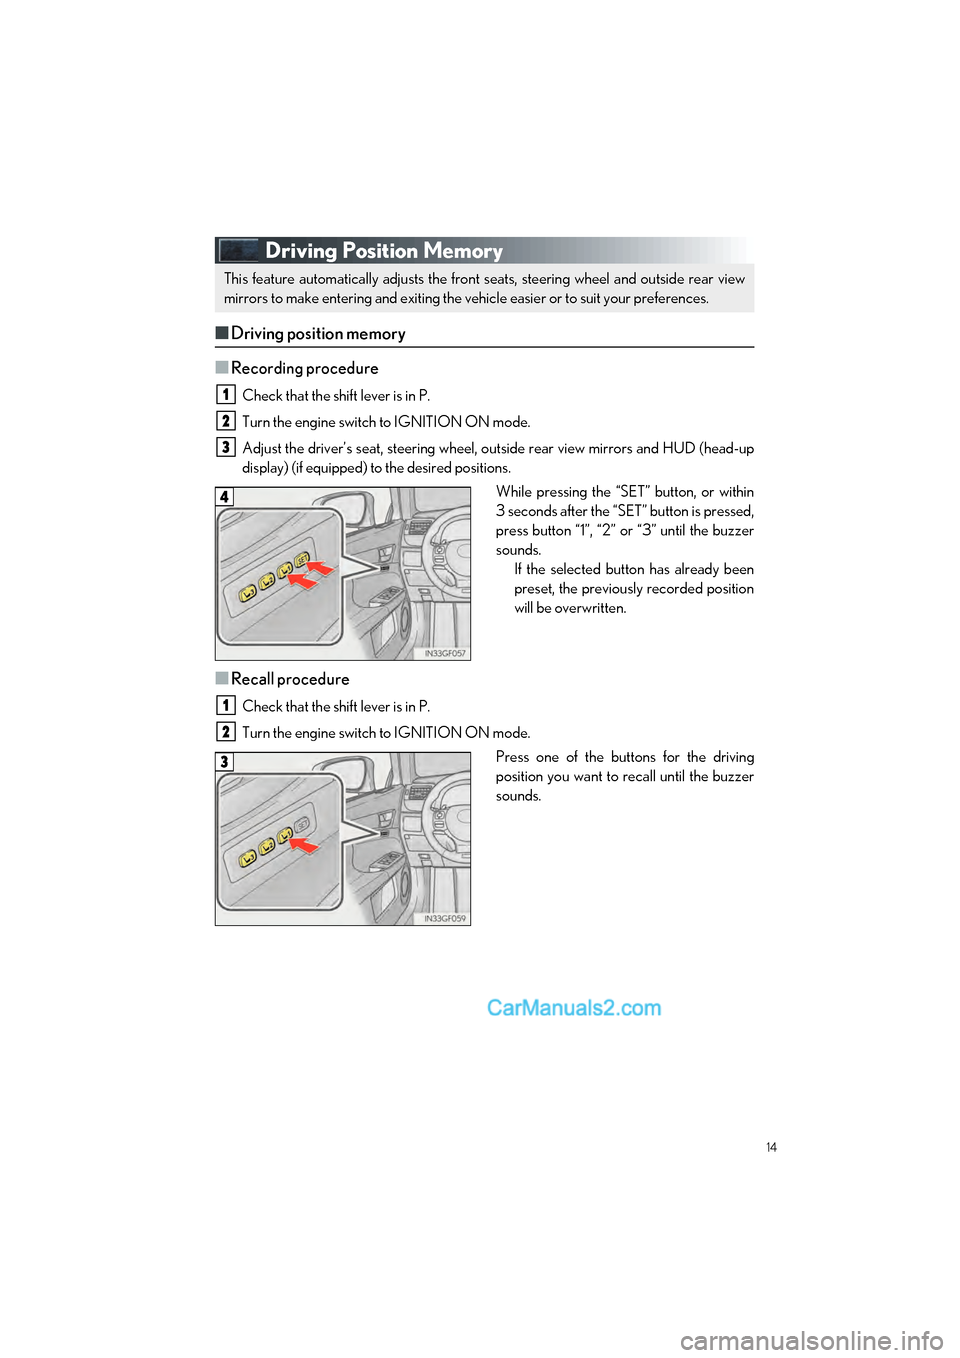
Driving Position Memory
■Driving position memory
■
Recording procedure
Check that the shift lever is in P.
Turn the engine switch to IGNITION ON mode.
Adjust the driver’s seat, steering wheel, outside rear view mirrors and HUD (head-up
display) (if equipped) to the desired positions. While pressing the “SET” button, or within
3 seconds after the “SET” button is pressed,
press button “1”, “2” or “3” until the buzzer
sounds.If the selected button has already been
preset, the previously recorded position
will be overwritten.
■Recall procedure
Check that the shift lever is in P.
Turn the engine switch to IGNITION ON mode.
Press one of the buttons for the driving
position you want to recall until the buzzer
sounds.
This feature automatically adjusts the front seats, steering wheel and outside rear view
mirrors to make entering and exiting the vehicle easier or to suit your preferences.
1
2
3
4
1
2
3
Page 47 of 96
46
GS F_QG_OM30G10U_(U)
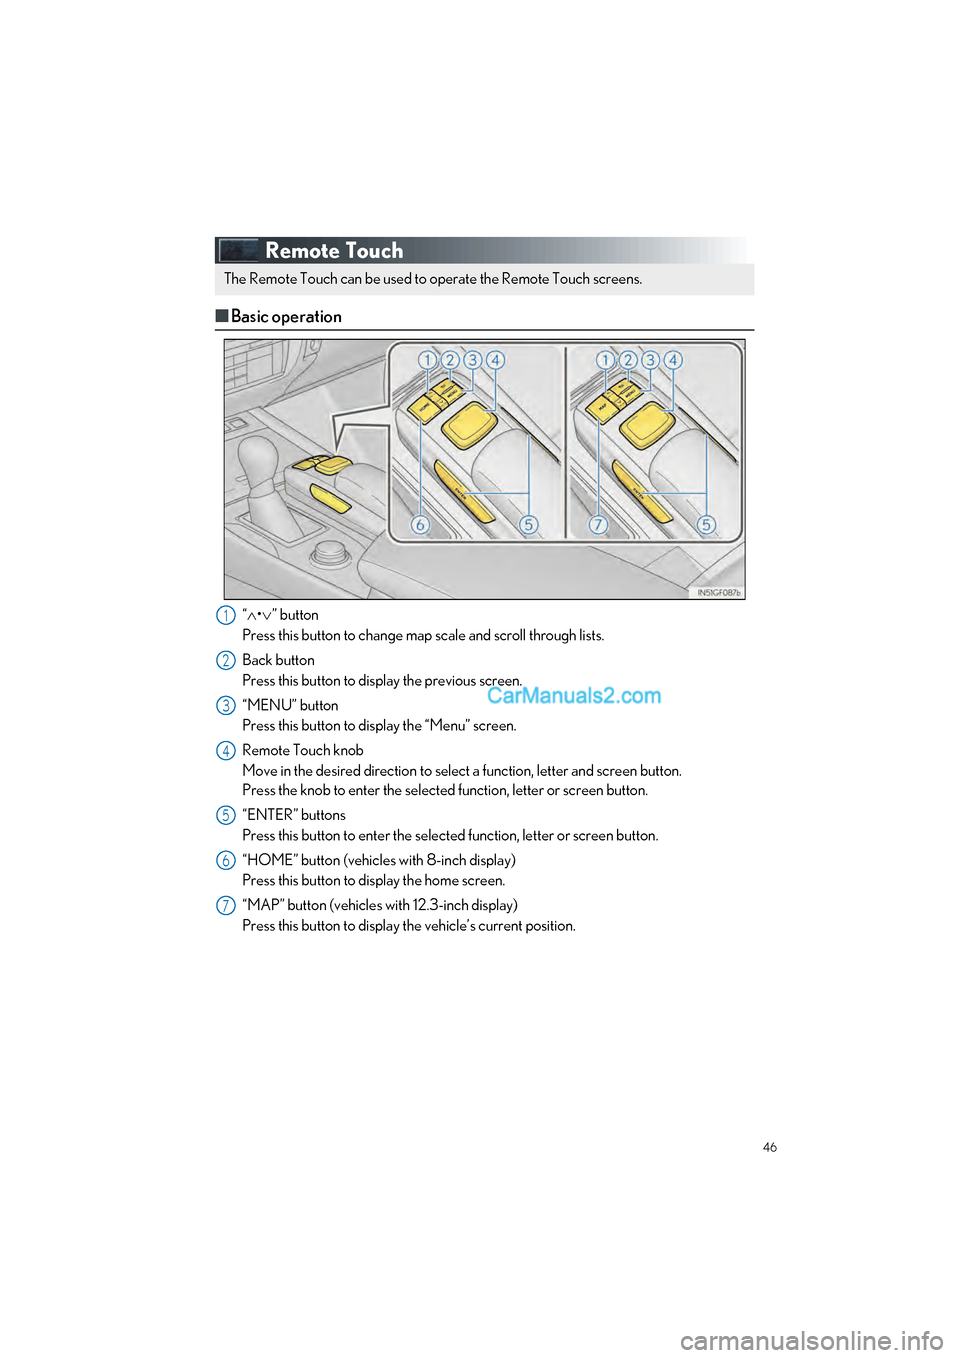
Remote Touch
■Basic operation
“ • ” button
Press this button to change map scale and scroll through lists.
Back button
Press this button to display the previous screen.
“MENU” button
Press this button to display the “Menu” screen.
Remote Touch knob
Move in the desired direction to select a function, letter and screen button.
Press the knob to enter the selected function, letter or screen button.
“ENTER” buttons
Press this button to enter the selected function, letter or screen button.
“HOME” button (vehicles with 8-inch display)
Press this button to display the home screen.
“MAP” button (vehicles with 12.3-inch display)
Press this button to display the vehicle’s current position.
The Remote Touch can be used to operate the Remote Touch screens.
1
2
3
4
5
6
7
Page 61 of 96
60
GS F_QG_OM30G10U_(U)
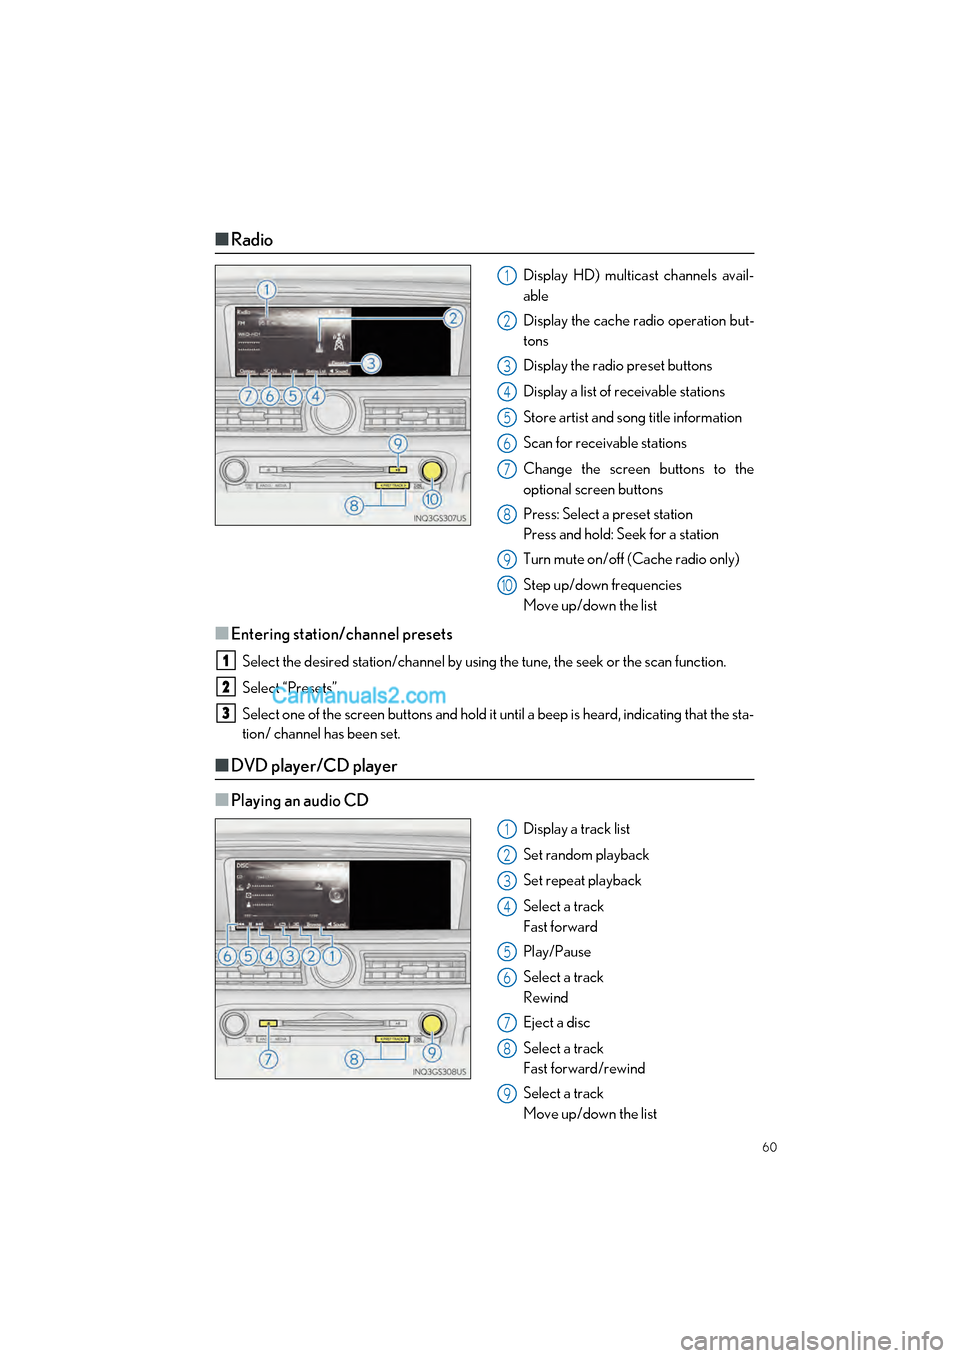
■Radio
Display HD) multicast channels avail-
able
Display the cache radio operation but-
tons
Display the radio preset buttons
Display a list of receivable stations
Store artist and song title information
Scan for receivable stations
Change the screen buttons to the
optional screen buttons
Press: Select a preset station
Press and hold: Seek for a station
Turn mute on/off (Cache radio only)
Step up/down frequencies
Move up/down the list
■Entering station/channel presets
Select the desired station/channel by using the tune, the seek or the scan function.
Select “Presets”.
Select one of the screen buttons and hold it until a beep is heard, indicating that the sta-
tion/ channel has been set.
■DVD player/CD player
■
Playing an audio CD
Display a track list
Set random playback
Set repeat playback
Select a track
Fast forward
Play/Pause
Select a track
Rewind
Eject a disc
Select a track
Fast forward/rewind
Select a track
Move up/down the list
1
2
3
4
5
6
7
8
9
10
1
2
3
1
2
3
4
5
6
7
8
9
Page 76 of 96
75
GS F_QG_OM30G10U_(U)
Portable Audio Device Ports
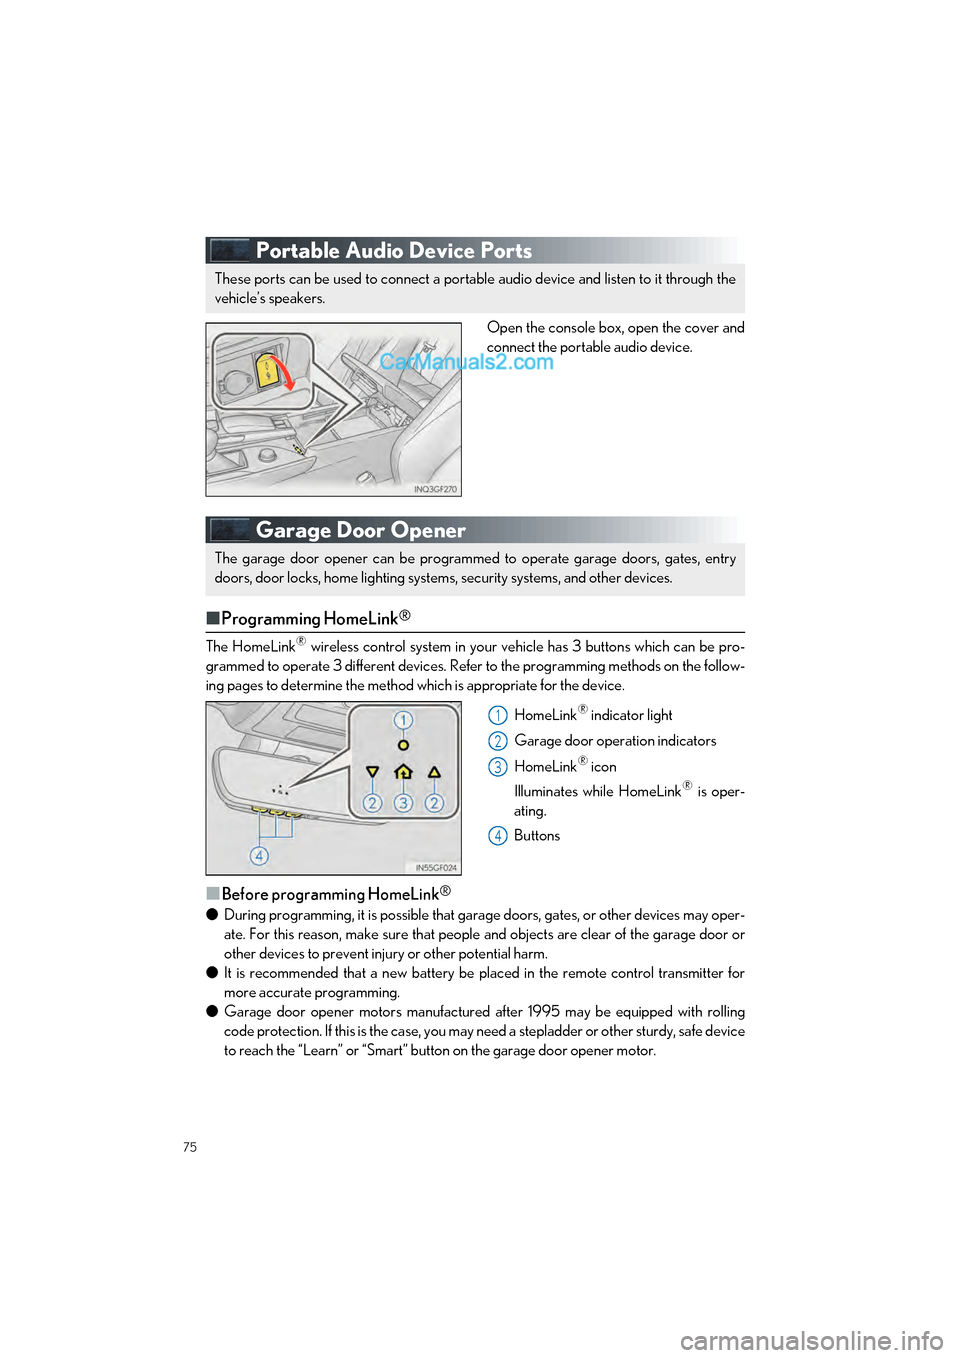
Open the console box, open the cover and
connect the portable audio device.
Garage Door Opener
■Programming HomeLink®
The HomeLink® wireless control system in your ve hicle has 3 buttons which can be pro-
grammed to operate 3 different devices. Refer to the programming methods on the follow-
ing pages to determine the method which is appropriate for the device.
HomeLink
® indicator light
Garage door operation indicators
HomeLink
® icon
Illuminates while HomeLink
® is oper-
ating.
Buttons
■Before programming HomeLink®
● During programming, it is possible that garage doors, gates, or other devices may oper-
ate. For this reason, make sure that people and objects are clear of the garage door or
other devices to prevent inju ry or other potential harm.
● It is recommended that a new battery be placed in the remote control transmitter for
more accurate programming.
● Garage door opener motors manufactured after 1995 may be equipped with rolling
code protection. If this is the case, you may need a stepladder or other sturdy, safe device
to reach the “Learn” or “Smart” button on the garage door opener motor.
These ports can be used to connect a portable audio device and listen to it through the
vehicle’s speakers.
The garage door opener can be programmed to operate garage doors, gates, entry
doors, door locks, home lighting system s, security systems, and other devices.
1
2
3
4
Page 77 of 96
76
GS F_QG_OM30G10U_(U)
■Programming HomeLink®
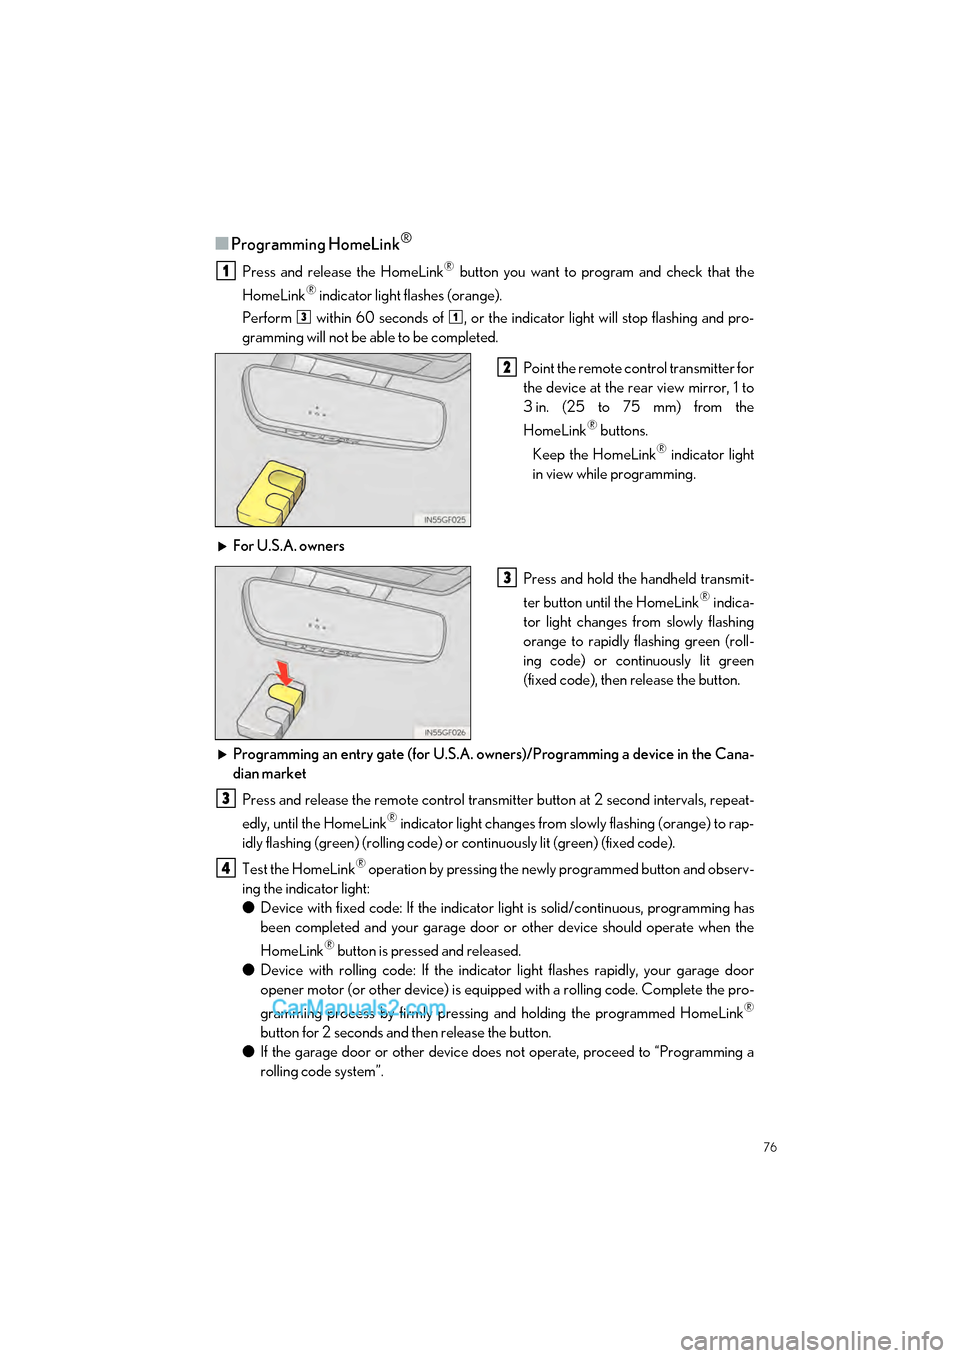
Press and release the HomeLink® button you want to program and check that the
HomeLink
® indicator light flashes (orange).
Perform within 60 seconds of , or the indicator light will stop flashing and pro-
gramming will not be able to be completed.
Point the remote control transmitter for
the device at the rear view mirror, 1 to
3 in. (25 to 75 mm) from the
HomeLink
® buttons.
Keep the HomeLink
® indicator light
in view while programming.
For U.S.A. owners Press and hold the handheld transmit-
ter button until the HomeLink
® indica-
tor light changes from slowly flashing
orange to rapidly flashing green (roll-
ing code) or contin uously lit green
(fixed code), then release the button.
Programming an entry gate (for U.S.A. owners)/Programming a device in the Cana-
dian market Press and release the remote control transmitter button at 2 second intervals, repeat-
edly, until the HomeLink
® indicator light changes from slowly flashing (orange) to rap-
idly flashing (green) (rolling code) or continuously lit (green) (fixed code).
Test the HomeLink
® operation by pressing the newly programmed button and observ-
ing the indi cator light:
● Device with fixed code: If the indicator light is solid/continuous, programming has
been completed and your garage door or other device should operate when the
HomeLink
® button is pressed and released.
● Device with rolling code: If the indicator light flashes rapidly, your garage door
opener motor (or other device) is equipped with a rolling code. Complete the pro-
gramming process by firmly pressing and holding the programmed HomeLink
®
button for 2 seconds and then release the button.
● If the garage door or other device does not operate, proceed to “Programming a
rolling code system”.
1
31
2
3
3
4
Page 78 of 96
77
GS F_QG_OM30G10U_(U)
Repeat the steps above to program another device for any of the remaining
HomeLink
® buttons.
■Programming a rolling code system
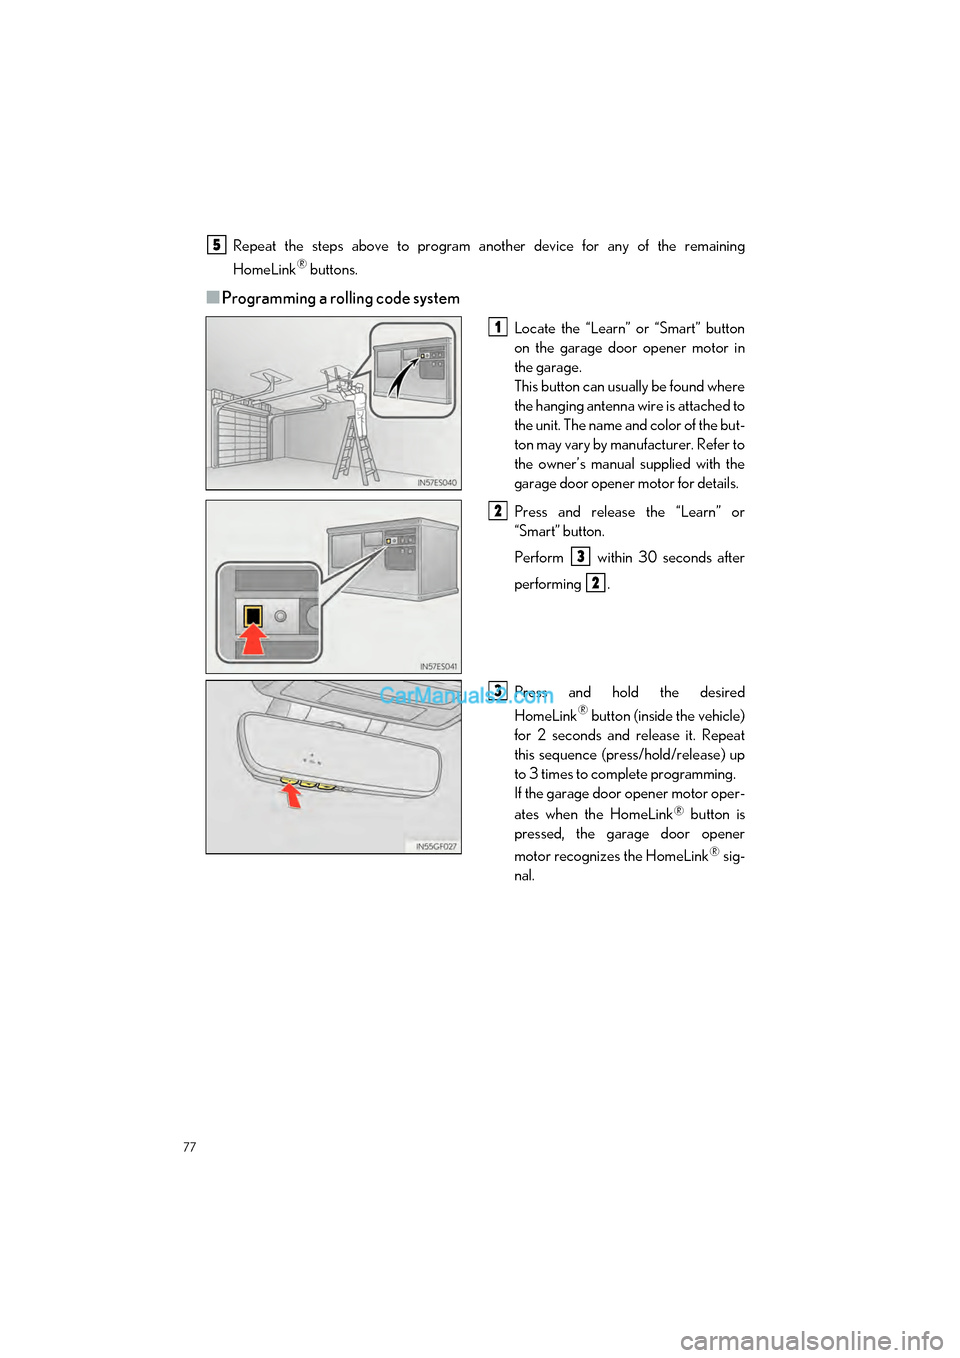
Locate the “Learn” or “Smart” button
on the garage door opener motor in
the garage.
This button can usually be found where
the hanging antenna wire is attached to
the unit. The name and color of the but-
ton may vary by manufacturer. Refer to
the owner’s manual supplied with the
garage door opener motor for details.
Press and release the “Learn” or
“Smart” button.
Perform within 30 seconds after
performing .
Press and hold the desired
HomeLink
® button (inside the vehicle)
for 2 seconds and release it. Repeat
this sequence (press/hold/release) up
to 3 times to complete programming.
If the garage door opener motor oper-
ates when the HomeLink
® button is
pressed, the garage door opener
motor recognizes the HomeLink
® sig-
nal.
5
1
2
3
2
3
Page 79 of 96
78
GS F_QG_OM30G10U_(U)
■Enabling 2-way communication with a garage door (only available for compat-
ible devices)
When enabled, 2-way communication allows you to check the status of the opening and
closing of a garage door through indicators in your vehicle.
2-way communication is only available if the garage door opener motor used is a compati-
ble device. (To check device compat ibility, refer to www.HomeLink.com.)
Within 5 seconds after programming the garage door opener has been completed, if
the garage door opener motor is trained to HomeLink
®, both garage door operation
indicators will flash rapidly (green) and the light on the garage door opener motor will
blink twice, indicating that 2-way communication is enabled.
If the indicators do not flash, perform and within the first 10 presses of the
HomeLink
® button after programming has been completed.
Press a programmed HomeLink
® button to operate a garage door.
Within 1 minute of pressing the HomeLink
® button, after the garage door operation
has stopped, press the “Learn” or “Smart” button on the garage door opener motor.
Within 5 seconds of the establishment of 2-way communication with the garage door
opener, both garage door operation indicator s in the vehicle will flash rapidly (green)
and the light on the garage d oor opener motor will blink tw ice, indicating that 2-way
communication is enabled.
■Reprogramming a single HomeLink® button
When the following procedure is performed, buttons which already have devices registered
to them can be overwritten:
With one hand, press and hold the desired HomeLink
® button.
When the HomeLink
® indicator starts flashing (orange), continue to hold the
HomeLink
® button and perform “Programming HomeLink®” (it takes 20 seconds
for the HomeLink
® indicator to start flashing).
■ Operating HomeLink®
Press the appropriate HomeLink® button. The HomeLink® indicator light should turn on.
1
23
2
3
1
2
1