ESP Lexus GS F 2019 s Workshop Manual
[x] Cancel search | Manufacturer: LEXUS, Model Year: 2019, Model line: GS F, Model: Lexus GS F 2019Pages: 600, PDF Size: 13.04 MB
Page 364 of 600
364
GS F_OM_OM30G90U_(U)6-1. Maintenance and care
NOTICE
■Cleaning detergents
●Do not use the following types of detergent,
as they may discolor the vehicle interior
or cause streaks or damage to painted surfaces:
• Non-seat portions: Organic substances su ch as benzene or gasoline, alkaline or
acidic solutions, dye, and bleach
• Seats: Alkaline or acidic solutions, su ch as thinner, benzene, and alcohol
●Do not use polish wax or polish cleaner. The instrument pane l’s or other interior part’s
painted surface may be damaged.
■Preventing damage to leather surfaces
Observe the following precautions to avoid damage to and deterioration of leather
surfaces:
●Remove any dust or dirt from leather surfaces immediately.
●Do not expose the vehicle to direct sunlight for extended periods of time. Park the
vehicle in the shade, especially during summer.
●Do not place items made of vinyl, plastic, or containing wax on the upholstery, as they
may stick to the leather su rface if the vehicle interior heats up significantly.
■Water on the floor
Do not wash the vehicle floor with water.
Vehicle systems such as the audio system ma y be damaged if water comes into contact
with electrical components such as the au dio system above or under the floor of the
vehicle. Water may also cause the body to rust.
■When cleaning the inside of the windshie ld (vehicles with Lexus Safety System+)
Do not allow glass cleaner to contact the lens. Also, do not touch the lens. ( P. 234)
■Cleaning the inside of the rear window
●Do not use glass cleaner to clean the rear window, as this may cause damage to the
rear window defogger heater wires or antenna. Use a cloth dampened with luke-
warm water to gently wipe the window clean. Wipe th e window in strokes running
parallel to the heater wires or antenna.
●Be careful not to scratch or damage the heater wires or antenna.
Page 440 of 600
4407-2. Steps to take in an emergency
GS F_OM_OM30G90U_(U)
WARNING
■Maintenance of the tires
Each tire, including the spare (if provided), should be checked monthly when cold and
inflated to the inflation pressure recomm ended by the vehicle manufacturer on the
vehicle placard or tire inflation pressure label (tire and load information label). (If your
vehicle has tires of a different size than the size indicated on the vehicle placard or tire
inflation pressure label [tire and load in formation label], you should determine the
proper tire inflation pressure for those tires.)
As an added safety feature, your vehicle ha s been equipped with a tire pressure moni-
toring system (TPMS-tire pressure warning system) that illuminates a low tire pressure
telltale (tire pressure warning light) when on e or more of your tires is significantly
under-inflated. Accordingly, when the low ti re pressure telltale (tire pressure warning
light) illuminates, you should stop and check your tires as soon as possible, and inflate
them to the proper pressure. Driving on a si gnificantly under-inflated tire causes the
tire to overheat and can lead to tire failure . Under-inflation also reduces fuel efficiency
and tire tread life, and may affect the vehicle’s handling and stopping ability.
Please note that the TPMS (tire pressure wa rning system) is not a substitute for proper
tire maintenance, and it is th e driver’s responsibility to ma intain correct tire pressure,
even if under-inflation has not reached the le vel to trigger illumination of the TPMS low
tire pressure telltale (tir e pressure warning light).
Your vehicle has also been equipped with a TPMS (tire pressure warning system) mal-
function indicator to indicate when the system is not operating properly. The TPMS
(tire pressure warning system) malfunction indi cator is combined with the low tire pres-
sure telltale (tire pressure warning light). When the system detects a malfunction, the
telltale will flash for approximately one mi nute and then remain continuously illumi-
nated. This sequence will cont inue upon subsequent vehicle start-ups as long as the
malfunction exists. When the malfunction in dicator is illuminated, the system may not
be able to detect or signal low tire pressure as intended.
TPMS (tire pressure warning system) malfun ctions may occur for a variety of reasons,
including the installation of replacement or alternate tires or wheels on the vehicle that
prevent the TPMS (tire pressure warning system) from functioning properly. Always
check the TPMS (tire pressure warning system) malfunction telltale after replacing one
or more tires or wheels on your vehicle to ensure that the replacement or alternate
tires and wheels allow the TPMS (tire pressu re warning system) to continue to function
properly.
NOTICE
■To ensure the tire pressure warning system operates properly
Do not install tires with differ ent specifications or markers, as the tire pressure warning
system may not operate properly.
Page 463 of 600
4637-2. Steps to take in an emergency
GS F_OM_OM30G90U_(U)
7
When trouble arises
*: Refer to the separate “Scheduled Mainte nance” or “Owner’s Manual Supplement”
for the maintenance interval applicable to your vehicle.
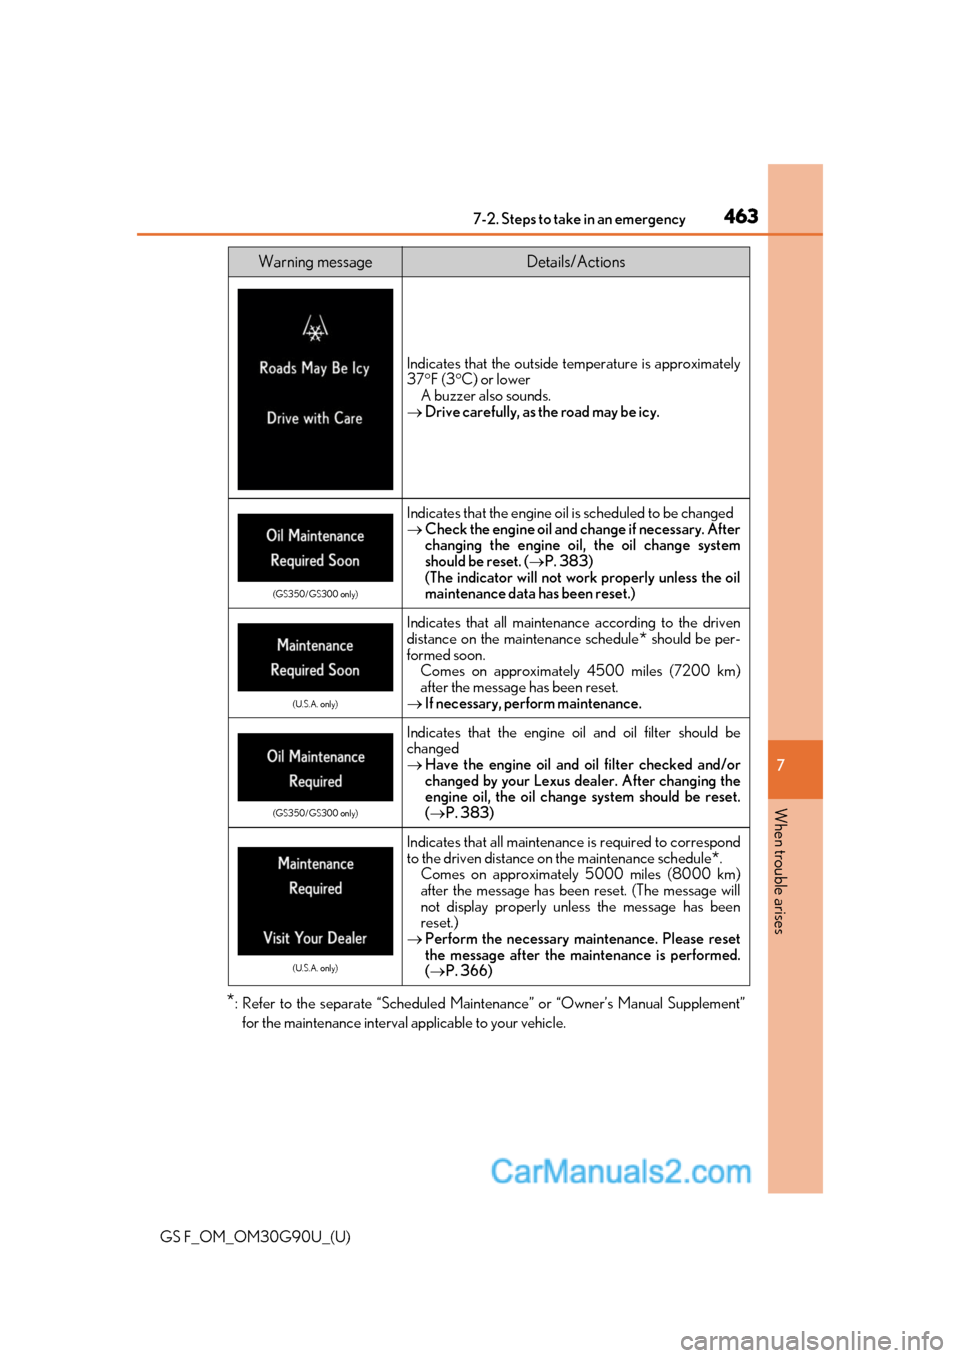
Indicates that the outside temperature is approximately
37 F (3 C) or lower
A buzzer also sounds.
Drive carefully, as the road may be icy.
(GS350/GS300 only)
Indicates that the engine oil is scheduled to be changed
Check the engine oil and change if necessary. After
changing the engine oil, the oil change system
should be reset. ( P. 383)
(The indicator will not work properly unless the oil
maintenance data has been reset.)
(U.S.A. only)
Indicates that all maintenance according to the driven
distance on the maintenance schedule
* should be per-
formed soon. Comes on approximately 4500 miles (7200 km)
after the message has been reset.
If necessary, perform maintenance.
(GS350/GS300 only)
Indicates that the engine o il and oil filter should be
changed
Have the engine oil and oil filter checked and/or
changed by your Lexus dealer. After changing the
engine oil, the oil change system should be reset.
( P. 383)
(U.S.A. only)
Indicates that all maintenanc e is required to correspond
to the driven distance on the maintenance schedule
*.
Comes on approximately 5000 miles (8000 km)
after the message has been reset. (The message will
not display properly unless the message has been
reset.)
Perform the necessary maintenance. Please reset
the message after the maintenance is performed.
( P. 366)
Warning messageDetails/Actions
Page 494 of 600
4947-2. Steps to take in an emergency
GS F_OM_OM30G90U_(U)
■Emergency tire puncture repair kit
●The sealant has a limited lifespan. The expiry date is shown on the bottle. The sealant
should be replaced before the expiry date. Contact your Lexus dealer for replacement.
●The sealant stored in the emergency tire puncture repair kit can be used only once to
temporarily repair a single tire. If the sealant has been used and need to be purchased,
contact your Lexus dealer.
●The sealant can be used when the outside temperature is from -40 F (-40 C) to
140 F (60 C).
●The repair kit is exclusively designed for size and type of tires originally installed on your
vehicle. Do not use it for tires that a differen t size than the original ones, or for any other
purposes.
●If the sealant gets on yo ur clothes, it may stain.
●If the sealant adheres to a wheel or the surface of the vehicle body, the stain may not be
removable if it is not cleaned at once. Immediately wipe away the sealant with a wet
cloth.
●During operation of the repair kit, a loud operation noise is produced. This does not
indicate a malfunction.
●Do not use the emergency tire puncture repair kit to check or to adjust the tire pres-
sure.
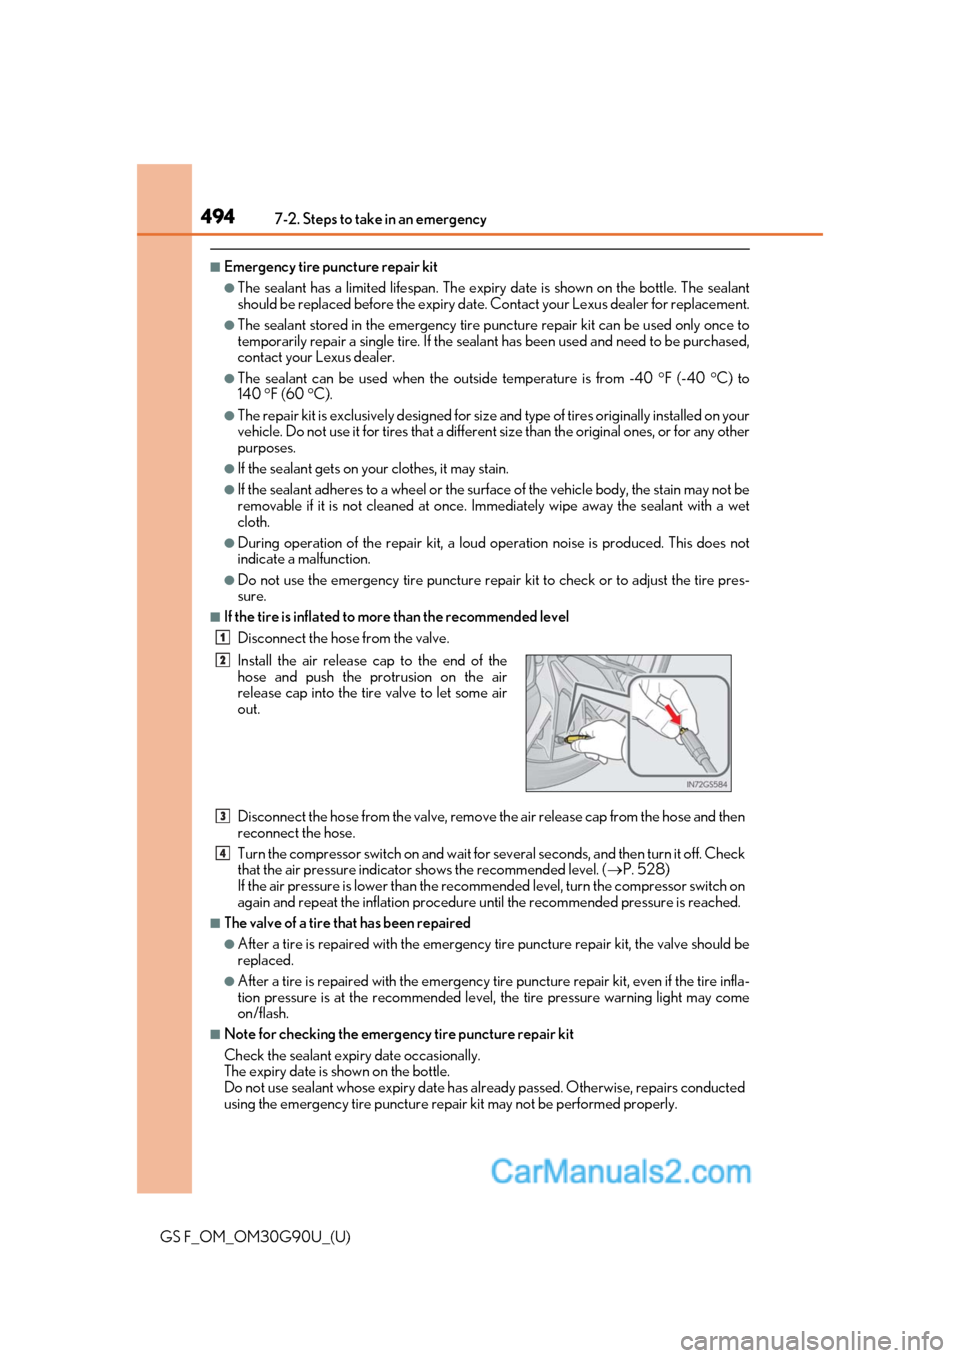
■If the tire is inflated to mo re than the recommended level
Disconnect the hose from the valve.
Disconnect the hose from the valve, remove the air releas e cap from the hose and then
reconnect the hose.
Turn the compressor switch on and wait for several seconds, and then turn it off. Check
that the air pressure indicator shows the recommended level. ( P. 528)
If the air pressure is lower than the reco mmended level, turn the compressor switch on
again and repeat the inflation procedure un til the recommended pressure is reached.
■The valve of a tire that has been repaired
●After a tire is repaired with the emergency tire puncture repair kit, the valve should be
replaced.
●After a tire is repaired with the emergency tire puncture repair kit, even if the tire infla-
tion pressure is at the recommended level, the tire pressure warning light may come
on/flash.
■Note for checking the emergency tire puncture repair kit
Check the sealant expi ry date occasionally.
The expiry date is shown on the bottle.
Do not use sealant whose expiry date has al ready passed. Otherwise, repairs conducted
using the emergency tire puncture repa ir kit may not be performed properly.
Install the air release cap to the end of the
hose and push the protrusion on the air
release cap into the tire valve to let some air
out.
1
2
3
4
Page 496 of 600
4967-2. Steps to take in an emergency
GS F_OM_OM30G90U_(U)
WARNING
■Driving to spread the liquid sealant evenly
●Drive the vehicle carefully at a low speed. Be especially careful when turning and cor-
nering.
●If the vehicle does not drive straight or you feel a pull through the steering wheel, stop
the vehicle and check the following:
• Tire condition. The tire may have separated from the wheel.
• Tire inflation pressure. If tire inflation pressure is 19 psi (130 kPa, 1.3 kgf/cm
2 or
bar) or less, the tire may be severely damaged.
NOTICE
■When performing an emergency repair
●Perform the emergency repair without removi ng the nail or screw that has punctured
the tread of the tire. If the object that has punctured the tire is removed, repair by the
emergency tire puncture repair kit may not be possible.
●The repair kit is not waterproof. Make sure that the repair kit is not exposed to water,
such as when it is be ing used in the rain.
●Do not put the repair kit directly onto dusty ground such as sand at the side of the
road. If the repair kit vacuums up dust etc., a malfunction may occur.
■Handling the emergency tire puncture repair kit
●The repair kit power source should be 12 V DC suitable for vehicle use. Do not con-
nect the repair kit to any other source.
●If gasoline splatters on the repair kit, the repair kit may deteriorate. Take care not to
allow gasoline to contact it.
●Store the emergency tire puncture repair kit in the trunk.
The kit may be thrown around during sudden braking and so forth, damaging the kit.
●Store the repair kit in the tr unk out of reach of children.
●Do not disassemble or modify the repair kit. Do not subject parts such as the air pres-
sure indicator to impacts. This may cause a malfunction.
■To avoid damage to the tire pressu re warning valves and transmitters
When a tire is repaired with liquid sealants, the tire pressure warning valve and trans-
mitter may not operate properly. If a liquid sealant is used, contact your Lexus dealer or
other qualified service shop as soon as possible. Make sure to replace the tire pressure
warning valve and transmitter when replacing the tire. ( P. 394)
Page 507 of 600
5077-2. Steps to take in an emergency
GS F_OM_OM30G90U_(U)
7
When trouble arises
■Starting the engine when the battery is discharged
The engine cannot be started by push-starting.
■To prevent battery discharge
●Turn off the headlights and the audio system while the engine is off.
●Turn off any unnecessary electrical components when the vehicle is running at a low
speed for an extended period , such as in heavy traffic.
■Charging the battery
The electricity stored in the battery will disc harge gradually even when the vehicle is not
in use, due to natural discharge and the draini ng effects of certain electrical appliances. If
the vehicle is left for a long time, the battery may discharge, and the engine may be
unable to start. (The battery recharges automatically during driving.)
■When recharging or replacing the battery
●In some cases, it may not be possible to un lock the doors using the smart access system
with push-button start when the battery is discharged. Use the wireless remote control
or the mechanical key to lock or unlock the doors.
●The engine may not start on the first attempt after the battery has recharged but will
start normally after the second attempt. This is not a malfunction.
●The engine switch mode is memorized by the vehicle. When the battery is recon-
nected, the system will return to the mode it was in before the battery was discharged.
Before disconnecting the battery, turn the engine switch off.
If you are unsure what mode the engine switch was in before the battery discharged, be
especially careful when reconnecting the battery.
Page 513 of 600
5137-2. Steps to take in an emergency
GS F_OM_OM30G90U_(U)
7
When trouble arises
WARNING
■When inspecting under the hood of your vehicle
Observe the following precautions.
Failure to do so may result in serious injury such as burns.
●If steam is seen coming from under the h ood, do not open the hood until the steam
has subsided. The engine compartment may be very hot.
●Keep hands and clothing (especially a tie, a scarf or a muffler) away from the fans and
belts. Failure to do so may cause the hands or clothing to be caught, resulting in seri-
ous injury.
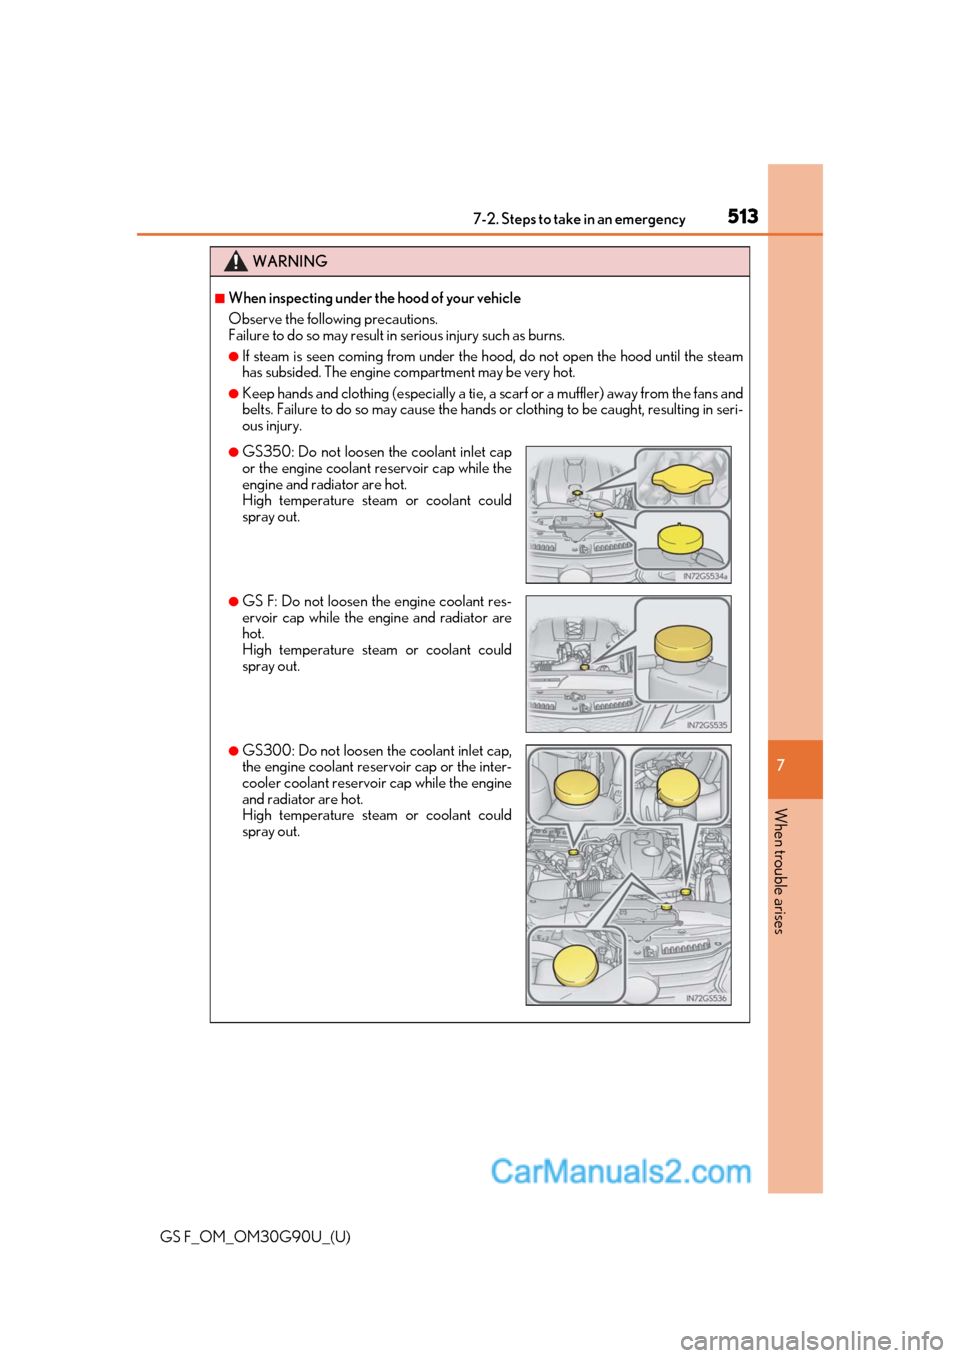
●GS350: Do not loosen the coolant inlet cap
or the engine coolant reservoir cap while the
engine and radiator are hot.
High temperature steam or coolant could
spray out.
●GS F: Do not loosen the engine coolant res-
ervoir cap while the engine and radiator are
hot.
High temperature steam or coolant could
spray out.
●GS300: Do not loosen the coolant inlet cap,
the engine coolant rese rvoir cap or the inter-
cooler coolant reservoir cap while the engine
and radiator are hot.
High temperature steam or coolant could
spray out.
Page 540 of 600
540
GS F_OM_OM30G90U_(U)8-1. Specifications
■Temperature A, B, C
The temperature grades are A (the highes
t), B, and C, representing the tire’s
resistance to the generation of heat and its ability to dissipate heat when
tested under controlled conditions on a specified indoor laboratory test
wheel.
Sustained high temperature can cause the ma terial of the tire to degenerate and
reduce tire life, and excessive temperature can lead to sudden tire failure.
Grade C corresponds to a level of perfor mance which all passenger car tires must
meet under the Federal Motor Vehicle Safety Standard No. 109.
Grades B and A represent higher levels of performance on the laboratory test
wheel than the minimum required by law.
Warning: The temperature grades of a tire assume that it is properly inflated and
not overloaded.
Excessive speed, underi nflation, or excessive loading, either separately or in com-
bination, can cause heat buildup and possible tire failure.
Glossary of tire terminology
Tire related termMeaning
Cold tire inflation pressure
Tire pressure when the vehicle has been parked for
three hours or more, or has not been driven more than 1
mile or 1.5 km un der that condition
Maximum inflation pres-
sureThe maximum cold inflated pr essure to which a tire may
be inflated, shown on the sidewall of the tire
Recommended inflation
pressureCold tire inflation pressure recommended by a manu-
facturer
Accessory weight
The combined weight (in exce ss of those standard items
which may be replaced) of automatic transmission,
power steering, power brakes, power windows, power
seats, radio and heater, to the extent that these items are
available as factory-installed equipment (whether
installed or not)
Curb weight
The weight of a motor vehicle with standard equipment,
including the maximum capacity of fuel, oil and coolant,
and if so equipped, air co nditioning and additional
weight optional engine
Maximum loaded vehicle
weight
The sum of:
(a) Curb weight
(b) Accessory weight
(c) Vehicle capacity weight
(d) Production options weight
Normal occupant weight150 lb. (68 kg) times the numb er of occupants specified
in the second column of Table 1
* that follows
Page 542 of 600
542
GS F_OM_OM30G90U_(U)8-1. Specifications
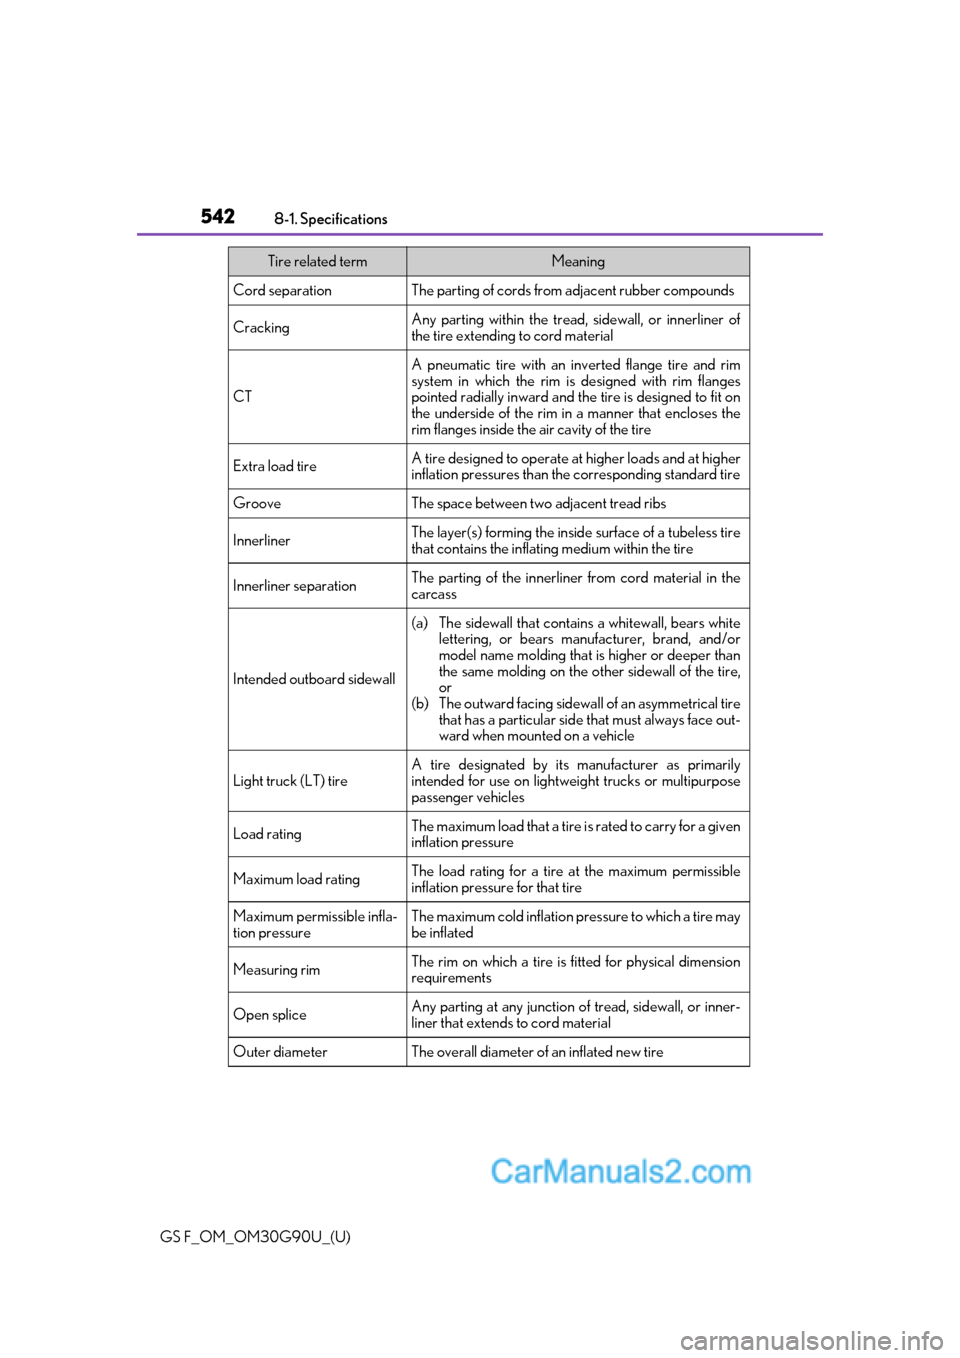
Cord separationThe parting of cords from adjacent rubber compounds
CrackingAny parting within
the tread, sidewall, or innerliner of
the tire extending to cord material
CT
A pneumatic tire with an inverted flange tire and rim
system in which the rim is designed with rim flanges
pointed radially inward and the tire is designed to fit on
the underside of the rim in a manner that encloses the
rim flanges inside the air cavity of the tire
Extra load tireA tire designed to operate at higher loads and at higher
inflation pressures than the corresponding standard tire
GrooveThe space between two adjacent tread ribs
InnerlinerThe layer(s) forming the insi de surface of a tubeless tire
that contains the inflating medium within the tire
Innerliner separationThe parting of the innerliner from cord material in the
carcass
Intended outboard sidewall
(a) The sidewall that contains a whitewall, bears white lettering, or bears manufacturer, brand, and/or
model name molding that is higher or deeper than
the same molding on the ot her sidewall of the tire,
or
(b) The outward facing sidewa ll of an asymmetrical tire
that has a particular side that must always face out-
ward when mounted on a vehicle
Light truck (LT) tireA tire designated by its manufacturer as primarily
intended for use on lightweig ht trucks or multipurpose
passenger vehicles
Load ratingThe maximum load that a tire is rated to carry for a given
inflation pressure
Maximum load ratingThe load rating for a tire at the maximum permissible
inflation pressure for that tire
Maximum permissible infla-
tion pressureThe maximum cold inflation pr essure to which a tire may
be inflated
Measuring rimThe rim on which a tire is fitted for physical dimension
requirements
Open spliceAny parting at any junction of tread, sidewall, or inner-
liner that extends to cord material
Outer diameterThe overall diameter of an inflated new tire
Tire related termMeaning
Page 543 of 600
GS F_OM_OM30G90U_(U)
5438-1. Specifications
8
Vehicle specifications
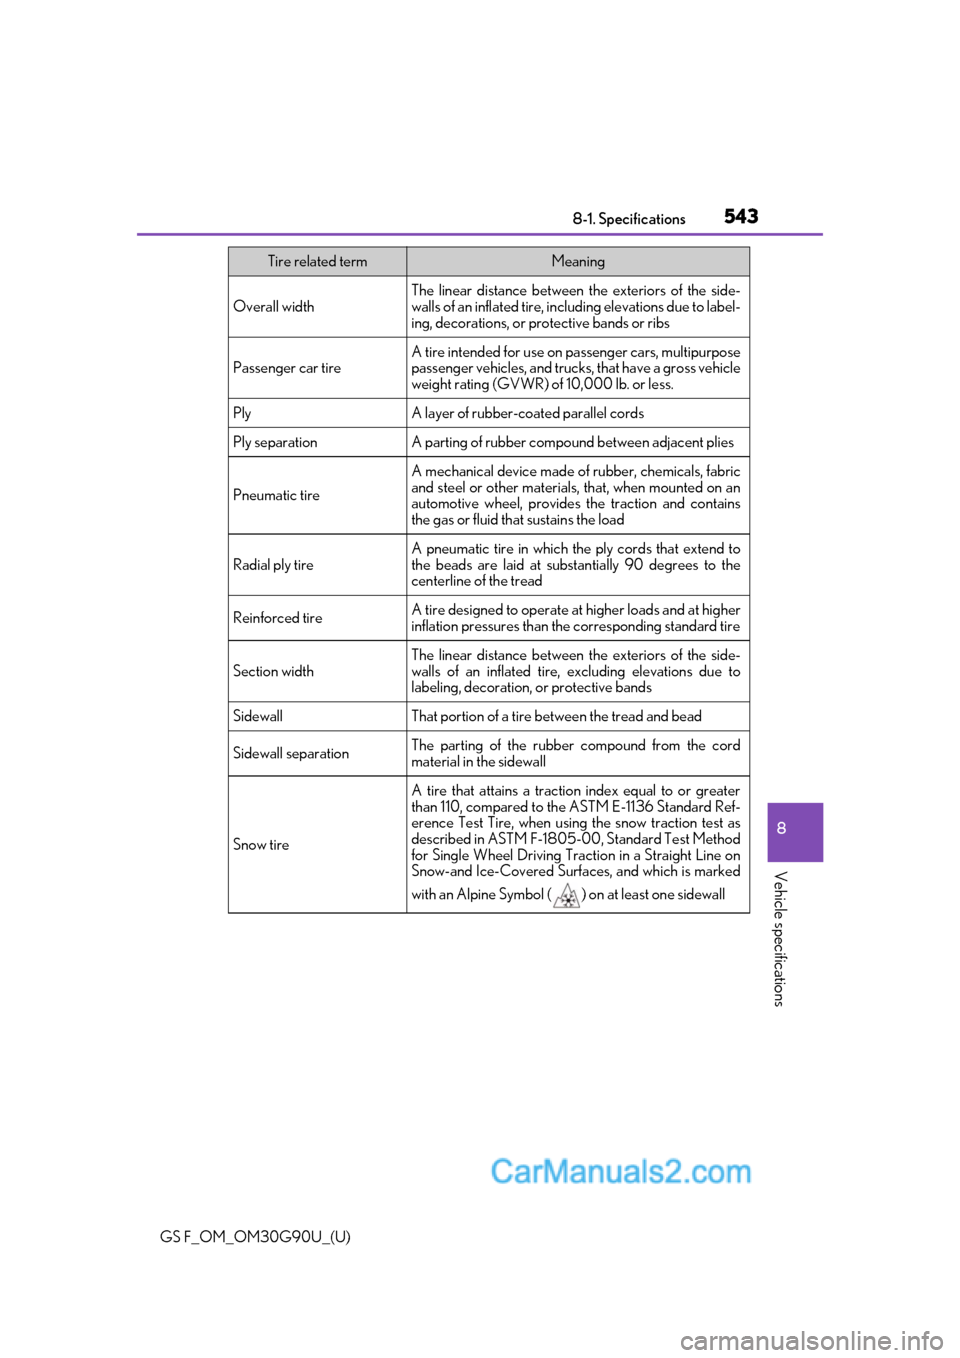
Overall widthThe linear distance between the exteriors of the side-
walls of an inflated tire, including elev ations due to label-
ing, decorations, or protective bands or ribs
Passenger car tire
A tire intended for use on passenger cars, multipurpose
passenger vehicles, and trucks, that have a gross vehicle
weight rating (GVWR) of 10,000 lb. or less.
PlyA layer of rubber-coat ed parallel cords
Ply separationA parting of rubber compou nd between adjacent plies
Pneumatic tire
A mechanical device made of rubber, chemicals, fabric
and steel or other materials, that, when mounted on an
automotive wheel, provides the traction and contains
the gas or fluid that sustains the load
Radial ply tire
A pneumatic tire in which the ply cords that extend to
the beads are laid at substa ntially 90 degrees to the
centerline of the tread
Reinforced tire A tire designed to operate at higher loads and at higher
inflation pressures than the corresponding standard tire
Section width
The linear distance between the exteriors of the side-
walls of an inflated tire, excluding elevations due to
labeling, decoration, or protective bands
SidewallThat portion of a tire between the tread and bead
Sidewall separationThe parting of the rubber compound from the cord
material in the sidewall
Snow tire
A tire that attains a traction index equal to or greater
than 110, compared to the ASTM E-1136 Standard Ref-
erence Test Tire, when using the snow traction test as
described in ASTM F-1805-00, Standard Test Method
for Single Wheel Driving Traction in a Straight Line on
Snow-and Ice-Covered Surfaces, and which is marked
with an Alpine Symbol ( ) on at least one sidewall
Tire related termMeaning