display Lexus GS200t 2015 Workshop Manual
[x] Cancel search | Manufacturer: LEXUS, Model Year: 2015, Model line: GS200t, Model: Lexus GS200t 2015Pages: 668, PDF Size: 177.56 MB
Page 148 of 668
1482. Instrument cluster
GS350_200t_GS F_OM_OM30E87E_(EE)
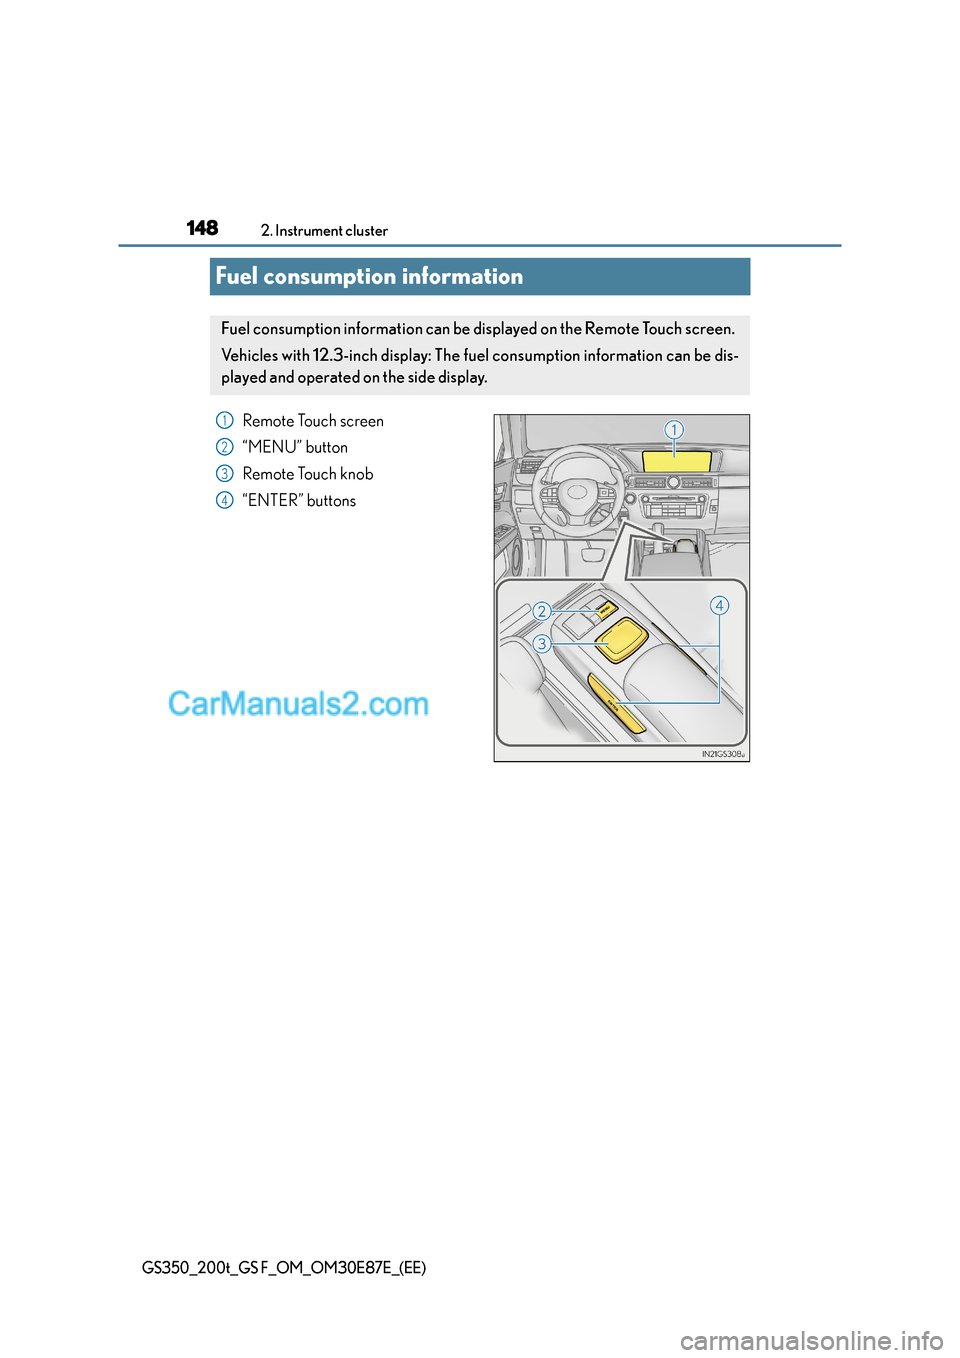
Fuel consumption information
Remote Touch screen
“MENU” button
Remote Touch knob
“ENTER” buttons
Fuel consumption information can be displayed on the Remote Touch screen.
Vehicles with 12.3-inch display: The fu el consumption information can be dis-
played and operated on the side display.
1
2
3
4
Page 149 of 668
1492. Instrument cluster
2
Instrument cluster
GS350_200t_GS F_OM_OM30E87E_(EE)
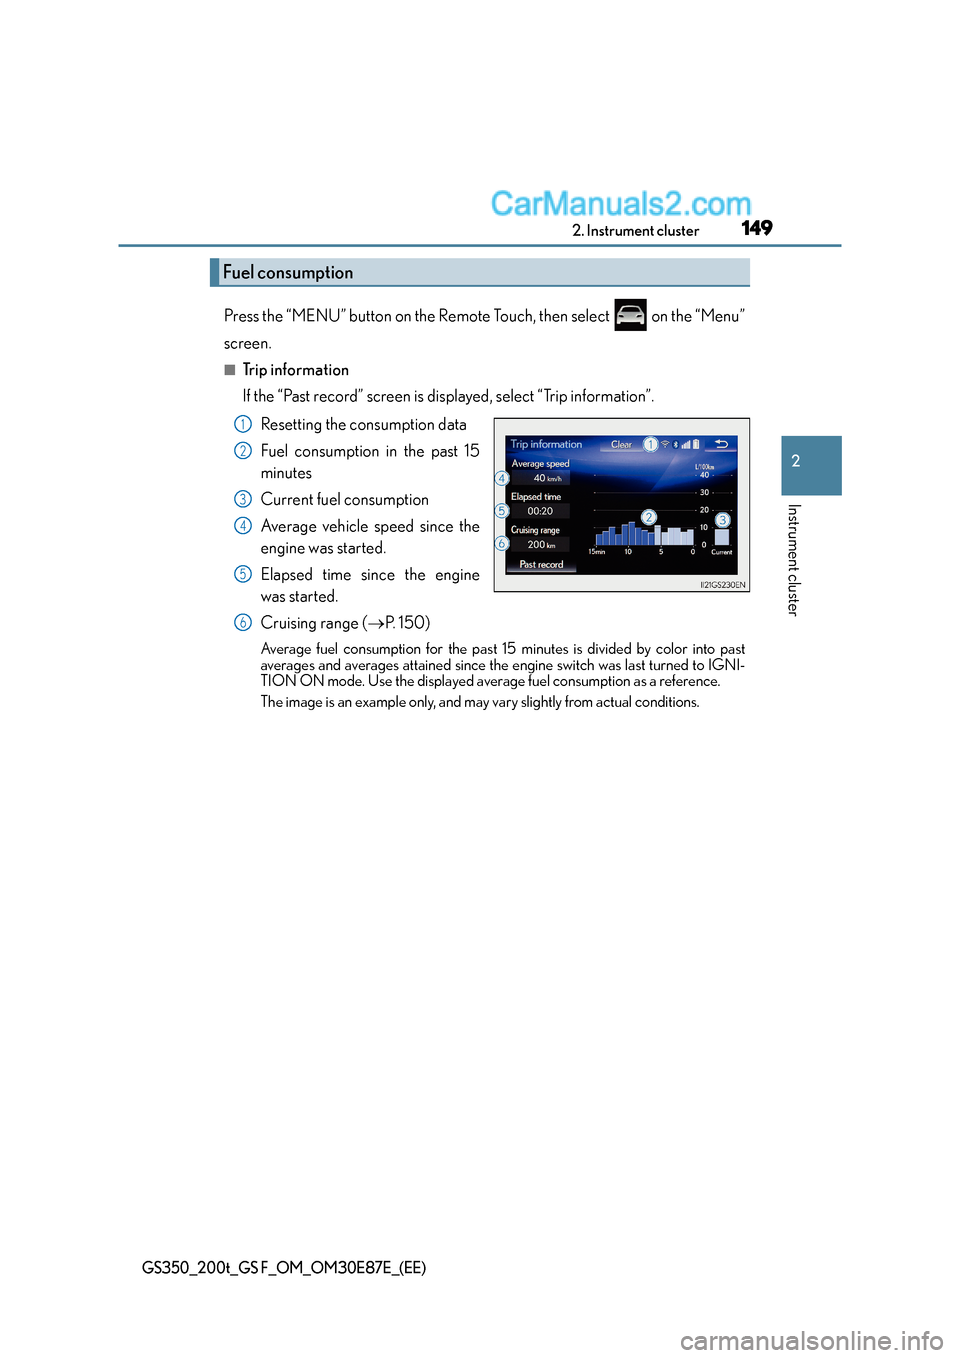
Press the “MENU” button on the Remote Touch, then select on the “Menu”
screen.
■Trip information
If the “Past record” screen is displayed, select “Trip information”.Resetting the consumption data
Fuel consumption in the past 15
minutes
Current fuel consumption
Average vehicle speed since the
engine was started.
Elapsed time since the engine
was started.
Cruising range ( →P. 1 5 0 )
Average fuel consumption for the past 15 minutes is divided by color into past
averages and averages attained since the engine switch was last turned to IGNI-
TION ON mode. Use the displayed average fuel consumption as a reference.
The image is an example only, and may vary slightly from actual conditions.
Fuel consumption
1
2
3
4
5
6
Page 150 of 668
1502. Instrument cluster
GS350_200t_GS F_OM_OM30E87E_(EE)
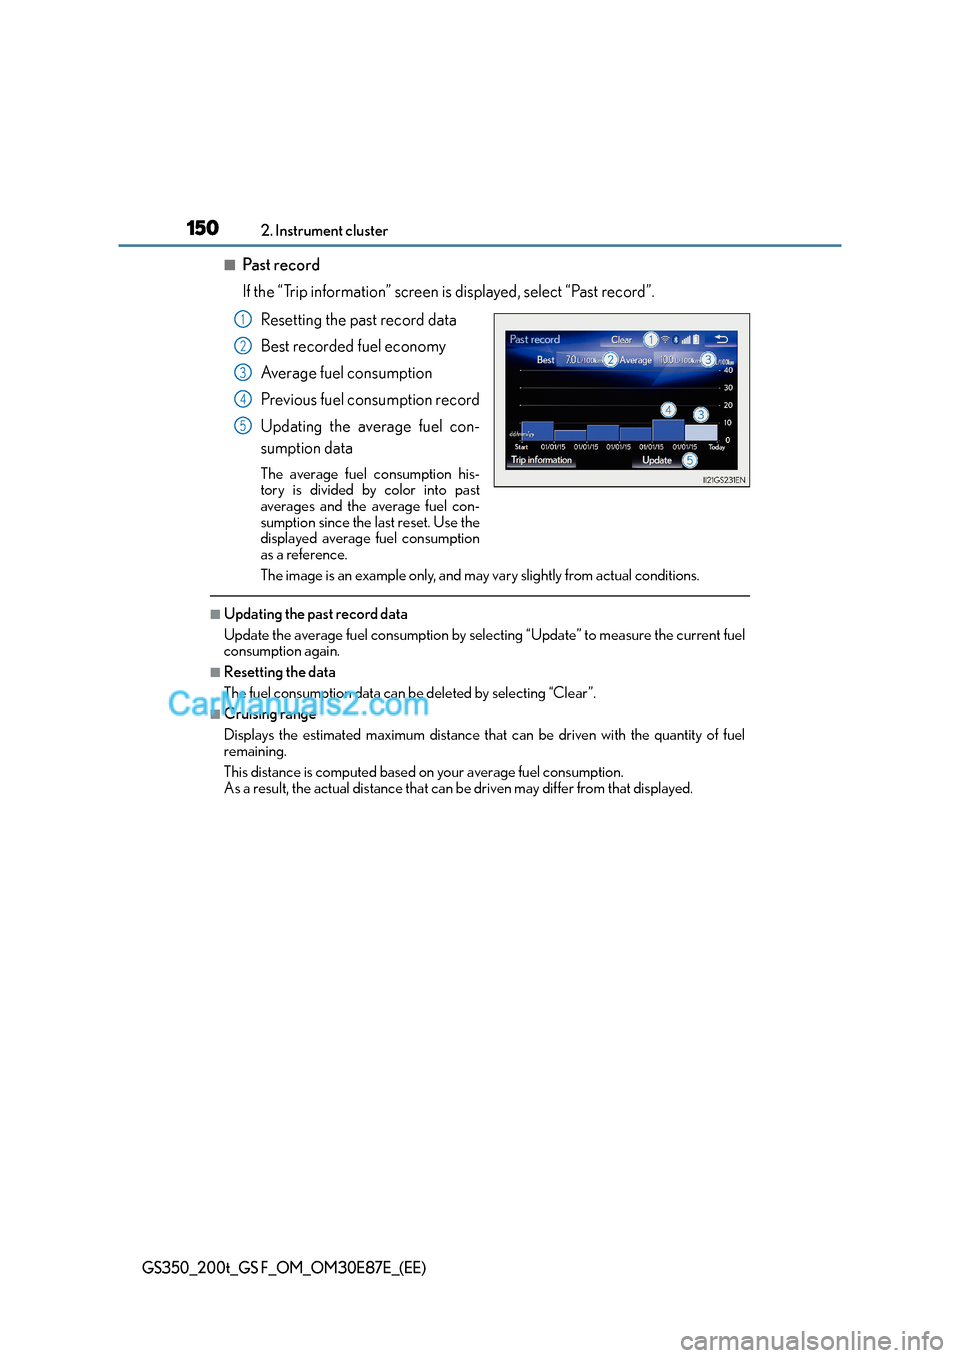
■Pa s t re c o r d
If the “Trip information” screen is displayed, select “Past record”.Resetting the past record data
Best recorded fuel economy
Average fuel consumption
Previous fuel consumption record
Updating the average fuel con-
sumption data
The average fuel consumption his-
tory is divided by color into past
averages and the average fuel con-
sumption since the last reset. Use the
displayed average fuel consumption
as a reference.
The image is an example only, and may vary slightly from actual conditions.
■Updating the past record data
Update the average fuel consumption by selecting “Update” to measure the current fuel
consumption again.
■Resetting the data
The fuel consumption data can be deleted by selecting “Clear”.
■Cruising range
Displays the estimated maximum distance that can be driven with the quantity of fuel
remaining.
This distance is computed based on your average fuel consumption.
As a result, the actual distance that can be driven may differ from that displayed.
1
2
3
4
5
Page 151 of 668
1512. Instrument cluster
2
Instrument cluster
GS350_200t_GS F_OM_OM30E87E_(EE)
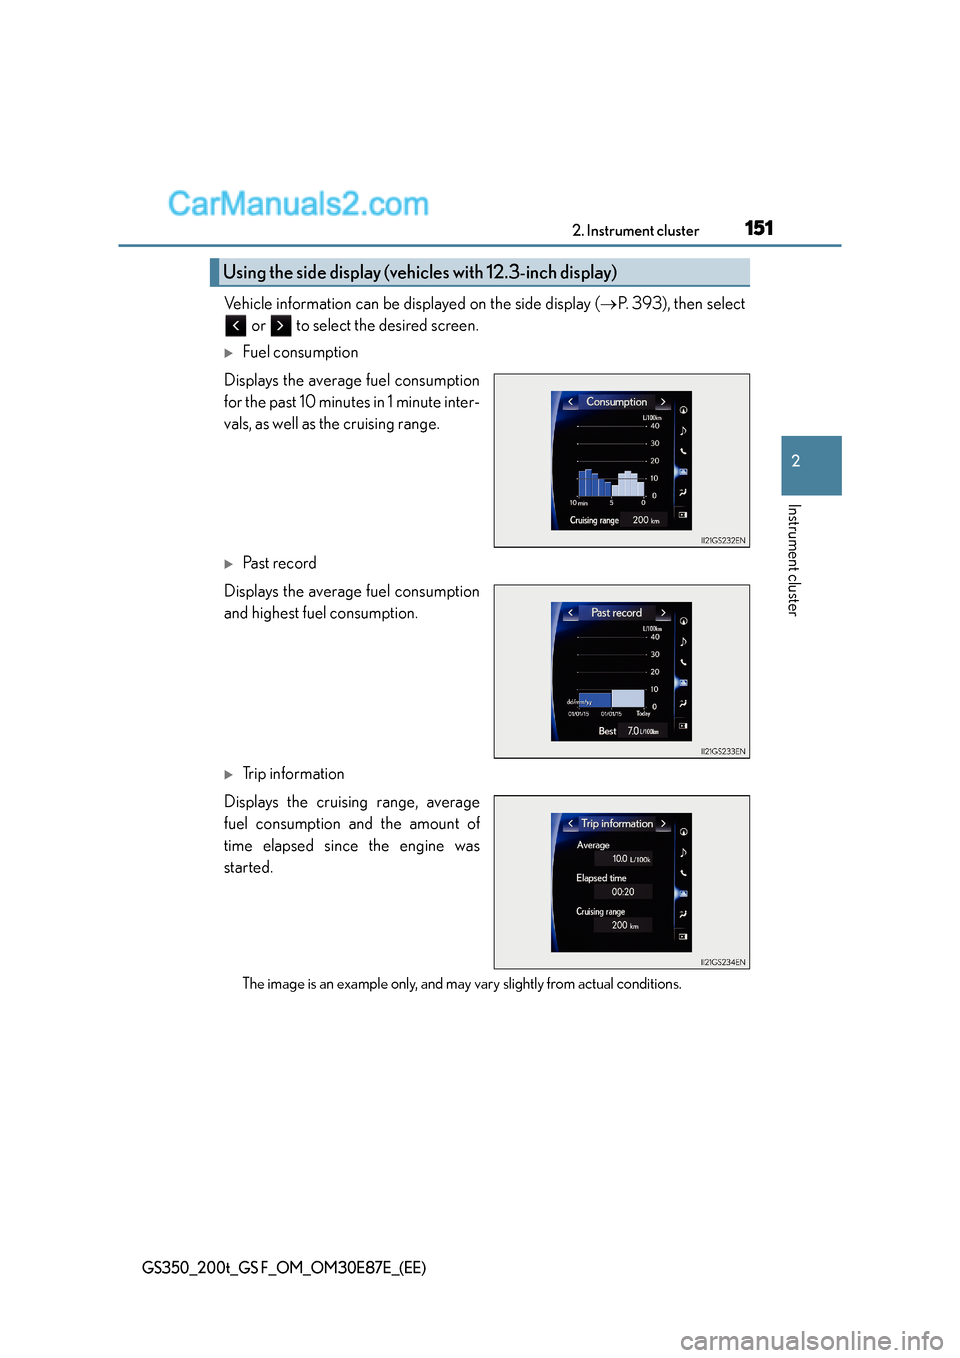
Vehicle information can be displayed on the side display (→P. 3 9 3 ) , t h e n s e l e c t
or to select the desired screen.
�XFuel consumption
Displays the average fuel consumption
for the past 10 minutes in 1 minute inter-
vals, as well as the cruising range.
�XPa s t re c o rd
Displays the average fuel consumption
and highest fuel consumption.
�XTrip information
Displays the cruising range, average
fuel consumption and the amount of
time elapsed since the engine was
started.
The image is an example only, and may vary slightly from actual conditions.
Using the side display (vehicles with 12.3-inch display)
Page 164 of 668
1643-2. Opening, closing and locking the doors and trunk
GS350_200t_GS F_OM_OM30E87E_(EE)
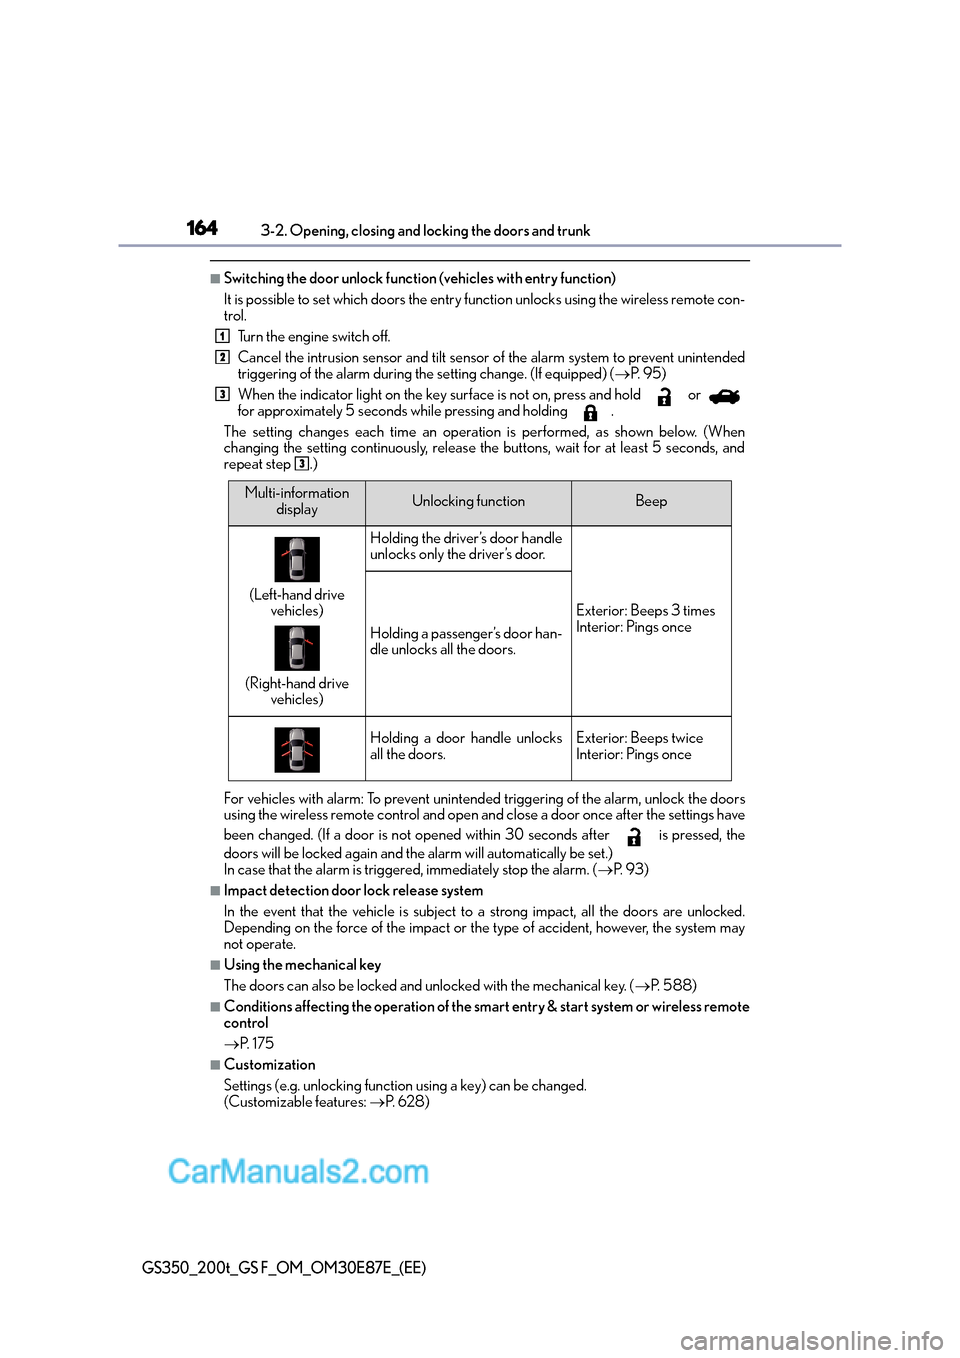
■Switching the door unlock function (vehicles with entry function)
It is possible to set which doors the entry function unlocks using the wireless remote con-
trol. Turn the engine switch off.
Cancel the intrusion sensor and tilt sensor of the alarm system to prevent unintended
triggering of the alarm during the setting change. (If equipped) ( →P. 9 5 )
When the indicator light on the key surface is not on, press and hold or
for approximately 5 seconds while pressing and holding .
The setting changes each time an operation is performed, as shown below. (When
changing the setting continuously, release the buttons, wait for at least 5 seconds, and
repeat step .)
For vehicles with alarm: To prevent unintended triggering of the alarm, unlock the doors
using the wireless remote control and open an d close a door once after the settings have
been changed. (If a door is not opened within 30 seconds after is pressed, the
doors will be locked again and the alarm will automatically be set.)
In case that the alarm is triggered, immediately stop the alarm. ( →P. 9 3 )
■Impact detection door lock release system
In the event that the vehicle is subject to a strong impact, all the doors are unlocked.
Depending on the force of the impact or the type of accident, however, the system may
not operate.
■Using the mechanical key
The doors can also be locked and unlocked with the mechanical key. ( →P. 5 8 8 )
■Conditions affecting the operation of the smart entry & start system or wireless remote
control
→P. 1 7 5
■Customization
Settings (e.g. unlocking function using a key) can be changed.
(Customizable features: →P. 6 2 8 )
1
2
3
3
Multi-information
displayUnlocking functionBeep
(Left-hand drive vehicles)
(Right-hand drive vehicles)
Holding the driver’s door handle
unlocks only the driver’s door.
Exterior: Beeps 3 times
Interior: Pings once
Holding a passenger’s door han-
dle unlocks all the doors.
Holding a door handle unlocks
all the doors.Exterior: Beeps twice
Interior: Pings once
Page 174 of 668
1743-2. Opening, closing and locking the doors and trunk
GS350_200t_GS F_OM_OM30E87E_(EE)
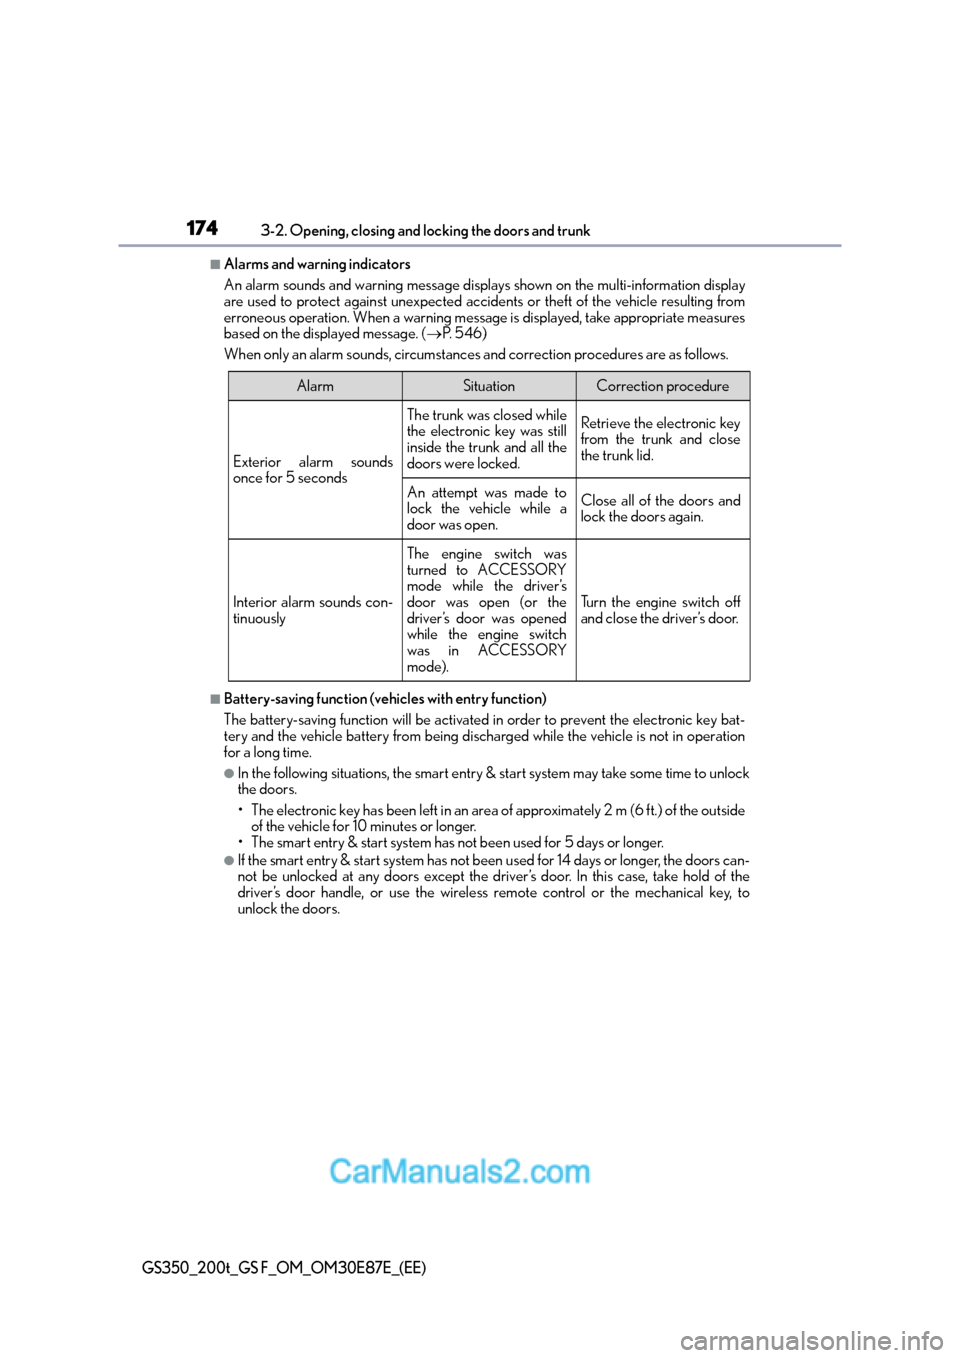
■Alarms and warning indicators
An alarm sounds and warning message displays shown on the multi-information display
are used to protect against unexpected accidents or theft of the vehicle resulting from
erroneous operation. When a warning message is displayed, take appropriate measures
based on the displayed message. ( →P. 5 4 6 )
When only an alarm sounds, circumstances and correction procedures are as follows.
■Battery-saving function (vehicles with entry function)
The battery-saving function will be activated in order to prevent the electronic key bat-
tery and the vehicle battery from being discharged while the vehicle is not in operation
for a long time.
●In the following situations, the smart entry & start system may take some time to unlock
the doors.
• The electronic key has been left in an area of approximately 2 m (6 ft.) of the outside
of the vehicle for 10 minutes or longer.
• The smart entry & start system has not been used for 5 days or longer.
●If the smart entry & start system has not been used for 14 days or longer, the doors can-
not be unlocked at any doors except the driver’s door. In this case, take hold of the
driver’s door handle, or use the wireless remote control or the mechanical key, to
unlock the doors.
AlarmSituationCorrection procedure
Exterior alarm sounds
once for 5 seconds
The trunk was closed while
the electronic key was still
inside the trunk and all the
doors were locked.Retrieve the electronic key
from the trunk and close
the trunk lid.
An attempt was made to
lock the vehicle while a
door was open.Close all of the doors and
lock the doors again.
Interior alarm sounds con-
tinuously
The engine switch was
turned to ACCESSORY
mode while the driver’s
door was open (or the
driver’s door was opened
while the engine switch
was in ACCESSORY
mode).
Turn the engine switch off
and close the driver’s door.
Page 175 of 668

1753-2. Opening, closing and locking the doors and trunk
3
Operation of each component
GS350_200t_GS F_OM_OM30E87E_(EE)
■Electronic Key Battery-Saving Function
When battery-saving mode is set, battery depletion is minimized by stopping the elec-
tronic key from receiving radio waves.
■Conditions affecting operation
The smart entry & start system uses weak radio waves. In the following situations, the
communication between the electronic key and the vehicle may be affected, preventing
the smart entry & start system, wireless remote control and engine immobilizer system
from operating properly. (Ways of coping: →P. 5 8 8 )
●When the electronic key battery is depleted
●Near a TV tower, electric power plant, gas station, radio station, large display, airport or
other facility that generates strong radio waves or electrical noise
●When the electronic key is in contact wi th, or is covered by the following metallic
objects
• Cards to which aluminum foil is attached
• Cigarette boxes that have aluminum foil inside
• Metallic wallets or bags
•Coins
• Hand warmers made of metal
• Media such as CDs and DVDs
●When other wireless keys (that emit radio waves) are being used nearby
●When carrying the electronic key together with the following devices that emit radio
waves
• When carrying a portable radio, cellular phone, cordless phone or other wireless communication device
• Another vehicle’s electronic key or a wireless key that emits radio waves
• Personal computers or personal digital assistants (PDAs)
• Digital audio players
• Portable game systems
●If window tint with a metallic content or me tallic objects are attached to the rear win-
dow
●When the electronic key is placed near a battery charger or electronic devices
Press twice while pressing and holding
. Confirm that the electronic key indica-
tor flashes 4 times.
While the battery-saving mode is set, the smart
entry & start system cannot be used. To cancel
the function, press any of the electronic key but-
tons.
Page 176 of 668
1763-2. Opening, closing and locking the doors and trunk
GS350_200t_GS F_OM_OM30E87E_(EE)
■Note for the entry function (if equipped)
●Even when the electronic key is within the effective range (detection areas), the system
may not operate properly in the following cases:
• The electronic key is too close to the window or outside door handle, near theground, or in a high place when the doors are locked or unlocked.
• The electronic key is near the ground or in a high place, or too close to the rear
bumper center when the trunk is opened.
• The electronic key is on the instrument pa nel, rear package tray or floor, or in the
door pockets or glove box when the engine is started or engine switch modes are
changed.
●Do not leave the electronic key on top of th e instrument panel or near the door pockets
when exiting the vehicle. Depending on the radio wave reception conditions, it may be
detected by the antenna outside the cabin and the door will become lockable from the
outside, possibly trapping the electronic key inside the vehicle.
●As long as the electronic key is within the effective range, the doors may be locked or
unlocked by anyone. However, only the doors detecting the electronic key can be used
to unlock the vehicle.
●The doors may unlock or lock if a large amou nt of water splashes on the door handle,
such as in the rain or in a car wash when the electronic key is within the effective range.
(The doors will automatically be locked af ter approximately 30 seconds if the doors
are not opened and closed.)
●If the wireless remote control is used to lock the doors when the electronic key is near
the vehicle, there is a possibility that the d oor may not be unlocked by the entry func-
tion. (Use the wireless remote control to unlock the doors.)
●Touching the door lock sensor while wearing gloves may delay or prevent lock opera-
tion.
●If the door handle becomes wet while the electronic key is within the effective range,
the door may lock and unlock repeatedly. In that case, follow the following correction
procedures to wash the vehicle:
• Place the electronic key in a location 2 m (6 ft.) or more away from the vehicle. (Take care to ensure that the key is not stolen.)
• Set the electronic key to battery-saving mode to disable the smart entry & start sys- tem. ( →P. 1 7 5 )
●If the electronic key is inside the vehicle and a door handle becomes wet during a car
wash, a message may be shown on the multi-information display and a buzzer will
sound outside the vehicle. To turn off the alarm, lock all the doors.
●The lock sensor may not work properly if it comes into contact with ice, snow, mud, etc.
Clean the lock sensor and attempt to operate it again, or use the lock sensor on the
lower part of the door handle.
●A sudden approach to the effective range or door handle may prevent the doors from
being unlocked. In this case, return the door handle to the original position and check
that the doors unlock before pulling the door handle again.
●Gripping the door handle when wearing a glove may not unlock the door.
●If there is another electronic key in the de tection area, it may take slightly longer to
unlock the doors after the door handle is gripped.
Page 199 of 668

1993-3. Adjusting the seats
3
Operation of each component
GS350_200t_GS F_OM_OM30E87E_(EE)
■Operation of the power easy access system
When exiting the vehicle, the power easy access system may not operate if the seat is
already close to the rearmost position, etc.
■Customization
The seat movement amount settings of the power easy access system can be custom-
ized. (Customizable features: →P. 6 2 8 )
Your preferred driving position (the positi on of the driver’s seat, steering wheel,
outside rear view mirrors and HUD [head-up display] [if equipped]) can be
recorded and recalled by pressing a button.
Three different driving positions can be recorded into memory.
■Recording procedure
Check that the shift lever is in P.
Turn the engine switch to IGNITION ON mode.
Adjust the driver’s seat, steering wheel, outside rear view mirrors and HUD
(head-up display) (if equipped) to the desired positions.
While pressing the “SET” button,
or within 3 seconds after the
“SET” button is pressed, press
button “1”, “2” or “3” until the
buzzer sounds.
If the selected button has already
been preset, the previously recorded
position will be overwritten.
Vehicles with the driving position memory for the front passenger’s seat: To
record the position of the front passenger’s seat, adjust the front passenger’s
seat to the desired position and perform step using the buttons on the front
passenger’s side.
Driving position memory
1
2
3
4
4
Page 200 of 668

2003-3. Adjusting the seats
GS350_200t_GS F_OM_OM30E87E_(EE)
■Recall procedureCheck that the shift lever is in P.
Turn the engine switch to IGNITION ON mode.
Press one of the buttons for the
driving position you want to recall
until the buzzer sounds.
Vehicles with front passenger’s seat
ottoman:
The recorded position will only be
recalled if the ottoman is in a position
higher than the recorded position. It
will not move in an upward direction.
■To stop the position recall operation part-way through
Perform any of the following:
●Press the “SET” button.
●Press button “1”, “2” or “3”.
●Operate any of the seat adjustment switches (only cancels seat position recall).
●Operate the tilt and telescopic steering control switch (only cancels steering wheel
position recall).
●Operate the head-up display position adjustment switch (if equipped) (only cancels
head-up display position recall).
■Seat positions that can be memorized ( →P. 1 9 5 )
�XVehicles without seatback side support adjustment switch
The adjusted positions other than the position adjusted by lumbar support switch can be
recorded.
�XVehicles with seatback side support adjustment switch
All adjusted positions can be recorded.
■Automatic ottoman adjustment (if equipped)
While the recorded position is being recalled, if it appears that the front edge of the cush-
ion will touch the area surrounding the instrument panel, the ottoman will be automati-
cally stowed.
1
2
3