power steering Lexus GS300h 2017 Owner's Manual
[x] Cancel search | Manufacturer: LEXUS, Model Year: 2017, Model line: GS300h, Model: Lexus GS300h 2017Pages: 600, PDF Size: 58.17 MB
Page 99 of 600
99
2. Instrument cluster
2
Instrument cluster
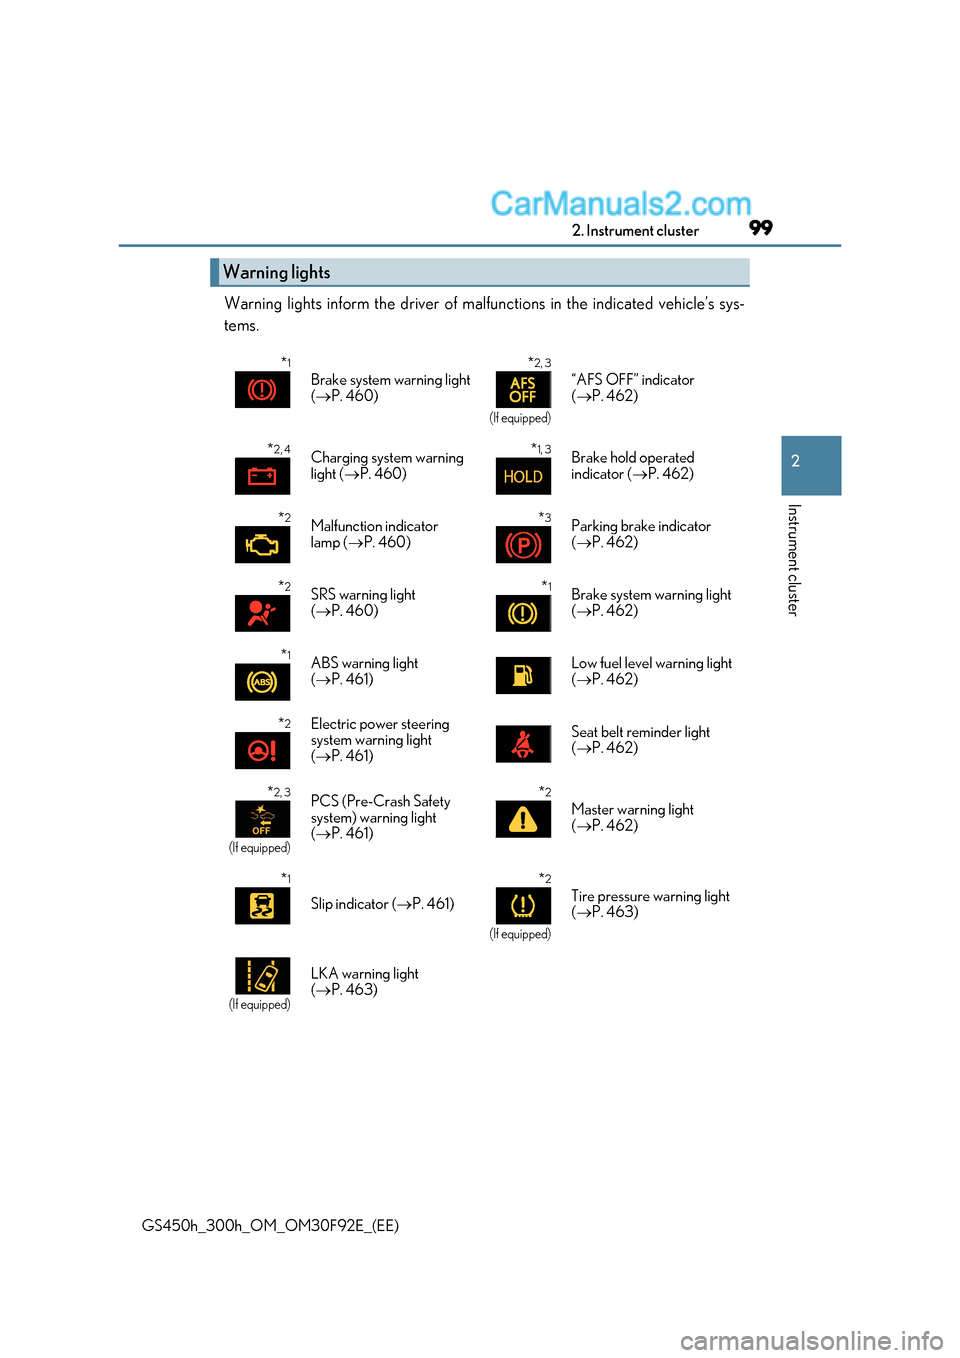
GS450h_300h_OM_OM30F92E_(EE) Warning lights inform the driver of malfunctions in the indicated vehicle’s sys-
tems.
Warning lights
*
1
Brake system warning light ( P. 460) *
2, 3
(If equipped)
“AFS OFF” indicator (
P. 462)
* 2, 4
Charging system warning
light (P. 460) *
1, 3
Brake hold operated
indicator (
P. 462)
* 2
Malfunction indicator
lamp ( P. 460) *
3
Parking brake indicator (
P. 462)
* 2
SRS warning light ( P. 460) *
1
Brake system warning light (
P. 462)
* 1
ABS warning light ( P. 461)
Low fuel level warning light ( P. 462)
* 2
Electric power steering
system warning light (
P. 461)Seat belt reminder light ( P. 462)
* 2, 3
(If equipped)
PCS (Pre-Crash Safety
system) warning light (
P. 461) *
2
Master warning light ( P. 462)
* 1
Slip indicator (
P. 461) *
2
(If equipped)
Tire pressure warning light (
P. 463)
(If equipped)
LKA warning light ( P. 463)
Page 117 of 600
117
2. Instrument cluster
2
Instrument cluster
GS450h_300h_OM_OM30F92E_(EE)
■G-force display
●The G-force values may not be zero even when the vehicle is parked, such as when it is
parked on an incline.
●Depending on the vehicle usage conditions, the brake fluid pressure display may not
reach its maximum reading even though the brake pedal is fully depressed.
●If a 12-volt battery terminal is disconnected and reconnected, the steering amount dis-
play may be disabled temporarily. After driv ing the vehicle for a while, the display will
be enabled.
●Depending on the condition of the vehicle, the brake fluid pressure display may change
even when the brake pedal is not depressed.
■System check display
After turning the power switch to ON mode , opening image is displayed while system
operation is checked. When the system check is complete, the normal screen will return.
■Suspension of the settings display
In the following situations, the settings display using the meter control switches will be
suspended.
●When a warning message appears on the multi-information display
●When the vehicle begins to move
■Tire inflation pressure (if equipped)
●It may take a few minutes to display the tire inflation pressure after the power switch is
turned to ON mode. It may also take a few minutes to display the tire inflation pressure
after inflation pressure has been adjusted.
●“---” may be displayed if the tire information cannot be determined due to unfavorable
radio wave conditions.
●Tire inflation pressure changes with temperature. The displayed values may also be dif-
ferent from the values measured using a tire pressure gauge.
■When disconnecting and reconnecting 12-volt battery terminals
The drive information will be reset.
■Liquid crystal display P. 109
Page 133 of 600
133
3
Operation of
each component
GS450h_300h_OM_OM30F92E_(EE) 3-1. Key information
Keys .................................................. 134
3-2. Opening, closing and locking the doors and trunk
Doors ............................................... 139
Trunk .................................................146
Smart entry & start system ...... 153
3-3. Adjusting the seats Front seats.......................................175
Driving position memory ......... 178
Head restraints ............................ 183
3-4. Adjusting the steering wheel and mirrors
Steering wheel ............................. 186
Inside rear view mirror ............. 188
Outside rear view mirrors....... 190
3-5. Opening, closing the windows and moon roof
Power windows ........................... 193
Moon roof ...................................... 196
Page 176 of 600
1763-3. Adjusting the seats
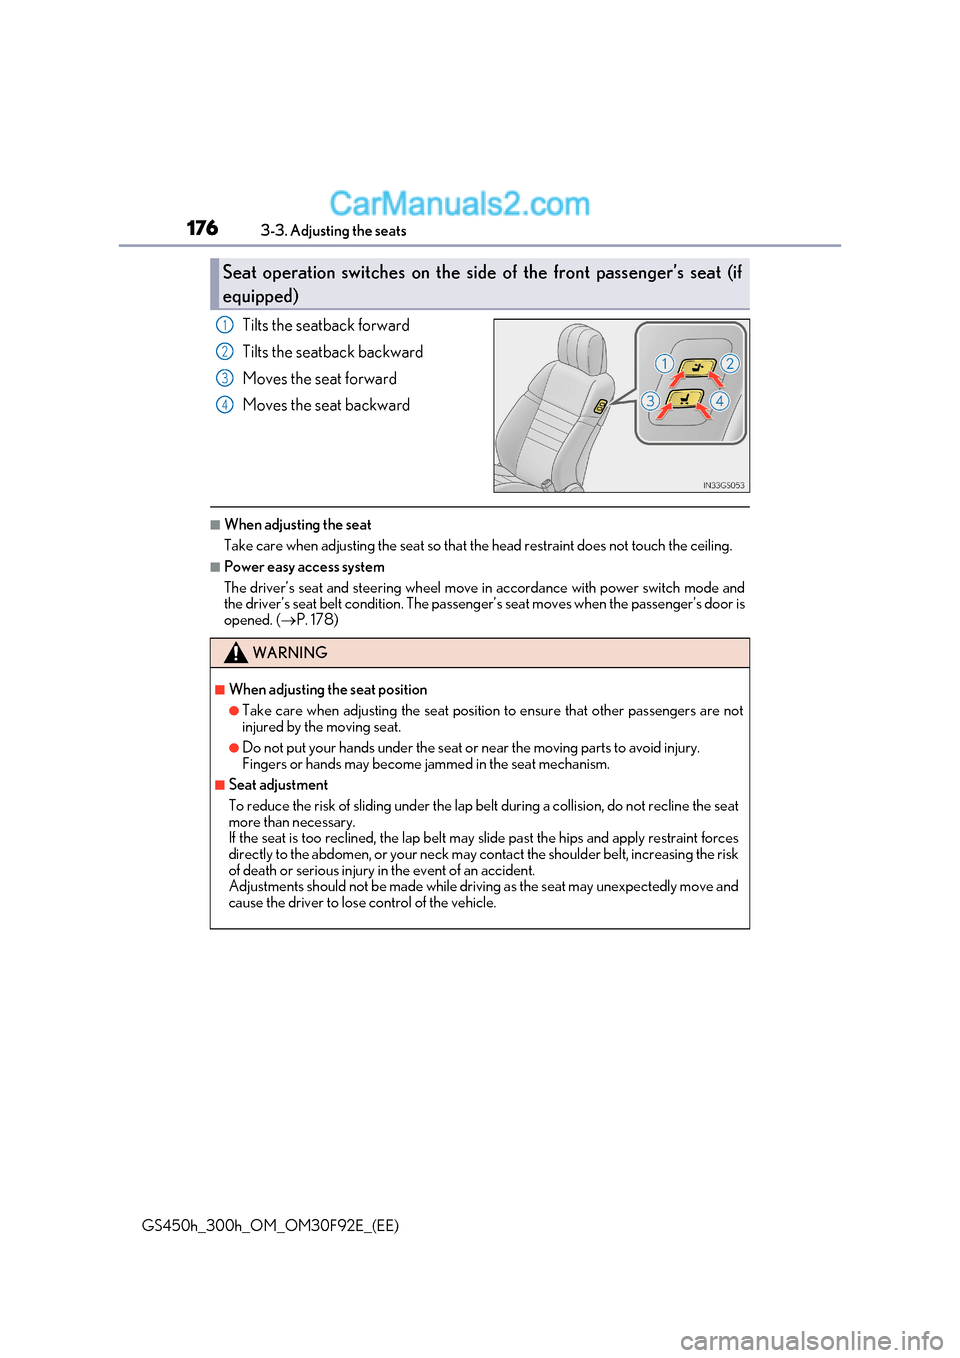
GS450h_300h_OM_OM30F92E_(EE) Tilts the seatback forward
Tilts the seatback backward
Moves the seat forward
Moves the seat backward
■When adjusting the seat
Take care when adjusting the seat so that
the head restraint does not touch the ceiling.
■Power easy access system
The driver’s seat and steering wheel move in accordance with power switch mode and
the driver’s seat belt condition. The passeng er’s seat moves when the passenger’s door is
opened. ( P. 178)
Seat operation switches on the side of the front passenger’s seat (if
equipped)
1
2
3
4
WARNING
■When adjusting the seat position
●Take care when adjusting the seat position to ensure that other passengers are not
injured by the moving seat.
●Do not put your hands under the seat or near the moving parts to avoid injury.
Fingers or hands may become jammed in the seat mechanism.
■Seat adjustment
To reduce the risk of sliding under the lap be lt during a collision, do not recline the seat
more than necessary.
If the seat is too reclined, th e lap belt may slide past the hips and apply restraint forces
directly to the abdomen, or your neck may contact the shoulder belt, increasing the risk
of death or serious injury in the event of an accident.
Adjustments should not be made while driving as the seat may unexpectedly move and
cause the driver to lose control of the vehicle.
Page 179 of 600
179
3-3. Adjusting the seats
3
Operation of each component
GS450h_300h_OM_OM30F92E_(EE)
■Operation of the power easy access system
When exiting the vehicle, the power easy access system may not op erate if the seat is
already close to the rearmost position, etc.
■Customization
The seat movement amount settings of the power easy access system can be custom-
ized. (Customizable features: P. 561)
Your preferred driving position (the position of the driver’s seat, steering wheel,
outside rear view mirrors and HUD [head-up display] [if equipped]) can be
recorded and recalled by pressing a button.
Three different driving positions can be recorded into memory.
■Recording procedure
Check that the shift lever is in P.
Turn the power switch to ON mode.
Adjust the driver’s seat, steering wheel, outside rear view mirrors and HUD
(head-up display) (if equipped) to the desired positions.
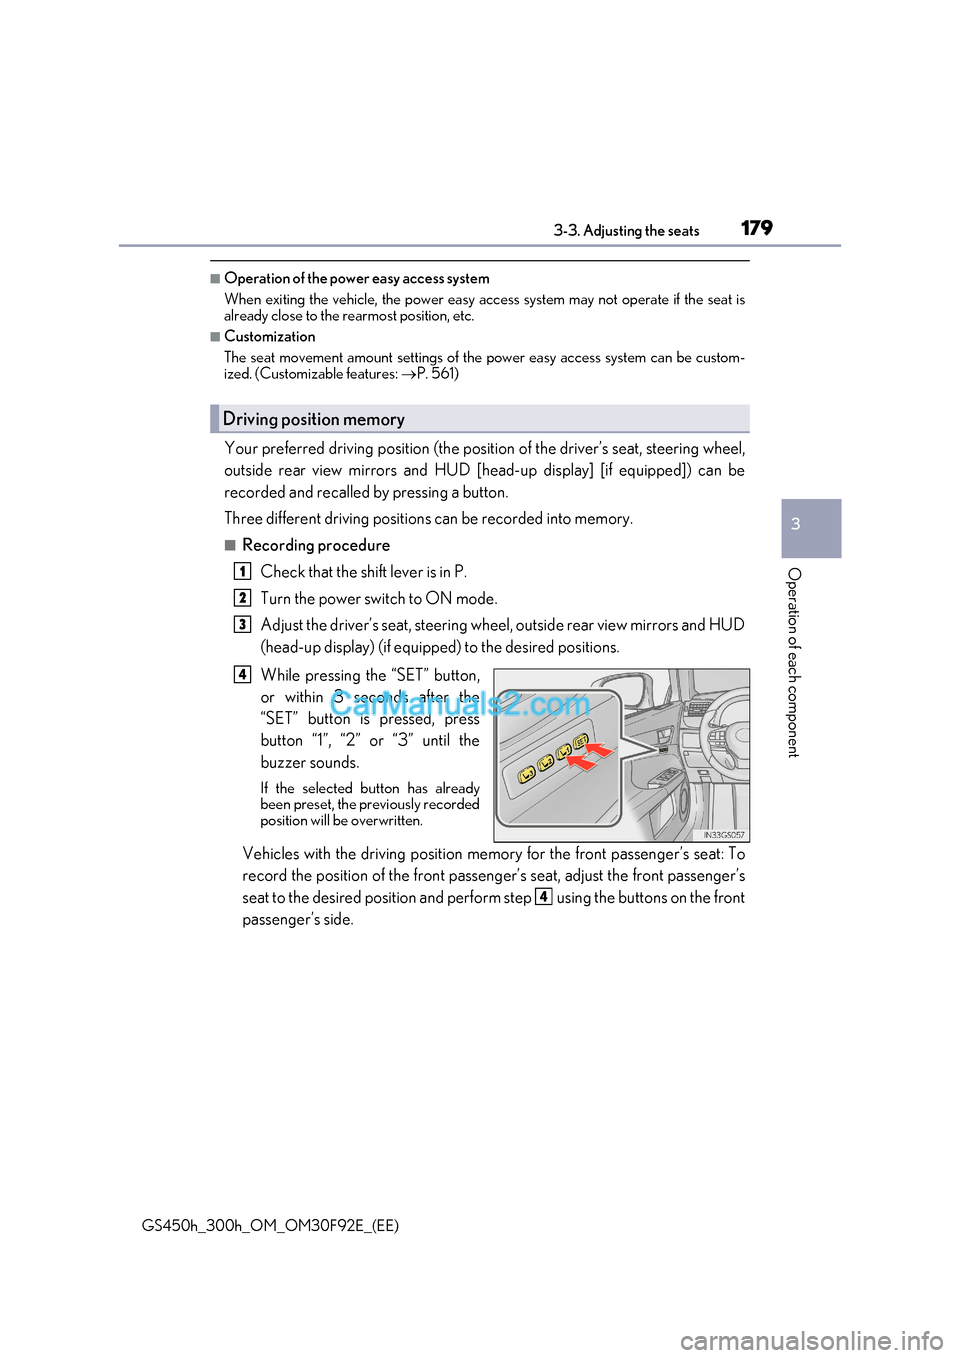
While pressing the “SET” button,
or within 3 seconds after the
“SET” button is pressed, press
button “1”, “2” or “3” until the
buzzer sounds.
If the selected button has already
been preset, the previously recorded
position will be overwritten.
Vehicles with the driving position memory for the front passenger’s seat: To
record the position of the front passeng er’s seat, adjust the front passenger’s
seat to the desired position and perfor m step using the buttons on the front
passenger’s side.
Driving position memory
1
2
3
4
4
Page 180 of 600
1803-3. Adjusting the seats
GS450h_300h_OM_OM30F92E_(EE)
■Recall procedure
Check that the shift lever is in P.
Turn the power switch to ON mode.
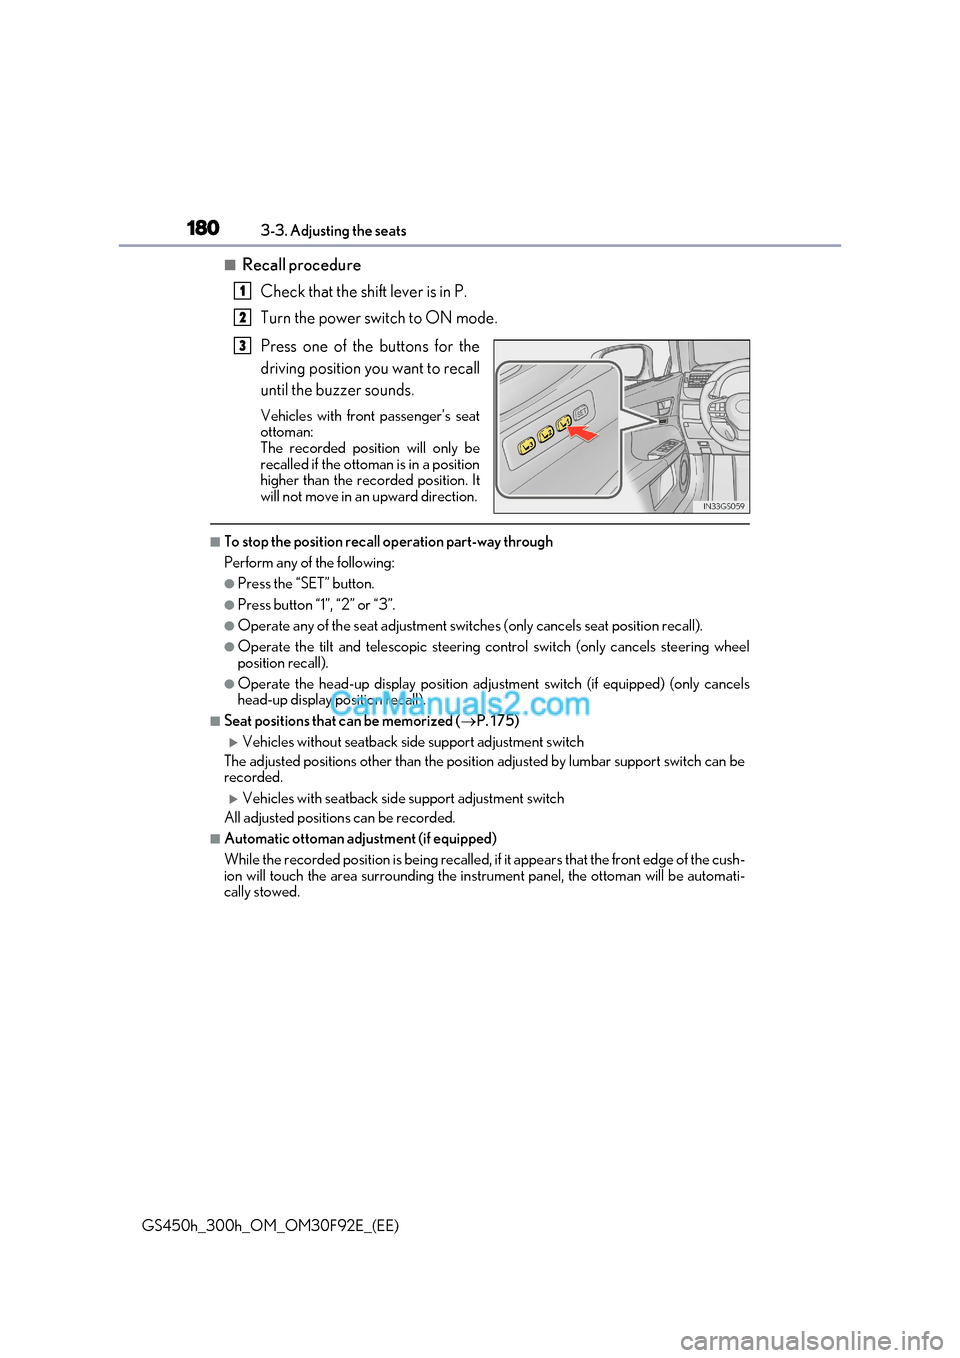
Press one of the buttons for the
driving position you want to recall
until the buzzer sounds.
Vehicles with front passenger’s seat
ottoman:
The recorded position will only be
recalled if the ottoman is in a position
higher than the recorded position. It
will not move in an upward direction.
■To stop the position recall operation part-way through
Perform any of the following:
●Press the “SET” button.
●Press button “1”, “2” or “3”.
●Operate any of the seat adjustment switches (only cancels seat position recall).
●Operate the tilt and telescopic steering control switch (only cancels steering wheel
position recall).
●Operate the head-up display position adju stment switch (if equipped) (only cancels
head-up display position recall).
■Seat positions that can be memorized ( P. 175)
Vehicles without seatback side support adjustment switch
The adjusted positions other than the position adjusted by lumbar support switch can be
recorded.
Vehicles with seatback side support adjustment switch
All adjusted positions can be recorded.
■Automatic ottoman adjustment (if equipped)
While the recorded position is being recalled, if it appears that the front edge of the cush-
ion will touch the area surrounding the instrument panel, the ottoman will be automati-
cally stowed.
1
2
3
Page 182 of 600
1823-3. Adjusting the seats
GS450h_300h_OM_OM30F92E_(EE)
■Recall procedure
Carry the electronic key that has been registered to the driving position,
and then unlock and open the driver’s door using the smart entry & start
system or wireless remote control.
The driving position will move to the reco rded position (not including the steering
wheel and HUD [head-up display] [if equipp ed]). However, the seat will move to a
position slightly behind the recorded position in order to make entering the vehicle
easier.
If the driving position is in a position that has already been recorded, the seat and
outside rear view mirrors will not move.
Turn the power switch to ACCESSORY mode or ON mode, or fasten a
seat belt.
The seat, steering wheel and HUD (head-up display) (if equipped) will move to the
recorded position.
■Cancelation procedure
Carry only the key you want to cancel and then close the driver’s door.
If 2 or more keys are in the vehicle, the driving position cannot be canceled
properly.
Turn the power switch to ON mode.
While pressing the “SET” button, press and hold the door lock switch
(either lock or unlock) until the buzzer sounds twice.
If the button could not be canceled, the buzzer sounds continuously for approxi- mately 3 seconds.
■Recalling the driving position us ing the memory recall function
●Different driving positions can be registered for each electronic key. Therefore, the
driving position that is recalled may be different depending on the key being carried.
●If a door other than the driver’s door is unlocked with the smart entry & start system, the
driving position cannot be recalled. In this case, press the driving position button which
has been set.
■Customization
The unlock door settings of the memory recall function can be customized.
(Customizable features: P. 561)
WARNING
■Seat adjustment caution
Take care during seat adjustment so that the seat does not strike the rear passenger or
squeeze your body against the steering wheel.
1
2
1
2
Page 186 of 600
1863-4. Adjusting the steering wheel and mirrors
GS450h_300h_OM_OM30F92E_(EE)
Steering wheel
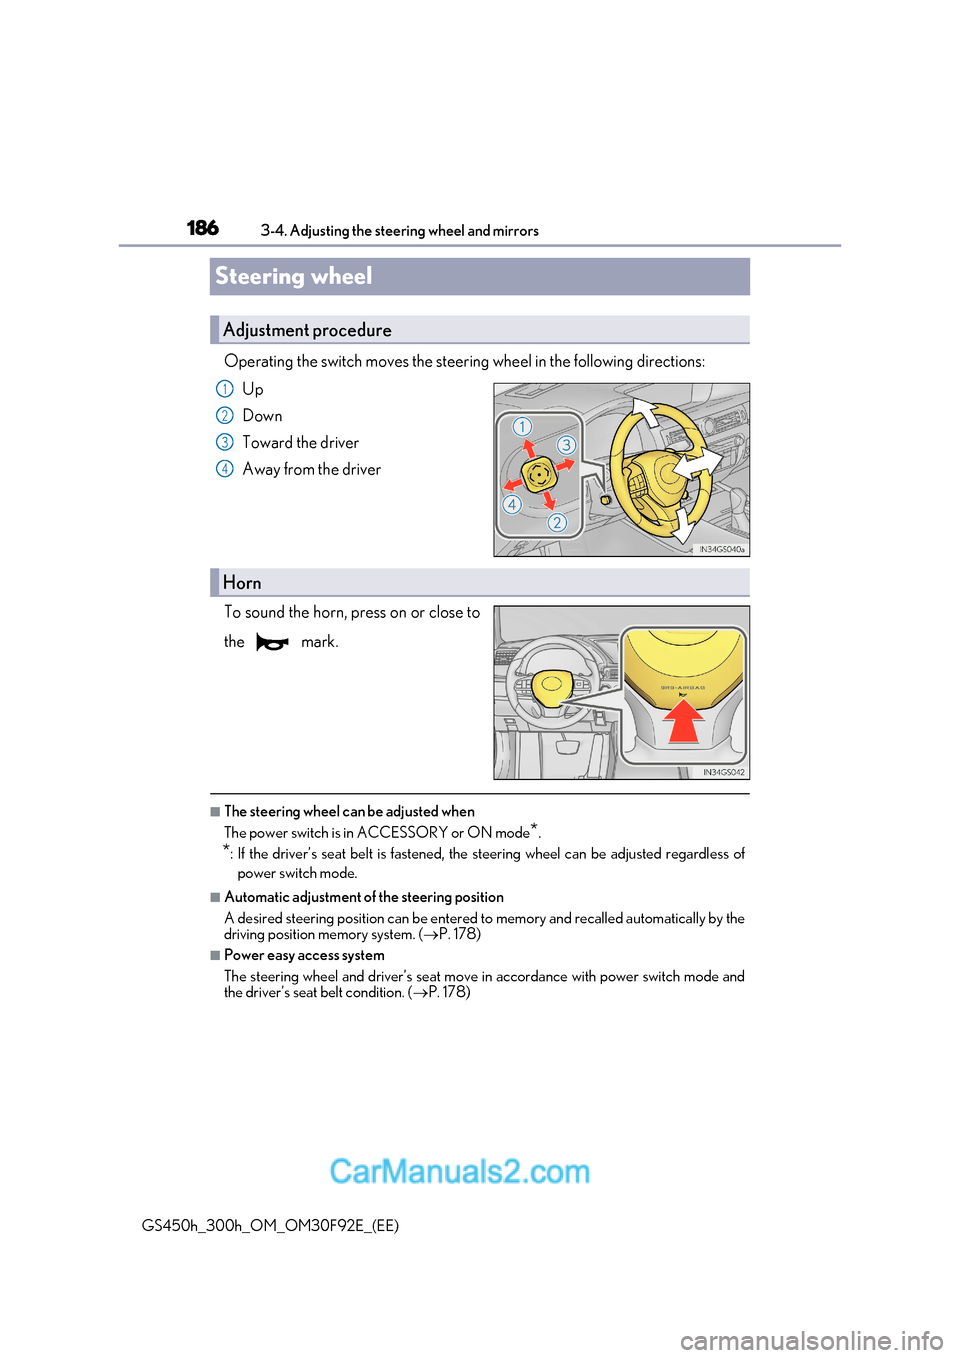
Operating the switch moves the steering wheel in the following directions: Up
Down
Toward the driver
Away from the driver
To sound the horn, press on or close to
the mark.
■The steering wheel can be adjusted when
The power switch is in ACCESSORY or ON mode *.
* : If the driver’s seat belt is fastened, the steering wheel can be adjusted regardless of
power switch mode.
■Automatic adjustment of the steering position
A desired steering position can be entered to memory and recalled automatically by the
driving position memory system. ( P. 178)
■Power easy access system
The steering wheel and driver’s seat move in accordance with power switch mode and
the driver’s seat belt condition. ( P. 178)
Adjustment procedure
1
2
3
4
Horn
Page 188 of 600
1883-4. Adjusting the steering wheel and mirrors
GS450h_300h_OM_OM30F92E_(EE)
Inside rear view mirror
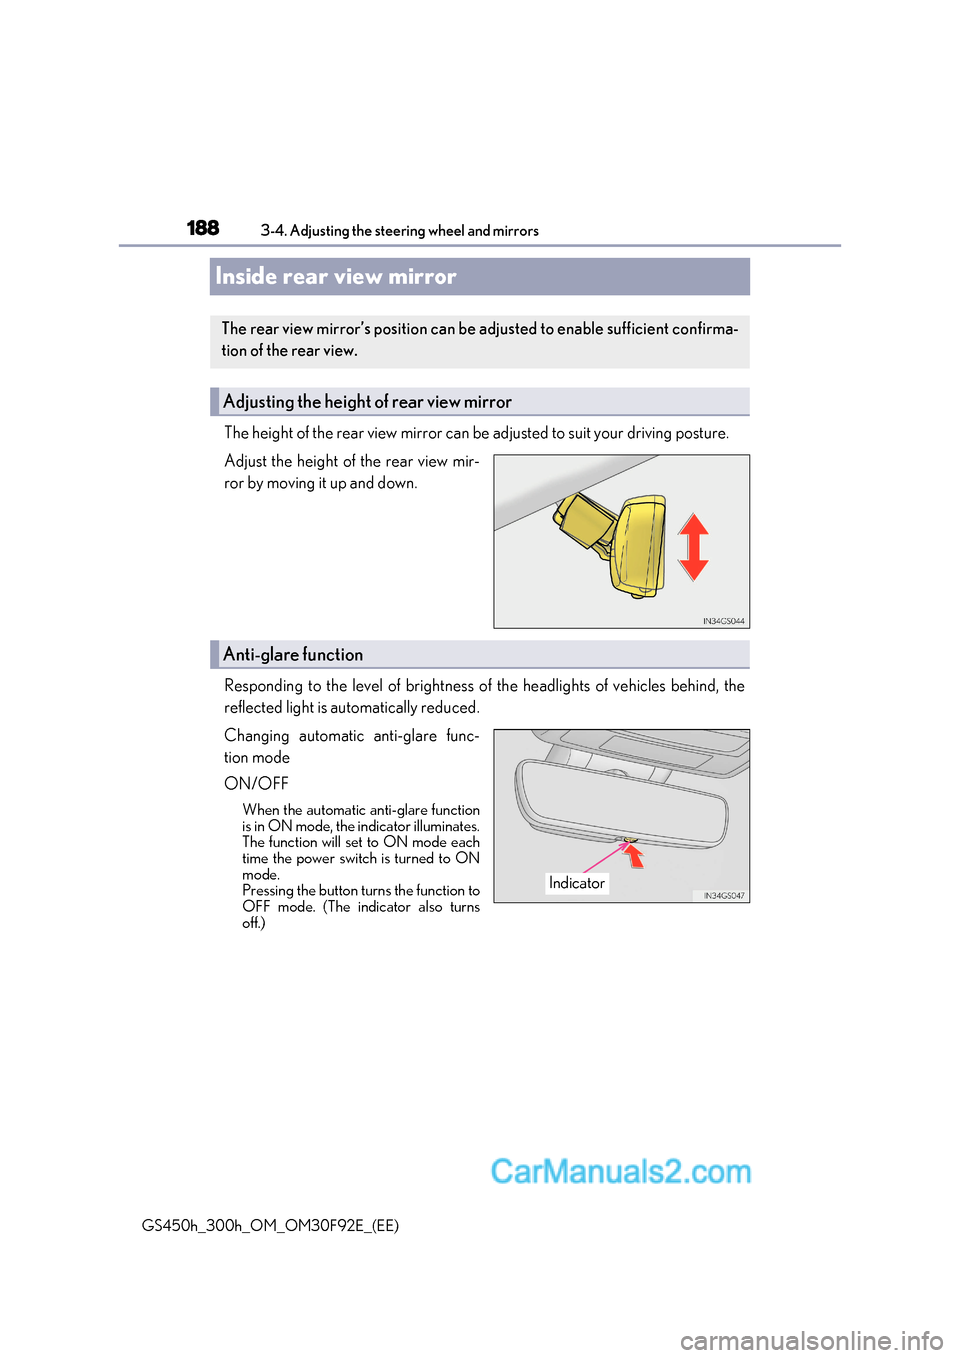
The height of the rear view mirror can be adjusted to suit your driving posture.
Adjust the height of the rear view mir-
ror by moving it up and down.
Responding to the level of brightness of the headlights of vehicles behind, the
reflected light is automatically reduced.
Changing automatic anti-glare func-
tion mode
ON/OFF
When the automatic anti-glare function
is in ON mode, the indicator illuminates.
The function will set to ON mode each
time the power switch is turned to ON
mode.
Pressing the button turns the function to
OFF mode. (The indicator also turns
off.)
The rear view mirror’s position can be adjusted to enable sufficient confirma-
tion of the rear view.
Adjusting the height of rear view mirror
Anti-glare function
Indicator
Page 192 of 600
1923-4. Adjusting the steering wheel and mirrors
GS450h_300h_OM_OM30F92E_(EE)
■Mirror angle can be adjusted when
The power switch is in ACCESSORY or ON mode.
■When the mirrors are fogged up
The outside rear view mirrors can be clea red using the mirror defoggers. Turn on the
rear window defogger to turn on the outside rear view mirror defoggers. ( P. 352)
■Automatic adjustment of the mirror angle
A desired mirror face angle can be entered to memory and recalled automatically by the
driving position memory. ( P. 178)
■Auto anti-glare function
When the anti-glare inside rear view mirror is set to automatic mode, the outside rear
view mirrors will activate in conjunction with the anti-glare inside rear view mirror to
reduce reflected light. ( P. 188)
■Using automatic mode in cold weather
When automatic mode is used in cold weather, the door mirror could freeze up and
automatic stowing and return may not be possible. In this event, remove any ice and snow
from the door mirror, then either operate the mirror using manual mode or move the mir- ror by hand.
WARNING
■Important points while driving
Observe the following precautions while driving.
Failure to do so may result in loss of control of the vehicle and cause an accident, result-
ing in death or serious injury.
●Do not adjust the mirrors while driving.
●Do not drive with the mirrors folded.
●Both the driver and passenger side mirrors must be extended and properly adjusted
before driving.
■When a mirror is moving
To avoid personal injury and mirror malfunction, be careful not to get your hand caught
by the moving mirror.
■When the mirror defoggers are operating
Do not touch the rear view mirror surfaces, as they can become very hot and burn you.