tires LEXUS GS300H 2019 Service Manual
[x] Cancel search | Manufacturer: LEXUS, Model Year: 2019, Model line: GS300H, Model: LEXUS GS300H 2019Pages: 600, PDF Size: 55.99 MB
Page 510 of 600
5107-2. Steps to take in an emergency
GS450h_300h_OM_OM30F92E_(EE)
●Stop the vehicle in a safe place on a hard, flat surface.
●Set the parking brake.
●Shift the shift lever to P.
●Stop the hybrid system.
●Turn on the emergency flashers. (P. 452)
●Check the degree of the tire damage.
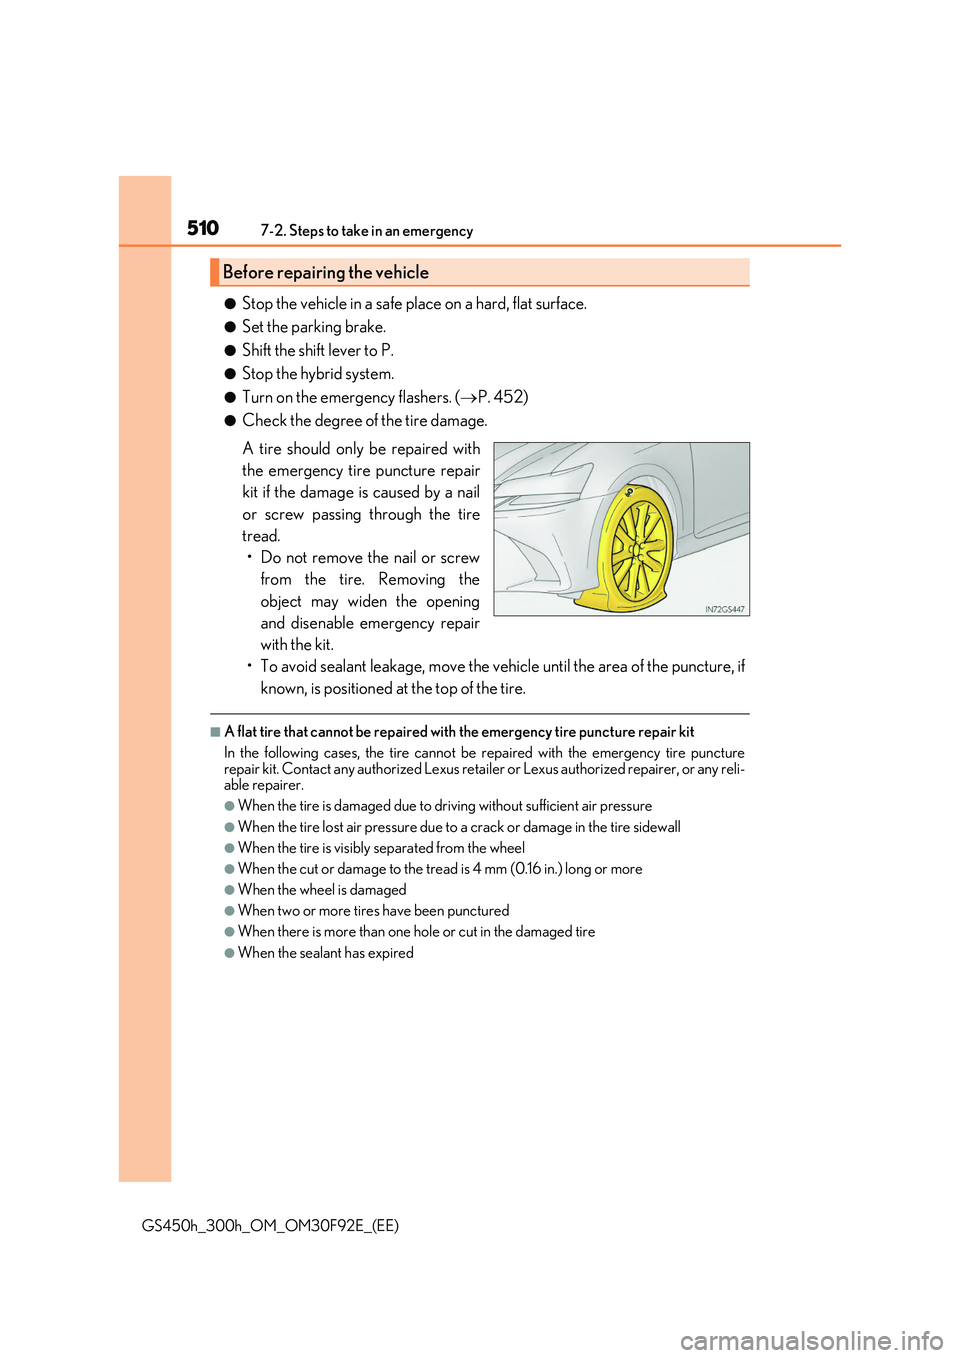
A tire should only be repaired with
the emergency tire puncture repair
kit if the damage is caused by a nail
or screw passing through the tire
tread.
• Do not remove the nail or screw
from the tire. Removing the
object may widen the opening
and disenable emergency repair
with the kit.
• To avoid sealant leakage, move the vehicle until the area of the puncture, if
known, is positioned at the top of the tire.
■A flat tire that cannot be repaired with the emergency tire puncture repair kit
In the following cases, the tire cannot be repaired with the emergency tire puncture
repair kit. Contact any authorized Lexus reta iler or Lexus authorized repairer, or any reli- able repairer.
●When the tire is damaged due to driving without sufficient air pressure
●When the tire lost air pressure due to a crack or damage in the tire sidewall
●When the tire is visibly separated from the wheel
●When the cut or damage to the tread is 4 mm (0.16 in.) long or more
●When the wheel is damaged
●When two or more tires have been punctured
●When there is more than one hole or cut in the damaged tire
●When the sealant has expired
Before repairing the vehicle
Page 519 of 600
5197-2. Steps to take in an emergency
7
When trouble arises
GS450h_300h_OM_OM30F92E_(EE)
Turn the compressor switch on to inflate the tire until the recommended tire
inflation pressure is reached. Drive for about 5 km (3 miles) and then perform
step .
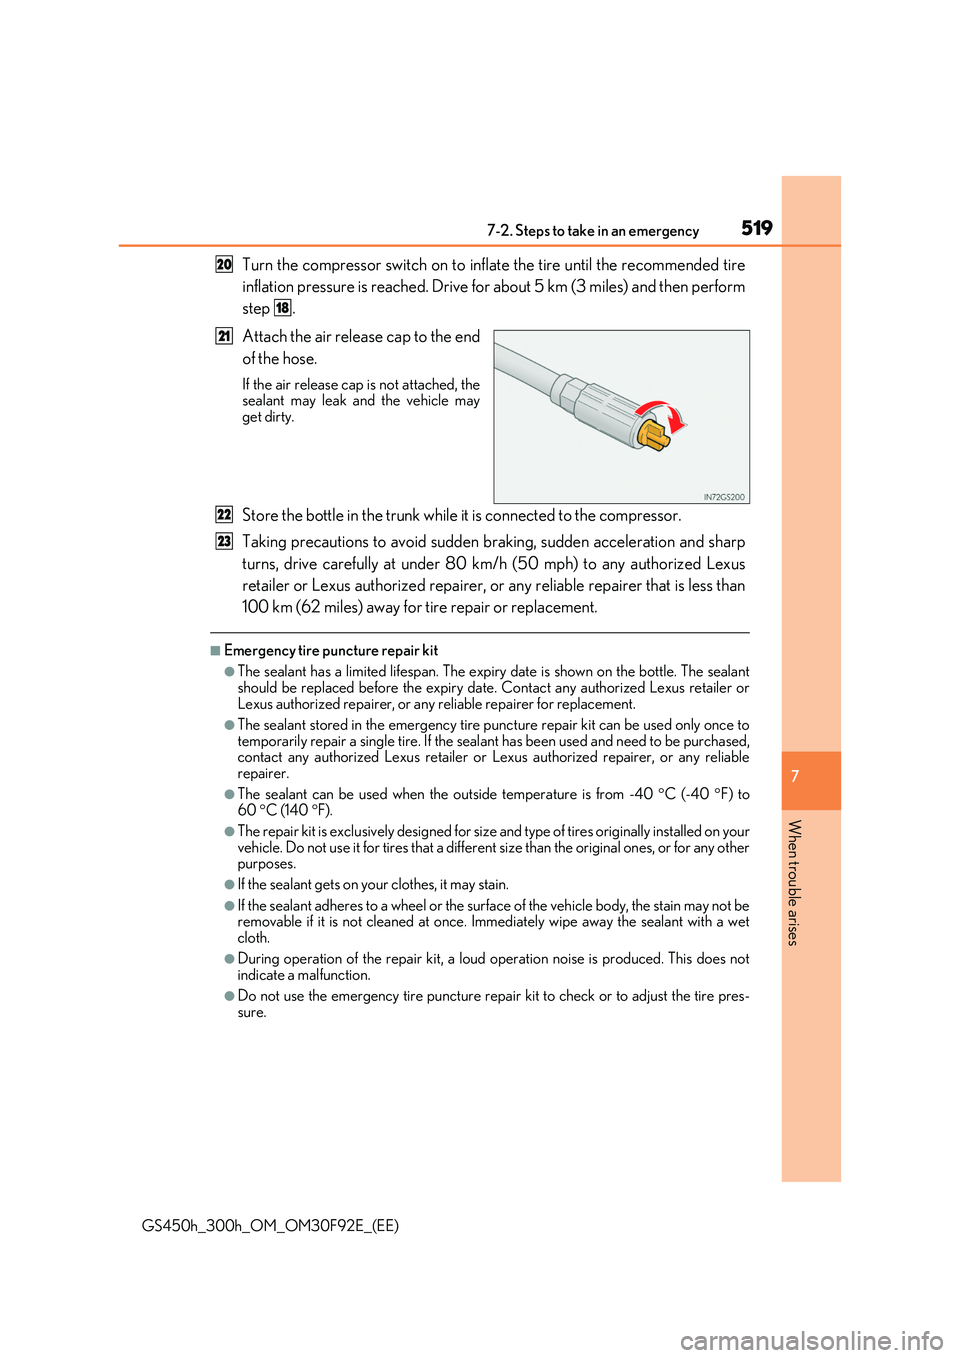
Attach the air release cap to the end
of the hose.
If the air release cap is not attached, the sealant may leak and the vehicle mayget dirty.
Store the bottle in the trunk while it is connected to the compressor.
Taking precautions to avoid sudden braking, sudden acceleration and sharp
turns, drive carefully at under 80 km /h (50 mph) to any authorized Lexus
retailer or Lexus authorized repairer, or any reliable repairer that is less than
100 km (62 miles) away for tire repair or replacement.
■Emergency tire puncture repair kit
●The sealant has a limited lifespa n. The expiry date is shown on the bottle. The sealant
should be replaced before the expiry date. Contact any authorized Lexus retailer or Lexus authorized repairer, or any reliable repairer for replacement.
●The sealant stored in the emergency tire puncture repair kit can be used only once to
temporarily repair a single tire. If the sealant has been used and need to be purchased, contact any authorized Lexus retailer or Lexus authorized repairer, or any reliable repairer.
●The sealant can be used when the outside temperature is from -40 C (-40 F) to 60 C (140 F).
●The repair kit is exclusively designed for size and type of tires originally installed on your
vehicle. Do not use it for tires that a different size than the original ones, or for any other purposes.
●If the sealant gets on your clothes, it may stain.
●If the sealant adheres to a wheel or the surface of the vehicle body, the stain may not beremovable if it is not cleaned at once. Immediately wipe away the sealant with a wetcloth.
●During operation of the repair kit, a loud operation noise is produced. This does not indicate a malfunction.
●Do not use the emergency tire puncture repair kit to check or to adjust the tire pres-
sure.
20
18
21
22
23
Page 520 of 600
5207-2. Steps to take in an emergency
GS450h_300h_OM_OM30F92E_(EE)
■If the tire is inflated to more than the recommended level
Disconnect the hose from the valve.
Disconnect the hose from the valve, remove the air release cap from the hose and then reconnect the hose.
Turn the compressor switch on and wait for se veral seconds, and then turn it off. Check that the air pressure indicator shows the recommended level. ( P. 555) If the air pressure is lower than the reco mmended level, turn the compressor switch on
again and repeat the inflation procedure un til the recommended pressure is reached.
■After a tire is repaired with the emergency tire puncture repair kit
●The tire pressure warning valve and transmitter should be replaced.
●Vehicles with the tire pressure warning system: Even if the tire inflation pressure is at the recommended level, the ti re pressure warning light may come on/flash.
■Note for checking the emergency tire puncture repair kit
Check the sealant expiry date occasionally. The expiry date is shown on the bottle.Do not use sealant whose expiry date has already passed. Otherwise, repairs conducted
using the emergency tire puncture repair kit may not be performed properly.
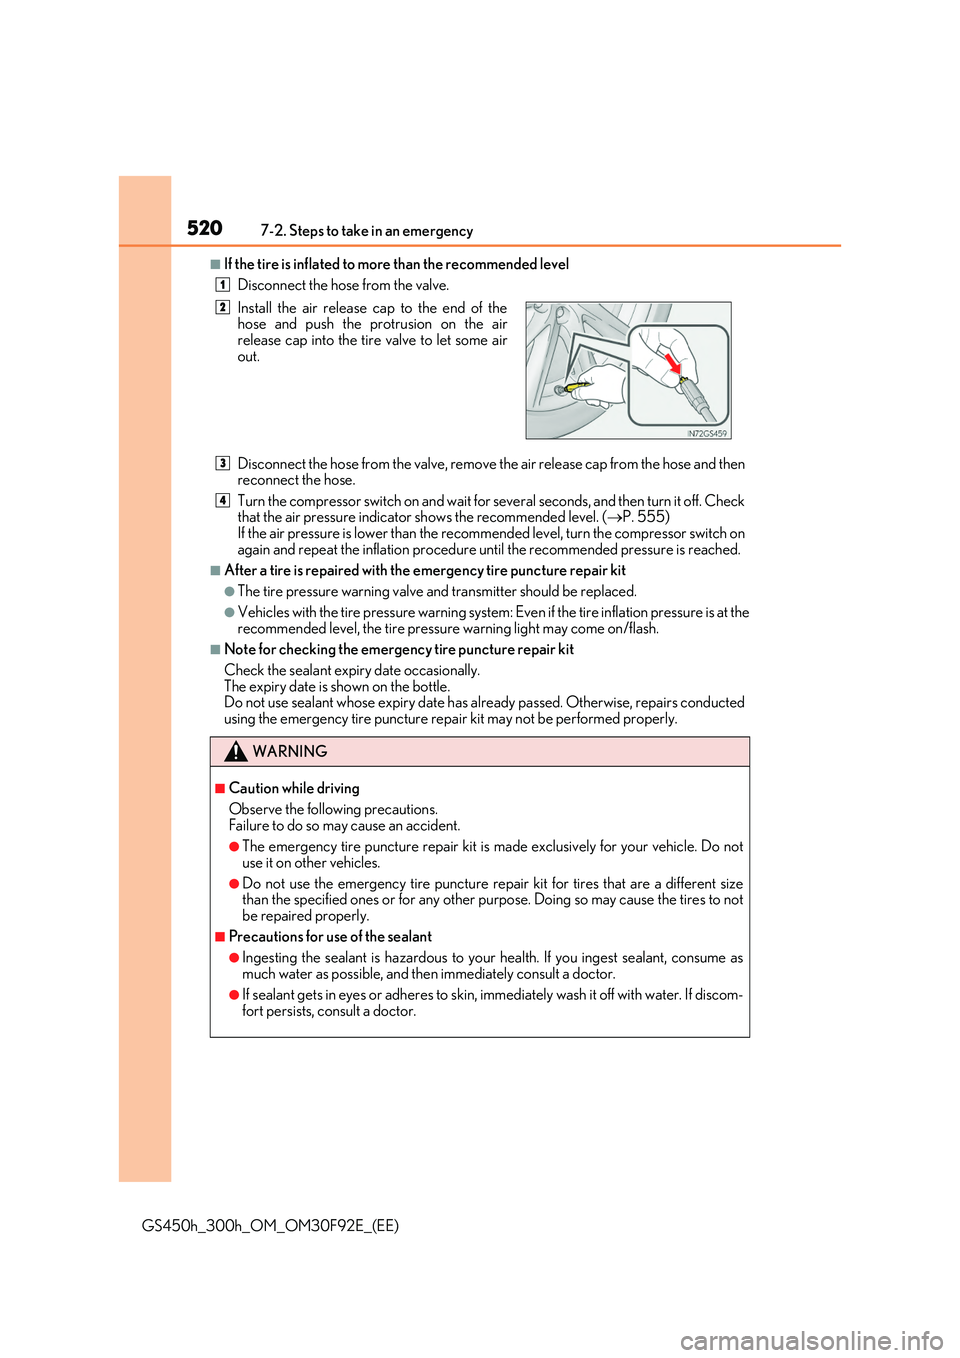
Install the air release cap to the end of the hose and push the protrusion on the airrelease cap into the tire valve to let some air
out.
WARNING
■Caution while driving
Observe the following precautions. Failure to do so may cause an accident.
●The emergency tire puncture repair kit is made exclusively for your vehicle. Do not
use it on other vehicles.
●Do not use the emergency tire puncture repair kit for tires that are a different size than the specified ones or fo r any other purpose. Doing so may cause the tires to not
be repaired properly.
■Precautions for use of the sealant
●Ingesting the sealant is hazardous to your health. If you ingest sealant, consume as
much water as possible, and then immediately consult a doctor.
●If sealant gets in eyes or adheres to skin, i mmediately wash it off with water. If discom- fort persists, consult a doctor.
1
2
3
4
Page 525 of 600

525
7
7-2. Steps to take in an emergency
When trouble arises
GS450h_300h_OM_OM30F92E_(EE)
If the parking brake cannot be released
●Shift the shift lever to P.
●Turn the power switch off.
●Check that the parking brake indicator is off.
●Chock the tires.
Take out the parking brake release
tool and the screwdriver from the
trunk. ( P. 499, 511)
Fit the parking brake release tool into the screwdriver handle.
Vehicles with spare tire: Take out the spare tire. ( P. 501)
Vehicles without spare tire: Remove the center auxiliary box. ( P. 513)
In the event that the 12-volt battery is discharged or switch operation does not
release the parking brake, the parking brake can be released manually using
the procedure below. This procedure should be performed only if necessary,
such as in an emergency.
If the switch cannot be operated even when the 12-volt battery is normal, the
parking brake system may be malfunctioning. Have the vehicle inspected by
any authorized Lexus retailer or Lexus authorized repairer, or any reliable
repairer immediately.
Before releasing the parking brake manually
Releasing the parking brake manually
1
2
Page 526 of 600

5267-2. Steps to take in an emergency
GS450h_300h_OM_OM30F92E_(EE)
Remove the plug.
Insert the tool and press it down
firmly while turning it counterclock-
wise until it stops.
■Manual operation of the parking brake
The parking brake cannot be set manually.
3
4
WARNING
■When releasing the parking brake manually
●Shift the shift lever to P, turn the power switch off and chock the tires. Failure to do so may cause the vehicle to move, resulting in an accident.
●Turn the power switch off and check that the parking brake indicator is off. Failure todo so may cause the system to operate and turn the inserted parking brake releasetool, resulting in an injury.
Page 542 of 600
5427-2. Steps to take in an emergency
GS450h_300h_OM_OM30F92E_(EE)
If the vehicle becomes stuck
Stop the hybrid system. Set the parking brake and shift the shift lever to P.
Remove the mud, snow or sand from around the rear wheels.
Place wood, stones or some other materi al under the rear wheels to help pro-
vide traction.
Restart the hybrid system.
Shift the shift lever to D or R and rele ase the parking brake. Then, while exer-
cising caution, depress the accelerator pedal.
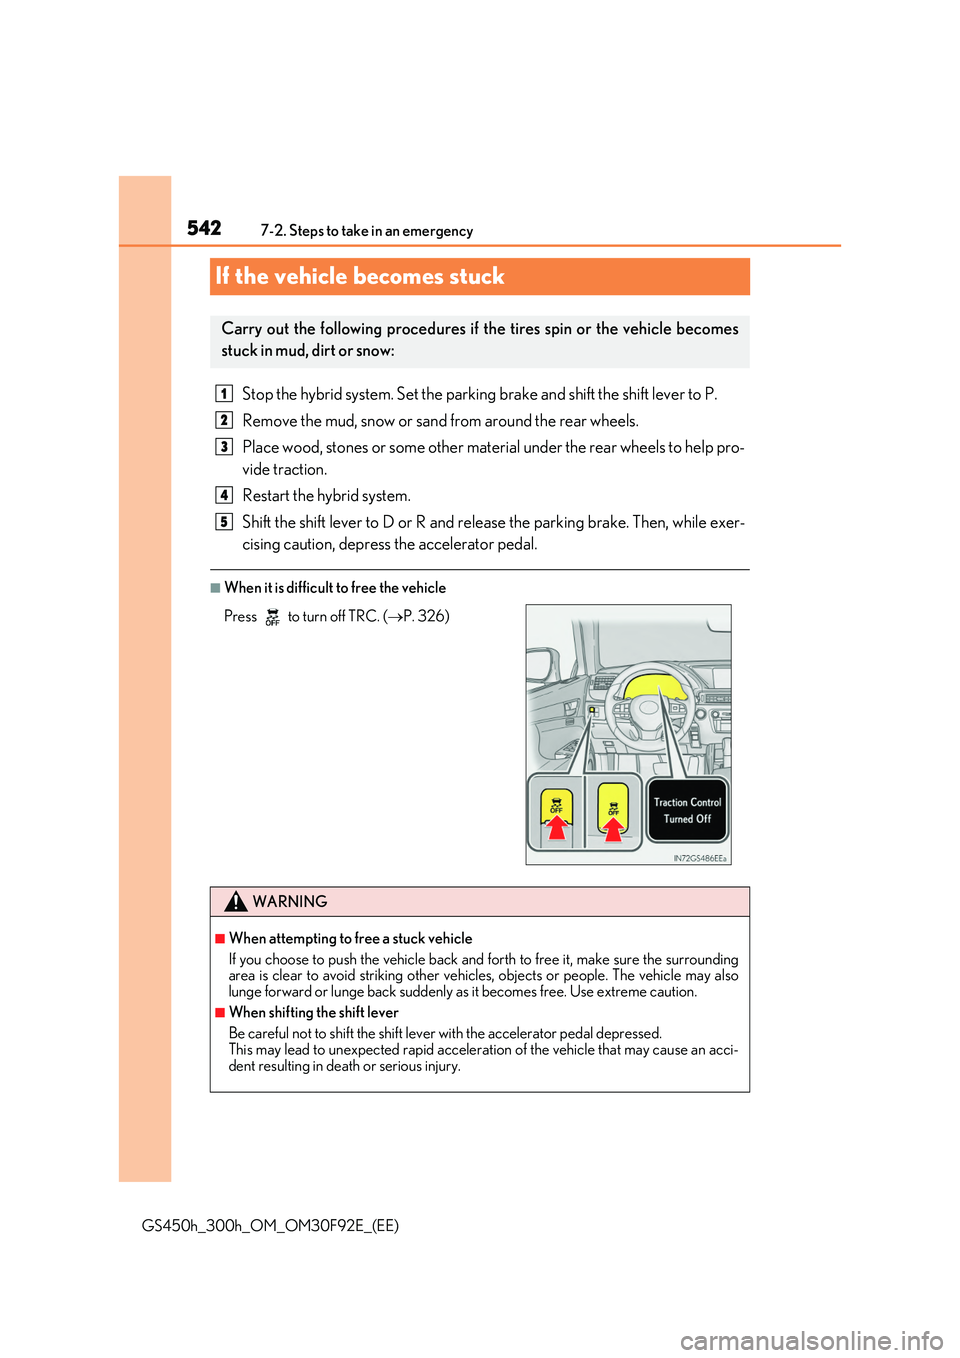
■When it is difficult to free the vehicle
Carry out the following procedures if the tires spin or the vehicle becomes
stuck in mud, dirt or snow:
Press to turn off TRC. ( P. 326)
WARNING
■When attempting to free a stuck vehicle
If you choose to push the vehicle back and forth to free it, make sure the surrounding area is clear to avoid striking other vehi cles, objects or people. The vehicle may also
lunge forward or lunge back suddenly as it becomes free. Use extreme caution.
■When shifting the shift lever
Be careful not to shift the shift lever with the accelerator pedal depressed.
This may lead to unexpected rapid acceleration of the vehicle that may cause an acci- dent resulting in death or serious injury.
1
2
3
4
5
Page 546 of 600
5468-1. Specifications
GS450h_300h_OM_OM30F92E_(EE)
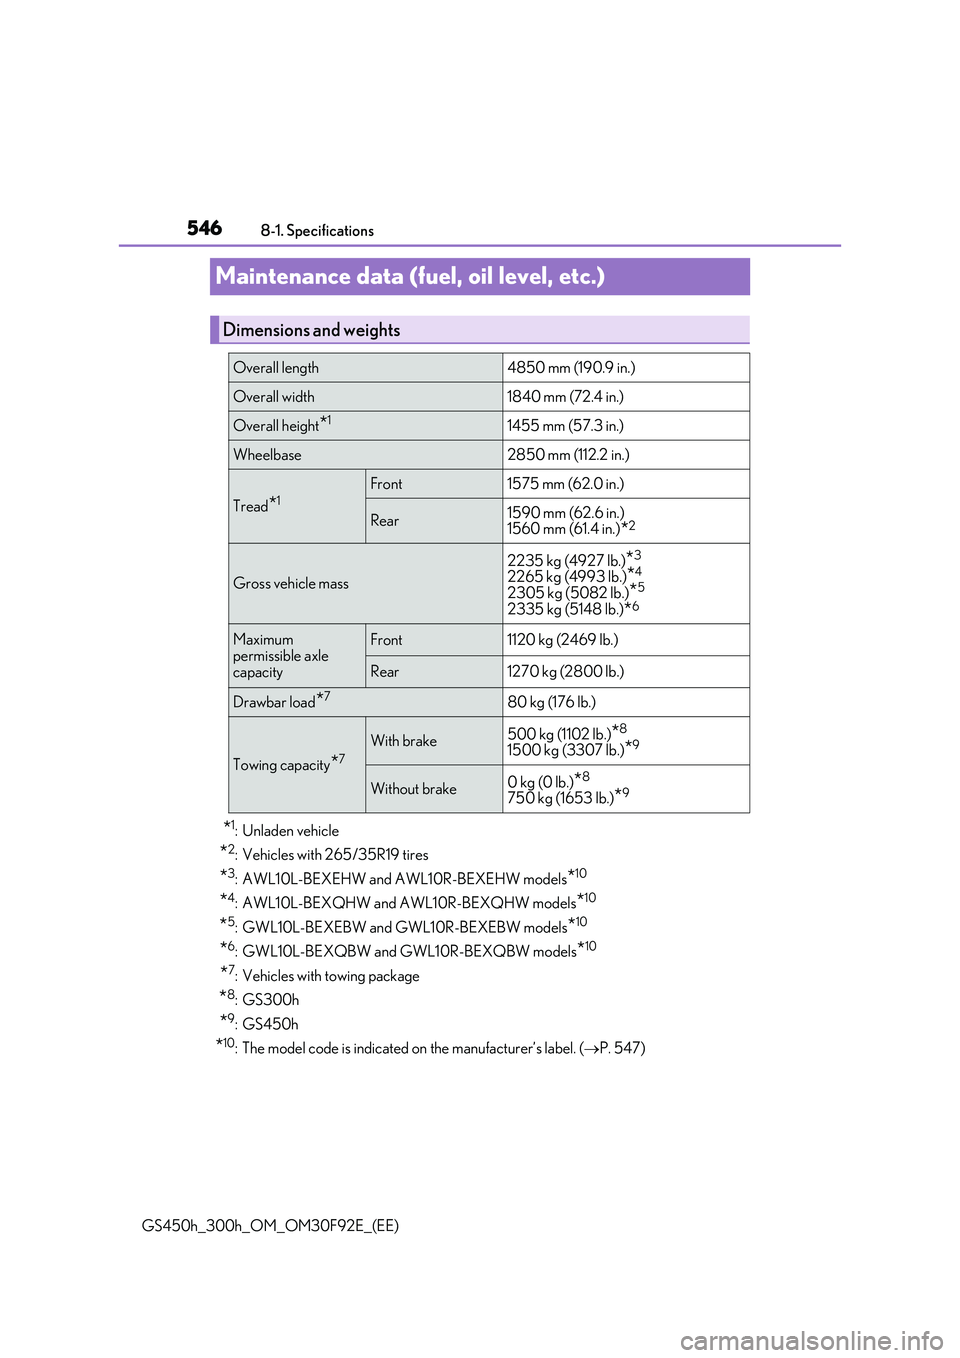
Maintenance data (fuel, oil level, etc.)
*1: Unladen vehicle
*2: Vehicles with 265/35R19 tires
*3: AWL10L-BEXEHW and AWL10R-BEXEHW models*10
*4: AWL10L-BEXQHW and AWL10R-BEXQHW models*10
*5: GWL10L-BEXEBW and GWL10R-BEXEBW models*10
*6: GWL10L-BEXQBW and GWL10R-BEXQBW models*10
*7: Vehicles with towing package
*8:GS300h
*9:GS450h
*10: The model code is indicated on the manufacturer’s label. (P. 547)
Dimensions and weights
Overall length 4850 mm (190.9 in.)
Overall width 1840 mm (72.4 in.)
Overall height*11455 mm (57.3 in.)
Wheelbase 2850 mm (112.2 in.)
Tread*1Front 1575 mm (62.0 in.)
Rear 1590 mm (62.6 in.) 1560 mm (61.4 in.)*2
Gross vehicle mass
2235 kg (4927 lb.)*3
2265 kg (4993 lb.)*4
2305 kg (5082 lb.)*5
2335 kg (5148 lb.)*6
Maximum permissible axle
capacity
Front 1120 kg (2469 lb.)
Rear 1270 kg (2800 lb.)
Drawbar load*780 kg (176 lb.)
Towing capacity*7
With brake 500 kg (1102 lb.)*8
1500 kg (3307 lb.)*9
Without brake0 kg (0 lb.)*8
750 kg (1653 lb.)*9
Page 555 of 600
555
8
8-1. Specifications
Vehicle specifications
GS450h_300h_OM_OM30F92E_(EE)
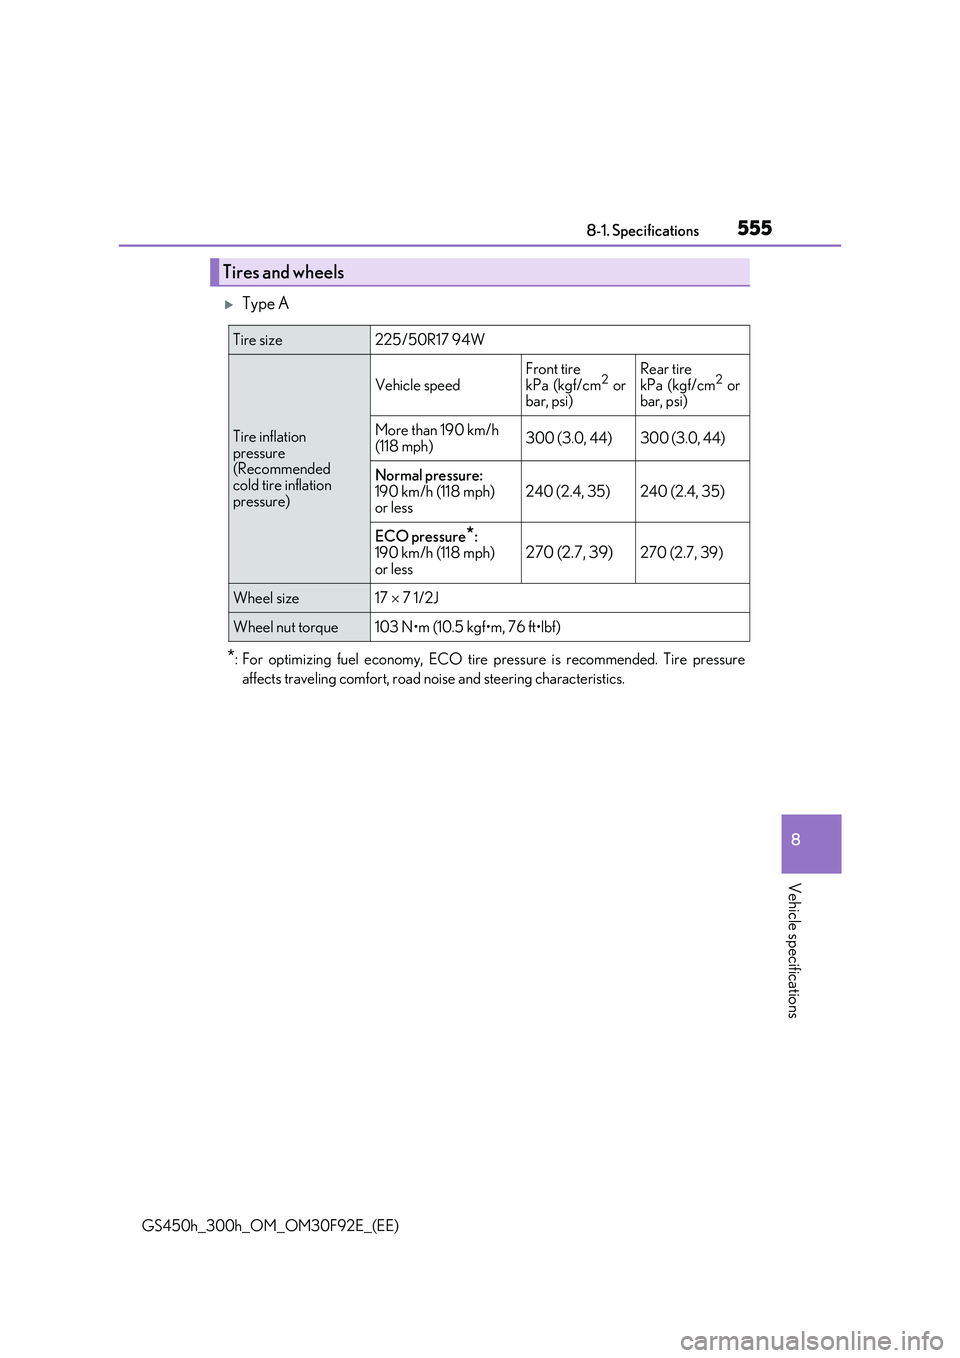
Type A
*: For optimizing fuel economy, ECO tire pressure is recommended. Tire pressure
affects traveling comfort, road noise and steering characteristics.
Tires and wheels
Tire size225/50R17 94W
Tire inflation
pressure (Recommended cold tire inflation
pressure)
Vehicle speed
Front tire
kPa (kgf/cm2 or bar, psi)
Rear tire
kPa (kgf/cm2 or bar, psi)
More than 190 km/h(118 mph)300 (3.0, 44)300 (3.0, 44)
Normal pressure:
190 km/h (118 mph) or less240 (2.4, 35)240 (2.4, 35)
ECO pressure*:190 km/h (118 mph)
or less270 (2.7, 39)270 (2.7, 39)
Wheel size17 7 1/2J
Wheel nut torque103 N•m (10.5 kgf•m, 76 ft•lbf)
Page 576 of 600
5768-3. Initialization
GS450h_300h_OM_OM30F92E_(EE)
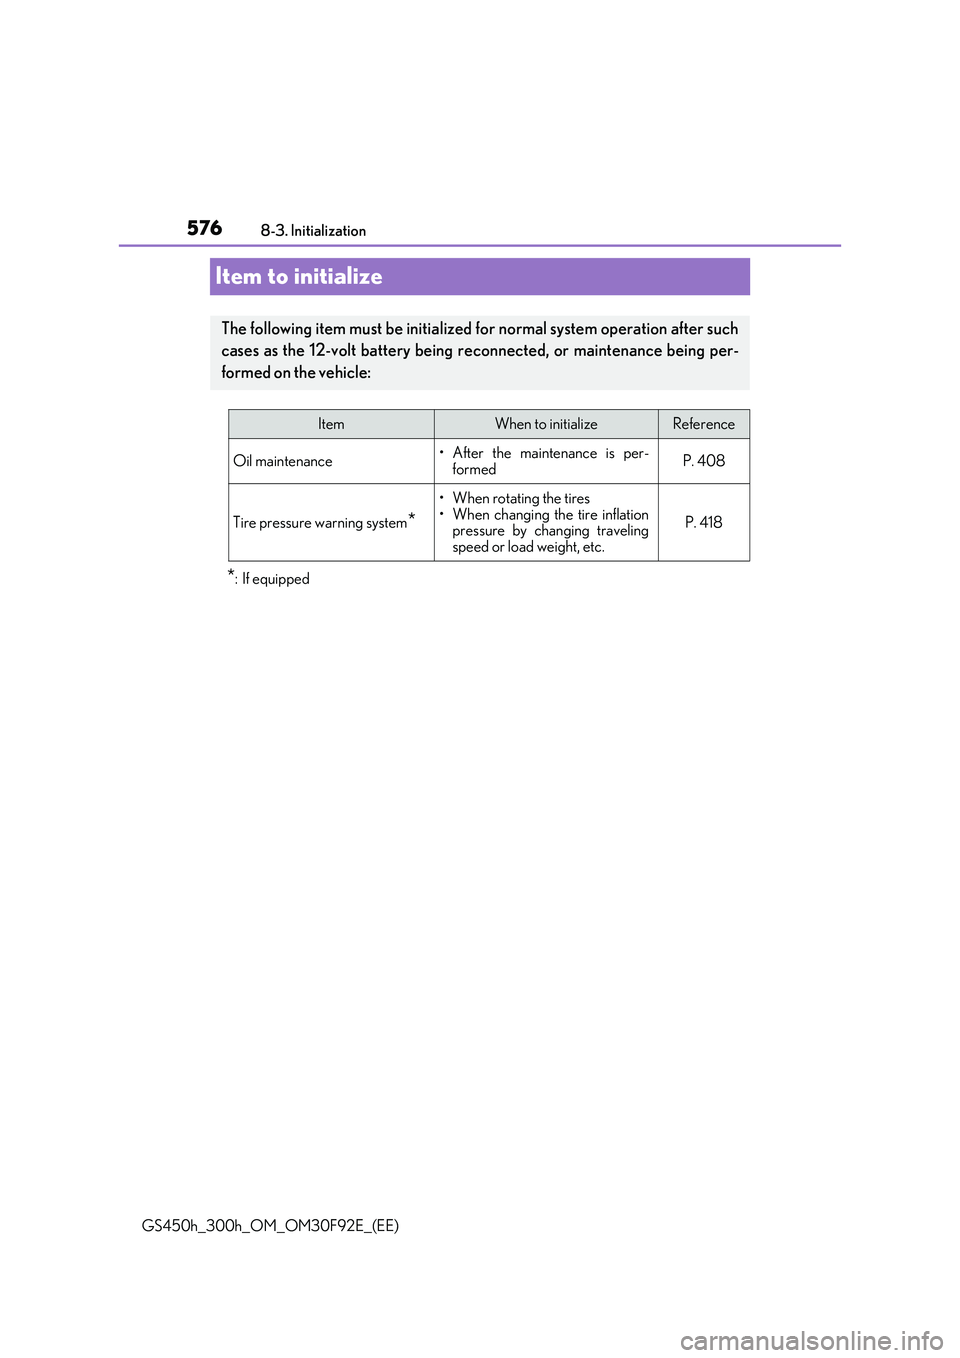
Item to initialize
*: If equipped
The following item must be initialized for normal system operation after such
cases as the 12-volt battery being re connected, or maintenance being per-
formed on the vehicle:
ItemWhen to initializeReference
Oil maintenance• After the maintenance is per-
formedP. 408
Tire pressure warning system*
• When rotating the tires • When changing the tire inflationpressure by changing traveling
speed or load weight, etc.
P. 418
Page 594 of 600
594Alphabetical index
GS450h_300h_OM_OM30F92E_(EE)
Refueling .................................................. 257
Capacity .................................................549
Fuel types ...............................................549
Opening the fuel tank cap ............259
When the fuel filler door
cannot be opened ......................... 259
Regenerative braking ............................ 78
Remote Touch*
Replacing
Electronic key battery......................435
Fuses ........................................................ 437
Light bulbs ............................................. 442
Tires ......................................................... 498
Rev indicator............................................ 106
Rev peak .................................................... 106
Road accident cautions.........................83
Seat belt reminder light ...................... 462
Seat belts .....................................................38
Adjusting the seat belt ........................ 39
Child restraint system
installation.............................................. 67
Cleaning and maintaining
the seat belt .......................................395
Emergency Locking
Retractor (ELR).................................. 40
How to wear your seat belt ............. 38
How your child should wear
the seat belt .......................................... 40
Pregnant women, proper
seat belt use ........................................... 41
Reminder light and buzzer ........... 462
Seat belt pretensioners ...................... 39
SRS warning light.............................. 460
Seat heaters ............................................ 362
Seat position memory...........................178
Seat ventilators ...................................... 362
Seats............................................................. 175
Adjustment ............................................. 175
Adjustment precautions................... 176
Child seats/child restraint
system installation ............................. 66
Cleaning ................................................ 394
Driving position memory ................ 178
Head restraints .....................................183
Power easy access system............. 178
Properly sitting in the seat................ 36
Seat heaters.......................................... 362
Seat position memory ....................... 178
Seat ventilators ................................... 362
Sensor
Automatic headlight system ........ 240
Automatic High Beam
system.................................................. 246
Inside rear view mirror .....................189
Intrusion sensor and tilt sensor.......94
Lexus parking assist-sensor*
LKA (Lane-Keeping Assist) ........ 282
Radar sensor .............................263, 318
Rain-sensing windshield
wipers .................................................. 255
Service plug ............................................... 80
Service reminder indicators ............... 98
S-FLOW mode ..................................... 347
S