night Lexus GS350 2007 Other interior features / LEXUS 2007 GS430/350 QUICK REFERENCE MANUAL
[x] Cancel search | Manufacturer: LEXUS, Model Year: 2007, Model line: GS350, Model: Lexus GS350 2007Pages: 58, PDF Size: 2.43 MB
Page 2 of 58
Entering and Exiting
Before Driving
When Driving
Rain and
Night Driving
Driving Comfort
Opening and Closing
What to do if ...
Customizing
Yo u r L e x u s
2
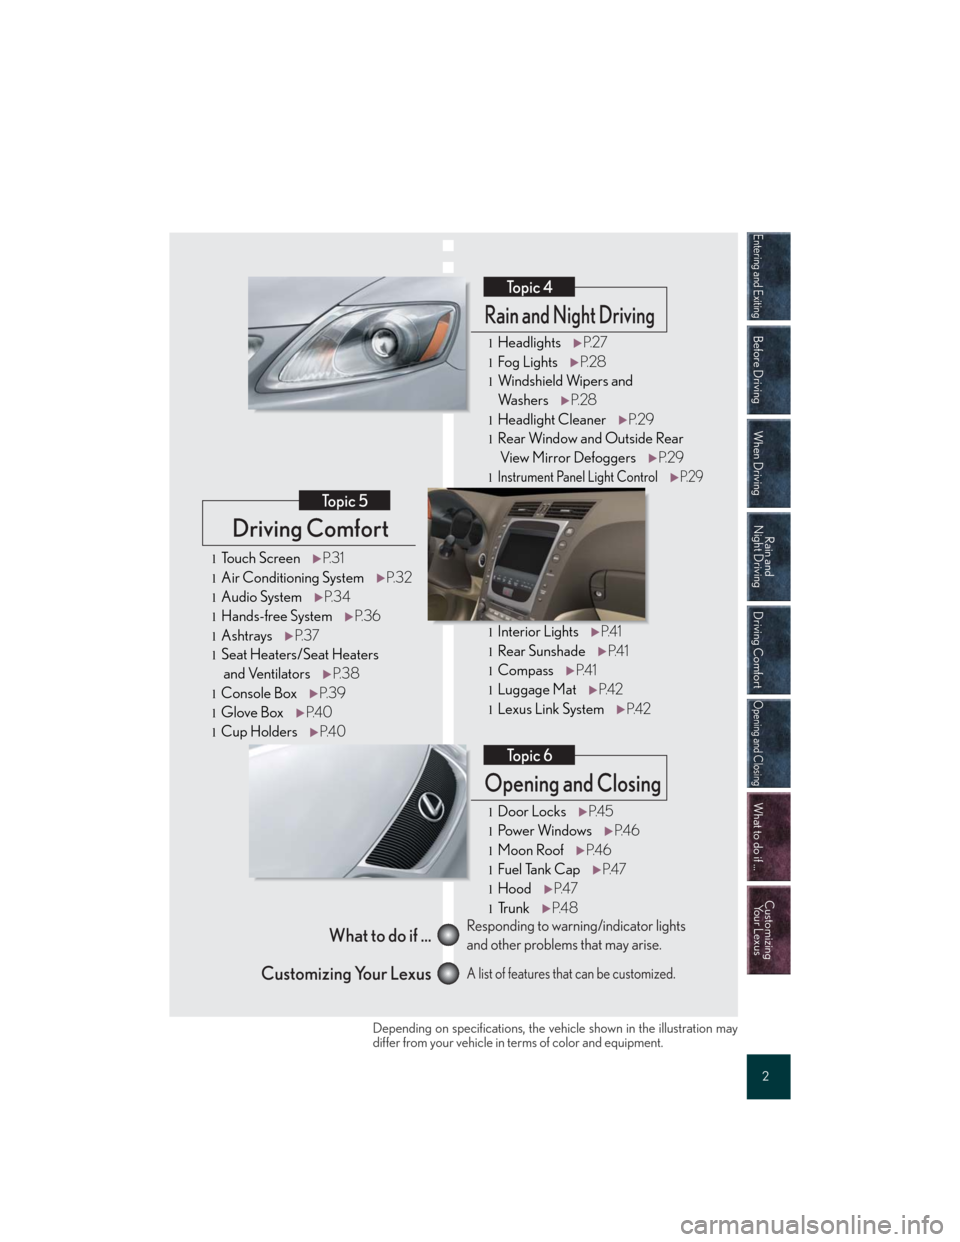
Driving Comfort
Topic 5
Opening and Closing
Topic 6
What to do if ...
Customizing Your LexusResponding to warning/indicator lights
and other problems that may arise.
A list of features that can be customized.
Rain and Night Driving
Topic 4
lHeadlightsP. 2 7
lFog LightsP. 2 8
lWindshield Wipers and
Wa s h e r sP. 2 8
lHeadlight CleanerP. 2 9
lRear Window and Outside Rear
View Mirror DefoggersP. 2 9
lInstrument Panel Light ControlP. 2 9
lInterior LightsP. 4 1
lRear SunshadeP. 4 1
lCompassP. 4 1
lLuggage MatP. 4 2
lLexus Link SystemP. 4 2
lDoor LocksP. 4 5
lPo w e r Wi n d o w sP. 4 6
lMoon RoofP. 4 6
lFuel Tank CapP. 4 7
lHoodP. 4 7
lTr u n kP. 4 8
lTo u c h S c r e e nP. 3 1
lAir Conditioning SystemP. 3 2
lAudio SystemP. 3 4
lHands-free SystemP. 3 6
lAshtraysP. 3 7
lSeat Heaters/Seat Heaters
and VentilatorsP. 3 8
lConsole BoxP. 3 9
lGlove BoxP. 4 0
lCup HoldersP. 4 0
Depending on specifications, the vehicle shown in the illustration may
differ from your vehicle in terms of color and equipment.
Page 8 of 58
Topic 1
Entering and Exiting
8
Entering and Exiting
When Driving
Rain and
Night Driving
Driving Comfort
Opening and Closing
What to do if ...
Customizing
Yo u r L e x u s
Before DrivingBefore Driving
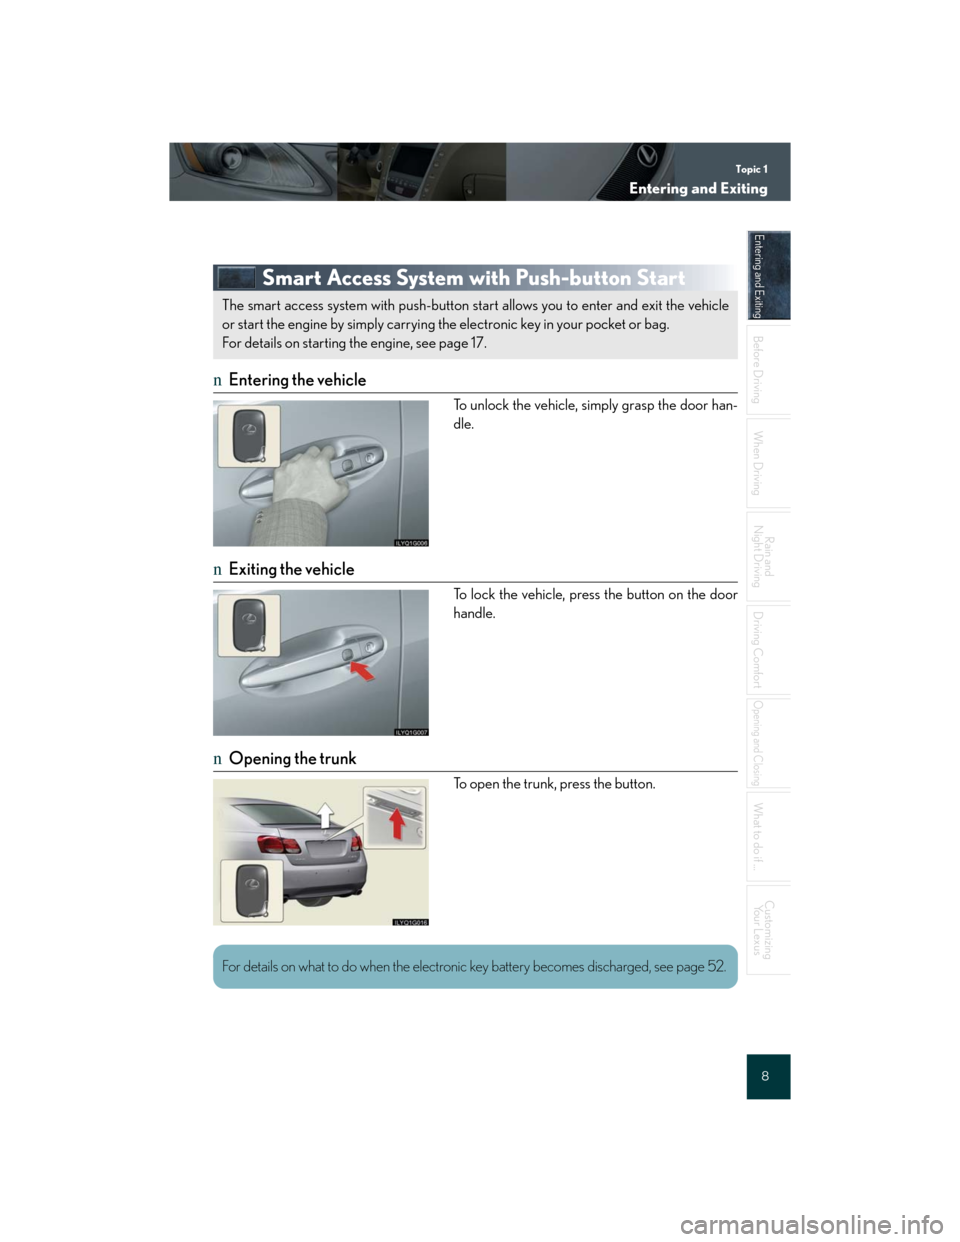
Smart Access System with Push-button Start
nEntering the vehicle
To unlock the vehicle, simply grasp the door han-
dle.
nExiting the vehicle
To lock the vehicle, press the button on the door
handle.
nOpening the trunk
To open the trunk, press the button.
The smart access system with push-button start allows you to enter and exit the vehicle
or start the engine by simply carrying the electronic key in your pocket or bag.
For details on starting the engine, see page 17.
For details on what to do when the electronic key battery becomes discharged, see page 52.
Page 12 of 58
Topic 2
Before Driving
12
Entering and Exiting
Before Driving
When Driving
Rain and
Night Driving
Driving Comfort
Opening and Closing
What to do if ...
Customizing
Yo u r L e x u s
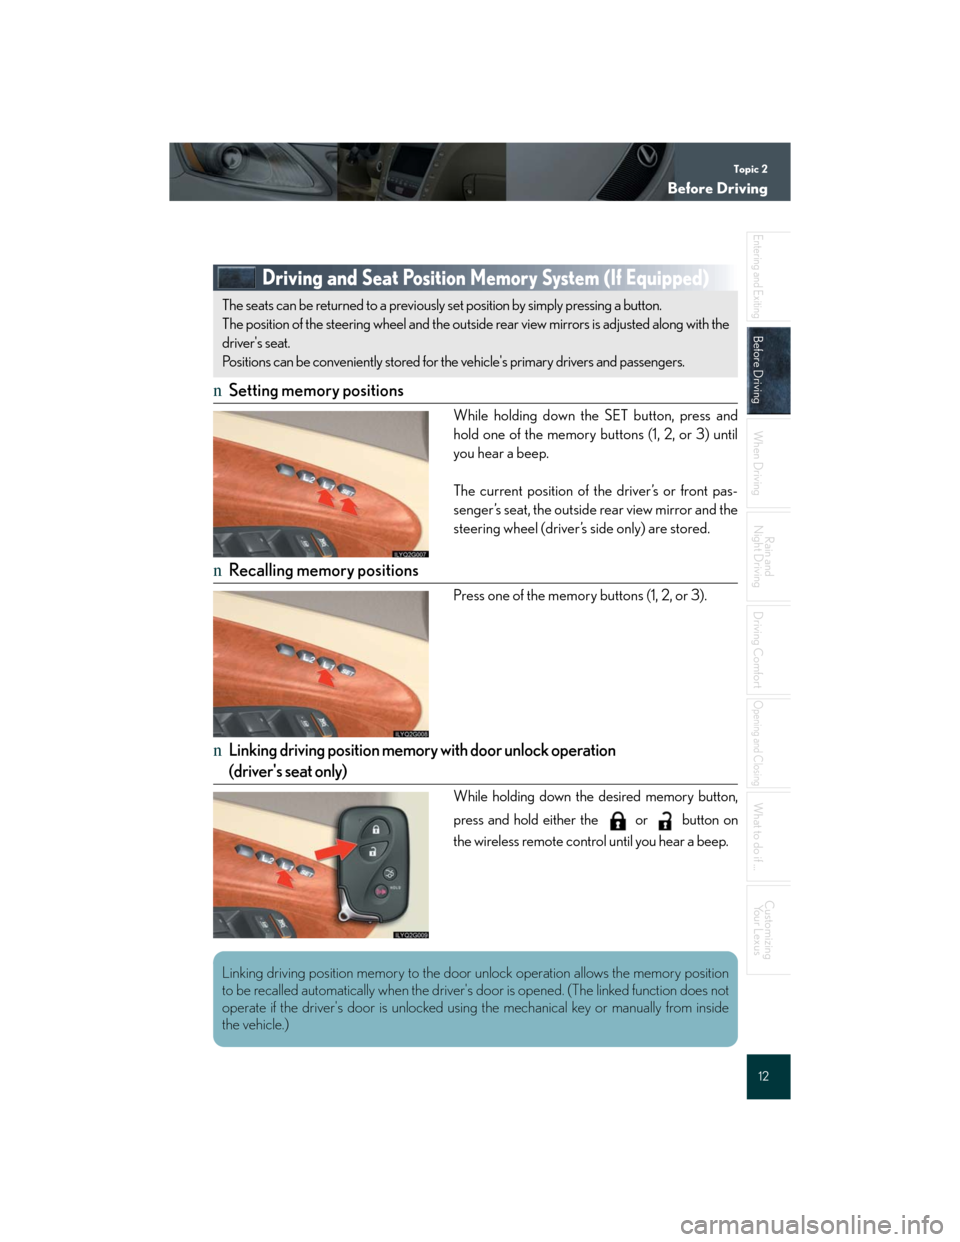
Driving and Seat Position Memory System (If Equipped)
nSetting memory positions
While holding down the SET button, press and
hold one of the memory buttons (1, 2, or 3) until
you hear a beep.
The current position of the driver’s or front pas-
senger’s seat, the outside rear view mirror and the
steering wheel (driver’s side only) are stored.
nRecalling memory positions
Press one of the memory buttons (1, 2, or 3).
nLinking driving position memory with door unlock operation
(driver's seat only)
While holding down the desired memory button,
press and hold either the or button on
the wireless remote control until you hear a beep.
The seats can be returned to a previously set position by simply pressing a button.
The position of the steering wheel and the outside rear view mirrors is adjusted along with the
driver's seat.
Positions can be conveniently stored for the vehicle's primary drivers and passengers.
Linking driving position memory to the door unlock operation allows the memory position
to be recalled automatically when the driver's door is opened. (The linked function does not
operate if the driver's door is unlocked using the mechanical key or manually from inside
the vehicle.)
Page 14 of 58
Topic 2
Before Driving
14
Entering and Exiting
Before Driving
When Driving
Rain and
Night Driving
Driving Comfort
Opening and Closing
What to do if ...
Customizing
Yo u r L e x u s
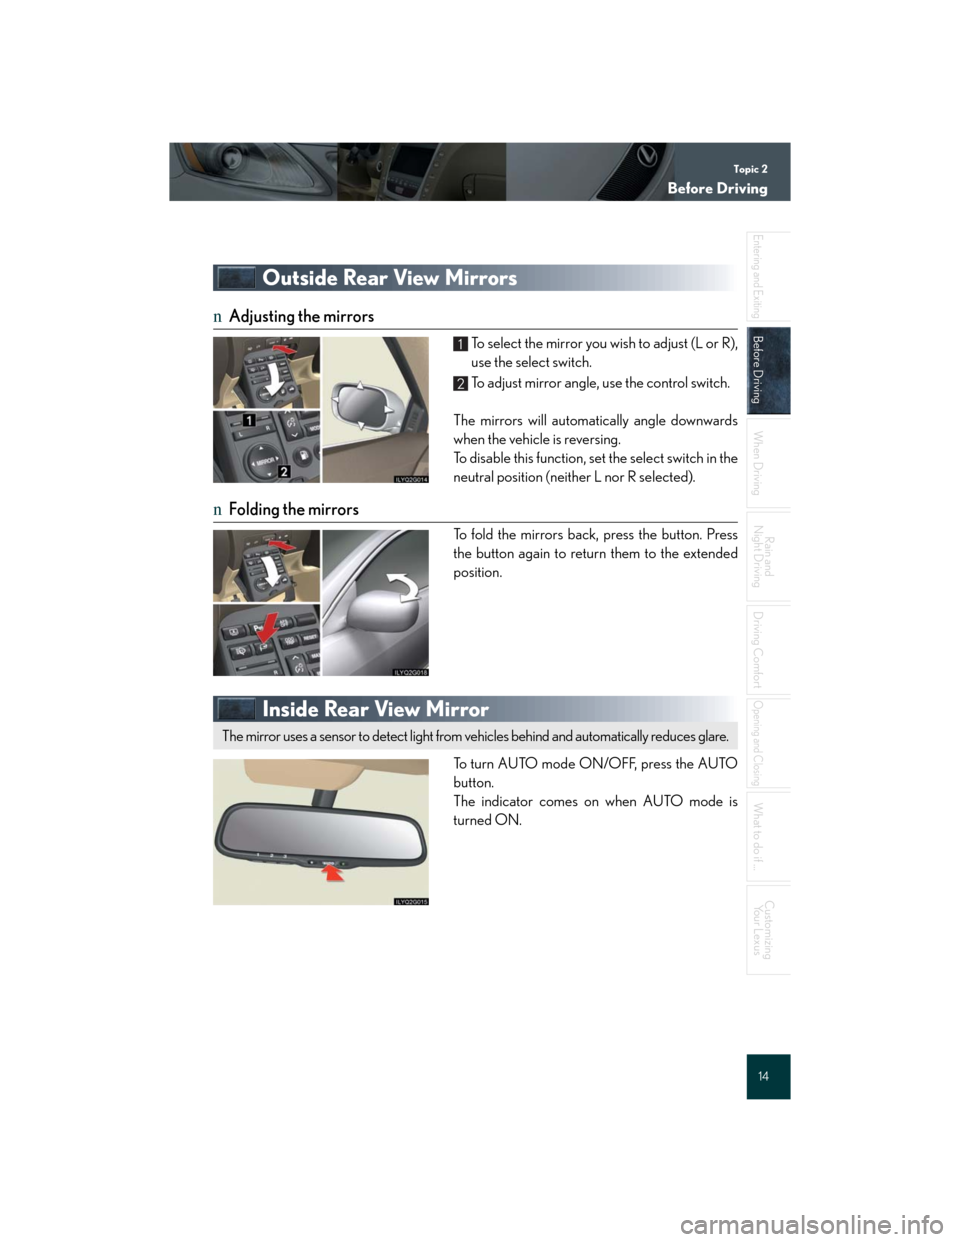
Outside Rear View Mirrors
nAdjusting the mirrors
To select the mirror you wish to adjust (L or R),
use the select switch.
To adjust mirror angle, use the control switch.
The mirrors will automatically angle downwards
when the vehicle is reversing.
To disable this function, set the select switch in the
neutral position (neither L nor R selected).
nFolding the mirrors
To fold the mirrors back, press the button. Press
the button again to return them to the extended
position.
Inside Rear View Mirror
To turn AUTO mode ON/OFF, press the AUTO
button.
The indicator comes on when AUTO mode is
turned ON.
1
2
The mirror uses a sensor to detect light from vehicles behind and automatically reduces glare.
Page 18 of 58
Topic 3
When Driving
18
Entering and Exiting
Before DrivingBefore Driving
When DrivingWhen Driving
Rain and
Night Driving
Driving Comfort
Opening and Closing
What to do if ...
Customizing
Yo u r L e x u s
Tr a n s m i s s i o n
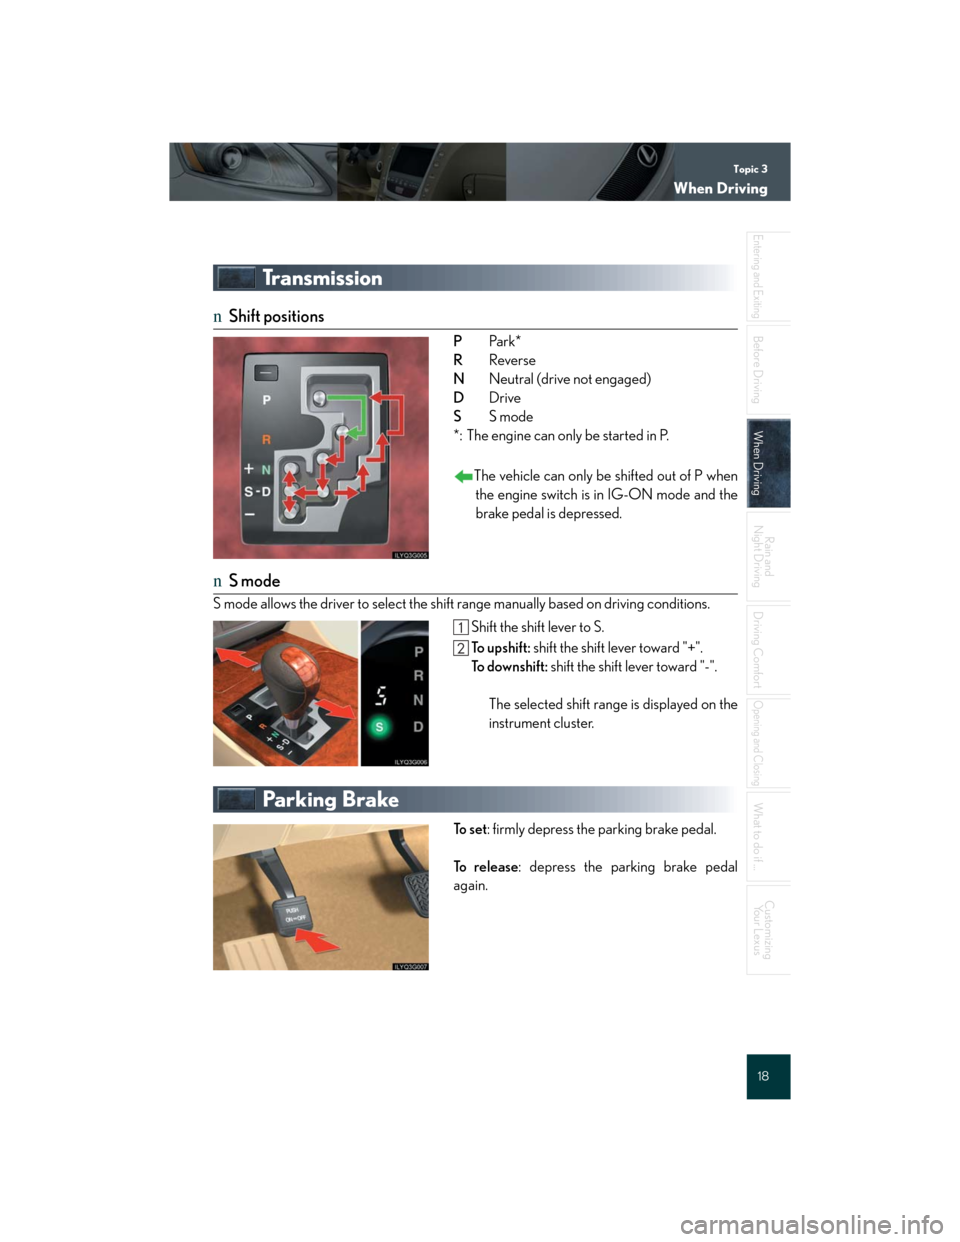
nShift positions
PPa r k *
RReverse
NNeutral (drive not engaged)
DDrive
SS mode
*: The engine can only be started in P.
The vehicle can only be shifted out of P when
the engine switch is in IG-ON mode and the
brake pedal is depressed.
nS mode
S mode allows the driver to select the shift range manually based on driving conditions.
Shift the shift lever to S.
To u p s h i f t : shift the shift lever toward "+".
To d o w n s h i f t : shift the shift lever toward "-".
The selected shift range is displayed on the
instrument cluster.
Parking Brake
To s e t: firmly depress the parking brake pedal.
To r e l e a s e: depress the parking brake pedal
again.
Page 20 of 58
Topic 3
When Driving
20
Entering and Exiting
Before DrivingBefore Driving
When DrivingWhen Driving
Rain and
Night Driving
Driving Comfort
Opening and Closing
What to do if ...
Customizing
Yo u r L e x u s
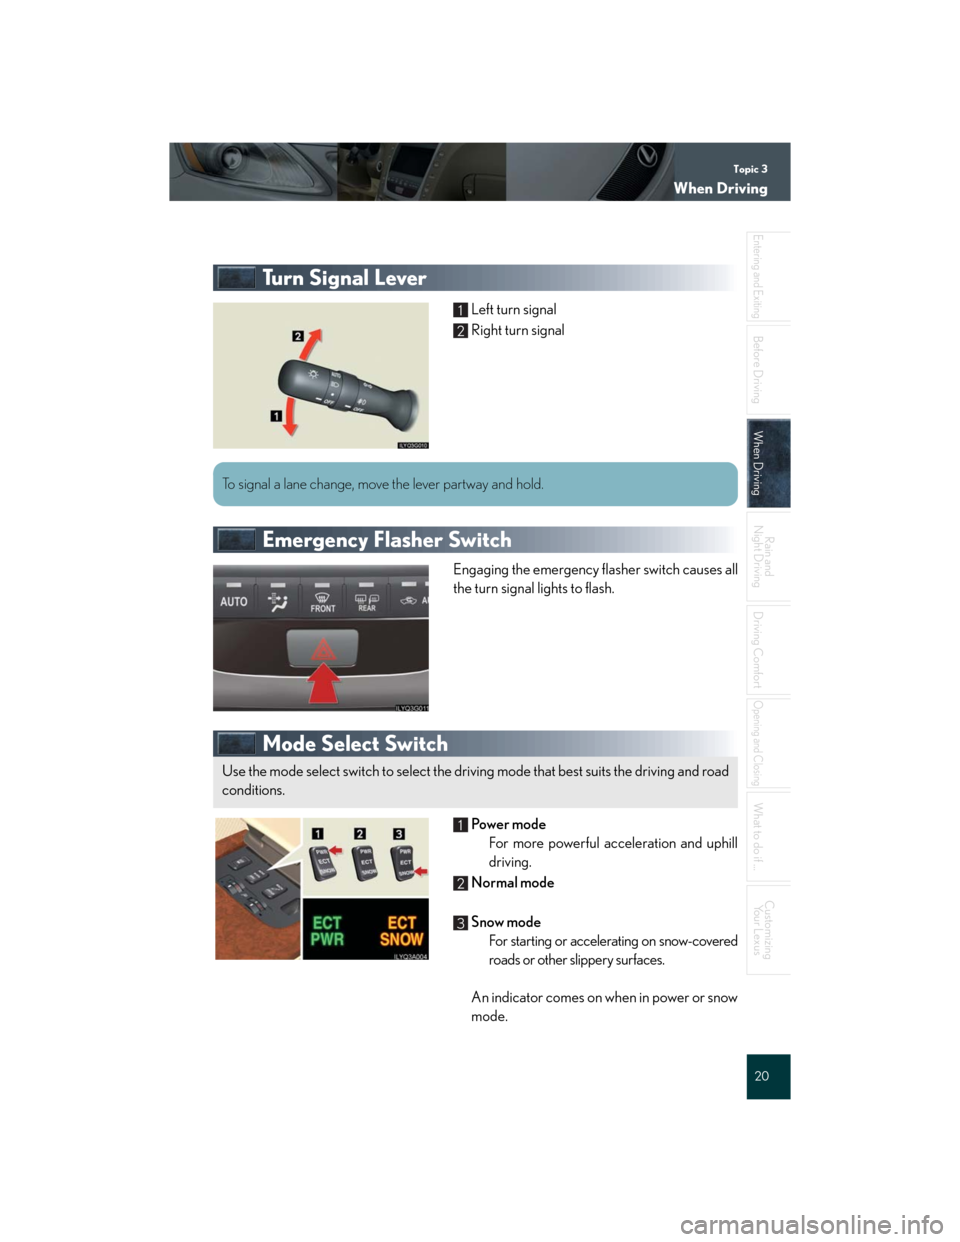
Tu r n S i g n a l L e v e r
Left turn signal
Right turn signal
Emergency Flasher Switch
Engaging the emergency flasher switch causes all
the turn signal lights to flash.
Mode Select Switch
Powe r m o d e
For more powerful acceleration and uphill
driving.
Normal mode
Snow mode
For starting or accelerating on snow-covered
roads or other slippery surfaces.
An indicator comes on when in power or snow
mode.
1
2
To signal a lane change, move the lever partway and hold.
Use the mode select switch to select the driving mode that best suits the driving and road
conditions.
ILYQ3A00
1
2
3
Page 22 of 58
Topic 3
When Driving
22
Entering and Exiting
Before DrivingBefore Driving
When DrivingWhen Driving
Rain and
Night Driving
Driving Comfort
Opening and Closing
What to do if ...
Customizing
Yo u r L e x u s
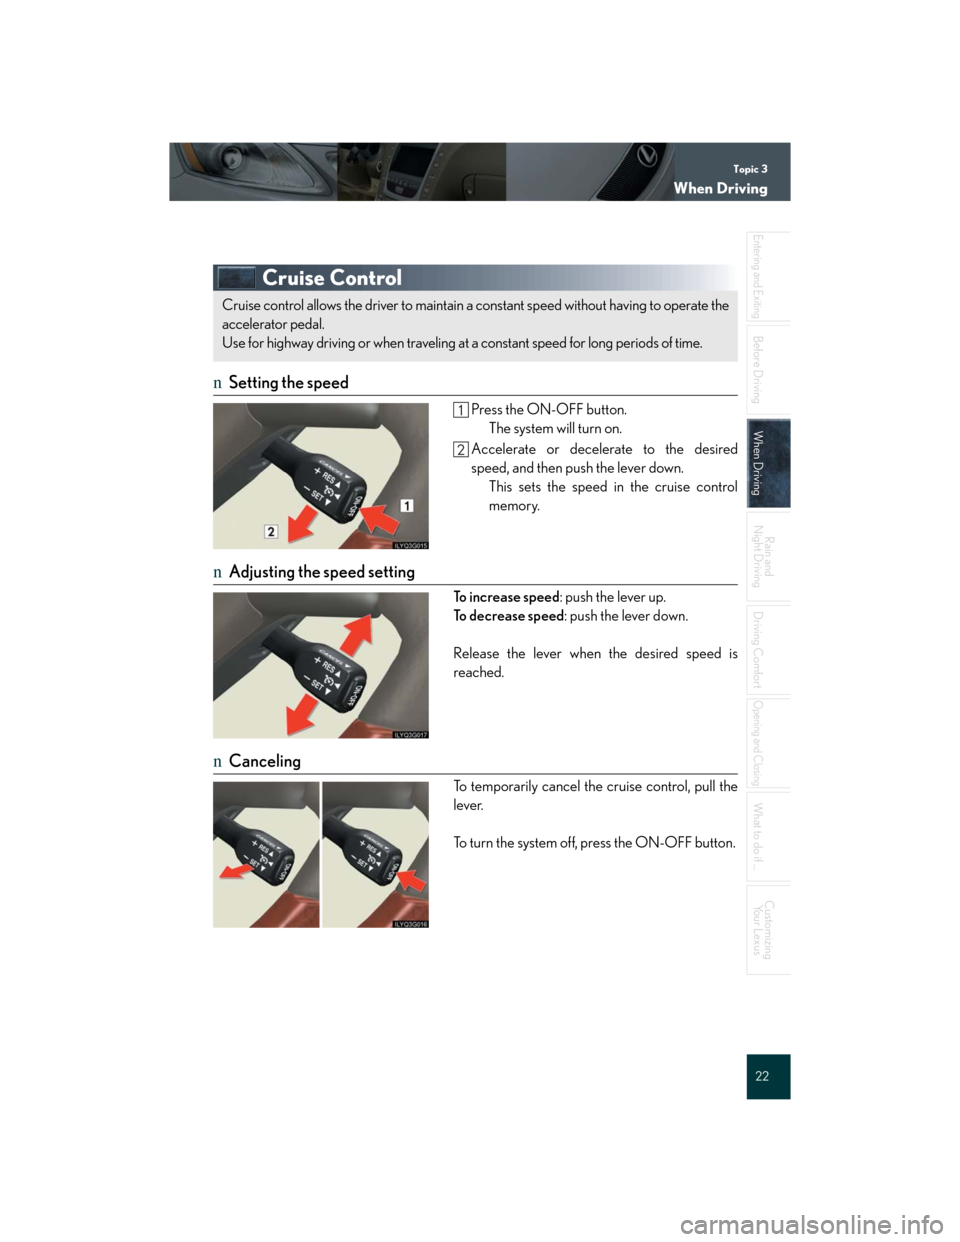
Cruise Control
nSetting the speed
Press the ON-OFF button.
The system will turn on.
Accelerate or decelerate to the desired
speed, and then push the lever down.
This sets the speed in the cruise control
memory.
nAdjusting the speed setting
To i n c r e a s e s p e e d: push the lever up.
To decrease speed: push the lever down.
Release the lever when the desired speed is
reached.
nCanceling
To temporarily cancel the cruise control, pull the
lever.
To turn the system off, press the ON-OFF button.
Cruise control allows the driver to maintain a constant speed without having to operate the
accelerator pedal.
Use for highway driving or when traveling at a constant speed for long periods of time.
Page 24 of 58
Topic 3
When Driving
24
Entering and Exiting
Before DrivingBefore Driving
When DrivingWhen Driving
Rain and
Night Driving
Driving Comfort
Opening and Closing
What to do if ...
Customizing
Yo u r L e x u s
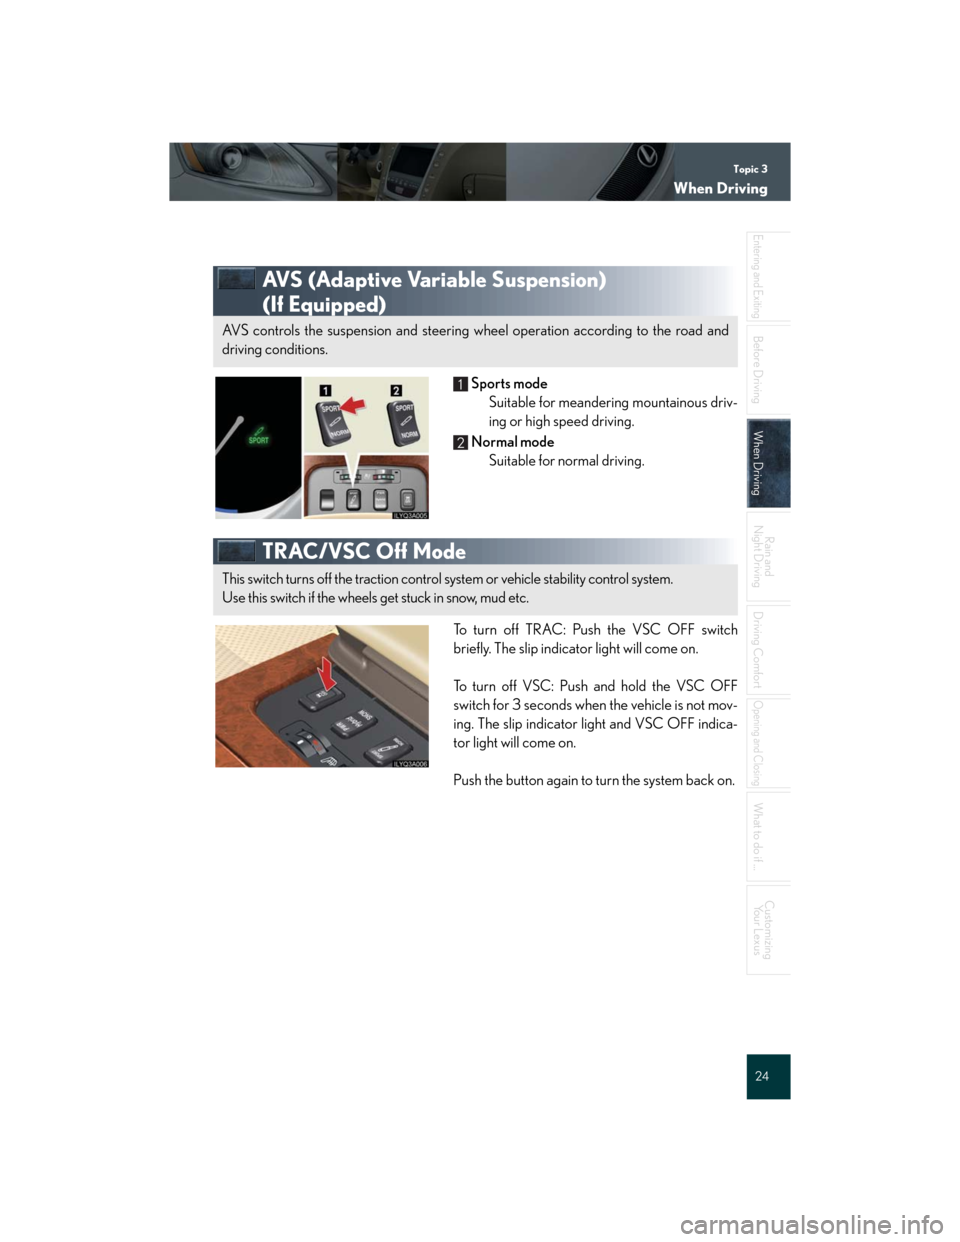
AVS (Adaptive Variable Suspension)
(If Equipped)
Sports mode
Suitable for meandering mountainous driv-
ing or high speed driving.
Normal mode
Suitable for normal driving.
TRAC/VSC Off Mode
To turn off TRAC: Push the VSC OFF switch
briefly. The slip indicator light will come on.
To turn off VSC: Push and hold the VSC OFF
switch for 3 seconds when the vehicle is not mov-
ing. The slip indicator light and VSC OFF indica-
tor light will come on.
Push the button again to turn the system back on.
AVS controls the suspension and steering wheel operation according to the road and
driving conditions.
ILYQ3A005
1
2
This switch turns off the traction control system or vehicle stability control system.
Use this switch if the wheels get stuck in snow, mud etc.
ILYQ3A006
Page 26 of 58
Rain and Night DrivingTopic 4
Headlights............................................................... 27
Fog Lights ................................................................ 28
Windshield Wipers and Washers .................... 28
Headlight Cleaner ............................................... 29
Rear Window and Outside Rear View
Mirror Defoggers................................................. 29
Instrument Panel Light Control ....................... 29
Page 27 of 58
Topic 4
Rain and Night Driving
27
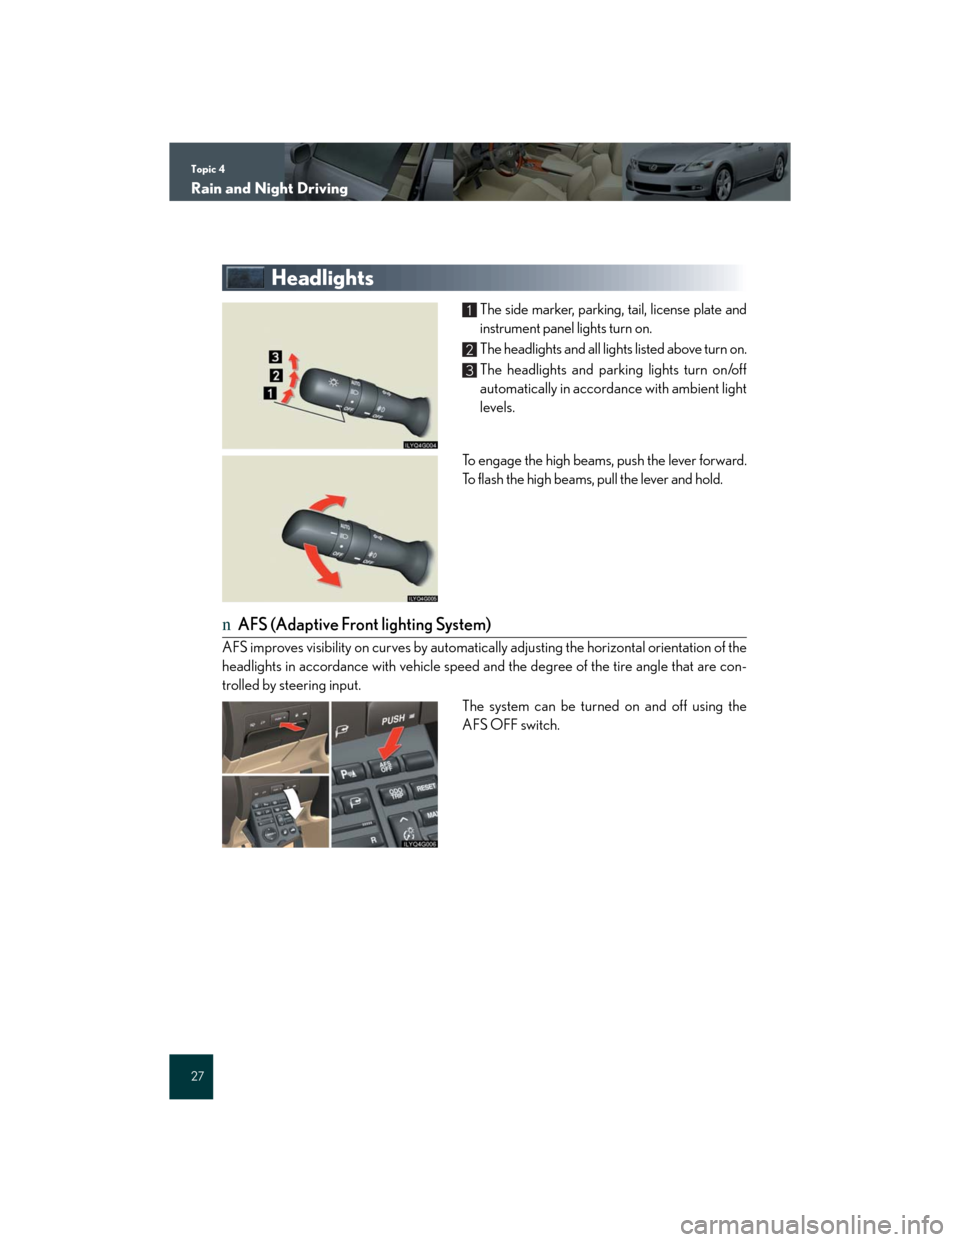
Headlights
The side marker, parking, tail, license plate and
instrument panel lights turn on.
The headlights and all lights listed above turn on.
The headlights and parking lights turn on/off
automatically in accordance with ambient light
levels.
To engage the high beams, push the lever forward.
To flash the high beams, pull the lever and hold.
nAFS (Adaptive Front lighting System)
AFS improves visibility on curves by automatically adjusting the horizontal orientation of the
headlights in accordance with vehicle speed and the degree of the tire angle that are con-
trolled by steering input.
The system can be turned on and off using the
AFS OFF switch.
1
2
3