engine Lexus GS350 2007 Using the front audio system / LEXUS 2007 GS430/350 (OM30A04U) User Guide
[x] Cancel search | Manufacturer: LEXUS, Model Year: 2007, Model line: GS350, Model: Lexus GS350 2007Pages: 562, PDF Size: 17.95 MB
Page 39 of 562
19
1-2. Opening, closing and locking the doors and trunk
1
Before driving
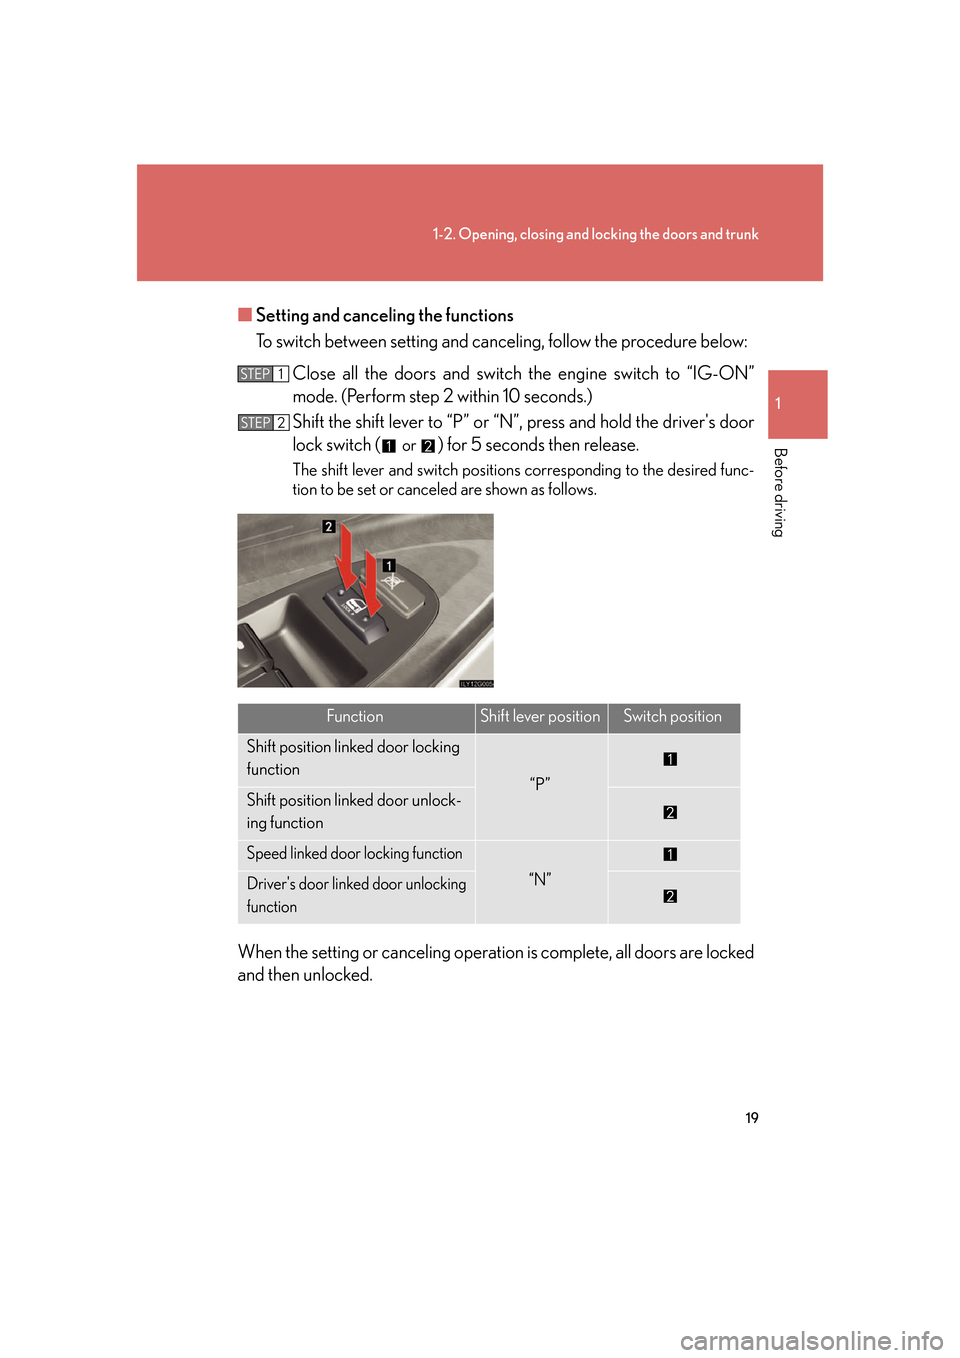
■Setting and canceling the functions
To switch between setting and canceling, follow the procedure below:
Close all the doors an d switch the engine switch to “IG-ON”
mode. (Perform step 2 within 10 seconds.)
Shift the shift lever to “P” or “N”, press and hold the driver's door
lock switch (
or ) for 5 seconds then release.
The shift lever and switch position s corresponding to the desired func -
tion to be set or canceled are shown as follows.
When the setting or canceling operat ion is complete, all doors are locked
and then unlocked.
STEP1
STEP2
FunctionShift lever positionSwitch position
Shift position linked door locking
function
“P”Shift position linked door unlock-
ing function
Speed linked door locking function
“N”Driver's door linked door unlocking
function
Page 40 of 562
20
1-2. Opening, closing and locking the doors and trunk
■Closing the front doors from outside with the inside lock button set in the locked
position
The door cannot be locked if the engine switch is in “ACC” or “IG-ON” mode, or
the e
lectronic key is left in the vehicle. (However, depending on the key's location,
the system may not be able to detect it. In these instances the door lock protection
function will not operate properly.)
■Using the mechanical key
The doors can also be locked and unlocked with the mechanical key. ( P.
4 8 6 )
■Customization
Settings (e.g. unlocking function using a key) can be changed. (P. 5 2 3 )
CAUTION
■To prevent an accident
Observe the following precautions while driving the vehicle.
Failing to do so may result in a door opening and an occupant falling out, resulting in
death or serious injury.
●Always use a seat belt.
●Always lock all doors.
●Ensure that all doors are properly closed.
●Do not pull the inside handle of the front door while driving.
●Set the rear door child protector locks when children are seated in the rear seat.
Page 48 of 562
28
1-3. Adjustable components
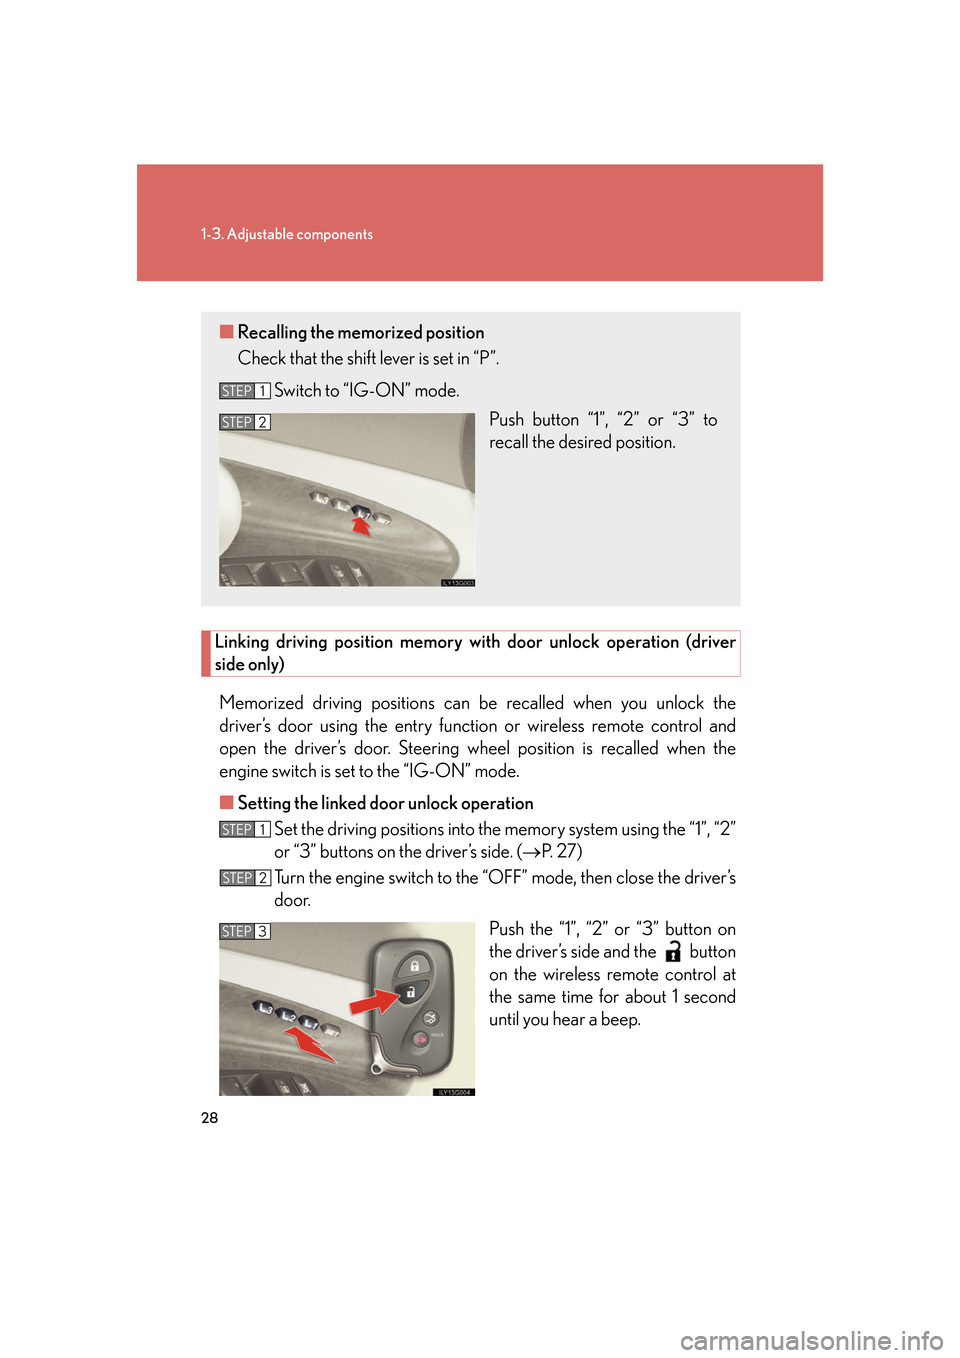
Linking driving position memory with door unlock operation (driver
side only)
Memorized driving positions can be recalled when you unlock the
driver’s door using the entry functi on or wireless remote control and
open the driver’s door. Steering wh eel position is recalled when the
engine switch is set to the “IG-ON” mode.
■ Setting the link
ed door unlock operation
Set the driving positions into the memor
y system using the “1”, “2”
or “3” buttons on the driver’s side. ( P. 2 7 )
Turn the engine switch to the “O FF” mode, then close the driv
er’s
door.
Push the “1”, “2” or “3” button on
the driv
er’s side and the button
on the wireless remote control at
the same time for about 1 second
until you hear a beep.
■Recalling the memorized position
Check that the shift lever is set in “P”.
Switch to “IG-ON” mode. Push button “1”, “2” or “3” to
r
ecall the desired position.
STEP1
STEP2
STEP1
STEP2
STEP3
Page 49 of 562
29
1-3. Adjustable components
1
Before driving
Open one of the doors.
If a door is not opened within 60 seconds after is pressed, the
doors will be locked again and the alarm will automatically be set.
In case that the alarm is triggered, immediately stop the alarm.
( P. 5 4 )
■Canceling the linked do or unlock operation
Close the driver’s door with the en gine switch set
to the “OFF” mode.
Push the “SET” button and the or button on the wireless remote con-
trol at the same time for about 1 second until you hear 2 beeps.
■Retained accessory power
Each memorized position (except for the tilt and telescopic steering column) can
b
e activated within 30 seconds after the co rresponding side door is opened, even if
the engine switch is in the “OFF” mode.
■If any position memory button is push ed while the adjustments are being made
The operation will stop. To reactivate the sy st
em, push the desired button (“1” or “2”)
again.
■If the battery is disconnected
The memorized positions must be reset be cause the computer's memory is erased
when the battery is disconnected.
CAUTION
■Seat adjustment caution
Take care during seat adjustment that the seat does not strike the rear passenger or
squeeze your body against the steering wheel.
If this happens, you can stop the movement by pressing another seat position mem-
ory button.
STEP4
STEP1
STEP2
Page 59 of 562
39
1
1-3. Adjustable components
Before driving
Steering wheel
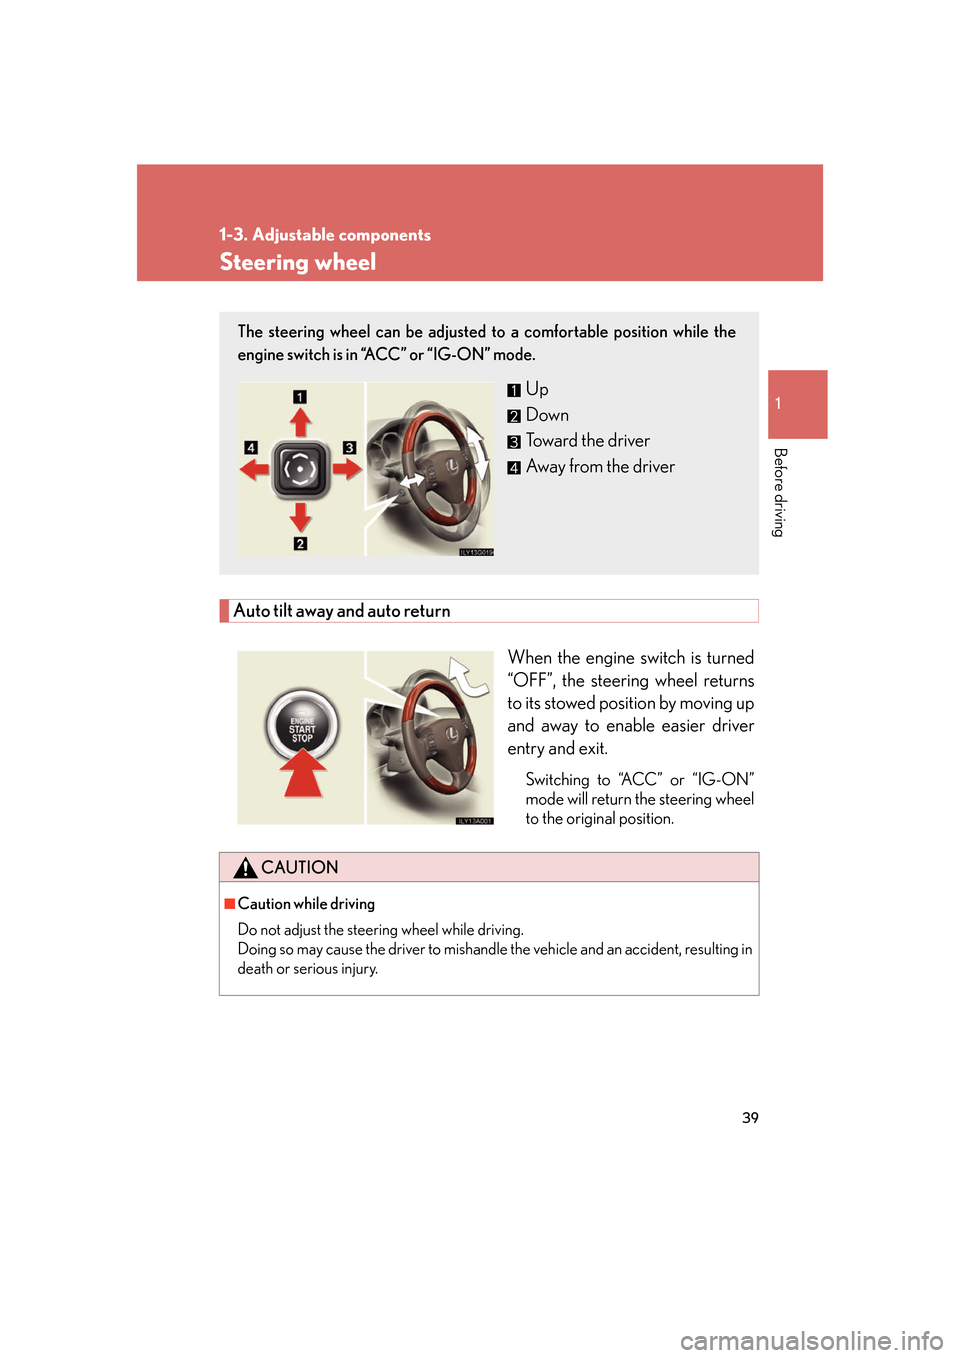
Auto tilt away and auto return
When the engine switch is turned
“OFF”, the steering wheel returns
to its stowed position by moving up
and away to enable easier driver
entry and exit.
Switching to “ACC” or “IG-ON”
mode will return the steering wheel
to the original position.
The steering wheel can be adjusted to a comfortable position while the
engine switch is in “ACC” or “IG-ON” mode.
Up
Down
Toward the driver
Away from the driver
CAUTION
■Caution while driving
Do not adjust the steering wheel while driving.
Doing so may cause the driver to mishandle the vehicle and an accident, resulting in
death or serious injury.
Page 60 of 562
40
1-3. Adjustable components
Inside rear view mirror
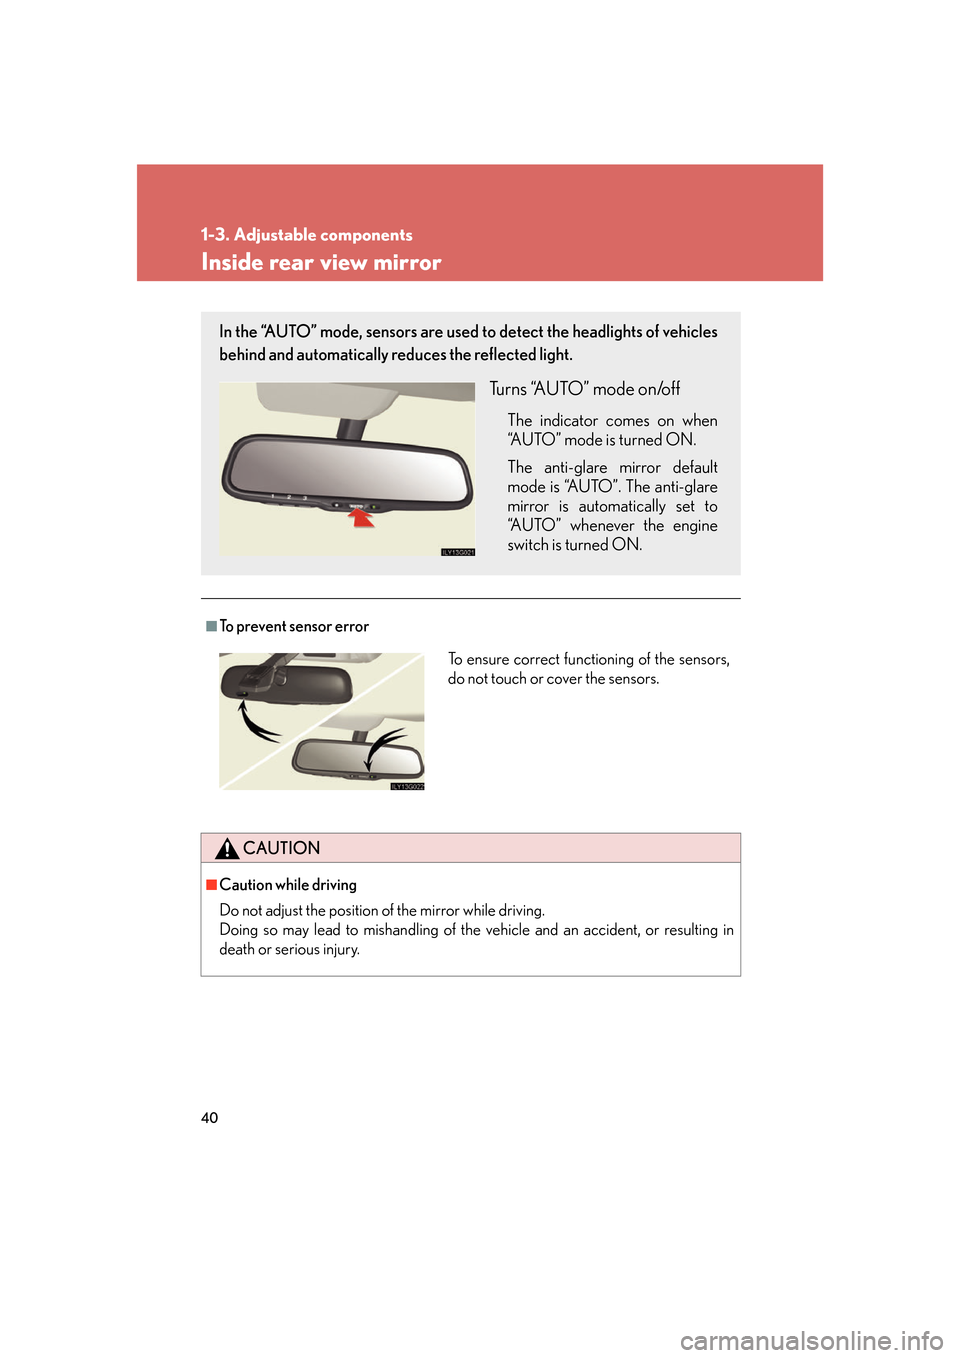
■To prevent sensor error
CAUTION
■Caution while driving
Do not adjust the position of the mirror while driving.
Doing so may lead to mishandling of the vehicle and an accident, or resulting in
death or serious injury.
In the “AUTO” mode, sensors are used to detect the headlights of vehicles
behind and automatically re duces the reflected light.
Turns “AUTO” mode on/off
The indicator comes on when
“AUTO” mode is turned ON.
The anti-glare mirror default
mode is “
AUTO”. The anti-glare
mirror is automatically set to
“AUTO” whenever the engine
switch is turned ON.
To ensure correct functioning of the sensors,
do not touch or cover the sensors.
Page 61 of 562

41
1
1-3. Adjustable components
Before driving
Outside rear view mirrors
Folding the mirrors
Press the switch
Pressing again will extend the mir-
rors.
Mirror angle can be adjusted using the switch when the engine switch is in
“ACC” or “IG-ON” mode.
Select the mirror to adjust
(“L”: left or “R”: right)
Adjust the mirror up, down,
in, or out using the switch
■When the mirrors are fogged up
Turn on the mirror heaters to defog the mirrors. ( P.
1 9 8 )
■Auto anti-glare function
When the anti-glare inside rear view mirror is set to “AUTO” mode, the outside rear
vie
w mirrors will activate in conjunction with the anti-glare inside rear view mirror to
reduce reflected light. ( P. 4 0 )
Page 64 of 562

44
1-4. Opening and closing the windows and moon roof
■The power windows can be operated when
The engine switch is in “IG-ON” mode.
■Linked door lock window operation
●The power windows can be opened and closed using the mechanical key.
( P. 4 8 6 )
●The power windows can be opened using the wireless remote control. ( P. 1 4 )
■Operating the power windows after turning the engine switch “OFF”
The power windows can be operated for ap pr
oximately 45 seconds even after the
engine switch is switched to “ACC” mode or turned “OFF”. They cannot, however,
be operated once the driver’s or front passenger’s door is opened.
■Jam protection function
If an object becomes caught between th e
window and the window frame, window
travel is stopped and the window is opened slightly.
■When the battery is disconnected
The power windows must be initialized in order to ensure proper operation.
(Perform for each window with the switch for each seat.)
Open the window halfway.
Fully close the window by pulling the swi
tch up and continue holding the
switch for 1 second.
The indicator on the switch changes from a flashing pattern to being on when initial
setting
s are complete.
■Customization
Settings (e.g. linked door lock operation) can be changed. ( P.
5 2 5 )
STEP1
STEP2
Page 67 of 562

47
1-4. Opening and closing the windows and moon roof
1
Before driving
■The moon roof can be operated when
The engine switch is in “IG-ON” mode.
■Linked door lock moon roof operation
●The moon roof can be opened and closed using the mechanical key. (P. 4 8 6 )
●The moon roof can be opened using the wireless remote control. ( P. 1 4 )
■Operating the moon roof after turning the engine switch “OFF”
The moon roof can be operated for ap pr
oximately 45 seconds even after the
engine switch is switched to “ACC” mode or turned “OFF”. It cannot, however, be
operated once the driv er’s door is opened.
■Jam protection function
If an object is detected between the moon r
oof and the frame while closing or tilting
down, travel is stopped and the moon roof opens slightly.
■If the moon roof cannot be closed automatically
Keep the switch depressed.
■To reduce moon roof wind noise
Drive with the moon roof opened automati c
ally ( just before fully opened position).
■Sunshade
The sunshade can be opened and closed manually. However, the sunshade will
open a
utomatically when the moon roof is opened.
■Customization
Settings (e.g. linked door lock operation) can be changed. ( P.
5 2 5 )
Page 69 of 562

49
1
Before driving
1-5. Refueling
Opening the fuel tank cap
Perform the following steps to open the fuel tank cap.
■Before refueling the vehicle
Turn the engine switch “OFF” and ensur
e that all the doors and win-
dows are closed.
■ Opening the fuel tank cap
Press the fuel filler door
opener switch.
Turn the fuel tank cap slowly to
ope
n.
Hang the fuel tank cap on the
back of the fuel filler door
.
STEP1
STEP2
STEP3