turn signal Lexus GS350 2010 Using The Audio System / LEXUS 2010 GS460 GS350 (OM30C80U) User Guide
[x] Cancel search | Manufacturer: LEXUS, Model Year: 2010, Model line: GS350, Model: Lexus GS350 2010Pages: 648, PDF Size: 15.57 MB
Page 267 of 648

267
3-3. Using the audio system
3
Interior features
GS_G_U (OM30C80U)
June 29, 2011 10:30 am
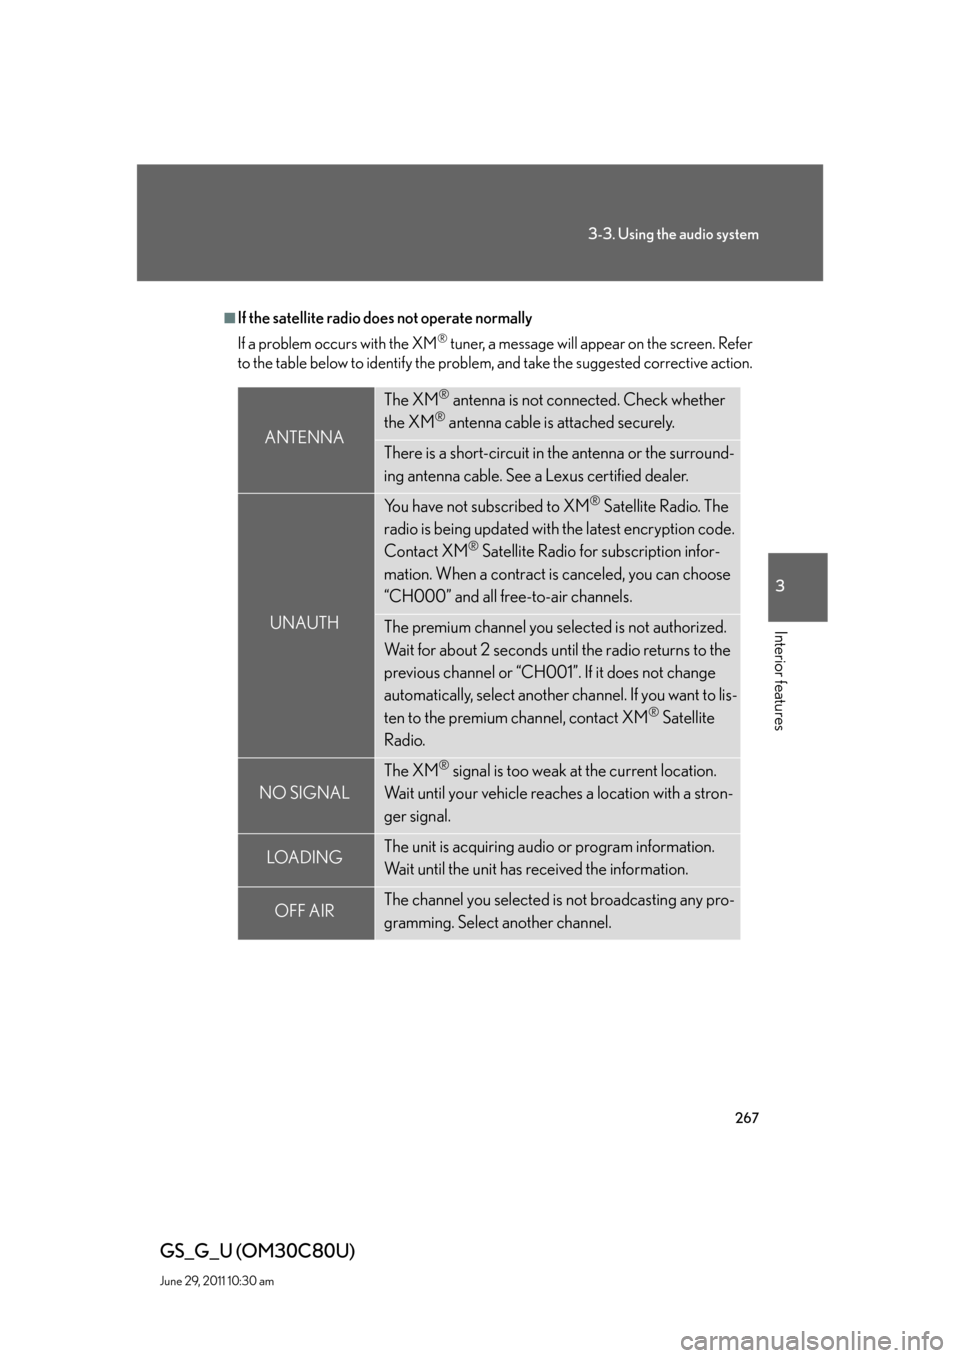
■If the satellite radio does not operate normally
If a problem occurs with the XM
® tuner, a message will appear on the screen. Refer
to the table below to identify the problem, and take the suggested corrective action.
ANTENNA
The XM® antenna is not connected. Check whether
the XM
® antenna cable is attached securely.
There is a short-circuit in the antenna or the surround-
ing antenna cable. See a Lexus certified dealer.
UNAUTH
You have not subscribed to XM® Satellite Radio. The
radio is being updated with the latest encryption code.
Contact XM
® Satellite Radio for subscription infor-
mation. When a contract is canceled, you can choose
“CH000” and all free-to-air channels.
The premium channel you selected is not authorized.
Wait for about 2 seconds until the radio returns to the
previous channel or “CH001”. If it does not change
automatically, select another channel. If you want to lis-
ten to the premium channel, contact XM
® Satellite
Radio.
NO SIGNAL
The XM® signal is too weak at the current location.
Wait until your vehicle reaches a location with a stron-
ger signal.
LOADIN GThe unit is acquiring audio or program information.
Wait until the unit has received the information.
OFF AIRThe channel you selected is not broadcasting any pro-
gramming. Select another channel.
Page 313 of 648

313
3-3. Using the audio system
3
Interior features
GS_G_U (OM30C80U)
June 29, 2011 10:30 am
■When using the Bluetooth® audio system
●In the following conditions, the system may not function.
• The portable player is turned off
• The portable player is not connected
• The portable player battery is low
●There may be a delay if phone connection is carried out during Bluetooth®
audio play.
●Depending on the type of portable player that is connected to the system, oper-
ation may differ slightly and certain functions may not be available.
■Bluetooth® antenna
The antenna is built into the instrument panel. If the portable player is behind the
seat or in the glove box or console box, or is touching or covered by metal objects,
connection status may deteriorate.
■Battery charge/signal status
This display may not correspond exactly with the portable player, and this system
does not have a charging function.
■About Bluetooth®
Bluetooth is a registered trademark of
Bluetooth SIG. Inc.
Page 342 of 648

342
3-4. Using the hands-free system (for cellular phone)
GS_G_U (OM30C80U)
June 29, 2011 10:30 am
■Reconnecting to the Bluetooth® phone
If the system cannot connect due to poor signal strength with the “ENGINE START
STOP” switch in ACCESSORY or IGNITION ON mode, the system will automat-
ically attempt to reconnect.
If the phone is turned off, the system will not attempt to reconnect. In this case, it
must be connected manually, or the phone must be re-selected or re-entered.
■Connecting the phone while Bluetooth® audio is playing
●Bluetooth® audio will stop temporarily.
●It may take time to connect.
■Help icon
When “?” is displayed on the screen, an explanation of the function can be dis-
played.
To display the explanation of the function, touch “?” and choose the desired func-
tion.
Page 415 of 648

415
3-7. Other interior features
3
Interior features
GS_G_U (OM30C80U)
June 29, 2011 10:30 am
Operating the HomeLink®
Press the appropriate HomeLink® button. The HomeLink® indicator
light on the HomeLink® transceiver should turn on.
The HomeLink® continues to send a signal for up to 20 seconds as long as
the button is pressed.
Reprogramming a HomeLink® button
Press and hold the desired HomeLink
® button. After 20 seconds, the
HomeLink® indicator light will start flashing slowly. Next, while still press-
ing and holding the HomeLink® button, press and hold the button on the
transmitter until the HomeLink® indicator light changes from a slow to a
rapid flash.
Erasing the entire HomeLink® memory (all three programs)
Press and hold the 2 outside but-
tons for 20 seconds until the indi-
cator light flashes.
If you sell your vehicle, be sure to
erase the programs stored in the
HomeLink
® memory.
Page 489 of 648

489
4-3. Do-it-yourself maintenance
4
Maintenance and care
GS_G_U (OM30C80U)
June 29, 2011 10:30 am
Fuse layout and amperage ratings
■Engine compartment (Type A)
GS460
FuseAmpereCircuit
1ECU-B10VGRS, EPS, driver’s seat switch
module
2ABS MAIN310Electronically controlled
brake system
3TURN-HAZ15Turn signal lights, emergency flashers
4IG2 MAIN20IG2, GAUGE and IGN
5RAD NO.230Audio system
6D/C CUT20DOME and MPX-B
7RAD NO.130Audio system
Page 493 of 648

493
4-3. Do-it-yourself maintenance
4
Maintenance and care
GS_G_U (OM30C80U)
June 29, 2011 10:30 am
GS350
FuseAmpereCircuit
1ECU-B10VGRS, EPS, driver’s seat switch
module
2ABS MAIN325Electronically controlled
brake system
3TURN-HAZ15Turn signal lights, emergency flashers
4IG2 MAIN20IG2, GAUGE and IGN
5RAD NO.230Audio system
6D/C CUT20DOME and MPX-B
7RAD NO.130Audio system
8MPX-B10
Multiplex communication system,
front controller, door control system
(power door lock system, door cour-
tesy lights, power windows, power
rear view mirror control system, out-
side rear view mirror heaters), power
seat system, steering sensors, elec-
tronically controlled brake system, tilt
and telescopic steering wheel,
gauges and meters, combination
switch
Page 512 of 648

512
4-3. Do-it-yourself maintenance
GS_G_U (OM30C80U)
June 29, 2011 10:30 am
Light bulbs
You may replace the following bulbs yourself. For more information about
replacing other light bulbs, contact your Lexus dealer.
■Prepare a replacement light bulb
Check the wattage of the light bulb being replaced. (P. 600)
■Remove the engine compartment cover if necessary
P. 4 5 0
■Front bulb locations
■Rear bulb locations
Parking light
Headlight high beam and
daytime running light
Rear turn signal light Back-up light
Page 516 of 648

516
4-3. Do-it-yourself maintenance
GS_G_U (OM30C80U)
June 29, 2011 10:30 am
■Rear turn signal light
Open the trunk lid and remove the
cover.
Turn the bulb base counterclock-
wise.
Remove the light bulb.
STEP1
STEP2
STEP3
Page 517 of 648

517
4-3. Do-it-yourself maintenance
4
Maintenance and care
GS_G_U (OM30C80U)
June 29, 2011 10:30 am
■Bulbs other than the above
If any of the bulbs listed below has burnt out, have your Lexus dealer
replace it.
●Headlight low beams (high-intensity discharge bulbs)
●Fog lights
●Front turn signal lights
●Front side marker lights
●Side turn signal lights
●Tail/stop lights
●Tail lights
●Rear side marker lights
●High mounted stoplight
●License plate lights
■Condensation build-up on the inside of the lens
Contact your Lexus dealer for more information in the following situations. Tempo-
rary condensation build-up on the inside of the headlight lens does not indicate a
malfunction.
●Large drops of water are built up on the inside of the lens.
●Water has built up inside the headlight.
■LED light bulbs
The side turn signal lights, rear side marker lights, tail lights, tail/stop lights and high
mounted stoplights consist of a number of LEDs. If any of the LEDs burn out, take
your vehicle to your Lexus dealer to have the light replaced.
If two or more LEDs in a stoplight burn out, your vehicle may not conform to local
laws (SAE).
Page 520 of 648

520
GS_G_U (OM30C80U)
June 29, 2011 10:30 am
5-1. Essential information
Emergency flashers
NOTICE
■To prevent 12 volt battery discharge
Do not leave the emergency flashers on longer than necessary when the engine is
not running.
Use the emergency flashers if the vehicle malfunctions or is involved in an
accident.
Press the switch to flash all the
turn signal lights. To turn them
off, press the switch once again.