display Lexus GS350 2012 Owner's Guide
[x] Cancel search | Manufacturer: LEXUS, Model Year: 2012, Model line: GS350, Model: Lexus GS350 2012Pages: 914, PDF Size: 49.39 MB
Page 112 of 914

1112. Instrument cluster
2
Instrument cluster
GS350/250_EE (OM30C36E)
NOTICE
During setting up the display
To prevent battery discharge, ensure that the engine is running while setting
up the display features.
Page 113 of 914
1122. Instrument cluster
GS350/250_EE (OM30C36E)
Head-up display
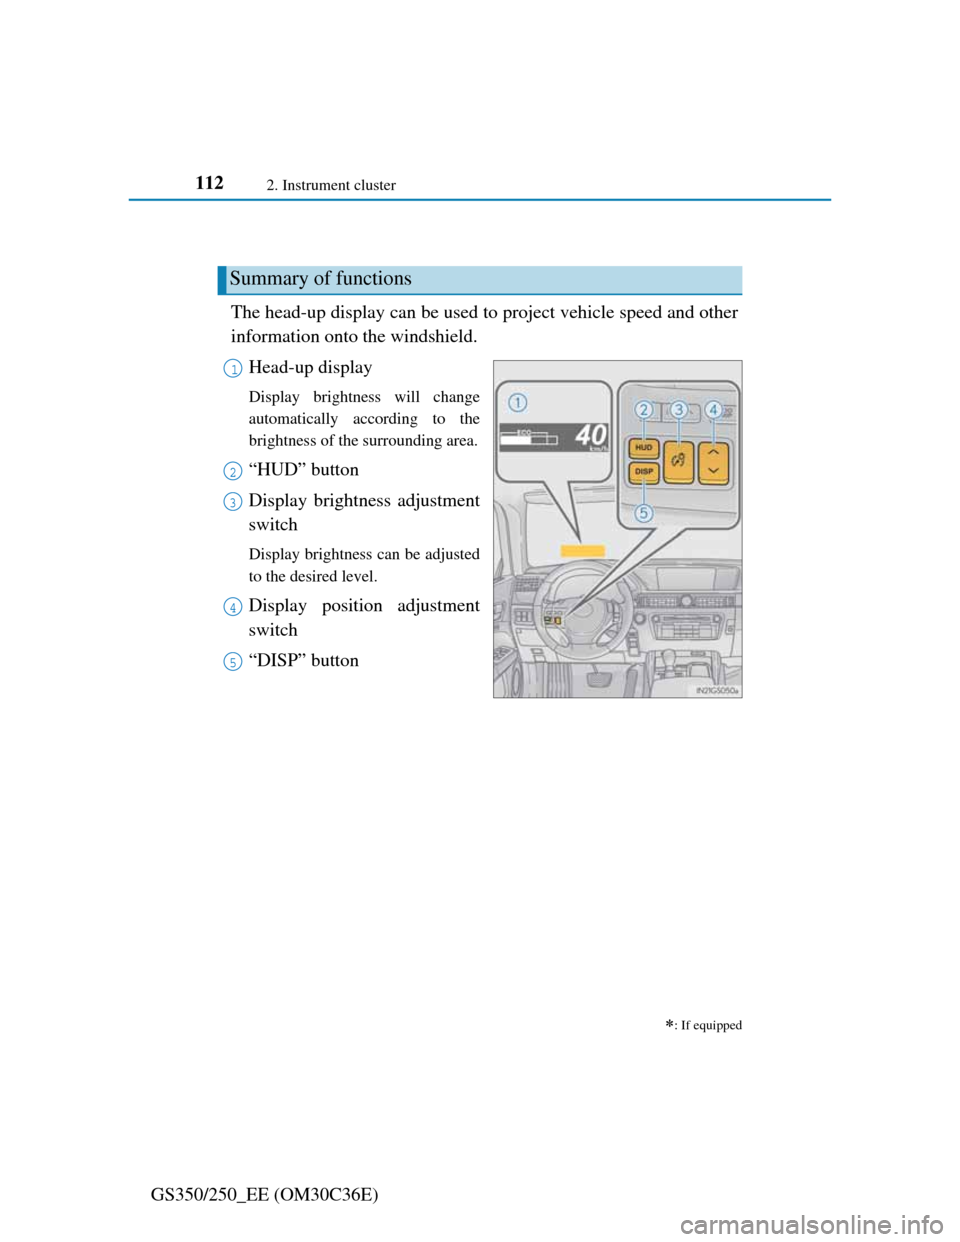
The head-up display can be used to project vehicle speed and other
information onto the windshield.
Head-up display
Display brightness will change
automatically according to the
brightness of the surrounding area.
“HUD” button
Display brightness adjustment
switch
Display brightness can be adjusted
to the desired level.
Display position adjustment
switch
“DISP” button
: If equipped
Summary of functions
1
2
3
4
5
Page 114 of 914

1132. Instrument cluster
2
Instrument cluster
GS350/250_EE (OM30C36E)
Vehicle speed
Tachometer
Shift position and shift range
Displays the selected shift position or selected shift range (P. 214)
Eco Driving Indicator (P. 109)
Audio display
Displays audio information for approximately 3 seconds when the audio
system is operated
Route guidance display (vehicles with navigation system)
(P. 116)
When approaching an intersection while the navigation system is giving
route guidance, an arrow will automatically be displayed to indicate the
direction of travel.
Lane departure warning display (LKA [Lane-Keeping Assist])
(if equipped) (P. 767)
Approach warning display (dynamic radar cruise control) (if
equipped)
(P. 767)
Pre-crash braking warning message (pre-crash safety system)
(if equipped) (P. 767)
Head-up display contents
Page 115 of 914
1142. Instrument cluster
GS350/250_EE (OM30C36E)
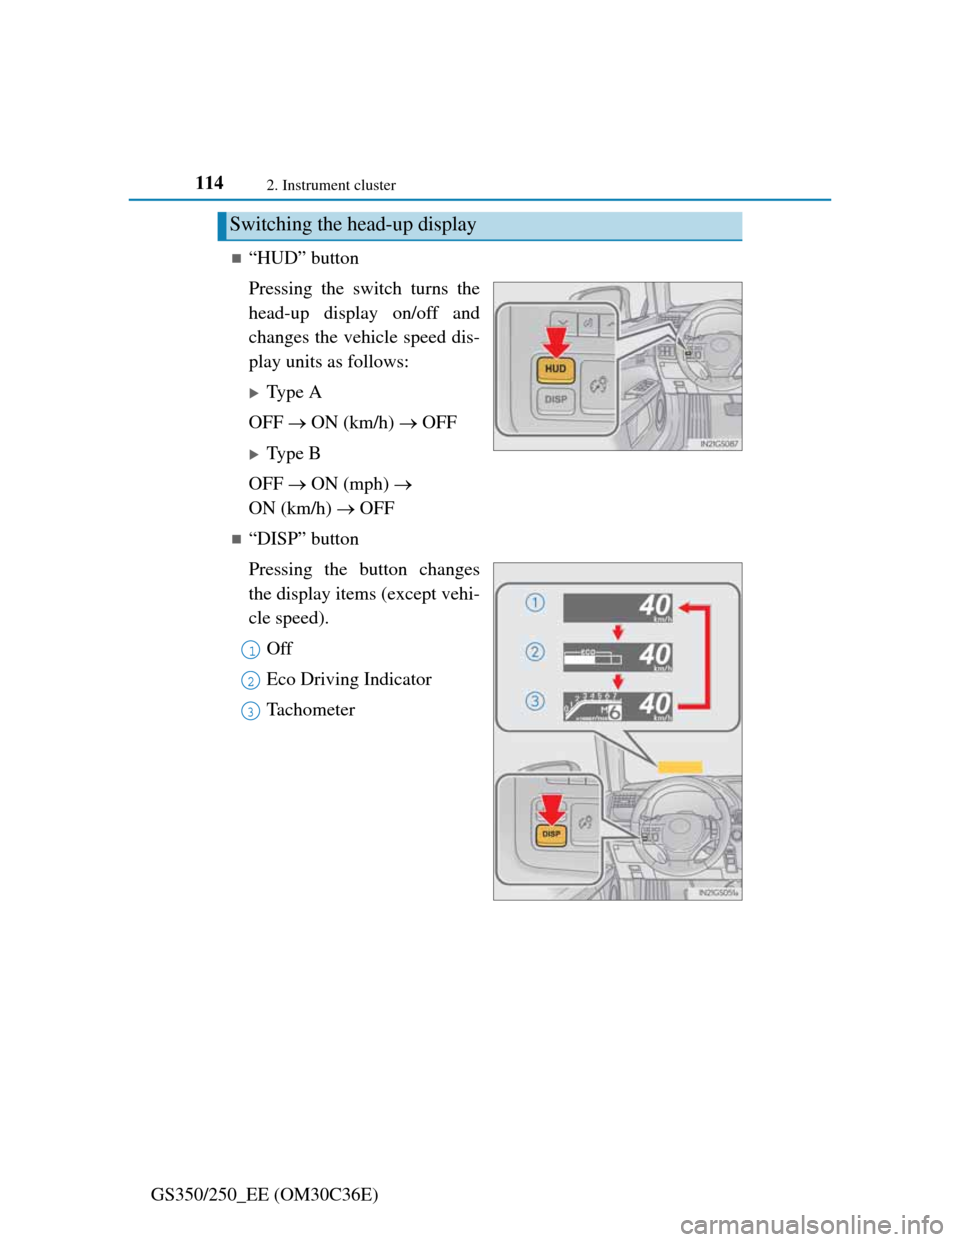
“HUD” button
Pressing the switch turns the
head-up display on/off and
changes the vehicle speed dis-
play units as follows:
Type A
OFF ON (km/h) OFF
Type B
OFF ON (mph)
ON (km/h) OFF
“DISP” button
Pressing the button changes
the display items (except vehi-
cle speed).
Off
Eco Driving Indicator
Tachometer
Switching the head-up display
1
2
3
Page 116 of 914
1152. Instrument cluster
2
Instrument cluster
GS350/250_EE (OM30C36E)
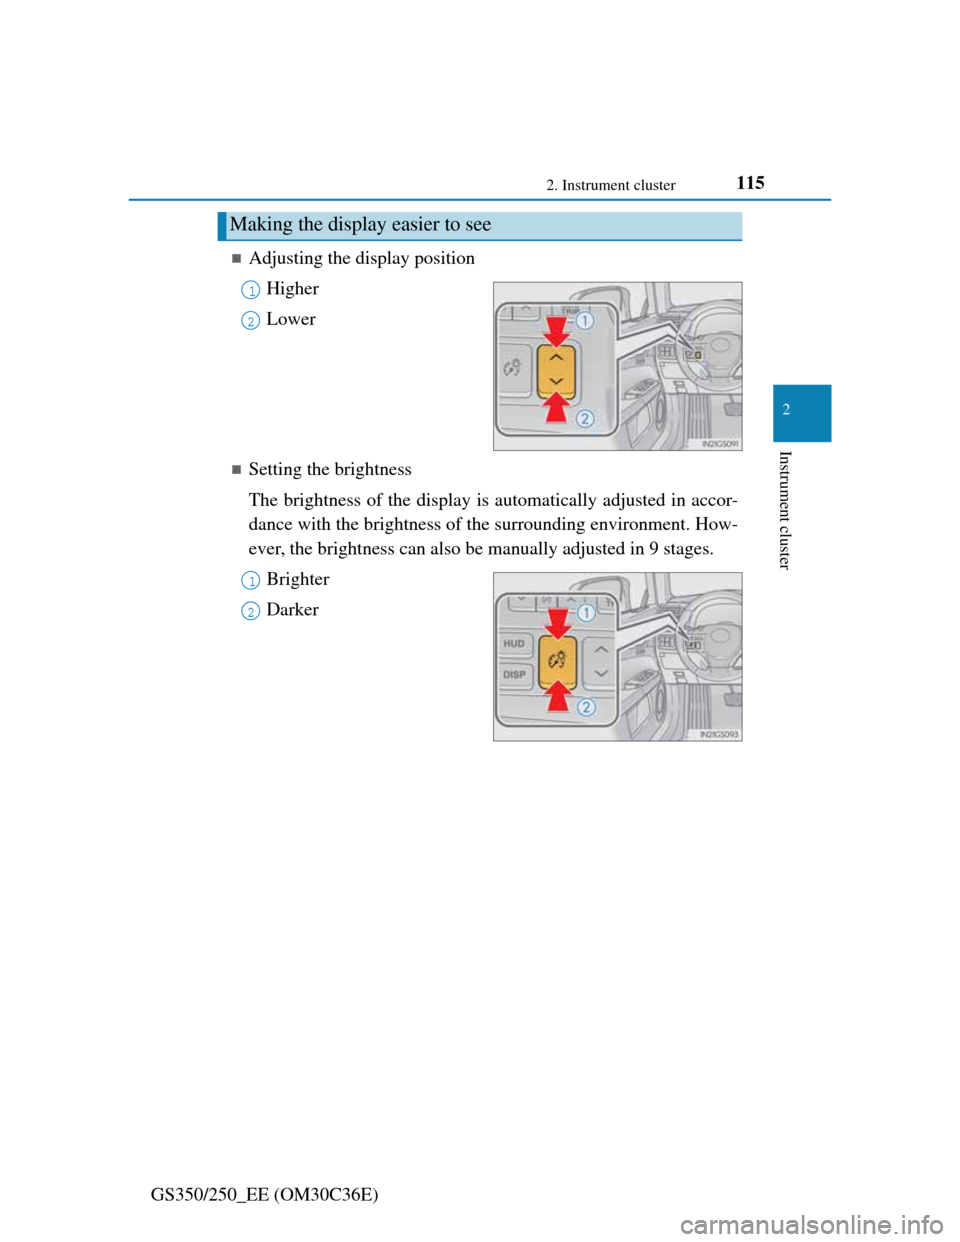
Adjusting the display position
Higher
Lower
Setting the brightness
The brightness of the display is automatically adjusted in accor-
dance with the brightness of the surrounding environment. How-
ever, the brightness can also be manually adjusted in 9 stages.
Brighter
Darker
Making the display easier to see
1
2
1
2
Page 117 of 914

1162. Instrument cluster
GS350/250_EE (OM30C36E)When the vehicle approaches an
intersection, the direction the
vehicle should go is guided by
the arrow.
When the vehicle approaches an
intersection, the route guidance
will start and the distance
* to the
intersection will also be dis-
played.
*: The distance decreases in incre-
ments of 50 m (164 ft.) and the dis-
tance indication will disappear
when the vehicle passes through
the intersection.
The following display can be shown or hidden.
Audio display
Route guidance display (vehi-
cles with navigation system)
Route guidance display (vehicles with navigation system)
Display customization
1
2
Page 118 of 914
1172. Instrument cluster
2
Instrument cluster
GS350/250_EE (OM30C36E)
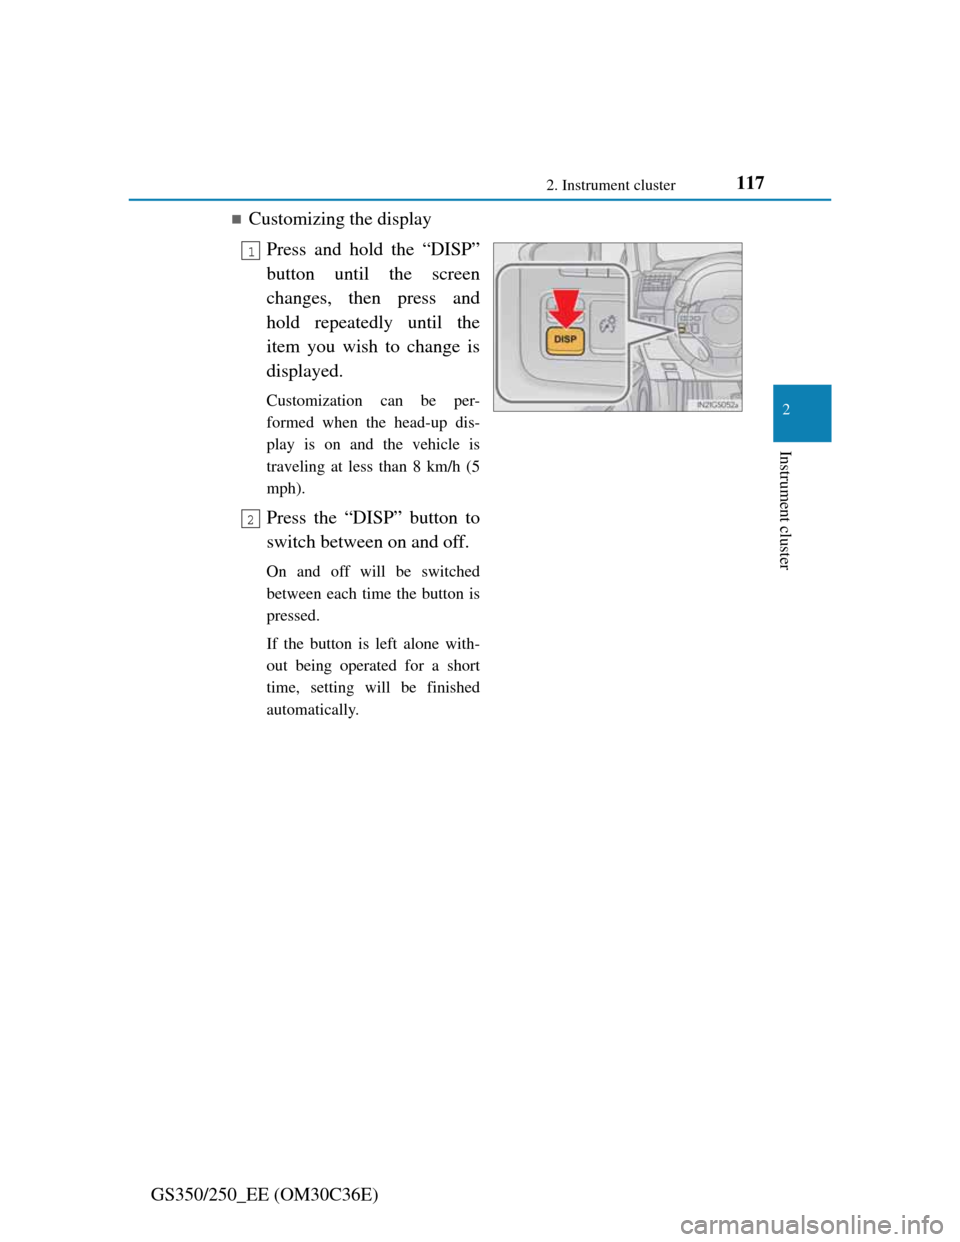
Customizing the display
Press and hold the “DISP”
button until the screen
changes, then press and
hold repeatedly until the
item you wish to change is
displayed.
Customization can be per-
formed when the head-up dis-
play is on and the vehicle is
traveling at less than 8 km/h (5
mph).
Press the “DISP” button to
switch between on and off.
On and off will be switched
between each time the button is
pressed.
If the button is left alone with-
out being operated for a short
time, setting will be finished
automatically.
1
2
Page 119 of 914
1182. Instrument cluster
GS350/250_EE (OM30C36E)
Head-up display
The head-up display may seem dark and hard to see when viewed through
sunglasses, especially polarized sunglasses.
Adjust the brightness of the head-up display or remove your sunglasses.
When the head-up display is turned off, it will remain off even if the engine
switch is turned to IGNITION ON mode after the engine switch has been
turned off.
When the battery is disconnected
The customize settings of the head-up display will be reset.
CAUTION
Before using the head-up display
Check that the position and brightness of the head-up display image does
not interfere with safe driving. Incorrect adjustment of the image’s position
or brightness may obstruct the driver’s view and lead to an accident, result-
ing in death or serious injury.
NOTICE
To prevent damage to components
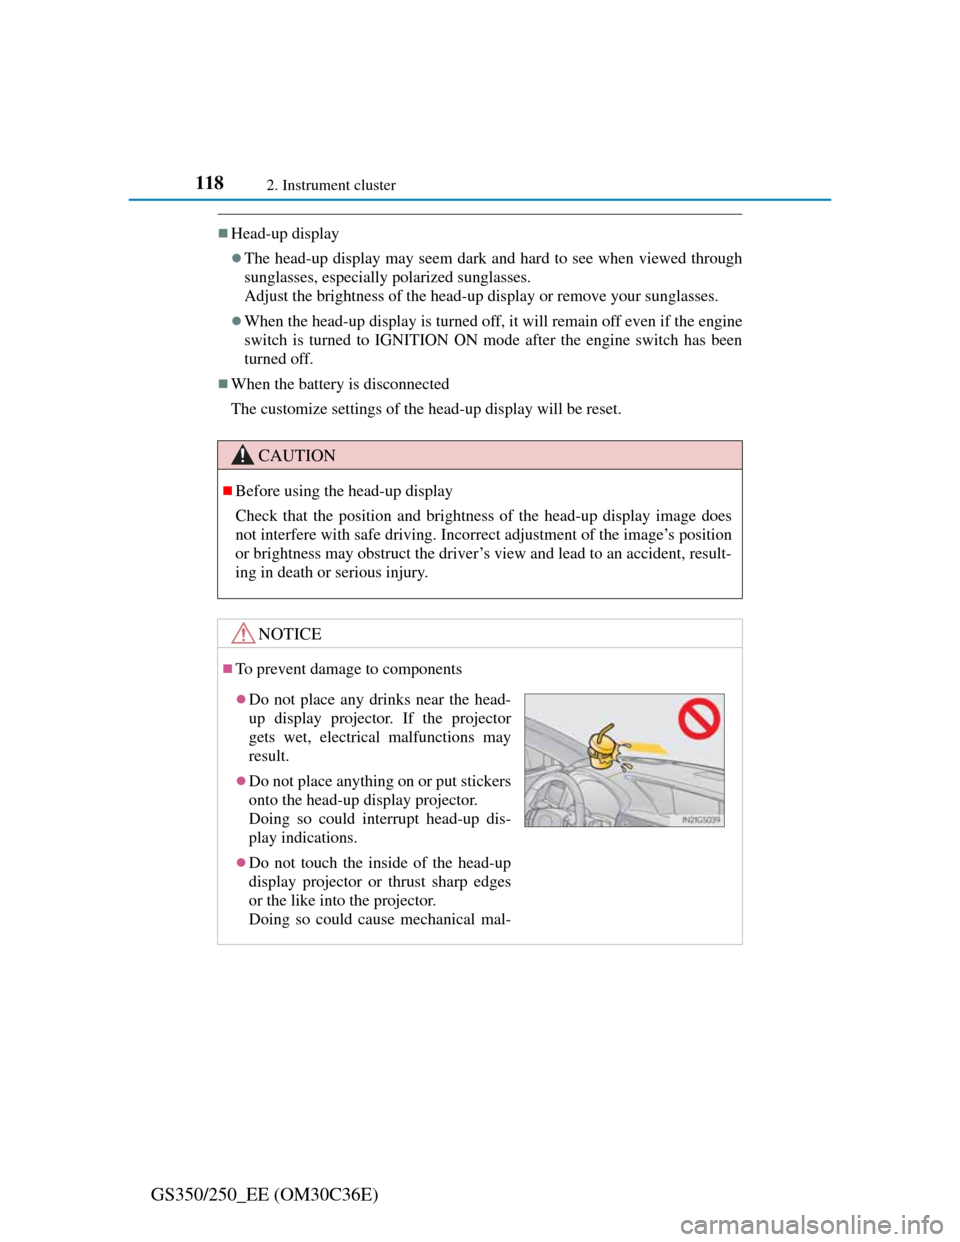
Do not place any drinks near the head-
up display projector. If the projector
gets wet, electrical malfunctions may
result.
Do not place anything on or put stickers
onto the head-up display projector.
Doing so could interrupt head-up dis-
play indications.
Do not touch the inside of the head-up
display projector or thrust sharp edges
or the like into the projector.
Doing so could cause mechanical mal-
Page 130 of 914
1273-2. Opening, closing and locking the doors and trunk
3
Operation of each component
GS350/250_EE (OM30C36E)
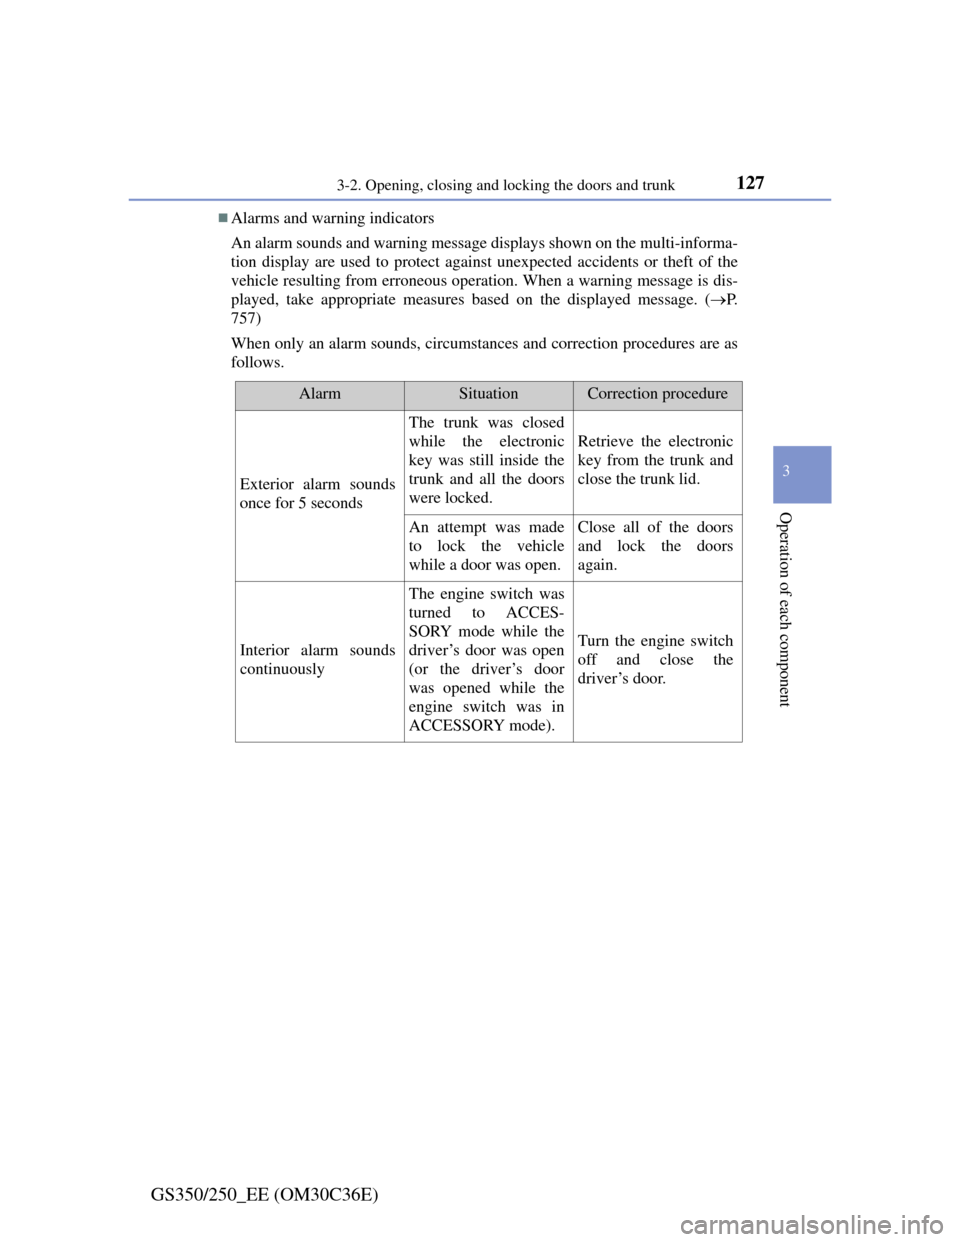
Alarms and warning indicators
An alarm sounds and warning message displays shown on the multi-informa-
tion display are used to protect against unexpected accidents or theft of the
vehicle resulting from erroneous operation. When a warning message is dis-
played, take appropriate measures based on the displayed message. (P.
757)
When only an alarm sounds, circumstances and correction procedures are as
follows.
AlarmSituationCorrection procedure
Exterior alarm sounds
once for 5 seconds
The trunk was closed
while the electronic
key was still inside the
trunk and all the doors
were locked.
Retrieve the electronic
key from the trunk and
close the trunk lid.
An attempt was made
to lock the vehicle
while a door was open.Close all of the doors
and lock the doors
again.
Interior alarm sounds
continuously
The engine switch was
turned to ACCES-
SORY mode while the
driver’s door was open
(or the driver’s door
was opened while the
engine switch was in
ACCESSORY mode).
Turn the engine switch
off and close the
driver’s door.
Page 131 of 914
1283-2. Opening, closing and locking the doors and trunk
GS350/250_EE (OM30C36E)
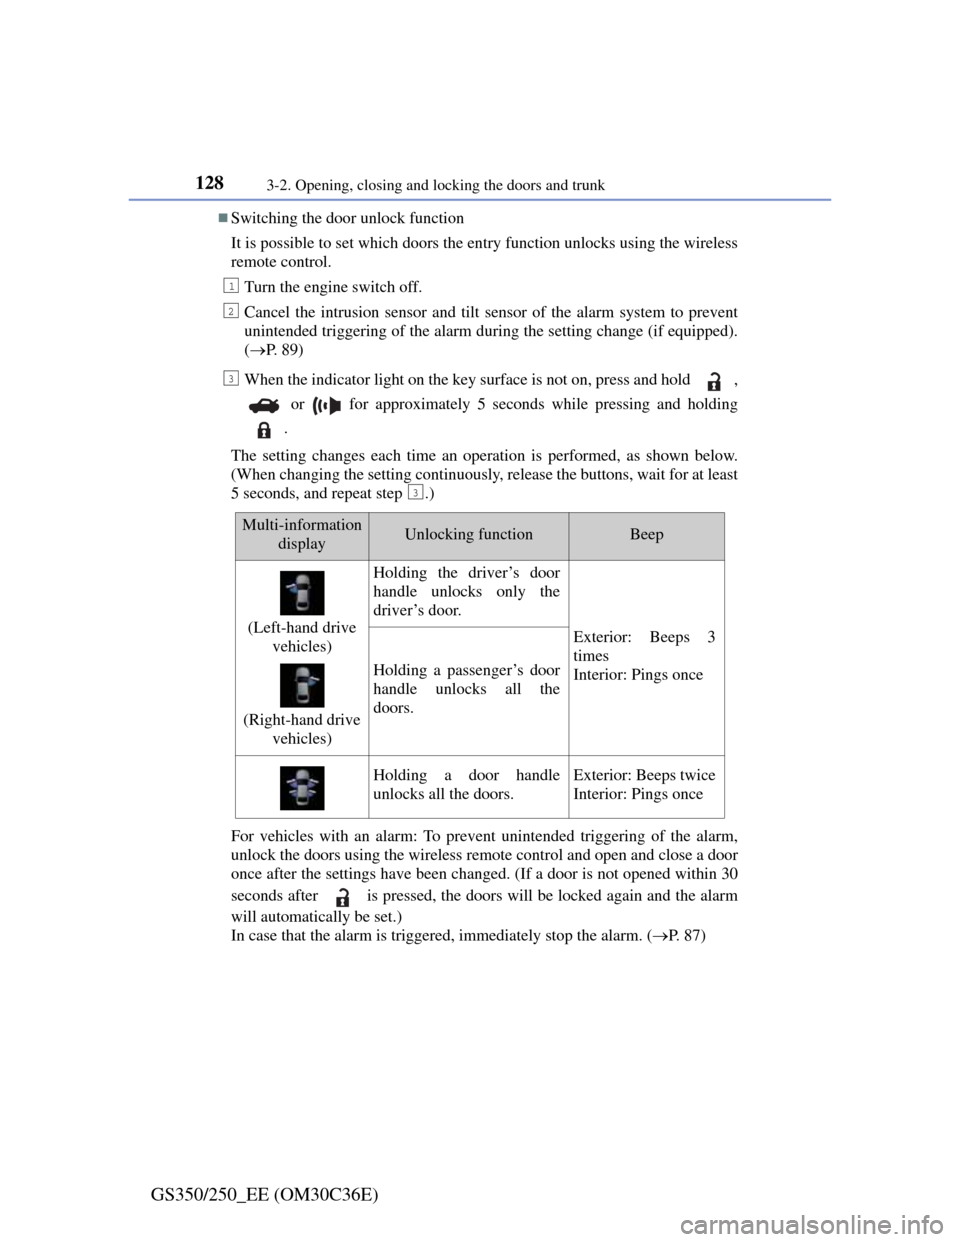
Switching the door unlock function
It is possible to set which doors the entry function unlocks using the wireless
remote control.
Turn the engine switch off.
Cancel the intrusion sensor and tilt sensor of the alarm system to prevent
unintended triggering of the alarm during the setting change (if equipped).
(P. 8 9 )
When the indicator light on the key surface is not on, press and hold ,
or for approximately 5 seconds while pressing and holding
.
The setting changes each time an operation is performed, as shown below.
(When changing the setting continuously, release the buttons, wait for at least
5 seconds, and repeat step .)
For vehicles with an alarm: To prevent unintended triggering of the alarm,
unlock the doors using the wireless remote control and open and close a door
once after the settings have been changed. (If a door is not opened within 30
seconds after is pressed, the doors will be locked again and the alarm
will automatically be set.)
In case that the alarm is triggered, immediately stop the alarm. (P. 8 7 )
1
2
3
3
Multi-information
displayUnlocking functionBeep
(Left-hand drive
vehicles)
(Right-hand drive
vehicles)
Holding the driver’s door
handle unlocks only the
driver’s door.
Exterior: Beeps 3
times
Interior: Pings once
Holding a passenger’s door
handle unlocks all the
doors.
Holding a door handle
unlocks all the doors.Exterior: Beeps twice
Interior: Pings once