height Lexus GS350 2013 Theft deterrent system / LEXUS 2013 GS350 OWNERS MANUAL (OM30C34U)
[x] Cancel search | Manufacturer: LEXUS, Model Year: 2013, Model line: GS350, Model: Lexus GS350 2013Pages: 828, PDF Size: 10.43 MB
Page 31 of 828
311-1. For safe use
GS350_U (OM30C34U)
1
For safety and security
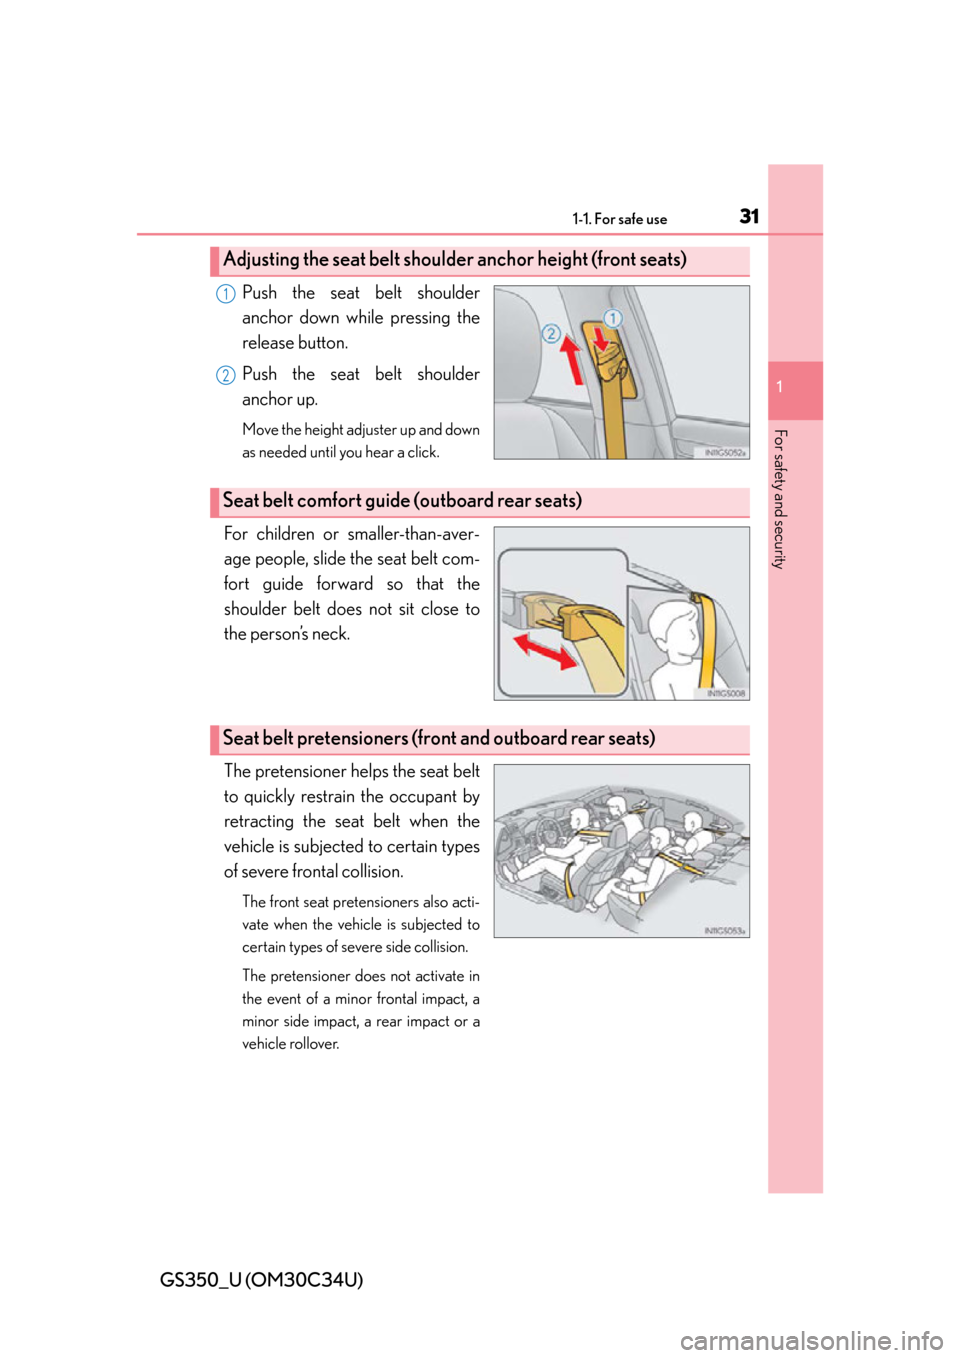
Push the seat belt shoulder
anchor down while pressing the
release button.
Push the seat belt shoulder
anchor up.
Move the height adjuster up and down
as needed until you hear a click.
For children or smaller-than-aver-
age people, slide the seat belt com-
fort guide forward so that the
shoulder belt does not sit close to
the person’s neck.
The pretensioner helps the seat belt
to quickly restrain the occupant by
retracting the seat belt when the
vehicle is subjected to certain types
of severe frontal collision.
The front seat pretensioners also acti-
vate when the vehicle is subjected to
certain types of severe side collision.
The pretensioner does not activate in
the event of a minor frontal impact, a
minor side impact, a rear impact or a
vehicle rollover.
Adjusting the seat belt shoulder anchor height (front seats)
1
2
Seat belt comfort guide (outboard rear seats)
Seat belt pretensioners (front and outboard rear seats)
Page 128 of 828
128
GS350_U (OM30C34U)
3-3. Adjusting the seats
Front seats
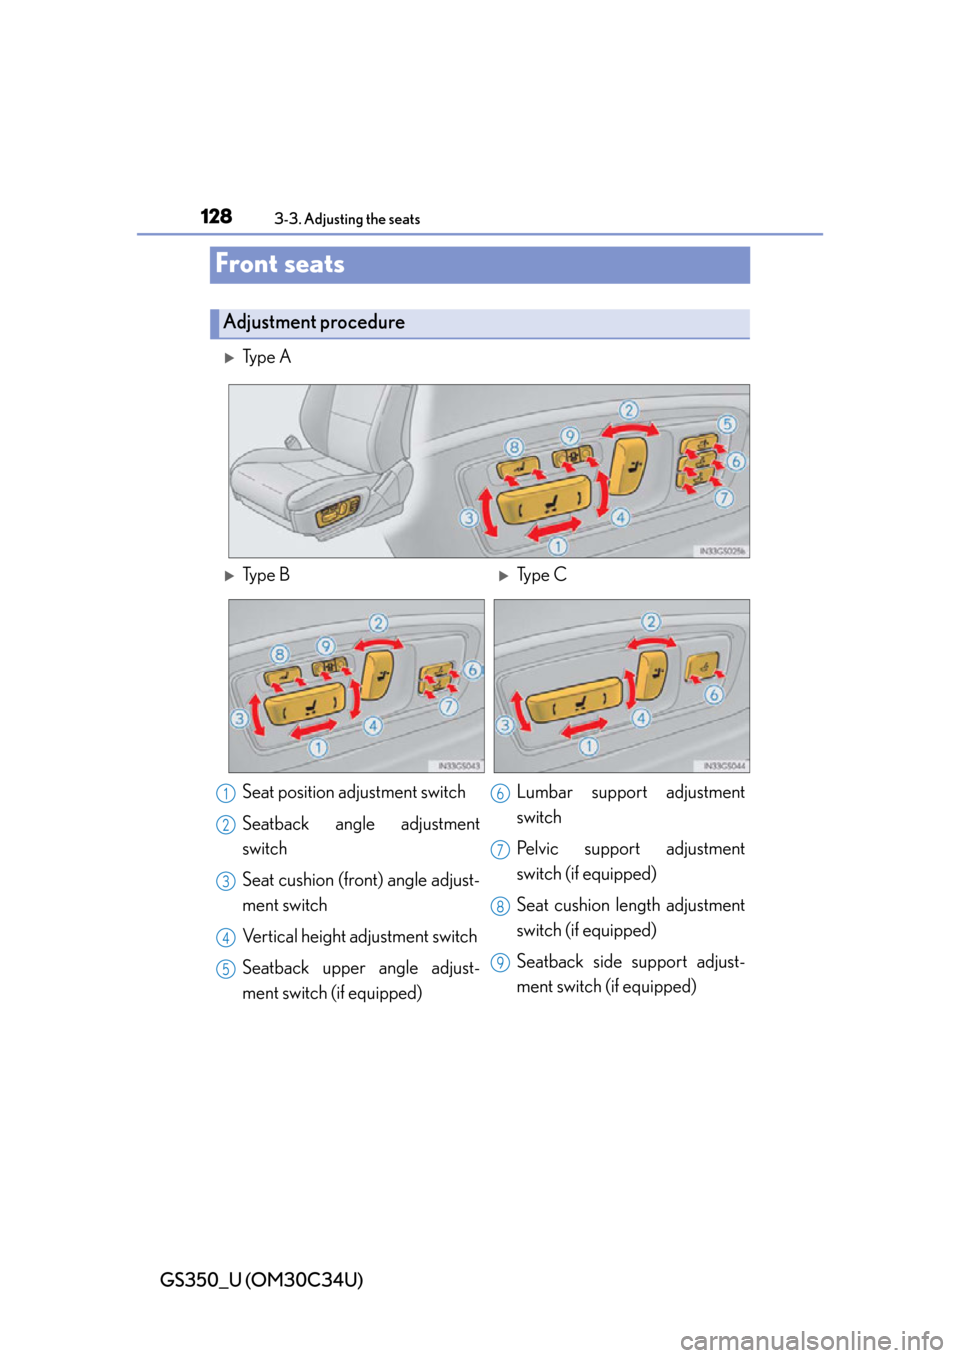
Ty p e A
Adjustment procedure
Ty p e BType C
Seat position adjustment switch
Seatback angle adjustment
switch
Seat cushion (front) angle adjust-
ment switch
Vertical height adjustment switch
Seatback upper angle adjust-
ment switch (if equipped) Lumbar support adjustment
switch
Pelvic support adjustment
switch (if equipped)
Seat cushion length adjustment
switch (if equipped)
Seatback side support adjust-
ment switch (if equipped)
1
2
3
4
5
6
7
8
9
Page 138 of 828
138
GS350_U (OM30C34U)
3-3. Adjusting the seats
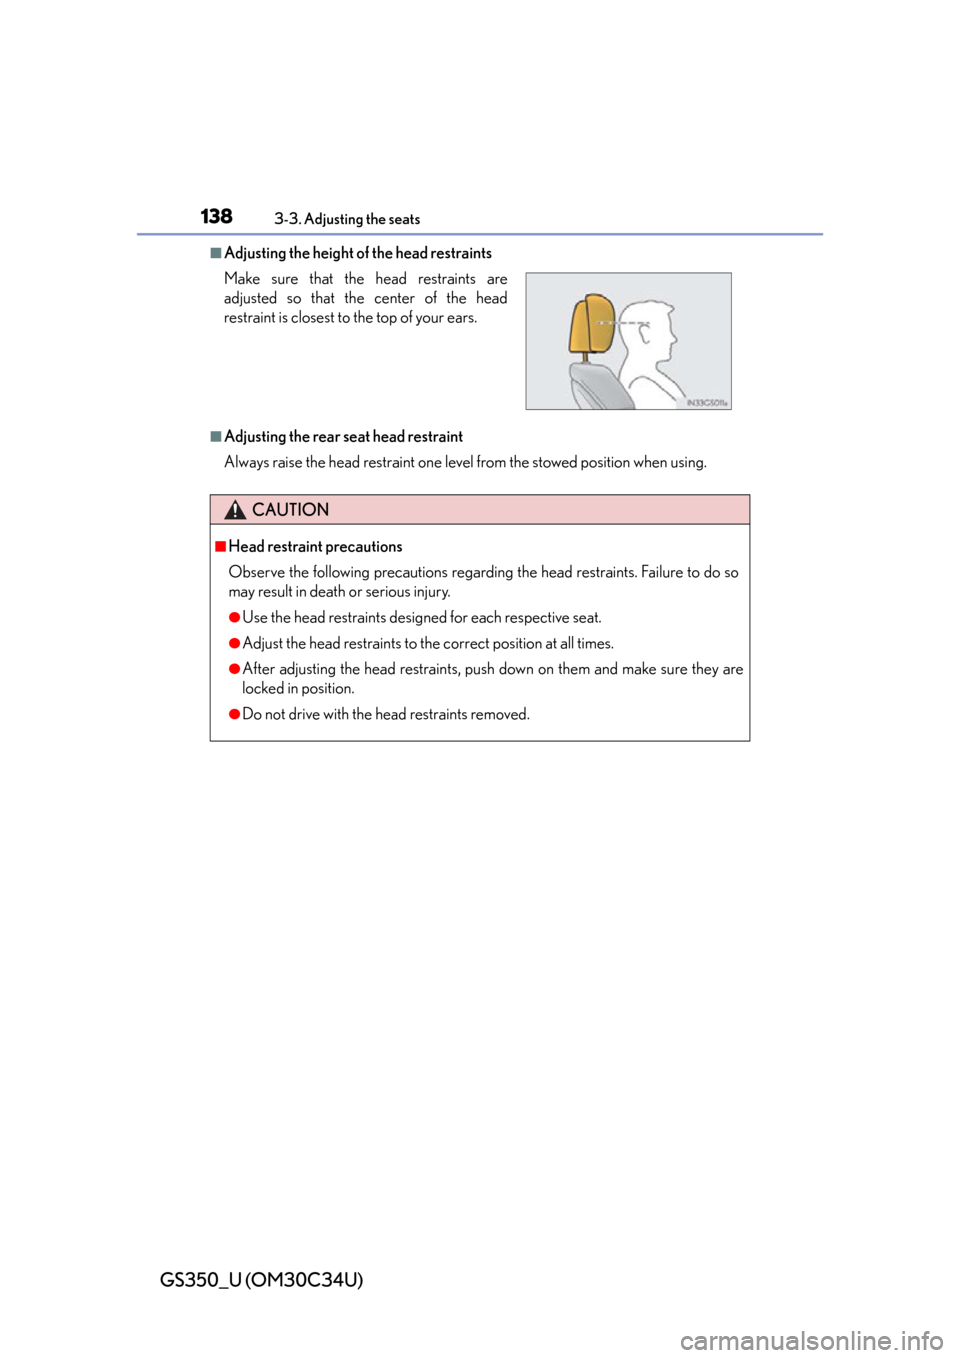
■Adjusting the height of the head restraints
■Adjusting the rear seat head restraint
Always raise the head restraint one level from the stowed position when using. Make sure that the head restraints are
adjusted so that the center of the head
restraint is closest to the top of your ears.
CAUTION
■Head restraint precautions
Observe the following precautions regarding the head restraints. Failure to do so
may result in death or serious injury.
●Use the head restraints designed for each respective seat.
●Adjust the head restraints to the correct position at all times.
●After adjusting the head restraints, push down on them and make sure they are
locked in position.
●Do not drive with the head restraints removed.
Page 140 of 828
1403-4. Adjusting the steering wheel and mirrors
GS350_U (OM30C34U)
Inside rear view mirror
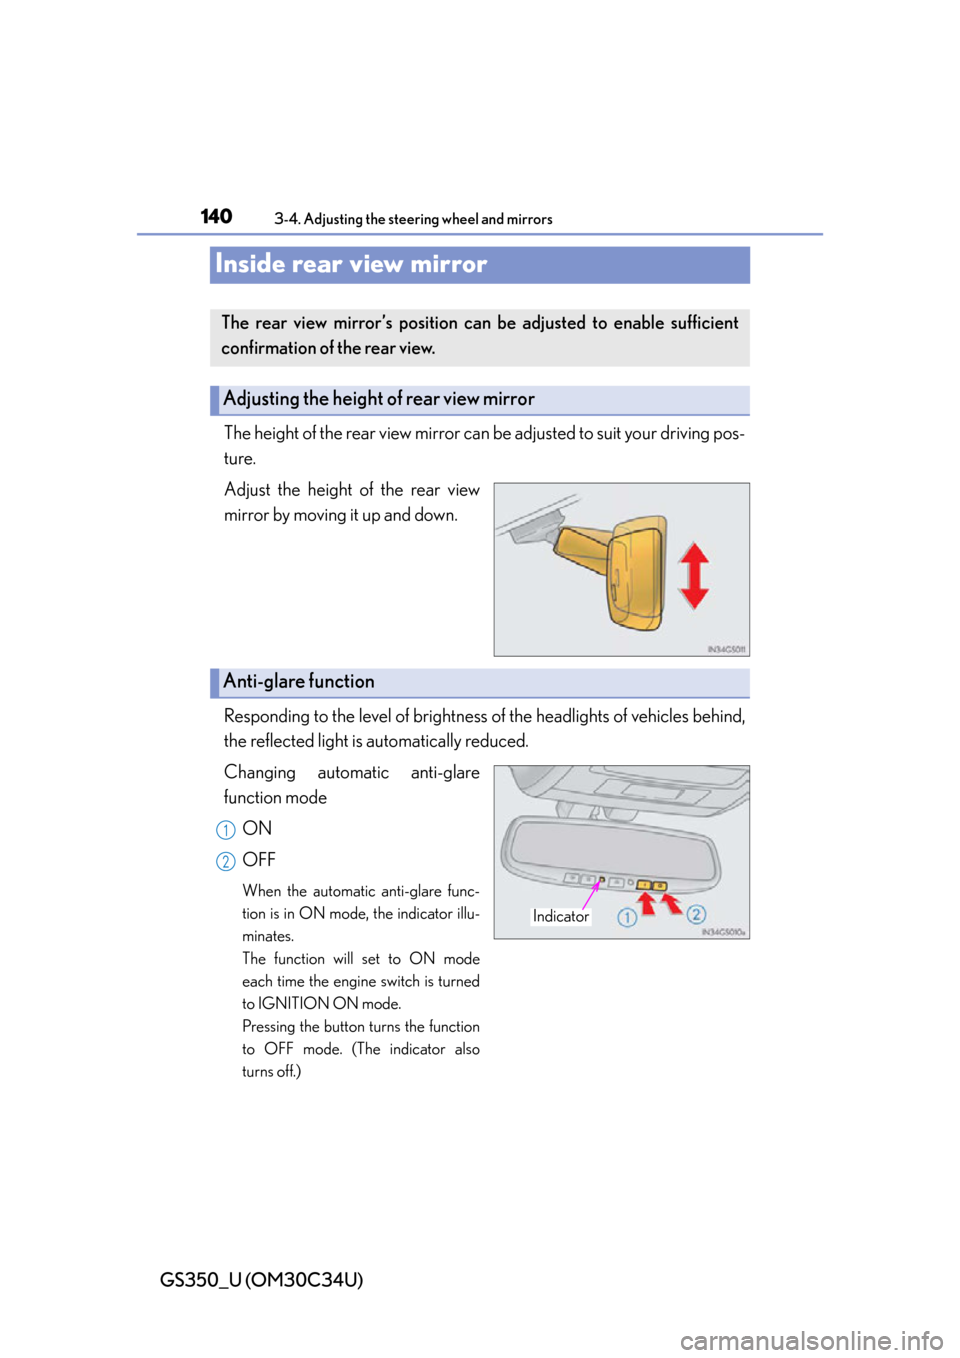
The height of the rear view mirror can be adjusted to suit your driving pos-
ture.
Adjust the height of the rear view
mirror by moving it up and down.
Responding to the level of brightness of the headlights of vehicles behind,
the reflected light is automatically reduced.
Changing automatic anti-glare
function mode
ON
OFF
When the automatic anti-glare func-
tion is in ON mode, the indicator illu-
minates.
The function will set to ON mode
each time the engine switch is turned
to IGNITION ON mode.
Pressing the button turns the function
to OFF mode. (The indicator also
turns off.)
The rear view mirror’s position can be adjusted to enable sufficient
confirmation of the rear view.
Adjusting the height of rear view mirror
Anti-glare function
Indicator
1
2
Page 279 of 828

GS350_U (OM30C34U)
2794-5. Using the driving support systems
4
Driving
◆Suspension control (if equipped)
When the system determines that a collision is unavoidable, the opera-
tion of AVS ( P. 269) optimally controls the damping force of the
shock absorber.
◆Steering control (if equipped)
Vehicles with VGRS
There is a high possibility of collisi on and if the steering wheel is oper-
ated, the steering gear ratio is chan ged by VGRS to help improve the
response to steering input.
Vehicles with LDH
There is a high possibility of collisi on and if the steering wheel is oper-
ated, the steering angles of the fr ont and rear wheels and the heaviness
of the steering wheel are controlled by LDH, thus heightening respon-
siveness in response to the steering operation.
◆Driver monitor system (if equipped)
When the system determines that there is a possibility of a collision, and
either the driver is not facing forwar d or the driver’s eyes are closed,
PCS warnings are given in advance to warn the driver. If the system
determines that the conditions to operate pre-collision alert braking
have been met even when the possibility of a collision increases further,
pre-collision alert braking will operate.
Page 290 of 828

290
GS350_U (OM30C34U)
4-5. Using the driving support systems
■Conditions under which the Blind Spot Monitor system may not function correctly
●The Blind Spot Monitor system may not detect vehicles correctly in the following
conditions:
• During bad weather such as heavy rain, fog, snow etc.
• When ice or mud etc. is attached to the rear bumper
• When driving on a road surface that is wet due to rain, standing water etc.
• When there is a significant difference in speed between your vehicle and the vehicle that enters the detection area
• When a vehicle is in the detection area from a stop and remains in the detection area as your vehicle accelerates
• When driving up or down consecutive steep inclines, such as hills, a dip in the road etc.
• When multiple vehicles approach with only a small gap between each vehicle
• When vehicle lanes are wide, and the vehicle in the next lane is too far away from your vehicle
• When the vehicle that enters the detect ion area is traveling at about the same
speed as your vehicle
• When there is a significant difference in height between your vehicle and the vehicle that enters the detection area
• Directly after the BSM switch is set to on
●Instances of the Blind Spot Monitor unnece ssarily detecting a vehicle and/or object
may increase under the following conditions:
• When there is only a short distance between your vehicle and a guardrail, wall etc.
• When there is only a short distance between your vehicle and a following vehi- cle
• When vehicle lanes are narrow and a ve hicle driving 2 lanes across from your
vehicle enters the detection area
■The outside rear view mirror indicators visibility
When under strong sunlight, the outside rear view mirror indicator may be difficult to
see.
Page 724 of 828

7247-2. Steps to take in an emergency
GS350_U (OM30C34U)
CAUTION
■Using the tire jack
Observe the following precautions.
Improper use of the tire jack may cause the vehicle to suddenly fall off the jack,
leading to death or serious injury.
●Do not use the tire jack for any purpose other than replacing tires or installing and
removing tire chains.
●Only use the tire jack that comes with this vehicle for replacing a flat tire.
Do not use it on other vehicles, and do not use other tire jacks for replacing tires
on this vehicle.
●Put the jack properly in its jack point.
●Do not put any part of your body under the vehicle while it is supported by the
jack.
●Do not start the engine or drive the vehicle while the vehicle is supported by the
jack.
●Do not raise the vehicle while someone is inside.
●When raising the vehicle, do not put an object on or under the jack.
●Do not raise the vehicle to a height greater than that required to replace the tire.
●Use a jack stand if it is necessary to get under the vehicle.
●When lowering the vehicle, make sure that there is no-one near the vehicle. If
there are people nearby, warn them vocally before lowering.
Page 752 of 828
752
GS350_U (OM30C34U)
8-1. Specifications
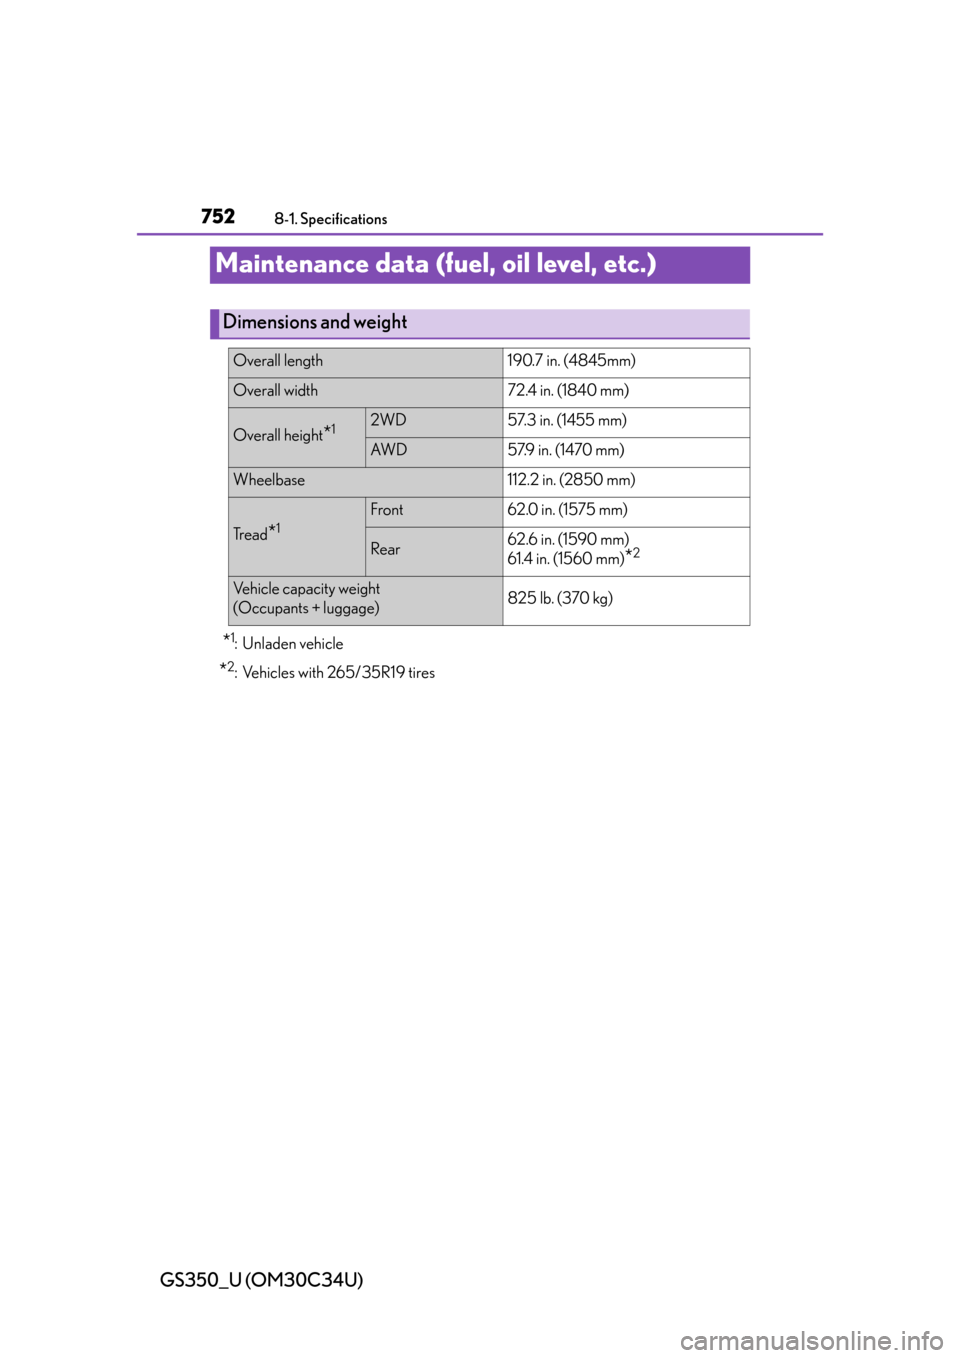
Maintenance data (fuel, oil level, etc.)
*1: Unladen vehicle
*2: Vehicles with 265/35R19 tires
Dimensions and weight
Overall length190.7 in. (4845mm)
Overall width72.4 in. (1840 mm)
Overall height*12WD57.3 in. (1455 mm)
AW D57.9 in. (1470 mm)
Wheelbase112.2 in. (2850 mm)
Tr e a d*1
Front62.0 in. (1575 mm)
Rear62.6 in. (1590 mm)
61.4 in. (1560 mm)
*2
Vehicle capacity weight
(Occupants + luggage)825 lb. (370 kg)
Page 768 of 828
768
GS350_U (OM30C34U)
8-1. Specifications
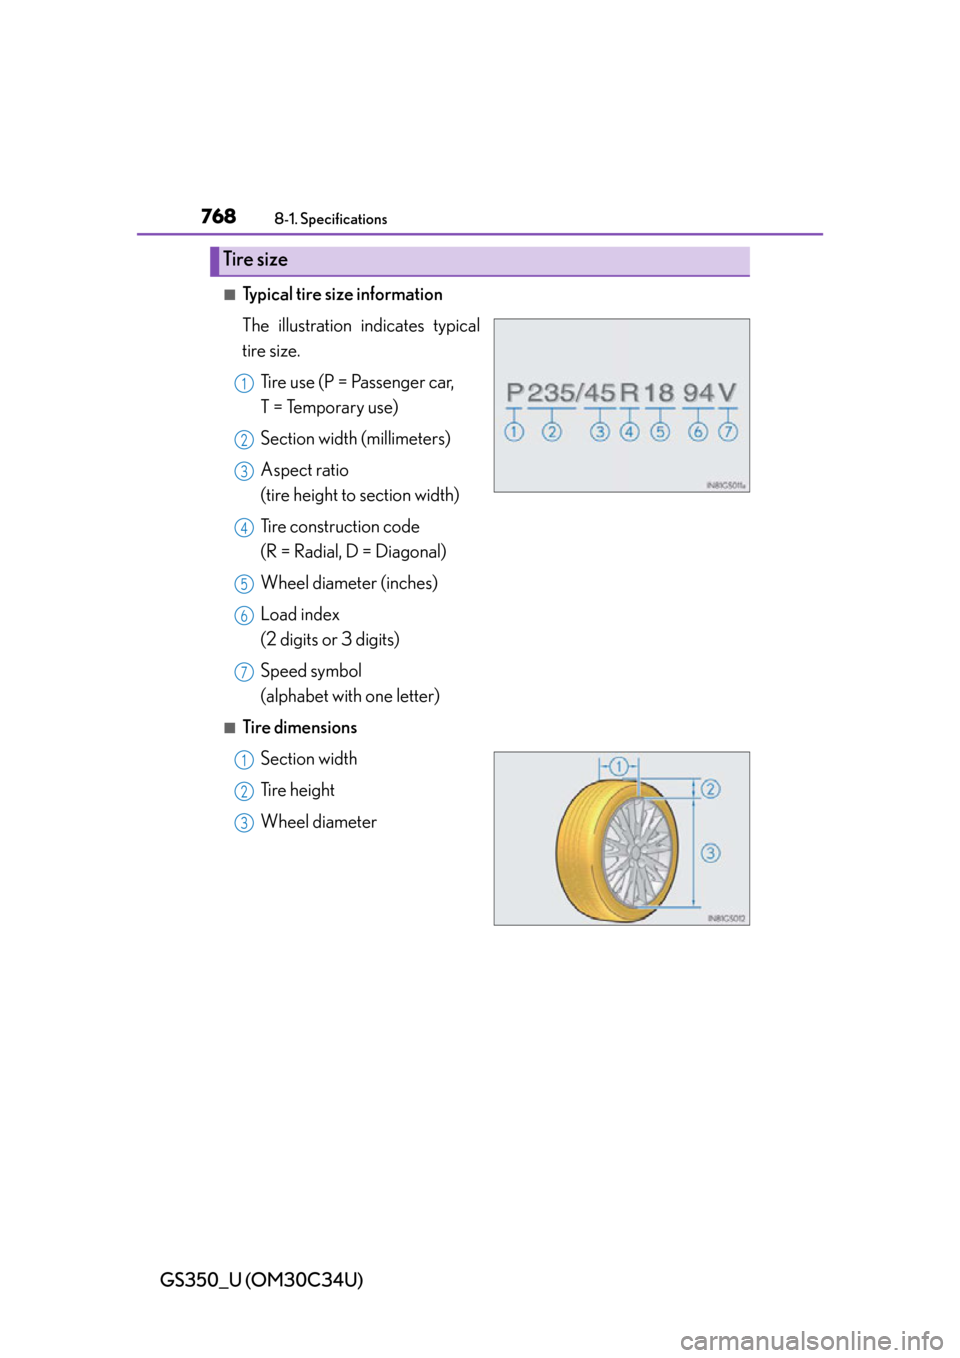
■Typical tire size information
The illustration indicates typical
tire size.Tire use (P = Passenger car,
T = Temporary use)
Section width (millimeters)
Aspect ratio
(tire height to section width)
Tire construction code
(R = Radial, D = Diagonal)
Wheel diameter (inches)
Load index
(2 digits or 3 digits)
Speed symbol
(alphabet with one letter)
■Tire dimensionsSection width
Tire height
Wheel diameter
Tire size
1
2
3
4
5
6
7
1
2
3