ECO mode Lexus GS350 2014 Using the air conditioning system and defogger / LEXUS 2014 GS350 OWNERS MANUAL (OM30D41U)
[x] Cancel search | Manufacturer: LEXUS, Model Year: 2014, Model line: GS350, Model: Lexus GS350 2014Pages: 844, PDF Size: 10.59 MB
Page 27 of 844

271-1. For safe use
GS350_OM_OM30D41U_(U)
1
For safety and security
CAUTION
Observe the following precautions.
Failure to do so may cause the driver’s floor mat to slip, possibly interfering with the
pedals while driving. An unexpectedly high speed may result or it may become diffi-
cult to stop the vehicle, lead ing to an accident, or leading to death or a serious injury.
■When installing the driver’s floor mat
●Do not use floor mats designed for other models or different model year vehicles,
even if they are Lexus Genuine floor mats.
●Only use floor mats designed for the driver’s seat.
●Always install the floor mat securely using the retaining hooks (clips) provided.
●Do not use two or more floor mats on top of each other.
●Do not place the floor mat bo ttom-side up or upside-down.
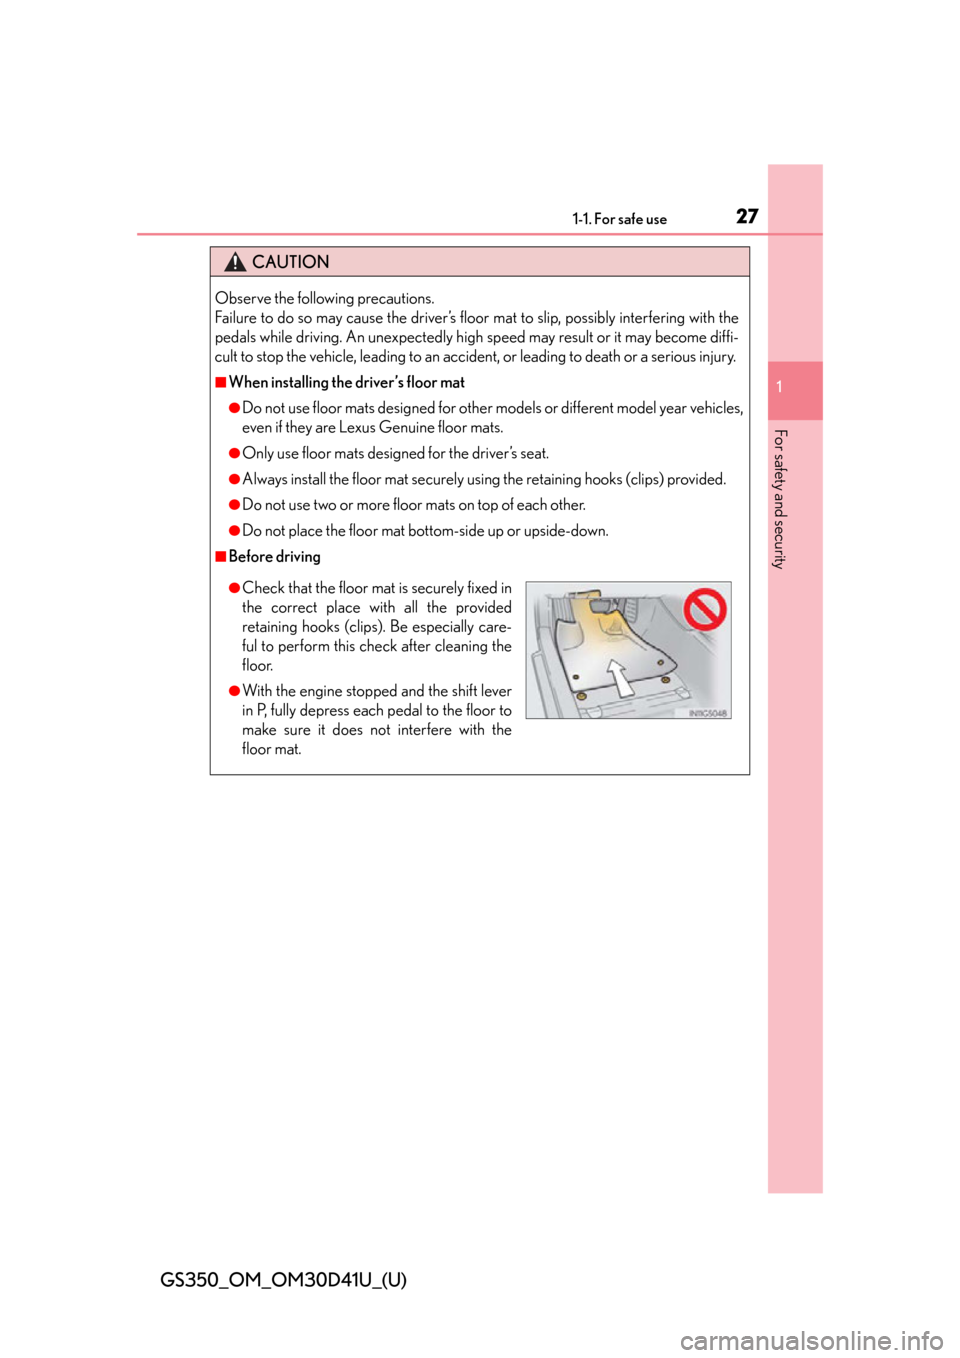
■Before driving
●Check that the floor mat is securely fixed in
the correct place with all the provided
retaining hooks (clips). Be especially care-
ful to perform this check after cleaning the
floor.
●With the engine stopped and the shift lever
in P, fully depress each pedal to the floor to
make sure it does not interfere with the
floor mat.
Page 72 of 844

721-2. Theft deterrent system
GS350_OM_OM30D41U_(U)
Alarm
The alarm uses light and sound to give an alert when an intrusion is
detected.
The alarm is triggered in the following situations when the alarm is set:
●A locked door or trunk is unlocked or opened in any way other than
using the entry function, wireless remote control or mechanical key.
(The doors will lock again automatically.)
●The hood is opened.
Close the doors, trunk and hood,
and lock all the doors. The system
will be set automatically after 30
seconds.
The indicator light changes from
being on to flashing when the system
is set.
Do one of the following to deactivate or stop the alarms:
●Unlock the doors or open the trunk.
●Turn the engine switch to ACCE SSORY or IGNITION ON mode, or
start the engine. (The alarm will be deactivated or stopped after a few
seconds.)
The alarm
Setting the alarm system
Deactivating or stopping the alarm
Page 78 of 844

78
GS350_OM_OM30D41U_(U)
2. Instrument cluster
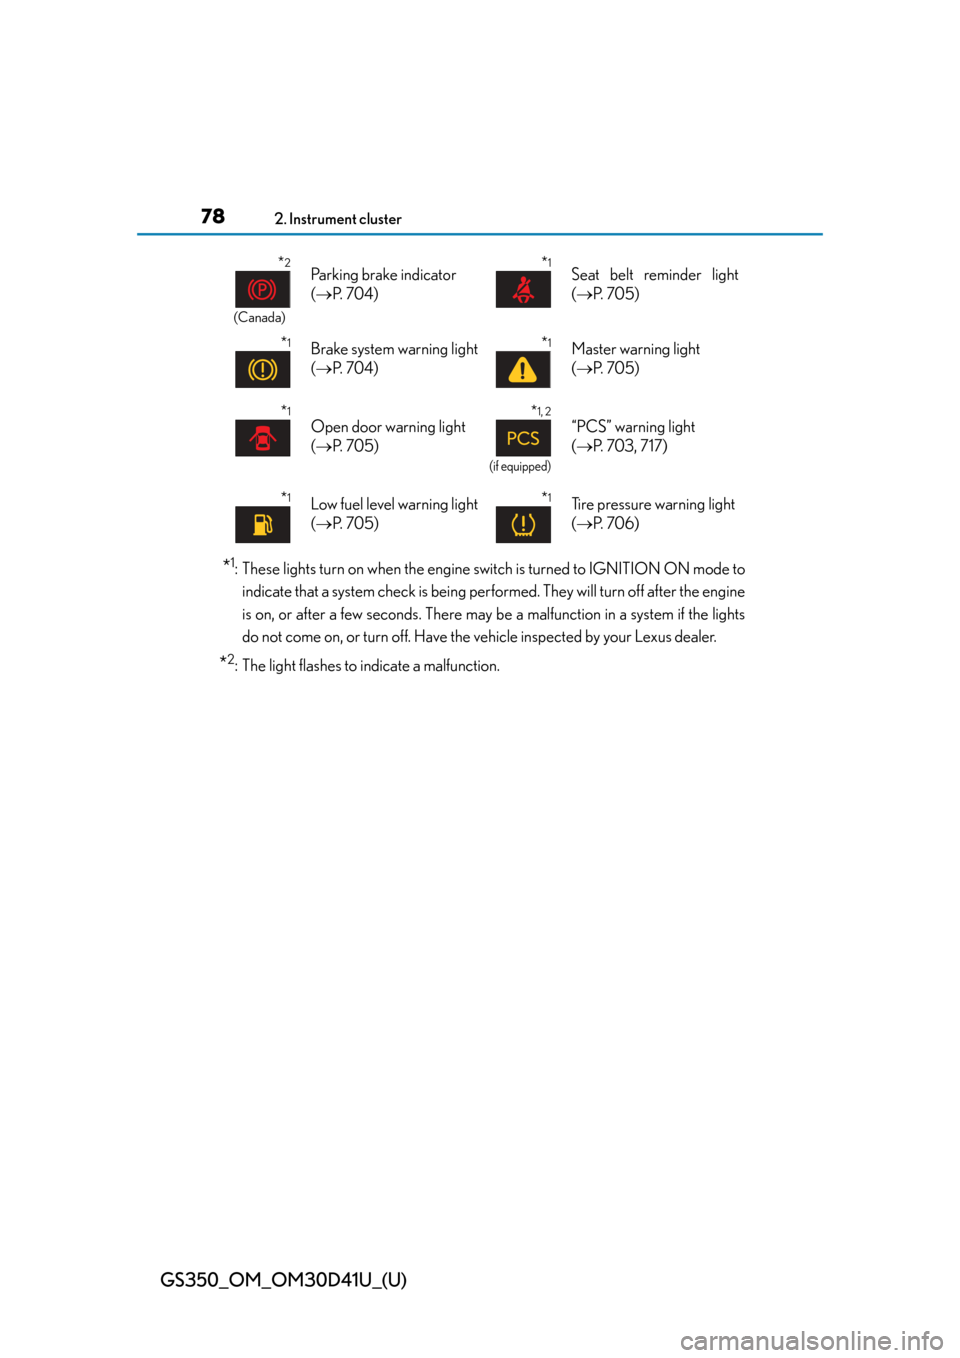
*1: These lights turn on when the engine switch is turned to IGNITION ON mode to
indicate that a system check is being performed. They will turn off after the engine
is on, or after a few seconds. There may be a malfunction in a system if the lights
do not come on, or turn off. Have the vehicle inspected by your Lexus dealer.
*2: The light flashes to indicate a malfunction.
*2
(Canada)
Parking brake indicator
( P. 7 0 4 )*1Seat belt reminder light
( P. 705)
*1Brake system warning light
( P. 7 0 4 )*1Master warning light
( P. 705)
*1
Open door warning light
( P. 705)*1, 2
(if equipped)
“PCS” warning light
( P. 703, 717)
*1Low fuel level warning light
( P. 705)*1Tire pressure warning light
( P. 7 0 6 )
Page 80 of 844

80
GS350_OM_OM30D41U_(U)
2. Instrument cluster
*1: These lights turn on when the engine switch is turned to IGNITION ON mode to
indicate that a system check is being performed. They will turn off after the engine
is on, or after a few seconds. There may be a malfunction in a system if the lights
do not come on, or turn off. Have the vehicle inspected by your Lexus dealer.
*2: The light flashes to indicate that the system is operating.
*3: The light comes on when the system is turned off. The light flashes faster than
usual to indicate that the system is operating.
*4: In order to confirm operation, the BSM ou tside rear view mirror indicators illumi-
nate in the following situations:
• When the engine switch is turned to IGNITION ON mode while the BSM main switch is set to ON.
• When the BSM main switch is set to ON while the engine switch is in IGNI- TION ON mode.
If the system is functioning correctly, the BSM outside rear view mirror indicators
will turn off after a few seconds.
If the BSM outside rear view mirror indicato rs do not illuminate or do not turn off,
there may be a malfunction with the system.
If this occurs, have the vehicle inspected by your Lexus dealer.
CAUTION
■If a safety system warning light does not come on
Should a safety system light such as the ABS and SRS warning light not come on
when you start the engine, this could mean that these systems are not available to
help protect you in an accident, which coul d result in death or serious injury. Have
the vehicle inspected by your Lexus dealer immediately if this occurs.
Page 81 of 844

81
GS350_OM_OM30D41U_(U)2. Instrument cluster
2
Instrument cluster
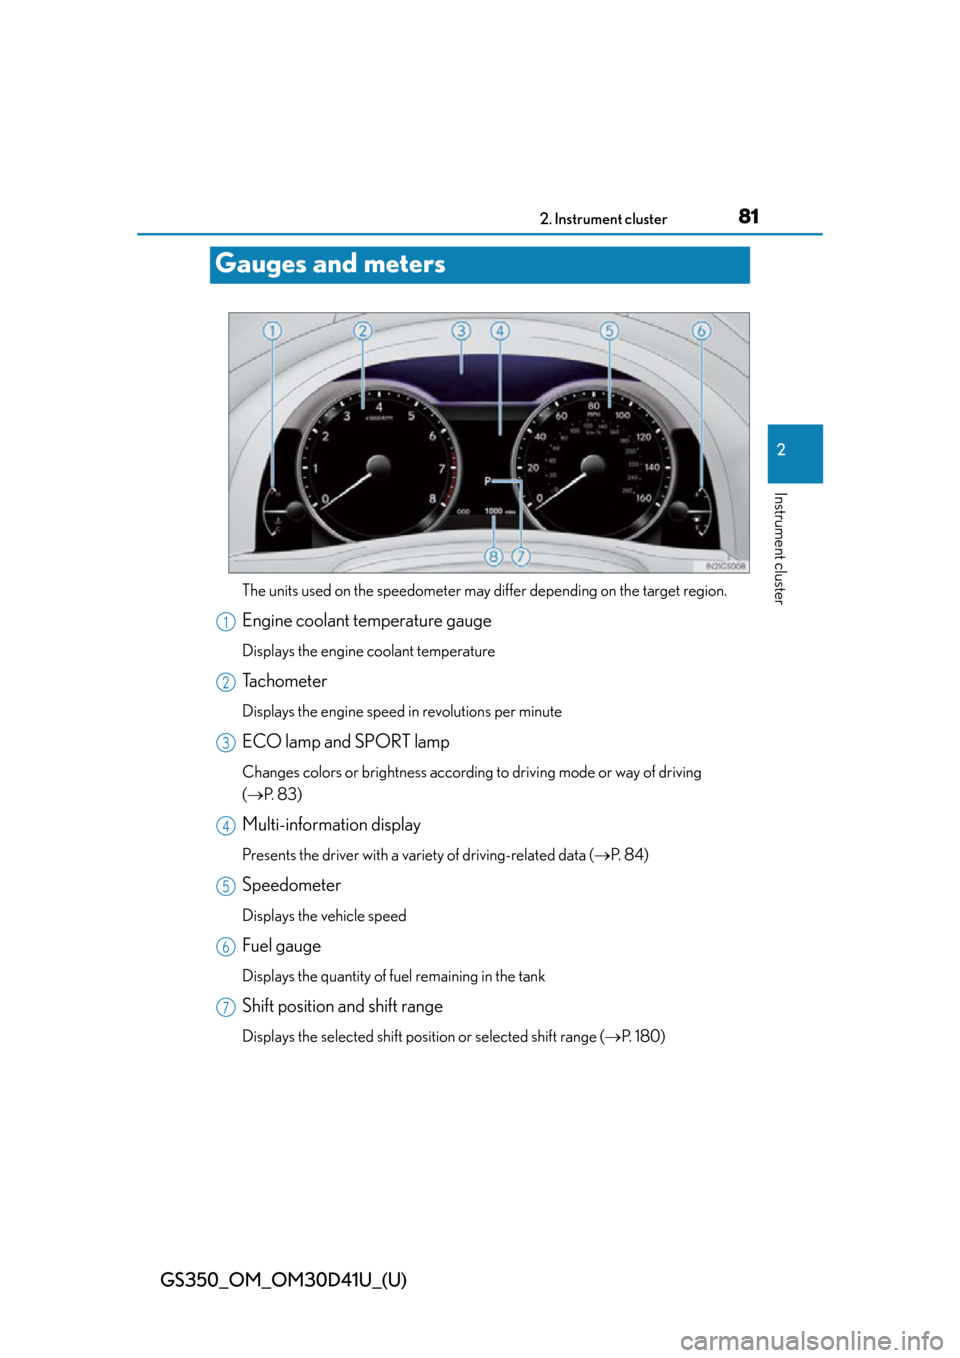
Gauges and meters
The units used on the speedometer may di ffer depending on the target region.
Engine coolant temperature gauge
Displays the engine coolant temperature
Tachometer
Displays the engine speed in revolutions per minute
ECO lamp and SPORT lamp
Changes colors or brightness according to driving mode or way of driving
( P. 8 3 )
Multi-information display
Presents the driver with a variety of driving-related data ( P. 8 4 )
Speedometer
Displays the vehicle speed
Fuel gauge
Displays the quantity of fuel remaining in the tank
Shift position and shift range
Displays the selected shift position or selected shift range ( P. 1 8 0 )
1
2
3
4
5
6
7
Page 83 of 844

GS350_OM_OM30D41U_(U)
832. Instrument cluster
2
Instrument cluster
■The meters and display illuminate when
The engine switch is in IGNITION ON mode.
■Instrument panel brightness adjustment
The instrument panel brightness levels when the tail lights are on and off can be
adjusted individually. However, when the surroundings are bright (daytime, etc.),
turning on the tail lights will not change th e instrument panel brightness. At this time,
any adjustments made to the instrument panel brightness levels will be applied to
both settings at once.
■Limitation of brightness adjustment
The brightness of the instrument panel ligh ts is automatically adjusted based on the
light sensor detecting how bright the surroundings are. However, if the instrument
panel brightness has been manually set to ei ther the brightest or darkest setting, the
automatic adjustment will not be performed.
■ECO lamp and SPORT lamp
●When sport mode is selected, SPORT lamp (red) will illuminate.
●When all of the following conditions are satisfied and Eco-friendly driving, ECO
lamp (blue) will illuminate. (ECO lamp will become brighter the more Eco-friendly
driving you perform. Also, while the acceleration exceeds Zone of Eco driving,
ECO lamp turns off. [P. 90] However, when Eco drive mode is selected, while
the acceleration exceeds Zone of Eco driving, ECO lamp does not turn off.):
• Driving with the shift lever in D
• Paddle shift switch is not operated.
• Either normal mode or Eco drive mode is selected.
• The vehicle speed is approximately 80 mph (130 km/h) or below.
■Customization
Settings (e.g. on/off operatio n of ECO lamp) can be changed.
(Customizable features: P. 7 9 3 )
NOTICE
■To prevent damage to the engine and its components
●Do not let the indicator needle of the tachometer enter the red zone, which indi-
cates the maximum engine speed.
●The engine may be overheating if the engine coolant temperature gauge is in the
red zone (H). In this case, immediately stop the vehicle in a safe place, and check
the engine after it has cooled completely. ( P. 76 1 )
Page 90 of 844

90
GS350_OM_OM30D41U_(U)
2. Instrument cluster
■System check display
After turning the engine switch to IGNITION ON mode, “SYSTEM CHECK” is dis-
played while system operation is checked.
■Eco Driving Indicator Zone Display
Eco Driving Indicator will not operate in the following conditions:
●The shift lever is anything other than D.
●Paddle shift switch is operated.
●Neither normal mode nor Eco drive mode is selected. ( P. 181)
●The vehicle speed is approximatel y 80 mph (130 km/h) or higher.
■Outside temperature display
In the following situations, the correct outside temperature may not be displayed, or
the display may take longer than normal to change.
●When stopped, or driving at low speeds (less than 12 mph [20 km/h])
●When the outside temperature has changed suddenly (at the entrance/exit of a
garage, tunnel, etc.)
■Setting display automatic cancelation
In the following situations, setting display in which the settings can be changed
through the “DISP” button will automatically be turned off.
●When a warning message appears whil e the setting display is displayed
●When the vehicle begins to move while the setting display is displayed
Suggests Zone of Eco driving and Eco driving
ratio based on acceleration.
Eco driving ratio based on acceleration
If the acceleration exceeds Zone of Eco
driving, the right side of Eco Driving Indica-
tor Zone Display blinks.
Zone of Eco driving
1
2
Page 107 of 844

GS350_OM_OM30D41U_(U)
1073-2. Opening, closing and locking the doors and trunk
3
Operation of each component
■Alarms and warning indicators
An alarm sounds and warning message displays shown on the multi-information dis-
play are used to protect against unexpected accidents or theft of the vehicle result-
ing from erroneous operation. When a warning message is displayed, take
appropriate measures based on the displayed message. ( P. 7 1 2 )
When only an alarm sounds, circumstance s and correction procedures are as fol-
lows.
AlarmSituationCorrection procedure
Exterior alarm sounds
once for 5 seconds
The trunk was closed
while the electronic key
was still inside the trunk
and all the doors were
locked.
Retrieve the electronic
key from the trunk and
close the trunk lid.
An attempt was made to
lock the vehicle while a
door was open.Close all of the doors and
lock the doors again.
Interior alarm sounds
continuously
The engine switch was
turned to ACCESSORY
mode while the driver’s
door was open (or the
driver’s door was opened
while the engine switch
was in ACCESSORY
mode).
Tu r n t h e e n g i n e s w i t c h o f f
and close the driver’s
door.
Page 111 of 844

GS350_OM_OM30D41U_(U)
1113-2. Opening, closing and locking the doors and trunk
3
Operation of each component
■Note for the entry function
●Even when the electronic key is within the effective range (detection areas), the
system may not operate properly in the following cases:
• The electronic key is too close to the window or outside door handle, near the
ground, or in a high place when the doors are locked or unlocked.
• The electronic key is near the ground or in a high place, or too close to the rear bumper center when the trunk is opened.
• The electronic key is on the instrument pa nel, rear package tray or floor, or in the
door pockets or glove box when the engine is started or engine switch modes
are changed.
●Do not leave the electronic key on top of the instrument panel or near the door
pockets when exiting the vehicle. Depending on the radio wave reception condi-
tions, it may be detected by the ante nna outside the cabin and the door will
become lockable from the outside, possibly trapping the electronic key inside the
vehicle.
●As long as the electronic key is within the effective range, the doors may be locked
or unlocked by anyone. However, only th e doors detecting the electronic key can
be used to unlock the vehicle.
●Even if the electronic key is not inside the vehicle, it may be possible to start the
engine if the electronic key is near the window.
●The doors may unlock or lock if a large am ount of water splashes on the door han-
dle, such as in the rain or in a car wash when the electronic key is within the effec-
tive range. (The doors will automatically be locked after approximately 60 seconds
if the doors are not opened and closed.)
●If the wireless remote control is used to lock the doors when the electronic key is
near the vehicle, there is a possibility that the door may not be unlocked by the
entry function. (Use the wireless re mote control to unlock the doors.)
Page 112 of 844

112
GS350_OM_OM30D41U_(U)
3-2. Opening, closing and locking the doors and trunk
■Note for locking the doors
●Touching the door lock sensor while wearing gloves may delay or prevent lock
operation. Remove the gloves an d touch the lock sensor again.
●If the door handle becomes wet while the electronic key is within the effective
range, the door may lock and unlock repe atedly. In that case, follow the following
correction procedures to wash the vehicle:
• Place the electronic key in a location 6 ft. (2 m) or more away from the vehicle. (Take care to ensure that the key is not stolen.)
• Set the electronic key to battery-saving mode to disable the smart access sys- tem with push-button start. ( P. 1 0 9 )
●If the electronic key is inside the vehicle and a door handle becomes wet during a
car wash, a message may be shown on th e multi-information display and a buzzer
will sound outside the vehicle. To turn off the alarm, lock all the doors.
●The lock sensor may not work properly if it comes into contact with ice, snow, mud,
etc. Clean the lock sensor and attempt to operate it again, or use the lock sensor
on the lower part of the door handle.
●Fingernails may scrape against the door during operation of the door handle. Be
careful not to injure fingernails or damage the surface of the door.
■Note for the unlocking function
●A sudden approach to the effective rang e or door handle may prevent the doors
from being unlocked. In this case, return the door handle to the original position
and check that the doors unlock befo re pulling the door handle again.
●Gripping the door handle when wearing a glove may not unlock the door.
●If the door handle becomes wet while the electronic key is within the effective
range, the door may lock and unlock repe atedly. In that case, follow the following
correction procedures to wash the vehicle:
• Place the electronic key in a location 6 ft. (2 m) or more away from the vehicle. (Take care to ensure that the key is not stolen.)
• Set the electronic key to battery-saving mode to disable the smart access sys- tem with push-button start. ( P. 1 0 9 )
●If there is another electronic key in the de tection area, it may take slightly longer to
unlock the doors after the door handle is gripped.
●Fingernails may scrape against the door during operation of the door handle. Be
careful not to injure fingernails or damage the surface of the door.