check engine light Lexus GS350 2016 User Guide
[x] Cancel search | Manufacturer: LEXUS, Model Year: 2016, Model line: GS350, Model: Lexus GS350 2016Pages: 624, PDF Size: 15.29 MB
Page 201 of 624
GS350_200t_GS F_OM_OM30E86U_(U)
2014-2. Driving procedures
4
Driving
NOTICE
■To prevent battery discharge
●Do not leave the engine switch in ACCESSORY or IGNITION ON mode for long
periods of time without the engine running.
●If “POWER ON” is displayed on the multi- information display, the engine switch is
not off. Exit the vehicle after turning the engine switch off.
●Do not stop the engine when the shift lever is in a position other than P. If the engine is
stopped in another shift lever position, the engine switch will not be turned off but
instead be turned to ACCESSORY mode. If the vehicle is left in ACCESSORY
mode, battery discharge may occur.
■When starting the engine
●Do not race a cold engine.
●If the engine becomes difficult to start or stalls frequently, have your vehicle checked
by your Lexus dealer immediately.
■Symptoms indicating a malfun ction with the engine switch
If the engine switch seems to be operating somewhat differently than usual, such as the
switch sticking slightly, there may be a malf unction. Contact your Lexus dealer immedi-
ately.
Page 209 of 624
209
GS350_200t_GS F_OM_OM30E86U_(U)4-2. Driving procedures
4
Driving
Turn signal lever
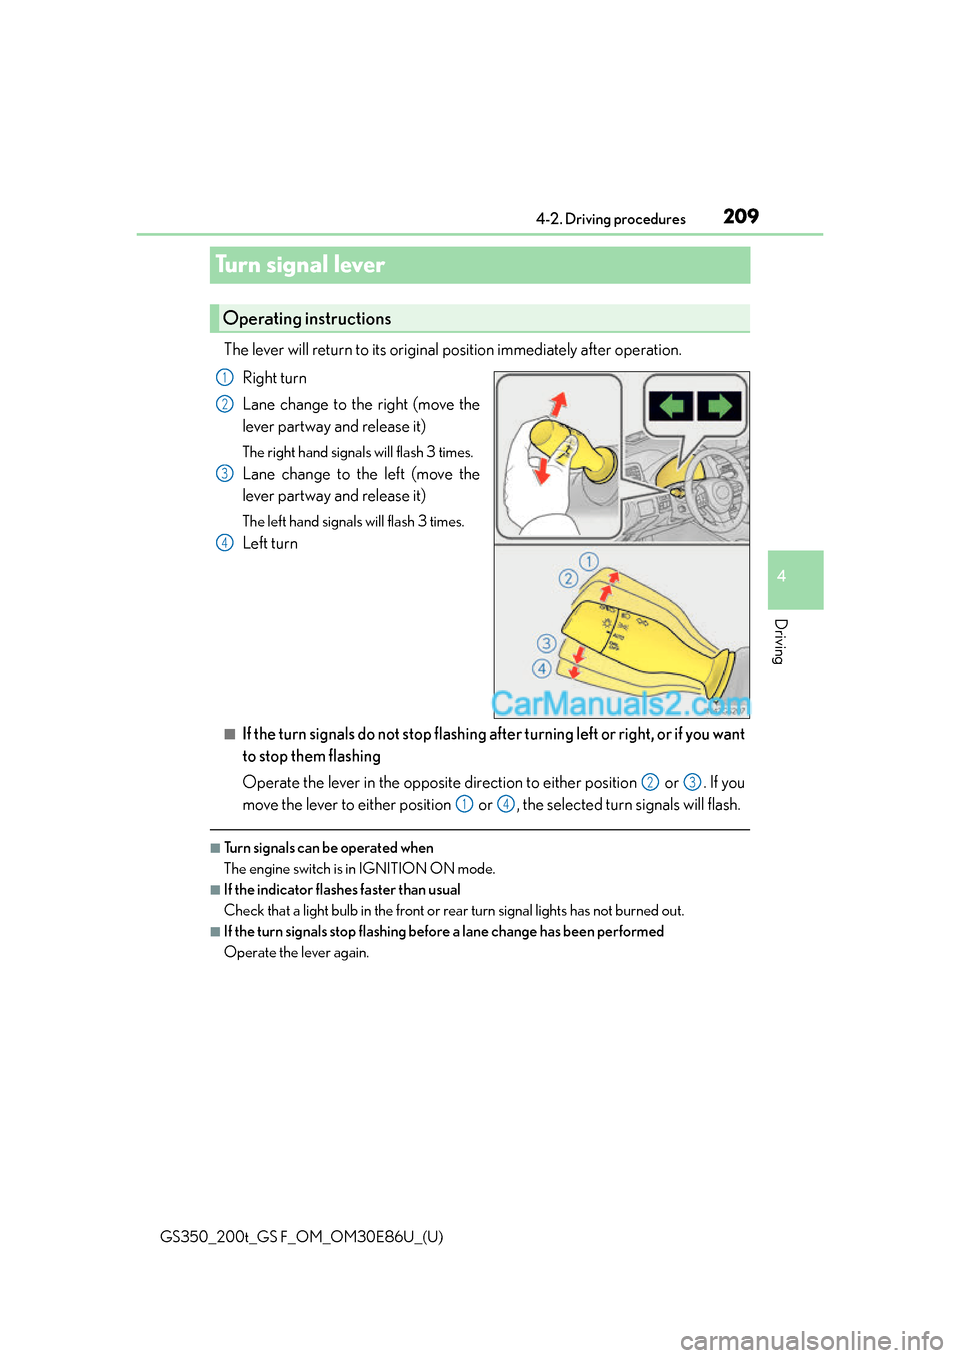
The lever will return to its original
position immediately after operation.
Right turn
Lane change to the right (move the
lever partway and release it)
The right hand signals will flash 3 times.
Lane change to the left (move the
lever partway and release it)
The left hand signals will flash 3 times.
Left turn
■If the turn signals do not stop flashing af ter turning left or right, or if you want
to stop them flashing
Operate the lever in the opposite direction to either position or . If you
move the lever to either position or , the selected turn signals will flash.
■Turn signals can be operated when
The engine switch is in IGNITION ON mode.
■If the indicator flashes faster than usual
Check that a light bulb in the front or rear turn signal lights has not burned out.
■If the turn signals stop flashing befo re a lane change has been performed
Operate the lever again.
Operating instructions
1
2
3
4
23
14
Page 211 of 624
GS350_200t_GS F_OM_OM30E86U_(U)
2114-2. Driving procedures
4
Driving
■Parking brake operation
●When the engine switch is not in IGNITION ON mode, the parking brake cannot be
released using the parking brake switch.
●When the engine switch is not in IGNI TION ON mode, automatic mode (automatic
brake setting and releas ing) is not available.
●If the parking brake is operated repeatedly over a short period of time, the system may
restrict operation to prevent overheating. If this happens, refrain from operating the
parking brake. Normal operation will return after about 1 minute.
●In situations such as when parking on a steep slope*, the maximum amount of braking
force can be used by pressing the parking brake switch with the parking brake already
set.
*: Use wheel chocks when parking on a steep slope.
■Parking brake operation sound
When the parking brake operates, a motor sound (whirring sound) may be heard. This
does not indicate a malfunction.
■Parking brake indicator light
●Depending on the engine switch mode, the parking brake indicator light will come on
and stay on as described below:
IGNITION ON mode: Comes on until the parking brake is released.
Not in IGNITION ON mode: Stays on for approximately 15 seconds.
●When the engine switch is turned off with the parking brake set, the parking brake indi-
cator light will stay on for about 15 seco nds. This does not indicate a malfunction.
■When there is a malfunction in the system
Warning lights and/or warning message will turn on or flash. ( P. 4 5 4 , 4 6 0 )
Depending on the condition, the par king brake indicator light may flash.
■Parking brake engaged warning buzzer
P. 4 6 3
■Usage in winter time
P. 3 1 7
NOTICE
■When parking the vehicle
Before you leave the vehicle, set the parking brake, shift the shift lever to P and make
sure that the vehicle does not move.
■When the system malfunctions
Stop the vehicle in a safe place and check the warning messages.
■When the parking brake cannot be released due to a malfunction
Use the parking brake release tool to manually release the parking brake. (P. 5 1 8 )
Driving the vehicle with the parking brake set will lead to brake components overheat-
ing, which may affect braking perf ormance and increase brake wear.
Page 213 of 624
GS350_200t_GS F_OM_OM30E86U_(U)
2134-2. Driving procedures
4
Driving
■When the parking brake is set automatically while the system is holding the brakes
The parking brake will not be released auto matically. Perform one of the following proce-
dures to release the parking brake and conf irm that the parking brake indicator light
turns off. ( P. 2 1 0 )
●With the brake pedal depressed, operate the parking brake switch.
●Fasten your seat belt, check that the shift leve r is in either D or R and slowly depress the
accelerator pedal.
■Warning message and buzzers
Warning messages and buzzers are used to indicate a system malfunction or to inform
the driver of the need for caution. ( P. 4 5 9 )
WA R N I N G
■When the vehicle is on a steep incline
When using the brake hold system on a stee p incline exercise caution. The brake hold
function may not hold the vehicle in such a situation.
■When stopped on a slippery road
The system cannot stop the vehicle when the gripping ability of the tires has been
exceeded. Do not use the system when stopped on a slippery road.
NOTICE
■When parking the vehicle
The brake hold system is not designed for use when parking the vehicle for a long
period of time. Turning the engine switch of f while the system is holding the brake may
release the brake, which would cause the vehicle to move. When operating the engine
switch, depress the brake pedal, set the parking brake and shift the shift lever to P.
Page 377 of 624
377
GS350_200t_GS F_OM_OM30E86U_(U)
6Maintenance and care
6-1. Maintenance and careCleaning and protecting the vehicle exterior................. 378
Cleaning and protecting the vehicle interior .................. 382
6-2. Maintenance Maintenance requ irements ...385
General maintena nce .............. 387
Emission inspection and maintenance (I/M)
programs ....................................390
6-3. Do-it-yourself maintenance Do-it-yourself service precautions ................................. 391
Hood ............................................... 393
Positioning a floor jack ............. 394
Engine compartment ............... 396
Tires ................................................... 413
Tire inflation pressure ............... 422
Wheels ........................................... 425
Air conditioning filter ................427
Electronic key battery .............. 429
Checking and replacing fuses ............................................... 431
Headlight aim (vehicles with single-beam headlights)....... 435
Light bulbs..................................... 437
Page 416 of 624
416
GS350_200t_GS F_OM_OM30E86U_(U)6-3. Do-it-yourself maintenance
◆Registering ID codes
The tire pressure warning valve and transmitter is equipped with a unique ID
code. When replacing a tire pressure warning valve and transmitter, it is nec-
essary to register the ID code. Have the ID code registered by your Lexus
dealer.
■When to replace your vehicle’s tires
Tires should be replaced if:
●The treadwear indicators are showing on a tire.
●You have tire damage such as cuts, splits, cracks deep enough to expose the fabric, and
bulges indicating internal damage
●A tire goes flat repeatedly or cannot be prop
erly repaired due to the size or location of
a cut or other damage
If you are not sure, consult with your Lexus dealer.
■Replacing tires and wheels
If the ID code of the tire pressure warning valve and transmitter is not registered, the tire
pressure warning system will not work proper ly. After driving for about 20 minutes, the
tire pressure warning light blinks for 1 minute and stays on to indicate a system malfunc-
tion.
■Tire life
Any tire over 6 years old must be checked by a qualified technician even if it has seldom
or never been used or damage is not obvious.
■Routine tire inflation pressure checks
The tire pressure warning system does not replace routine tire inflation pressure checks.
Make sure to check tire inflation pressure as part of your routine of daily vehicle checks.
■When rotating the tires
Make sure that the engine switch is off. If the tires are rotated while the engine switch is in
IGNITION ON mode, the tire position information will not be updated.
If this accidentally occurs, either turn the engine switch to off and then to IGNITION ON
mode, or initialize the system after checking th at the tire pressure is properly adjusted.
■Low profile tires (except 225/50R17 tires)
Generally, low profile tires will wear more rapidly and tire grip performance will be
reduced on snowy and/or icy roads when compared to standard tires. Be sure to use
snow tires or tire chains on snowy and/or icy roads and drive carefully at a speed appro-
priate for road and weather conditions. ( P. 3 1 7 )
Page 437 of 624
437
GS350_200t_GS F_OM_OM30E86U_(U)6-3. Do-it-yourself maintenance
6
Maintenance and care
Light bulbs
Check the wattage of the light bulb to be replaced. (
P. 5 5 4 )
P. 3 9 9
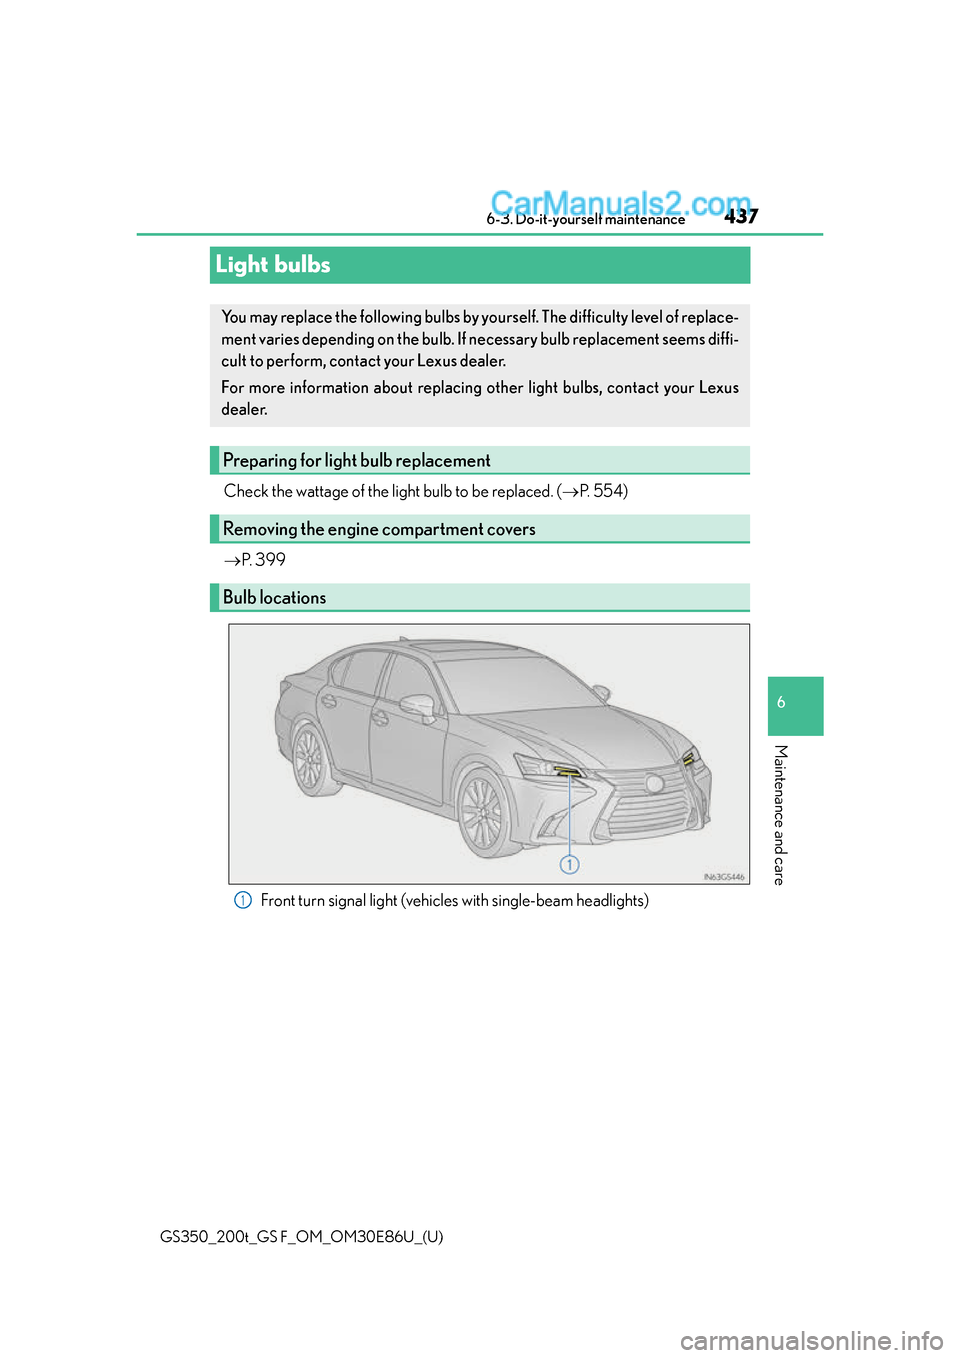
Front turn signal light (vehicles with single-beam headlights)
You may replace the following bulbs by yourself. The difficulty level of replace-
ment varies depending on the bulb. If necessary bulb replacement seems diffi-
cult to perform, contact your Lexus dealer.
For more information about replacing other light bulbs, contact your Lexus
dealer.
Preparing for light bulb replacement
Removing the engine compartment covers
Bulb locations
1
Page 456 of 624
4567-2. Steps to take in an emergency
GS350_200t_GS F_OM_OM30E86U_(U)
■SRS warning light
This warning light system monitors the airbag sensor assembly, front impact sensors, side
impact sensors (front door), side impact sensors (front), side impact sensors (rear),
driver’s seat position sensor, driver’s seat belt buckle switch, front passenger occupant
classification system, “AIR BAG ON” indica tor light, “AIR BAG OFF” indicator light,
front passenger’s seat belt buckle switch, seat belt pretensioner assemblies, airbags,
interconnecting wiring and power sources. ( P. 4 3 )
■Front passenger detection sensor, seat belt reminder and warning buzzer
If luggage is placed on the front passenger seat, the front passenger detection sensor
may cause the warning light to flash and the wa rning buzzer to sound even if a passenger
is not sitting in the seat.
■If the malfunction indicator lamp comes on while driving
First check the following:
●Is the fuel tank empty?
If it is, fill the fuel tank immediately.
●Is the fuel tank cap loose?
If it is, tighten it securely.
The light will go off after several driving trips.
If the light does not go off even after severa l trips, contact your Lexus dealer as soon as
possible.
■Electric power steering system warning light (warning buzzer)
When the battery charge becomes insufficie nt or the voltage temporarily drops, the
electric power steering system warning light may come on and the warning buzzer may
sound.
■When the tire pressure warning light comes on
Check the tire inflation pressure and adjust to the appropriate level. Initializing the tire
pressure warning system will not turn off the tire pressure warning light.
■The tire pressure warning light may come on due to natural causes
The tire pressure warning light may come on due to natural causes such as natural air
leaks and tire inflation pressure changes caused by temperature. In this case, adjusting
the tire inflation pressure will turn off the warning light (after a few minutes).
■When a tire is replaced with a spare tire
The compact spare tire is not equipped with a tire pressure warning valve and transmit-
ter. If a tire goes flat, the tire pressure warning light will not turn off even though the flat
tire has been replaced with the spare tire.
■Conditions that the tire pressure warning system may not function properly
P. 4 1 8
■If the tire pressure warning light frequently comes on after blinking for 1 minute
If the tire pressure warning light frequently comes on after blinking for 1 minute when the
engine switch is turned to IGNITION ON mo de, have it checked by your Lexus dealer.
Page 479 of 624
4797-2. Steps to take in an emergency
GS350_200t_GS F_OM_OM30E86U_(U)
7
When trouble arises
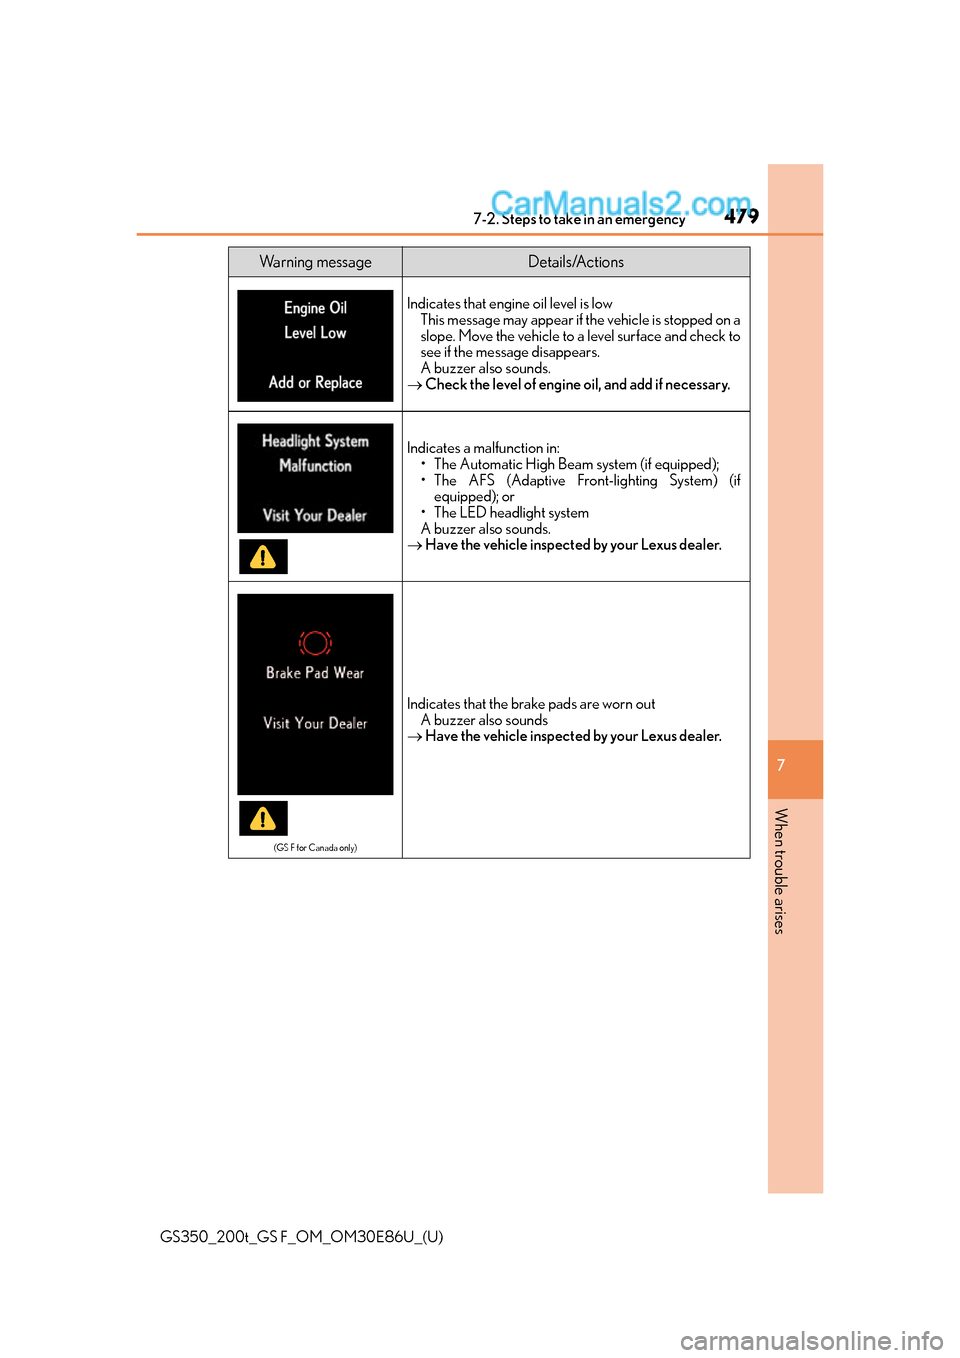
Indicates that engine oil level is low This message may appear if the vehicle is stopped on a
slope. Move the vehicle to a level surface and check to
see if the message disappears.
A buzzer also sounds.
Check the level of engine oil, and add if necessary.
Indicates a malfunction in:
• The Automatic High Beam system (if equipped);
• The AFS (Adaptive Front-lighting System) (if
equipped); or
• The LED headlight system
A buzzer also sounds.
Have the vehicle inspected by your Lexus dealer.
(GS F for Canada only)
Indicates that the brake pads are worn out
A buzzer also sounds
Have the vehicle inspected by your Lexus dealer.
Wa r n i n g m e s s a g eDetails/Actions
Page 500 of 624
5007-2. Steps to take in an emergency
GS350_200t_GS F_OM_OM30E86U_(U)
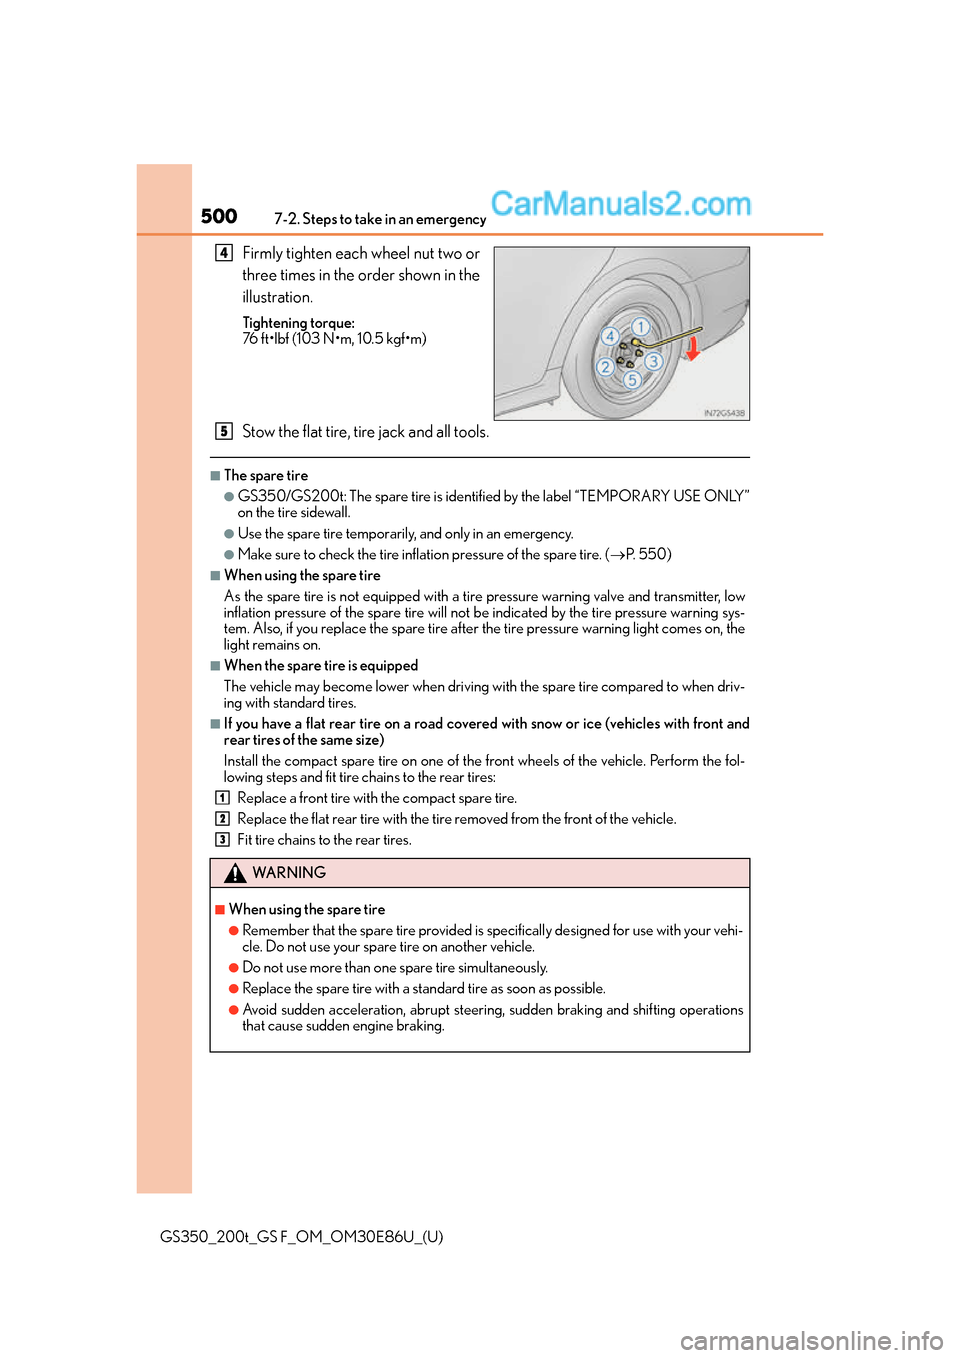
Firmly tighten each wheel nut two or
three times in the order shown in the
illustration.
Tightening torque:
76 ft•lbf (103 N•m, 10.5 kgf•m)
Stow the flat tire, tire jack and all tools.
■The spare tire
●GS350/GS200t: The spare tire is identified by the label “TEMPORARY USE ONLY”
on the tire sidewall.
●Use the spare tire temporarily, and only in an emergency.
●Make sure to check the tire inflation pressure of the spare tire. (P. 5 5 0 )
■When using the spare tire
As the spare tire is not equipped with a tire pressure warning valve and transmitter, low
inflation pressure of the spare tire will not be indicated by the tire pressure warning sys-
tem. Also, if you replace the spare tire after the tire pressure warning light comes on, the
light remains on.
■When the spare tire is equipped
The vehicle may become lower when driving with the spare tire compared to when driv-
ing with standard tires.
■If you have a flat rear tire on a road covered with snow or ice (vehicles with front and
rear tires of the same size)
Install the compact spare tire on one of the front wheels of the vehicle. Perform the fol-
lowing steps and fit tire chains to the rear tires:
Replace a front tire with the compact spare tire.
Replace the flat rear tire with the tire removed from the front of the vehicle.
Fit tire chains to the rear tires.
4
WA R N I N G
■When using the spare tire
●Remember that the spare tire provided is specifically designed for use with your vehi-
cle. Do not use your spare tire on another vehicle.
●Do not use more than one spare tire simultaneously.
●Replace the spare tire with a stan dard tire as soon as possible.
●Avoid sudden acceleration, abrupt steering, sudden braking and shifting operations
that cause sudden engine braking.
5
1
2
3