Lexus GS350 2016 Owner's Manual
Manufacturer: LEXUS, Model Year: 2016, Model line: GS350, Model: Lexus GS350 2016Pages: 624, PDF Size: 15.29 MB
Page 501 of 624
5017-2. Steps to take in an emergency
GS350_200t_GS F_OM_OM30E86U_(U)
7
When trouble arises
WA R N I N G
■When the spare tire is attached
The vehicle speed may not be correctly detected, and the following systems may not
operate correctly:
Also, not only can the following system not be utilized fully, but it may even negatively
affect the drive-train components:
•AWD system
■Speed limit when using the spare tire
Do not drive at speeds in excess of 50 mp h (80 km/h) when a spare tire is installed on
the vehicle.
The spare tire is not designed for driving at high speeds. Failure to observe this precau-
tion may lead to an accident causing death or serious injury.
■After using the tools and jack
Before driving, make sure all the tools and jack are securely in place in their storage
location to reduce the possibility of personal injury during a collision or sudden brak-
ing.
NOTICE
■Be careful when driving over bumps with the spare tire installed on the vehicle.
The vehicle may become lower when driving with the spare tire compared to when
driving with standard tires. Be careful when driving over uneven road surfaces.
■Driving with tire chains and the spare tire
Do not fit tire chains to the spare tire.
Tire chains may damage the vehicle body and adversely affect driving performance.
■When replacing the tires
When removing or fitting the wheels, tires or the tire pressure warning valve and trans-
mitter, contact your Lexus dealer as the tire pressure warning valve and transmitter
may be damaged if not handled correctly.
• ABS & Brake assist
•VSC
•TRAC
•Cruise control
• Dynamic radar cruise control with
full-speed range (if equipped)
• Dynamic radar cruise control
(if equipped)
• PCS (Pre-Collision System) (if equipped)
•EPS
•AFS (if equipped)
• Adaptive Variable Suspension system (if equipped) • LDA (Lane Departure Alert with
steering control) (if equipped)
• LKA (Lane-Keeping Assist) (if equipped)
• Tire pressure warning system
•VDIM
• Lexus parking assist monitor
• Intuitive parking assist (if equipped)
• Navigation system (if equipped)
• DRS (if equipped)
• VGRS (if equipped)
• LDH (if equipped)
Page 502 of 624
502
GS350_200t_GS F_OM_OM30E86U_(U)7-2. Steps to take in an emergency
If you have a flat tire (vehicles without spare tire)
●Stop the vehicle in a safe place on a hard, flat surface.
●Set the parking brake.
●Shift the shift lever to P.
●Stop the engine.
●Turn on the emergency flashers. (
P. 4 4 2 )
Your vehicle is not equipped with a spare tire, but instead is equipped with an
emergency tire puncture repair kit.
A puncture caused by a nail or screw passing through the tire tread can be
repaired temporarily with the emer gency tire puncture repair kit.
WA R N I N G
■If you have a flat tire
Do not continue driving with a flat tire.
Driving even a short distance with a flat ti re can damage the tire and the wheel beyond
repair, which could result in an accident.
Driving with a flat tire may cause a ci rcumferential groove on the side wall.
In such a case, the tire may explode when using a repair kit.
Before repairing the vehicle
Page 503 of 624
5037-2. Steps to take in an emergency
GS350_200t_GS F_OM_OM30E86U_(U)
7
When trouble arises
*: Use of the jack ( P. 4 9 7 )
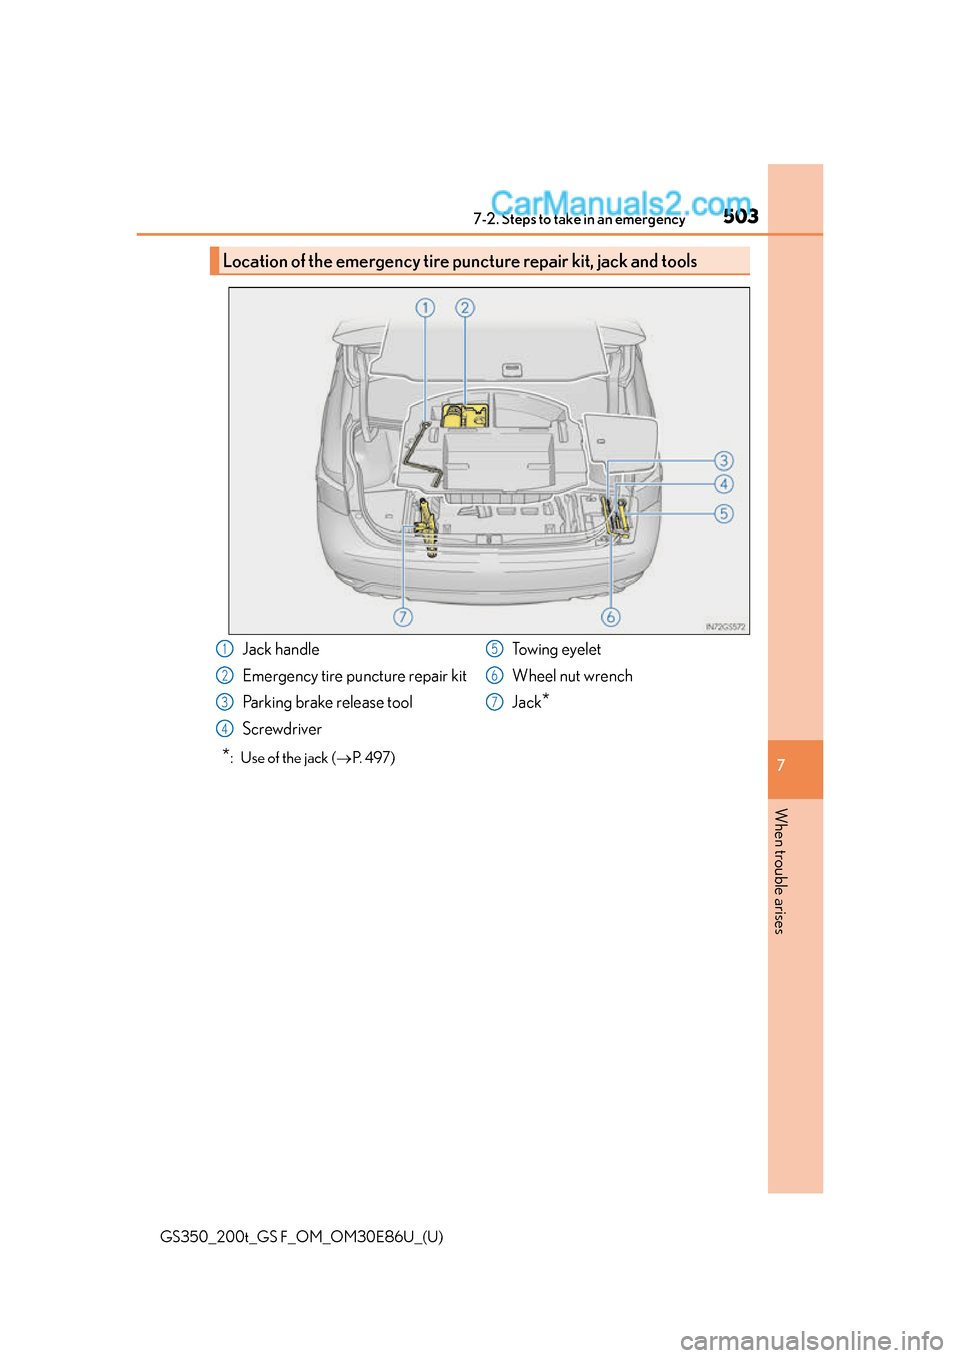
Location of the emergency tire puncture repair kit, jack and tools
Jack handle
Emergency tire puncture repair kit
Parking brake release tool
Screwdriver Towing eyelet
Wheel nut wrench
Jack
*
1
2
3
4
5
6
7
Page 504 of 624
5047-2. Steps to take in an emergency
GS350_200t_GS F_OM_OM30E86U_(U)
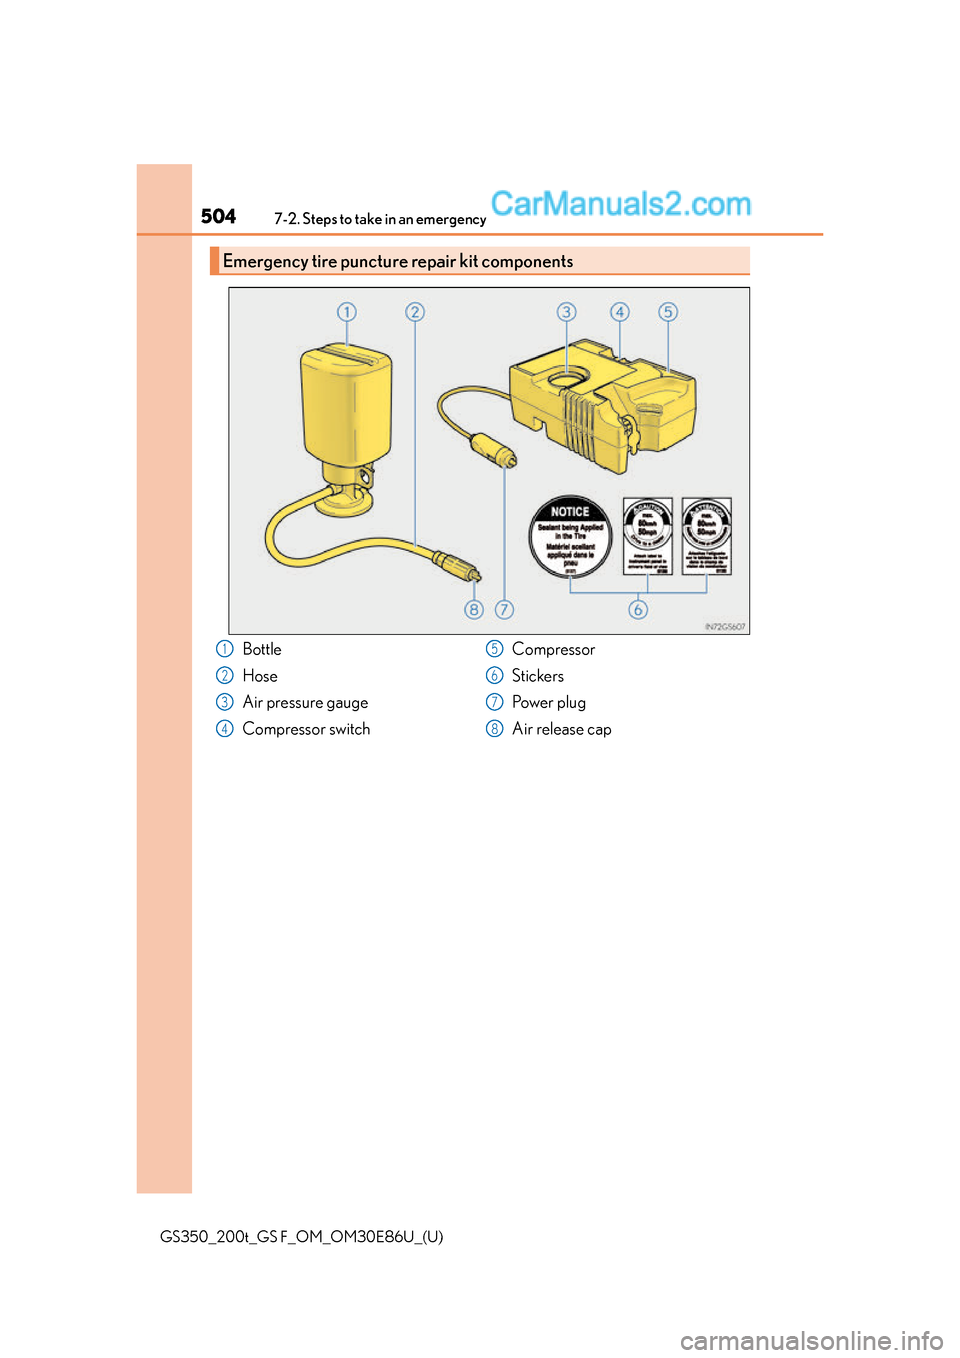
Emergency tire puncture repair kit components
Bottle
Hose
Air pressure gauge
Compressor switchCompressor
Stickers
Po w e r p l u g
Air release cap1
2
3
4
5
6
7
8
Page 505 of 624
5057-2. Steps to take in an emergency
GS350_200t_GS F_OM_OM30E86U_(U)
7
When trouble arises
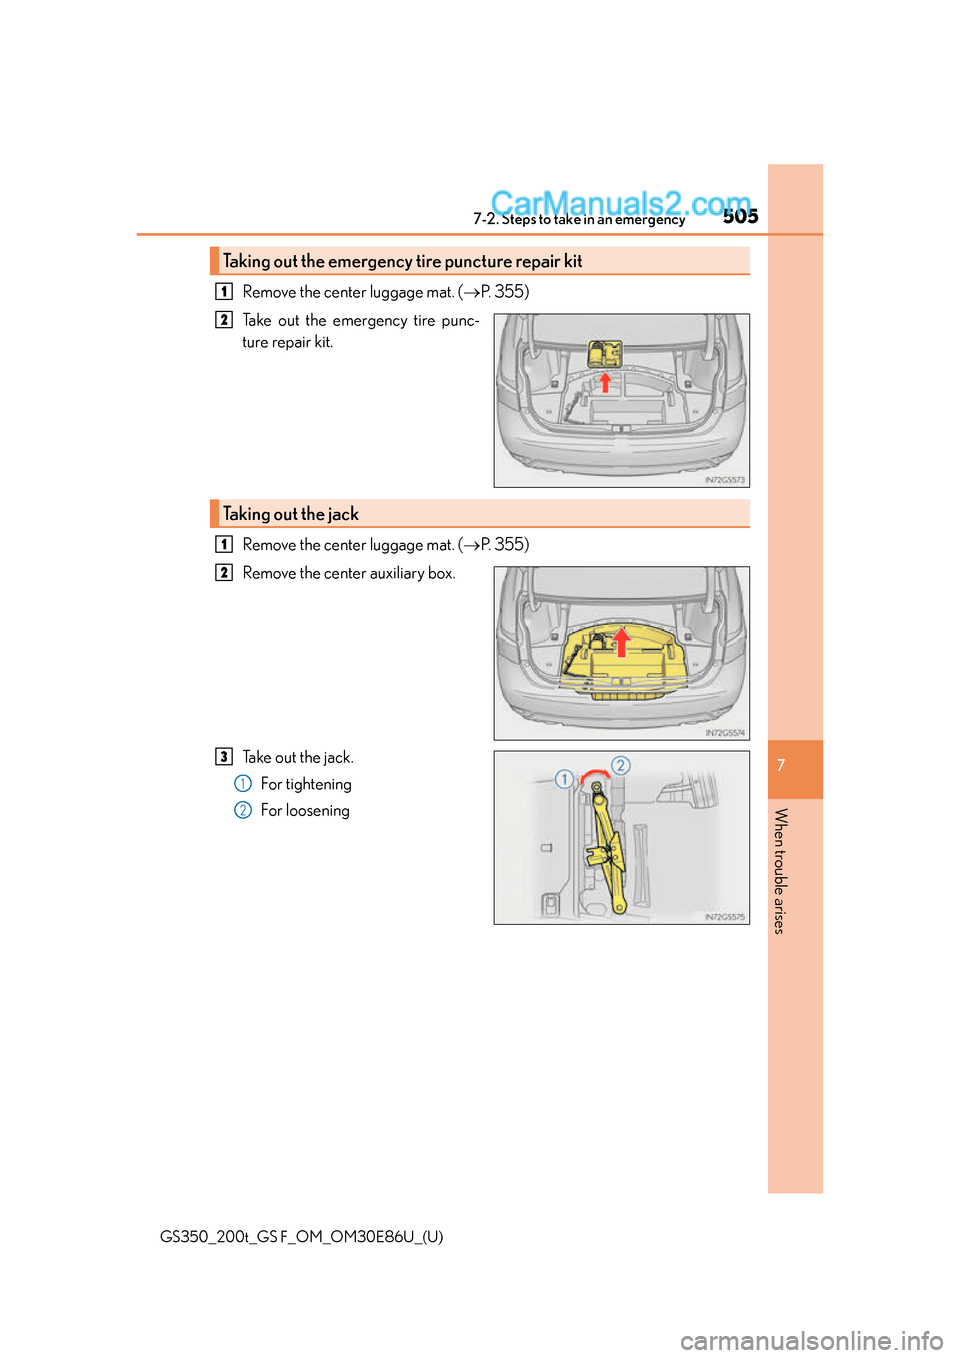
Remove the center luggage mat. ( P. 3 5 5 )
Take out the emergency tire punc-
ture repair kit.
Remove the center luggage mat. ( P. 3 5 5 )
Remove the center auxiliary box.
Take out the jack. For tightening
For loosening
Taking out the emergency tire puncture repair kit
1
2
Taking out the jack
1
2
3
1
2
Page 506 of 624
5067-2. Steps to take in an emergency
GS350_200t_GS F_OM_OM30E86U_(U)
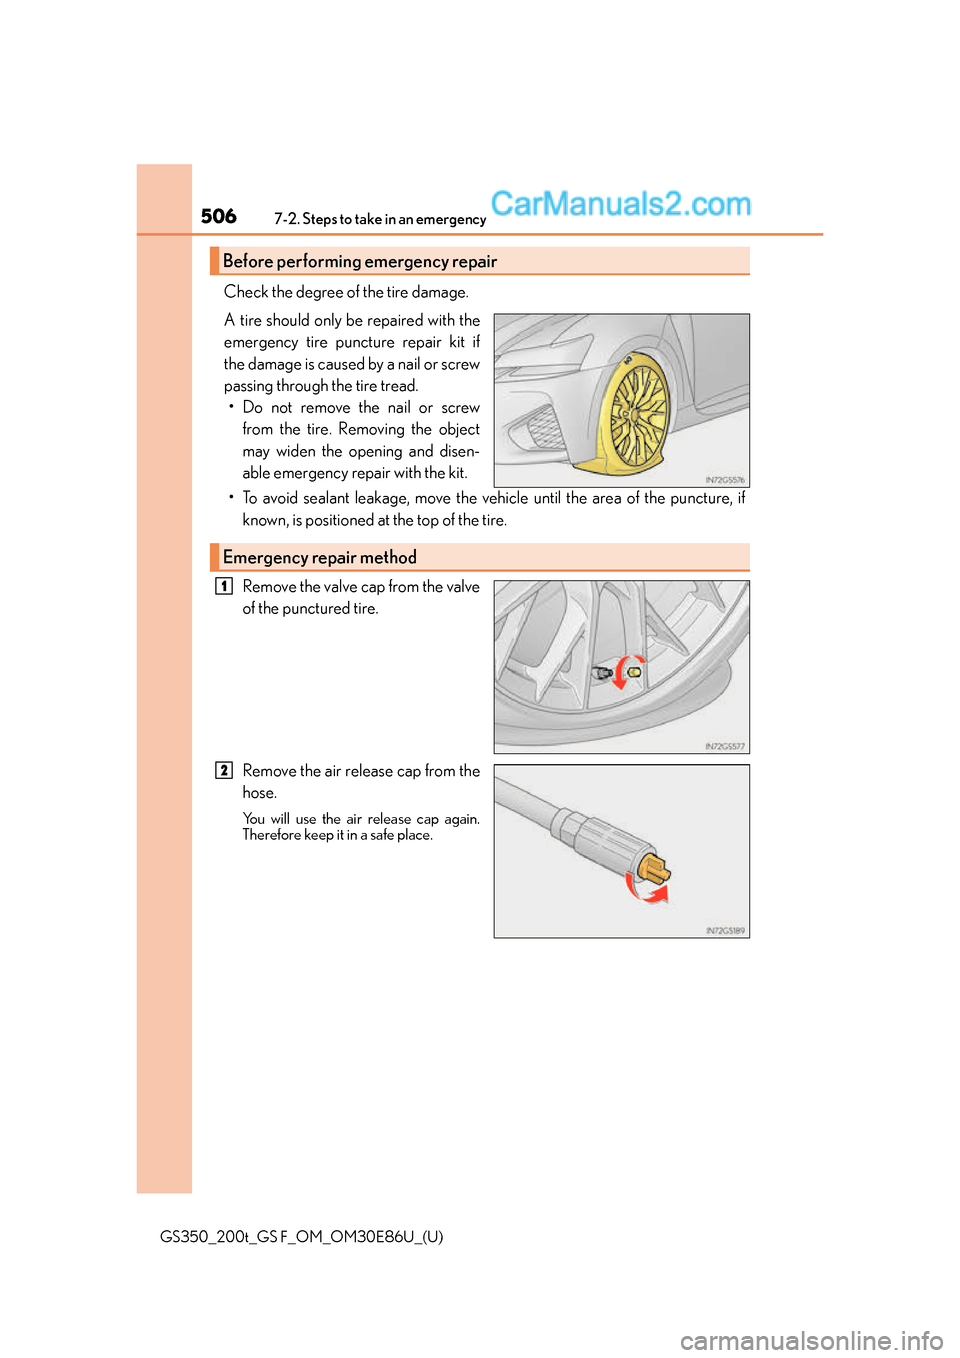
Check the degree of the tire damage.
A tire should only be repaired with the
emergency tire puncture repair kit if
the damage is caused by a nail or screw
passing through the tire tread.• Do not remove the nail or screw from the tire. Removing the object
may widen the opening and disen-
able emergency repair with the kit.
• To avoid sealant leakage, move the vehicle until the area of the puncture, if known, is positioned at the top of the tire.
Remove the valve cap from the valve
of the punctured tire.
Remove the air release cap from the
hose.
You will use the air release cap again.
Therefore keep it in a safe place.
Before performing emergency repair
Emergency repair method
1
2
Page 507 of 624
5077-2. Steps to take in an emergency
GS350_200t_GS F_OM_OM30E86U_(U)
7
When trouble arises
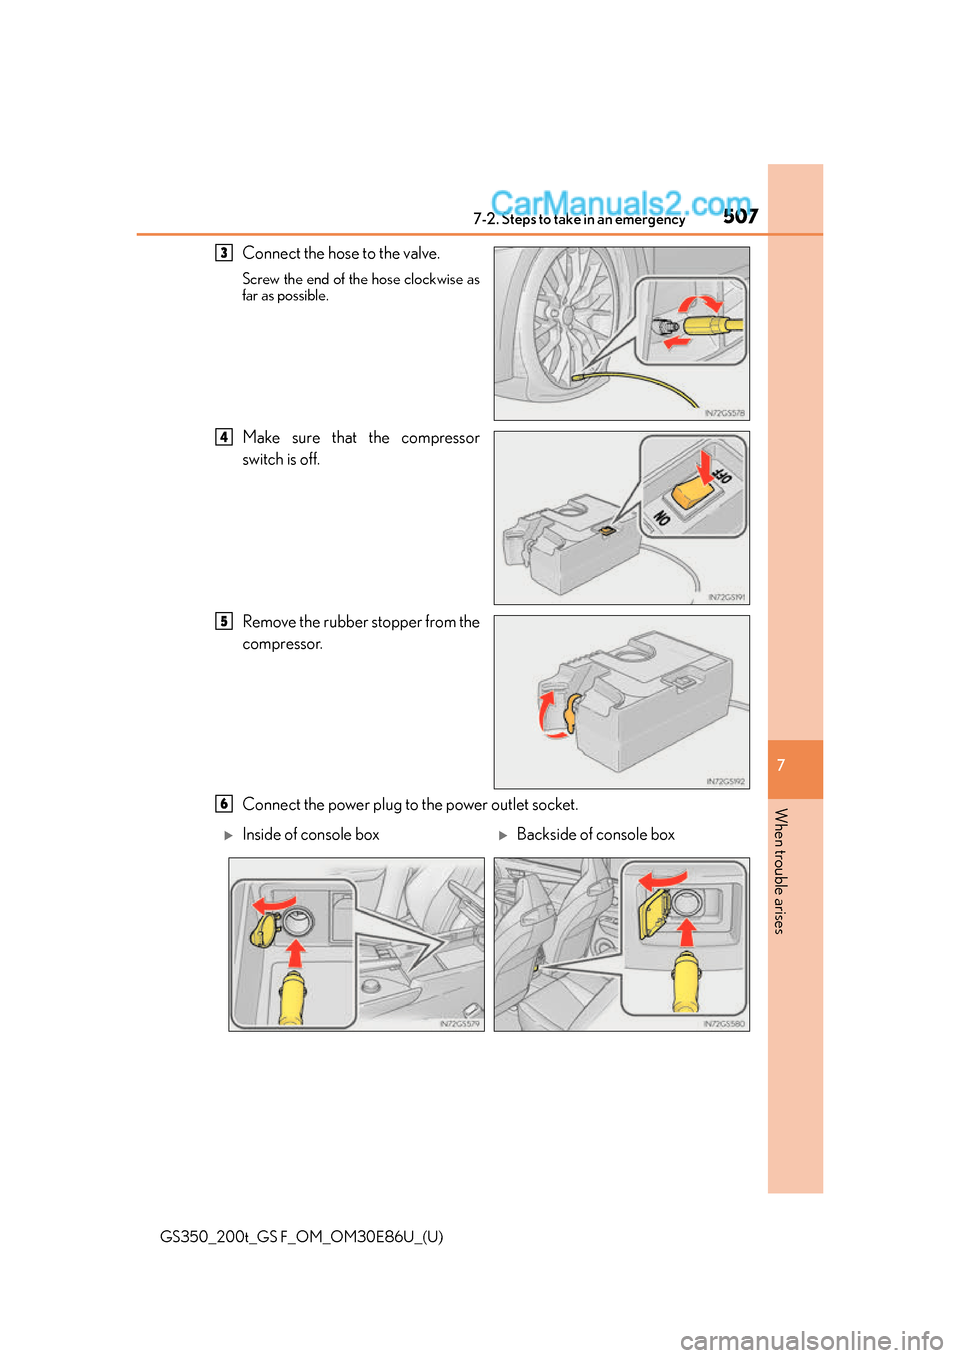
Connect the hose to the valve.
Screw the end of the hose clockwise as
far as possible.
Make sure that the compressor
switch is off.
Remove the rubber stopper from the
compressor.
Connect the power plug to the power outlet socket.
3
4
5
6
Inside of console boxBackside of console box
Page 508 of 624
5087-2. Steps to take in an emergency
GS350_200t_GS F_OM_OM30E86U_(U)
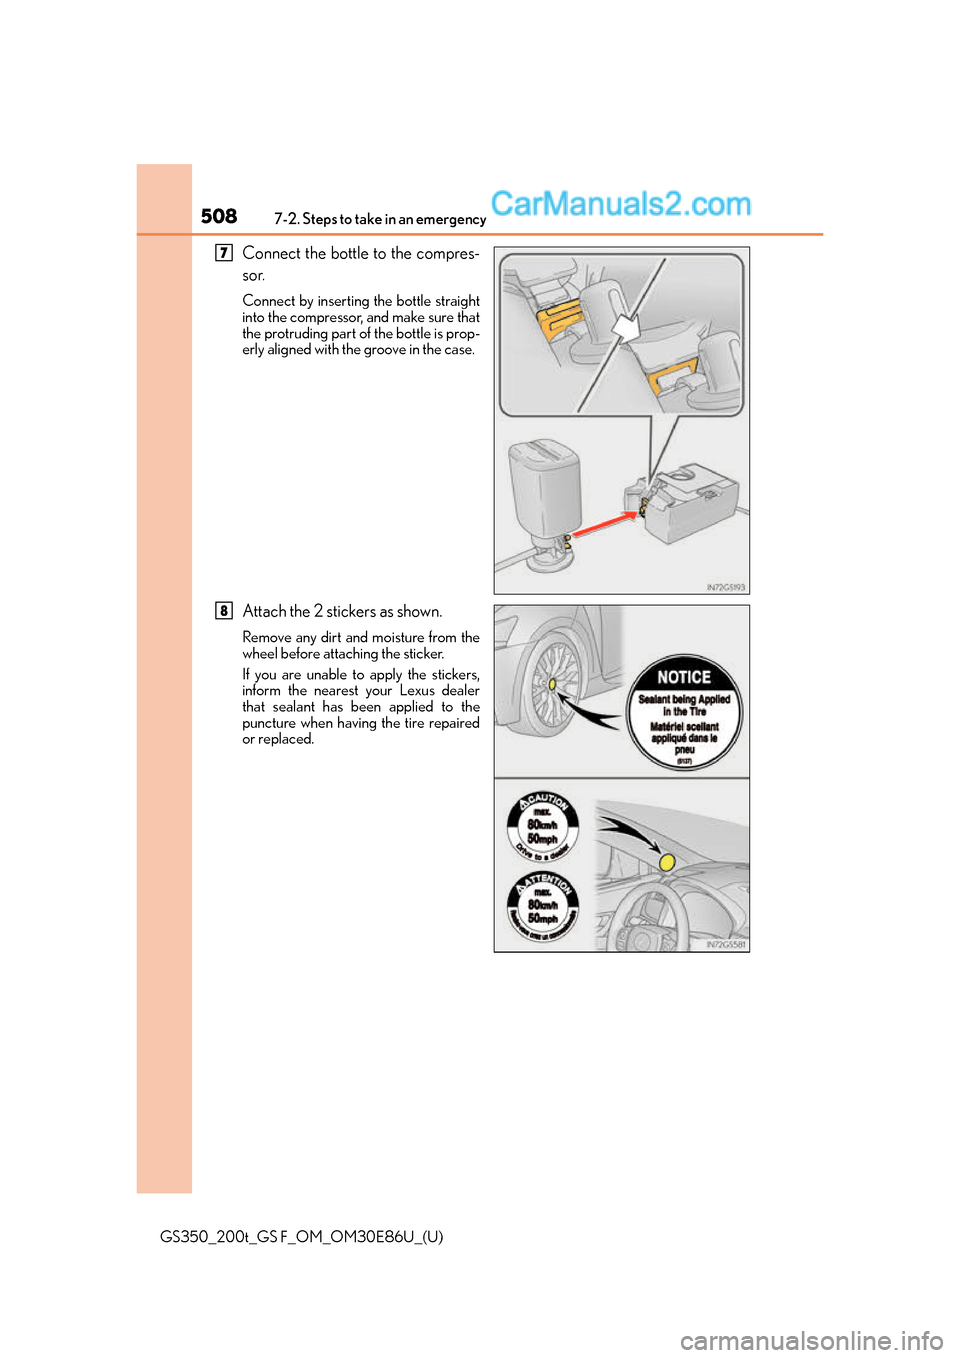
Connect the bottle to the compres-
sor.
Connect by inserting the bottle straight
into the compressor, and make sure that
the protruding part of the bottle is prop-
erly aligned with the groove in the case.
Attach the 2 stickers as shown.
Remove any dirt and moisture from the
wheel before attaching the sticker.
If you are unable to apply the stickers,
inform the nearest your Lexus dealer
that sealant has been applied to the
puncture when having the tire repaired
or replaced.
7
8
Page 509 of 624
5097-2. Steps to take in an emergency
GS350_200t_GS F_OM_OM30E86U_(U)
7
When trouble arises
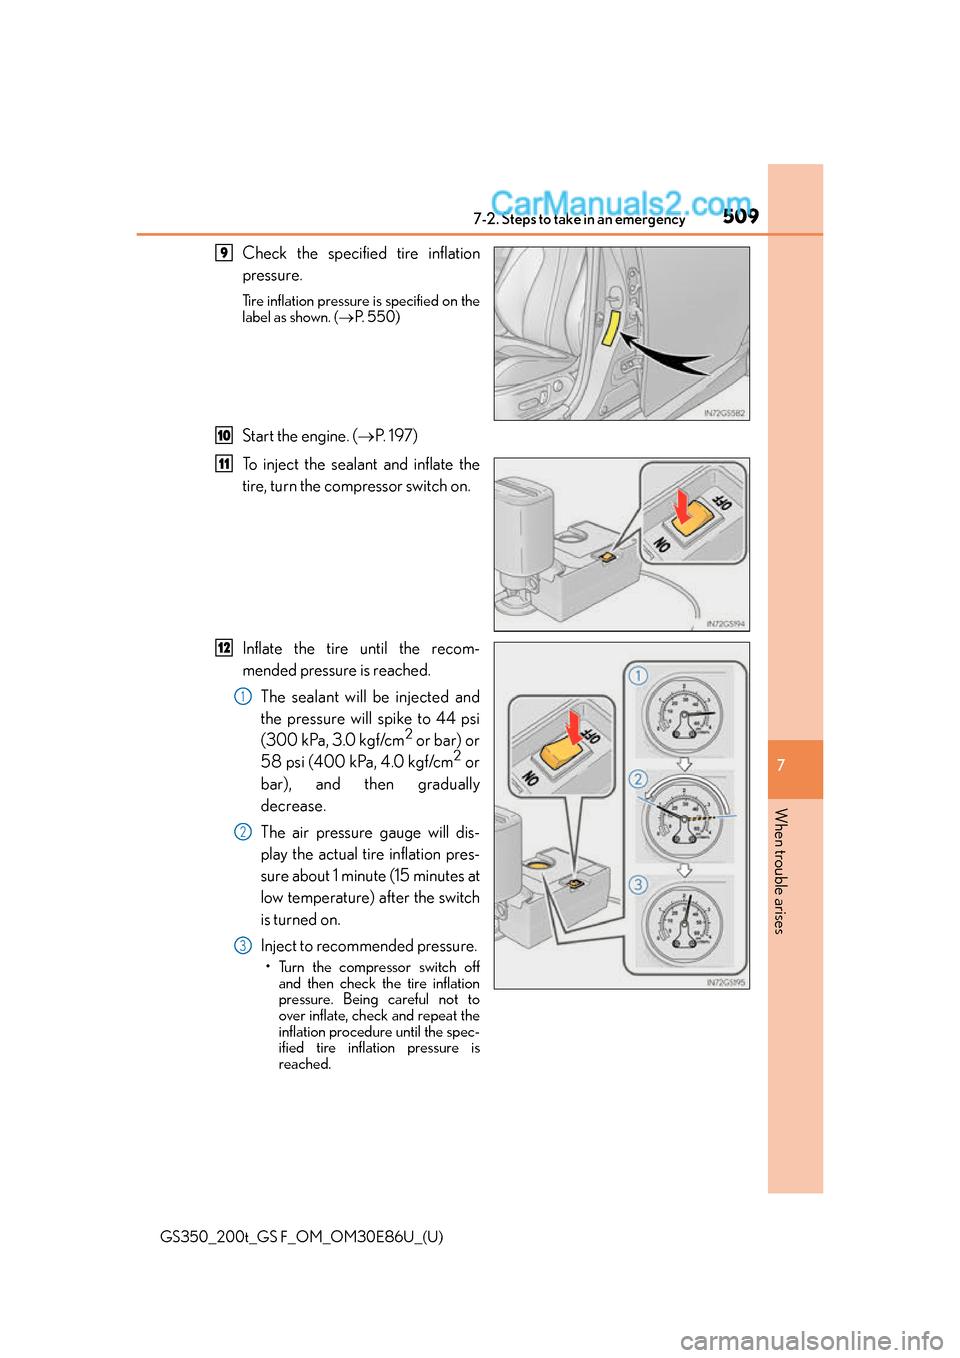
Check the specified tire inflation
pressure.
Tire inflation pressure is specified on the
label as shown. ( P. 5 5 0 )
Start the engine. (P. 1 9 7 )
To inject the sealant and inflate the
tire, turn the compressor switch on.
Inflate the tire until the recom-
mended pressure is reached. The sealant will be injected and
the pressure will spike to 44 psi
(300 kPa, 3.0 kgf/cm
2 or bar) or
58 psi (400 kPa, 4.0 kgf/cm2 or
bar), and then gradually
decrease.
The air pressure gauge will dis-
play the actual tire inflation pres-
sure about 1 minute (15 minutes at
low temperature) after the switch
is turned on.
Inject to recommended pressure.
• Turn the compressor switch off and then check the tire inflation
pressure. Being careful not to
over inflate, check and repeat the
inflation procedure until the spec-
ified tire inflation pressure is
reached.
9
10
11
12
1
2
3
Page 510 of 624
5107-2. Steps to take in an emergency
GS350_200t_GS F_OM_OM30E86U_(U)• If the tire inflation pressure is still lower
than the specified point after inflation for
10 minutes (35 minutes at low temperature) with the switch on, the tire is too
damaged to be repaired. Turn the compressor switch off and contact your
Lexus dealer.
• If the tire inflation pressure exceeds the recommended level, let out some air to adjust the tire inflation pressure. ( P. 512, 550)
With the compressor switch off, disconnect the hose from the valve on the tire
and then pull out the power plug from the power outlet socket.
Some sealant may leak when the hose is removed.
Install the valve cap onto the valve of the emergency repaired tire.
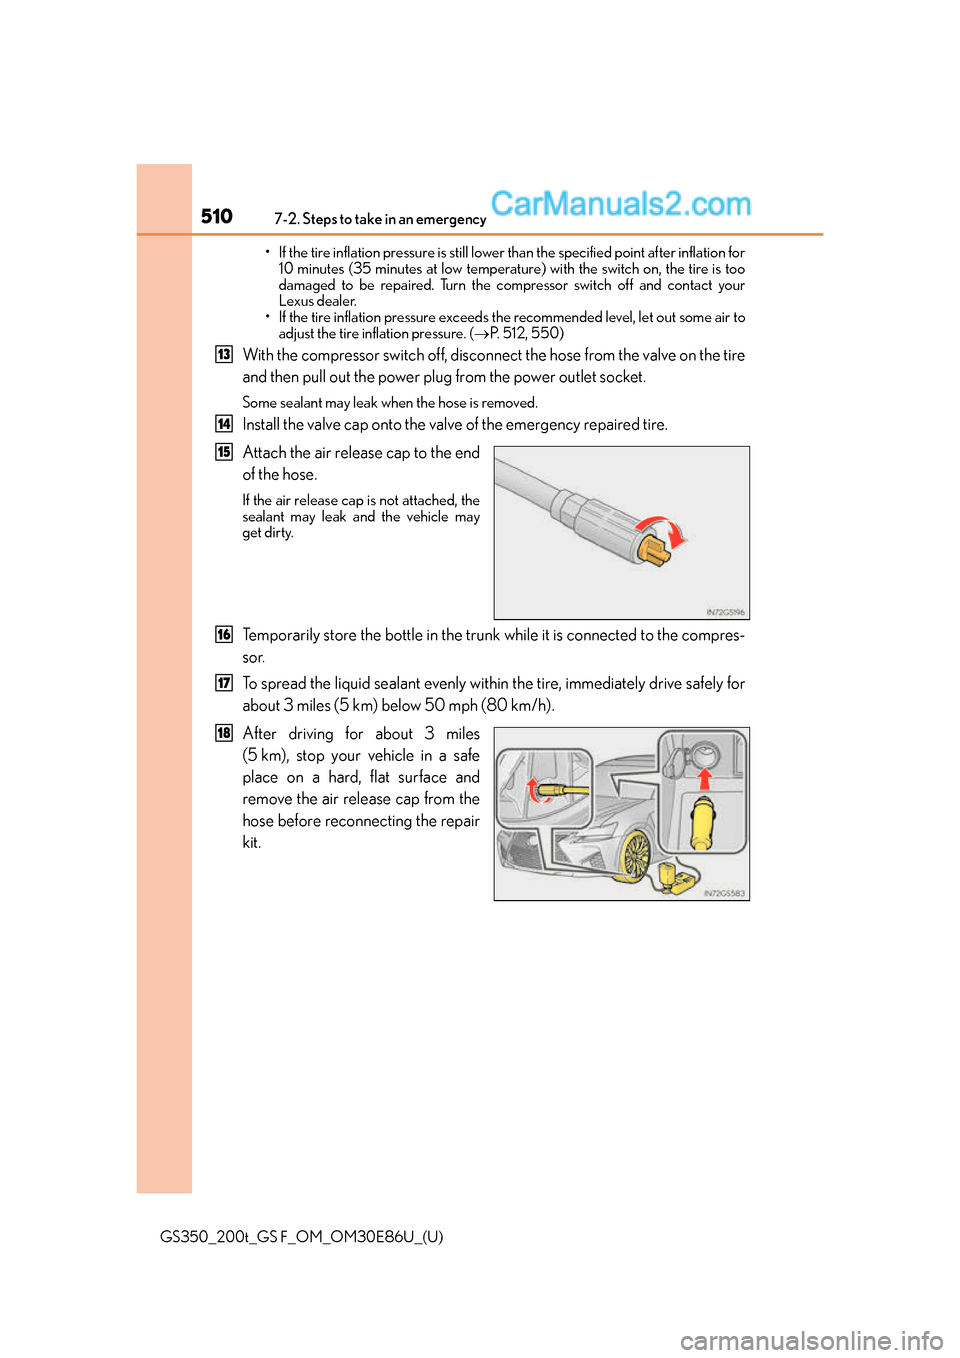
Attach the air release cap to the end
of the hose.
If the air release cap is not attached, the
sealant may leak and the vehicle may
get dirty.
Temporarily store the bottle in the trun k while it is connected to the compres-
sor.
To spread the liquid sealant evenly within the tire, immediately drive safely for
about 3 miles (5 km) below 50 mph (80 km/h).
After driving for about 3 miles
(5 km), stop your vehicle in a safe
place on a hard, flat surface and
remove the air release cap from the
hose before reconnecting the repair
kit.
13
14
15
16
17
18