AUX Lexus GS350 2016 Owner's Manual
[x] Cancel search | Manufacturer: LEXUS, Model Year: 2016, Model line: GS350, Model: Lexus GS350 2016Pages: 624, PDF Size: 15.29 MB
Page 4 of 624
TABLE OF CONTENTS4
GS350_200t_GS F_OM_OM30E86U_(U)
5-1. Remote Touch screenRemote Touch/12.3-inch display.......................................... 322
5-2. Using the air conditioning system and defogger
Front automatic air conditioning system......... 328
Rear air conditioning system .......................................... 339
Heated steering wheel/ seat heaters/seat
ventilators................................... 342
5-3. Using the interior lights Interior lights list ......................... 347• Interior lights ..........................348
• Personal lights .......................348
5-4. Using the storage features List of storage features ............ 350• Glove box .................................351
• Console box ............................351
• Cup holders ........................... 352
• Auxiliary boxes ..................... 353
Trunk features .............................. 354 5-5. Using the other interior
features
Other interior features ............ 358 • Sun visors ................................ 358
• Vanity mirrors ........................ 358
• Clock ........................................ 359
• Ashtrays................................... 359
• Power outlets ......................... 360
• Armrest.................................... 360
•Rear sunshade/
rear door sunshades............. 361
•Trunk storage extension ................................. 363
• Coat hooks............................. 364
• Assist grips ............................. 364
Garage door opener ............... 365
LEXUS Enform Safety Connect.......................................372
6-1. Maintenance and care Cleaning and protecting the vehicle exterior .................378
Cleaning and protecting the vehicle interior.................. 382
6-2. Maintenance Maintenance requirements ... 385
General maintenance.............. 387
Emission inspection and maintenance (I/M)
programs .................................... 390
5Interior features
6Maintenance and care
Page 29 of 624

29Pictorial index
GS350_200t_GS F_OM_OM30E86U_(U)
SRS airbags . . . . . . . . . . . . . . . . . . . . . . . . . . . . . . . . . . . . . . . . . . . . . . . . . . . . . . . . . . . . P. 41
Floor mats. . . . . . . . . . . . . . . . . . . . . . . . . . . . . . . . . . . . . . . . . . . . . . . . . . . . . . . . . . . . . P. 32
Front seats . . . . . . . . . . . . . . . . . . . . . . . . . . . . . . . . . . . . . . . . . . . . . . . . . . . . . . . . . . . P. 158
Head restraints . . . . . . . . . . . . . . . . . . . . . . . . . . . . . . . . . . . . . . . . . . . . . . . . . . . . . . . P. 165
Seat belts . . . . . . . . . . . . . . . . . . . . . . . . . . . . . . . . . . . . . . . . . . . . . . . . . . . . . . . . . . . . . .P. 36
Console box . . . . . . . . . . . . . . . . . . . . . . . . . . . . . . . . . . . . . . . . . . . . . . . . . . . . . . . . . . P. 3 5 1
Inside lock buttons. . . . . . . . . . . . . . . . . . . . . . . . . . . . . . . . . . . . . . . . . . . . . . . . . . . .P. 139
Cup holders. . . . . . . . . . . . . . . . . . . . . . . . . . . . . . . . . . . . . . . . . . . . . . . . . . . . . . . . . . P . 352
Auxiliary boxes
*. . . . . . . . . . . . . . . . . . . . . . . . . . . . . . . . . . . . . . . . . . . . . . . . . . . . . P. 353
Ashtrays
* . . . . . . . . . . . . . . . . . . . . . . . . . . . . . . . . . . . . . . . . . . . . . . . . . . . . . . . . . . . . P. 359
Assist grips . . . . . . . . . . . . . . . . . . . . . . . . . . . . . . . . . . . . . . . . . . . . . . . . . . . . . . . . . . .P. 364
*: If equipped
1
2
3
4
5
6
7
8
9
10
Page 321 of 624
321
GS350_200t_GS F_OM_OM30E86U_(U)
5Interior features
5-1. Remote Touch screenRemote Touch/12.3-inch display ..........................................322
5-2. Using the air conditioning system and defogger
Front automatic air conditio ning system .........328
Rear air conditioning system ..........................................339
Heated steering wheel/ seat heaters/seat
ventilators ...................................342 5-3. Using the interior lights
Interior lights list ......................... 347• Interior lights ..........................348
• Personal lights .......................348
5-4. Using the storage features List of storage features ............350• Glove box ................................ 351
• Console box............................ 351
• Cup holders ........................... 352
• Auxiliary boxes ..................... 353
Trunk features .............................. 354
5-5. Using the other interior features
Other interior features ............358 • Sun visors ................................358
• Vanity mirrors ........................358
• Clock ........................................ 359
• Ashtrays ................................... 359
• Power outlets .........................360
• Armrest ....................................360
•Rear sunshade/ rear door sunshades .............361
•Trunk storage
extension ................................. 363
• Coat hooks ............................. 364
• Assist grips.............................. 364
• Garage door opener ......... 365
• LEXUS Enform Safety Connect ....................................372
Page 350 of 624
350
GS350_200t_GS F_OM_OM30E86U_(U)5-4. Using the storage features
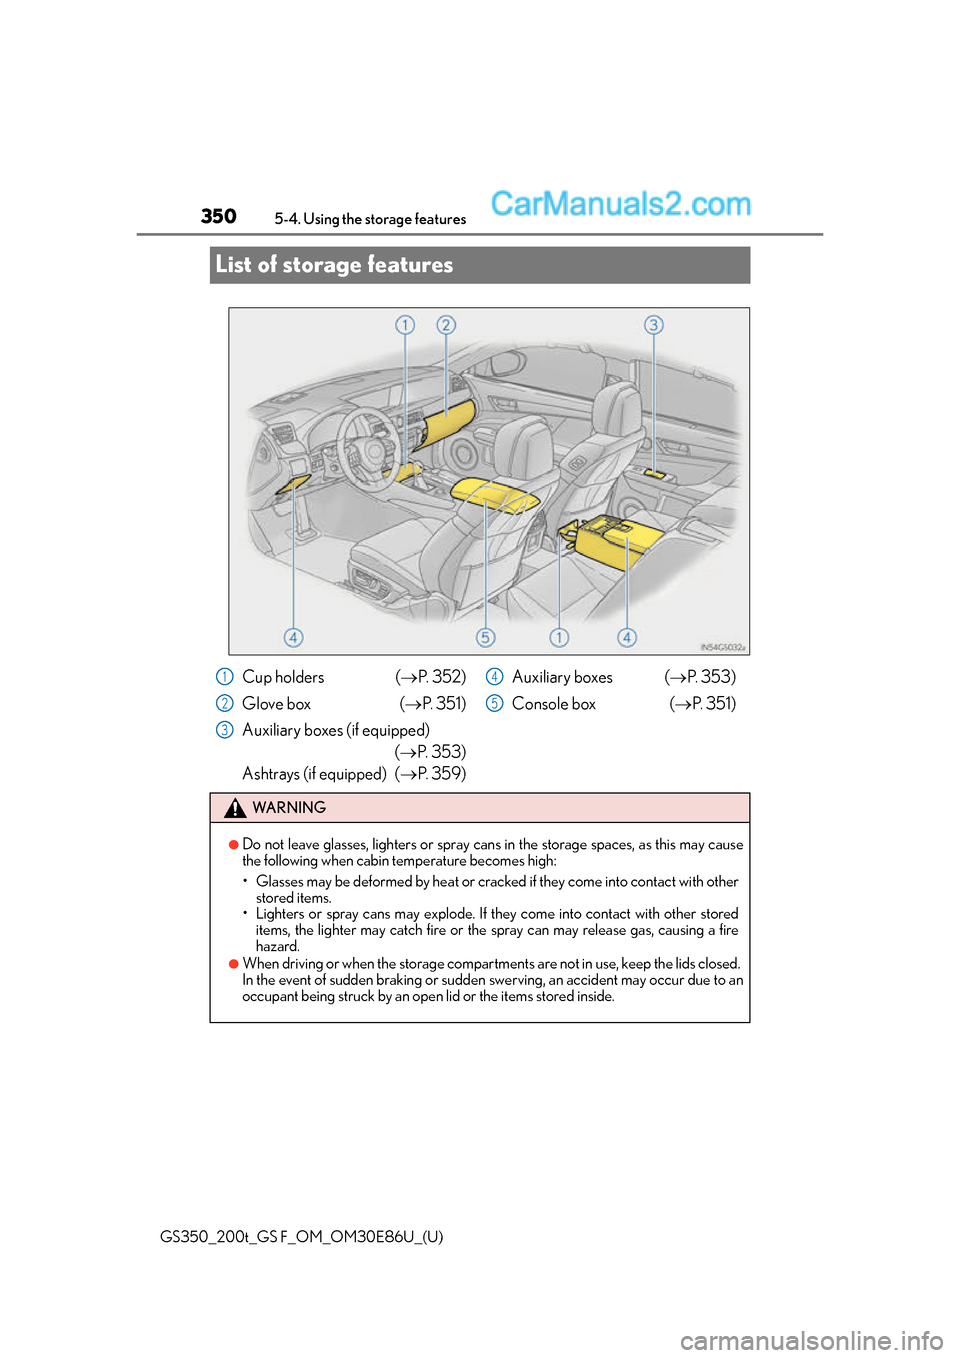
List of storage features
Cup holders (
P. 3 5 2 )
Glove box ( P. 3 5 1 )
Auxiliary boxes (if equipped) (P. 3 5 3 )
Ashtrays (if equipped) ( P. 3 5 9 ) Auxiliary boxes (
P. 3 5 3 )
Console box ( P. 3 5 1 )
WA R N I N G
●Do not leave glasses, lighters or spray cans in the storage spaces, as this may cause
the following when cabin temperature becomes high:
• Glasses may be deformed by heat or cracked if they come into contact with other
stored items.
• Lighters or spray cans may explode. If they come into contact with other stored
items, the lighter may catch fire or the spray can may release gas, causing a fire
hazard.
●When driving or when the storage compartmen ts are not in use, keep the lids closed.
In the event of sudden braking or sudden swerving, an accident may occur due to an
occupant being struck by an open lid or the items stored inside.
1
2
3
4
5
Page 353 of 624
GS350_200t_GS F_OM_OM30E86U_(U)
3535-4. Using the storage features
5
Interior features
WA R N I N G
Do not place anything other than cups or beverage cans in the cup holders.
Other items may be thrown out of the holders in the event of an accident or sudden
braking, causing injury. If possible , cover hot drinks to prevent burns.
NOTICE
To prevent damage to the rear cup holder, stow the cup holder before stowing the arm-
rest.
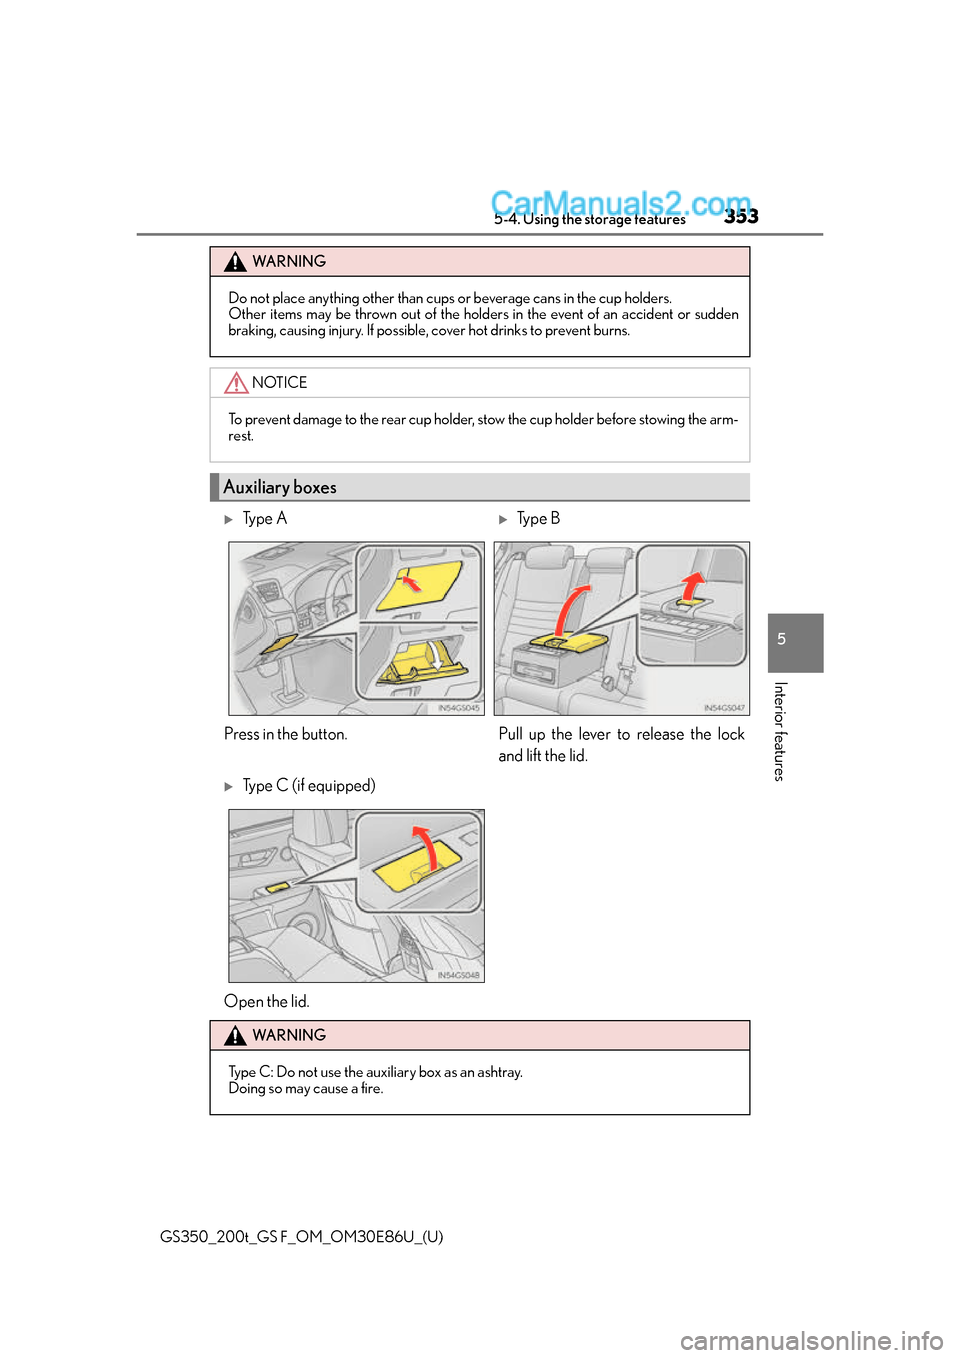
Auxiliary boxes
Ty p e ATy p e B
Press in the button. Pull up the lever to release the lock and lift the lid.
Type C (if equipped)
Open the lid.
WA R N I N G
Type C: Do not use the auxiliary box as an ashtray.
Doing so may cause a fire.
Page 393 of 624
393
GS350_200t_GS F_OM_OM30E86U_(U)6-3. Do-it-yourself maintenance
6
Maintenance and care
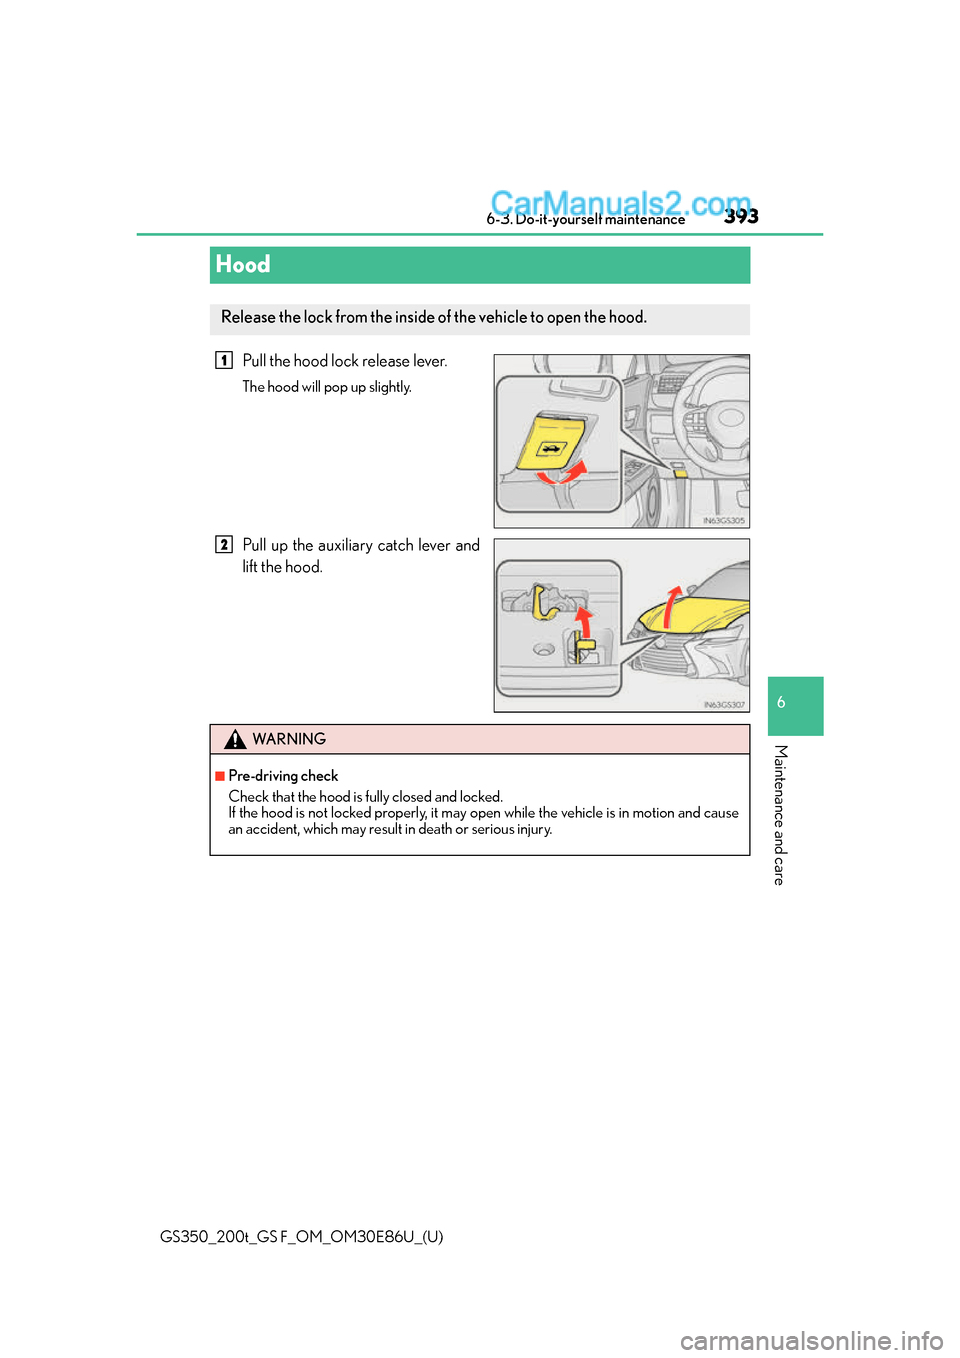
Hood
Pull the hood lock release lever.
The hood will pop up slightly.
Pull up the auxiliary catch lever and
lift the hood.
Release the lock from the inside of the vehicle to open the hood.
1
2
WA R N I N G
■Pre-driving check
Check that the hood is fully closed and locked.
If the hood is not locked properly, it may open while the vehicle is in motion and cause
an accident, which may result in death or serious injury.
Page 418 of 624
418
GS350_200t_GS F_OM_OM30E86U_(U)6-3. Do-it-yourself maintenance
■Situations in which the tire pressure warning system may not operate properly
●In the following cases, the tire pressure warning system may not operate properly.
• If non-genuine Lexus wheels are used.
• A tire has been replaced with a tire that is not an OE (Original Equipment) tire.
• A tire has been replaced with a tire that is not of the specified size.
• Tire chains etc. are equipped.
• An auxiliary-supported run-flat tire is equipped.
• If a window tint that affects the radio wave signals is installed.
• If there is a lot of snow or ice on the vehicle, particularly around the wheels or wheel
housings.
• If the tire inflation pressure is extremely higher than the specified level.
• If wheel without the tire pressure warning valve and transmitter are used.
• If the ID code on the tire pressure warning valves and transmitters is not registered in the tire pressure warning computer.
●Performance may be affected in the following situations.
• Near a TV tower, electric power plant, gas station, radio station, large display, air- port or other facility th at generates strong radio waves or electrical noise
• When carrying a portable radio, cellular phone, cordless phone or other wireless
communication device
If tire position information is not correctl y displayed due to the radio wave conditions,
the display may be corrected by driving and changing the radio wave conditions.
●When the vehicle is parked, the time taken for the warning to start or go off could be
extended.
●When tire inflation pressure declines rapidly for example when a tire has burst, the
warning may not function.
■The initialization operation
●Make sure to carry out initialization af ter adjusting the tire inflation pressure.
Also, make sure the tires are cold before carry ing out initialization or tire inflation pres-
sure adjustment.
●If you have accidentally turned the engine swit ch off during initialization, it is not neces-
sary to manually restart the initialization agai n, as initialization will restart automatically
the next time the engine switch is turned to IGNITION ON mode.
●If you accidentally perform initialization when initialization is not necessary, adjust the
tire inflation pressure to the specified level when the tires are co ld, and conduct initial-
ization again.
■When initialization of the tire pressure warning system has failed
Initialization can be completed in a few minutes. However, in the following cases, the set-
tings have not been recorded and the system will not operate properly. If repeated
attempts to record tire inflation pressure settings are unsuccessful, have the vehicle
inspected by your Lexus dealer.
●The initialization message is not displayed on the multi-information display when per-
forming initialization.
●After carrying out the initialization procedure, the tire pressure warning light blinks for 1
minute then stays on after driving for 20 minutes.
Page 496 of 624
4967-2. Steps to take in an emergency
GS350_200t_GS F_OM_OM30E86U_(U)
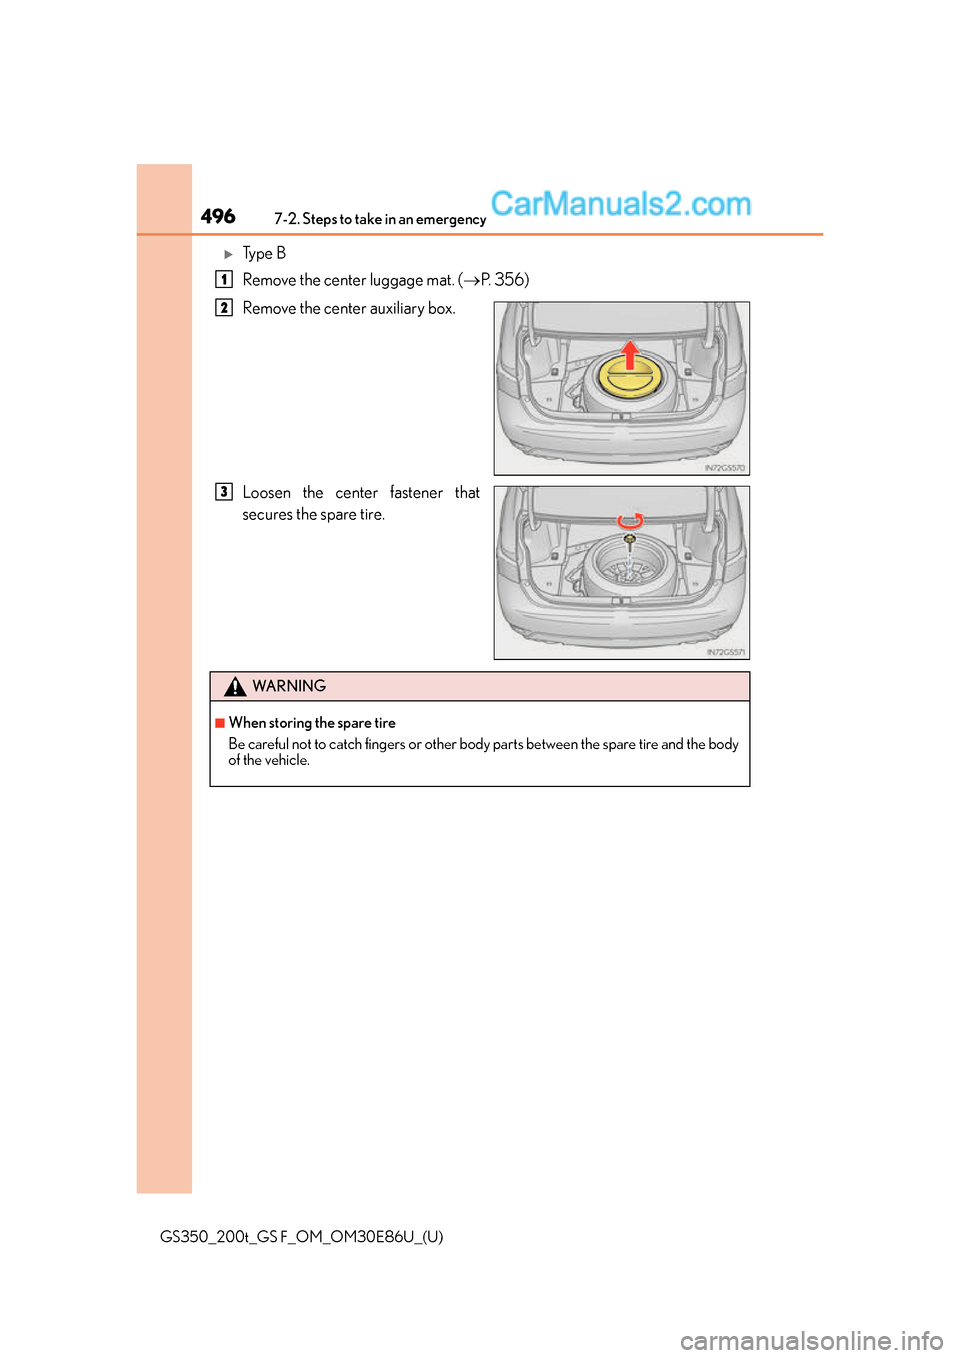
Ty p e B
Remove the center luggage mat. (P. 3 5 6 )
Remove the center auxiliary box.
Loosen the center fastener that
secures the spare tire.
1
2
3
WA R N I N G
■When storing the spare tire
Be careful not to catch fingers or other body parts between the spare tire and the body
of the vehicle.
Page 505 of 624
5057-2. Steps to take in an emergency
GS350_200t_GS F_OM_OM30E86U_(U)
7
When trouble arises
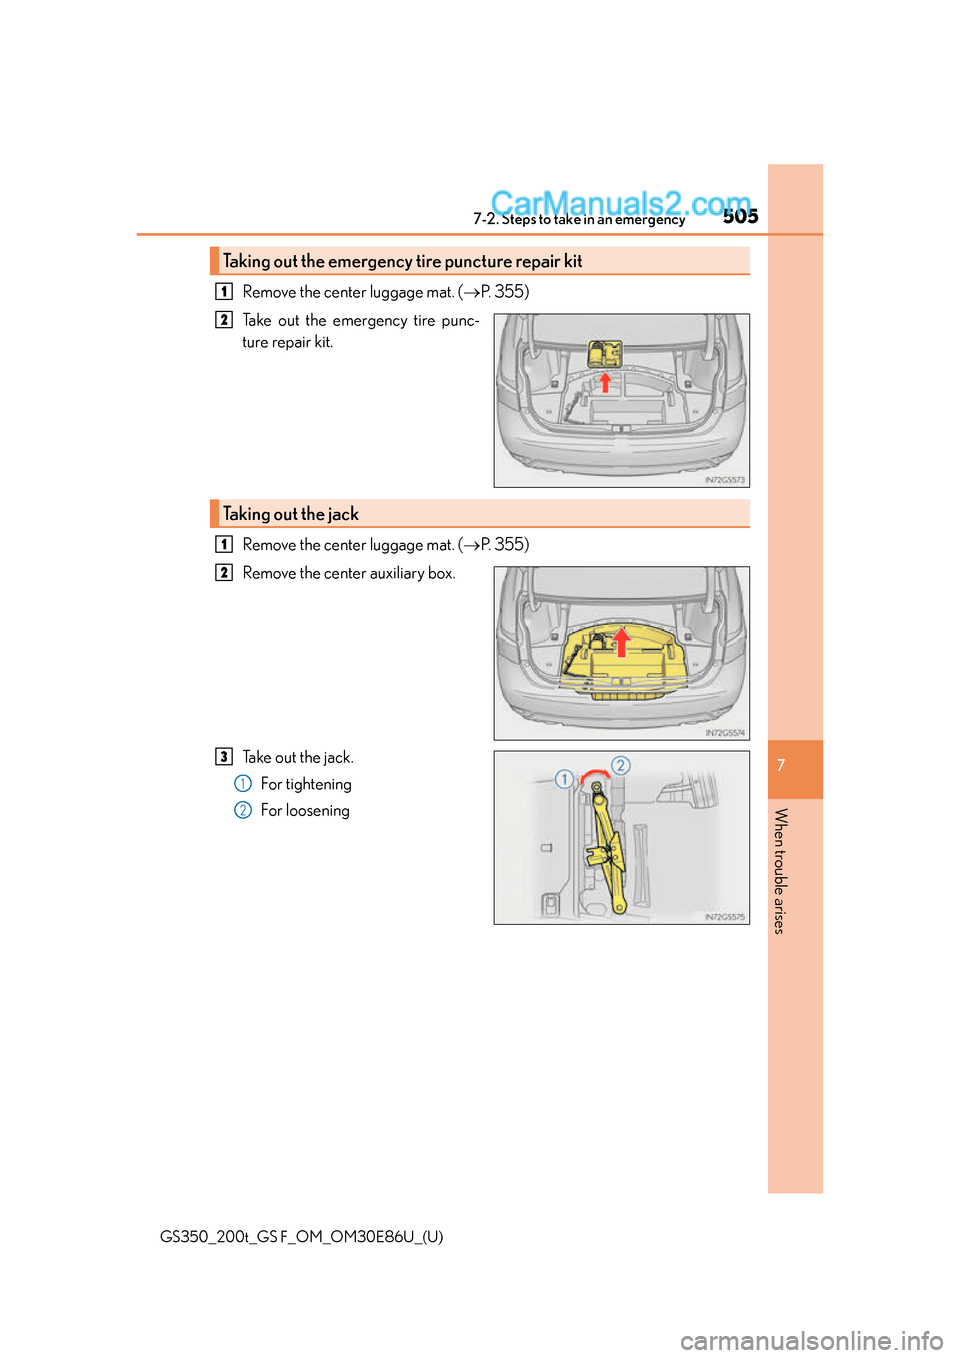
Remove the center luggage mat. ( P. 3 5 5 )
Take out the emergency tire punc-
ture repair kit.
Remove the center luggage mat. ( P. 3 5 5 )
Remove the center auxiliary box.
Take out the jack. For tightening
For loosening
Taking out the emergency tire puncture repair kit
1
2
Taking out the jack
1
2
3
1
2
Page 518 of 624
518
GS350_200t_GS F_OM_OM30E86U_(U)7-2. Steps to take in an emergency
If the parking brake cannot be released
●Shift the shift lever to P.
●Turn the engine switch off.
●Check that the parking brake indicator is off.
●Chock the tires.
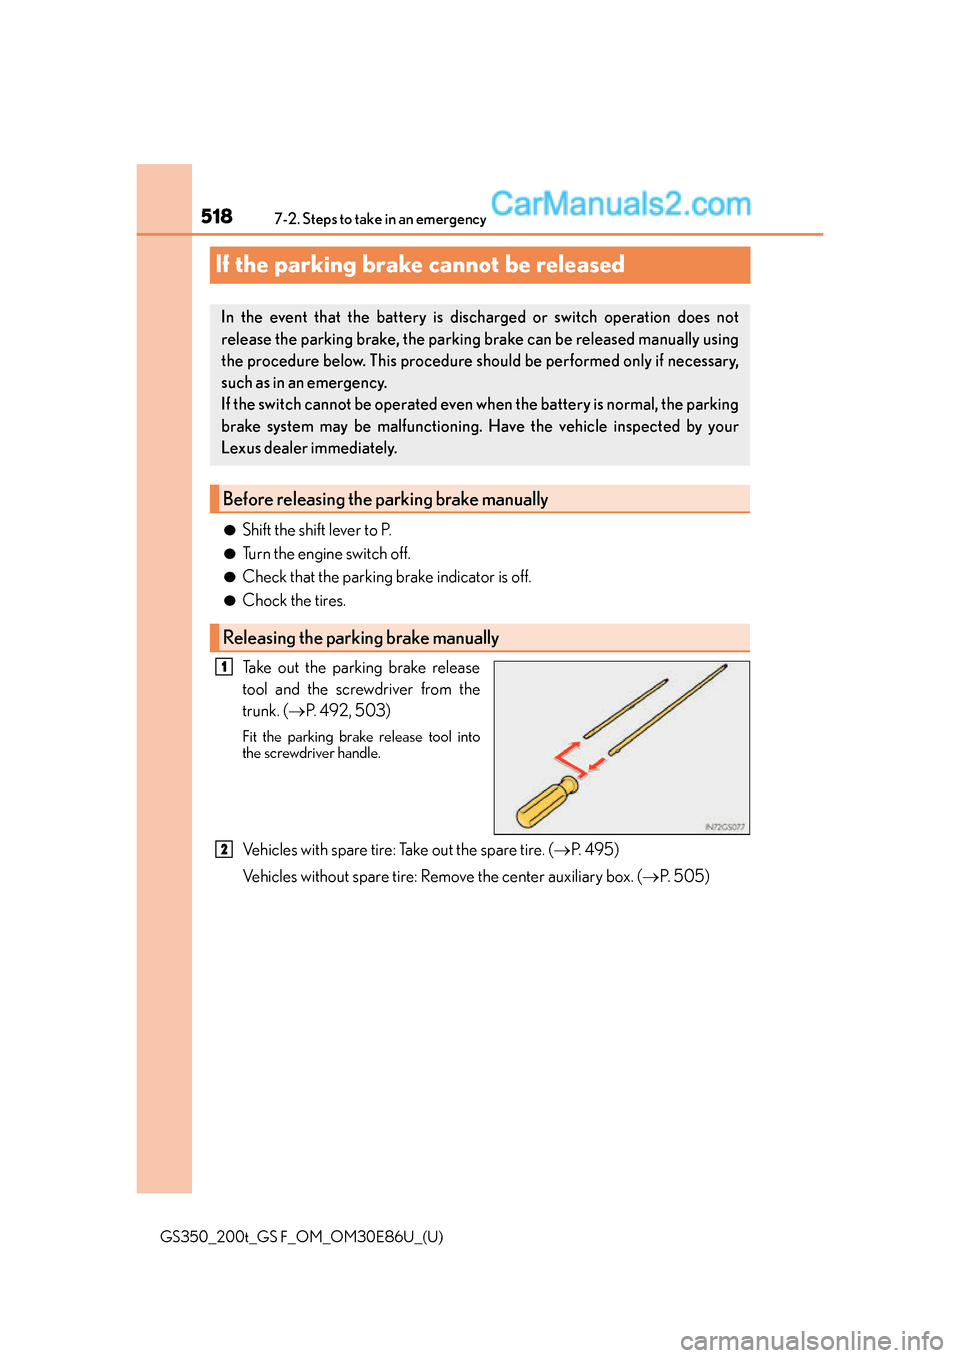
Take out the parking brake release
tool and the screwdriver from the
trunk. (
P. 4 9 2 , 5 0 3 )
Fit the parking brake release tool into
the screwdriver handle.
Vehicles with spare tire: Take out the spare tire. ( P. 4 9 5 )
Vehicles without spare tire: Remove the center auxiliary box. ( P. 505)
In the event that the battery is discharged or switch operation does not
release the parking brake, the parking brake can be released manually using
the procedure below. This procedure should be performed only if necessary,
such as in an emergency.
If the switch cannot be operated even when the battery is normal, the parking
brake system may be malfunctioning. Have the vehicle inspected by your
Lexus dealer immediately.
Before releasing the parking brake manually
Releasing the parking brake manually
1
2