Touch screen Lexus GS450h 2008 Using other driving systems / LEXUS 2008 GS450H (OM30A96U) Owner's Guide
[x] Cancel search | Manufacturer: LEXUS, Model Year: 2008, Model line: GS450h, Model: Lexus GS450h 2008Pages: 596, PDF Size: 9.36 MB
Page 246 of 596

246
3-3. Using the audio system
GS_HV_U
December 13, 2007 10:50 am
■Scanning all radio stations within range
● AM station
Touch on the screen or press .
“SCAN” appears on the screen and a ll stations with reception will be
played for a few seconds each.
When the desired station is reached, touch or press
once again.
● FM station
Press .
“SCAN” appears on the screen and a ll stations with reception will be
played for a few seconds each.
When the desired station is reach ed, press the button once again.
RDS (Radio Data System)
This feature allows your radio to re ceive station identification information
and program information (classical, ja zz, etc.) from radio stations which
broadcast this information.
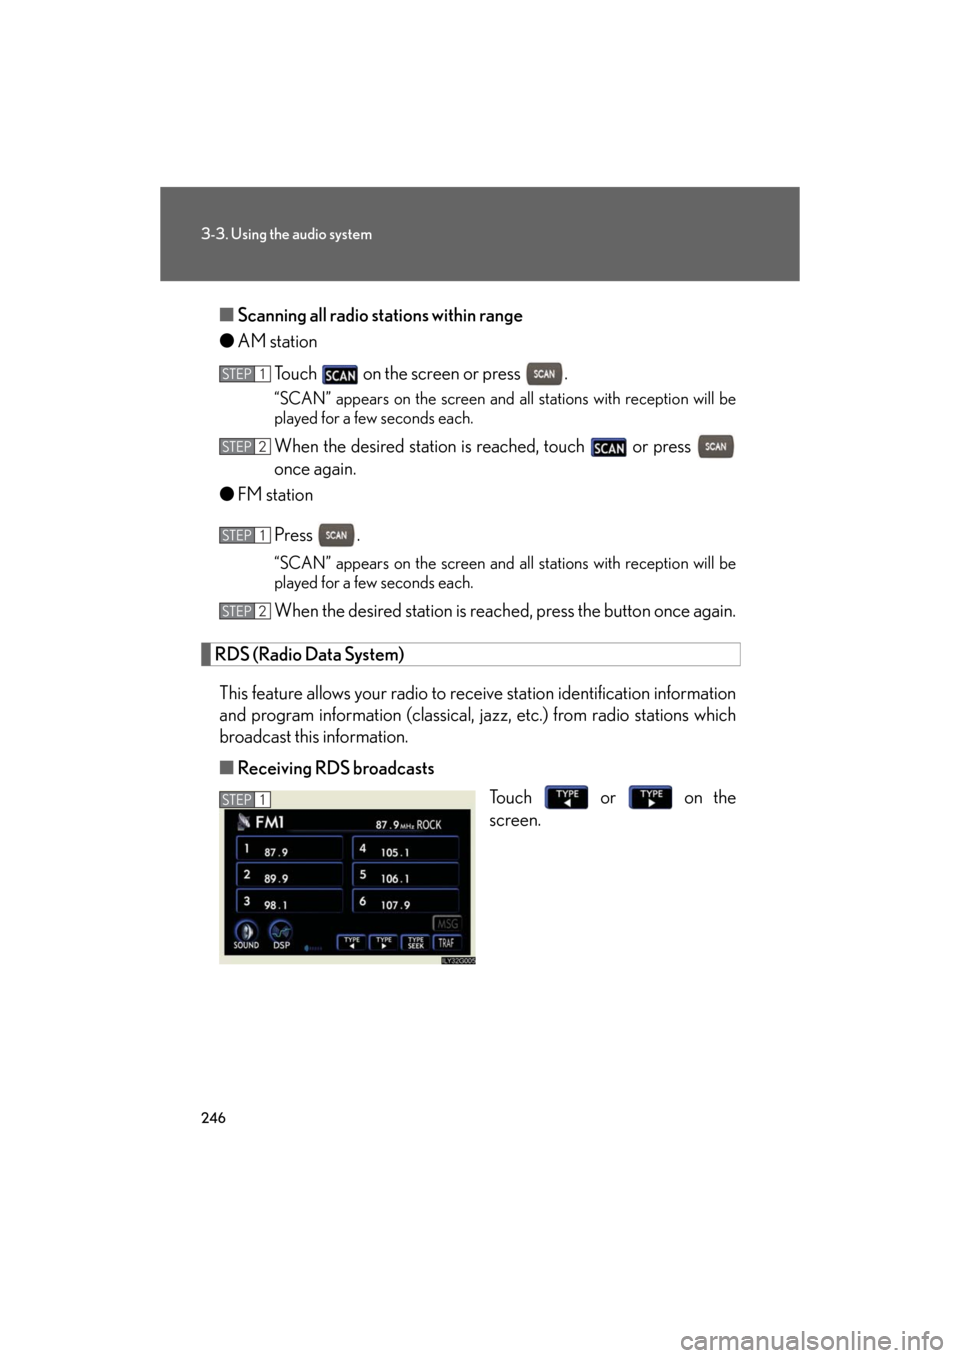
■ Receiving RDS broadcasts
Touch or on the
screen.
STEP1
STEP2
STEP1
STEP2
STEP1
Page 247 of 596

247
3-3. Using the audio system
3
Interior features
GS_HV_U
December 13, 2007 10:50 am
The type of program changes each time the button is pressed.
●ROCK
● EASYLIS (Easy listening)
● CLS/JAZZ (Classical music and Jazz)
● R & B (Rhythm and Blues)
● INFORM (Information)
● RELIGION
● MISC (Miscellaneous)
● ALARM (Emergency messages)
If the system receives no RDS statio ns, “NO PTY” appears on the display.
When a program is set, “TYPE SEEK” appears.
Touch on the screen or press or on .
The radio seeks or scans the station by the relevant program type.
If no radio station of that type is found, “NOTHING” appears on the
screen.
■ Displaying radio text messages
Touch on the screen.
If “MSG” appears on the screen, a
text message may be displayed.
STEP2
Page 248 of 596

248
3-3. Using the audio system
GS_HV_U
December 13, 2007 10:50 am
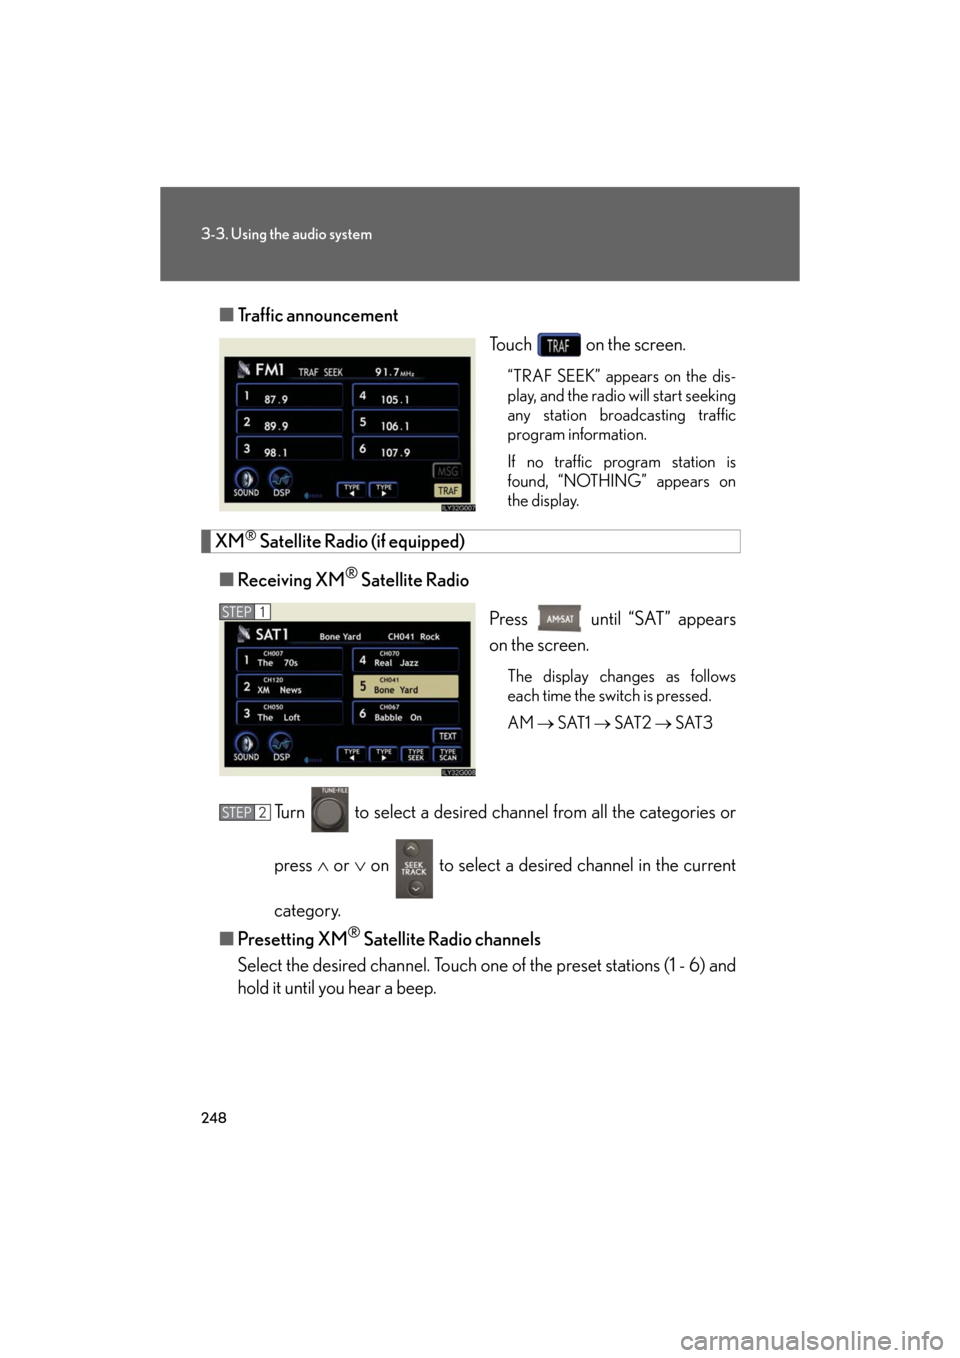
■Traffic announcement
Touch on the screen.
“TRAF SEEK” appears on the dis-
play, and the radio will start seeking
any station broadcasting traffic
program information.
If no traffic program station is
found, “NOTHING” appears on
the display.
XM® Satellite Radio (if equipped)
■ Receiving XM
® Satellite Radio
Press until “SAT” appears
on the screen.
The display changes as follows
each time the switch is pressed.
AM SAT1 SAT2 SAT3
Turn to select a desired channel from all the categories or
press or on to select a desir ed channel in the current
category.
■ Presetting XM
® Satellite Radio channels
Select the desired channe l. Touch one of the preset stations (1 - 6) and
hold it until you hear a beep.
STEP1
STEP2
Page 249 of 596

249
3-3. Using the audio system
3
Interior features
GS_HV_U
December 13, 2007 10:50 am
■Changing the channel category
Touch or on the screen.
■ Scanning XM
® Satellite Radio channels
● Scanning channels in the current category
Touch on the screen or press .
“SCAN” appears on the screen.
When the desired channel is reached, touch or press
the button once again.
● Scanning preset channels
Touch on the screen or press and hold it until
you hear a beep.
“P SCAN” appears on the screen.
When the desired channel is reached, touch or press
the button once again.
■ Displaying the title and artist name
Touch on the screen.
The screen will display up to 16
characters.
Touch the button once again to
return to the previous screen.
STEP1
STEP2
STEP1
STEP2
Page 255 of 596

255
3-3. Using the audio system
3
Interior features
GS_HV_U
December 13, 2007 10:50 am
Using Dolby® Noise Reduction
Touch on the screen.
Reduces the level of noise for tapes recorded with Dolby NR only.
Dolby noise reduction is manufactured under license from Dolby Laborato-
ries Licensing Corporation. DOLB Y and the double-D symbol are
registered trademarks of Dolby Laboratories.
■Canceling noise reduction, skip play, repeat play, rewind and fast forward
To cancel , and : Touch the corresponding button on the screen.
To cancel and : Touch the corresponding button on the screen or press
.
■Auto-reverse feature
After the cassette player reaches the end of a tape, it automatically reverses and
begins to play the other side, regardless of whether the cassette was playing or fast
forwarding.
■When the cassette player does not operate correctly due to the cassette record-
ing conditions
Forwarding to the beginning of a track, repeat, blank tape skip and fast-forward
may not be possible in the following situations:
●The interval between tracks is less th an 3 seconds (beginning of track and
repeat playback) or less than 15 seconds (blank tape skip).
●When there is noise between 2 tracks.
●The beginning and end of subsequent tracks are not clearly defined.
Page 258 of 596

258
3-3. Using the audio system
GS_HV_U
December 13, 2007 10:50 am
Loading a CD■ Loading a single CD
Press .
When the indicator changes from flashing amber to green, insert
a CD after the CD/DVD player door opens.
■ Loading multiple CDs
Press and hold until you hear a beep.
When the indicator changes from flashing amber to green, insert
a CD after the CD/DVD player door opens.
After inserting a CD, wait until th e indicator changes from flash-
ing amber to green, then insert the next CD after the CD/DVD
door has opened.
Repeat steps 2 and 3 until you have inserted all CDs.
To cancel the operation, press the or button. If you do not
insert a CD within 15 seconds, loading will be canceled automatically.
Ejecting CDs
■ Ejecting a CD
To select the CD to be ejected , touch the desired disc number
(1 - 6) on the screen or press or on .
Press and remove the CD.
■ Ejecting all CDs
Press and hold until you hear a beep, then remove the CDs.
STEP1
STEP2
STEP1
STEP2
STEP3
STEP1
STEP2
Page 259 of 596

259
3-3. Using the audio system
3
Interior features
GS_HV_U
December 13, 2007 10:50 am
Selecting, fast forwarding and scanning tracks■ Selecting a track
Press to move up and to move down using until the desired
track number appears on the screen.
To fast forward or rewind, press and hold or on .
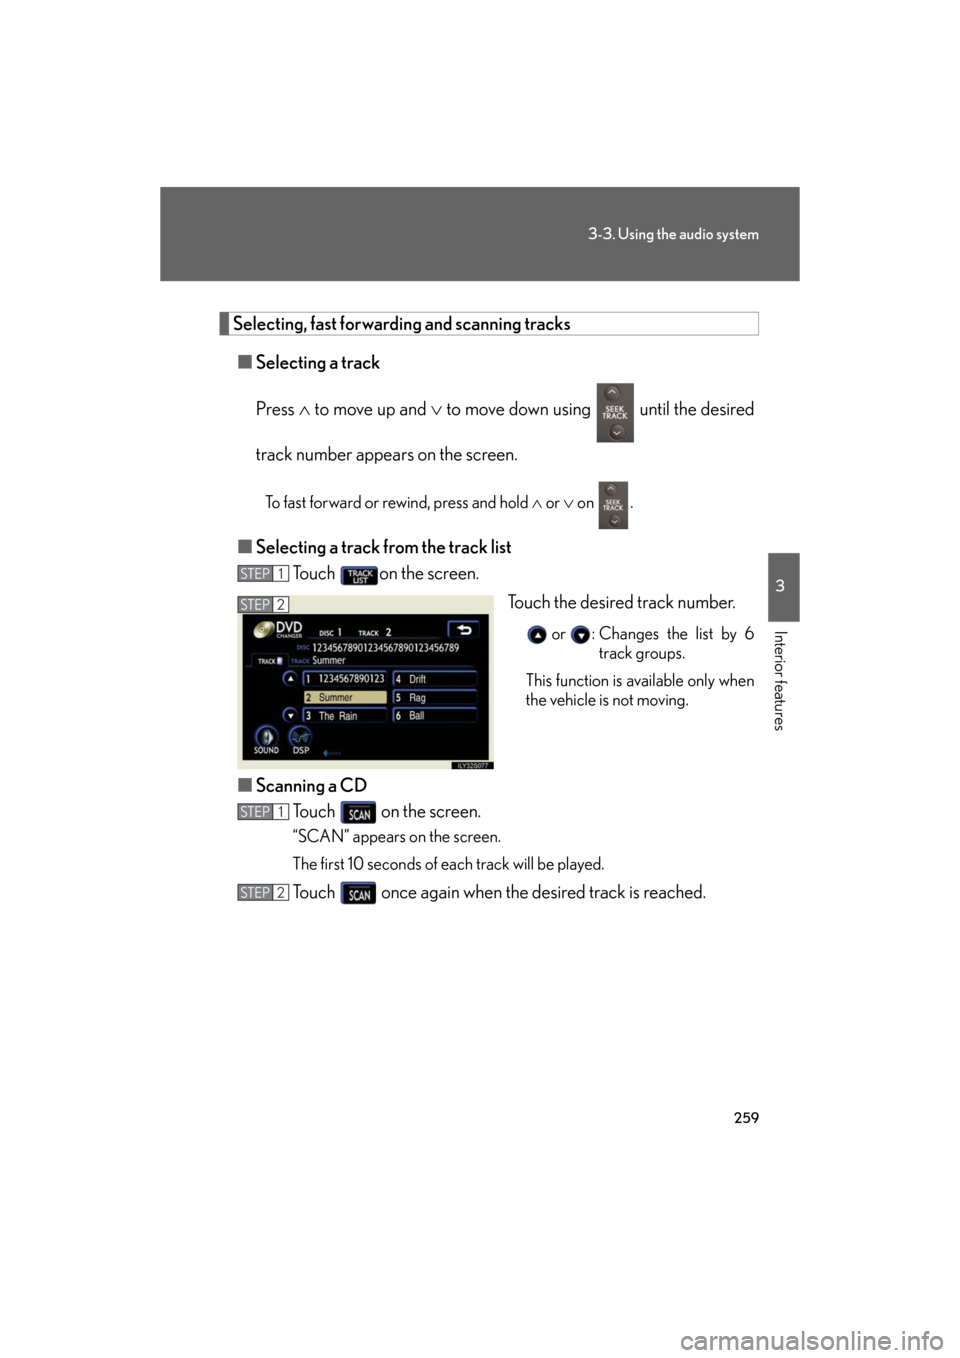
■ Selecting a track from the track list
Touch on the screen.
Touch the desired track number.
or : Changes the list by 6 track groups.
This function is available only when
the vehicle is not moving.
■ Scanning a CD
Touch on the screen.
“SCAN” appears on the screen.
The first 10 seconds of each track will be played.
Touch once again when the desired track is reached.
STEP1
STEP2
STEP1
STEP2
Page 260 of 596

260
3-3. Using the audio system
GS_HV_U
December 13, 2007 10:50 am
Selecting a CD■ To select a CD to play
Touch the desired disc number (1 - 6) on the screen or press or on
.
■ To scan loaded CDs
Touch and hold on the screen until “D SCAN” appears.
The first 10 seconds of the first track on each CD will be played.
Touch once again when the desired CD is reached.
Random playback
■ Current CD
Touch on the screen.
Songs are played in random order until random playback is canceled.
■All CDs
Touch and hold on the screen until “D RAND” appears.
Tracks on all loaded CDs are played in random order until the button is
touched once again.
Repeating a track or a disc
■ Repeating a track
Touch on the screen.
■ Repeating a disc
Touch and hold on the screen until “D RPT” appears.
STEP1
STEP2
Page 261 of 596

261
3-3. Using the audio system
3
Interior features
GS_HV_U
December 13, 2007 10:50 am
■Canceling random, repeat and scan playback
Touch , , or on the screen once again.
■Displaying the title and artist name
If a CD-TEXT disc is inserted, the title of the disc and track will be displayed. Up to
16 letters can be displayed.
■Error messages
P. 2 8 5
Page 263 of 596

263
3-3. Using the audio system
3
Interior features
GS_HV_U
December 13, 2007 10:50 am
Loading, ejecting and selecting MP3 and WMA discsRefer to the section titled “Usin g the CD player” for details. (P. 257)
Selecting a folder
■ Selecting a folder
Touch “FOLDER ” or “ ” on the screen to select the previ-
ous/next folder.
■ Selecting a folder from the folder list
Touch on the screen.
Touch the desired folder number.
or : Changes the list by 6 folder groups.
: Displays the details of the file currently play-
ing.
: Displays the file list.
This function is available only when
the vehicle is not moving.
■ Selecting the desired folder by cueing the first file of each folder
Touch and hold on the screen until “FLD SCAN” appears. When
the desired folder is reached, touch once again.
STEP1
STEP2