ECO mode Lexus GS450h 2008 Using the audio system / LEXUS 2008 GS450H (OM30A96U) User Guide
[x] Cancel search | Manufacturer: LEXUS, Model Year: 2008, Model line: GS450h, Model: Lexus GS450h 2008Pages: 596, PDF Size: 9.36 MB
Page 154 of 596

154
2-2. Instrument cluster
GS_HV_U
December 12, 2007 3:50 pm
CAUTION
■If a safety system warning light does not come on
Should a safety system light such as ABS and the SRS airbag warning light not
come on when you turn to ON mode, this could mean that these systems are not
available to help protect you in an accident, which could result in death or serious
injury. Have the vehicle inspected by your Lexus dealer immediately if this occurs.
■ Warning lights
Warning lights inform the driver of malfunctions in the indicated
vehicle’s systems. ( P. 4 9 1 )
*: These lights turn on when the “POWER” switch is turned to ON mode
to indicate that a system check is being performed. They will turn off
after the hybrid system is on, or af ter a few seconds. There may be a mal-
function in a system if the lights do not come on, or turn off. Have the
vehicle inspected by your Lexus dealer.
(U.S.A.)(Canada)(U.S.A.)(Canada)
(U.S.A.)(Canada)(if equipped)
*******
*****
*
Page 157 of 596

157
2-2. Instrument cluster
2
When driving
GS_HV_U
December 12, 2007 3:50 pm
■System check display
The “LEXUS HYBRID DRIVE” message is displayed 3 seconds after the
“POWER” switch is set to the ON mode. At this time a systems check is conducted,
and the normal display is shown upon successful completion of this check.
NOTICE
■The multi-information display at low temperatures
Allow the interior of the vehicle to warm up before using the liquid crystal informa-
tion display. At extremely low temperatures, the information display monitor may
respond slowly, and display changes may be delayed.
Page 160 of 596

160
2-3. Operating the lights and windshield wipers
GS_HV_U
May 19, 2008 9:00 pm
■Automatic light off system
The headlights and tail lights turn off 30 seconds after all doors are closed if the
“POWER” switch has been switched to ACCESSORY mode or turned OFF while
the headlights are turned on. (The lights turn off immediately if the button on the
key is pressed after all doors are locked.)
To turn the lights on again, switch to ON mode, or turn the light switch off once and
then back to the or position.
■Automatic headlight leveling system
The level of the headlights is automatica lly adjusted according to the number of
passengers and the loading condition of the vehicle to ensure that the headlights do
not interfere with other road users.
■If the indicator flashes...
It may indicate a malfunction in the system. Contact your Lexus dealer.
■Customization that can be configured at Lexus dealer
Settings (e.g. light sensor sensitivity) can be changed.
(Customizable features P. 5 7 2 )
NOTICE
■To prevent 12 volt battery discharge
Do not leave the lights on longer than necessary when the hybrid system is off.
Page 164 of 596

164
2-3. Operating the lights and windshield wipers
GS_HV_U
May 19, 2008 9:00 pm
CAUTION
■Caution regarding the use of windshield wipers in “AUTO” mode
The windshield wipers may operate unexpectedly if the sensor is touched or the
windshield is subject to vibration in “AUTO” mode. Take care that your fingers or
anything else do not become caught in the windshield wipers.
NOTICE
■When the windshield is dry
Do not use the wipers, as they may damage the windshield.
■When there is no washer fluid spray from the nozzle
Damage to the washer fluid pump may be caused if the lever is pulled toward you
and held continually.
Page 170 of 596

170
2-4. Using other driving systems
GS_HV_U
January 4, 2008 10:02 am
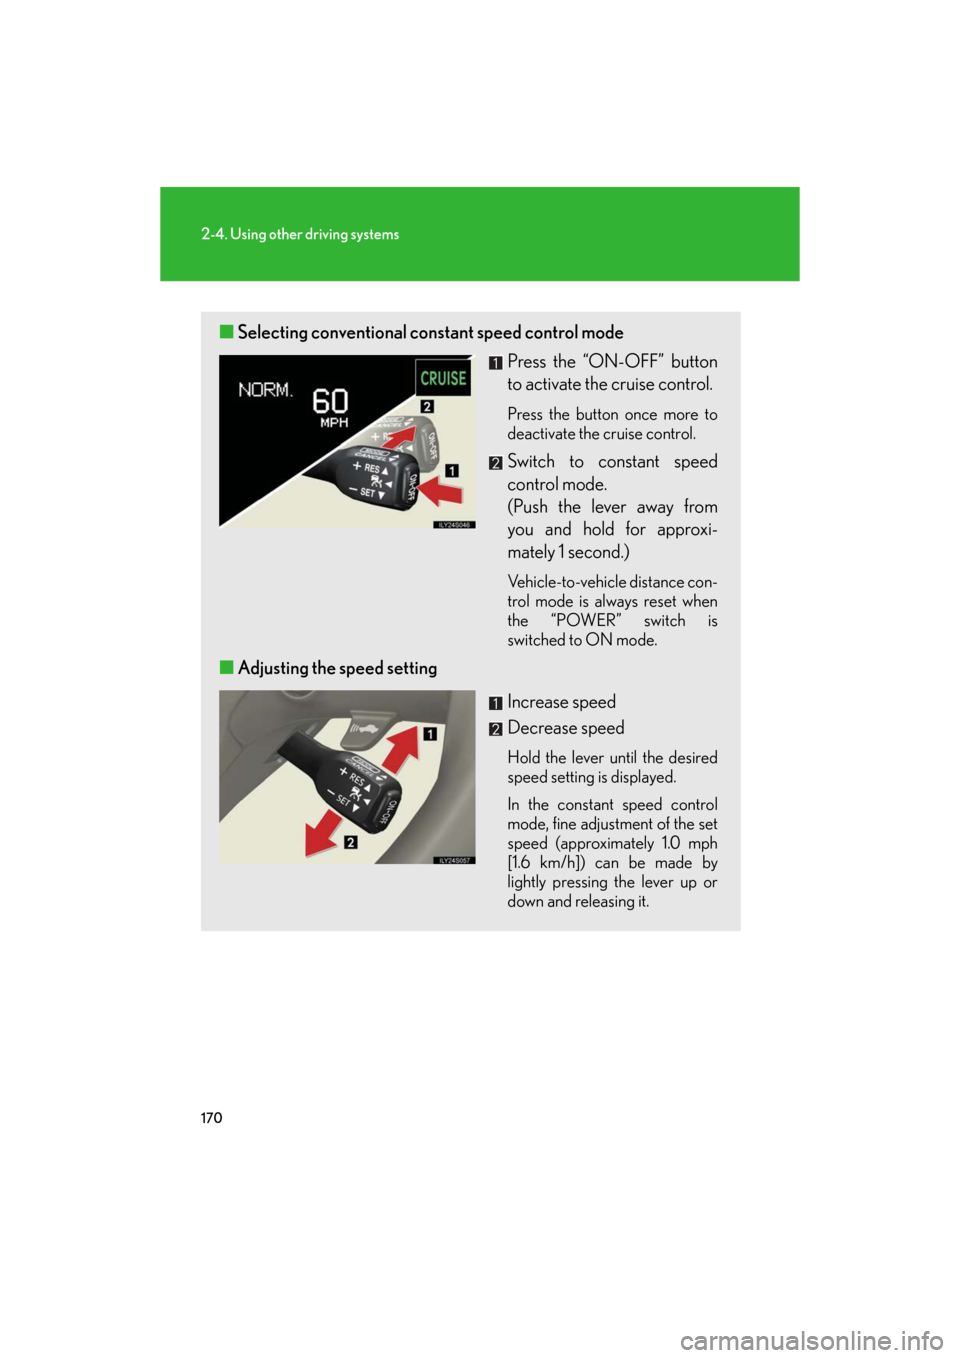
■Selecting conventional constant speed control mode
Press the “ON-OFF” button
to activate the cruise control.
Press the button once more to
deactivate the cruise control.
Switch to constant speed
control mode.
(Push the lever away from
you and hold for approxi-
mately 1 second.)
Vehicle-to-vehicle distance con-
trol mode is always reset when
the “POWER” switch is
switched to ON mode.
■ Adjusting the speed setting
Increase speed
Decrease speed
Hold the lever until the desired
speed setting is displayed.
In the constant speed control
mode, fine adjustment of the set
speed (approximately 1.0 mph
[1.6 km/h]) can be made by
lightly pressing the lever up or
down and releasing it.
Page 190 of 596

190
2-4. Using other driving systems
GS_HV_U
January 4, 2008 10:02 am
■The intuitive parking assist can be operated when
The “POWER” switch is in the ON mode.
■When the system malfunctions
●If a malfunction occurs and no obstacles have been detected, a warning is dis-
played, and a malfunction beep sounds for 7 seconds.
If an obstacle has been detected, or another malfunction occurs in a different
sensor, the malfunction beeps will not sound.
●In the following circumstances the displayed warning will disappear:
• If you switch the screen to a different mode.
• If you turn off the intuitive parking assist main switch.
• If the vehicle speed exceeds 6 mph (10 km/h). Once the vehicle speed drops
below 6 mph (10 km/h), the warning will be displayed again.
●If the malfunction screen is displayed, the detection range of the dual sensors is
shortened. In this case, the necessity fo r obstacle evasion (whether the obstacle
will come within 0.8 ft. [25 cm] of the vehicle or not) will not be calculated.
Page 226 of 596

226
3-1. Using the touch screen
GS_HV_U
December 12, 2007 3:50 pm
The initial screenIf the “POWER” switch is set to
ACCESSORY or ON mode, the
initializing screen will be displayed
for a few seconds as the system
starts up.
■To avoid damaging the touch screen
●Touch the screen lightly with your finger. If there is no response, remove your fin-
ger from the screen and try again.
●Remove any dirt on the screen by wiping with a soft cloth. Do not use detergent.
■When using the touch screen
●If the screen is cold, the display may be dark, or the system may seem to be
operating slightly sl ower than normal.
●The screen may seem dark and hard to see when viewed through sunglasses.
Change your angle of viewing, adjust the display on the “Display” screen or
remove your sunglasses.
Page 240 of 596

240
3-2. Using the air conditioning system and defogger
GS_HV_U
December 12, 2007 3:30 pm
Rear window and outside re ar view mirror defoggers
■Operating conditions
The “POWER” switch must be in the ON mode.
CAUTION
■When the outside rear view mirror defoggers are on
Do not touch the rear view mirror surfaces , as they can become very hot and burn
you.
NOTICE
■To prevent 12 volt battery discharge
Turn the defoggers off when the hybrid system is off.
These features are used to defog the rear window, and to remove rain-
drops, dew and frost from the outside rear view mirrors.
Press the button.
Press the button to turn on the
rear window and outside rear
view mirror defoggers. The
defoggers will automatically
turn off after approximately 15
minutes. Pressing the button
again also turns the defoggers
off.
Page 267 of 596

267
3-3. Using the audio system
3
Interior features
GS_HV_U
December 13, 2007 10:50 am
Loading a discs■ Loading a single disc
Push .
When the indicator changes from flashing amber to green, insert
a disc after the DVD player door opens.
■ Loading multiple discs
Press and hold until you hear a beep.
When the indicator changes from flashing amber to green, insert
a disc after the DVD player door opens.
After inserting a disc, wait until the indicator changes from flash-
ing amber to green, then insert the next disc after the DVD player
door has opened.
Repeat steps 2 and 3 until you have inserted all discs.
To cancel the operation, press the or button. If you do not
insert a disc within 15 seconds, loading will be canceled automatically.
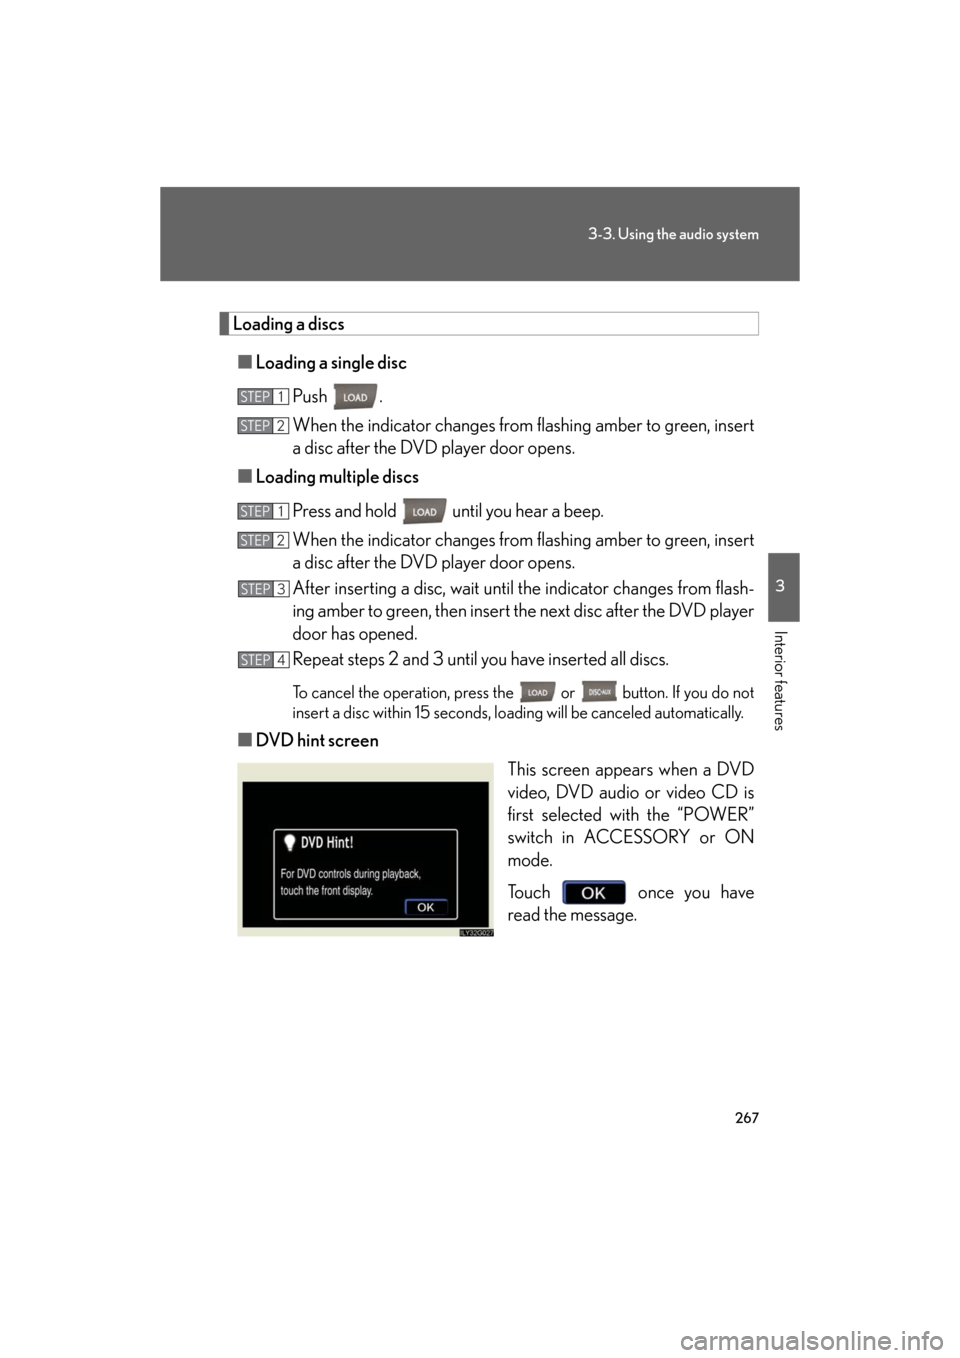
■DVD hint screen
This screen appears when a DVD
video, DVD audio or video CD is
first selected with the “POWER”
switch in ACCESSORY or ON
mode.
Touch once you have
read the message.
STEP1
STEP2
STEP1
STEP2
STEP3
STEP4
Page 290 of 596

290
3-3. Using the audio system
GS_HV_U
December 13, 2007 10:50 am
■MP3 and WMA files
MP3 (MPEG Audio LAYER 3) is a standard audio compression format.
Files can be compressed to approximately 1 /10 of their original size by using MP3
compression.
WMA (Windows Media
TMAudio) is a Microsoft audio compression format.
This format compresses audio data to a size smaller than that of the MP3 format.
There is a limit to the MP3 and WMA file standards and to the media/formats
recorded by them that can be used.
●MP3 file compatibility
• Compatible standards
MP3 (MPEG1 LAYER3, MPEG2 LSF LAYER3)
• Compatible sampling frequencies
MPEG1 LAYER3: 32, 44.1, 48 (kHz)
MPEG2 LSF LAYER3: 16, 22.05, 24 (kHz)
• Compatible bit rates
MPEG1 LAYER3: 64, 80, 96, 112, 128, 160, 192, 224, 256, 320 (kbps)
• MPEG2 LSF LAYER3: 64, 80, 96 , 112, 128, 144, 160 (kbps)
*: Compatible with VBR
• Compatible channel modes: stereo, joint stereo, dual channel and monaural
●WMA file compatibility
• Compatible standards
WMA Ver. 7, 8, 9
• Compatible sampling frequencies
32, 44.1, 48 (kHz)
• Compatible bit rates
Ver. 7, 8: CBR 48, 64, 80, 96, 128, 160, 192 (kbps)
Ver. 9: CBR 48, 64, 80, 96, 128, 160, 192, 256, 320 (kbps)
*: Only compatible with 2-channel playback