lock Lexus GS450h 2010 Using The Audio System / LEXUS 2010 GS450H (OM30C81U) Owner's Guide
[x] Cancel search | Manufacturer: LEXUS, Model Year: 2010, Model line: GS450h, Model: Lexus GS450h 2010Pages: 644, PDF Size: 15.8 MB
Page 59 of 644

59
1-3. Opening, closing and locking the doors and trunk
1
Before driving
GS_HV_U (OM30C81U)
October 13, 2015 12:41 pm
CAUTION
■To prevent an accident
Observe the following precautions while driving the vehicle.
Failing to do so may result in a door opening and an occupant falling out, resulting in
death or serious injury.
●Always use a seat belt.
●Always lock all doors.
●Ensure that all doors are properly closed.
●Do not pull the inside handle of the doors while driving.
The doors may be opened and the passengers are thrown out of the vehicle and it
may result in serious injury or death.
Be especially careful for the front doors, as the doors may be opened even if the
inside lock buttons are in locked position.
●Set the rear door child-protector locks when children are seated in the rear seat.
Page 60 of 644

60
1-3. Opening, closing and locking the doors and trunk
GS_HV_U (OM30C81U)
October 13, 2015 12:41 pm
Tr u n k
Canceling the trunk opener feature
Turn the main switch in the glove
box OFF to disable the trunk
opener.
ON
OFF
The trunk lid cannot be opened
even with the wireless remote con-
trol or the smart access system
with push- button start.
The trunk can be opened using the trunk opener, smart access system with
push-button start or wireless remote control.
■Opening the trunk from inside the vehicle
Press the opener switch.
■Opening the trunk from outside the vehicle
Smart access system with push-button start
P. 4 2
Wireless remote control
P. 5 3
Page 61 of 644

61
1-3. Opening, closing and locking the doors and trunk
1
Before driving
GS_HV_U (OM30C81U)
October 13, 2015 12:41 pm
■Tr u n k e a s y c l o s e r
In the event that the trunk lid is left slightly open (not latched properly), the trunk
easy closer will automatically close it to the fully closed position.
■Tr u n k l i g h t
When the trunk light switch is set to ON, the trunk light turns on when the trunk is
opened.
■Tr u n k h a n d l e
■Internal trunk release lever
■Using the mechanical key
The trunk can be also opened using the mechanical key. (P. 575)
ON
OFF
Use the trunk handle when closing the trunk.
The trunk lid can be opened by pulling down
on the glow-in-the-dark lever located on the
inside of the trunk lid.
The lever will continue to glow for some time
after the trunk lid is closed.
Page 62 of 644

62
1-3. Opening, closing and locking the doors and trunk
GS_HV_U (OM30C81U)
October 13, 2015 12:41 pm
CAUTION
■Caution while driving
●Keep the trunk lid closed while driving.
If the trunk lid is left open, it may hit near-by objects while driving or luggage in
the trunk may be unexpectedly thrown out, causing an accident.
In addition, exhaust gases may enter the vehicle, causing death or a serious
health hazard. Make sure to close the trunk lid before driving.
●Before driving the vehicle, make sure that the trunk lid is fully closed. If the trunk
lid is not fully closed, it may open unexpectedly while driving, causing an accident.
●Never let anyone sit in the trunk. In the event of sudden braking or a collision, they
are susceptible to death or serious injury.
■When children are in the vehicle
Observe the following precautions.
Failure to do so may result in death or serious injury.
●Do not allow children to enter the trunk.
If a child is accidentally locked in the trunk, they could overheat or suffocate.
●Do not allow a child to open or close the trunk lid.
Doing so may cause the trunk lid operate unexpectedly, or cause the child’s
hands, head, or neck to be caught by the closing trunk lid.
Page 63 of 644

63
1-3. Opening, closing and locking the doors and trunk
1
Before driving
GS_HV_U (OM30C81U)
October 13, 2015 12:41 pm
CAUTION
■Using the trunk
Observe the following precautions.
Failure to do so may cause parts of the body to be caught, resulting in serious injury.
●Remove any heavy loads, such as snow and ice, from the trunk lid before opening
it. Failure to do so may cause the trunk lid to fall closed again after it is opened.
●When opening or closing the trunk lid, thoroughly check to make sure the sur-
rounding area is safe.
●If anyone is in the vicinity, make sure they are safe and let them know that the
trunk is about to open or close.
●Use caution when opening or closing the trunk lid in windy weather as it may
move abruptly in strong wind.
●Do not attach any accessories other than genuine Lexus parts to the trunk lid.
Such additional weight on the trunk lid may cause the lid to fall closed again after
it is opened.
●The trunk lid may fall if it is not opened
fully. It is more difficult to open or close
the trunk lid on an incline than on a level
surface, so beware of the trunk lid unex-
pectedly opening or closing by itself.
Make sure that the trunk lid is fully open
and secure before using the trunk.
●When closing the trunk lid, take extra
care to prevent your fingers etc. from
being caught.
●When closing the trunk lid, make sure to
press it lightly on its outer surface. If the
trunk handle is used to fully close the
trunk lid, it may result in hands or arms
being caught.
Page 64 of 644

64
1-3. Opening, closing and locking the doors and trunk
GS_HV_U (OM30C81U)
October 13, 2015 12:41 pm
CAUTION
■Tr u n k e a s y c l o s e r
NOTICE
■To prevent trunk easy closer malfunction
Do not apply excessive force to the trunk lid while the trunk easy closer is operating.
In the event that the trunk lid is left slightly
open, the trunk easy closer will automatically
close it to the fully closed position. It takes
several seconds before the trunk easy closer
begins to operate. Be careful not to catch fin-
gers or anything else in the trunk lid, as this
may cause bone fractures or other serious
injuries.
Page 67 of 644

67
1
1-4. Adjustable components (seats, mirrors, steering wheel)
Before driving
GS_HV_U (OM30C81U)
February 1, 2010 11:00 am
Driving position memory system
Your preferred driving position (the position of the driver’s seat, steering
wheel and outside rear view mirrors) can be entered into the computer’s
memory and recalled with the touch of a button. It is also possible to set this
function to activate automatically when the doors are unlocked.
Three different driving positions can be entered into memory.
The same buttons are found on the front passenger’s side, allowing the
position of the front passenger’s seat to be memorized. (if equipped)
■Entering a position to memory
Turn the “POWER” switch to ON mode.
Adjust the driver’s seat, steering wheel, and outside rear view
mirrors to the desired positions.
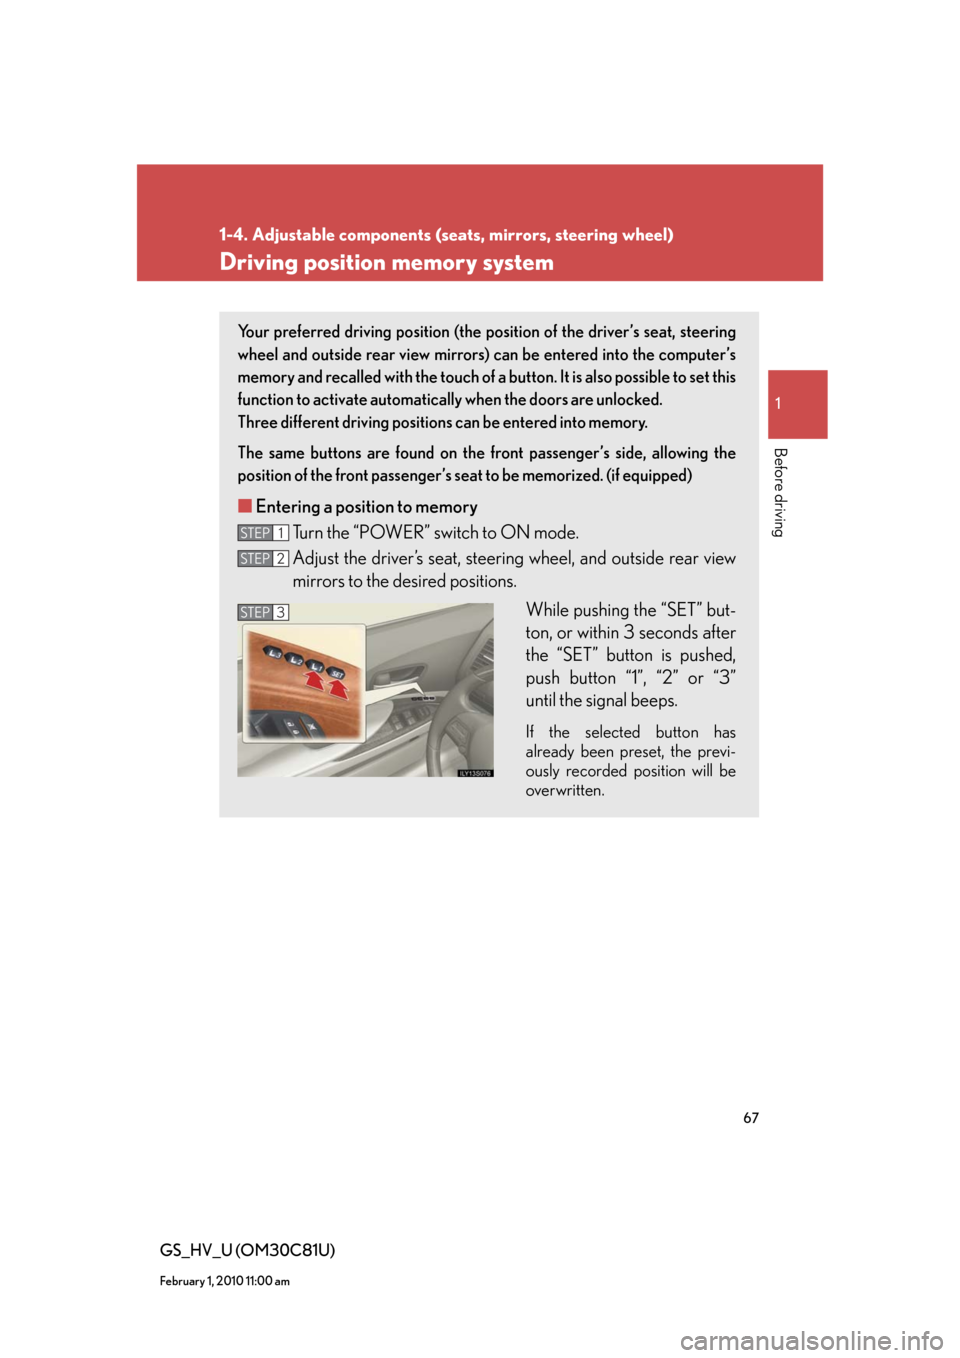
While pushing the “SET” but-
ton, or within 3 seconds after
the “SET” button is pushed,
push button “1”, “2” or “3”
until the signal beeps.
If the selected button has
already been preset, the previ-
ously recorded position will be
overwritten.
STEP1
STEP2
STEP3
Page 68 of 644

68
1-4. Adjustable components (seats, mirrors, steering wheel)
GS_HV_U (OM30C81U)
February 1, 2010 11:00 am
Linking driving position memory with door unlock operation
Record your driving position to button “1”, “2” or “3” before performing
the following:
Using the wireless remote control
Turn the “POWER” switch to OFF and close the driver’s door.
While pushing the desired button
(“1”, “2” or “3”), push on the
wireless remote control until the
signal beeps.
The driving position is recalled
when the driver’s door is unlocked
using the entry function or wireless
remote control and the driver’s
door is opened.
■Recalling the memorized position
Check that the shift lever is set in “P”.
Turn the “POWER” switch to ON mode.
Push button “1”, “2” or “3” to
recall the memorized position.
STEP1
STEP2
STEP1
STEP2
Page 69 of 644

69
1-4. Adjustable components (seats, mirrors, steering wheel)
1
Before driving
GS_HV_U (OM30C81U)
February 1, 2010 11:00 am
Open one of the doors.
If a door is not opened within 60 seconds after is pushed,
the doors will be locked again and the alarm will automatically be set.
In case that the alarm is triggered, immediately stop the alarm.
(
P. 1 0 1 )
Using the door lock switch
Carry only the key (including the card key) to which you want to link
the driving position. If 2 or more keys are in the vehicle, the driving
position cannot be linked properly.
Turn the “POWER” switch to OFF mode and close the driver’s
door.
While pushing the desired button
(“1”, “2” or “3”), push the lock or
unlock side on the door lock
switch (either the driver or passen-
ger side) until the signal beeps.
The driving position is recalled
when the driver’s door is unlocked
using the entry function or wireless
remote control and the driver’s
door is opened.
STEP3
STEP1
STEP2
Page 70 of 644

70
1-4. Adjustable components (seats, mirrors, steering wheel)
GS_HV_U (OM30C81U)
February 1, 2010 11:00 am
■Canceling the linked door unlock operation
Close the driver’s door with the “POWER” switch set to the OFF.
Push the “SET” button and the button on the wireless remote control
at the same time for about 1 second until you hear 2 beeps.
■Retained accessory power
With front passenger’s seat memory
●Each memorized position (except for the tilt and telescopic steering column)
can be recalled within 3 minutes after the corresponding side door is opened,
even if the “POWER” switch is turned to OFF.
●Driver’s side: Each memorized position (except for the tilt and telescopic steer-
ing column) can be recalled within 60 seconds after the driver’s door is closed,
even if the “POWER” switch is turned to OFF.
Without front passenger’s seat memory
●Each memorized position (except for the tilt and telescopic steering column)
can be recalled within 3 minutes after the driver’s door is opened, even if the
“POWER” switch is turned to OFF.
●Each memorized position (except for the tilt and telescopic steering column)
can be recalled within 60 seconds after the driver’s door is closed, even if the
“POWER” switch is turned to OFF.
■If any position memory button is pushed while the adjustments are being made
The operation will stop. To reactivate the system, push the desired button (“1”, “2” or
“3”) again.
■If the 12 volt battery is disconnected
The memorized positions must be reset because the computer’s memory is erased
when the battery is disconnected.
STEP1
STEP2