buttons Lexus GS450h 2010 Using The Audio System / LEXUS 2010 GS450H OWNERS MANUAL (OM30C81U)
[x] Cancel search | Manufacturer: LEXUS, Model Year: 2010, Model line: GS450h, Model: Lexus GS450h 2010Pages: 644, PDF Size: 15.8 MB
Page 17 of 644

17
GS_HV_U (OM30C81U)
January 28, 2010 10:42 am
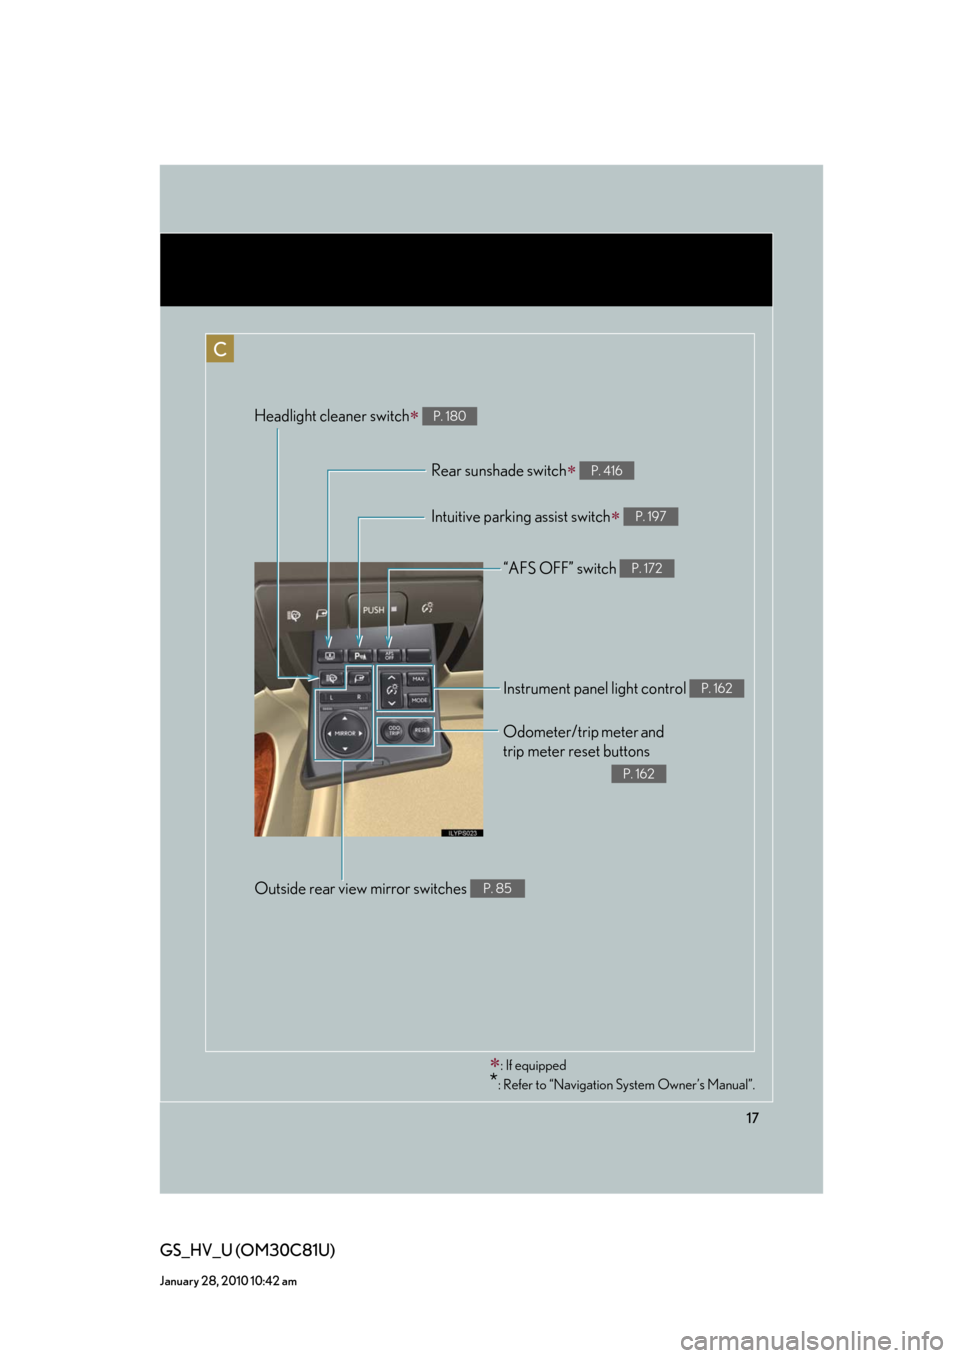
“AFS OFF” switch P. 172
Rear sunshade switch P. 416
Headlight cleaner switch P. 180
Intuitive parking assist switch P. 197
Odometer/trip meter and
trip meter reset buttons
P. 162
Instrument panel light control P. 162
Outside rear view mirror switches P. 85
: If equipped
*: Refer to “Navigation System Owner’s Manual”.
C
Page 39 of 644

39
1-2. Key information
1
Before driving
GS_HV_U (OM30C81U)
January 28, 2010 12:55 pm
■Key number plate
Keep the plate in a safe place such as your wallet, not in the vehicle. In the event that
a mechanical key is lost, a new key can be made at your Lexus dealer using the key
number plate. (P. 5 74 )
■When riding in an aircraft
When bringing an electronic key onto an aircraft, make sure you do not press any
buttons on the electronic key while inside the aircraft cabin. If you are carrying an
electronic key in your bag etc., ensure that the buttons are not likely to be pressed
accidentally. Pressing a button may cause the electronic key to emit radio waves
that could interfere with the operation of the aircraft.
NOTICE
■To prevent key damage
Observe the following:
●Do not drop the keys, subject them to strong shocks or bend them.
●Do not expose the keys to high temperatures for a long period of time.
●Do not get the keys wet or wash them in an ultrasonic washer etc.
●Do not attach metallic or magnetic materials to the keys or place the keys close to
such materials.
●Do not disassemble the keys.
●Do not place the keys near objects that produce magnetic fields, such as TVs,
audio system, glass top ranges, or medical electrical equipment, such as low-fre-
quency therapy equipment.
Page 46 of 644

46
1-3. Opening, closing and locking the doors and trunk
GS_HV_U (OM30C81U)
October 13, 2015 12:41 pm
■Switching the door unlock function
It is possible to set which doors the entry function unlocks using the wireless remote
control.
Turn the “POWER” switch OFF.
When the indicator light on the key surface is not on, press and hold ,
, or for approximately 5 seconds while pressing and holding
.
The setting changes each time an operation is performed, as shown below. (When
changing the setting continuously, release the buttons, wait for at least 5 seconds,
and repeat step 2.)
STEP1
STEP2
Multi-information
displayUnlocking doorsBeep
Hold the driver’s door handle
to unlock only the driver’s
door
Exterior: Beeps 3 times
Interior: Rings once
Hold a passenger’s door han-
dle to unlock all the doors
Hold the door handle to
unlock the front and rear
doors on your sideExterior: Beeps 4 times
Interior: Rings once
Hold the door handle to
unlock the doorExterior: Beeps once
Interior: Rings once
Hold a door handle to unlock
all doorsExterior: Beeps twice
Interior: Rings once
Page 55 of 644

55
1
1-3. Opening, closing and locking the doors and trunk
Before driving
GS_HV_U (OM30C81U)
October 13, 2015 12:41 pm
Doors
The vehicle can be locked and unlocked using the smart access system with
push-button start, wireless remote control or door lock switch.
■Smart access system with push-button start
P. 4 2
■Wireless remote control
P. 5 3
■Door lock switch
Locks all doors
Unlocks all doors
■Inside lock button
Locks the door
Unlocks the door
The front doors can be opened
by pulling the inside handles
even if the lock buttons are in
the lock position.
Page 59 of 644

59
1-3. Opening, closing and locking the doors and trunk
1
Before driving
GS_HV_U (OM30C81U)
October 13, 2015 12:41 pm
CAUTION
■To prevent an accident
Observe the following precautions while driving the vehicle.
Failing to do so may result in a door opening and an occupant falling out, resulting in
death or serious injury.
●Always use a seat belt.
●Always lock all doors.
●Ensure that all doors are properly closed.
●Do not pull the inside handle of the doors while driving.
The doors may be opened and the passengers are thrown out of the vehicle and it
may result in serious injury or death.
Be especially careful for the front doors, as the doors may be opened even if the
inside lock buttons are in locked position.
●Set the rear door child-protector locks when children are seated in the rear seat.
Page 67 of 644

67
1
1-4. Adjustable components (seats, mirrors, steering wheel)
Before driving
GS_HV_U (OM30C81U)
February 1, 2010 11:00 am
Driving position memory system
Your preferred driving position (the position of the driver’s seat, steering
wheel and outside rear view mirrors) can be entered into the computer’s
memory and recalled with the touch of a button. It is also possible to set this
function to activate automatically when the doors are unlocked.
Three different driving positions can be entered into memory.
The same buttons are found on the front passenger’s side, allowing the
position of the front passenger’s seat to be memorized. (if equipped)
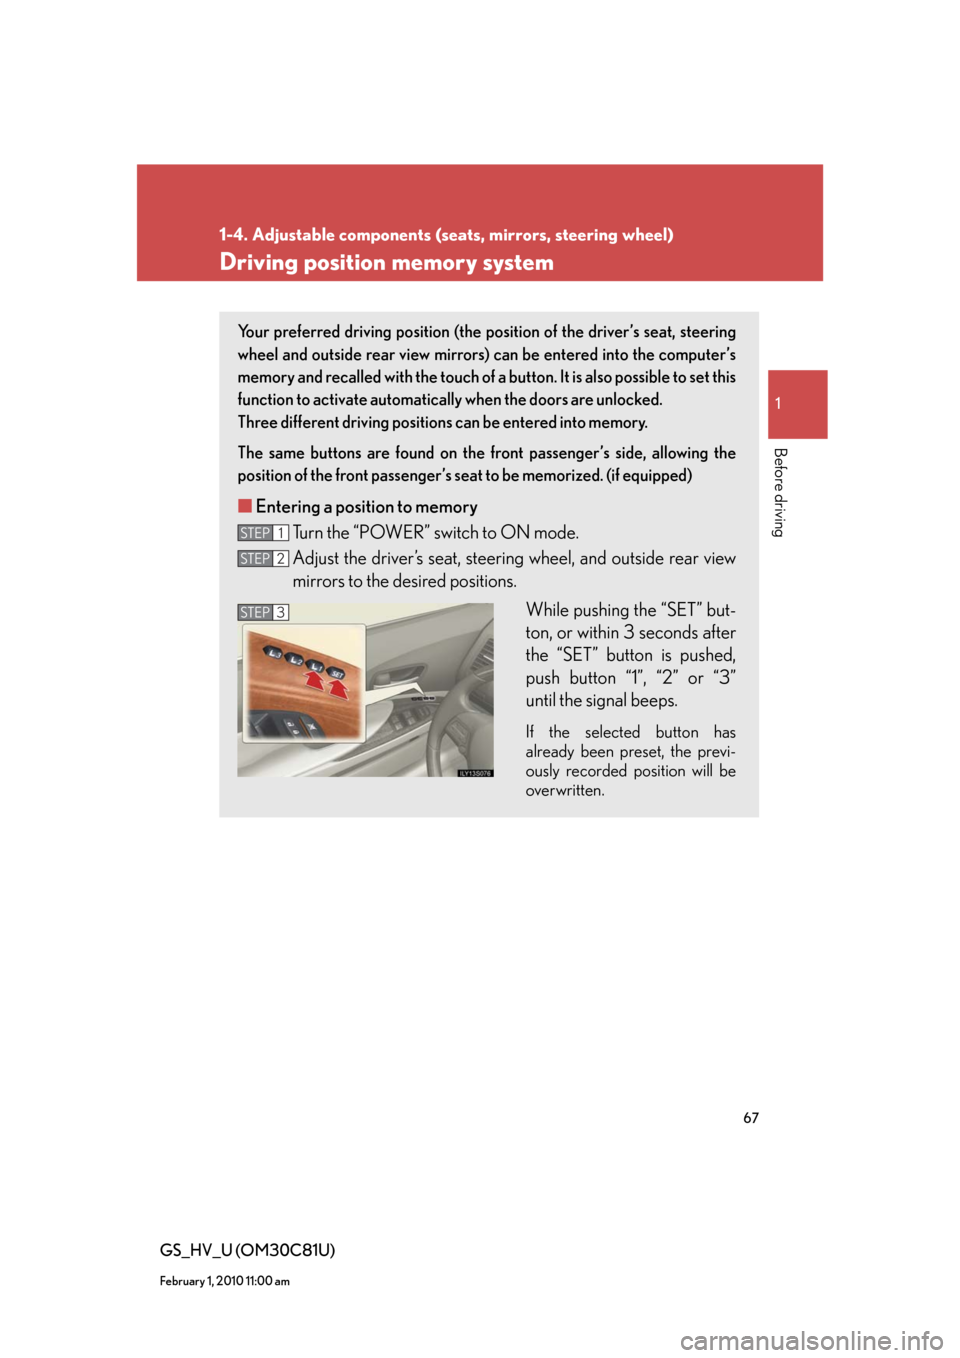
■Entering a position to memory
Turn the “POWER” switch to ON mode.
Adjust the driver’s seat, steering wheel, and outside rear view
mirrors to the desired positions.
While pushing the “SET” but-
ton, or within 3 seconds after
the “SET” button is pushed,
push button “1”, “2” or “3”
until the signal beeps.
If the selected button has
already been preset, the previ-
ously recorded position will be
overwritten.
STEP1
STEP2
STEP3
Page 128 of 644

128
1-8. Safety information
GS_HV_U (OM30C81U)
January 28, 2010 10:42 am
Installing child restraints
Follow the child restraint system manufacturer’s instructions. Firmly
secure child restraints to the rear seats using the LATCH anchors or a seat
belt. Attach the top tether strap when installing a child restraint.
The lap/shoulder belt can be used if your child restraint system is not com-
patible with the LATCH (Lower Anchors and Tethers for Children) system.
Child restraint LATCH
anchors
LATCH anchors are provided
for the outboard rear seats.
(Buttons displaying the location
of the anchors are attached to
the seats.)
Seat belts equipped with a
child restraint locking mecha-
nism (ALR/ELR belts except
driver’s seat belt)
Anchor bracket
(for top tether strap)
Anchor brackets are provided
for all rear seats.
Page 162 of 644

162
2-2. Instrument cluster
GS_HV_U (OM30C81U)
February 1, 2010 11:03 am
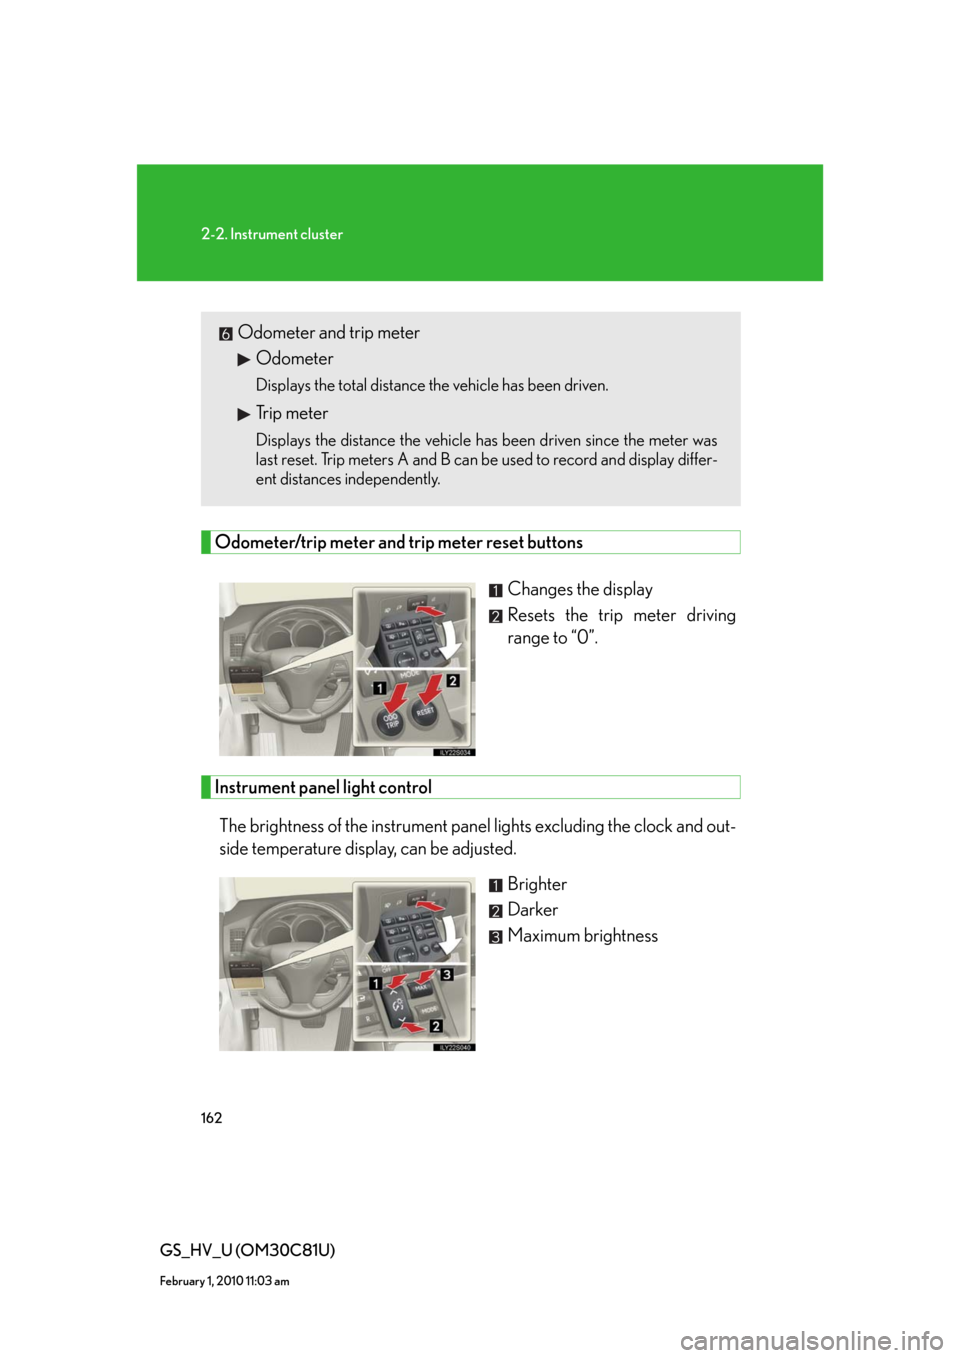
Odometer/trip meter and trip meter reset buttons
Changes the display
Resets the trip meter driving
range to “0”.
Instrument panel light control
The brightness of the instrument panel lights excluding the clock and out-
side temperature display, can be adjusted.
Brighter
Darker
Maximum brightness
Odometer and trip meter
Odometer
Displays the total distance the vehicle has been driven.
Trip meter
Displays the distance the vehicle has been driven since the meter was
last reset. Trip meters A and B can be used to record and display differ-
ent distances independently.
Page 243 of 644

243
3-1. Using the touch screen
3
Interior features
GS_HV_U (OM30C81U)
January 28, 2010 10:42 am
“Information” screen
■Reference
Display buttons
ButtonPa g e
“CLIMATE”P. 2 5 9
“A U D I O ”P. 2 7 0
“MAP VOICE”/”DEST”Navigation System Owner’s Manual
“INFO PHONE” (Displaying the
“Information” screen)P. 2 4 2
“DISP” (Adjusting the display)P. 2 4 6
“SETUP” (Displaying the “Setup”
screen)P. 2 4 8
Page 273 of 644

273
3-3. Using the audio system
3
Interior features
GS_HV_U (OM30C81U)
January 28, 2010 1:22 pm
Using the radio
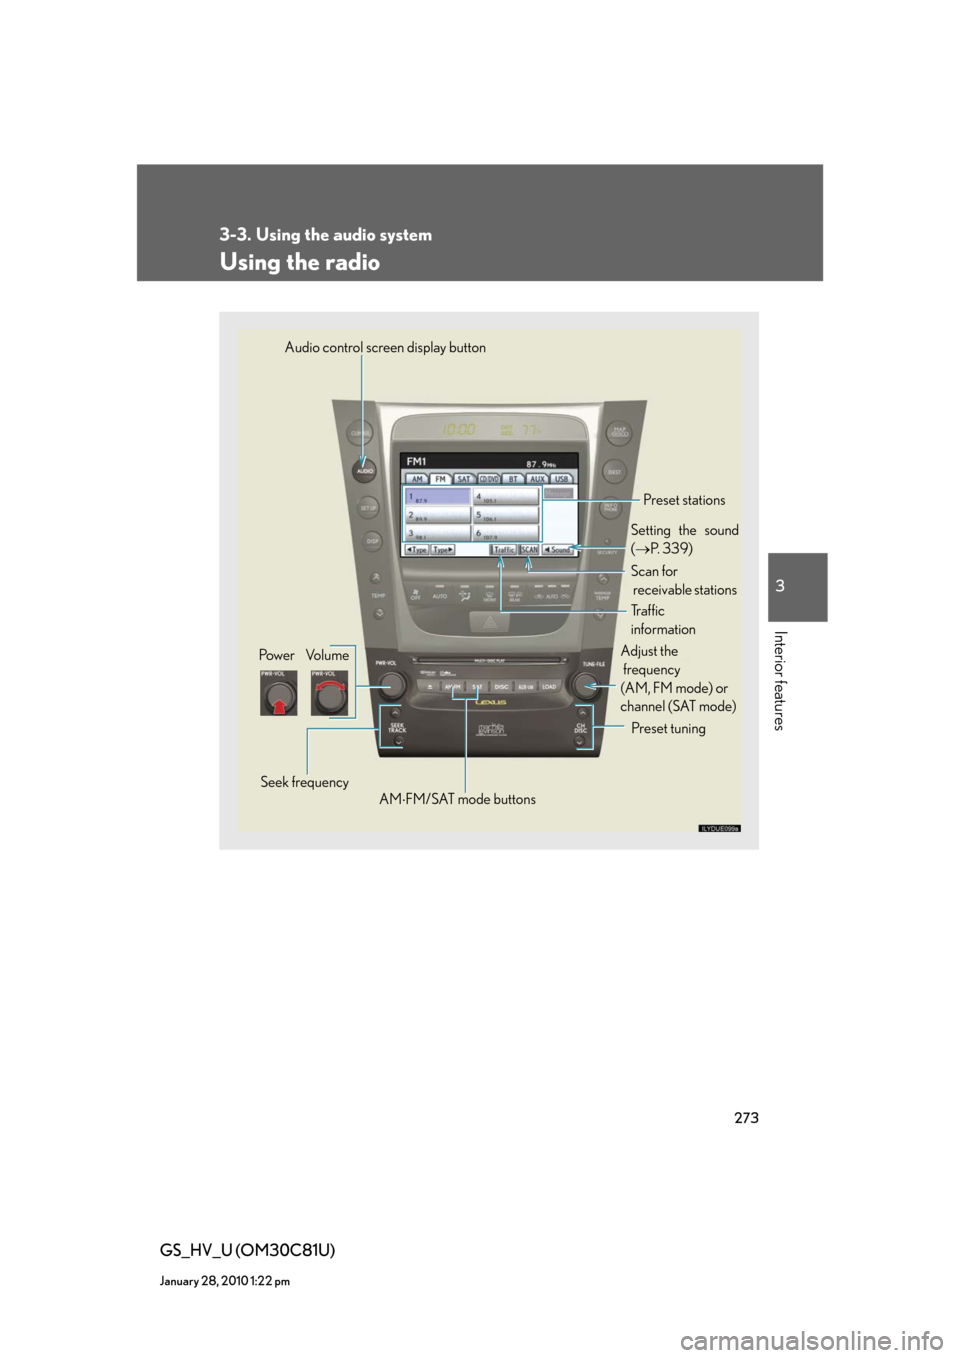
Audio control screen display button
Pow e r Vo l u m e
Seek frequencyPreset tuning Adjust the
frequency
(AM, FM mode) or
channel (SAT mode)
AMFM/SAT mode buttonsPreset stations
Setting the sound
(P. 3 3 9 )
Scan for
receivable stations
Tr a f f i c
information