inflation pressure Lexus GS450h 2010 Using The Audio System / LEXUS 2010 GS450H OWNERS MANUAL (OM30C81U)
[x] Cancel search | Manufacturer: LEXUS, Model Year: 2010, Model line: GS450h, Model: Lexus GS450h 2010Pages: 644, PDF Size: 15.8 MB
Page 5 of 644

1
2
3
4
5
6
7
5
GS_HV_U (OM30C81U)
February 1, 2010 10:54 am
4-1. Maintenance and care
Cleaning and protecting
the vehicle exterior................... 442
Cleaning and protecting
the vehicle interior .................... 445
4-2. Maintenance
Maintenance requirements ..... 448
General maintenance ............... 450
Emission inspection and
maintenance (I/M)
programs ...................................... 4534-3. Do-it-yourself maintenance
Do-it-yourself service
precautions .................................. 454
Hood ................................................. 457
Positioning a floor jack.............. 458
Engine compartment.................. 460
Tires ................................................... 475
Tire inflation pressure................ 485
Wheels ............................................ 489
Air conditioning filter................... 491
Electronic key battery ................ 494
Checking and replacing
fuses ................................................ 496
Headlight aim ................................... 511
Light bulbs ........................................ 514
5-1. Essential information
Emergency flashers .................... 522
If your vehicle needs to be
towed ............................................. 523
If you think something is
wrong .............................................. 531
Event data recorder.................... 532
4Maintenance and care
5When trouble arises
Page 9 of 644

9
GS_HV_U (OM30C81U)
January 28, 2010 10:42 am
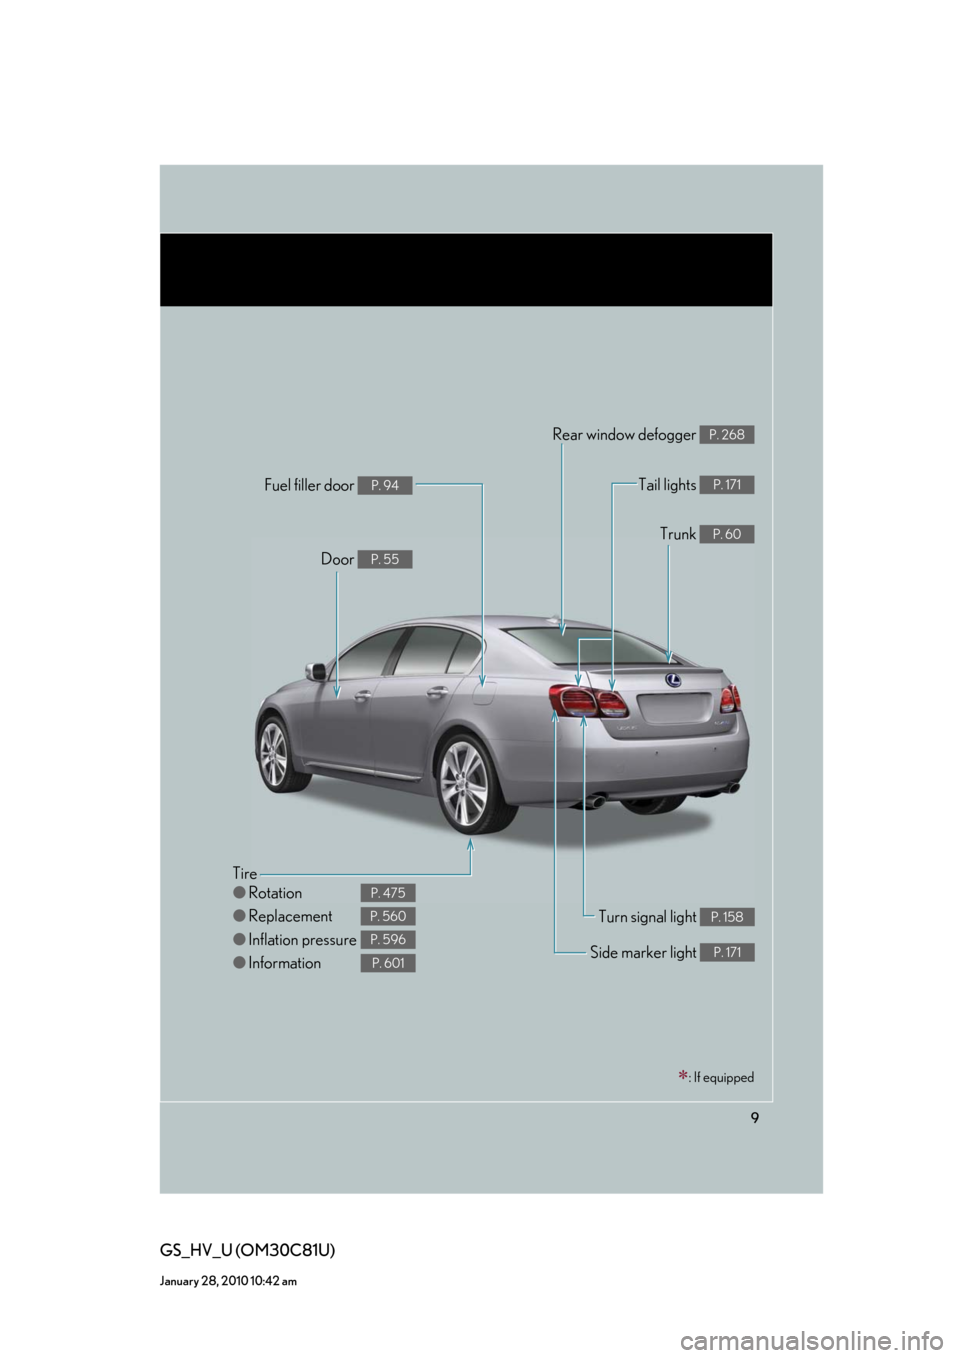
Tire
●Rotation
●Replacement
●Inflation pressure
●Information
P. 475
P. 560
P. 596
P. 601
Tail lights P. 171
Side marker light P. 171
Trunk P. 60
Rear window defogger P. 268
Door P. 55
Fuel filler door P. 94
Turn signal light P. 158
: If equipped
Page 236 of 644

236
2-5. Driving information
GS_HV_U (OM30C81U)
January 28, 2010 10:42 am
■Snow chain installation
Observe the following precautions when installing and removing chains.
●Install and remove tire chains in a safe location.
●Install tire chains on the rear tires only. Do not install tire chains on front tires.
●Install tire chains following the instructions provided in the accompanying
instructions.
CAUTION
■Driving with snow tires
Observe the following precautions to reduce the risk of accidents.
Failing to do so may result in a loss of vehicle control and cause death or serious
injury.
●Use tires of the size specified for your vehicle.
●Maintain the specified level of tire inflation pressure.
●Do not drive in excess of 75 mph (120 km/h), regardless of the type of snow tires
being used.
●Use snow tires on all, not just some wheels.
■Driving with snow chains
Observe the following precautions to reduce the risk of accidents.
Failing to do so may result in the vehicle being unable to be driven safely, and may
cause death or serious injury.
●Do not drive in excess of the speed limit specified for the tire chains being used,
or 30 mph (50 km/h), whichever is lower.
●Avoid driving on bumpy road surfaces or over potholes.
●Avoid sudden turns and braking, as use of chains may adversely affect vehicle
handling.
●Slow down sufficiently before entering a curve to ensure that vehicle control is
maintained.
Page 441 of 644

Maintenance and care4
441
GS_HV_U (OM30C81U)
January 28, 2010 11:30 am
4-1. Maintenance and care
Cleaning and protecting
the vehicle exterior............. 442
Cleaning and protecting
the vehicle interior .............. 4454-2. Maintenance
Maintenance
requirements........................ 448
General maintenance .......... 450
Emission inspection and
maintenance (I/M)
programs ............................... 453
4-3. Do-it-yourself maintenance
Do-it-yourself service
precautions ........................... 454
Hood ........................................... 457
Positioning a floor jack ......... 458
Engine compartment ........... 460
Tires............................................. 475
Tire inflation pressure........... 485
Wheels ...................................... 489
Air conditioning filter ............ 491
Electronic key battery.......... 494
Checking and replacing
fuses ........................................ 496
Headlight aim ........................... 511
Light bulbs ................................. 514
Page 452 of 644

452
4-2. Maintenance
GS_HV_U (OM30C81U)
January 28, 2010 10:42 am
Vehicle exterior
ItemsCheck points
Doors/trunk• Operate smoothly?
Engine hood• The lock system works properly?
Fluid leaks• Is there any leakage after parking?
Ti r e
• Inflation pressure is correct?
• Tire surfaces not worn or dam-
aged?
• Tires rotated according to the
maintenance schedule?
• Wheel nuts are not loose?
CAUTION
■If the hybrid system is operating
Turn off the hybrid system and ensure that there is adequate ventilation before per-
forming maintenance checks.
Page 455 of 644

455
4-3. Do-it-yourself maintenance
4
Maintenance and care
GS_HV_U (OM30C81U)
October 13, 2015 12:41 pm
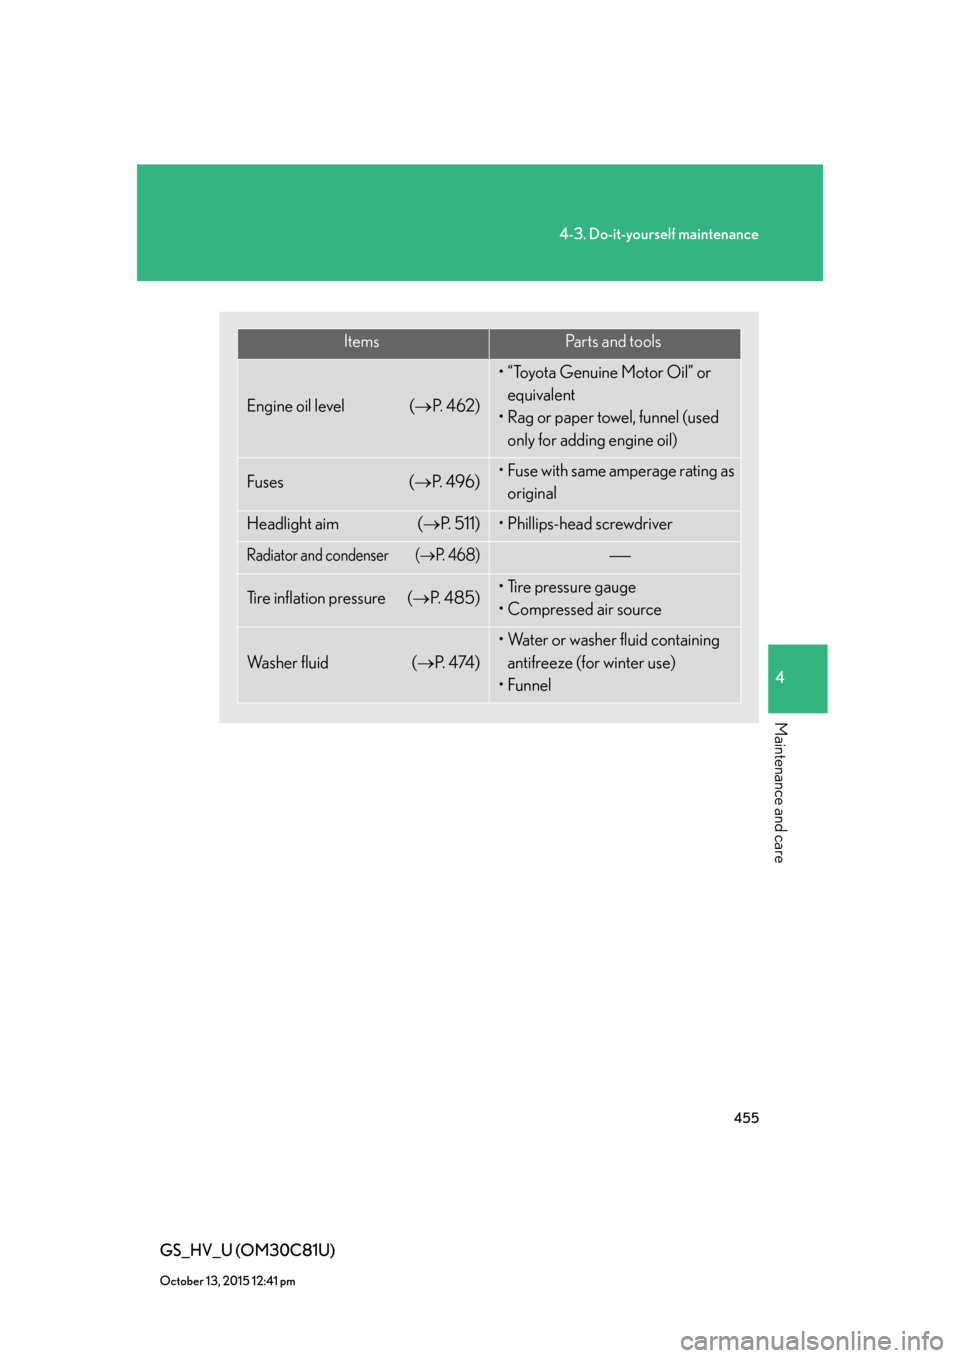
ItemsPa r t s a n d t o o l s
Engine oil level (P. 4 6 2 )
• “Toyota Genuine Motor Oil” or
equivalent
• Rag or paper towel, funnel (used
only for adding engine oil)
Fuses (P. 4 9 6 )• Fuse with same amperage rating as
original
Headlight aim (P. 5 1 1 )• Phillips-head screwdriver
Radiator and condenser (P. 4 6 8 )
Tire inflation pressure (P. 4 8 5 )• Tire pressure gauge
• Compressed air source
Wa s h e r f l u i d (P. 4 74 )
• Water or washer fluid containing
antifreeze (for winter use)
•Funnel
Page 475 of 644

475
4-3. Do-it-yourself maintenance
4
Maintenance and care
GS_HV_U (OM30C81U)
October 13, 2015 12:41 pm
Tires
Replace the tires when the treadwear indicators show.
■Checking tires
New tread
Treadwear indicator
Worn tread
The location of treadwear indi-
cators is shown by the “TWI” or
“ ” marks, etc., molded on the
sidewall of each tire.
Check spare tire condition and
inflation pressure if not rotated.
■Tire rotation
Rotate the tires in the order
shown.
To equalize tire wear and extend
tire life, Lexus recommends that
tire rotation is carried out at the
same interval as tire inspection.
■The tire pressure warning system
Your Lexus is equipped with a tire pressure warning system that uses
tire pressure warning valves and transmitters to detect low tire infla-
tion pressure before serious problems arise. (P. 545)
Front
Page 476 of 644

476
4-3. Do-it-yourself maintenance
GS_HV_U (OM30C81U)
October 13, 2015 12:41 pm
Installing tire pressure warning valves and transmitters
When replacing tires or wheels, tire pressure warning valves and trans-
mitters must also be installed.
When new tire pressure warning valves and transmitters are installed,
new tire pressure warning valve and transmitter ID codes must be regis-
tered in the tire pressure warning computer and tire pressure warning
system must be initialized. Have tire pressure warning valve and transmit-
ter ID codes registered by your Lexus dealer. (P. 4 7 8 )
Initializing the tire pressure warning system
■The tire pressure warning system must be initialized in the following
circumstances:
●When changing the tire inflation pressure by changing traveling
speed or load weight, etc.
When the tire pressure warning system is initialized, the current tire
inflation pressure is set as the pressure benchmark.
Page 477 of 644

477
4-3. Do-it-yourself maintenance
4
Maintenance and care
GS_HV_U (OM30C81U)
October 13, 2015 12:41 pm
■How to initialize the tire pressure warning system
Park the vehicle in safe place and turn the “POWER” switch to
OFF.
While the vehicle is moving, initialization is not performed.
Adjust the tire inflation pressure to the specified cold tire inflation
pressure level. (P. 5 9 6 )
Make sure to adjust the tire pressure to the specified cold tire inflation
pressure level. The tire pressure warning system will operate based on
this pressure level.
Turn the “POWER” switch to ON mode.
Push and hold the tire pressure
warning reset switch until the tire
pressure warning light blinks
slowly three times and the mes-
sage “PRESSURE INITIAL”
appears on the multi-information
display.
Wait for a few minutes with the ON mode, and then turn the
“POWER” switch to OFF.
STEP1
STEP2
STEP3
STEP4
STEP5
Page 480 of 644

480
4-3. Do-it-yourself maintenance
GS_HV_U (OM30C81U)
October 13, 2015 12:41 pm
■Maximum load of tire
Check that the maximum load of the replacement tire is greater than 1 /2 of the
Gross Axle Weight Ratings (GAWR) of either the front axle or the rear axle, which-
ever is greater.
■Tire types
1 Summer tires
Summer tires are high-speed performance tires best suited to highway driving
under dry conditions. Since summer tires do not have the same traction perfor-
mance as snow tires, summer tires are inadequate for driving on snow-covered
or icy roads. For driving on snow-covered roads or icy roads, the use of snow
tires is recommended. When installing snow tires, be sure to replace all four tires.
2All season tires
All season tires are designed to provide better traction in snow and to be ade-
quate for driving in most winter conditions, as well as for use year round. All sea-
son tires, however, do not have adequate traction performance compared with
snow tires in heavy or loose snow. Also, all season tires fall short in acceleration
and handling performance compared with summer tires in highway driving.
3Snow tires
For driving on snow-covered roads or icy roads, we recommend using snow
tires. If you need snow tires, select tires of the same size, construction and load
capacity as the originally installed tires. Since your vehicle has radial tires as orig-
inal equipment, make sure your snow tires also have radial construction. Do not
install studded tires without first checking local regulations for possible restric-
tion. Snow tires should be installed on all wheels. (P. 2 3 3 )
For the GAWR, see the Certification Label.
For the maximum load of the tire, see the load
limit at maximum cold tire inflation pressure
mentioned on the sidewall of the tire.
(P. 6 0 1 )