Lexus GS450h 2018 / LEXUS 2018 GS450H QUICK GUIDE (OM30G74U) Workshop Manual
Manufacturer: LEXUS, Model Year: 2018, Model line: GS450h, Model: Lexus GS450h 2018Pages: 98, PDF Size: 8.75 MB
Page 51 of 98

51
GS450h_QG_OM30G74U_(U)
Eco drive mode
Use Eco drive mode to help achieve low fuel consumption during trips that involve fre-
quent accelerating.
When not in Eco drive mode and the driving mode select switch is turned to the left, the
“ECO” or “ECO MODE” indicator comes on in the multi-information display.
Sport mode
•SPORT S mode
Assists acceleration response by controlling the transmission and engine.
When not in SPORT S mode and the driving mode select switch is turned to the right,
the “SPORT S” indicator comes on in the multi-information display, and the Hybrid
System Indicator changes to the tachometer.
•SPORT S+ mode
Helps to ensure steering performance and driving stability by simultaneously con-
trolling the steering and suspension in addition to the hybrid system. Suitable for
sporty driving.
When in SPORT S mode and the driving mode select switch is turned to the right, the
“SPORT S+” indicator comes on in the multi-information display.2
3
Page 52 of 98
52
GS450h_QG_OM30G74U_(U)
BSM (Blind Spot Monitor) (if equipped)
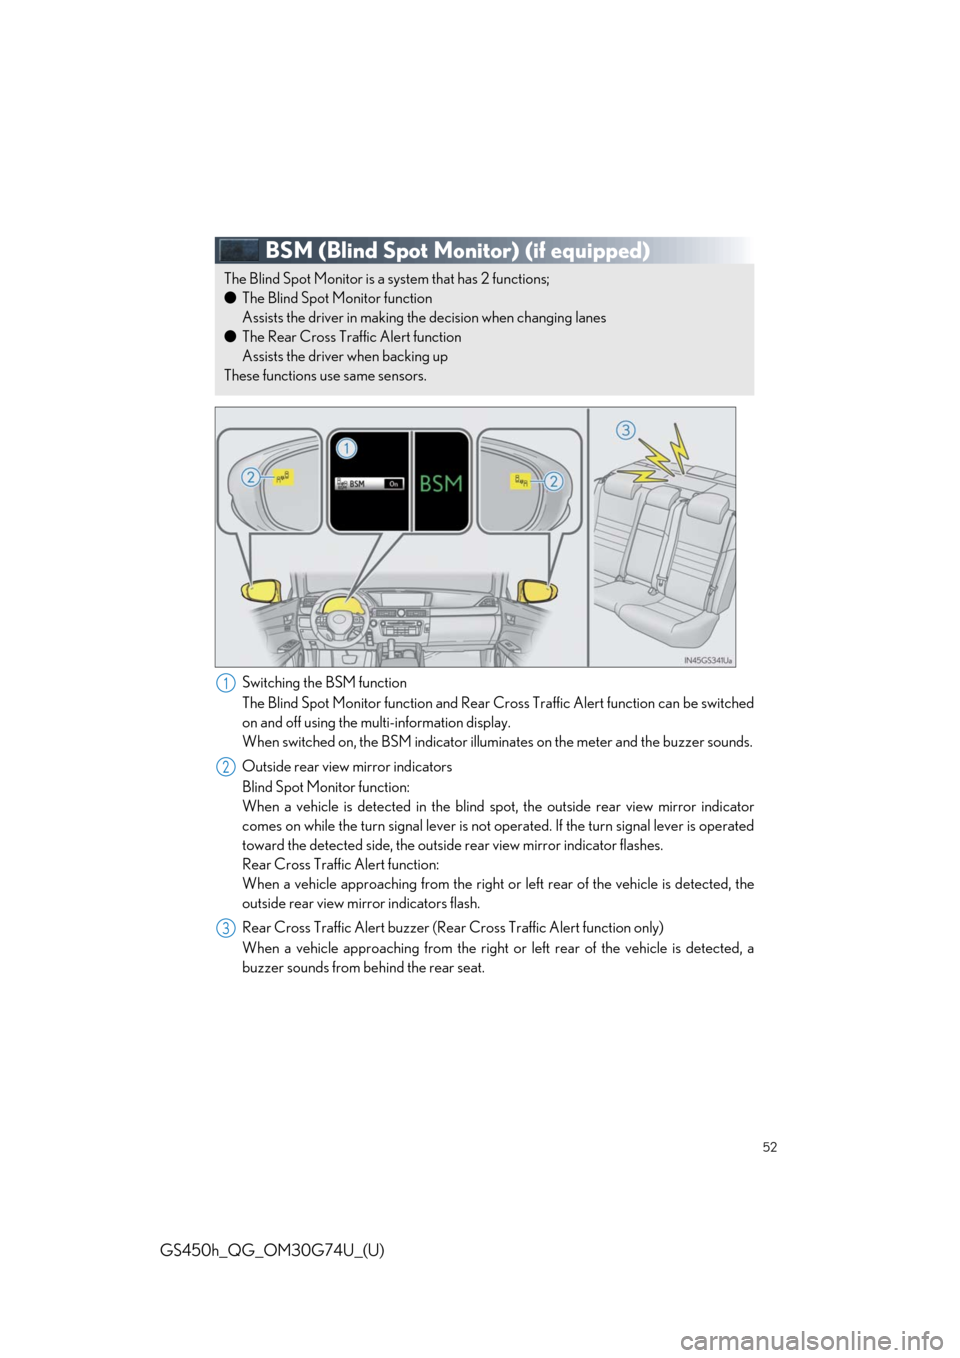
Switching the BSM function
The Blind Spot Monitor function and Rear Cross Traffic Alert function can be switched
on and off using the multi-information display.
When switched on, the BSM indicator illuminates on the meter and the buzzer sounds.
Outside rear view mirror indicators
Blind Spot Monitor function:
When a vehicle is detected in the blind spot, the outside rear view mirror indicator
comes on while the turn signal lever is not operated. If the turn signal lever is operated
toward the detected side, the outside rear view mirror indicator flashes.
Rear Cross Traffic Alert function:
When a vehicle approaching from the right or left rear of the vehicle is detected, the
outside rear view mirror indicators flash.
Rear Cross Traffic Alert buzzer (Rear Cross Traffic Alert function only)
When a vehicle approaching from the right or left rear of the vehicle is detected, a
buzzer sounds from behind the rear seat.
The Blind Spot Monitor is a system that has 2 functions;
●The Blind Spot Monitor function
Assists the driver in making the decision when changing lanes
●The Rear Cross Traffic Alert function
Assists the driver when backing up
These functions use same sensors.
1
2
3
Page 53 of 98
53
GS450h_QG_OM30G74U_(U)
Tire Pressure Warning System
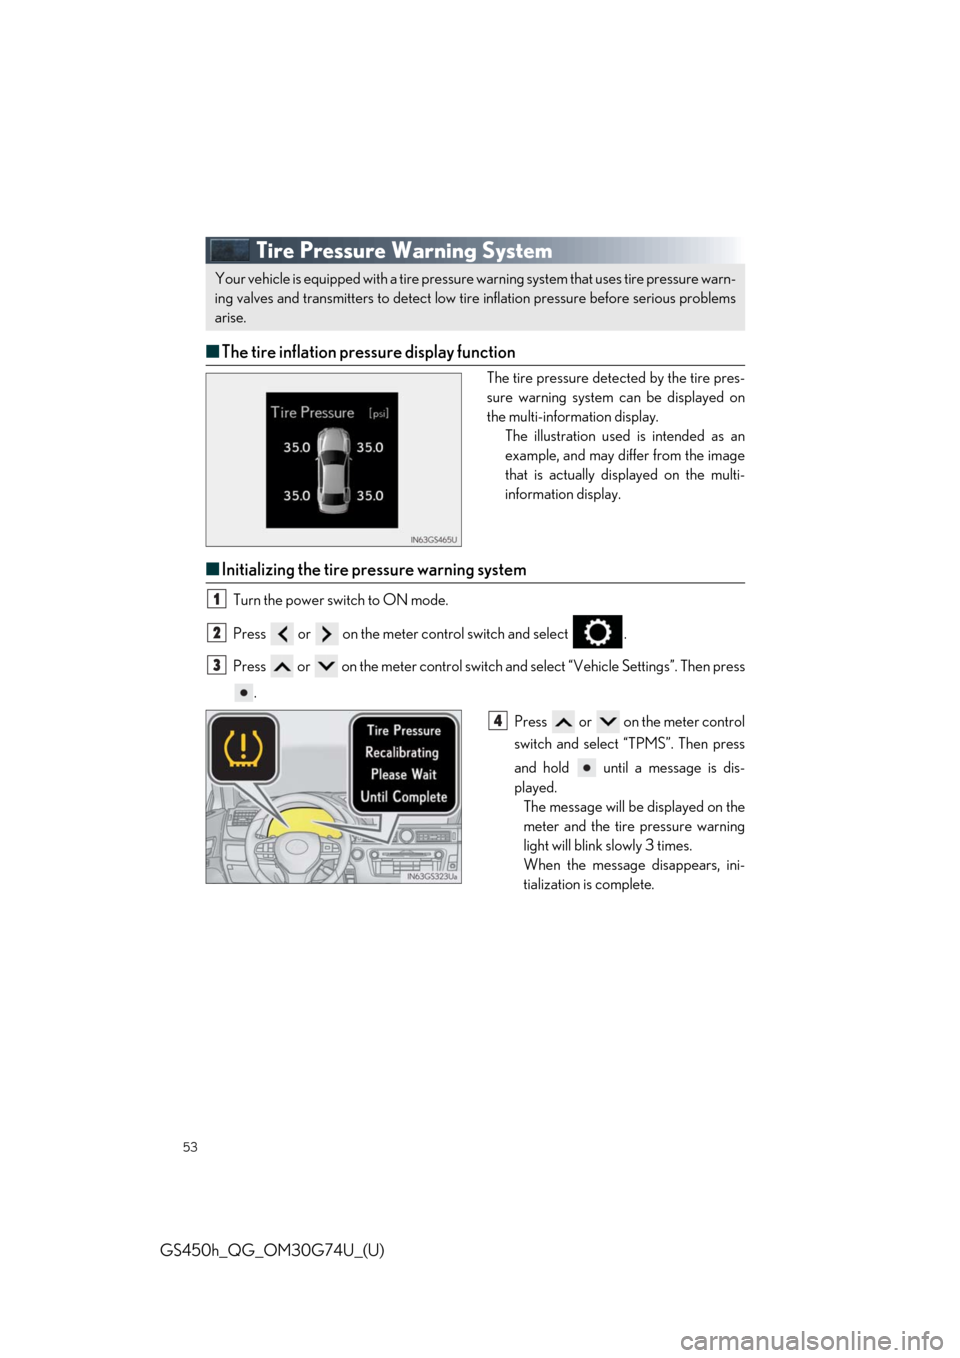
■The tire inflation pressure display function
The tire pressure detected by the tire pres-
sure warning system can be displayed on
the multi-information display.
The illustration used is intended as an
example, and may differ from the image
that is actually displayed on the multi-
information display.
■Initializing the tire pressure warning system
Turn the power switch to ON mode.
Press or on the meter control switch and select .
Press or on the meter control switch and select “Vehicle Settings”. Then press
.
Press or on the meter control
switch and select “TPMS”. Then press
and hold until a message is dis-
played.
The message will be displayed on the
meter and the tire pressure warning
light will blink slowly 3 times.
When the message disappears, ini-
tialization is complete.
Your vehicle is equipped with a tire pressure warning system that uses tire pressure warn-
ing valves and transmitters to detect low tire inflation pressure before serious problems
arise.
1
2
3
4
Page 54 of 98
54
GS450h_QG_OM30G74U_(U)
Remote Touch
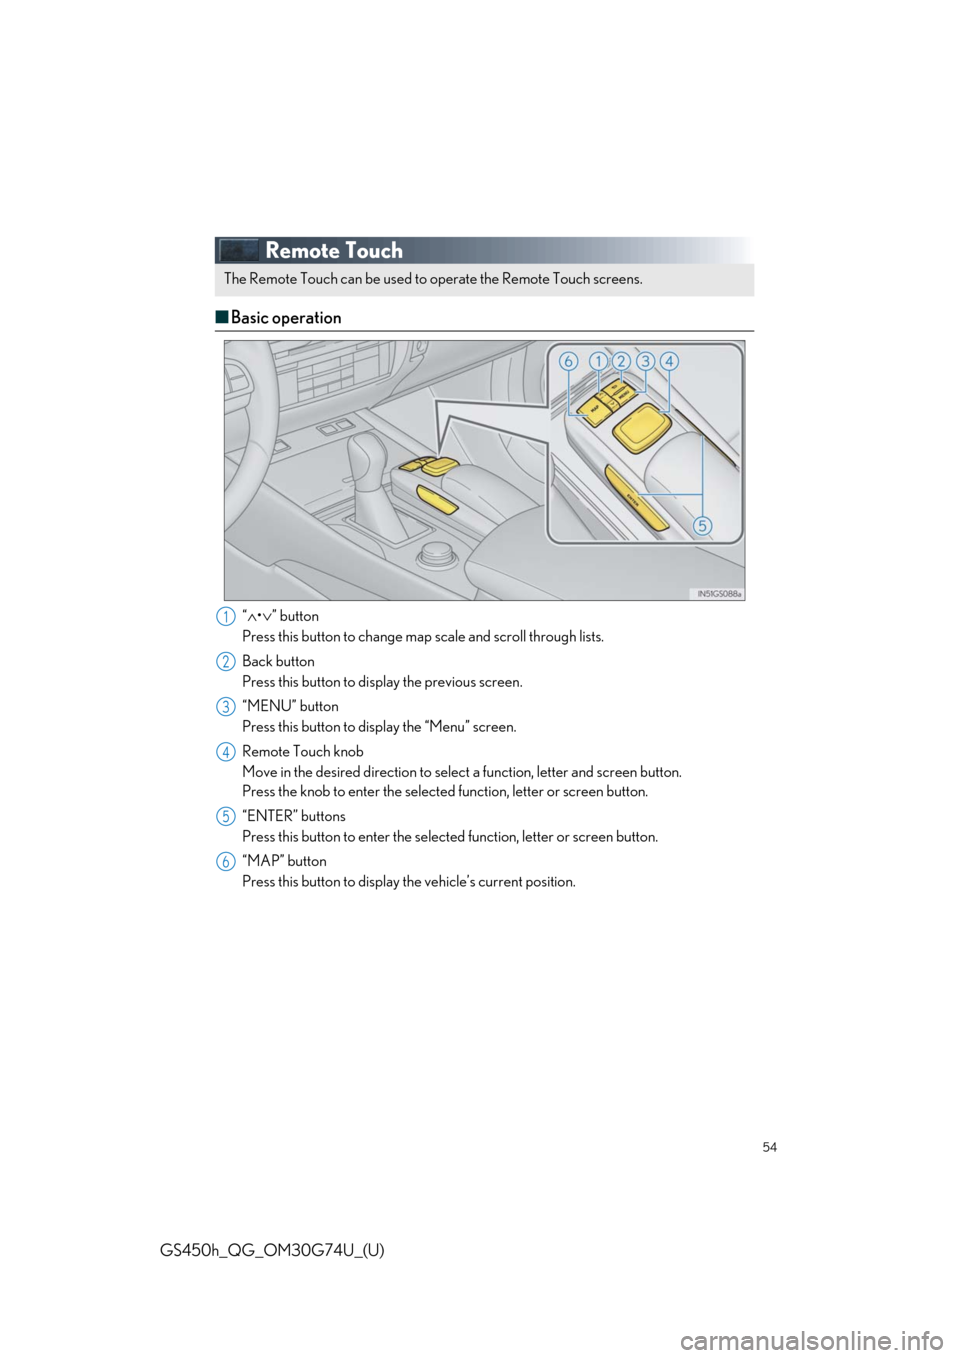
■Basic operation
“∧•∨” button
Press this button to change map scale and scroll through lists.
Back button
Press this button to display the previous screen.
“MENU” button
Press this button to display the “Menu” screen.
Remote Touch knob
Move in the desired direction to select a function, letter and screen button.
Press the knob to enter the selected function, letter or screen button.
“ENTER” buttons
Press this button to enter the selected function, letter or screen button.
“MAP” button
Press this button to display the vehicle’s current position.
The Remote Touch can be used to operate the Remote Touch screens.
1
2
3
4
5
6
Page 55 of 98
55
GS450h_QG_OM30G74U_(U)
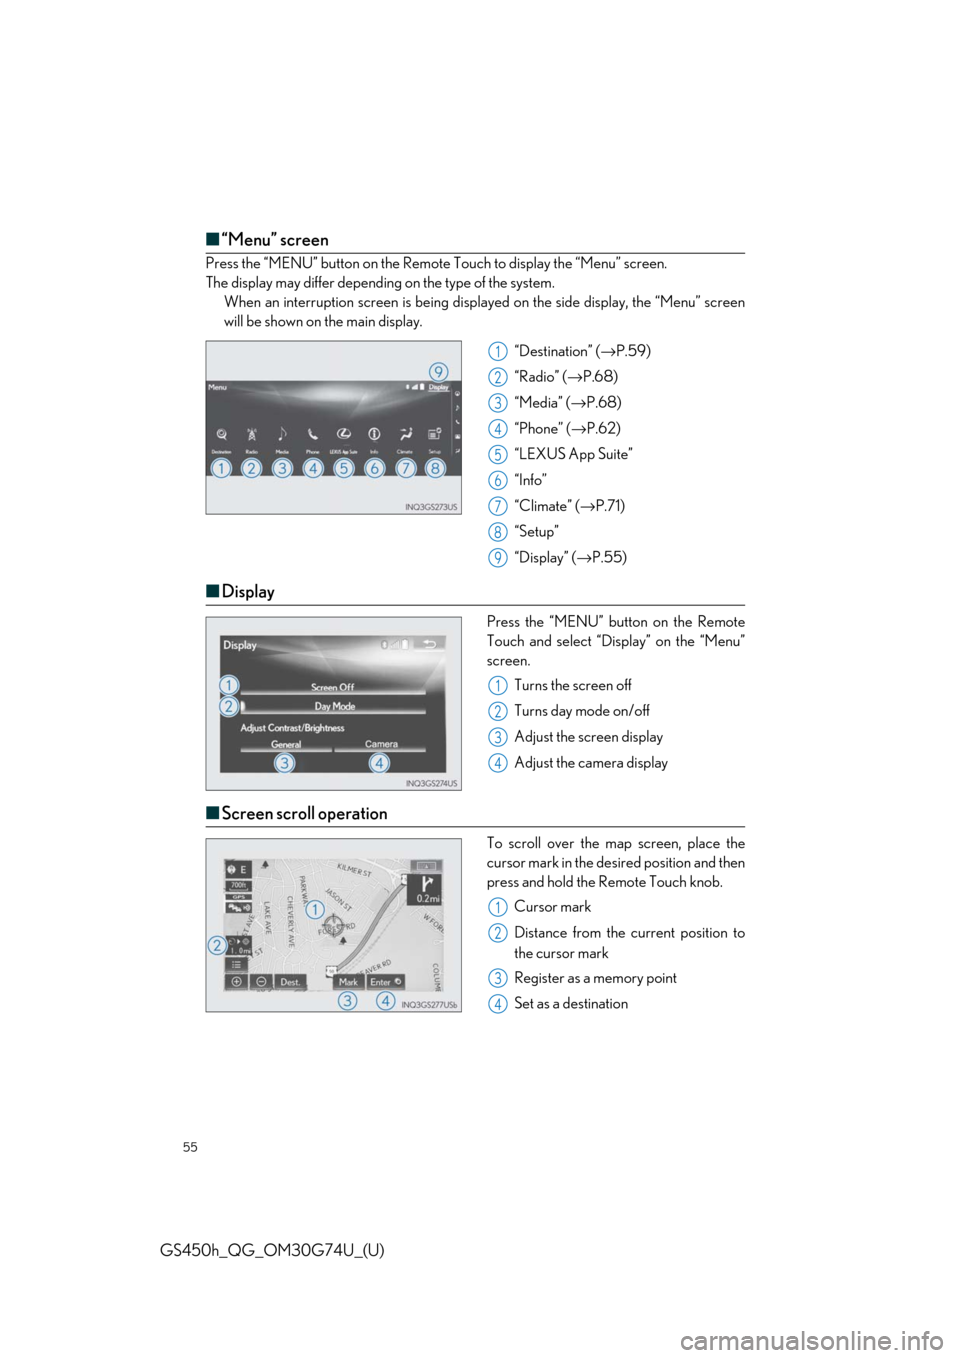
■“Menu” screen
Press the “MENU” button on the Remote Touch to display the “Menu” screen.
The display may differ depending on the type of the system.
When an interruption screen is being displayed on the side display, the “Menu” screen
will be shown on the main display.
“Destination” (→P.59)
“Radio” (→P.68)
“Media” (→P.68)
“Phone” (→P.62)
“LEXUS App Suite”
“Info”
“Climate” (→P.71)
“Setup”
“Display” (→P.55)
■Display
Press the “MENU” button on the Remote
Touch and select “Display” on the “Menu”
screen.
Turns the screen off
Turns day mode on/off
Adjust the screen display
Adjust the camera display
■Screen scroll operation
To scroll over the map screen, place the
cursor mark in the desired position and then
press and hold the Remote Touch knob.
Cursor mark
Distance from the current position to
the cursor mark
Register as a memory point
Set as a destination
1
2
3
4
5
6
7
8
9
1
2
3
4
1
2
3
4
Page 56 of 98
56
GS450h_QG_OM30G74U_(U)
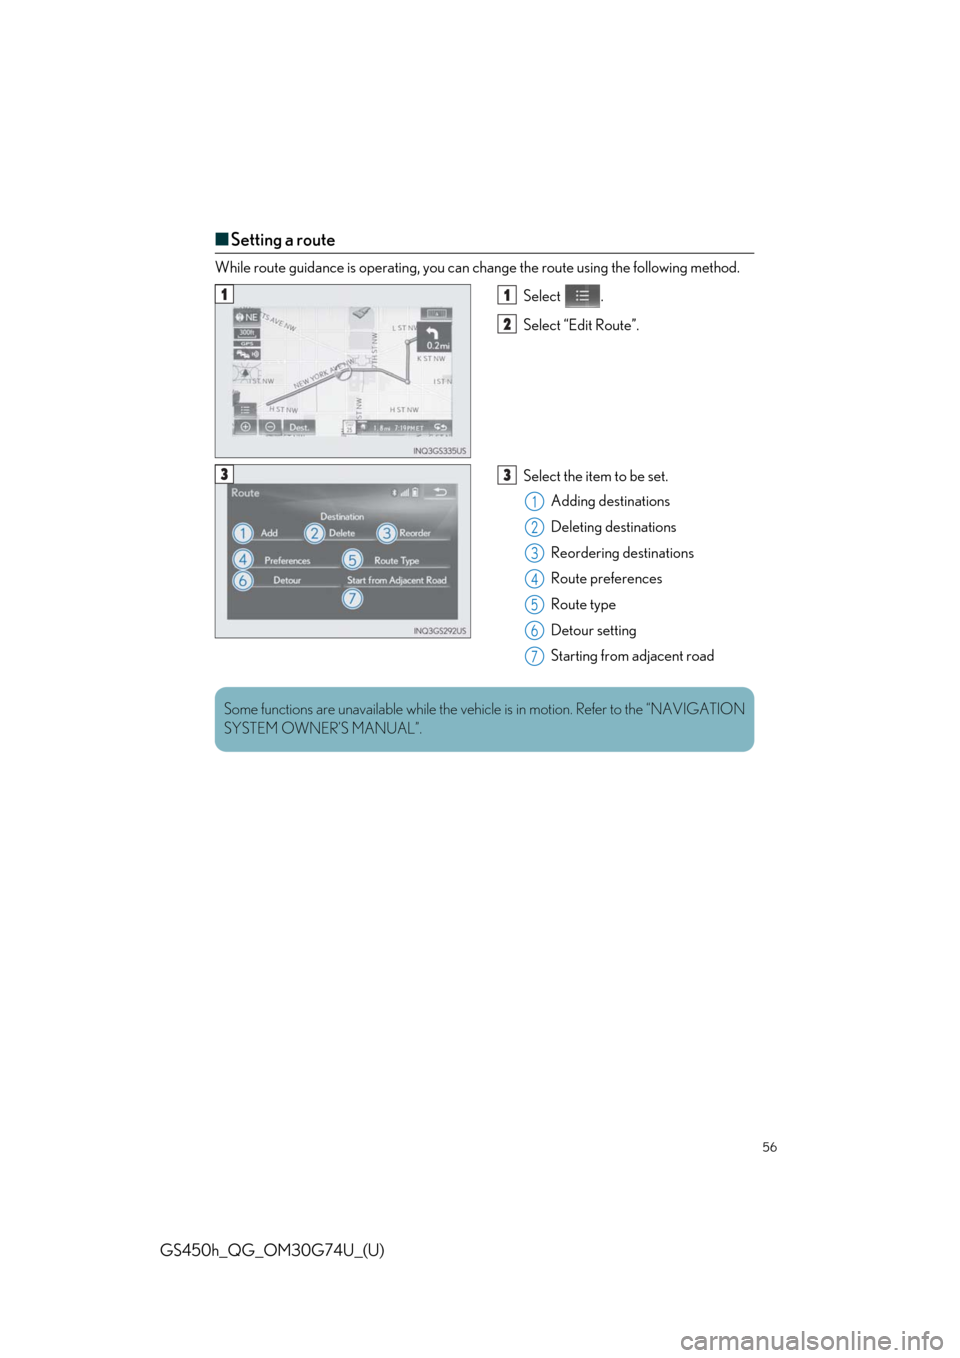
■Setting a route
While route guidance is operating, you can change the route using the following method.
Select .
Select “Edit Route”.
Select the item to be set.
Adding destinations
Deleting destinations
Reordering destinations
Route preferences
Route type
Detour setting
Starting from adjacent road
11
2
33
1
2
3
4
5
6
7
Some functions are unavailable while the vehicle is in motion. Refer to the “NAVIGATION
SYSTEM OWNER’S MANUAL”.
Page 57 of 98
57
GS450h_QG_OM30G74U_(U)
12.3-inch Display
■Full screen display
The following functions can be displayed full screen:
■Split-screen display
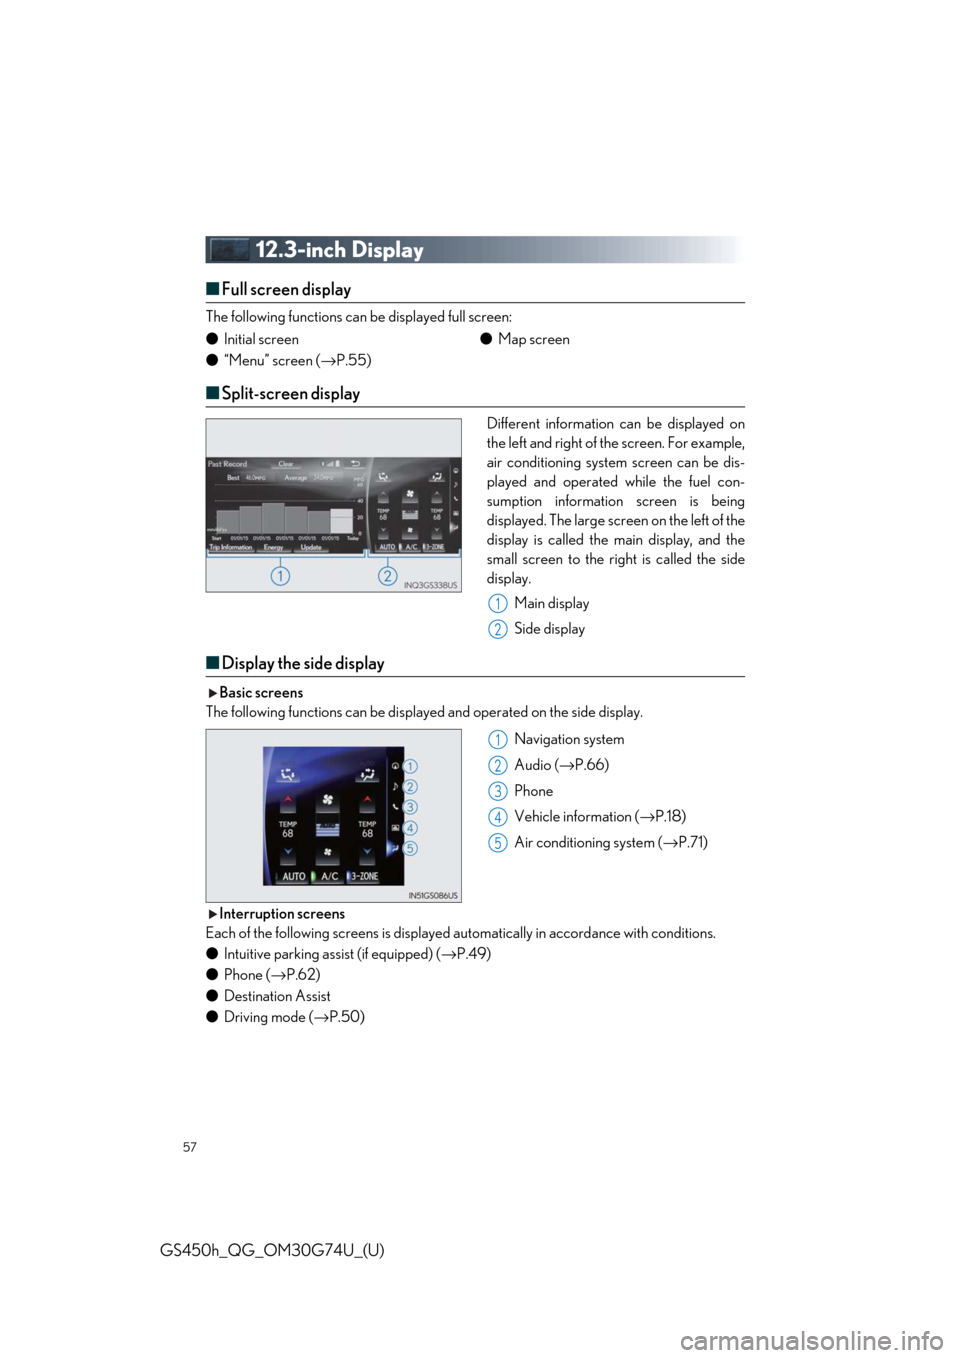
Different information can be displayed on
the left and right of the screen. For example,
air conditioning system screen can be dis-
played and operated while the fuel con-
sumption information screen is being
displayed. The large screen on the left of the
display is called the main display, and the
small screen to the right is called the side
display.
Main display
Side display
■Display the side display
Basic screens
The following functions can be displayed and operated on the side display.
Navigation system
Audio (→P.66)
Phone
Vehicle information (→P.18)
Air conditioning system (→P.71)
Interruption screens
Each of the following screens is displayed automatically in accordance with conditions.
●Intuitive parking assist (if equipped) (→P.49)
●Phone (→P.62)
●Destination Assist
●Driving mode (→P.50) ●Initial screen
●“Menu” screen (→P.55)●Map screen
1
2
1
2
3
4
5
Page 58 of 98
58
GS450h_QG_OM30G74U_(U)
Navigation System
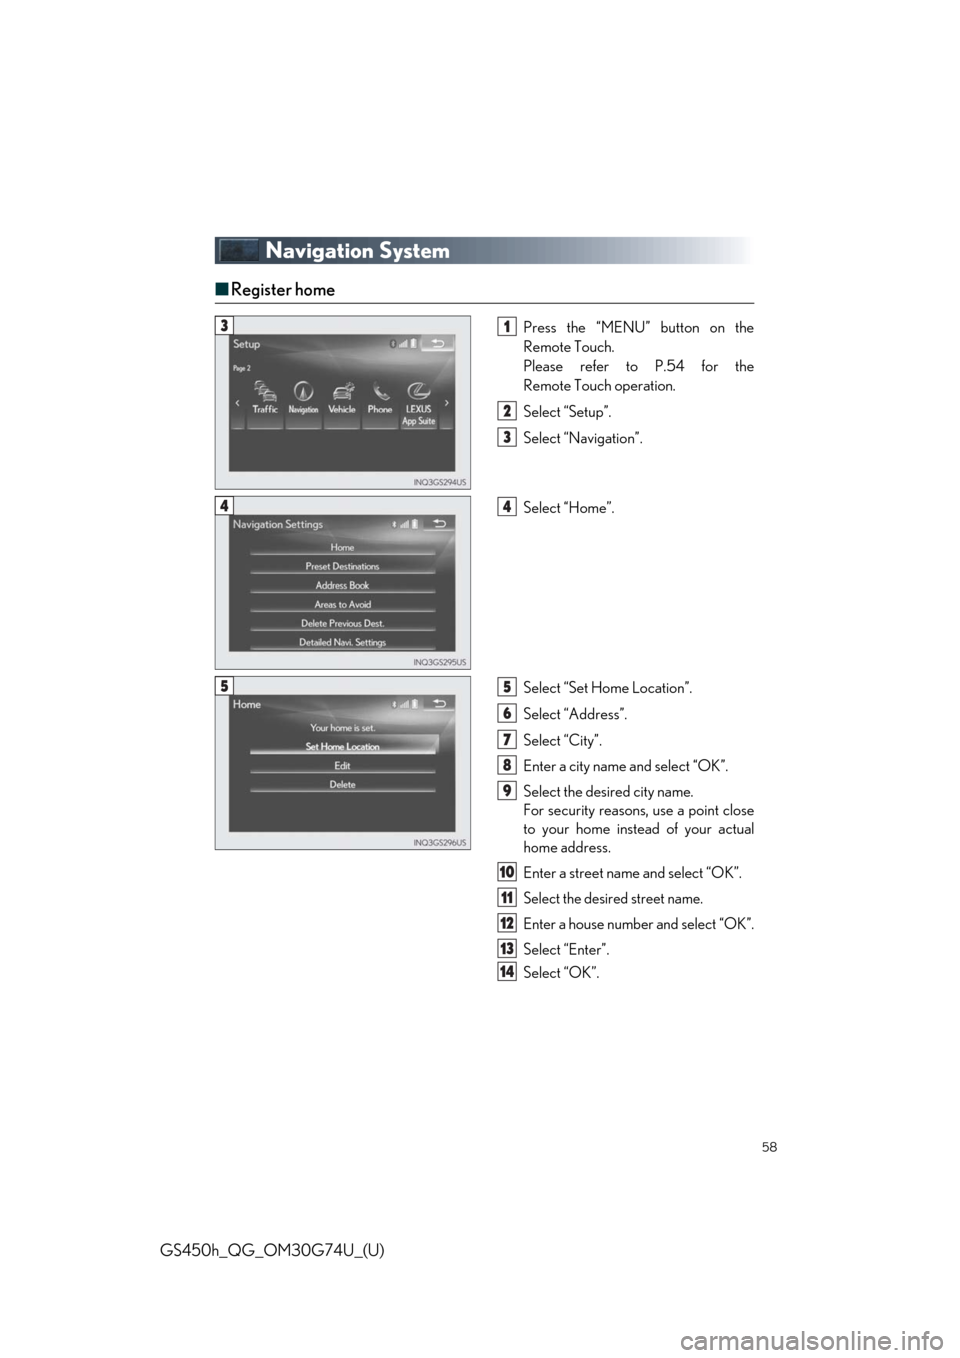
■Register home
Press the “MENU” button on the
Remote Touch.
Please refer to P.54 for the
Remote Touch operation.
Select “Setup”.
Select “Navigation”.
Select “Home”.
Select “Set Home Location”.
Select “Address”.
Select “City”.
Enter a city name and select “OK”.
Select the desired city name.
For security reasons, use a point close
to your home instead of your actual
home address.
Enter a street name and select “OK”.
Select the desired street name.
Enter a house number and select “OK”.
Select “Enter”.
Select “OK”.
31
2
3
44
55
6
7
8
9
10
11
12
13
14
Page 59 of 98
59
GS450h_QG_OM30G74U_(U)
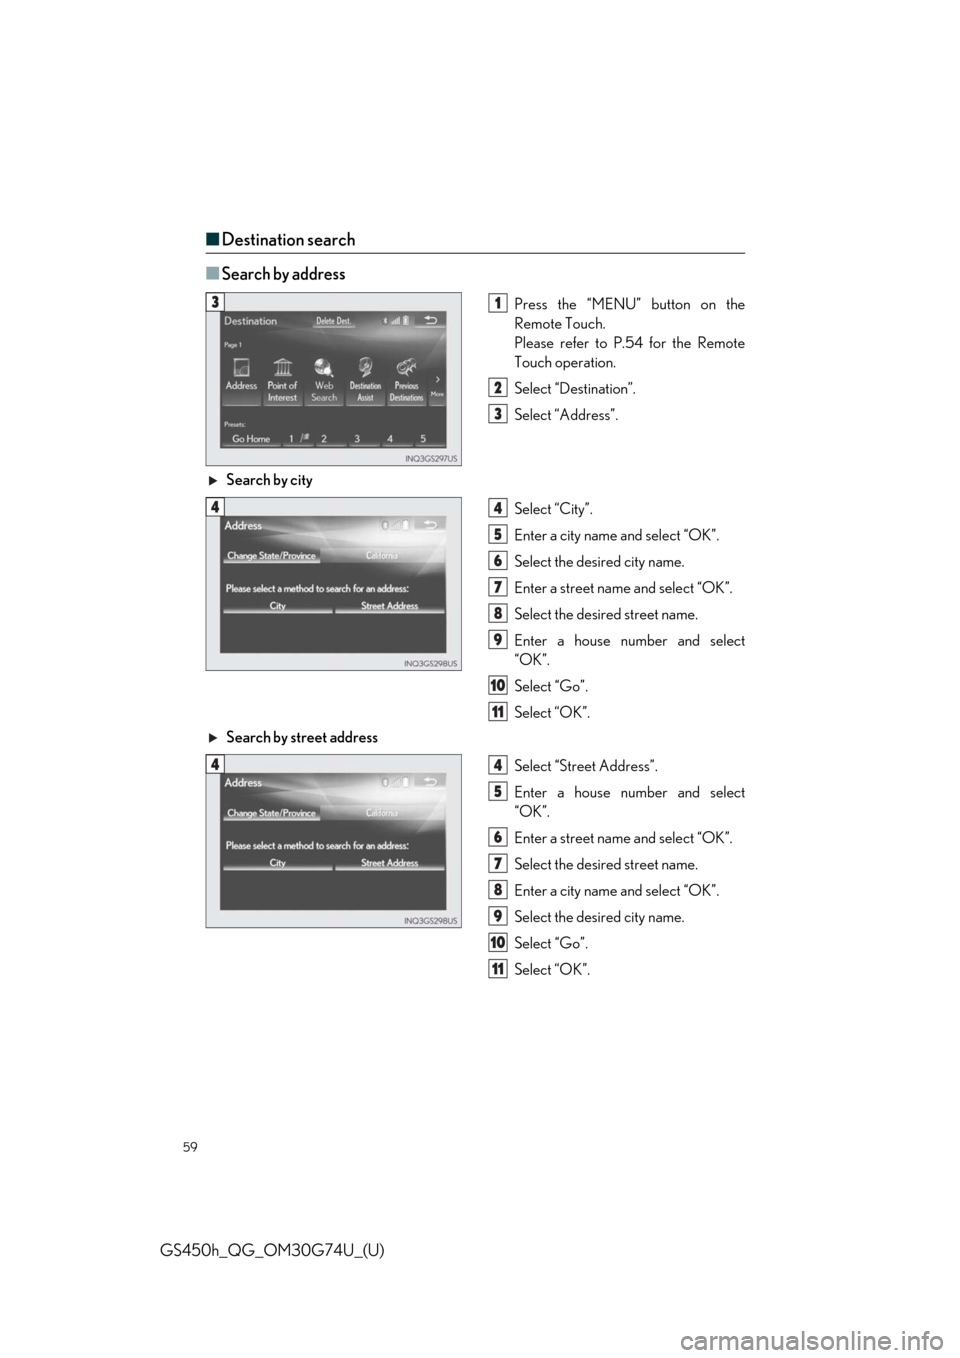
■Destination search
■
Search by address
Press the “MENU” button on the
Remote Touch.
Please refer to P.54 for the Remote
Touch operation.
Select “Destination”.
Select “Address”.
Search by city
Select “City”.
Enter a city name and select “OK”.
Select the desired city name.
Enter a street name and select “OK”.
Select the desired street name.
Enter a house number and select
“OK”.
Select “Go”.
Select “OK”.
Search by street address
Select “Street Address”.
Enter a house number and select
“OK”.
Enter a street name and select “OK”.
Select the desired street name.
Enter a city name and select “OK”.
Select the desired city name.
Select “Go”.
Select “OK”.31
2
3
44
5
6
7
8
9
10
11
44
5
6
7
8
9
10
11
Page 60 of 98
60
GS450h_QG_OM30G74U_(U)
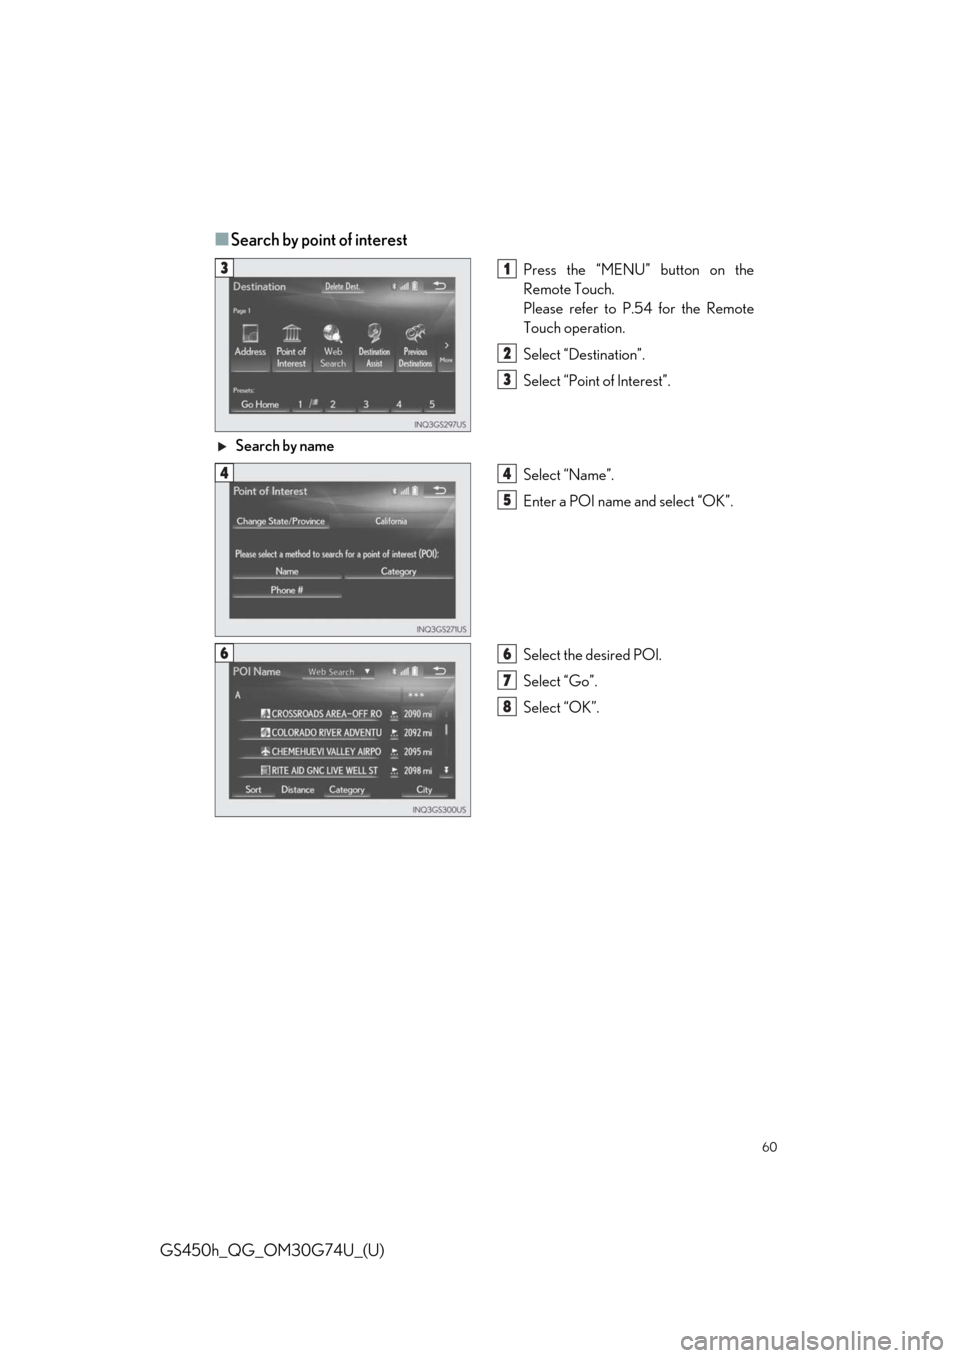
■Search by point of interest
Press the “MENU” button on the
Remote Touch.
Please refer to P.54 for the Remote
Touch operation.
Select “Destination”.
Select “Point of Interest”.
Search by name
Select “Name”.
Enter a POI name and select “OK”.
Select the desired POI.
Select “Go”.
Select “OK”.31
2
3
44
5
66
7
8