battery Lexus GX460 2010 Navigation Manual
[x] Cancel search | Manufacturer: LEXUS, Model Year: 2010, Model line: GX460, Model: Lexus GX460 2010Pages: 428, PDF Size: 6.27 MB
Page 34 of 428
NAVIGATION SYSTEM: BASIC FUNCTIONS
33
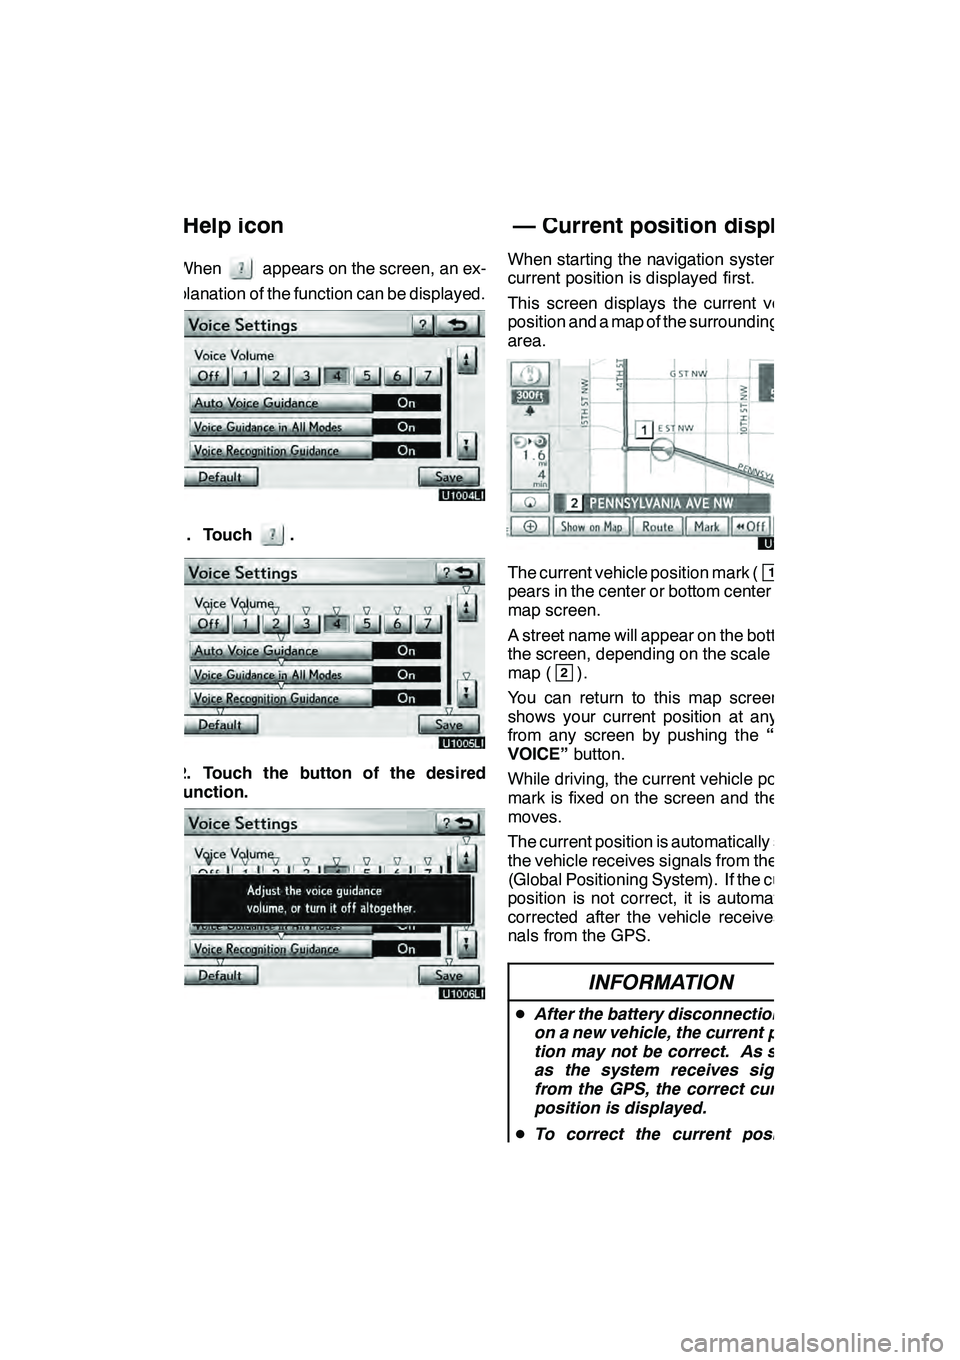
Whenappears on the screen, an ex-
planation of the function can be displayed.
1. Touch.
2. Touch the button of the desired
function.
When starting the navigation system, the
current position is displayed first.
This screen displays the current vehicle
position and a map of the surrounding local
area.
The current vehicle position mark (1) ap-
pears in the center or bottom center of the
map screen.
A street name will appear on the bottom of
the screen, depending on the scale of the
map (
2).
You can return to this map screen that
shows your current position at any time
from any screen by pushing the “MAP/
VOICE” button.
While driving, the current vehicle position
mark is fixed on the screen and the map
moves.
The current position is automatically set as
the vehicle receives signals from the GPS
(Global Positioning System). If the current
position is not correct, it is automatically
corrected after the vehicle receives sig-
nals from the GPS.
INFORMATION
D After the battery disconnection, or
on a new vehicle, the current posi-
tion may not be correct. As soon
as the system receives signals
from the GPS, the correct current
position is displayed.
D To correct the current position
manually, see page 346.
GX460 Navi (U)
OM60E73U
Finish
09.09.24
Help icon Map screen operation —
— Current position display
1
Page 133 of 428

TELEPHONE AND INFORMATION
132
INFORMATION
DTalk alternately with the other party
on the phone. If you talk at the same
time, the voice may not reach each
other. (It is not a malfunction.)
DKeep the volume of receiving voic
down. Otherwise, an echo will be
heard and receiving voice can be
heard outside of the vehicle. When
you talk on the phone, speak clear-
ly towards the microphone.
DIn the following situations, your
voice may not reach the other
party.
D Driving on unpaved road. (Mak-
ing a traffic noise.)
D Driving at the high speed.
D The windows or moon roof are
open.
D Turning the air− conditioning
vents towards the microphone.
D The sound of the air −condition-
ing fan is loud.
D There is an effect from the net-
work of the cellular phone.
1Indicates the condition of
Bluetooth rconnection.
“Blue” indicates an excellent connection
to Bluetooth r.
“Yellow” indicates a bad connection to
Bluetooth r, resulting in possible deteriora-
tion of voice quality.
: No connection to Bluetooth r.
2Indicates the amount of battery
charge left.
EmptyFull
This is not displayed when the Bluetooth r
is not connected.
The amount left does not always corre-
spond with the one of your cellular phone.
The amount of battery charge left may not
be displayed depending on the phone you
have. This system doesn’t have a charg-
ing function.
3Indicates the receiving area.
“Rm” is displayed when receiving in
Roaming area.
“Hm” is displayed when receiving in
Home area.
The receiving area may not be displayed
depending on the phone you have.
GX460 Navi (U)
OM60E73U
Finish
09.09.24
Page 189 of 428

AUDIO/VIDEO SYSTEM
188
Co−location: This transmitter must
not be co −located or operated in con-
junction with any other antenna or
transmitter.
DLaser products
D Do not take this unit apart or at-
tempt to make any changes
yourself. This is an intricate unit
that uses a laser pickup to re-
trieve information from the sur-
face of compact discs. The la-
ser is carefully shielded so that
its rays remain inside the cabi-
net. Therefore, never try to dis-
assemble the player or alter any
of its parts since you may be ex-
posed to laser rays and danger-
ous voltages.
D This product utilizes a laser.
Use of controls or adjustments
or performance of procedures
other than those specified here-
in may result in hazardous radi-
ation exposure.
NOTICE
To prevent the battery from being dis-
charged, do not leave the audio/video
system on longer than necessary
when the engine is not running.
(a) Voice command system
By pushing the switch above, you can
operate the voice command system.
For the operation of the voice command
system and the list of commands, see
pages 44 and 49.
GX460 Navi (U)
OM60E73U
Finish
09.09.24
Page 198 of 428
AUDIO/VIDEO SYSTEM
197
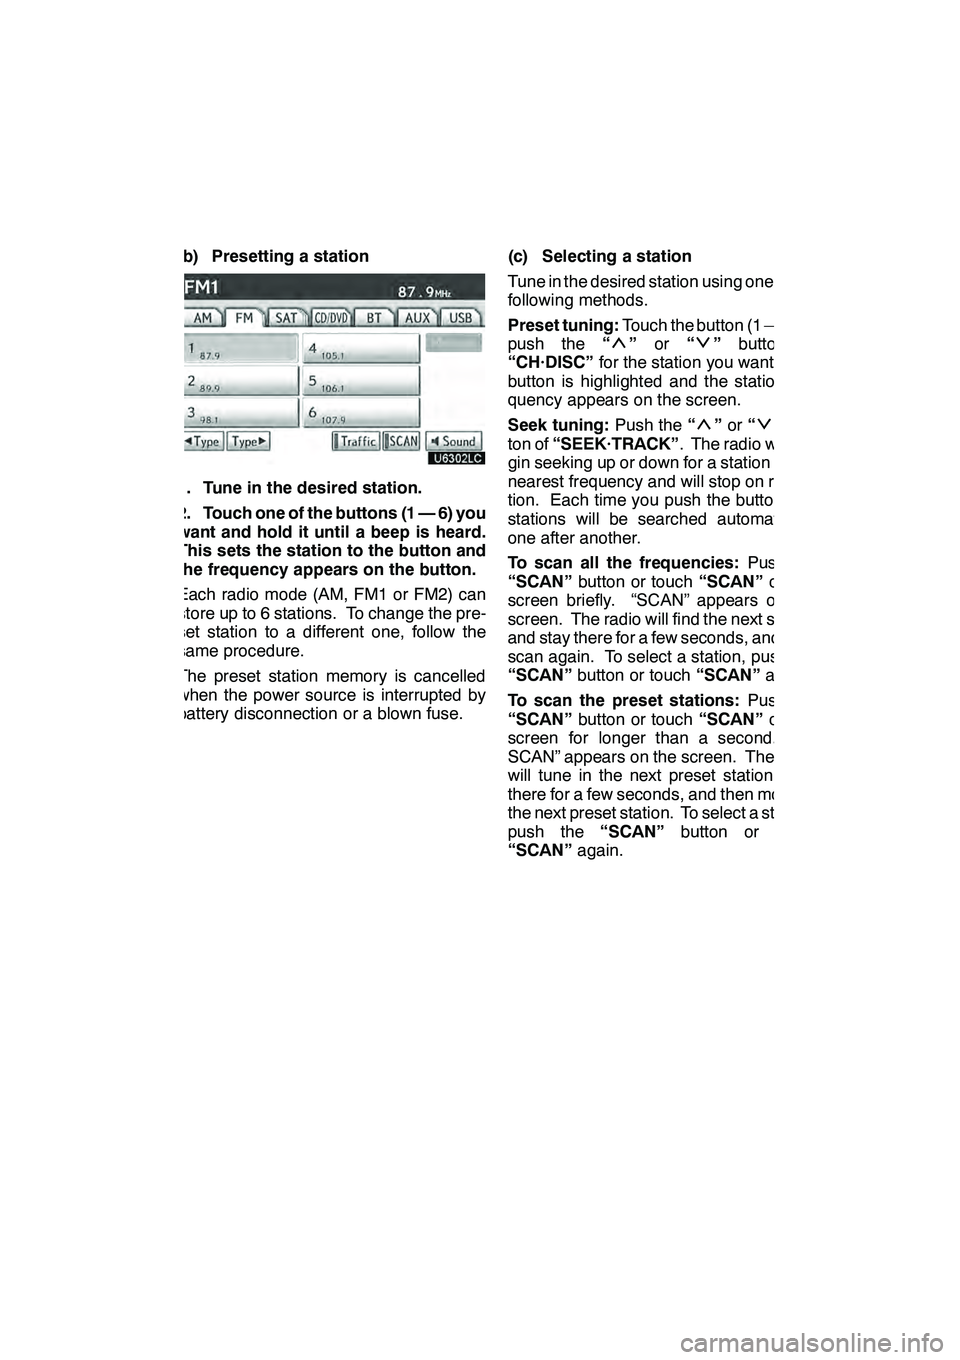
(b) Presetting a station
1. Tune in the desired station.
2. Touch one of the buttons (1 — 6) you
want and hold it until a beep is heard.
This sets the station to the button and
the frequency appears on the button.
Each radio mode (AM, FM1 or FM2) can
store up to 6 stations. To change the pre-
set station to a different one, follow the
same procedure.
The preset station memory is cancelled
when the power source is interrupted by
battery disconnection or a blown fuse.(c) Selecting a station
Tune in the desired station using one of the
following methods.
Preset tuning:
Touch the button (1 — 6) or
push the “
”or “”button of
“CH·DISC” for the station you want. The
button is highlighted and the station fre-
quency appears on the screen.
Seek tuning: Push the“
”or “”but-
ton of “SEEK·TRACK” . The radio will be-
gin seeking up or down for a station of the
nearest frequency and will stop on recep-
tion. Each time you push the button, the
stations will be searched automatically
one after another.
To scan all the frequencies: Push the
“SCAN” button or touch “SCAN”on the
screen briefly. “SCAN” appears on the
screen. The radio will find the next station
and stay there for a few seconds, and then
scan again. To select a station, push the
“SCAN” button or touch “SCAN”again.
To scan the preset stations: Push the
“SCAN” button or touch “SCAN”on the
screen for longer than a second. “P.
SCAN” appears on the screen. The radio
will tune in the next preset station, stay
there for a few seconds, and then move to
the next preset station. To select a station,
push the “SCAN”button or touch
“SCAN” again.
GX460 Navi (U)
OM60E73U
Finish
09.09.24
7
Page 203 of 428

AUDIO/VIDEO SYSTEM
202
(d) Channel category
Touch either“A Type” or“Type "”to go
to the next or previous category. (e) Presetting a channel
1. Tune in the desired channel.
2. Touch one of the channel selector
buttons (1 — 6) and hold it until a beep
is heard.
This sets the channels to the button and
the name and number of the channel ap-
pears on the button.
Each button can store three SAT channels.
To change the preset channel to a different
one, follow the same procedure.
The preset channel memory is cancelled
when the power source is interrupted by
battery disconnection or a blown fuse.
GX460 Navi (U)
OM60E73U
Finish
09.09.24
Page 248 of 428

AUDIO/VIDEO SYSTEM
247
1Indicates the condition of the
Bluetoothrconnection.
“Blue” indicates an excellent connection
to Bluetooth r.
“Yellow” indicates a bad connection to
Bluetooth r, resulting in possible deteriora-
tion of audio quality.
: No connection to Bluetooth r.
2Indicates the amount of battery
charge left.
EmptyFull
Remaining charge is not displayed while
the Bluetooth ris connecting.
The amount left does not always corre-
spond with the one of your portable player.
This system doesn’t have a charging func-
tion. An antenna for the Bluetooth
r
connection is built in to the instrument
panel. The indication of the Bluetooth r
connection may turn yellow and the
system may not function when you use
the Bluetooth rportable player in the
following conditions.
DYour portable player is hiding behind
from the display (behind the seat or in
the glove box or console box).
DYour portable player touches or is cov-
ered with metal materials.
Leave the Bluetooth rportable player in a
place where the “Blue” indication is dis-
played.
The portable player information is regis-
tered when the Bluetooth raudio system is
connected. When you release possession
of your vehicle, remove your portable play-
er. (See “(a) Removing Bluetooth raudio”
on page 392.)
GX460 Navi (U)
OM60E73U
Finish
09.09.24
7
Page 269 of 428
AUDIO/VIDEO SYSTEM
268 D
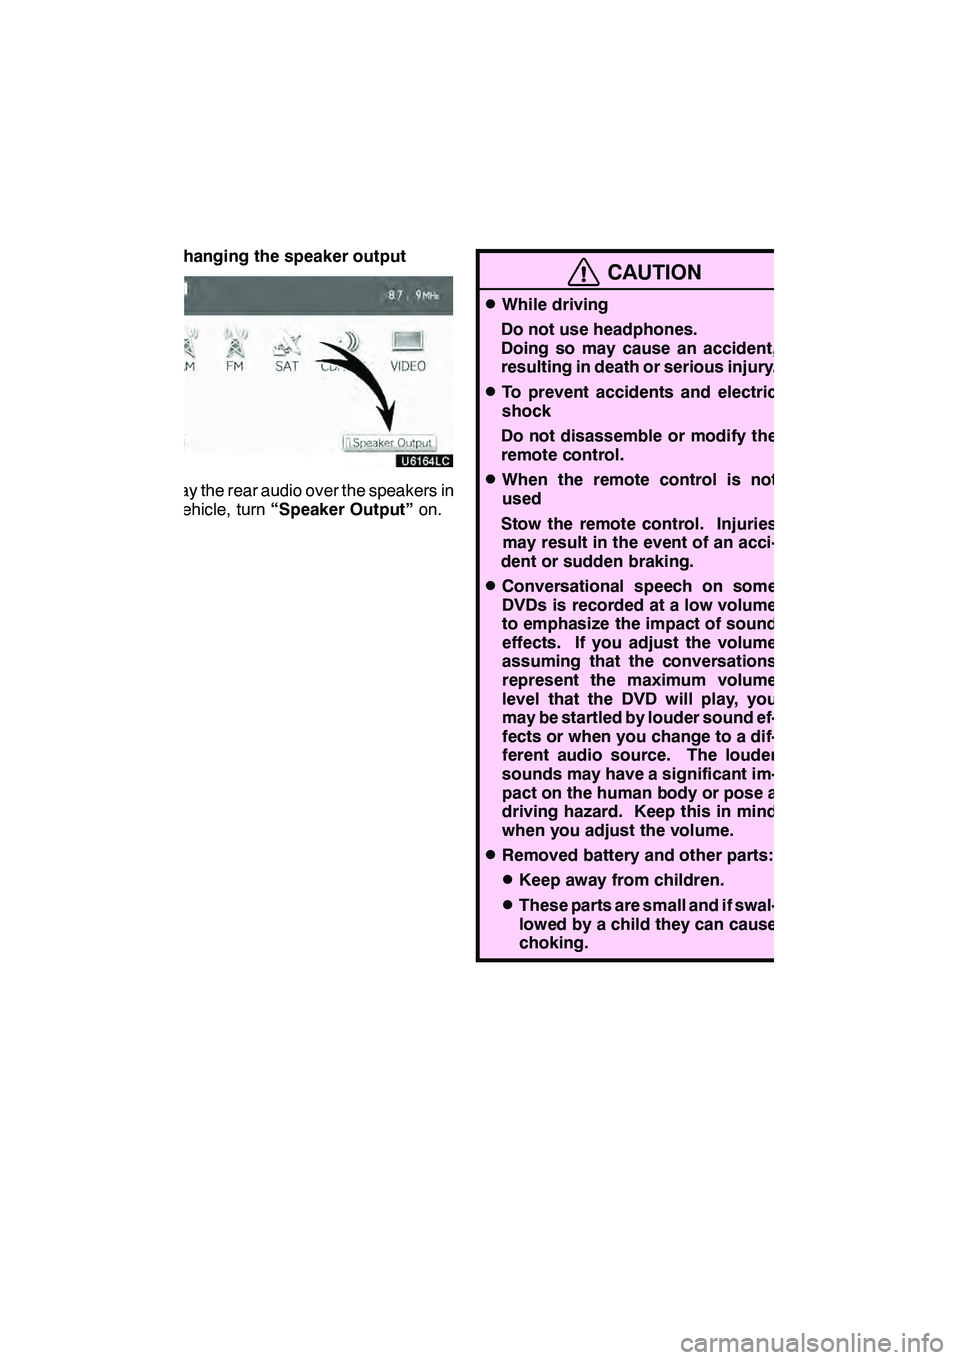
Changing the speaker output
To play the rear audio over the speakers in
the vehicle, turn“Speaker Output” on.
CAUTION
DWhile driving
Do not use headphones.
Doing so may cause an accident,
resulting in death or serious injury.
DTo prevent accidents and electric
shock
Do not disassemble or modify the
remote control.
DWhen the remote control is not
used
Stow the remote control. Injuries may result in the event of an acci-
dent or sudden braking.
DConversational speech on some
DVDs is recorded at a low volume
to emphasize the impact of sound
effects. If you adjust the volume
assuming that the conversations
represent the maximum volume
level that the DVD will play, you
may be startled by louder sound ef-
fects or when you change to a dif-
ferent audio source. The louder
sounds may have a significant im-
pact on the human body or pose a
driving hazard. Keep this in mind
when you adjust the volume.
DRemoved battery and other parts:
DKeep away from children.
DThese parts are small and if swal-
lowed by a child they can cause
choking.
GX460 Navi (U)
OM60E73U
Finish
09.09.24
Page 270 of 428
AUDIO/VIDEO SYSTEM
269
NOTICE
DCleaning the displayWipe the display with a dry soft
cloth.
If the screen is wiped with a rough
cloth, the surface of the screen
may be scratched.
DTo prevent damage to the remote
controlKeep the remote control away from
direct sunlight, temperature heat
and high humidity.
Do not drop or knock the remote
control against hard objects.
Do not sit on or place heavy ob-
jects on the remote control.
DFor normal operation after replac-
ing the battery, observe the follow-
ing precautions to prevent acci-
dents:
DAlways work with dry hands.
Moisture may cause the battery
to rust.
DDo not touch or move any other
components inside the remote
control.
DDo not bend either of the battery
terminals.
INFORMATION
Rear seat entertainment system can
be locked to prevent rear passengers
from operating the entertainment
system. (See “ DRear system lock”
on page 332.)
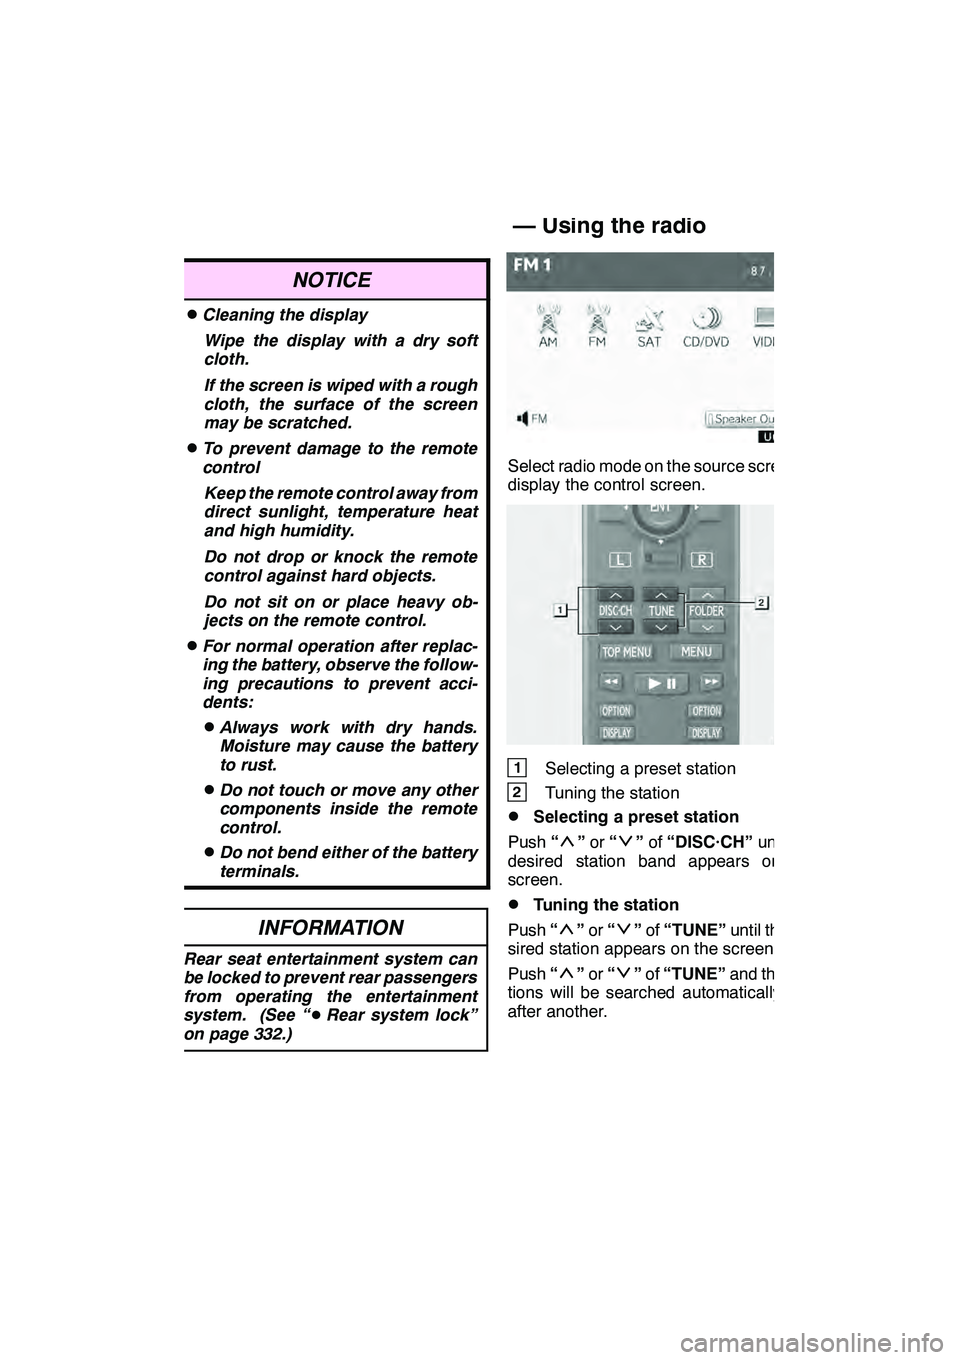
Select radio mode on the source screen to
display the control screen.
1Selecting a preset station
2Tuning the station
DSelecting a preset station
Push “
”or “”of “DISC·CH” until the
desired station band appears on the
screen.
DTuning the station
Push “
”or “”of “TUNE” until the de-
sired station appears on the screen.
Push “
”or “”of “TUNE” and the sta-
tions will be searched automatically one
after another.
GX460 Navi (U)
OM60E73U
Finish
09.09.24
— Using the radio
7
Page 300 of 428

AIR CONDITIONING
299
17“TEMP” buttons
(Driver side temperature control but-
ton)301, 303
...................
18Passenger side temperature dis-
play
(In degrees Fahrenheit or Centi-
grade)
19Driver side temperature display
(In degrees Fahrenheit or Centi-
grade) (a) Climate control
Air outlets and fan speed are automati-
cally adjusted according to the temper-
ature setting.
The “ENGINE START STOP” switch must
be in IGNITION ON mode.
Push the “CLIMATE” button to display
the air conditioning control screen.
INFORMATION
When the “ENGINE START STOP”
switch is turn on, the air conditioning
system settings will be set to those
that were in use the last time the “EN-
GINE START STOP” switch was
turned off. Air conditioning system
settings are memorized individually
on each electronic key, so the set-
tings reproduced will be specific to
the key that is used.
NOTICE
To prevent the battery from being dis-
charged, do not leave the air condi-
tioning on longer than necessary
when the engine is not running.
GX460 Navi (U)
OM60E73U
Finish
09.09.24
8
Page 310 of 428
AIR CONDITIONING
309
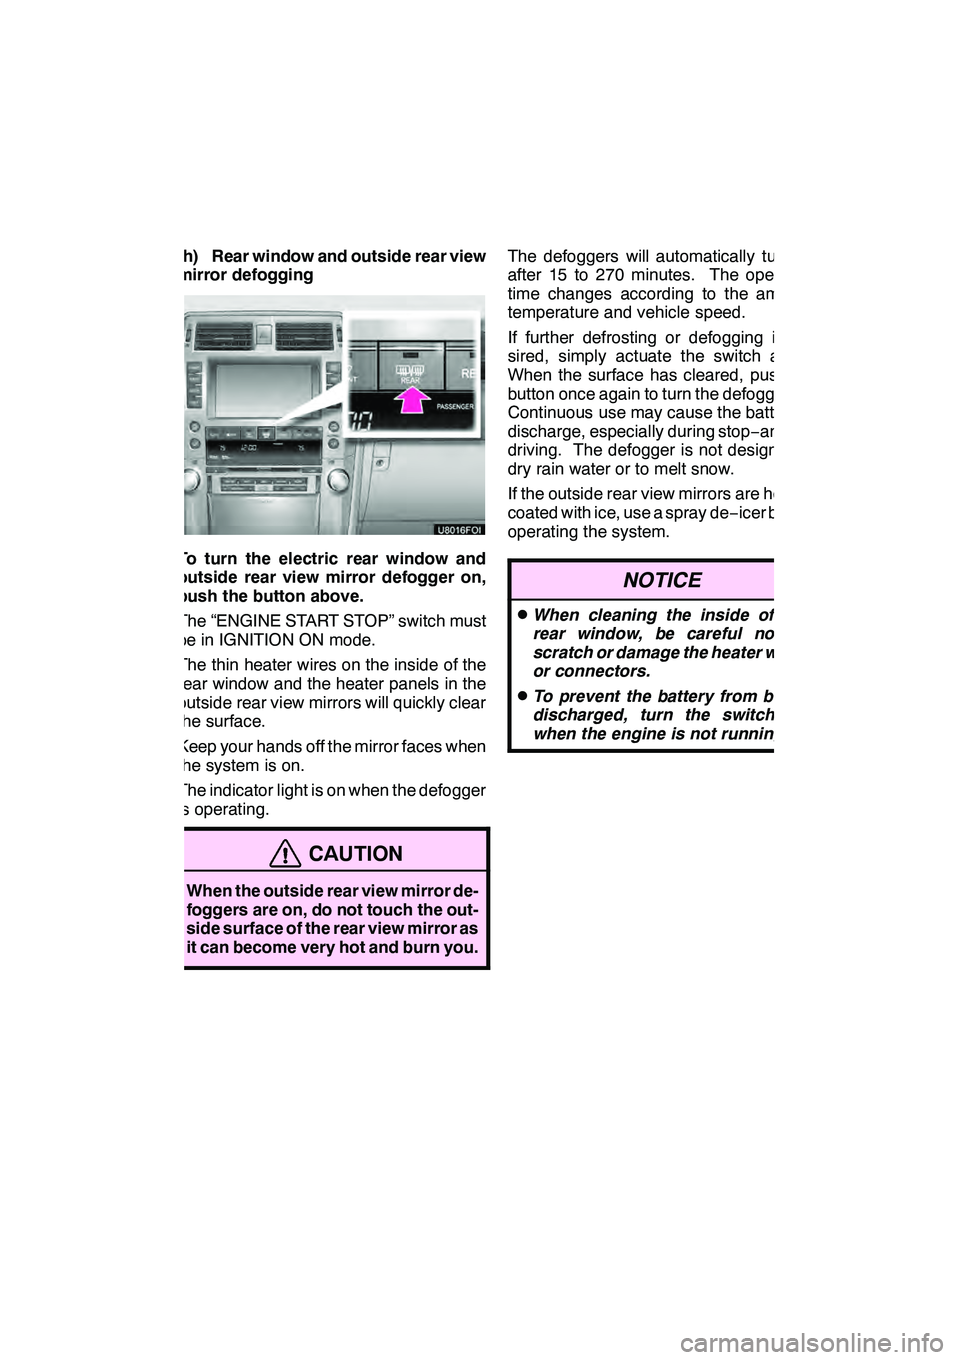
(h) Rear window and outside rear view
mirror defogging
To turn the electric rear window and
outside rear view mirror defogger on,
push the button above.
The “ENGINE START STOP” switch must
be in IGNITION ON mode.
The thin heater wires on the inside of the
rear window and the heater panels in the
outside rear view mirrors will quickly clear
the surface.
Keep your hands off the mirror faces when
the system is on.
The indicator light is on when the defogger
is operating.
CAUTION
When the outside rear view mirror de-
foggers are on, do not touch the out-
side surface of the rear view mirror as
it can become very hot and burn you.
The defoggers will automatically turn off
after 15 to 270 minutes. The operation
time changes according to the ambient
temperature and vehicle speed.
If further defrosting or defogging is de-
sired, simply actuate the switch again.
When the surface has cleared, push the
button once again to turn the defogger off.
Continuous use may cause the battery to
discharge, especially during stop−and− go
driving. The defogger is not designed to
dry rain water or to melt snow.
If the outside rear view mirrors are heavily
coated with ice, use a spray de −icer before
operating the system.
NOTICE
DWhen cleaning the inside of the
rear window, be careful not to
scratch or damage the heater wires
or connectors.
DTo prevent the battery from being
discharged, turn the switch off
when the engine is not running.
GX460 Navi (U)
OM60E73U
Finish
09.09.24
8