display Lexus GX460 2010 Operating Other Driving Systems / LEXUS 2010 GX460 QUICK GUIDE (OM60E77U) User Guide
[x] Cancel search | Manufacturer: LEXUS, Model Year: 2010, Model line: GX460, Model: Lexus GX460 2010Pages: 94, PDF Size: 5.4 MB
Page 27 of 94
27
GX460_QG_U (OM60E77U)
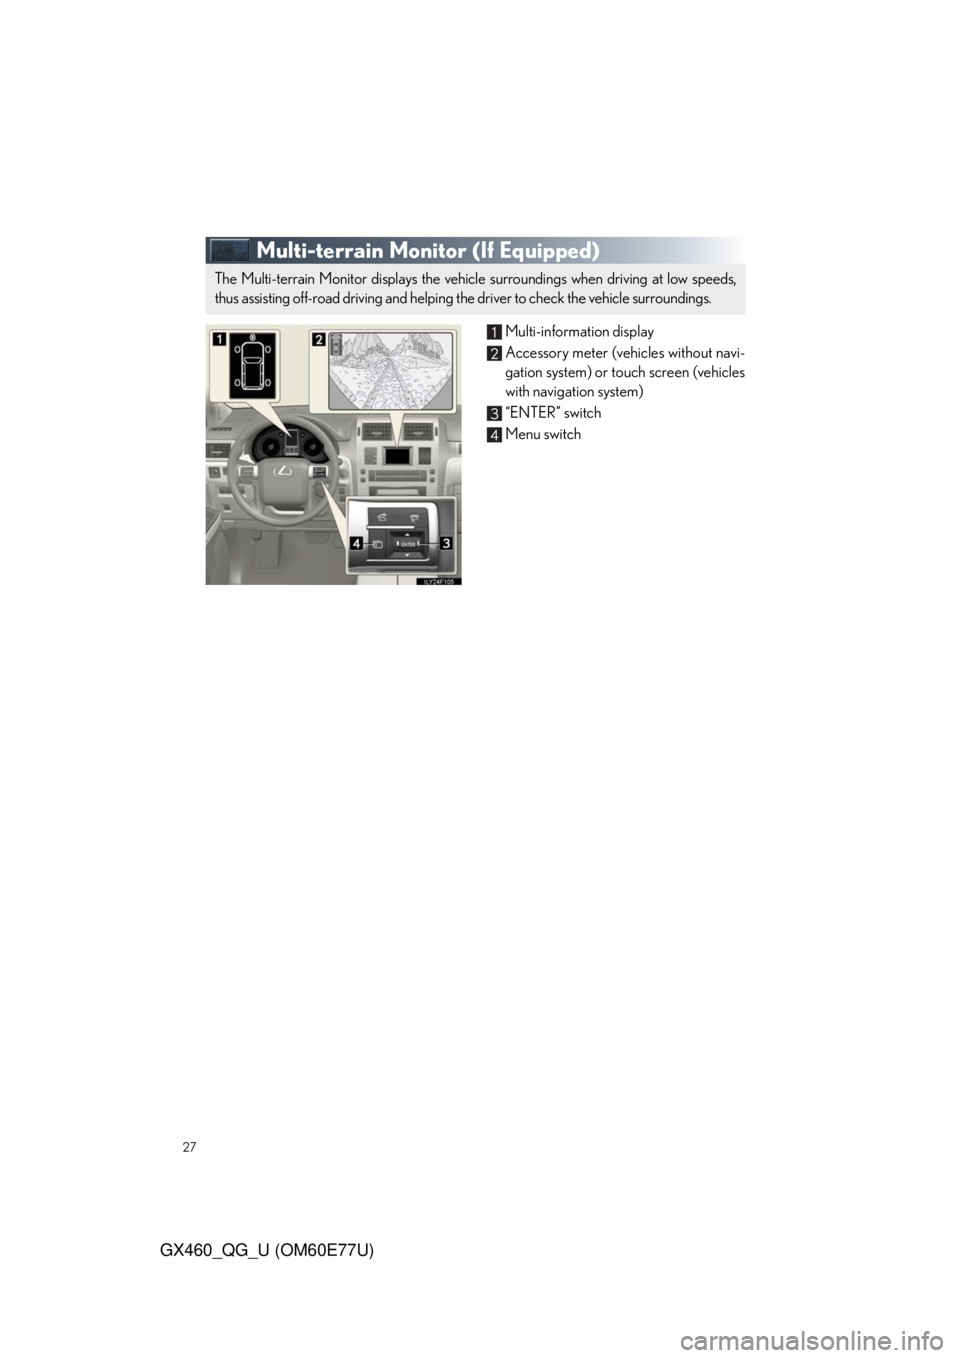
Multi-terrain Monitor (If Equipped)
Multi-information display
Accessory meter (vehicles without navi-
gation system) or touch screen (vehicles
with navigation system)
“ENTER” switch
Menu switch
The Multi-terrain Monitor displays the vehicle surroundings when driving at low speeds,
thus assisting off-road driving and helping the driver to check the vehicle surroundings.
Page 28 of 94
28
GX460_QG_U (OM60E77U)
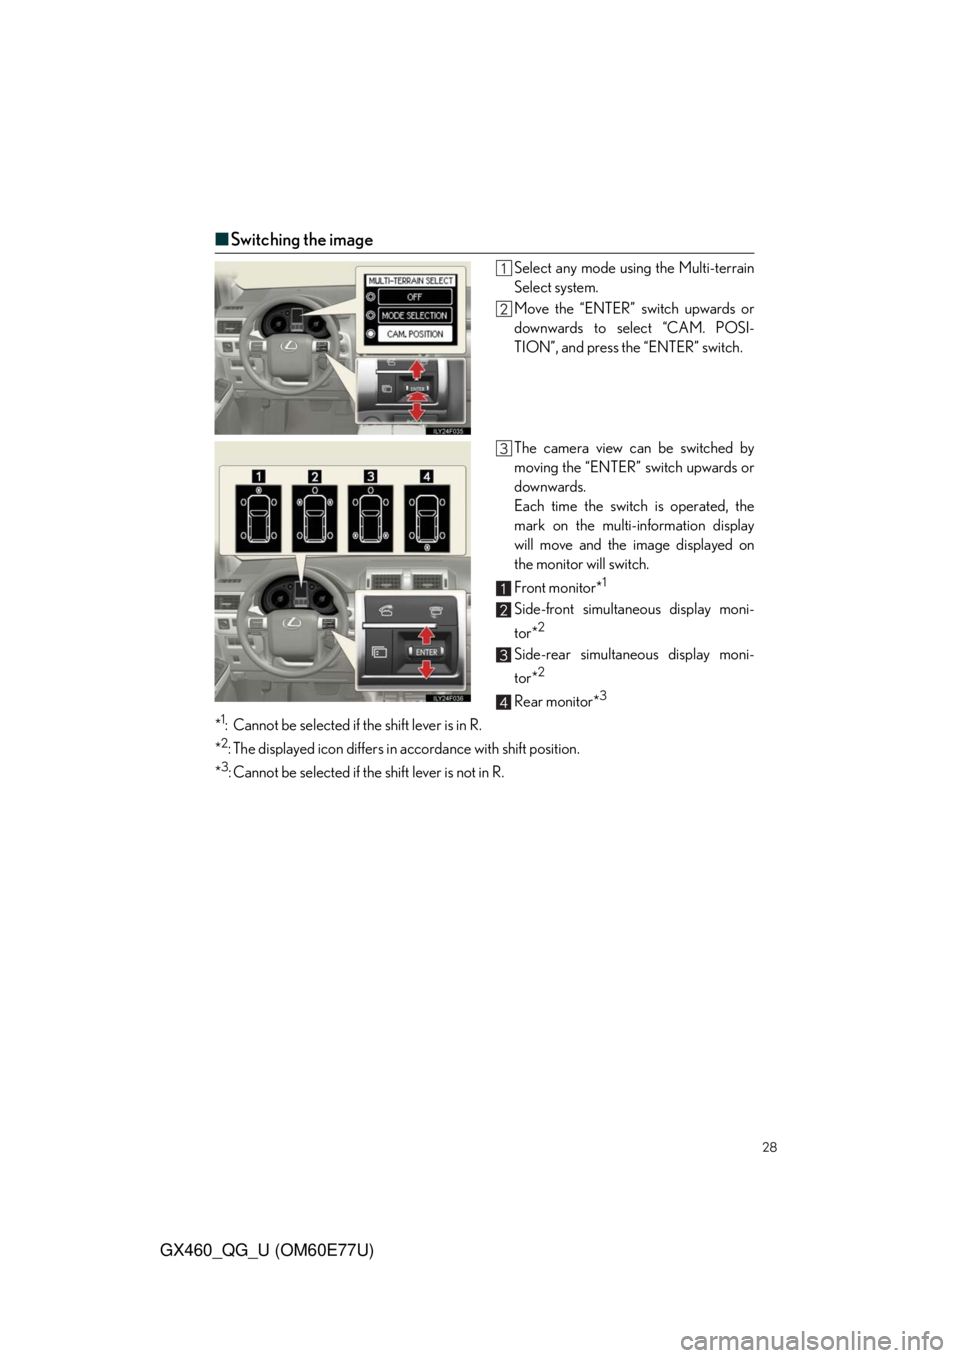
■Switching the image
Select any mode using the Multi-terrain
Select system.
Move the “ENTER” switch upwards or
downwards to select “CAM. POSI-
TION”, and press the “ENTER” switch.
The camera view can be switched by
moving the “ENTER” switch upwards or
downwards.
Each time the switch is operated, the
mark on the multi-information display
will move and the image displayed on
the monitor will switch.
Front monitor*
1
Side-front simultaneous display moni-
tor*
2
Side-rear simultaneous display moni-
tor*
2
Rear monitor*3
*1: Cannot be selected if the shift lever is in R.
*
2: The displayed icon differs in accordance with shift position.
*
3: Cannot be selected if the shift lever is not in R.
Page 30 of 94
30
GX460_QG_U (OM60E77U)
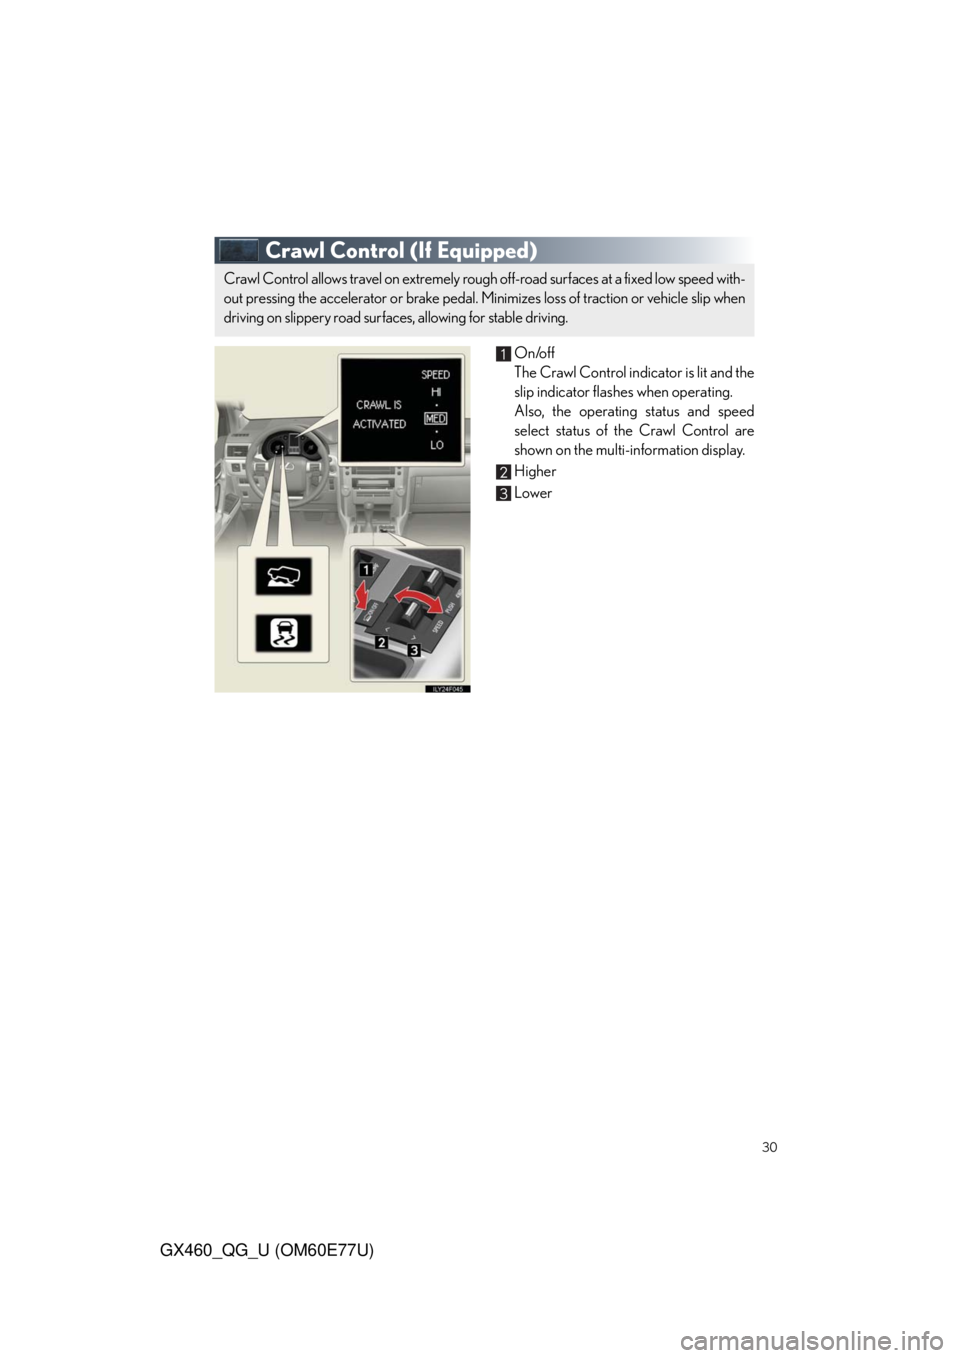
Crawl Control (If Equipped)
On/off
The Crawl Control indicator is lit and the
slip indicator flashes when operating.
Also, the operating status and speed
select status of the Crawl Control are
shown on the multi-information display.
Higher
Lower
Crawl Control allows travel on extremely rough off-road surfaces at a fixed low speed with-
out pressing the accelerator or brake pedal. Minimizes loss of traction or vehicle slip when
driving on slippery road surfaces, allowing for stable driving.
Page 32 of 94
32
GX460_QG_U (OM60E77U)
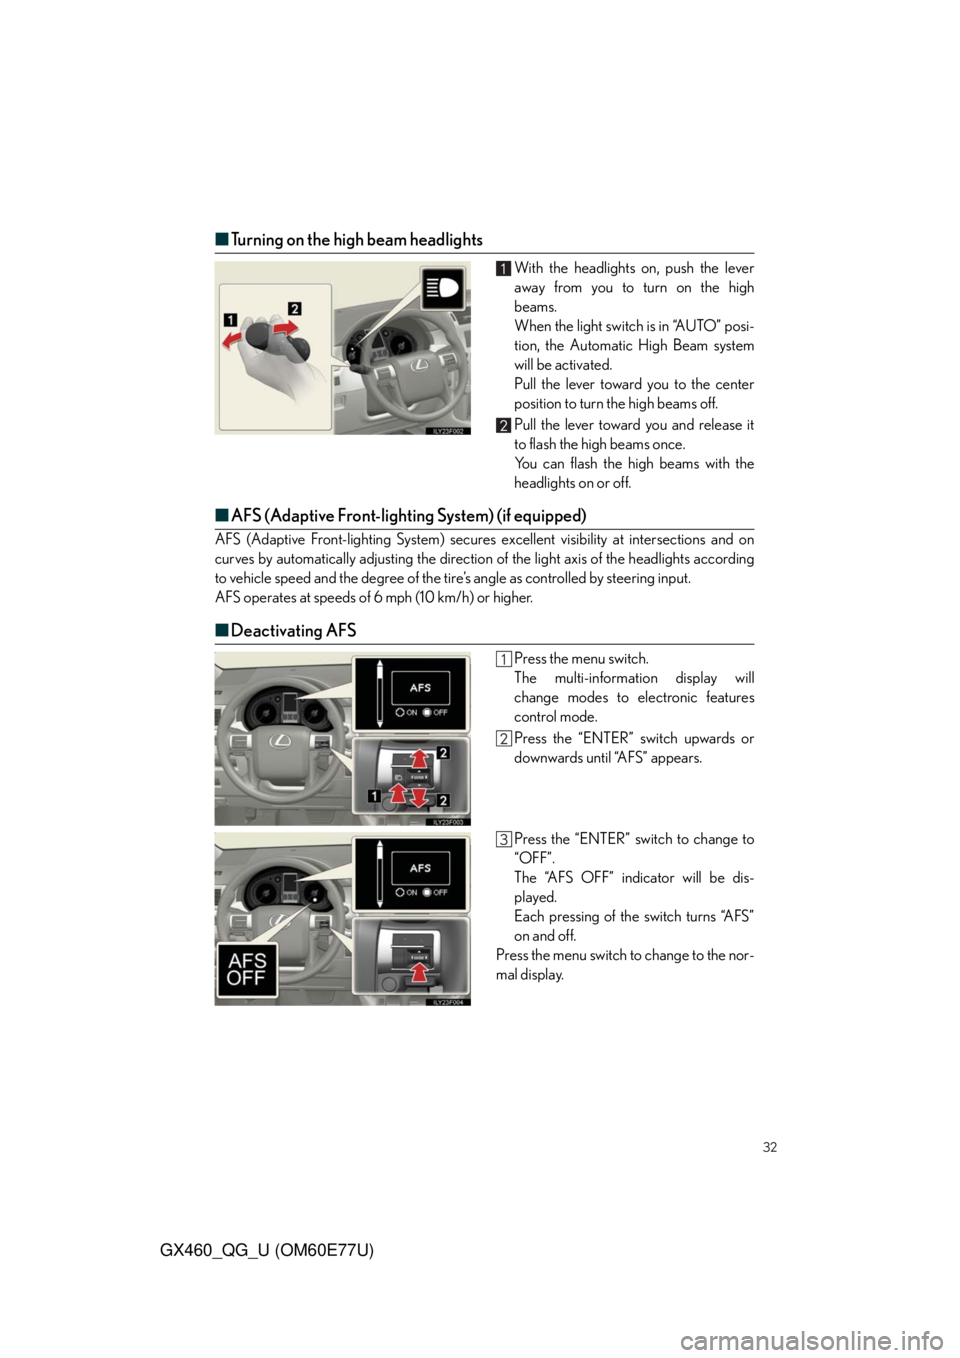
■Turning on the high beam headlights
With the headlights on, push the lever
away from you to turn on the high
beams.
When the light switch is in “AUTO” posi-
tion, the Automatic High Beam system
will be activated.
Pull the lever toward you to the center
position to turn the high beams off.
Pull the lever toward you and release it
to flash the high beams once.
You can flash the high beams with the
headlights on or off.
■AFS (Adaptive Front-lighting System) (if equipped)
AFS (Adaptive Front-lighting System) secures excellent visibility at intersections and on
curves by automatically adjusting the direction of the light axis of the headlights according
to vehicle speed and the degree of the tire’s angle as controlled by steering input.
AFS operates at speeds of 6 mph (10 km/h) or higher.
■Deactivating AFS
Press the menu switch.
The multi-information display will
change modes to electronic features
control mode.
Press the “ENTER” switch upwards or
downwards until “AFS” appears.
Press the “ENTER” switch to change to
“OFF”.
The “AFS OFF” indicator will be dis-
played.
Each pressing of the switch turns “AFS”
on and off.
Press the menu switch to change to the nor-
mal display.
Page 36 of 94
36
GX460_QG_U (OM60E77U)
Navigation System (If Equipped)
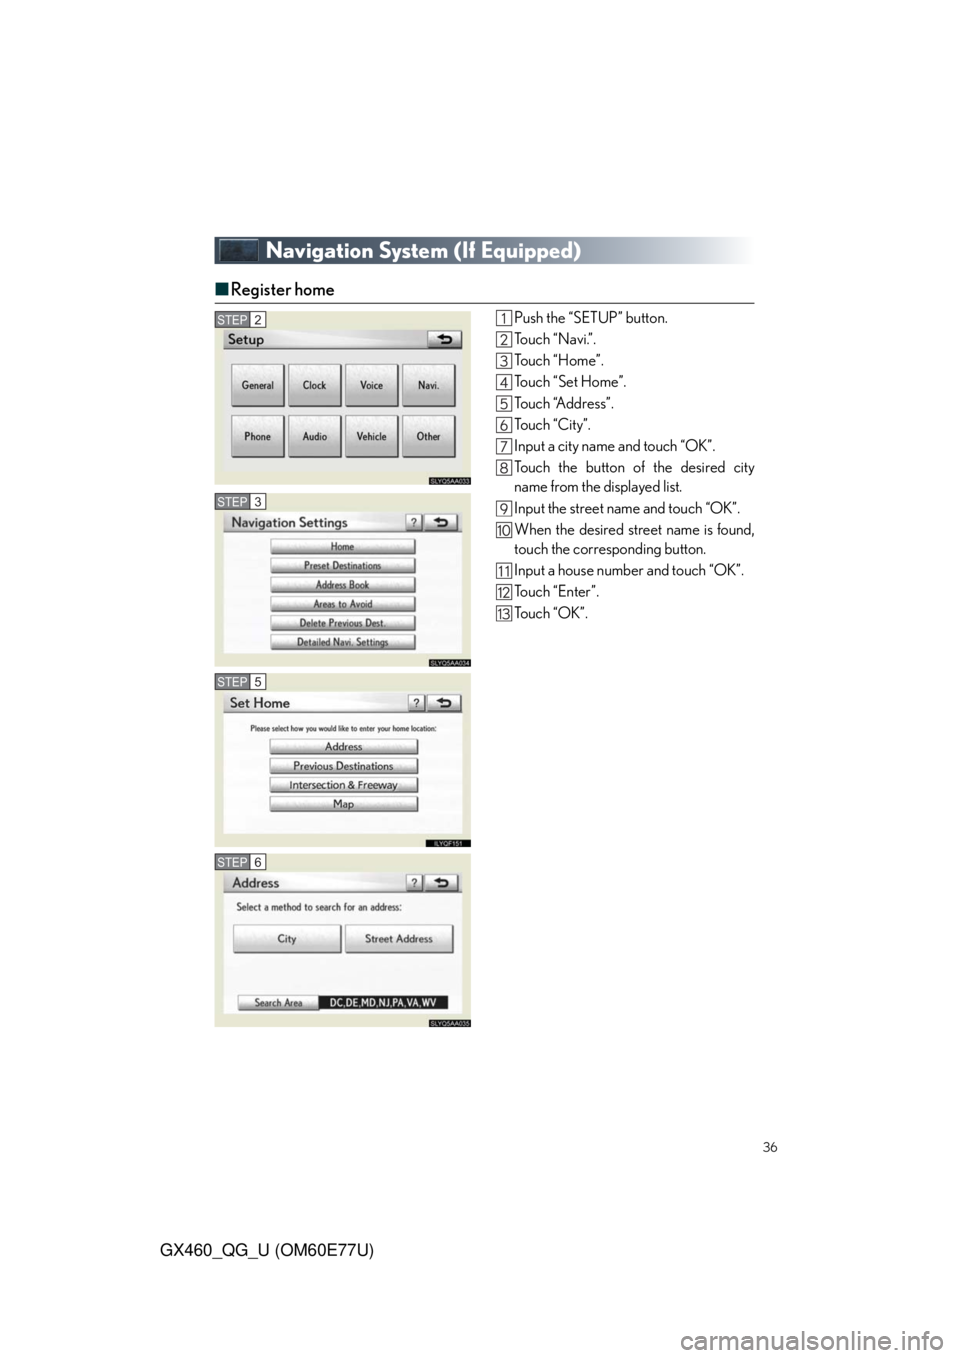
■Register home
Push the “SETUP” button.
Touch “Navi.”.
To u c h “ H o m e ” .
Touch “Set Home”.
To u c h “A d d r e s s ” .
To u c h “ C i t y ” .
Input a city name and touch “OK”.
Touch the button of the desired city
name from the displayed list.
Input the street name and touch “OK”.
When the desired street name is found,
touch the corresponding button.
Input a house number and touch “OK”.
Touch “Enter”.
To u c h “ O K ” .STEP2
STEP3
STEP5
STEP6
Page 37 of 94
37
GX460_QG_U (OM60E77U)
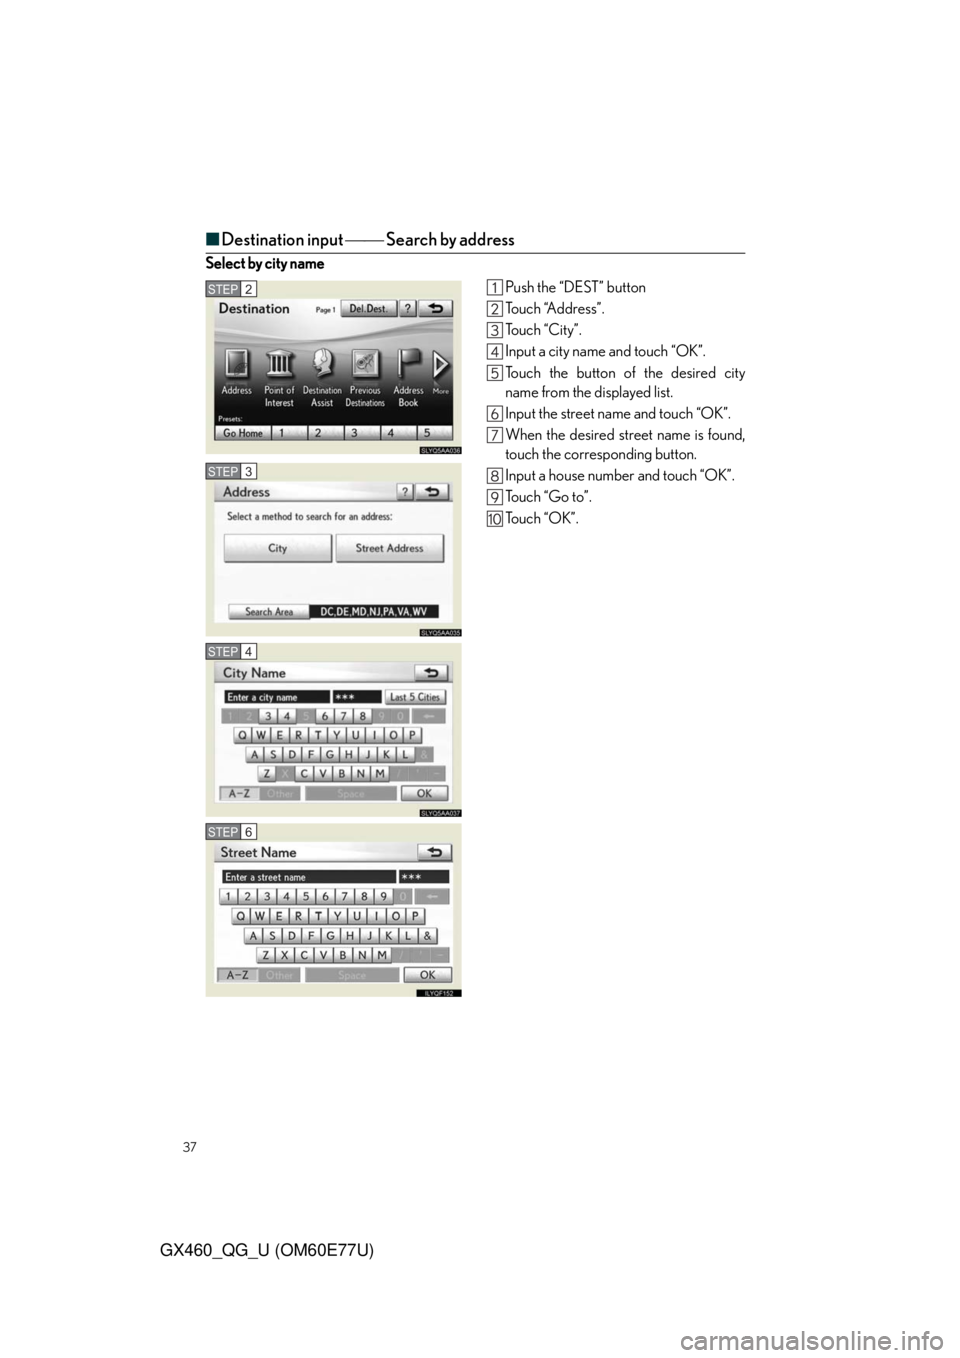
■Destination input Search by address
Select by city name
Push the “DEST” button
To u c h “A d d r e s s ” .
To u c h “ C i t y ” .
Input a city name and touch “OK”.
Touch the button of the desired city
name from the displayed list.
Input the street name and touch “OK”.
When the desired street name is found,
touch the corresponding button.
Input a house number and touch “OK”.
To u c h “ G o t o ” .
To u c h “ O K ” .
STEP2
STEP3
STEP4
STEP6
Page 38 of 94
38
GX460_QG_U (OM60E77U)
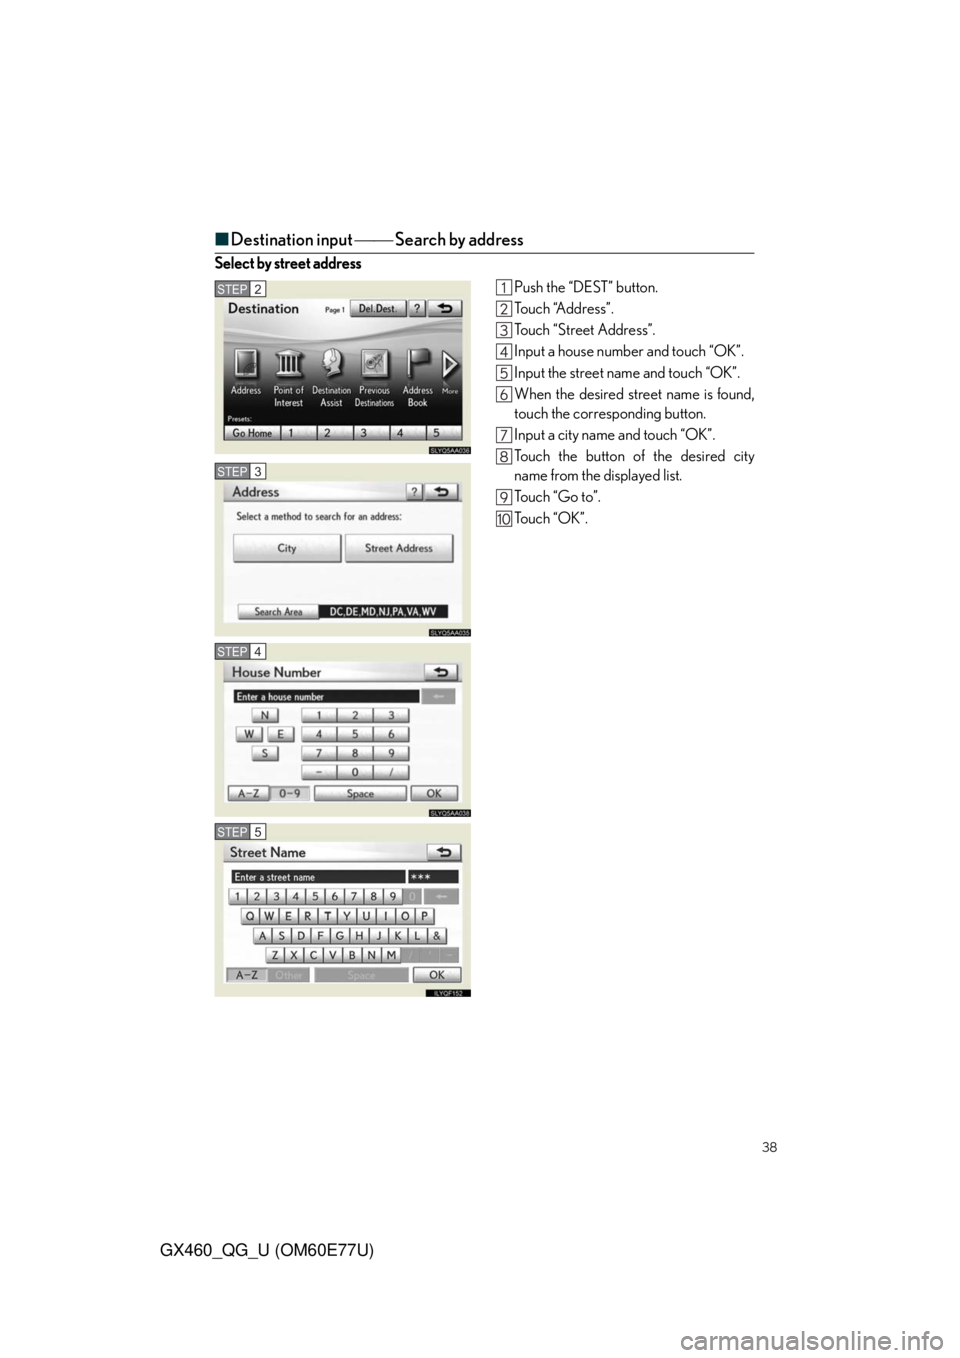
■Destination input Search by address
Select by street address
Push the “DEST” button.
To u c h “A d d r e s s ” .
Touch “Street Address”.
Input a house number and touch “OK”.
Input the street name and touch “OK”.
When the desired street name is found,
touch the corresponding button.
Input a city name and touch “OK”.
Touch the button of the desired city
name from the displayed list.
To u c h “ G o t o ” .
To u c h “ O K ” .
-
STEP2
STEP3
STEP4
STEP5
Page 42 of 94
42
GX460_QG_U (OM60E77U)
Hands-free System For Cellular Phone
(With Navigation System)
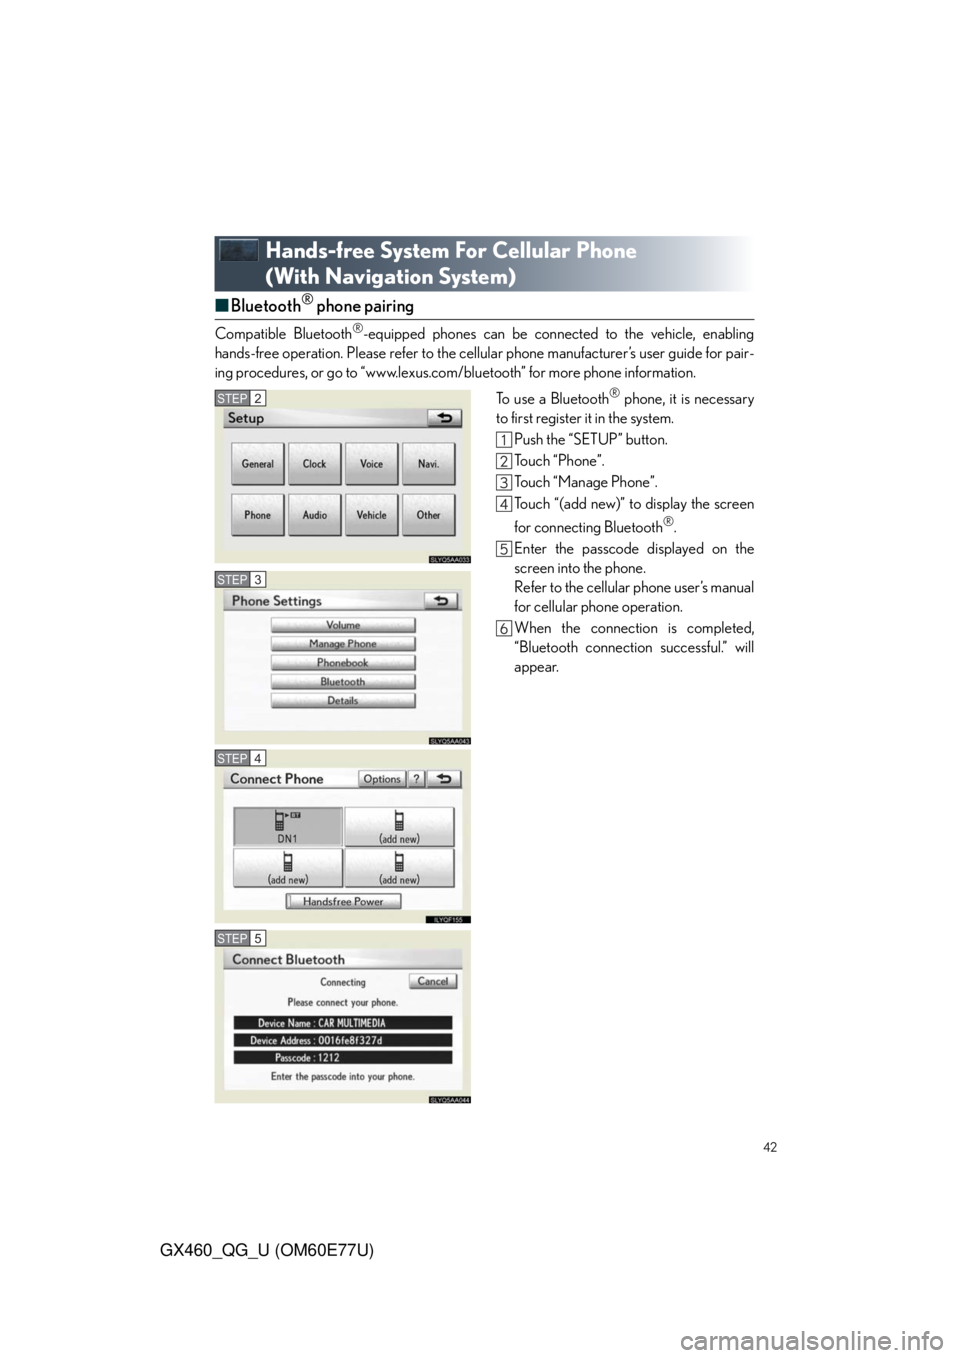
■Bluetooth® phone pairing
Compatible Bluetooth®-equipped phones can be connected to the vehicle, enabling
hands-free operation. Please refer to the cellular phone manufacturer’s user guide for pair-
ing procedures, or go to “www.lexus.com/bluetooth” for more phone information.
To use a Bluetooth
® phone, it is necessary
to first register it in the system.
Push the “SETUP” button.
Touch “Phone”.
Touch “Manage Phone”.
Touch “(add new)” to display the screen
for connecting Bluetooth
®.
Enter the passcode displayed on the
screen into the phone.
Refer to the cellular phone user’s manual
for cellular phone operation.
When the connection is completed,
“Bluetooth connection successful.” will
appear.
STEP2
STEP3
STEP4
STEP5
Page 45 of 94
45
GX460_QG_U (OM60E77U)
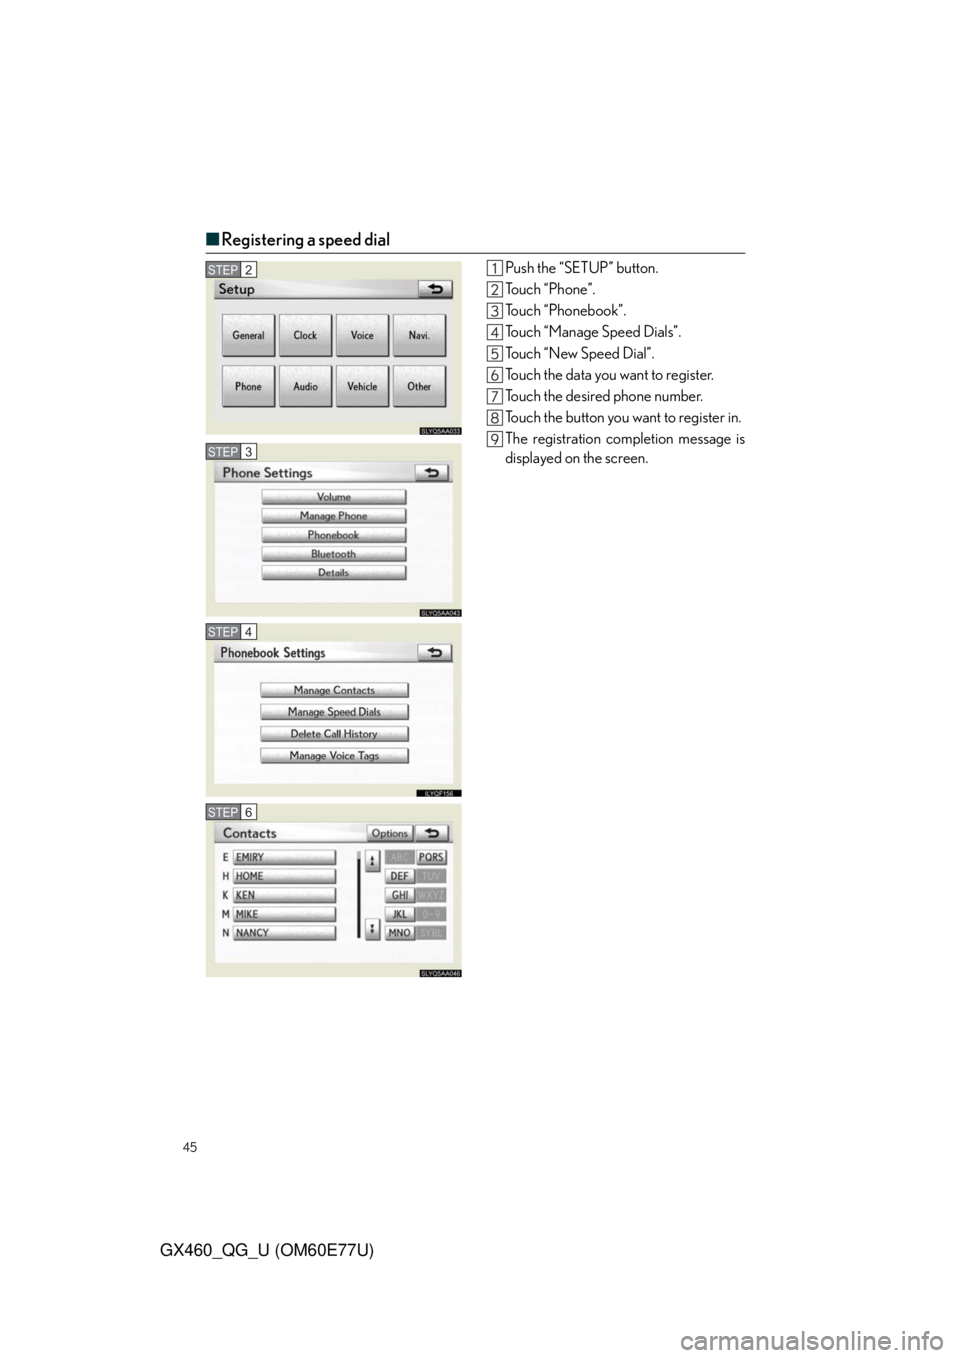
■Registering a speed dial
Push the “SETUP” button.
To u c h “ P h o n e ” .
Touch “Phonebook”.
Touch “Manage Speed Dials”.
To u c h “ N e w S p e e d D i a l ” .
Touch the data you want to register.
Touch the desired phone number.
Touch the button you want to register in.
The registration completion message is
displayed on the screen.STEP2
STEP3
STEP4
STEP6
Page 48 of 94
48
GX460_QG_U (OM60E77U)
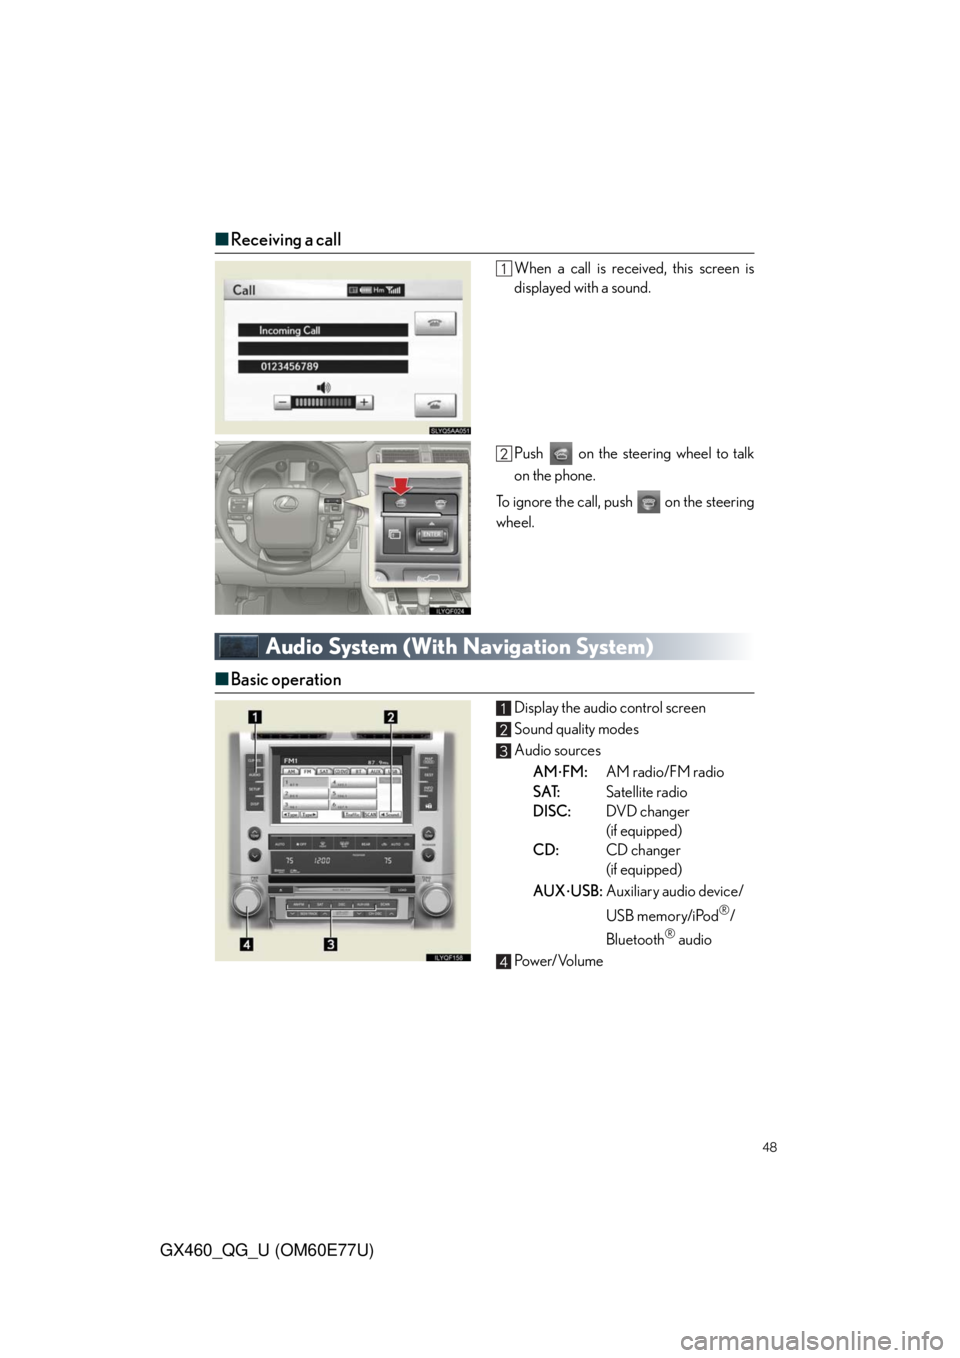
■Receiving a call
When a call is received, this screen is
displayed with a sound.
Push on the steering wheel to talk
on the phone.
To ignore the call, push on the steering
wheel.
Audio System (With Navigation System)
■Basic operation
Display the audio control screen
Sound quality modes
Audio sources
AM
FM:AM radio/FM radio
SAT:Satellite radio
DISC:DVD changer
(if equipped)
CD:CD changer
(if equipped)
AUX
USB:Auxiliary audio device/
USB memory/iPod
®/
Bluetooth
® audio
Pow e r/ Vo l u m e