fold seats Lexus GX460 2014 Opening, closing and locking the doors and trunk / LEXUS 2014 GX460 OWNERS MANUAL (OM60K80U)
[x] Cancel search | Manufacturer: LEXUS, Model Year: 2014,
Model line: GX460,
Model: Lexus GX460 2014
Pages: 622, PDF Size: 8.61 MB
Lexus GX460 2014 Opening, closing and locking the doors and trunk / LEXUS 2014 GX460 OWNERS MANUAL (OM60K80U)
GX460 2014
Lexus
Lexus
https://www.carmanualsonline.info/img/36/15450/w960_15450-0.png
Lexus GX460 2014 Opening, closing and locking the doors and trunk / LEXUS 2014 GX460 OWNERS MANUAL (OM60K80U)
Page 57 of 622
571-1. For safe use
GX460_OM_OM60K80U_(U)
1
For safety and security
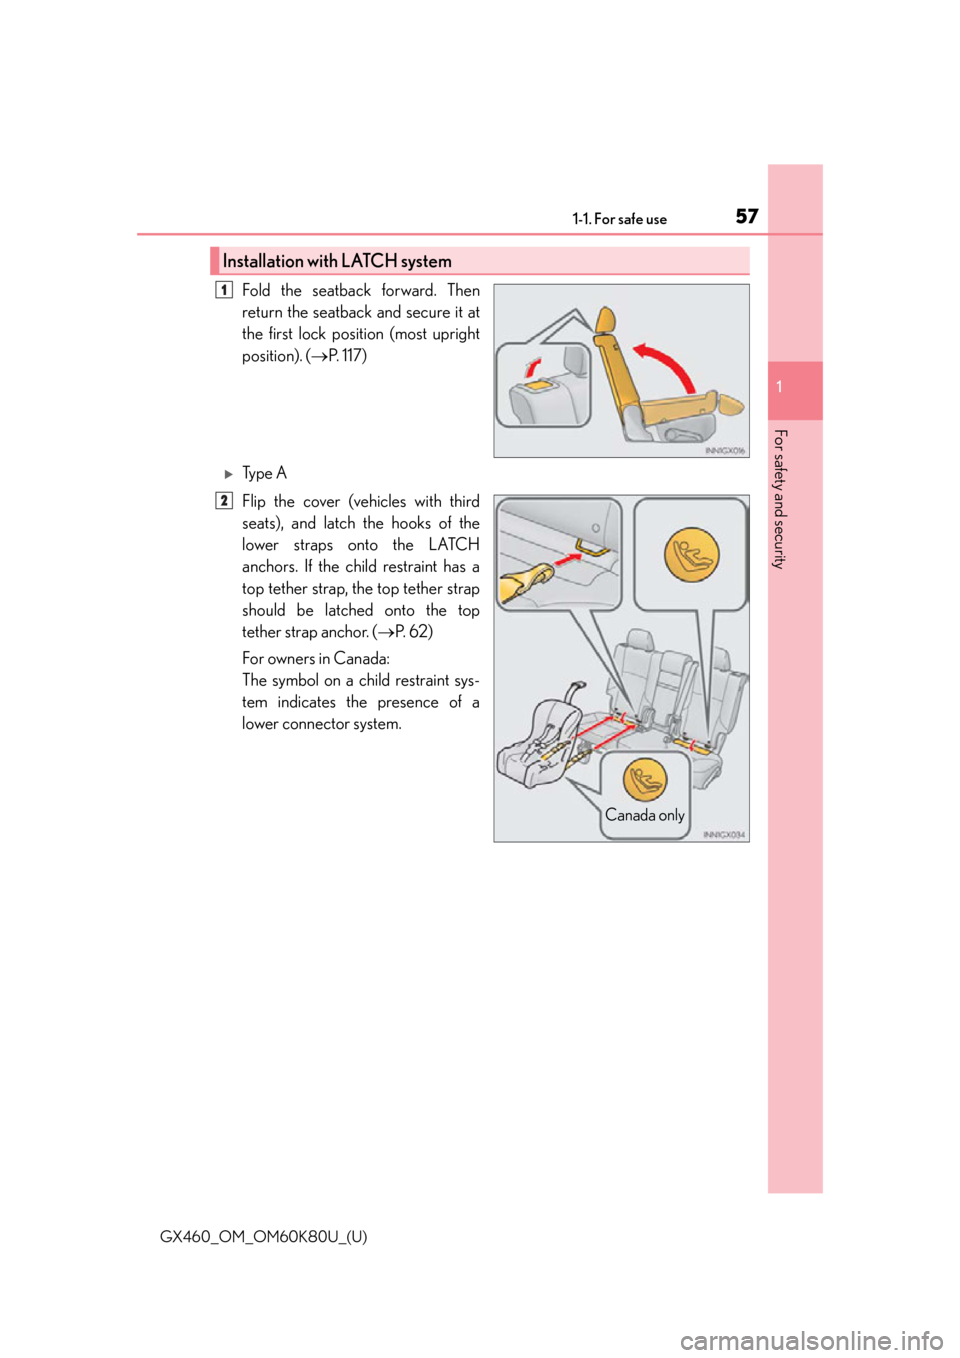
Fold the seatback forward. Then
return the seatback and secure it at
the first lock position (most upright
position). ( P. 1 1 7 )
Ty p e A
Flip the cover (vehicles with third
seats), and latch the hooks of the
lower straps onto the LATCH
anchors. If the child restraint has a
top tether strap, the top tether strap
should be latched onto the top
tether strap anchor. ( P. 6 2 )
For owners in Canada:
The symbol on a child restraint sys-
tem indicates the presence of a
lower connector system.
Installation with LATCH system
1
Canada only
2
Page 58 of 622
581-1. For safe use
GX460_OM_OM60K80U_(U)
Ty p e B
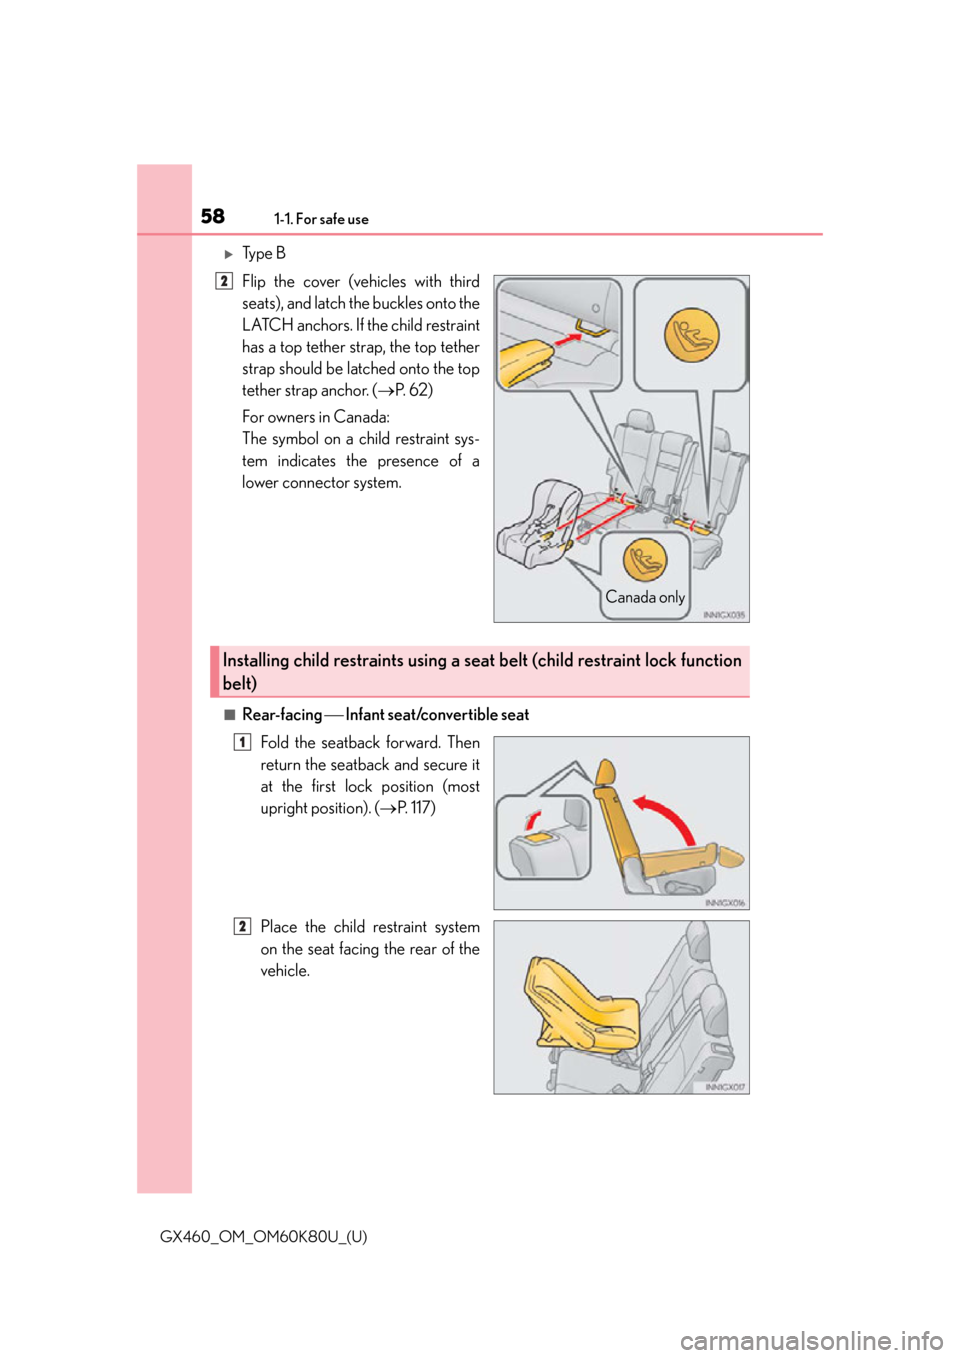
Flip the cover (vehicles with third
seats), and latch the buckles onto the
LATCH anchors. If the child restraint
has a top tether strap, the top tether
strap should be latched onto the top
tether strap anchor. (P. 6 2 )
For owners in Canada:
The symbol on a child restraint sys-
tem indicates the presence of a
lower connector system.
■Rear-facing Infant seat/convertible seat
Fold the seatback forward. Then
return the seatback and secure it
at the first lock position (most
upright position). ( P. 1 1 7 )
Place the child restraint system
on the seat facing the rear of the
vehicle.
Canada only
2
Installing child restraints using a se at belt (child restraint lock function
belt)
1
2
Page 118 of 622
118
GX460_OM_OM60K80U_(U)3-3. Adjusting the seats
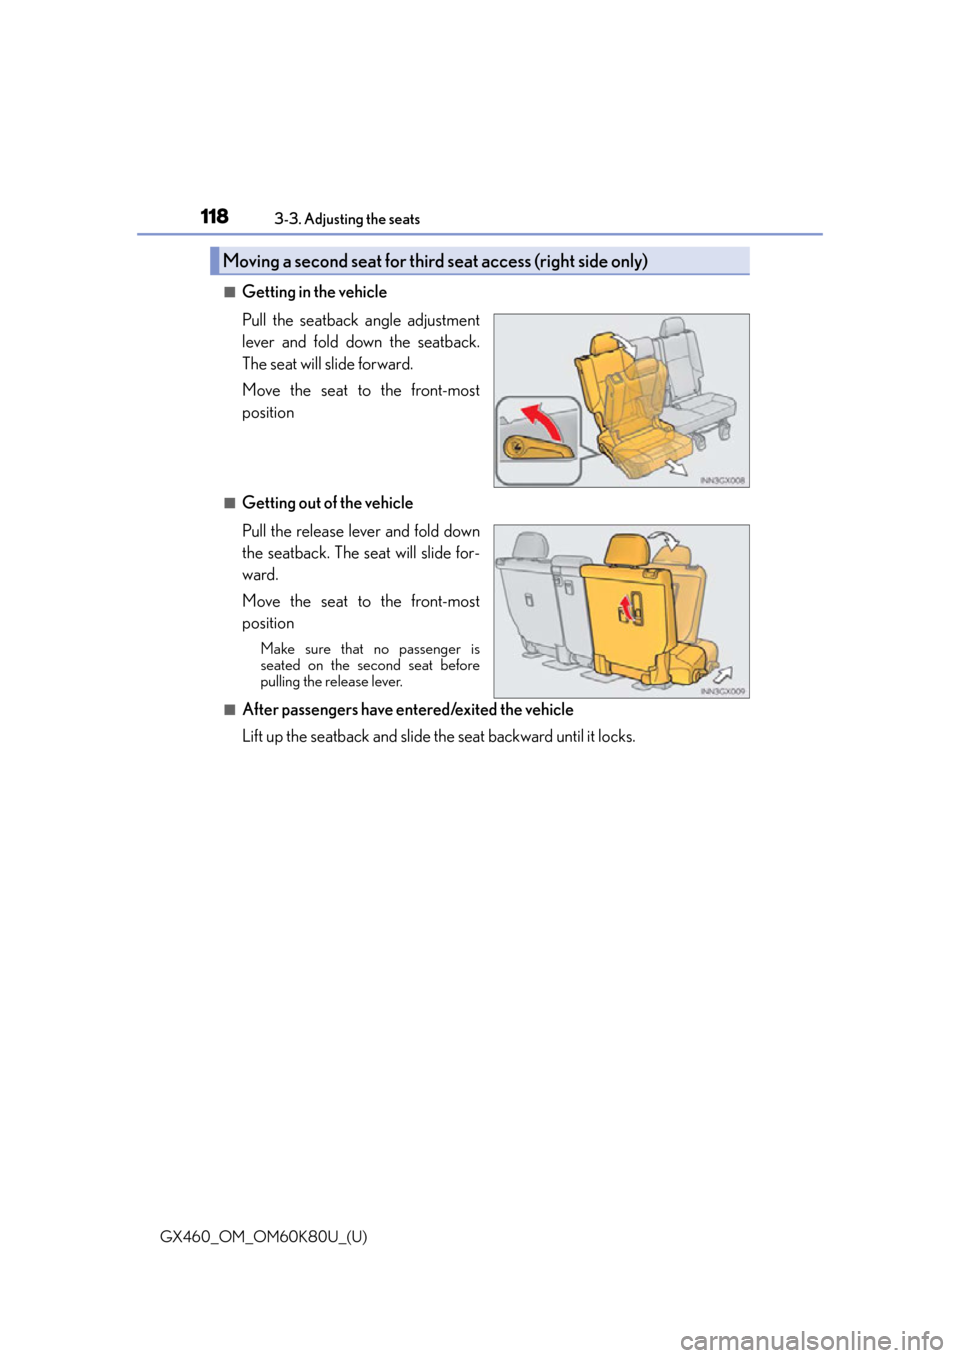
■Getting in the vehicle
Pull the seatback angle adjustment
lever and fold down the seatback.
The seat will slide forward.
Move the seat to the front-most
position
■Getting out of the vehicle
Pull the release lever and fold down
the seatback. The seat will slide for-
ward.
Move the seat to the front-most
position
Make sure that no passenger is
seated on the second seat before
pulling the release lever.
■After passengers have entered/exited the vehicle
Lift up the seatback and slide the seat backward until it locks.
Moving a second seat for third
seat access (right side only)
Page 119 of 622
GX460_OM_OM60K80U_(U)
1193-3. Adjusting the seats
3
Operation of each component
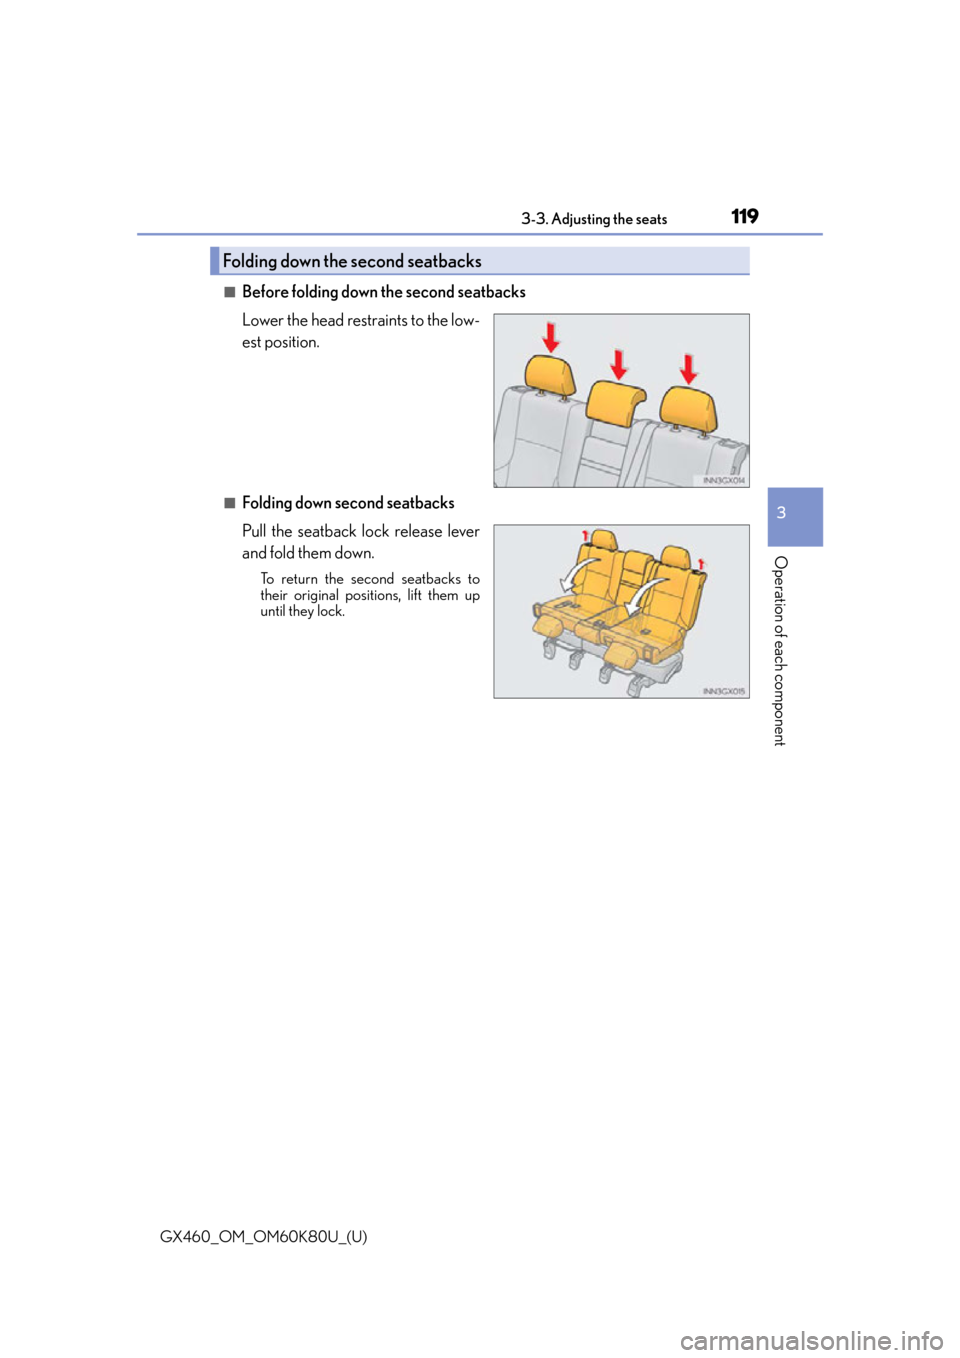
■Before folding down the second seatbacks
Lower the head restraints to the low-
est position.
■Folding down second seatbacks
Pull the seatback lock release lever
and fold them down.
To return the second seatbacks to
their original positions, lift them up
until they lock.
Folding down the second seatbacks
Page 120 of 622
120
GX460_OM_OM60K80U_(U)3-3. Adjusting the seats
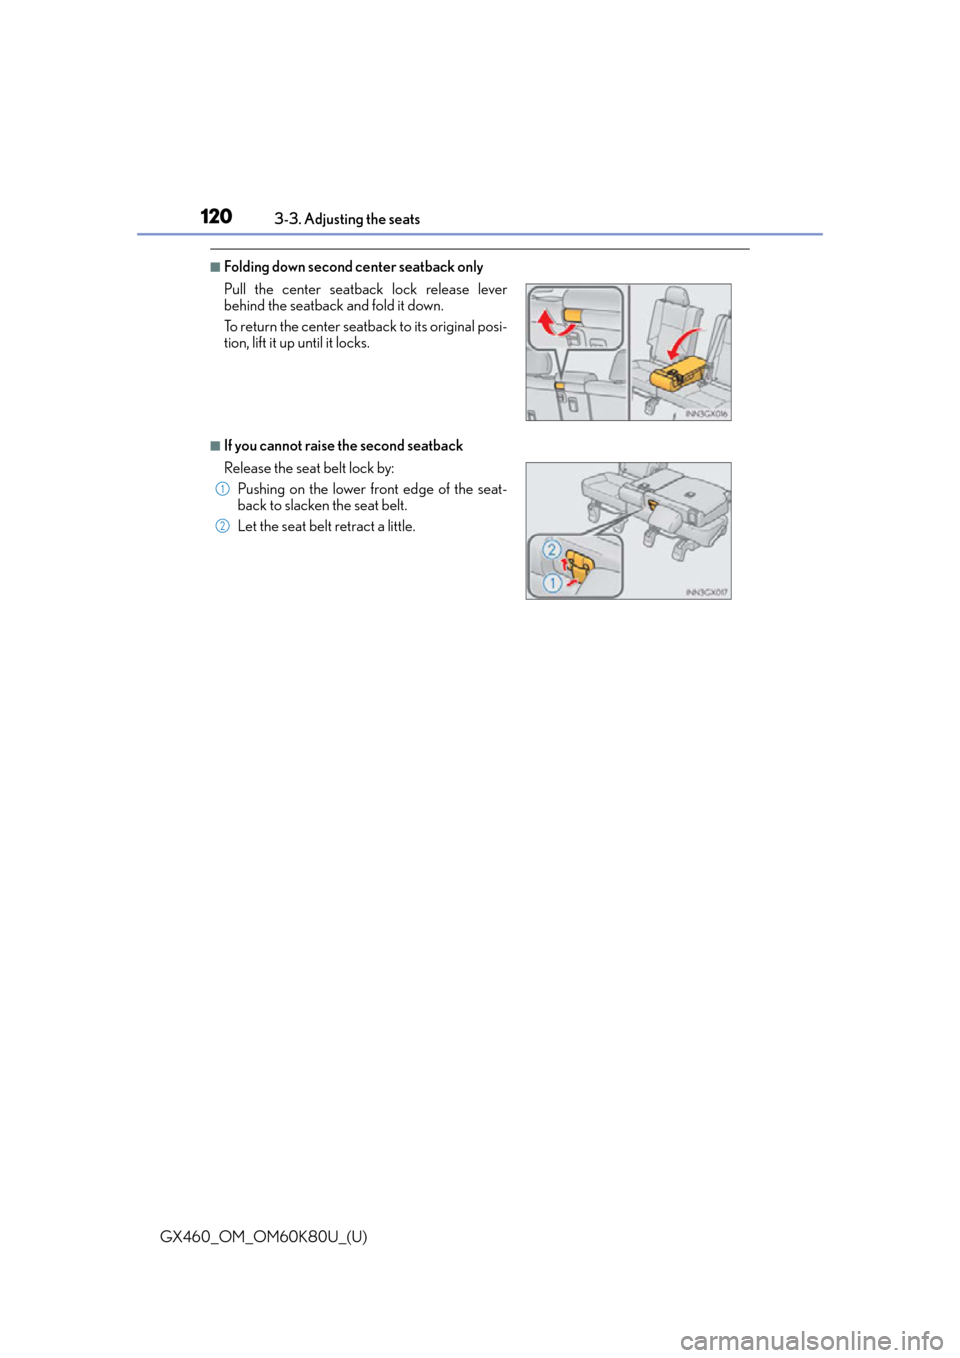
■Folding down second center seatback only
■If you cannot raise the second seatback Pull the center seatback lock release lever
behind the seatback and fold it down.
To return the center seatback to its original posi-
tion, lift it up until it locks.
Release the seat belt lock by:
Pushing on the lower fr ont edge of the seat-
back to slacken the seat belt.
Let the seat belt retract a little.
1
2
Page 121 of 622
GX460_OM_OM60K80U_(U)
1213-3. Adjusting the seats
3
Operation of each component
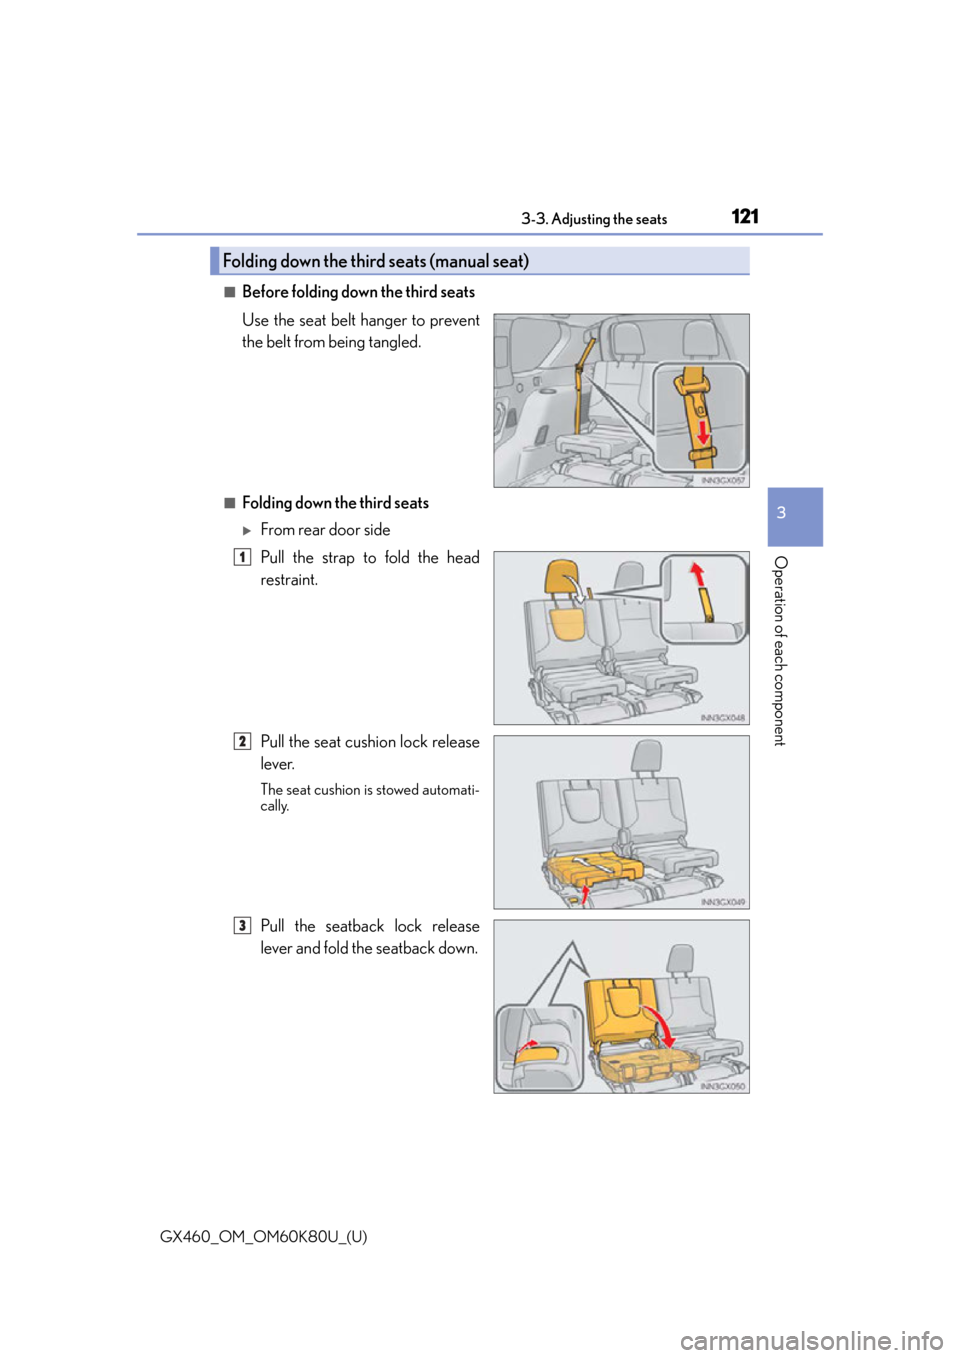
■Before folding down the third seats
Use the seat belt hanger to prevent
the belt from being tangled.
■Folding down the third seats
From rear door side
Pull the strap to fold the head
restraint.
Pull the seat cushion lock release
lever.
The seat cushion is stowed automati-
cally.
Pull the seatback lock release
lever and fold the seatback down.
Folding down the third seats (manual seat)
1
2
3
Page 122 of 622
122
GX460_OM_OM60K80U_(U)3-3. Adjusting the seats
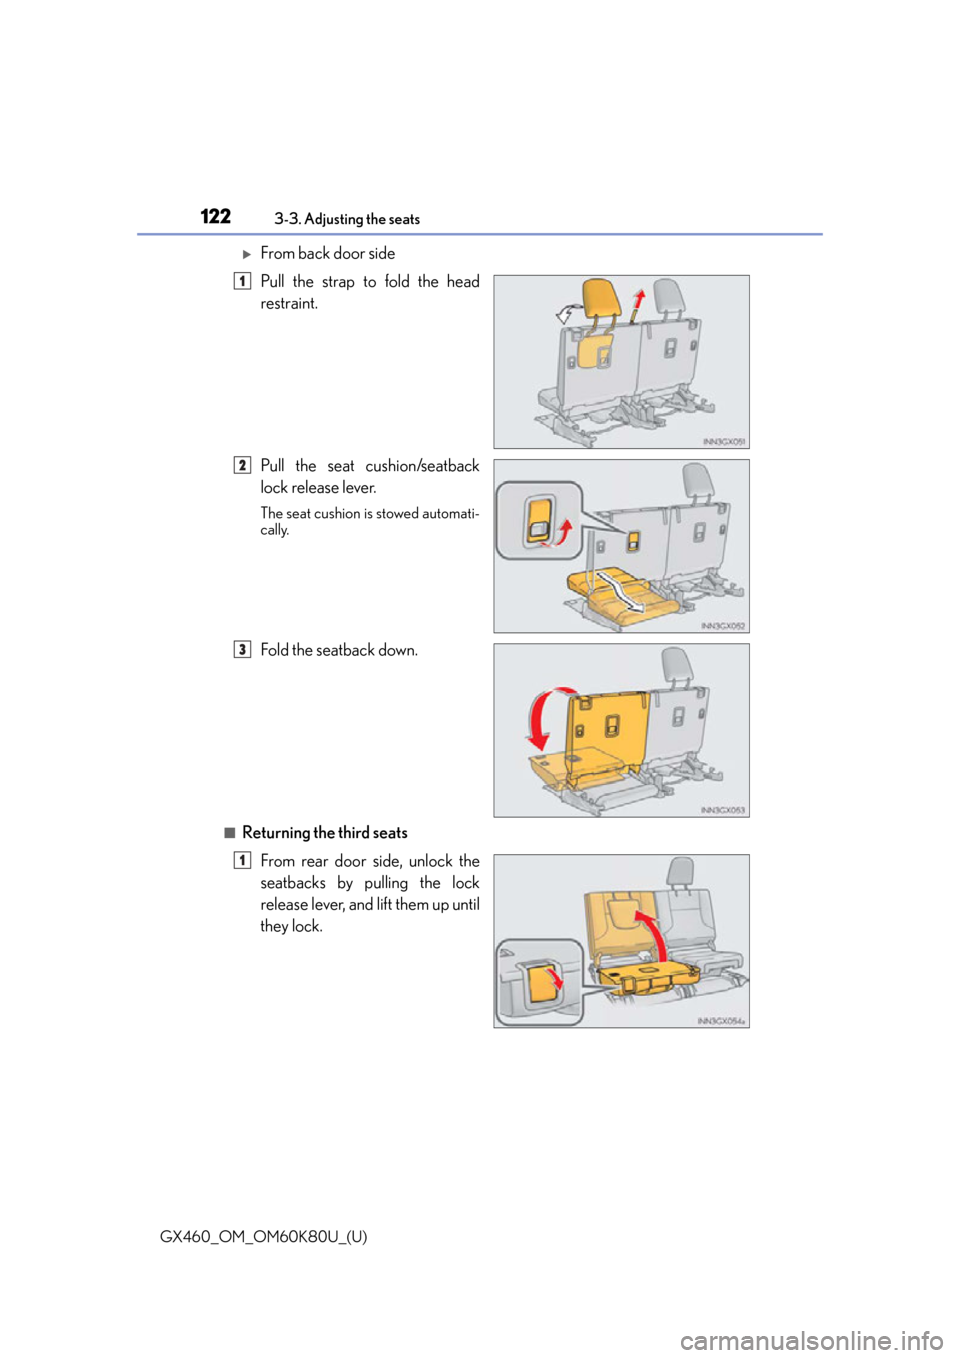
From back door side
Pull the strap to fold the head
restraint.
Pull the seat cushion/seatback
lock release lever.
The seat cushion is stowed automati-
cally.
Fold the seatback down.
■Returning the third seats
From rear door side, unlock the
seatbacks by pulling the lock
release lever, and lift them up until
they lock.
1
2
3
1
Page 123 of 622
GX460_OM_OM60K80U_(U)
1233-3. Adjusting the seats
3
Operation of each component
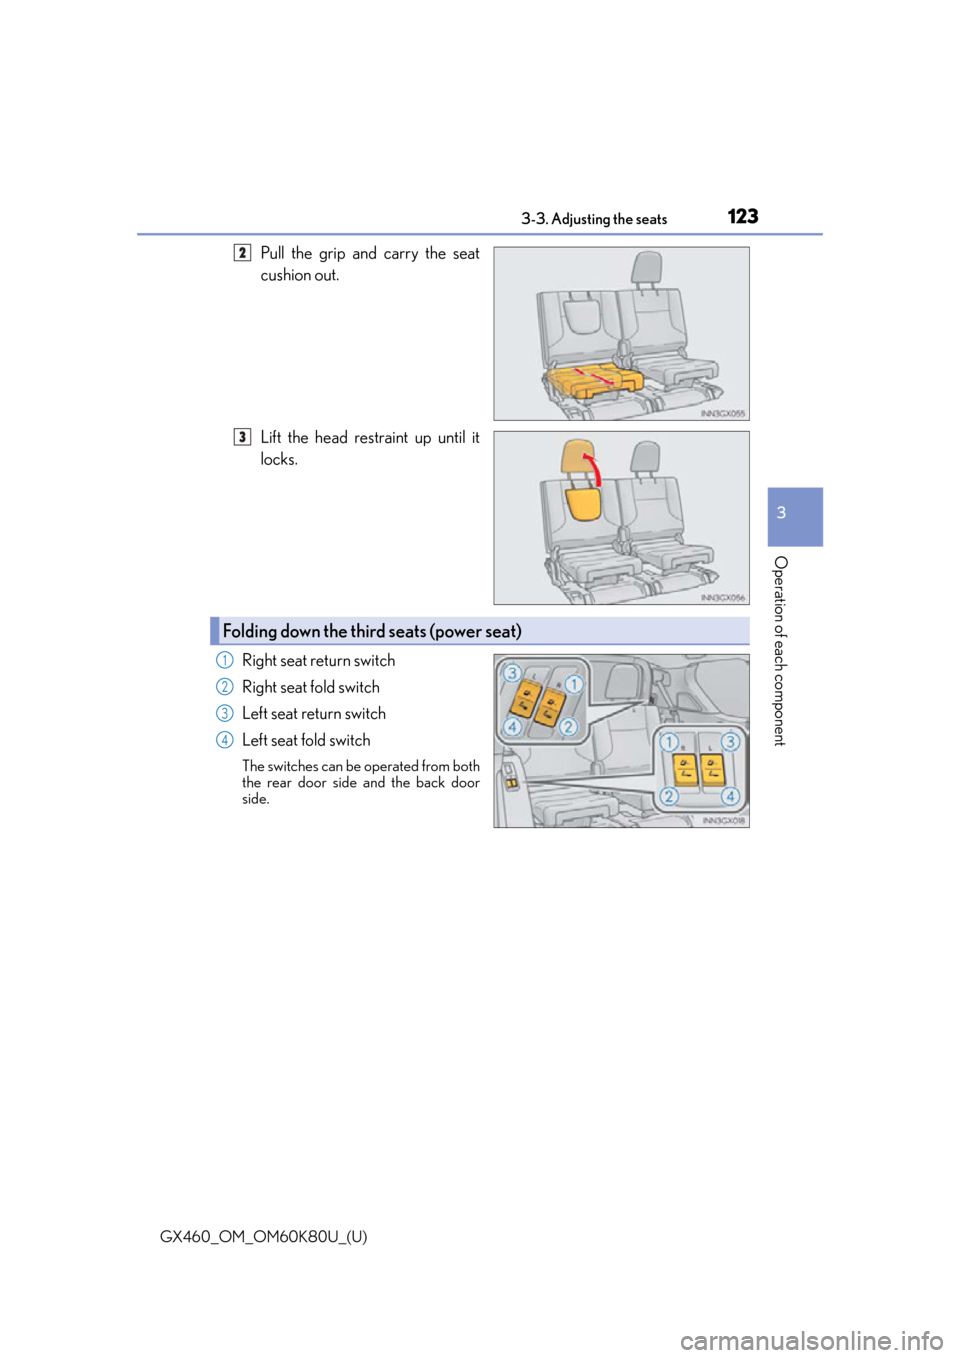
Pull the grip and carry the seat
cushion out.
Lift the head restraint up until it
locks.
Right seat return switch
Right seat fold switch
Left seat return switch
Left seat fold switch
The switches can be operated from both
the rear door side and the back door
side.
2
3
Folding down the third seats (power seat)
1
2
3
4
Page 124 of 622
124
GX460_OM_OM60K80U_(U)3-3. Adjusting the seats
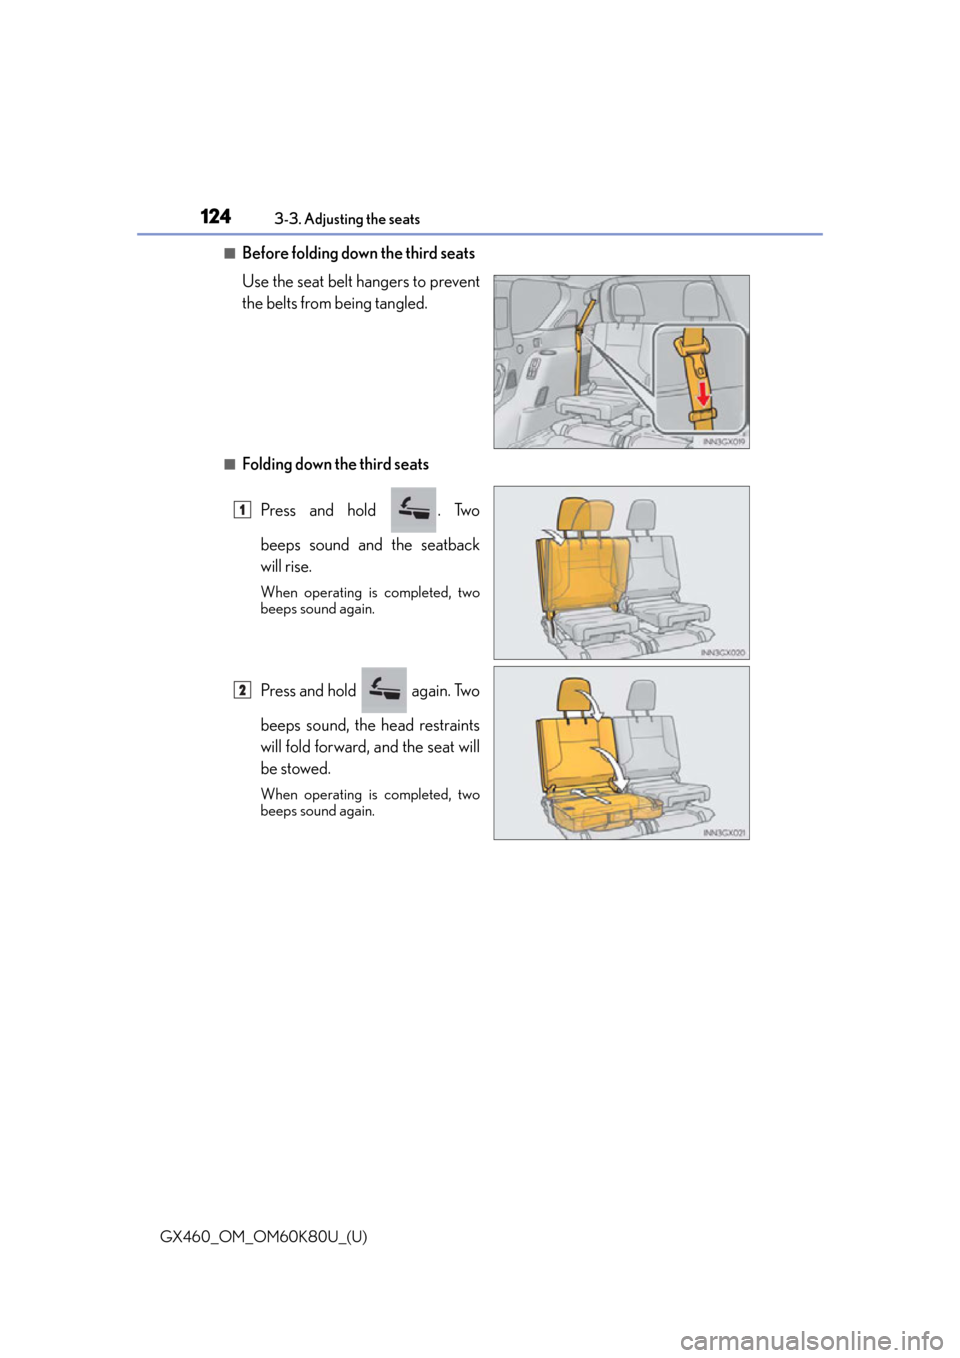
■Before folding down the third seats
Use the seat belt hangers to prevent
the belts from being tangled.
■Folding down the third seats
Press and hold . Two
beeps sound and the seatback
will rise.
When operating is completed, two
beeps sound again.
Press and hold again. Two
beeps sound, the head restraints
will fold forward, and the seat will
be stowed.
When operating is completed, two
beeps sound again.
1
2
Page 126 of 622
126
GX460_OM_OM60K80U_(U)3-3. Adjusting the seats
■Enlarging the luggage compartment
The third seat can be used for sitting when it is in the position shown in step of the fold-
ing down the third seats. (
P. 1 2 3 )
This can be convenient for enlarging the lu ggage compartment, for instance when the
luggage is against the back of the seatback.
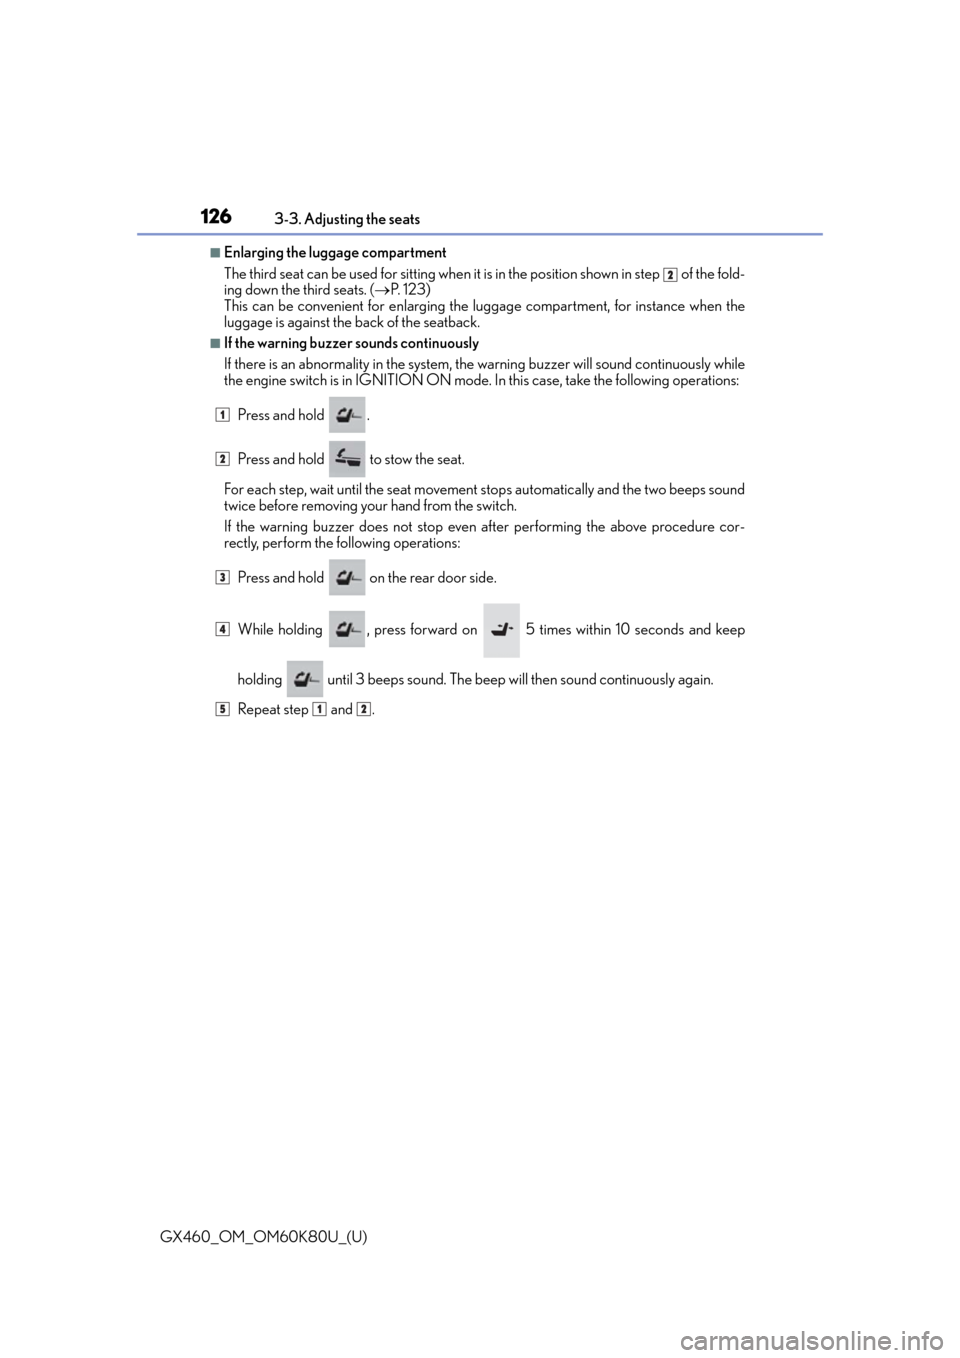
■If the warning buzzer sounds continuously
If there is an abnormality in the system, the warning buzzer will sound continuously while
the engine switch is in IGNITION ON mode. In this case, take the following operations:
Press and hold .
Press and hold to stow the seat.
For each step, wait until the seat movement stops automatically and the two beeps sound
twice before removing your hand from the switch.
If the warning buzzer does not stop even after performing the above procedure cor-
rectly, perform the following operations:
Press and hold on the rear door side.
While holding , press forward on 5 times within 10 seconds and keep
holding until 3 beeps sound. The beep will then sound continuously again.
Repeat step and .
2
1
2
3
4
512
