change time Lexus GX460 2014 Using the air conditioning system and defogger / LEXUS 2014 GX460 (OM60K80U) Owner's Manual
[x] Cancel search | Manufacturer: LEXUS, Model Year: 2014, Model line: GX460, Model: Lexus GX460 2014Pages: 622, PDF Size: 8.61 MB
Page 287 of 622

GX460_OM_OM60K80U_(U)
2874-5. Using the driving support systems
4
Driving
Change to the side monitor individual display.
Select .
The course line display mode will change as follows each time the switch is
selected.
The selected mode will also be displayed on the wide view front & side
monitor simultaneous display screen.1
2
No course lines mode
Minimum projected turning circle display mode Turning course line display mode
Page 303 of 622

303
GX460_OM_OM60K80U_(U)4-5. Using the driving support systems
4
Driving
Multi-terrain Monitor
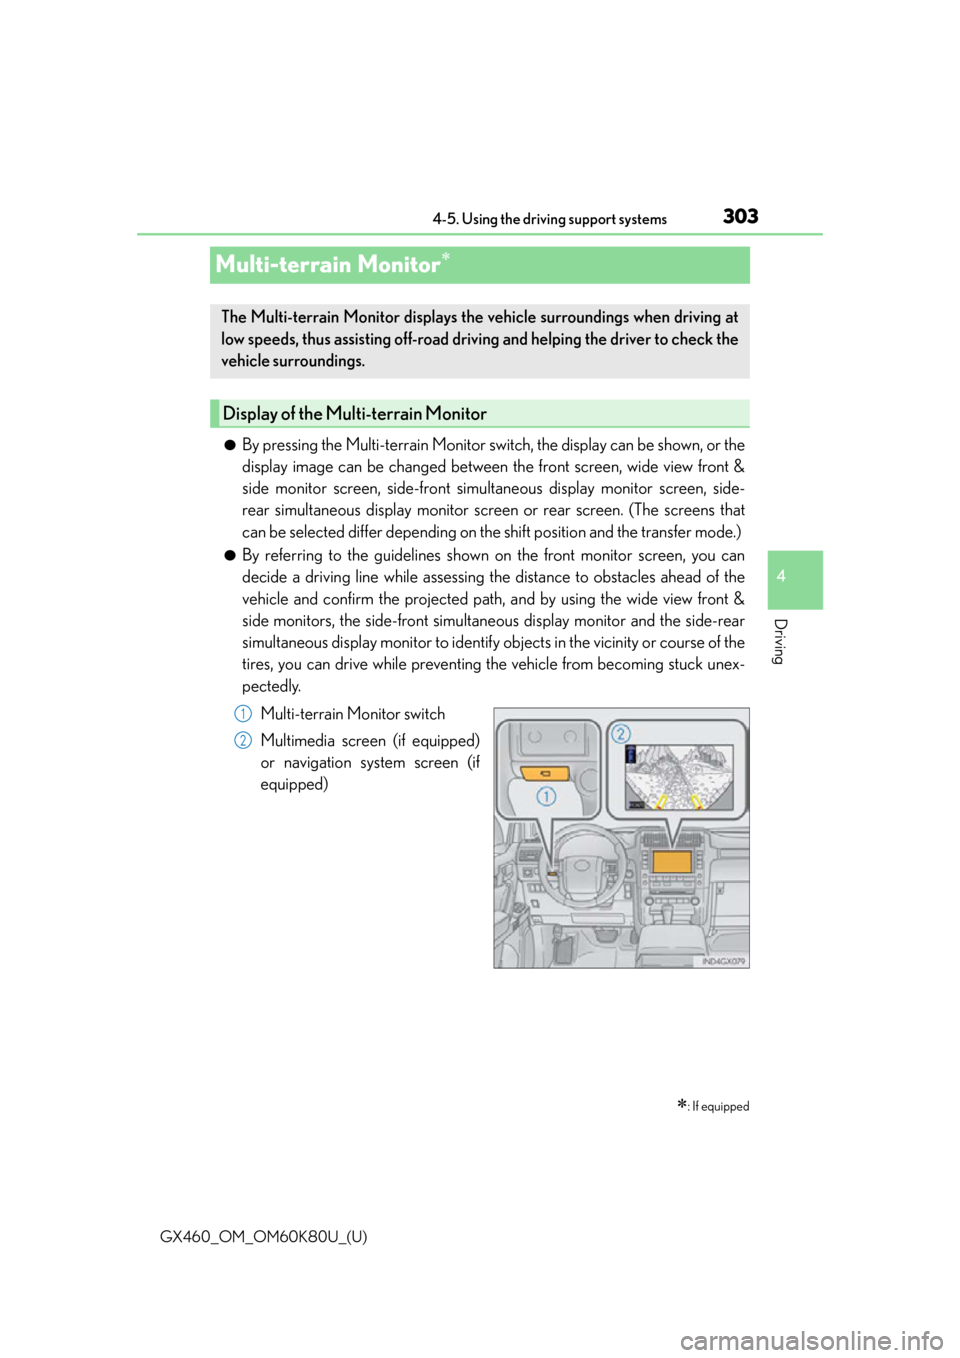
●By pressing the Multi-terrain Monitor switch, the display can be shown, or the
display image can be changed between the front screen, wide view front &
side monitor screen, side-front simult
aneous display monitor screen, side-
rear simultaneous display monitor screen or rear screen. (The screens that
can be selected differ depending on th e shift position and the transfer mode.)
●By referring to the guidelines shown on the front monitor screen, you can
decide a driving line while assessing th e distance to obstacles ahead of the
vehicle and confirm the projected path, and by using the wide view front &
side monitors, the side-front simultaneous display monitor and the side-rear
simultaneous display monitor to identify ob jects in the vicinity or course of the
tires, you can drive while preventing the vehicle from becoming stuck unex-
pectedly.
Multi-terrain Monitor switch
Multimedia screen (if equipped)
or navigation system screen (if
equipped)
: If equipped
The Multi-terrain Monitor displays the vehicle surroundings when driving at
low speeds, thus assisting off-road driving and helping the driver to check the
vehicle surroundings.
Display of the Multi-terrain Monitor
1
2
Page 310 of 622

310
GX460_OM_OM60K80U_(U)4-5. Using the driving support systems
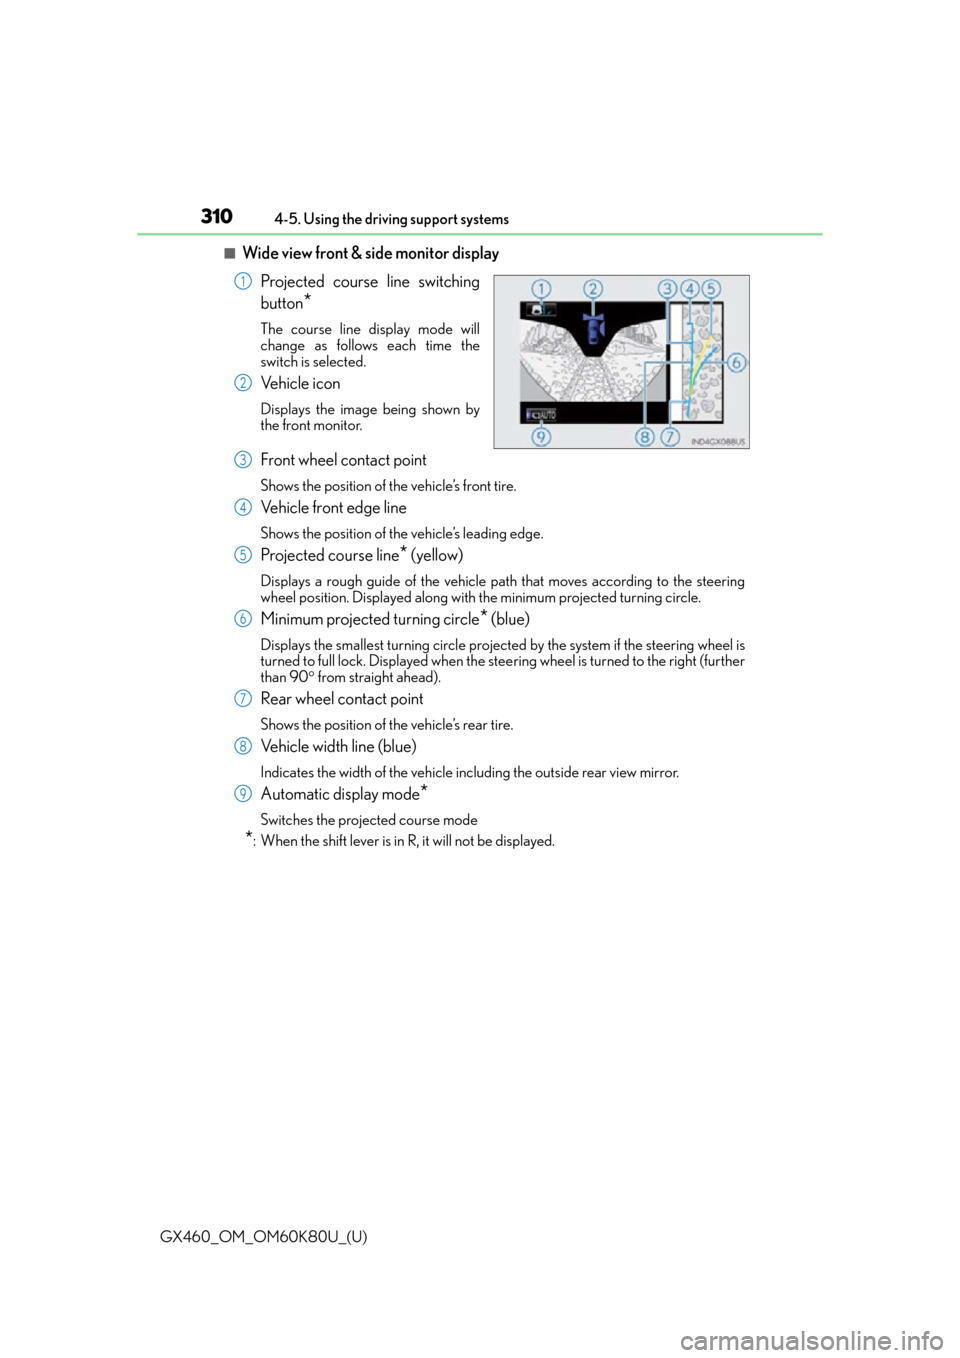
■Wide view front & side monitor display
Projected course line switching
button
*
The course line display mode will
change as follows each time the
switch is selected.
Ve h i c l e i c o n
Displays the image being shown by
the front monitor.
Front wheel contact point
Shows the position of the vehicle’s front tire.
Vehicle front edge line
Shows the position of the vehicle’s leading edge.
Projected course line* (yellow)
Displays a rough guide of the vehicle path that moves according to the steering
wheel position. Displayed along with the minimum projected turning circle.
Minimum projected turning circle* (blue)
Displays the smallest turning circle projec ted by the system if the steering wheel is
turned to full lock. Displayed when the stee ring wheel is turned to the right (further
than 90 from straight ahead).
Rear wheel contact point
Shows the position of the vehicle’s rear tire.
Vehicle width line (blue)
Indicates the width of the vehicle including the outside rear view mirror.
Automatic display mode*
Switches the projected course mode
*: When the shift lever is in R, it will not be displayed.
1
2
3
4
5
6
7
8
9
Page 329 of 622

GX460_OM_OM60K80U_(U)
3294-5. Using the driving support systems
4
Driving
■When HI mode is selected
The vehicle height will change to N mode when driving at the speeds of 18 mph (30 km/h).
Even if vehicle speed is then reduced to unde r 18 mph (30 km/h), height will not return to
HI mode.
■When LO mode is selected
The vehicle height will change to N mode when vehicle speed exceeds 7 mph (12 km/h).
Even if vehicle speed is then reduced to unde r 7 mph (12 km/h), height will not return to
LO m ode .
■Automatic leveling function
Regardless of the number of occupants and the luggage load, vehicle height in any mode
is always adjusted to a fixed height by the automatic leveling function.
■The rear height control air suspension will not operate in the following cases:
●The underbody of the vehicle is touching the surface of the road.
●The area around the suspension is covered with ice.
■Even if you hear an operating noise
This does not indicate a problem in the rear height control air suspension.
■Parking and stopping tips
●If you immediately stop the engine after off- road driving, or park the vehicle for a long
time, the vehicle height may gradually lower. When parking, make sure there is nothing
under the vehicle that may come in contact with the underbody. The vehicle will return
to the set height when the engine is started.
●The vehicle height may change as the temperature changes when the engine is
stopped. The vehicle will return to the set height when the engine is started.
■When lowering the vehicle
In order to prevent the vehicle height from rising as occupants leave the vehicle, lowering
control will occur for a short while after the engine has been stopped.
■The rear height control air suspension failure warning
●If a malfunction occurs in the rear height control air suspension, N mode is automati-
cally selected. However, the system may no t switch to N mode depending on the loca-
tion of the malfunction.
●The warning message is displayed on the multi-information display, and the rear height
control air suspension cannot be activated until the malfun ction is corrected.
Stop the engine and start it again. If the warning message turns off, the system is operat-
ing correctly. If the warning message contin ues to be displayed, have your vehicle
inspected by your Lexus deal er as soon as possible.
Page 330 of 622

330
GX460_OM_OM60K80U_(U)4-5. Using the driving support systems
CAUTION
■The rear height control air suspension must be turned off
Be sure to observe the following precautions. Otherwise, the automatic leveling func-
tion may cause vehicle height to change, an
d you may catch part of your body in the
vehicle, resulting in an accident:
●When jacking up the vehicle, installing tire chains or tying the vehicle with chains/
wires for transportation via flat bed truck, turn off the rear height control air suspen-
sion and stop the engine.
●When the vehicle must be towed or disconnecting a trailer, put the vehicle height in N
mode and turn off the rear height control air suspension.
●When the vehicle is stuck, turn off the rear height control air suspension.
■Selecting the correct height mode
●HI mode should only be used when drivin g on rough roads, for example when driving
off-road.
Because the vehicle’s center of gravity will become higher when in the mode, the
vehicle may become unstable when turn ing abruptly, resulting in an accident.
●Do not select HI mode when loading cargo on the roof luggage carrier.
Because the vehicle’s center of gravity will become higher when in the mode, the
vehicle may become unstable when turn ing abruptly, resulting in an accident.
●Before lowering vehicle height, check that there is no one under the vehicle.
NOTICE
■Be careful in any place where overhead space is limited
The vehicle height will rise when a higher mode is selected or cargo is unloaded. This
may cause damage to the vehicle.
■Do not select LO mode when driving on bumpy roads
If the underbody of the vehicle touches a rugged road surface, the vehicle may be
damaged.
■Changing vehicle height
Do not change vehicle height frequently.
The compressor may overheat and stop operation.
■When on the extremely uneven roads with rocks
Sometimes the vehicle height is not adjusted because it is judged as uneven road driv-
ing.
Page 383 of 622

GX460_OM_OM60K80U_(U)
3835-1. Using the air conditioning system and defogger
5
Interior features
■Registering air conditioning settings to electronic keys
●Unlocking the vehicle using an electronic key and turning the engine switch to
IGNITION ON mode will recall that key’s registered air conditioning settings.
●When the engine switch is turned off, the current air conditioning settings will automat-
ically be registered to the electronic key that was used to unlock the vehicle.
The system may not operate correctly if more th an one electronic key is in the vicinity or
if the smart access system with push-button start is used to unlock a passenger door.
Settings for the electronic key and the corresponding door can be changed.
Contact your Lexus dealer.
■Using automatic mode
Fan speed is adjusted automatically accordin g to the temperature setting and the ambi-
ent conditions.
Therefore, the fan may stop for a while until warm or cool air is ready to flow immediately
after the “AUTO” button is pressed.
■When the outside temperature exceeds 75 F (24 C) and the air conditioning system
is on
●In order to reduce the air conditioning po wer consumption, the air conditioning system
may switch to recirculated air mode automatically.
This may also reduce fuel consumption.
●Recirculated air mode is selected as a default mode when the engine switch is turned to
IGNITION ON mode.
●It is possible to switch to outside air mode at any time by pressing or
.
■Fogging up of the windows
●The windows will easily fog up when the humidity in the vehicle is high. Touching “A/C”
on will dehumidify the air from the outlets and defog the windshield effectively.
●If you turn “A/C” off, the windows may fog up more easily.
●The windows may fog up if the recirculated air mode is used.
■Outside/recirculated air mode
●When driving on dusty roads such as tunnels or in heavy traffic, set the outside/recircu-
lated air mode button to the recirculated ai r mode. This is effective in preventing out-
side air from entering the vehicle interior. During cooling operation, setting the
recirculated air mode will also cool the vehicle interior effectively.
●Outside/recirculated air mode may automati cally switch depending on the tempera-
ture setting or the inside temperature.
■Automatic mode for air intake control (veh icles with rear air conditioning system)
In automatic mode, the system detects exhaust gas and other pollutants and automati-
cally switches between outside air and recirculated air modes.
When the dehumidification function is off, and the fan is operating, turning automatic
mode on will activate the dehumidification function.
Page 384 of 622

3845-1. Using the air conditioning system and defogger
GX460_OM_OM60K80U_(U)
■When the outside temperature is low
The dehumidification function may not operate even when “A/C” is touched.
■Air conditioning odors
●During use, various odors from inside and outside the vehicle may enter into and accu-
mulate in the air conditioning system. This may then cause odor to be emitted from the
vents.
●To reduce potential odors from occurring:
• It is recommended that the air conditioning system be set to outside air mode prior to turning the vehicle off.
• The start timing of the blower may be dela yed for a short period of time immediately
after the air conditioning system is started in automatic mode.
■Air conditioning filter
P. 4 7 7
■Customization
Settings (e.g. A/C automatic mode switch operation) can be changed.
(Customizable features P. 5 7 8 )
Page 394 of 622

394
GX460_OM_OM60K80U_(U)5-2. Using the interior lights
■Illuminated entry system
The lights automatically turn on/off according to engine switch mode, the presence of the
electronic key, whether the doors are locked/unlocked, and whether the doors are
open/closed.
■To prevent battery discharge
If the following lights remain on when the engine
switch is turned off the lights will go off
automatically after 20 minutes:
●Pe r s o n a l /i n t e r i o r l i g h t
●Inside door handle lights
●Footwell lights
●Running board lights
■Customization
Settings (e.g. adjust the time elapsed before the interior light s automatically turn off) can
be changed. (Customizable features P. 5 8 3 )
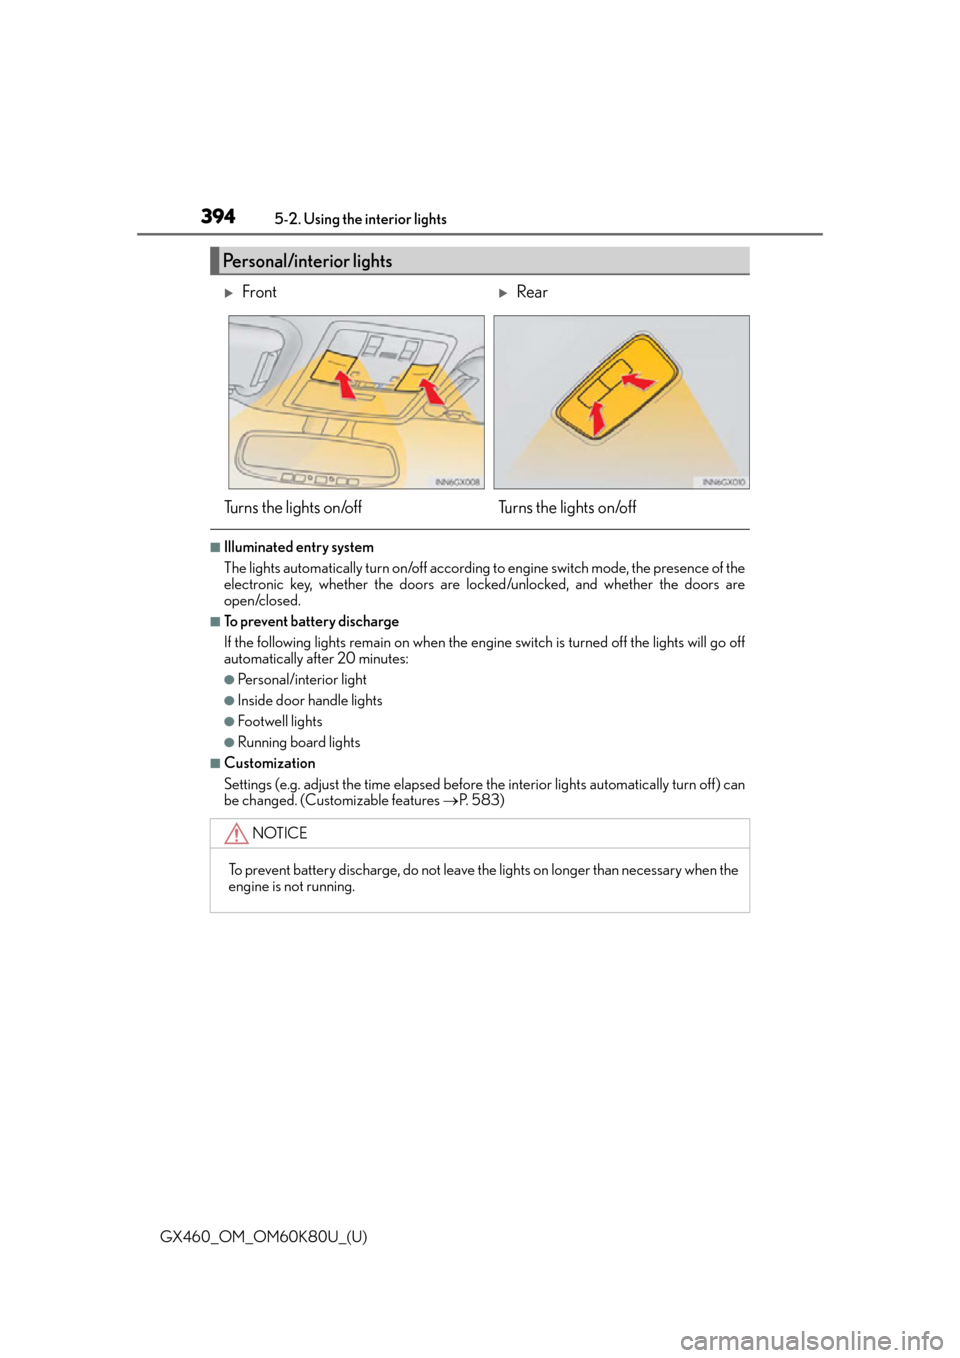
Personal/interior lights
FrontRear
Turns the lights on/off Turns the lights on/off
NOTICE
To prevent battery discharge, do not leave the lights on longer than necessary when the
engine is not running.
Page 544 of 622

5447-2. Steps to take in an emergency
GX460_OM_OM60K80U_(U)
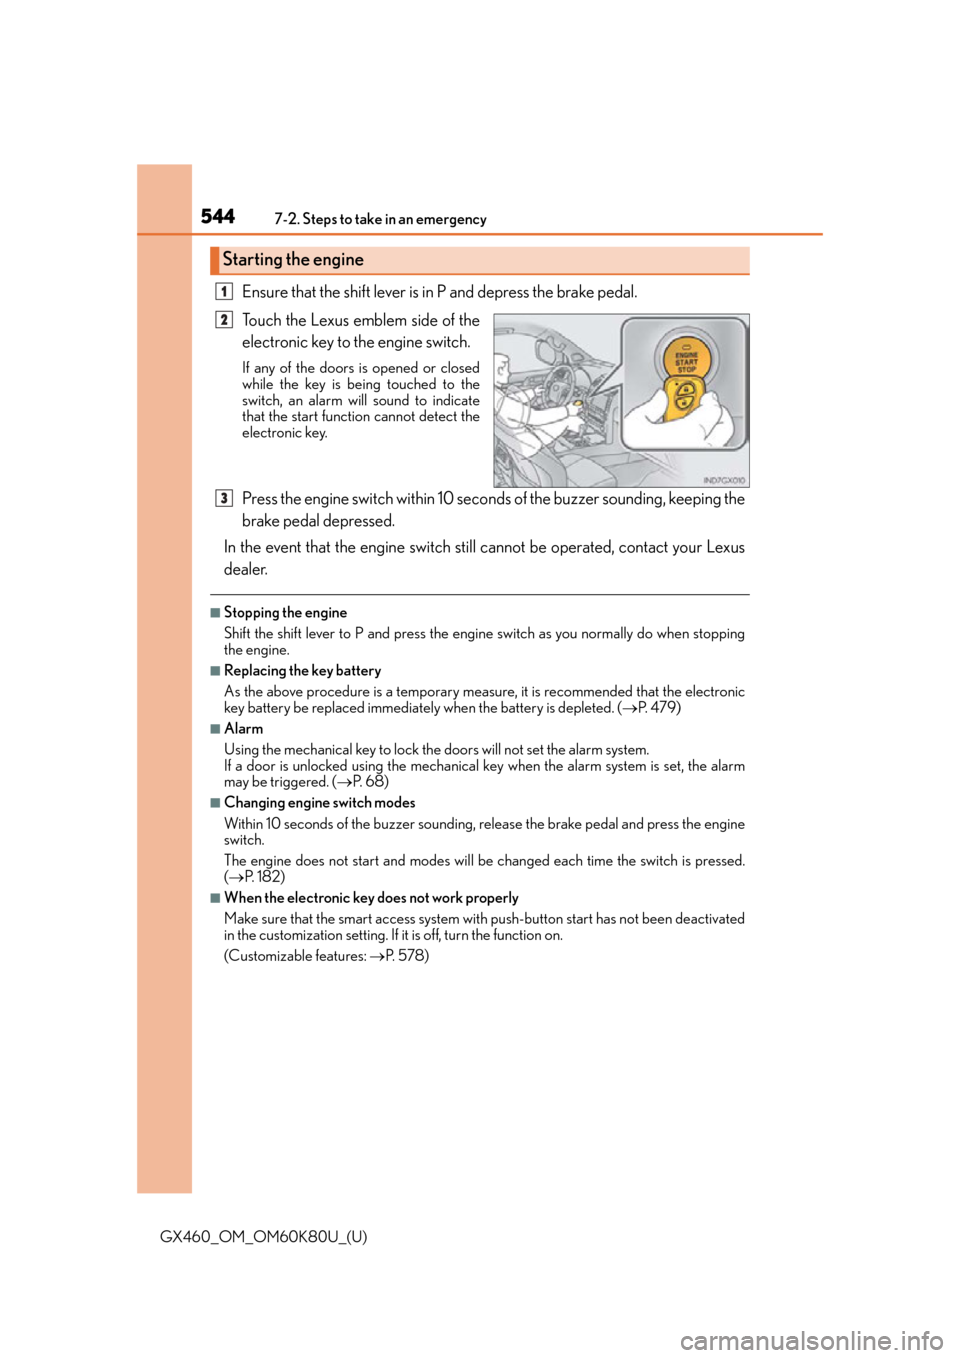
Ensure that the shift lever is in P and depress the brake pedal.
Touch the Lexus emblem side of the
electronic key to the engine switch.
If any of the doors is opened or closed
while the key is being touched to the
switch, an alarm will sound to indicate
that the start function cannot detect the
electronic key.
Press the engine switch within 10 seconds of the buzzer sounding, keeping the
brake pedal depressed.
In the event that the engine switch st ill cannot be operated, contact your Lexus
dealer.
■Stopping the engine
Shift the shift lever to P and press the engine switch as you normally do when stopping
the engine.
■Replacing the key battery
As the above procedure is a temporary measure, it is recommended that the electronic
key battery be replaced immediatel y when the battery is depleted. (P. 4 7 9 )
■Alarm
Using the mechanical key to lock th e doors will not set the alarm system.
If a door is unlocked using the mechanical key when the alarm system is set, the alarm
may be triggered. ( P. 6 8 )
■Changing engine switch modes
Within 10 seconds of the buzzer sounding, release the brake pedal and press the engine
switch.
The engine does not start and modes will be changed each time the switch is pressed.
( P. 1 8 2 )
■When the electronic key does not work properly
Make sure that the smart access system with push-button start has not been deactivated
in the customization setting. If it is off, turn the function on.
(Customizable features: P. 5 7 8 )
Starting the engine
1
2
3
Page 578 of 622

578
GX460_OM_OM60K80U_(U)8-2. Customization
Customizable features
■Changing by using the menu switch and the “ENTER” switch
When customizing vehicle features, ensure
that the vehicle is parked in a safe
place with the shift lever in P and the parking brake set.
Press and hold the menu switch to display customization mode. ( P. 8 1 )
Press the “ENTER” switch upwards or downwards to select the item to be
customized.
Press the “ENTER” switch to confirm.
Press the “ENTER” switch upwards or downwards to select the desired set-
ting for the item being customized.
Press the “ENTER” switch to confirm.
When customization is completed, pres s the menu switch to clear the cus-
tomization screen.
■Changing by using the multimedia system or navigation system
Press the “SETUP” button on the multimedia system or navigation system.
Select “Vehicle” on the “Setup” screen and select “Vehicle Customization”.
Various setting can be changed. Refer to the list of settings that can be
changed for details.
Your vehicle includes a variety of electronic features that can be personalized
to suit your preferences. The settings of these features can be changed by
using the steering wheel switches, the multimedia system or navigation sys-
tem or at your Lexus dealer.
It is also possible to customize cert ain vehicle features yourself using the
menu switch and the “ENTER” switch.
Customizing vehicle features
1
2
3
1
2