headlight Lexus GX460 2014 Using the air conditioning system and defogger / LEXUS 2014 GX460 (OM60K80U) Owner's Guide
[x] Cancel search | Manufacturer: LEXUS, Model Year: 2014, Model line: GX460, Model: Lexus GX460 2014Pages: 622, PDF Size: 8.61 MB
Page 416 of 622

416
GX460_OM_OM60K80U_(U)5-4. Using the other interior features
NOTICE
■To avoid damaging the power outlet and the plug (120 V AC)
●Close the power outlet lid when not in use.
●Do not allow foreign objects or liquids to
enter the power outlet, as this may cause a
short circuit.
●Do not use plug adaptors to connect too many plugs to the power outlet. (120 V AC)
●After removing a plug, gently close the power outlet lid. (120 V AC)
■To prevent the fuse from being blown
12 V DC: Do not use an accessory that uses more than 12 V 10 A.
120 V AC: Do not use a 120 V AC appliance that requires more than 100 W.
If a 120 V AC appliance that consumes more than 100 W is used, the protection circuit
will cut the power supply.
■Appliances that may not operate properly (120 V AC)
The following 120 V AC appliances may not operate even if their power consumption
is under 100 W.
●Appliances with high initial peak wattage
●Measuring devices that process precise data.
●Other appliances that require an extremely stable power supply
■To prevent battery discharge
12 V DC: Do not use the power outlet longer than necessary when the engine is not
running.
120 V AC: Turn off all the vehicle’s electronic equipment and accessories, such as the
headlights and air conditioning , when electrical appliances that consume in excess of
100 W are used continuously for long periods of time.
■To prevent any damage caused by heat (120 V AC)
●Do not use any electrical appliances that give off intense heat, such as toasters, in any
locations including the internal or external trim, seats and deck.
●Do not use any electrical appliances that are easily affected by vibration or heat inside
the vehicle. Vibration while driving, or the heat of the sun while parking, may result in
damage to those electrical appliances.
■If any electrical appliances are to be used while driving (120 V AC)
Securely fasten both the appliances and their cables to prevent them from falling or
getting caught in any of the power train components.
■If the power outlet is loose when an elec trical appliance plug is connected (120 V
AC)
Replace the outlet. Contact your Lexus dealer for any necessary replacements.
■If the power outlet gets dirty (120 V AC)
Turn the main switch off and use a soft, clean cloth to wipe it gently. Do not use any
cleansing materials, such as organic solvents, wax, or compound cleaners, as these
may damage the power outlet or cause it to malfunction.
Page 433 of 622

433
GX460_OM_OM60K80U_(U)
6Maintenance and care
6-1. Maintenance and careCleaning and protecting the vehicle exterior................. 434
Cleaning and protecting the vehicle interior .................. 437
6-2. Maintenance Maintenance requirements............................. 440
General mainte nance .............. 443
Emission inspection and maintenance (I/M)
programs .................................... 446
6-3. Do-it-yourself maintenance Do-it-yourself service precautions ................................ 447
Hood ............................................... 450
Engine compartment .................451
Tires .................................................. 464
Tire inflation pressure ................. 471
Wheels ........................................... 475
Air conditioning filter ................477
Electronic key battery .............. 479
Checking and replacing fuses ............................................... 481
Headlight aim ..............................484
Light bulbs.....................................486
Page 444 of 622
444
GX460_OM_OM60K80U_(U)6-2. Maintenance
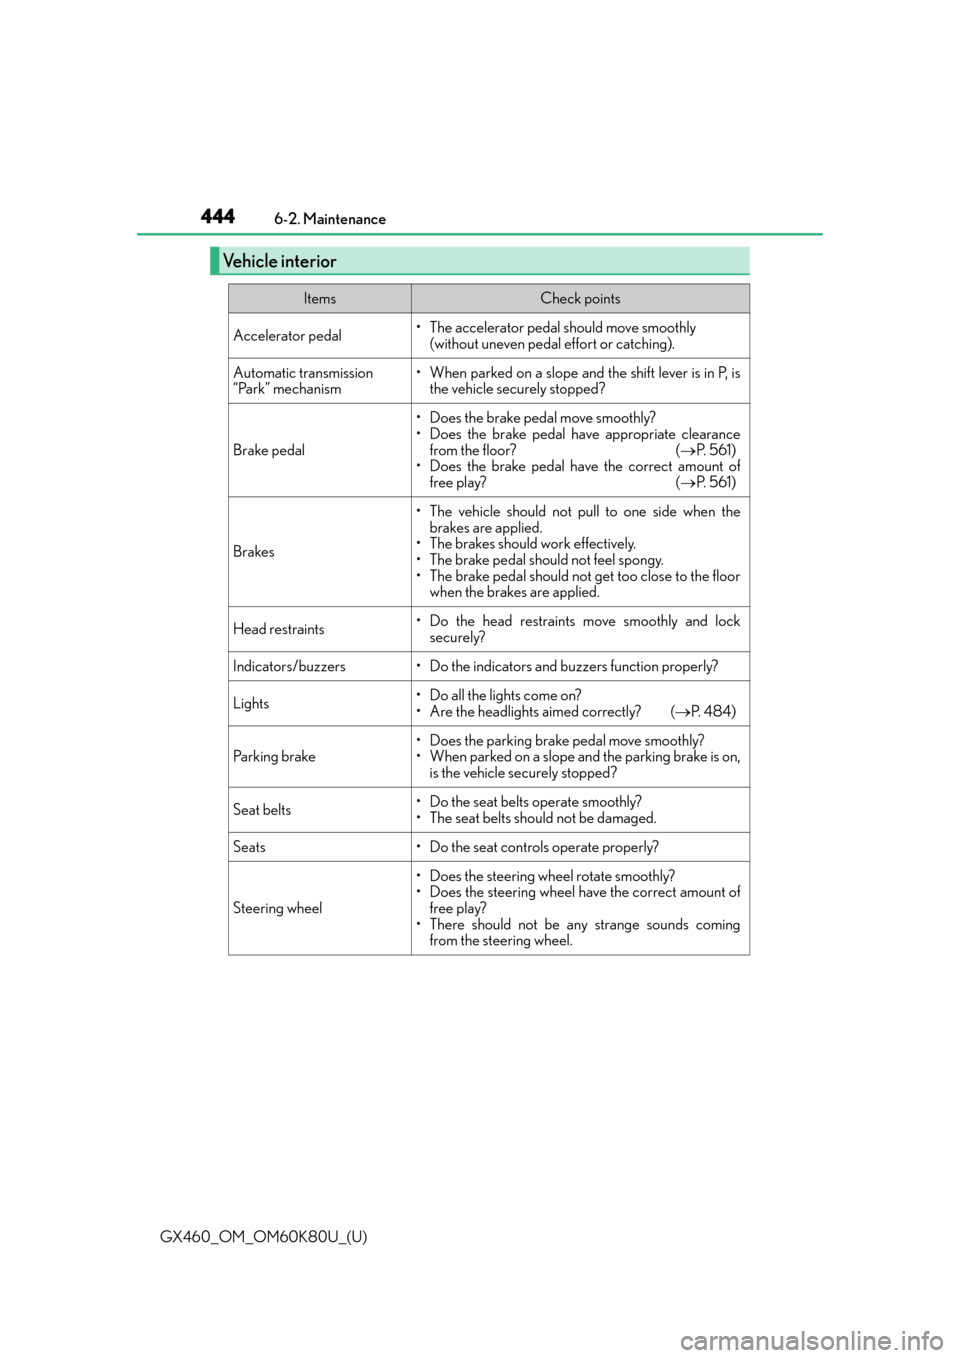
Vehicle interior
ItemsCheck points
Accelerator pedal• The accelerator pedal should move smoothly
(without uneven pedal effort or catching).
Automatic transmission
“Park” mechanism• When parked on a slope and the shift lever is in P, isthe vehicle securely stopped?
Brake pedal
• Does the brake pedal move smoothly?
• Does the brake pedal have appropriate clearance
from the floor? ( P. 5 6 1 )
• Does the brake pedal have the correct amount of
free play? ( P. 5 6 1 )
Brakes
• The vehicle should not pull to one side when the
brakes are applied.
• The brakes should work effectively.
• The brake pedal should not feel spongy.
• The brake pedal should not get too close to the floor when the brakes are applied.
Head restraints• Do the head restraints move smoothly and lock
securely?
Indicators/buzzers• Do the indicators and buzzers function properly?
Lights• Do all the lights come on?
• Are the headlights aimed correctly? ( P. 484)
Parking brake• Does the parking brake pedal move smoothly?
• When parked on a slope and the parking brake is on,
is the vehicle securely stopped?
Seat belts•Do the seat belt s operate smoothly?
• The seat belts should not be damaged.
Seats• Do the seat controls operate properly?
Steering wheel
• Does the steering wheel rotate smoothly?
• Does the steering wheel have the correct amount of free play?
• There should not be an y strange sounds coming
from the steering wheel.
Page 448 of 622
448
GX460_OM_OM60K80U_(U)6-3. Do-it-yourself maintenance
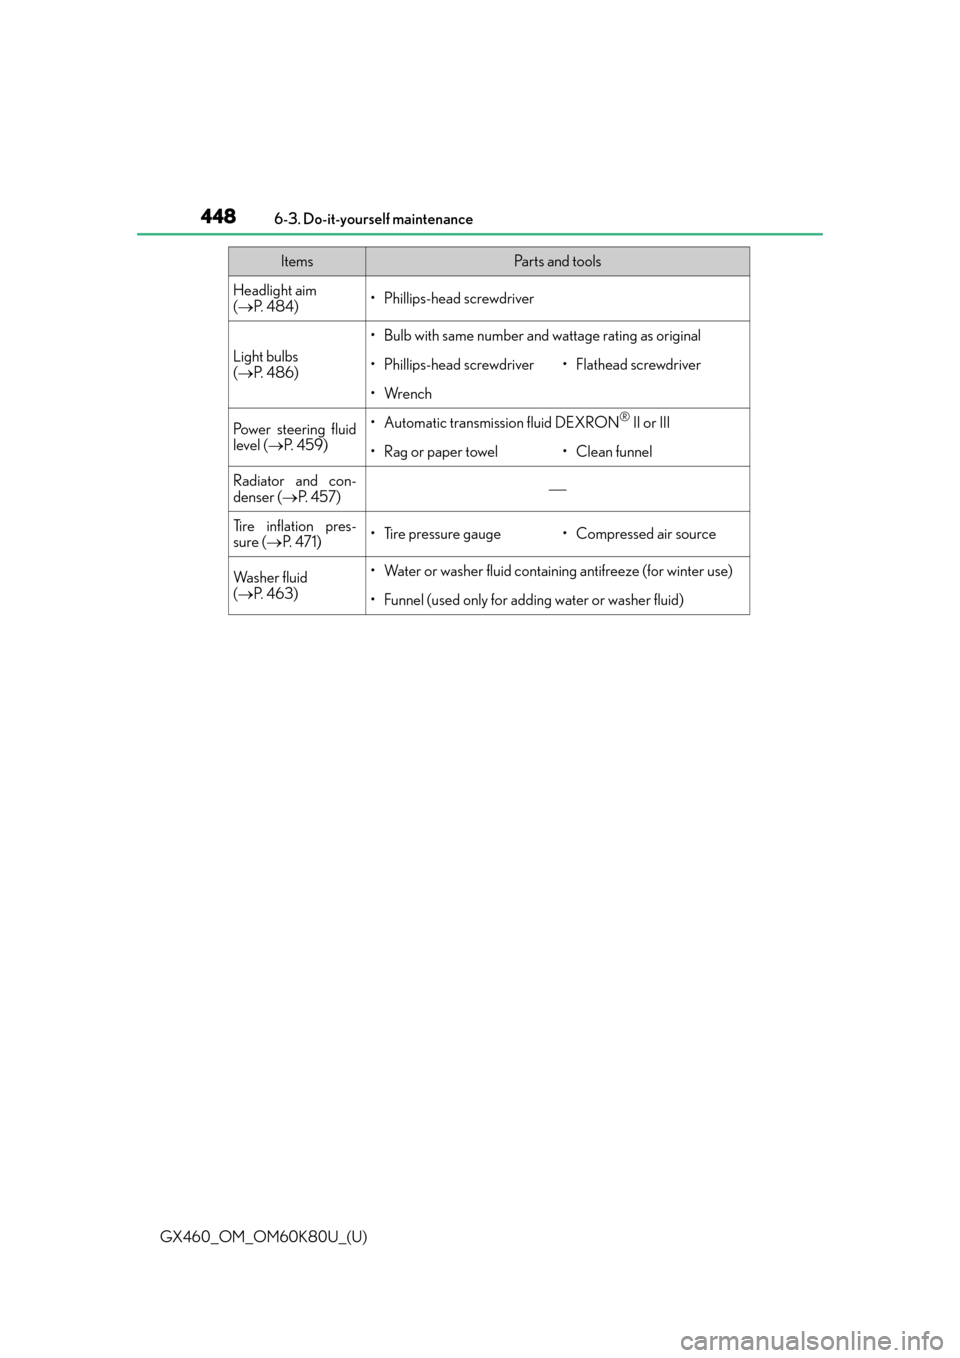
Headlight aim
(
P. 4 8 4 )• Phillips-head screwdriver
Light bulbs
( P. 4 8 6 )
• Bulb with same number and wattage rating as original
• Phillips-head screwdriver•Flathead screwdriver
•Wrench
Power steering fluid
level ( P. 4 5 9 )• Automatic transmission fluid DEXRON® II or III
•Rag or paper towel•Clean funnel
Radiator and con-
denser ( P. 4 5 7 )
Tire inflation pres-
sure (P. 4 7 1 )•Tire pressure gauge• Compressed air source
Wa s h e r f l u i d
( P. 4 6 3 )• Water or washer fluid containi ng antifreeze (for winter use)
• Funnel (used only for adding water or washer fluid)
ItemsPa r t s a n d t o o l s
Page 484 of 622

484
GX460_OM_OM60K80U_(U)6-3. Do-it-yourself maintenance
Headlight aim
Adjustment bolt A
Adjustment bolt B
Make sure the vehicle has a full tank of gasoline and the area around the
headlight is not deformed.
Park the vehicle on level ground.
Sit in the driver’s seat.
Bounce the vehicle several times.
Vertical movement adjusting bolts
1
2
Before checking the headlight aim
1
2
3
4
Page 485 of 622

GX460_OM_OM60K80U_(U)
4856-3. Do-it-yourself maintenance
6
Maintenance and care
Using a Phillips-head screwdriver, turn bolt A in either direction.
Remember the turning direction and the number of turns.
Turn bolt B the same number of turns
and in the same direction as step .
If the headlight cannot be adjusted using
this procedure, take the vehicle to your
Lexus dealer to adjust the headlight aim.
Adjusting the headlight aim
1
Left-hand sideRight-hand side
2
1
Page 486 of 622
486
GX460_OM_OM60K80U_(U)6-3. Do-it-yourself maintenance
Light bulbs
Check the wattage and color of the light bulb being replaced. (
P. 5 6 3 )
P. 4 5 2
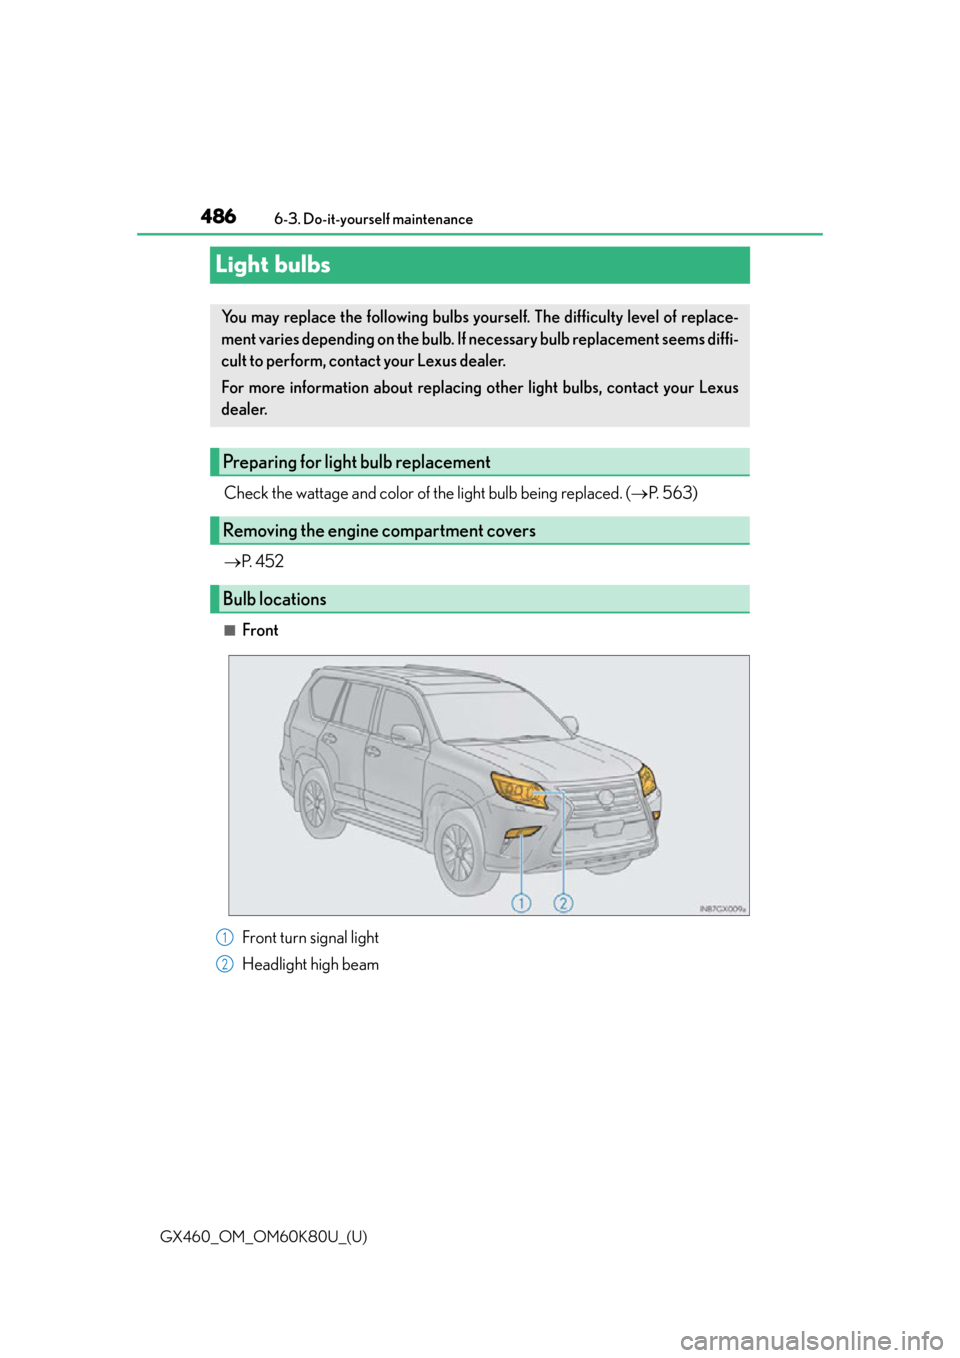
■Front
You may replace the following bulbs your self. The difficulty level of replace-
ment varies depending on the bulb. If necessary bulb replacement seems diffi-
cult to perform, contact your Lexus dealer.
For more information about replacing other light bulbs, contact your Lexus
dealer.
Preparing for light bulb replacement
Removing the engine compartment covers
Bulb locations
Front turn signal light
Headlight high beam1
2
Page 488 of 622
488
GX460_OM_OM60K80U_(U)6-3. Do-it-yourself maintenance
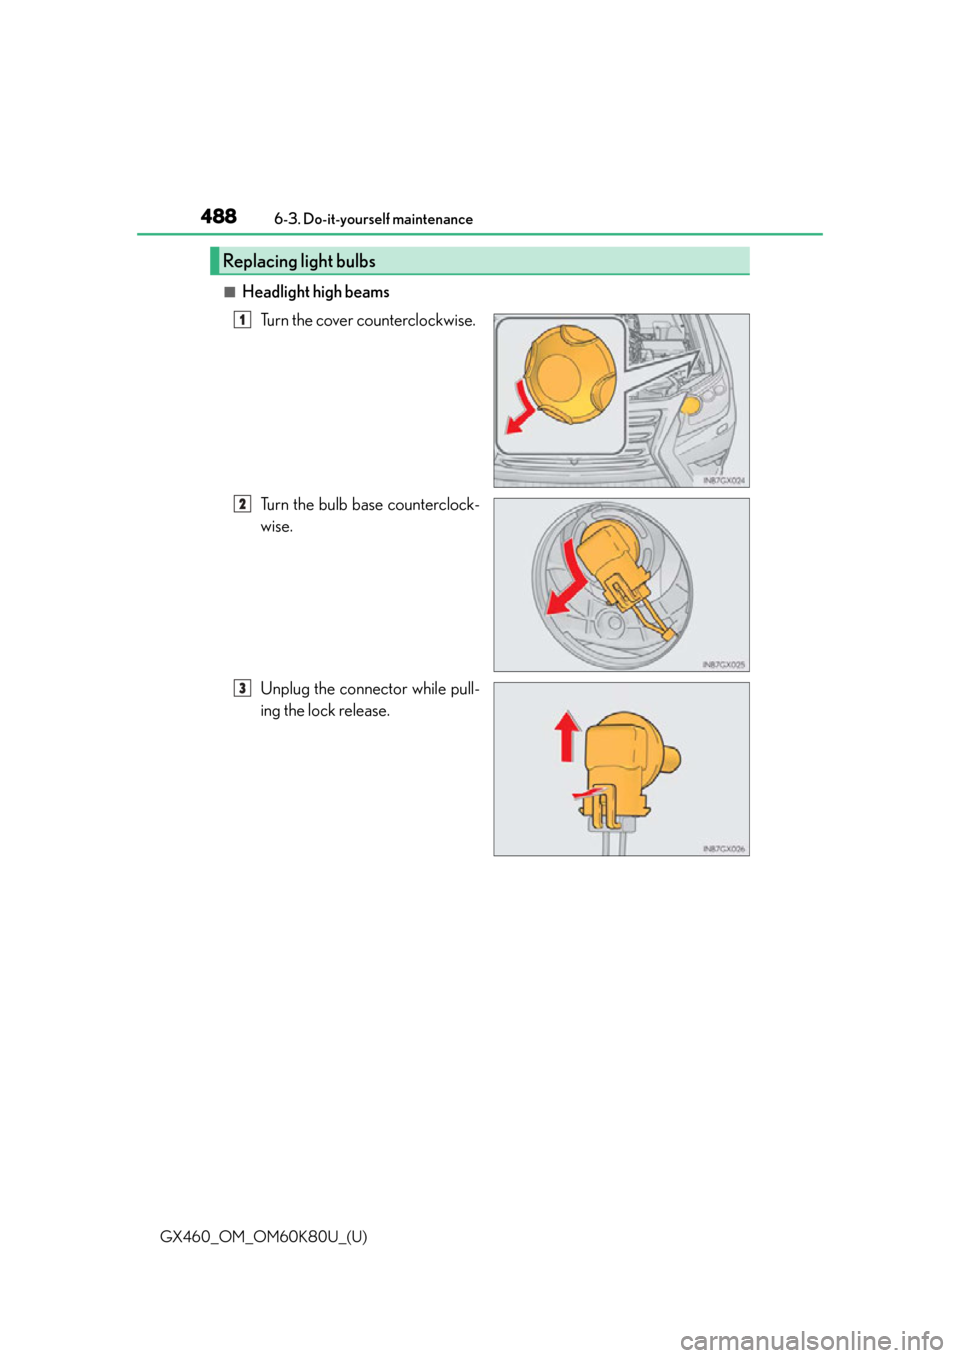
■Headlight high beams
Turn the cover counterclockwise.
Turn the bulb base counterclock-
wise.
Unplug the connector while pull-
ing the lock release.
Replacing light bulbs
1
2
3
Page 489 of 622
GX460_OM_OM60K80U_(U)
4896-3. Do-it-yourself maintenance
6
Maintenance and care
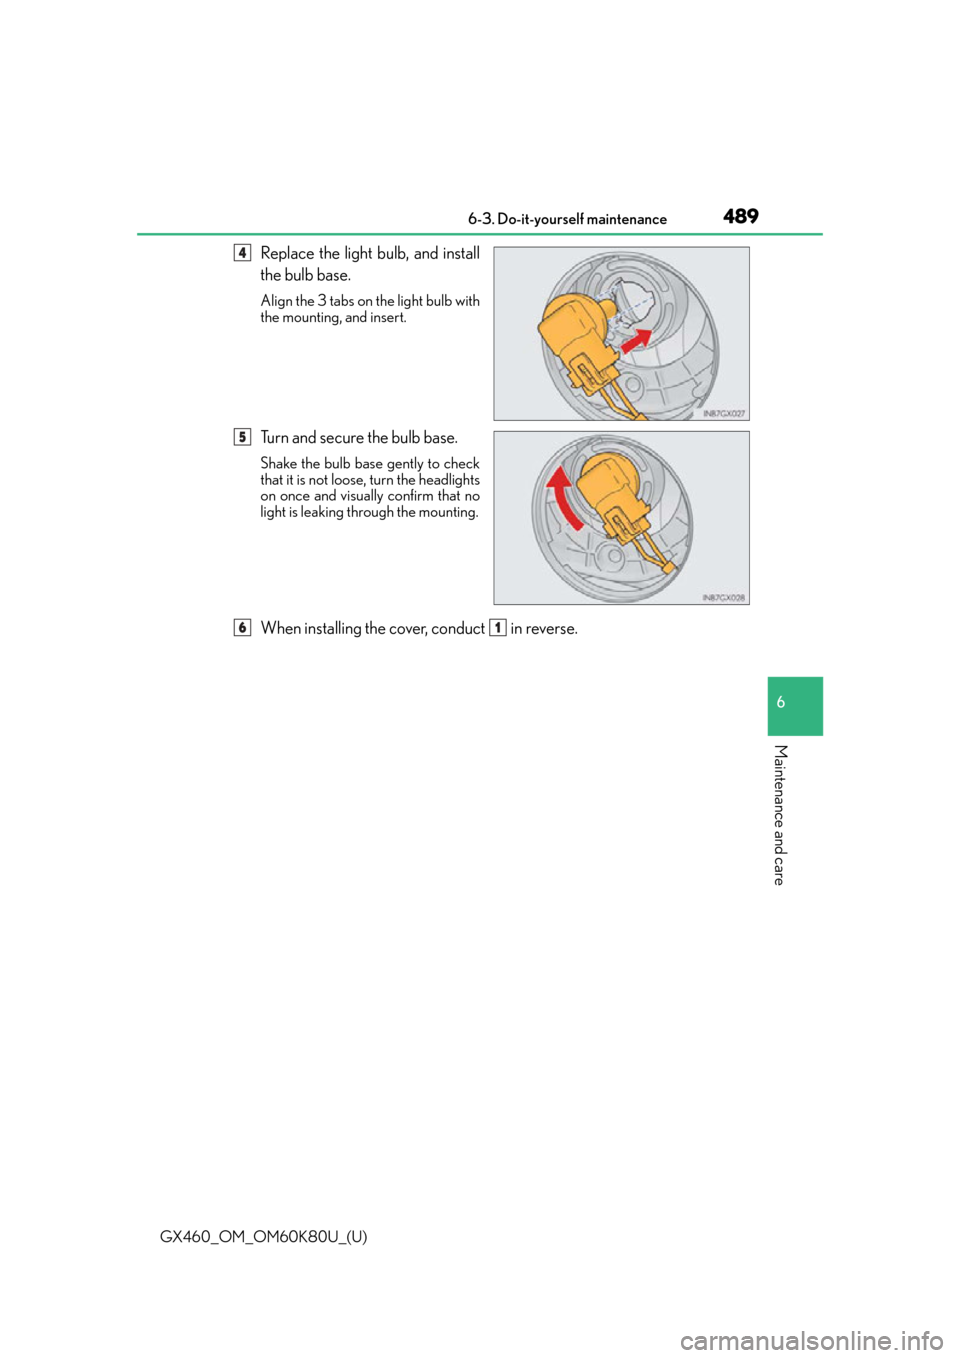
Replace the light bulb, and install
the bulb base.
Align the 3 tabs on the light bulb with
the mounting, and insert.
Turn and secure the bulb base.
Shake the bulb base gently to check
that it is not loose, turn the headlights
on once and visually confirm that no
light is leaking through the mounting.
When installing the cover, conduct in reverse.
4
5
61
Page 494 of 622
494
GX460_OM_OM60K80U_(U)6-3. Do-it-yourself maintenance
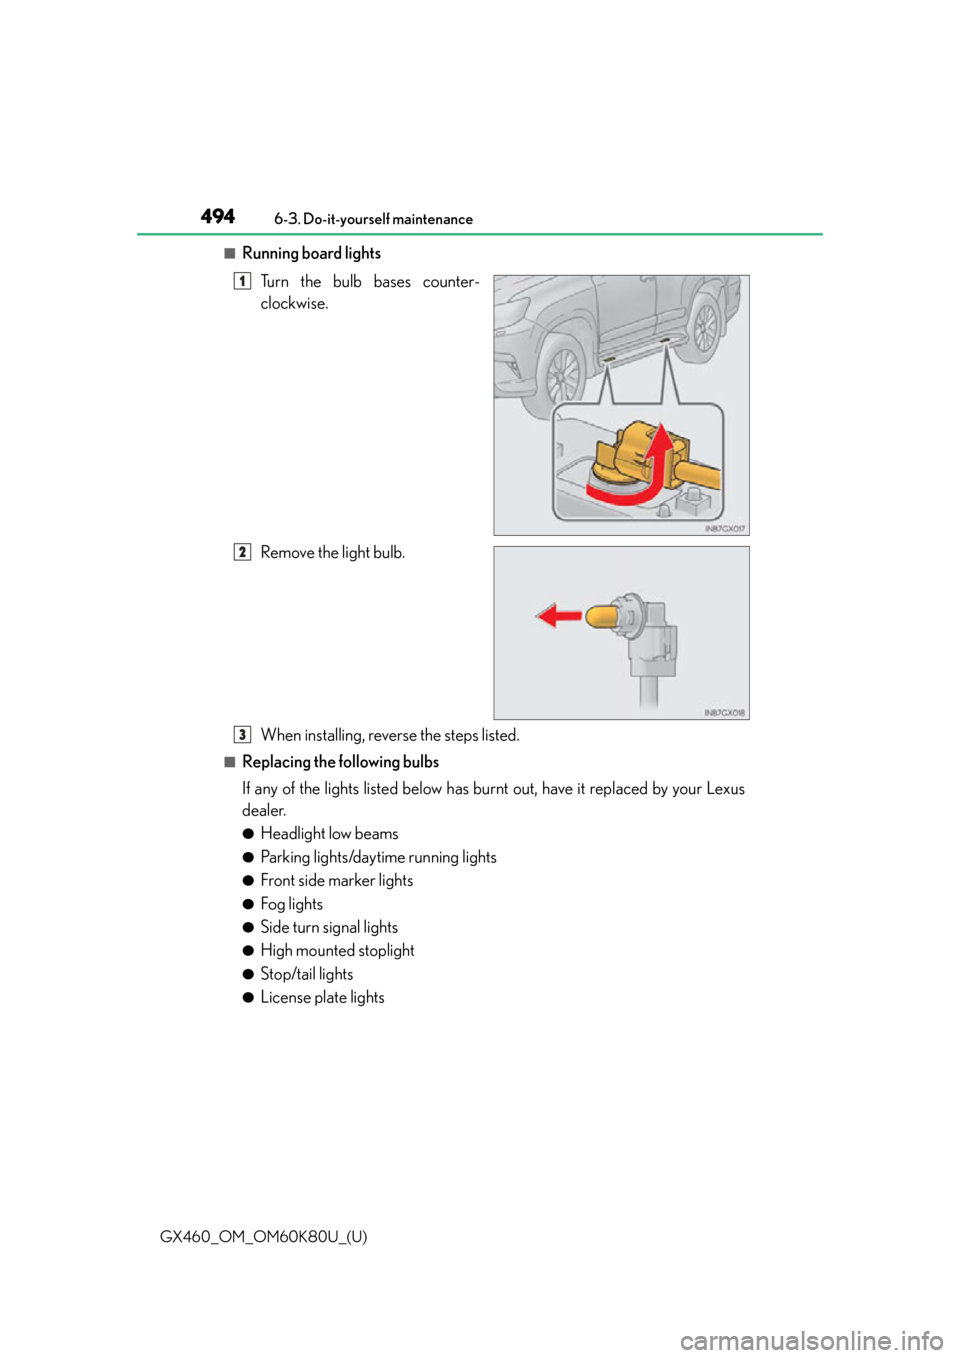
■Running board lights
Turn the bulb bases counter-
clockwise.
Remove the light bulb.
When installing, reverse the steps listed.
■Replacing the following bulbs
If any of the lights listed below has burnt out, have it replaced by your Lexus
dealer.
●Headlight low beams
●Parking lights/daytime running lights
●Front side marker lights
●Fog lights
●Side turn signal lights
●High mounted stoplight
●Stop/tail lights
●License plate lights
1
2
3