height Lexus GX460 2014 Using the air conditioning system and defogger / LEXUS 2014 GX460 OWNERS MANUAL (OM60K80U)
[x] Cancel search | Manufacturer: LEXUS, Model Year: 2014, Model line: GX460, Model: Lexus GX460 2014Pages: 622, PDF Size: 8.61 MB
Page 3 of 622

3
1
8 7
6
5
4
3
2
GX460_OM_OM60K80U_(U)
9
4-1. Before driving Driving the vehicle ..................... 150
Cargo and luggage..................... 157
Vehicle load limits ......................... 161
Trailer towing (with towing hitch) .................... 162
Dinghy towing .............................. 180
4-2. Driving procedures Engine (ign ition) switch .............. 181
Automatic transmission ........... 186
Turn signal lever ........................... 190
Parking brake ................................. 191
4-3. Operating the lights and wipers
Headlight switch ..........................192
Automatic High Beam...............195
Fog light switch ...........................200
Windshield wipers and washer ......................................... 202
Rear window wiper and washer ......................................... 207
Headlight cleaner switch........ 209
4-4. Refueling Opening the fuel tank cap ...... 210 4-5. Using the driving support
systems
Cruise control ............................... 214
Dynamic radar cruise control ........................................... 217
LDA (Lane Departure Alert)........ 228
Intuitive parking assist .............. 234
Rear view monitor system ...... 243
Lexus parking assist monitor........................................ 253
Wide view front & side monitor.........................................279
Multi-terrain Select................... 298
Multi-terrain Monitor............... 303
Rear height control air suspension ..................................327
AVS (Adaptive Variable Suspension System).................331
Four-wheel drive system ......... 332
Crawl Control ............................. 336
Downhill assist control system .......................................... 339
Driving assist systems ................341
BSM (Blind Spot Monitor)..... 347
• The Blind Spot Monitor function .................................... 352
• The Rear Cross Traffic Alert function ........................ 354
PCS (Pre-Collision system) ...........357
4-6. Driving tips Winter driving tips ..................... 366
Off-road precautions ............... 369
4Driving
Page 20 of 622
20Pictorial index
GX460_OM_OM60K80U_(U)
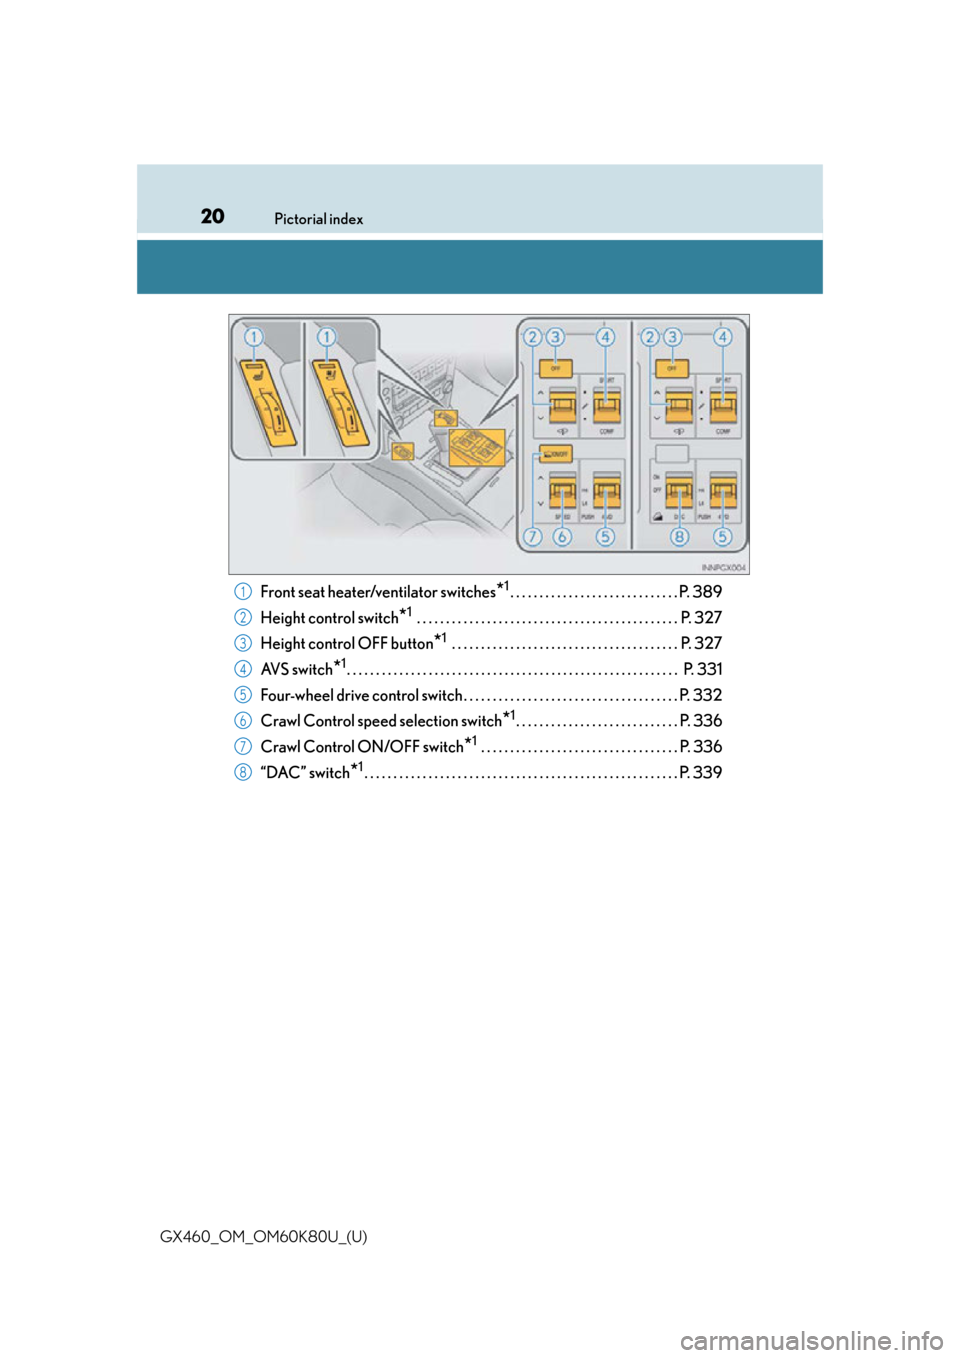
Front seat heater/ventilator switches*1. . . . . . . . . . . . . . . . . . . . . . . . . . . . . P. 389
Height control switch
*1 . . . . . . . . . . . . . . . . . . . . . . . . . . . . . . . . . . . . . . . . . . . . . P. 327
Height control OFF button
*1 . . . . . . . . . . . . . . . . . . . . . . . . . . . . . . . . . . . . . . . P. 327
AV S s w i t c h
*1. . . . . . . . . . . . . . . . . . . . . . . . . . . . . . . . . . . . . . . . . . . . . . . . . . . . . . . . . P. 331
Four-wheel drive control switch . . . . . . . . . . . . . . . . . . . . . . . . . . . . . . . . . . . . . P. 332
Crawl Control speed selection switch
*1. . . . . . . . . . . . . . . . . . . . . . . . . . . . P. 336
Crawl Control ON/OFF switch
*1 . . . . . . . . . . . . . . . . . . . . . . . . . . . . . . . . . . P. 336
“DAC” switch
*1. . . . . . . . . . . . . . . . . . . . . . . . . . . . . . . . . . . . . . . . . . . . . . . . . . . . . . P. 339
1
2
3
4
5
6
7
8
Page 29 of 622
291-1. For safe use
GX460_OM_OM60K80U_(U)
1
For safety and security
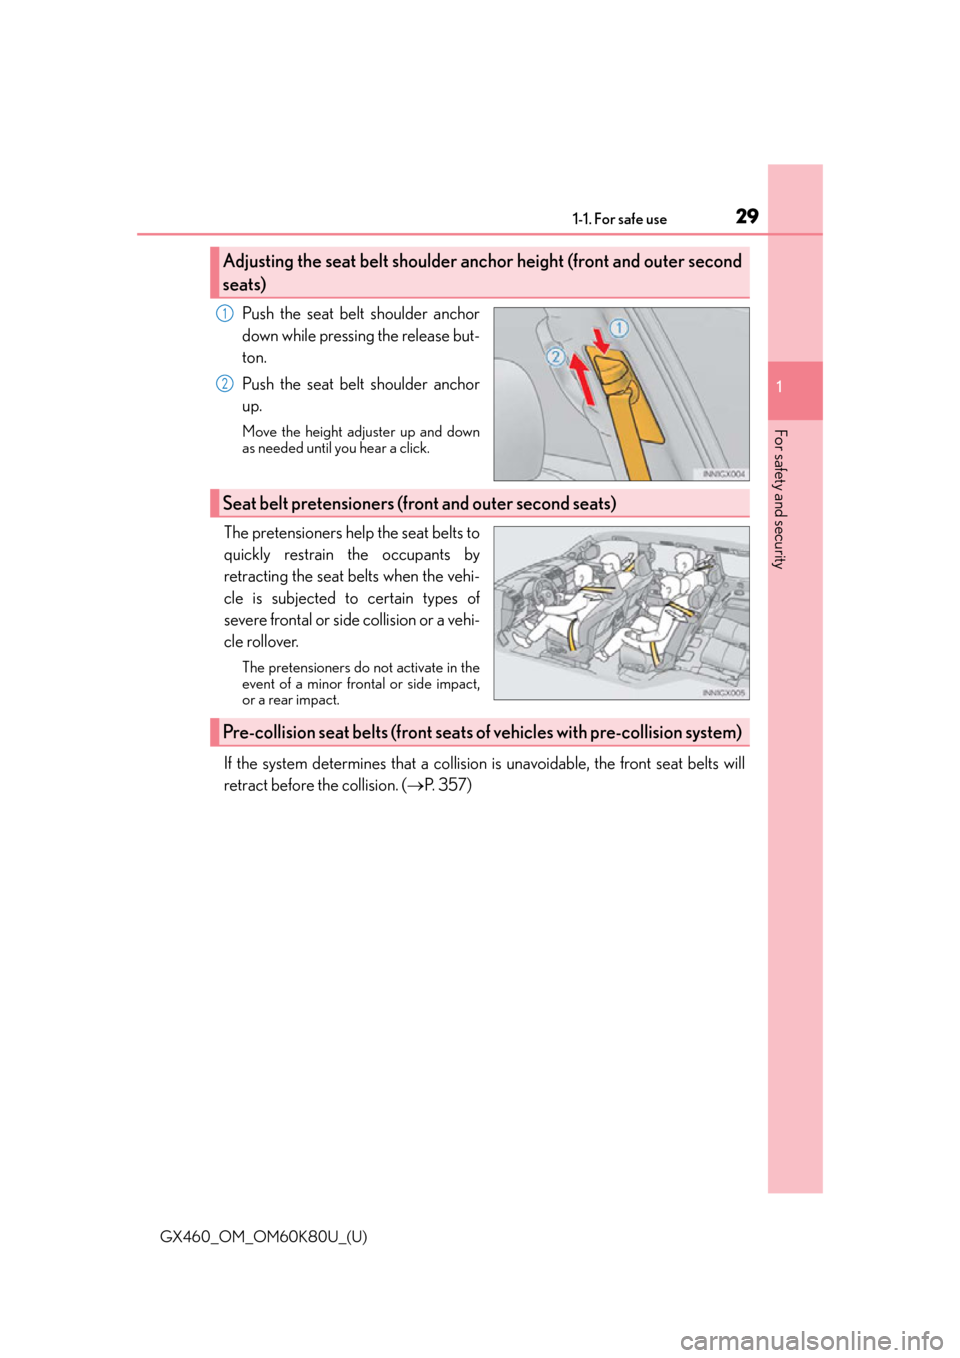
Push the seat belt shoulder anchor
down while pressing the release but-
ton.
Push the seat belt shoulder anchor
up.
Move the height adjuster up and down
as needed until you hear a click.
The pretensioners help the seat belts to
quickly restrain the occupants by
retracting the seat belts when the vehi-
cle is subjected to certain types of
severe frontal or side collision or a vehi-
cle rollover.
The pretensioners do not activate in the
event of a minor frontal or side impact,
or a rear impact.
If the system determines that a collision is unavoidable, the front seat belts will
retract before the collision. ( P. 3 5 7 )
Adjusting the seat belt shoulder anc hor height (front and outer second
seats)
1
2
Seat belt pretensioners (front and outer second seats)
Pre-collision seat belts (front seats of vehicles with pre-collision system)
Page 77 of 622
77
GX460_OM_OM60K80U_(U)2. Instrument cluster
2
Instrument cluster
Gauges and meters
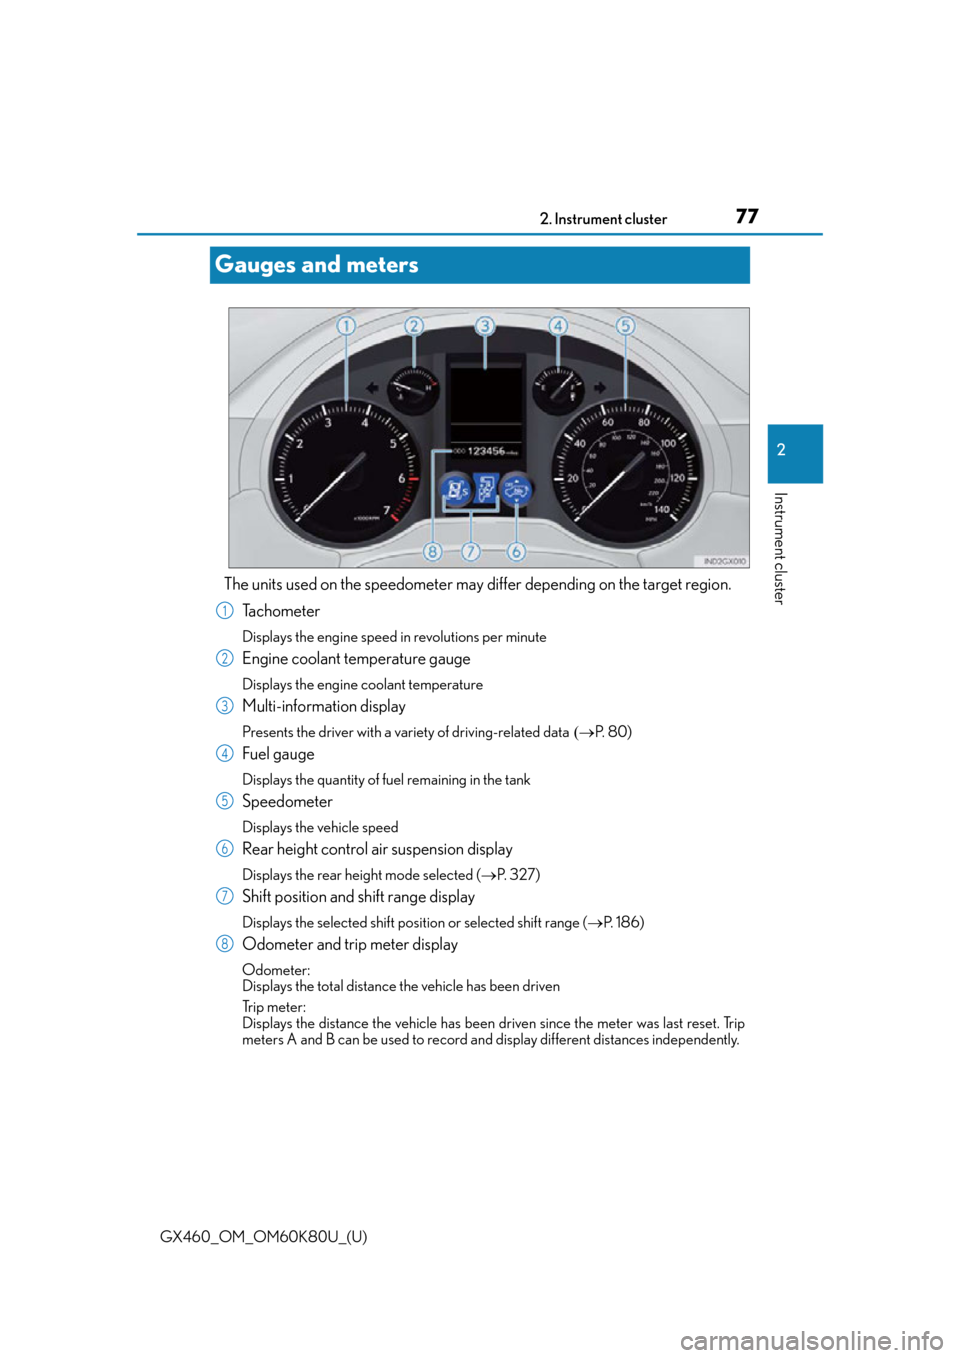
The units used on the speedometer may di
ffer depending on the target region.
Tachometer
Displays the engine speed in revolutions per minute
Engine coolant temperature gauge
Displays the engine coolant temperature
Multi-information display
Presents the driver with a va riety of driving-related dataP. 8 0 )
Fuel gauge
Displays the quantity of fuel remaining in the tank
Speedometer
Displays the vehicle speed
Rear height control air suspension display
Displays the rear heig ht mode selected (P. 3 2 7 )
Shift position and shift range display
Displays the selected shift posi tion or selected shift range (P. 1 8 6 )
Odometer and trip meter display
Odometer:
Displays the total distance the vehicle has been driven
Tr i p m e t e r :
Displays the distance the vehicle has been driven since the meter was last reset. Trip
meters A and B can be used to record an d display different distances independently.
1
2
3
4
5
6
7
8
Page 115 of 622
115
GX460_OM_OM60K80U_(U)3-3. Adjusting the seats
3
Operation of each component
Front seats
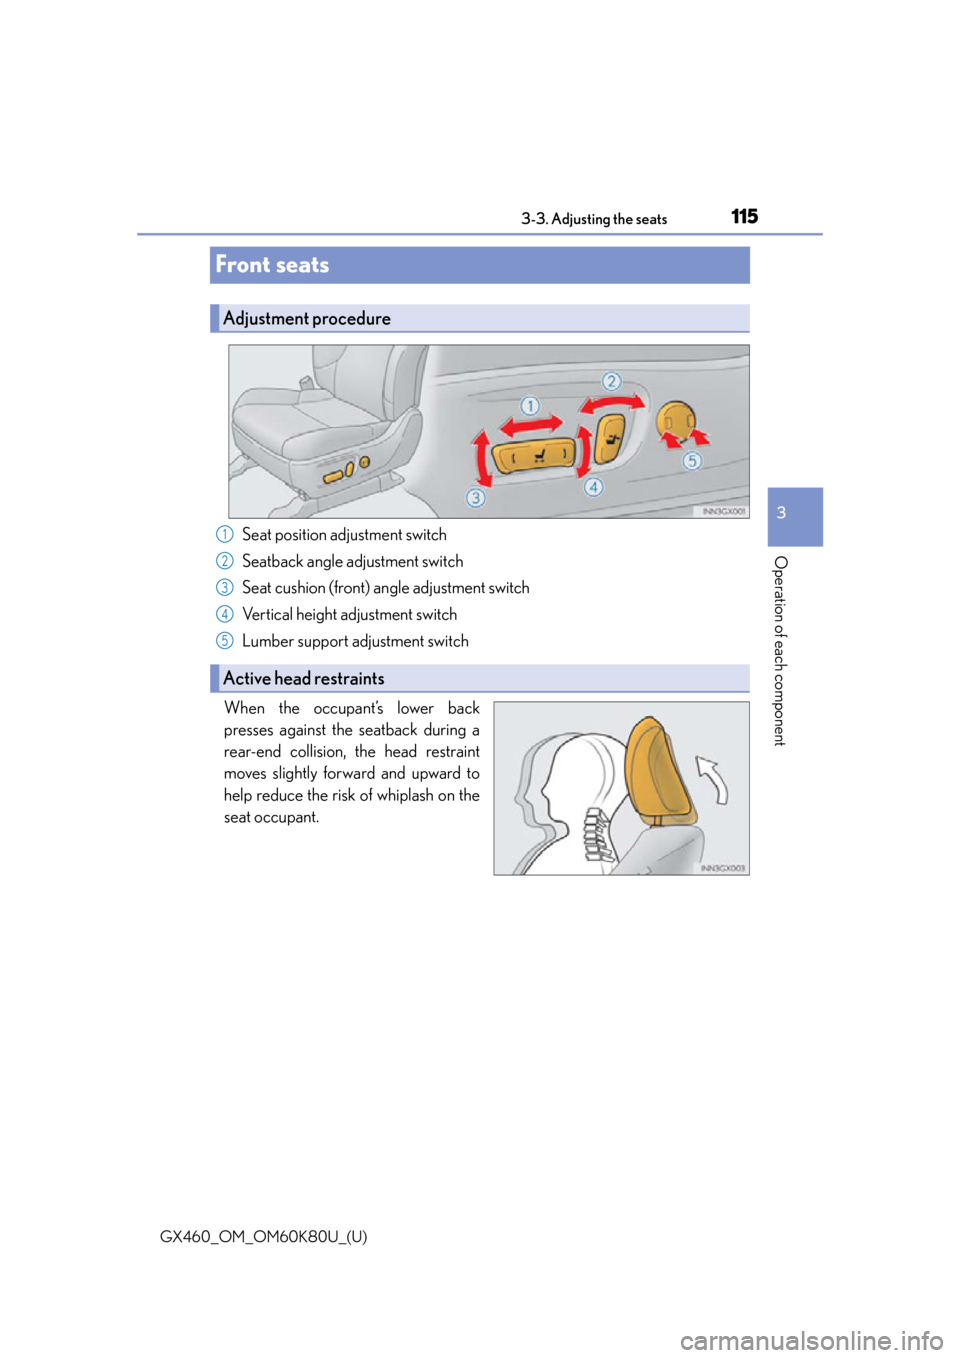
Seat position adjustment switch
Seatback angle adjustment switch
Seat cushion (front) angle adjustment switch
Vertical height adjustment switch
Lumber support adjustment switch
When the occupant’s lower back
presses against the seatback during a
rear-end collision, the head restraint
moves slightly forward and upward to
help reduce the risk of whiplash on the
seat occupant.
Adjustment procedure
Active head restraints
1
2
3
4
5
Page 133 of 622

GX460_OM_OM60K80U_(U)
1333-3. Adjusting the seats
3
Operation of each component
■Removing the head restraints
Front and second seats
Third seats
The head restraint cannot be removed.
■Installing the head restraints (front and second seats)
■Adjusting the height of the head re straints (front and second seats)
■Using the second center seat head restraint
■Using the third seats
Always lift the head restraints up until they lock when using.
Pull the head restraint up
while pressing the lock
release button.
Align the head restrain t with the installation
holes and push it down to the lock position.
Make sure that the head restraints are adjusted
so that the center of the head restraint is closest
to the top of your ears.
Always raise the head restraint one level from
the stowed position when using.
Lock release button
Page 137 of 622

1373-4. Adjusting the steering wheel and mirrors
3
Operation of each component
GX460_OM_OM60K80U_(U)
Inside rear view mirror
The height of the rear view mirror can be adjusted to suit your driving posture.
Adjust the height of the rear view mir-
ror by moving it up and down.
Responding to the level of brightness of the headlights of vehicles behind, the
reflected light is automatically reduced.
Without compass
Turns automatic mode on
Turns automatic mode off
The indicator comes on when automatic
mode is turned on.
The mirror reverts to automatic mode
each time the engine switch is turned to
IGNITION ON mode.
The rear view mirror’s position can be adjusted to enable sufficient confirma-
tion of the rear view.
Adjusting the height of rear view mirror
Anti-glare function
Indicator
1
2
Page 149 of 622

149
GX460_OM_OM60K80U_(U)
4Driving
4-1. Before drivingDriving the vehicle ...................... 150
Cargo and luggage .................... 157
Vehicle load limits ......................... 161
Tr a i l e r t o w i n g (with towing hitch).................... 162
Dinghy towing...............................180
4-2. Driving procedures Engine (ignition) switch ............. 181
Automatic transmission ............ 186
Turn signal lever ........................... 190
Parking brake ................................. 191
4-3. Operating the lights and wipers
Headlight switch .......................... 192
Automatic High Beam .............. 195
Fog light switch........................... 200
Windshield wipers and washer..........................................202
Rear window wiper and washer.......................................... 207
Headlight cleaner switch ....... 209
4-4. Refueling Opening the fuel tank cap....... 210 4-5. Using the driving support
systems
Cruise control ...............................214
Dynamic radar cruise control ........................................... 217
LDA (Lane Departure Alert) ........ 228
Intuitive parking assist .............. 234
Rear view monitor system ...... 243
Lexus parking assist monitor ........................................ 253
Wide view front & side monitor ........................................ 279
Multi-terrain Select ................... 298
Multi-terrain Monitor ...............303
Rear height control air suspension ................................. 327
AVS (Adaptive Variable Suspension System) ................ 331
Four-wheel drive system ......... 332
Crawl Control ............................. 336
Downhill assist control system .......................................... 339
Driving assist systems................ 341
BSM (Blind Spot Monitor) ..... 347 • The Blind Spot Monitor function .................................... 352
• The Rear Cross Traffic Alert function......................... 354
PCS (Pre-Collision system) .......... 357
4-6. Driving tips Winter driving tips ..................... 366
Off-road precautions ............... 369
Page 167 of 622
GX460_OM_OM60K80U_(U)
1674-1. Before driving
4
Driving
●A recommended tongue weight varies in accordance with the types of trailers
or towing as described below.
●To ensure the recommended values shown below, the trailer must be loaded
by referring to the following instructions. •Tongue Weight
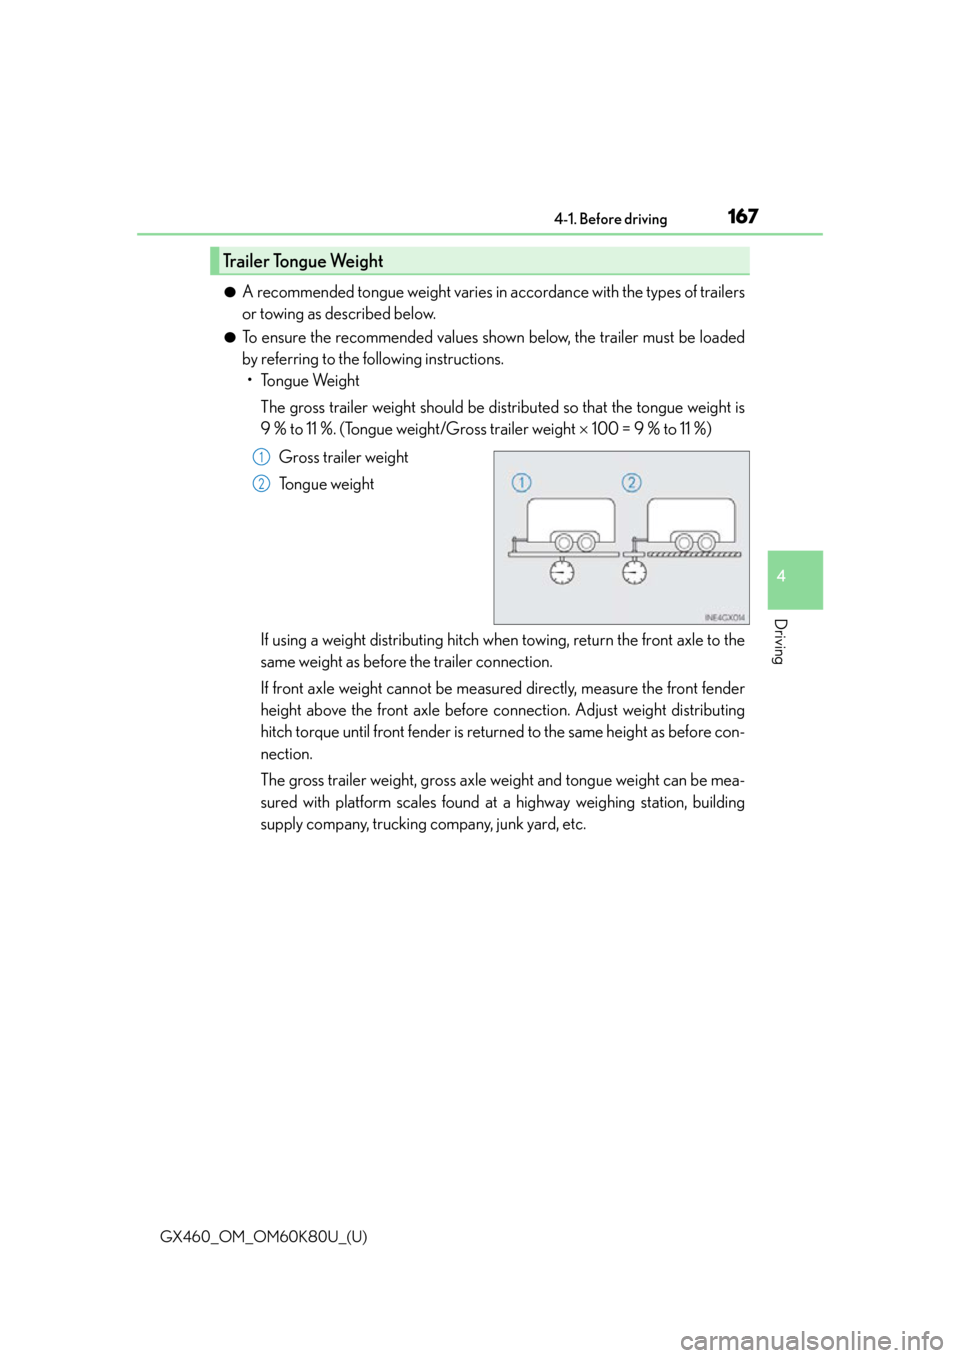
The gross trailer weight should be dist ributed so that the tongue weight is
9 % to 11 %. (Tongue weight/Gross trailer weight 100 = 9 % to 11 %)
Gross trailer weight
Tongue weight
If using a weight distributing hitch when towing, return the front axle to the
same weight as before the trailer connection.
If front axle weight cannot be measured directly, measure the front fender
height above the front axle before co nnection. Adjust weight distributing
hitch torque until front fender is return ed to the same height as before con-
nection.
The gross trailer weight, gross axle we ight and tongue weight can be mea-
sured with platform scales found at a highway weighing station, building
supply company, trucking company, junk yard, etc.
Trailer Tongue Weight
1
2
Page 171 of 622
GX460_OM_OM60K80U_(U)
1714-1. Before driving
4
Driving
Stop your vehicle and a trailer in line and perform the following:
●Connecting a trailerSet the rear height control air suspension to N mode.
Turn off the engine switch or the rear height control air suspension.
Connect the trailer.
Turn on the switch that was turned off on step .
●Disconnecting a trailer Set the rear height control air suspension to N mode.
Turn off the rear height control air suspension.
Turn off the engine switch.
Set the supporting leg of the trailer on the ground and raise the hitch by
4 in. (100 mm)
Turn on the engine switch.
Turn on the rear height control air suspension.
Wait until vehicle height is stabilized.
Make sure the hitch is disconnected. If the hitch does not disconnect, raise the
hitch higher and repeat steps through .
Connecting and disconnecting a trailer
1
2
3
42
1
2
3
4
5
6
7
27