suspension Lexus GX460 2014 Using the air conditioning system and defogger / LEXUS 2014 GX460 OWNERS MANUAL (OM60K80U)
[x] Cancel search | Manufacturer: LEXUS, Model Year: 2014, Model line: GX460, Model: Lexus GX460 2014Pages: 622, PDF Size: 8.61 MB
Page 3 of 622

3
1
8 7
6
5
4
3
2
GX460_OM_OM60K80U_(U)
9
4-1. Before driving Driving the vehicle ..................... 150
Cargo and luggage..................... 157
Vehicle load limits ......................... 161
Trailer towing (with towing hitch) .................... 162
Dinghy towing .............................. 180
4-2. Driving procedures Engine (ign ition) switch .............. 181
Automatic transmission ........... 186
Turn signal lever ........................... 190
Parking brake ................................. 191
4-3. Operating the lights and wipers
Headlight switch ..........................192
Automatic High Beam...............195
Fog light switch ...........................200
Windshield wipers and washer ......................................... 202
Rear window wiper and washer ......................................... 207
Headlight cleaner switch........ 209
4-4. Refueling Opening the fuel tank cap ...... 210 4-5. Using the driving support
systems
Cruise control ............................... 214
Dynamic radar cruise control ........................................... 217
LDA (Lane Departure Alert)........ 228
Intuitive parking assist .............. 234
Rear view monitor system ...... 243
Lexus parking assist monitor........................................ 253
Wide view front & side monitor.........................................279
Multi-terrain Select................... 298
Multi-terrain Monitor............... 303
Rear height control air suspension ..................................327
AVS (Adaptive Variable Suspension System).................331
Four-wheel drive system ......... 332
Crawl Control ............................. 336
Downhill assist control system .......................................... 339
Driving assist systems ................341
BSM (Blind Spot Monitor)..... 347
• The Blind Spot Monitor function .................................... 352
• The Rear Cross Traffic Alert function ........................ 354
PCS (Pre-Collision system) ...........357
4-6. Driving tips Winter driving tips ..................... 366
Off-road precautions ............... 369
4Driving
Page 41 of 622

411-1. For safe use
GX460_OM_OM60K80U_(U)
1
For safety and security
■If the SRS airbags deploy (inflate)
●Bruising and slight abrasions may result fr om contact with a deploying (inflating) SRS
airbag.
●A loud noise and white powder will be emitted.
●Parts of the airbag module (steering wheel hub, airbag cover and inflator) as well as the
front seats, parts of the front, side and rear pillars and roof side rails, may be hot for sev-
eral minutes. The airbag itself may also be hot.
●The windshield may crack.
●For Safety Connect subscribers, if the SRS airbags deploy or in the event of a severe
rear-end collision, the system is designed to send an emergency call to the response
center, notifying them of the vehicle’s location (without needing to push the “SOS” but-
ton) and an agent will attempt to speak wi th the occupants to ascertain the level of
emergency and assistance required. If the oc cupants are unable to communicate, the
argent automatically treats the call as an emergency and helps to dispatch the neces-
sary emergency services. ( P. 4 2 8 )
CAUTION
■Modification and disposal of SRS airbag system components
Do not dispose of your vehicle or perform any of the following modifications without
consulting your Lexus dealer. The SRS airb ags may malfunction or deploy (inflate)
accidentally, causing de ath or serious injury.
●Installation, removal, disassembl y and repair of the SRS airbags
●Repairs, modifications, removal or replac ement of the steering wheel, instrument
panel, dashboard, seats, seat upholstery, fron t, side and rear pillars or roof side rails
●Repairs or modifications of the front fender, front bumper, or side of the occupant
compartment
●Installation of a grille guar d (bull bars, kangaroo bar, etc.), snow plows, winches or
roof luggage carrier
●Modifications to the vehicle’s suspension system
●Installation of electronic devices such as mobile two-way radios and CD players
●Modifications to your vehicle for a person with a physical disability
Page 73 of 622

GX460_OM_OM60K80U_(U)
732. Instrument cluster
2
Instrument cluster
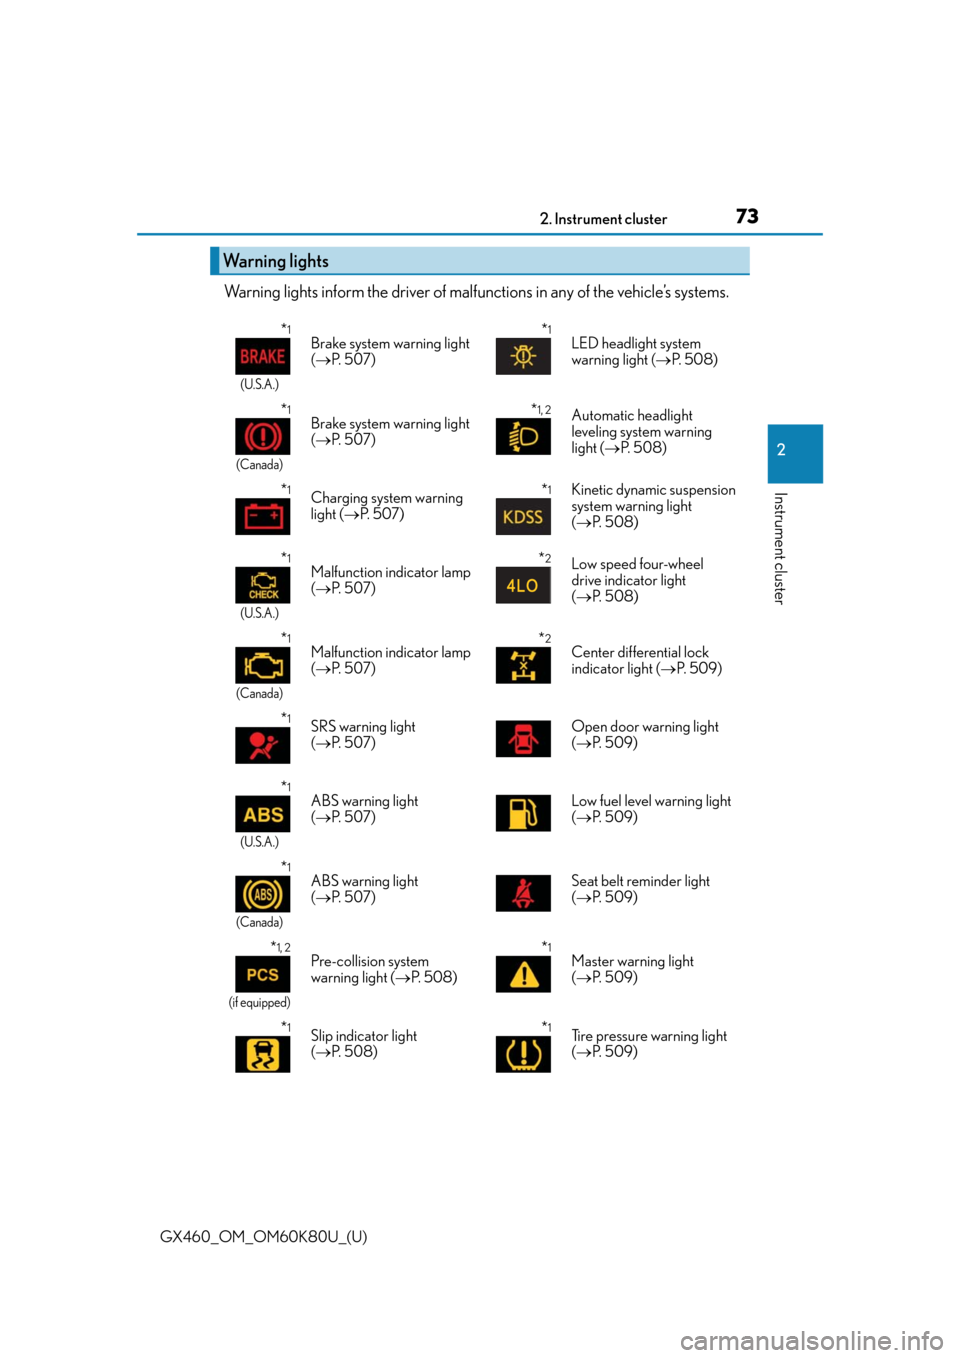
Warning lights inform the driver of malfunctions in any of the vehicle’s systems.
Warning lights
*1
(U.S.A.)
Brake system warning light
( P. 5 0 7 )*1LED headlight system
warning light ( P. 5 0 8 )
*1
(Canada)
Brake system warning light
( P. 5 0 7 )*1, 2Automatic headlight
leveling system warning
light ( P. 5 0 8 )
*1Charging system warning
light ( P. 5 0 7 )*1Kinetic dynamic suspension
system warning light
( P. 5 0 8 )
*1
(U.S.A.)
Malfunction indicator lamp
( P. 5 0 7 )*2Low speed four-wheel
drive indicator light
( P. 5 0 8 )
*1
(Canada)
Malfunction indicator lamp
( P. 5 0 7 )*2Center differential lock
indicator light ( P. 5 0 9 )
*1SRS warning light
( P. 5 0 7 ) Open door warning light
(
P. 5 0 9 )
*1
(U.S.A.)
ABS warning light
( P. 5 0 7 ) Low fuel level warning light
(
P. 5 0 9 )
*1
(Canada)
ABS warning light
( P. 5 0 7 ) Seat belt reminder light
(
P. 5 0 9 )
*1, 2
(if equipped)
Pre-collision system
warning light ( P. 5 0 8 )*1Master warning light
( P. 5 0 9 )
*1Slip indicator light
( P. 5 0 8 )*1Tire pressure warning light
( P. 5 0 9 )
Page 77 of 622

77
GX460_OM_OM60K80U_(U)2. Instrument cluster
2
Instrument cluster
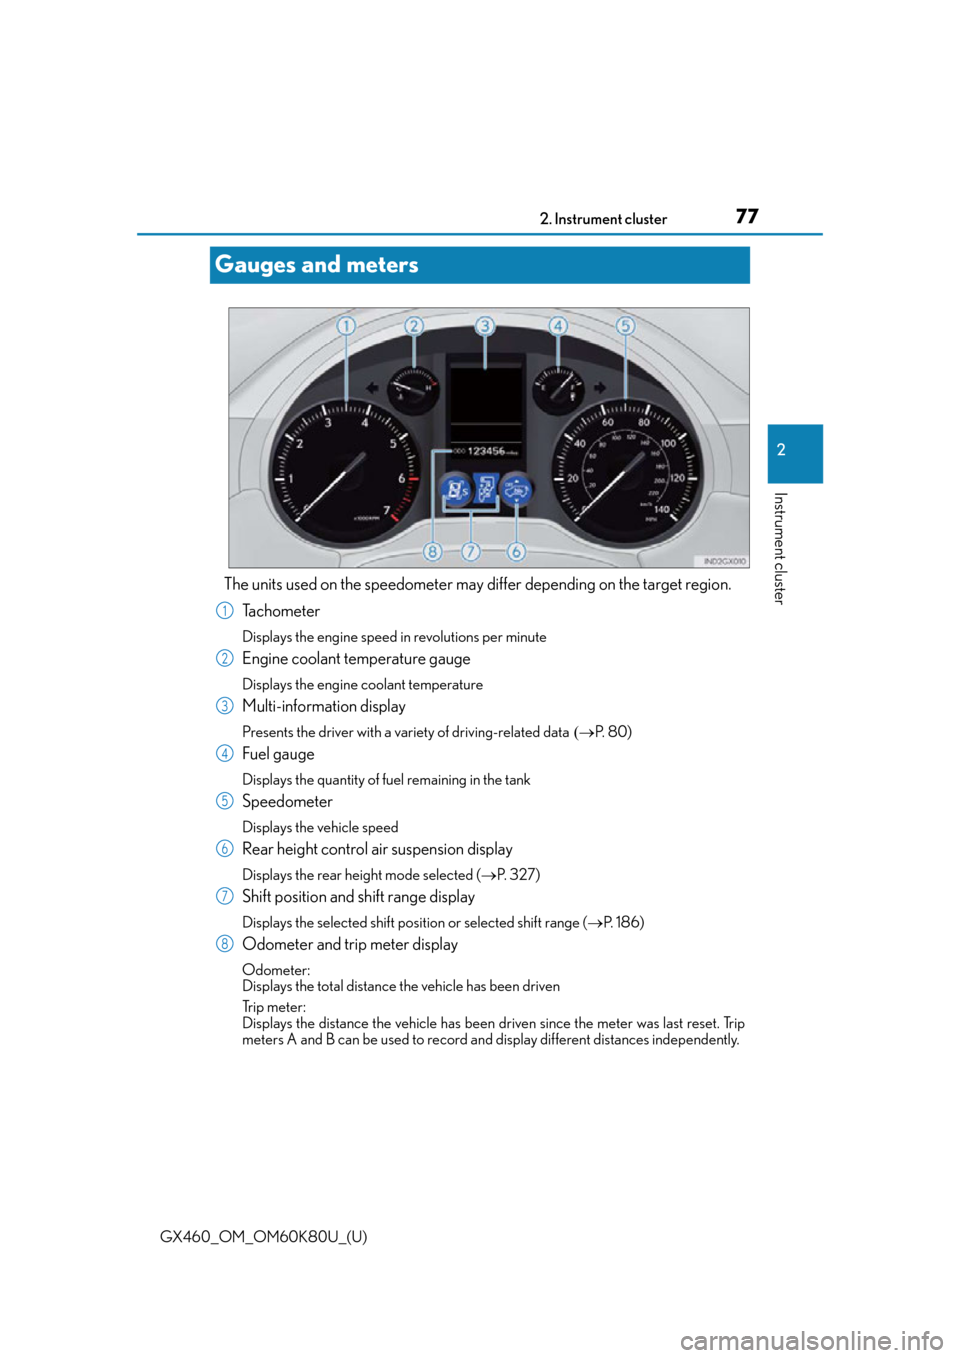
Gauges and meters
The units used on the speedometer may di
ffer depending on the target region.
Tachometer
Displays the engine speed in revolutions per minute
Engine coolant temperature gauge
Displays the engine coolant temperature
Multi-information display
Presents the driver with a va riety of driving-related dataP. 8 0 )
Fuel gauge
Displays the quantity of fuel remaining in the tank
Speedometer
Displays the vehicle speed
Rear height control air suspension display
Displays the rear heig ht mode selected (P. 3 2 7 )
Shift position and shift range display
Displays the selected shift posi tion or selected shift range (P. 1 8 6 )
Odometer and trip meter display
Odometer:
Displays the total distance the vehicle has been driven
Tr i p m e t e r :
Displays the distance the vehicle has been driven since the meter was last reset. Trip
meters A and B can be used to record an d display different distances independently.
1
2
3
4
5
6
7
8
Page 149 of 622

149
GX460_OM_OM60K80U_(U)
4Driving
4-1. Before drivingDriving the vehicle ...................... 150
Cargo and luggage .................... 157
Vehicle load limits ......................... 161
Tr a i l e r t o w i n g (with towing hitch).................... 162
Dinghy towing...............................180
4-2. Driving procedures Engine (ignition) switch ............. 181
Automatic transmission ............ 186
Turn signal lever ........................... 190
Parking brake ................................. 191
4-3. Operating the lights and wipers
Headlight switch .......................... 192
Automatic High Beam .............. 195
Fog light switch........................... 200
Windshield wipers and washer..........................................202
Rear window wiper and washer.......................................... 207
Headlight cleaner switch ....... 209
4-4. Refueling Opening the fuel tank cap....... 210 4-5. Using the driving support
systems
Cruise control ...............................214
Dynamic radar cruise control ........................................... 217
LDA (Lane Departure Alert) ........ 228
Intuitive parking assist .............. 234
Rear view monitor system ...... 243
Lexus parking assist monitor ........................................ 253
Wide view front & side monitor ........................................ 279
Multi-terrain Select ................... 298
Multi-terrain Monitor ...............303
Rear height control air suspension ................................. 327
AVS (Adaptive Variable Suspension System) ................ 331
Four-wheel drive system ......... 332
Crawl Control ............................. 336
Downhill assist control system .......................................... 339
Driving assist systems................ 341
BSM (Blind Spot Monitor) ..... 347 • The Blind Spot Monitor function .................................... 352
• The Rear Cross Traffic Alert function......................... 354
PCS (Pre-Collision system) .......... 357
4-6. Driving tips Winter driving tips ..................... 366
Off-road precautions ............... 369
Page 156 of 622

156
GX460_OM_OM60K80U_(U)4-1. Before driving
NOTICE
■When driving the vehicle
●Do not depress the accelerator and brake peda
ls at the same time during driving, as
this may restrain driving torque.
●Do not use the accelerator pedal or depress the accelerator and brake pedals at the
same time to hold the vehicle on a hill.
■When parking the vehicle
Always shift the shift lever to P. Failure to do so may cause the vehicle to move or the
vehicle may accelerate suddenly if the accelerator pedal is ac cidentally depressed.
■Avoiding damage to vehicle parts
●Do not turn the steering wheel fully in either direction and hold it there for an
extended period of time.
Doing so may damage the power steering pump.
●When driving over bumps in the road, drive as slowly as possible to avoid damaging
the wheels, underside of the vehicle, etc.
■If you get a flat tire while driving
A flat or damaged tire may cause the follo wing situations. Hold the steering wheel
firmly and gradually depress the brake pedal to slow down the vehicle.
●It may be difficult to control your vehicle.
●The vehicle will make abnormal sounds or vibrations.
●The vehicle will lean abnormally.
Information on what to do in case of a flat tire. (P. 5 2 7 )
■When encountering flooded roads
Do not drive on a road that has flooded after heavy rain etc. Doing so may cause the
following serious damage to the vehicle:
●Engine stalling
●Short in electrical components
●Engine damage caused by water immersion
In the event that you drive on a flooded road and the vehicle is flooded, be sure to have
your Lexus dealer check the following:
●Brake function
●Changes in quantity and quality of oil and fluid used for the engine, transmission,
transfer, differentials, etc.
●Lubricant condition for the propeller shaft, bearings and suspension joints (where
possible), and the function of all joints, bearings, etc.
Page 171 of 622

GX460_OM_OM60K80U_(U)
1714-1. Before driving
4
Driving
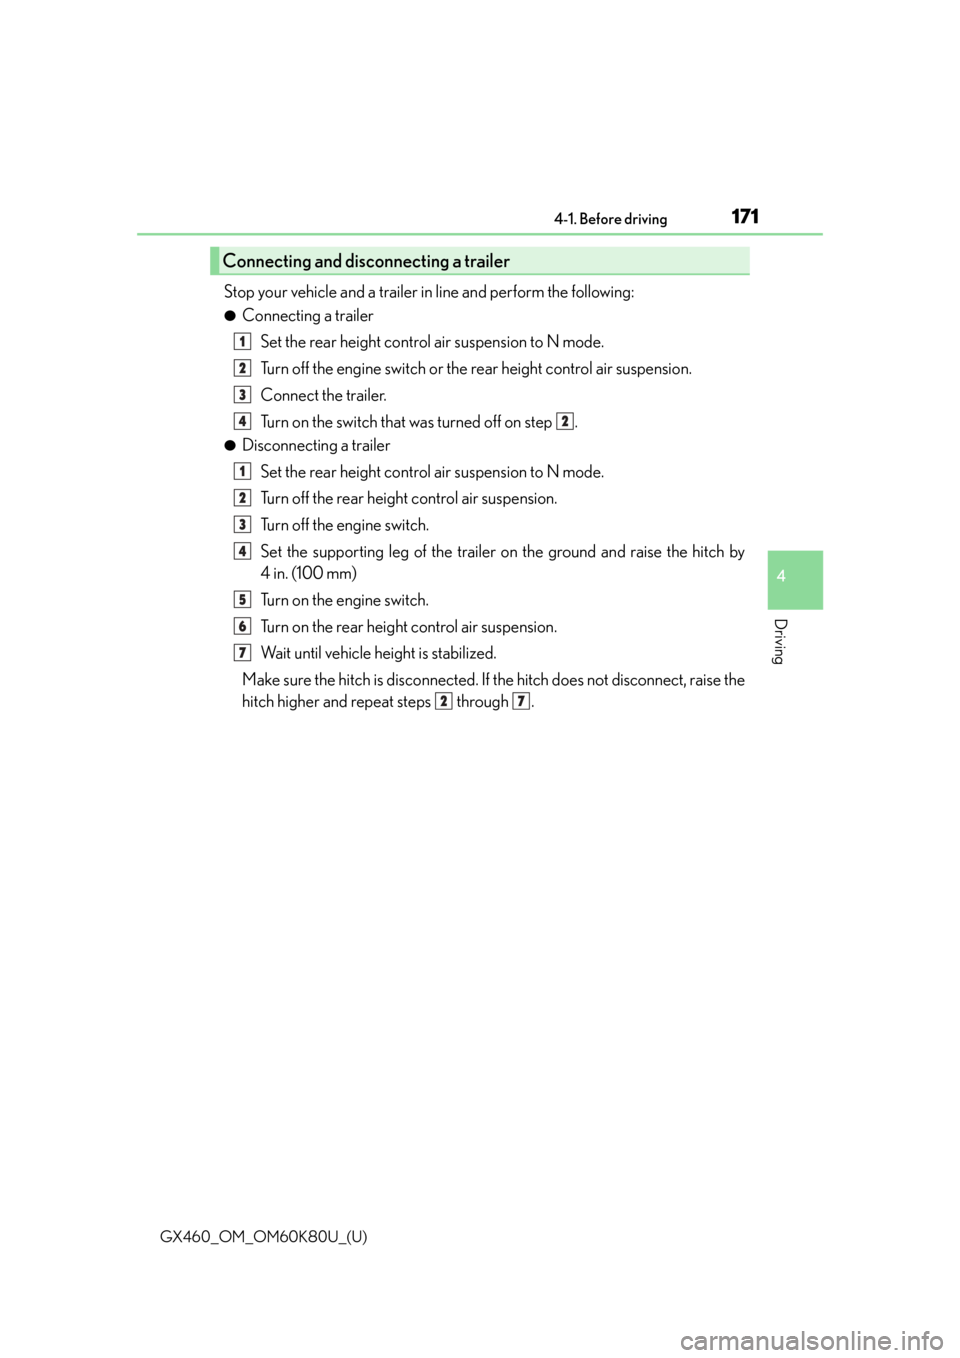
Stop your vehicle and a trailer in line and perform the following:
●Connecting a trailerSet the rear height control air suspension to N mode.
Turn off the engine switch or the rear height control air suspension.
Connect the trailer.
Turn on the switch that was turned off on step .
●Disconnecting a trailer Set the rear height control air suspension to N mode.
Turn off the rear height control air suspension.
Turn off the engine switch.
Set the supporting leg of the trailer on the ground and raise the hitch by
4 in. (100 mm)
Turn on the engine switch.
Turn on the rear height control air suspension.
Wait until vehicle height is stabilized.
Make sure the hitch is disconnected. If the hitch does not disconnect, raise the
hitch higher and repeat steps through .
Connecting and disconnecting a trailer
1
2
3
42
1
2
3
4
5
6
7
27
Page 175 of 622

GX460_OM_OM60K80U_(U)
1754-1. Before driving
4
Driving
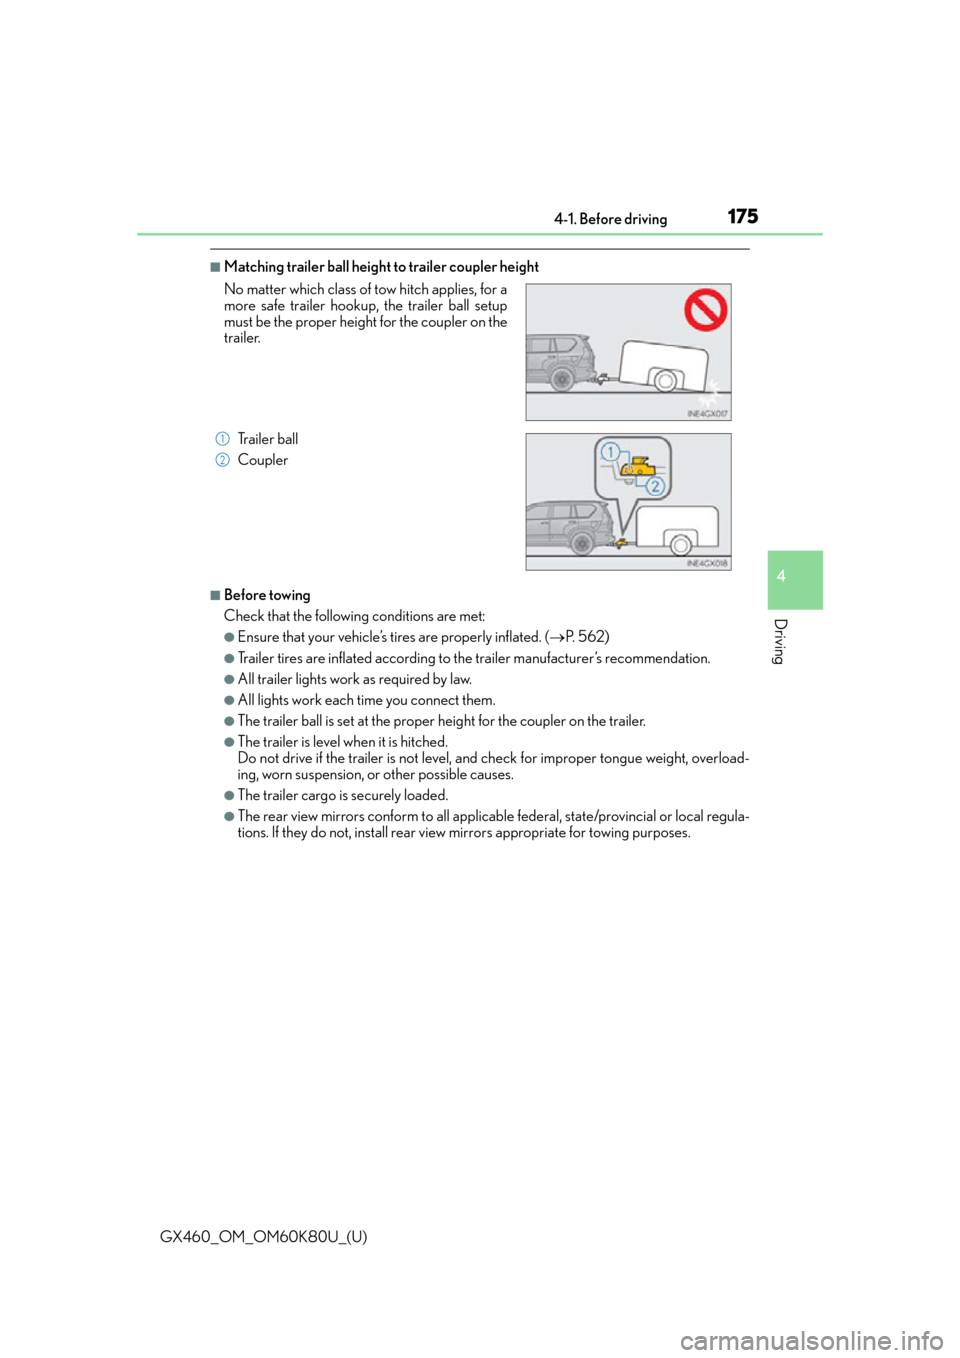
■Matching trailer ball height to trailer coupler height
■Before towing
Check that the following conditions are met:
●Ensure that your vehicle’s tires are properly inflated. ( P. 5 6 2 )
●Trailer tires are inflated according to the trailer manufacturer’s recommendation.
●All trailer lights work as required by law.
●All lights work each time you connect them.
●The trailer ball is set at the proper height for the coupler on the trailer.
●The trailer is level when it is hitched.
Do not drive if the trailer is not level, and check for improper to ngue weight, overload-
ing, worn suspension, or other possible causes.
●The trailer cargo is securely loaded.
●The rear view mirrors conform to all applicable federal, state/provincial or local regula-
tions. If they do not, install rear view mirrors appropriate for towing purposes.
No matter which class of tow hitch applies, for a
more safe trailer hookup, the trailer ball setup
must be the proper height for the coupler on the
trailer.
Trailer ball
Coupler
1
2
Page 176 of 622

176
GX460_OM_OM60K80U_(U)4-1. Before driving
■AVS (adaptive variable suspension system)
The suspension can be switched fo
r improvement in driveability. (P. 3 3 1 )
■Break-in schedule
If your vehicle is new or equipped with any new power train components (such as an
engine, transmission, differential or wheel bearing), Lexus recommends that you do not
tow a trailer until the vehicle has been driven for over 500 miles (800 km).
After the vehicle has been driven for over 500 miles (800 km), you can start towing.
However, for the next 500 miles (800 km), drive the vehicle at a speed of less than
50 mph (80 km/h) when towing a trailer, and avoid full throttle acceleration.
■Maintenance
●If you tow a trailer, your vehicle will require more frequent maintenance due to the addi-
tional load. (See “Owner’s Guide”, “Warranty and Services Guide”, “Owner’s Manual
Supplement” or “Warranty Booklet”.)
●Retighten the fixing bolts of the towing ba ll and bracket after approximately 600 miles
(1000 km) of trailer towing.
■If trailer sway occurs
One or more factors (crosswinds, passing vehicles, rough roads, etc.) can adversely
affect handling of your vehicle and trailer, causing instability.
●If trailer swaying occurs:
• Firmly grip the steering wheel. Steer straight ahead.
Do not try to control trailer sway ing by turning the steering wheel.
• Begin releasing the accelerator pedal i mmediately but very gradually to reduce
speed.
Do not increase speed. Do not apply vehicle brakes.
If you make no extreme correction with the steering or brakes, your vehicle and trailer
should stabilize.
Page 232 of 622

232
GX460_OM_OM60K80U_(U)4-5. Using the driving support systems
CAUTION
■Before using the LDA system
Do not rely solely on the LDA system. The LDA system does not drive the vehicle auto-
matically, nor does it reduce the amount of
care you need to take. As such, the driver
must always assume full responsibility for understanding his/her surroundings, for
operating the steering wheel to correct the driving line, and for driving safely.
Inappropriate or negligent drivin g could lead to an accident.
■To avoid operating the LDA by mistake
Switch the LDA system off using th e “LDA” switch when not in use.
■Situations unsuitable for LDA system
Do not use LDA system in any of the following situations.
Otherwise, the system may not function correctly and could result in an accident.
●When driving with tire chains, a spare tire, or similar equipment
●When driving with non-standard parts or aftermarket equipment installed (including
modified tires and suspensions, etc.).
●When there are objects or structures along the roadside that might be misinterpreted
as lane markers (such as guardrails, curb, reflector posts, etc.)
●When driving on snowy roads
●When pavement lane markers are difficult to see due to rain, snow, fog, sand, dirt, etc.
●When there are visible lines on the pavement from road repairs, or if the remains of
old lane markers are still visible on the road
●When driving in a lane other than the driving or passing lanes on a freeway or high-
way.
●When driving on a road with lane closures due to maintenance, or when driving in a
temporary lane