fog light Lexus GX460 2014 VOICE COMMAND SYSTEM OPERATION / LEXUS 2014 GX460 (OM60K80U) User Guide
[x] Cancel search | Manufacturer: LEXUS, Model Year: 2014, Model line: GX460, Model: Lexus GX460 2014Pages: 622, PDF Size: 8.61 MB
Page 200 of 622

200
GX460_OM_OM60K80U_(U)4-3. Operating the lights and wipers
Fog light switch
Ty p e A
Turns the fog lights off
Turns the fog lights on
: If equipped
The fog lights secure excellent visibility in difficult driving conditions, such as
in rain and fog.
1
2
Page 201 of 622

GX460_OM_OM60K80U_(U)
2014-3. Operating the lights and wipers
4
Driving
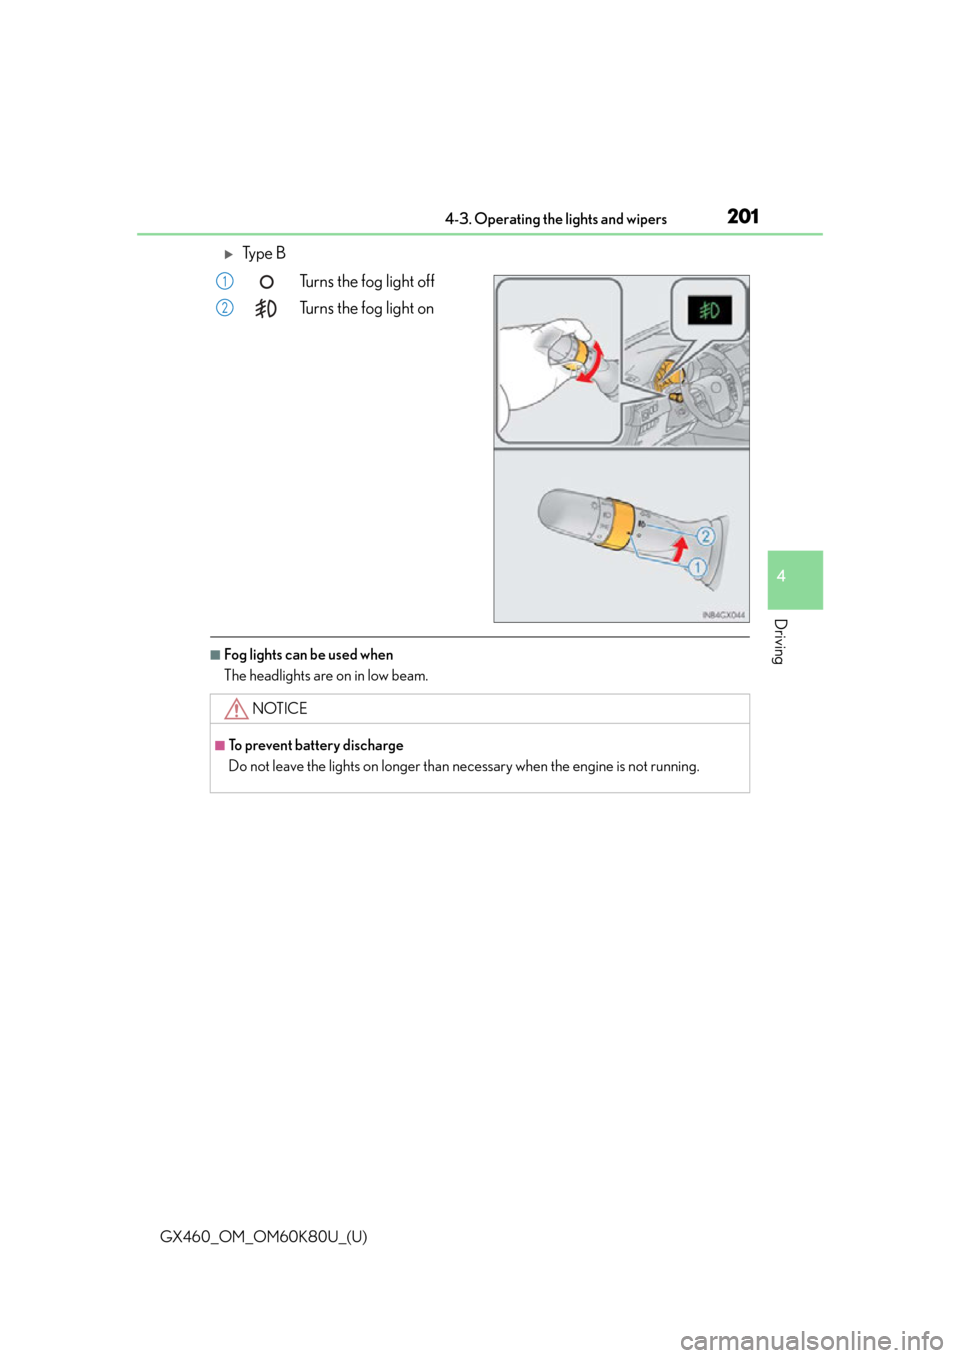
Ty p e BTurns the fog light off
Turns the fog light on
■Fog lights can be used when
The headlights are on in low beam.
1
2
NOTICE
■To prevent battery discharge
Do not leave the lights on longer than ne cessary when the engine is not running.
Page 233 of 622

GX460_OM_OM60K80U_(U)
2334-5. Using the driving support systems
4
Driving
NOTICE
■To prevent damage to or incorrect operation of the LDA system
●Do not modify the headlights or attach stickers to the surface of the lights.
●Do not modify the suspension or replace it with non-genuine parts.
●Do not install or place anything on the hood or the grille. Also, do not install a grille
guard (bull bars, kangaroo bar etc.).
●If your windshield needs repairs, contact your Lexus dealer.
■Camera sensor ( P. 228)
Observe the following to ensure that the LDA system functions correctly.
●Keep the windshield clean at all times.
Performance could be affected if the windshie ld is dirty, or if raindrops, condensation
or ice are adhering to the windshield.
●Do not spill liquid onto the camera sensor.
●Do not attach window tinting to the windshield.
●Do not install an antenna in front of the camera lens.
●If the windshield is fogged up, use the wi ndshield defogger to remove fog from the
windshield.
When it is cold, using the he ater with air blowing to the feet may allow the upper part
of the windshield to fog up. This will have a negative effect on the images.
●Do not scratch the camera lens, or let it get dirty.
When cleaning the inside of the windshield , be careful not to get any glass cleaner
etc. on the lens. Also, do not touch the lens.
For lens repair, contact your Lexus dealer.
●Do not change the installation position or di rection of the camera sensor or remove it.
The direction of the camera sensor is precisely adjusted.
●Do not subject the camera sensor to strong impact or force, and do not disassemble
the camera sensor.
●Do not replace windshield with non-genuine windshield.
Contact your Lexus dealer.
●Do not attach a sticker or other items to the
windshield near the camera sensor.
Page 375 of 622

375
GX460_OM_OM60K80U_(U)
5Interior features
5-1. Using the air conditioning system and defogger
Front automatic air conditioning system ................376
Rear air conditioning system ......................................... 386
Heated steering wheel/seat heaters/seat ventilators........ 389
5-2. Using the interior lights Interior lights list..........................392• Personal/interior lights main switch .............................393
• Personal/interior lights.......394 5-3. Using the storage features
List of storage features ............ 395• Glove box ............................... 396
• Console box........................... 396
• Coin holder ............................398
• Cup holders/bottle holders/door pockets ..........................398
• Auxiliary boxes .................... 400
Luggage compartment features........................................ 402
5-4. Using the other interior features
Other interior features ............409 • Cool box ..................................409
• Sun visors ................................... 411
• Vanity mirror ............................. 411
• Conversation mirror.............412
• Clock ..........................................412
• Power outlets .......................... 413
• Armrest ...................................... 417
• Coat hooks ............................... 417
• Assist grips............................... 418
• Compass .................................. 419
Garage door opener................ 423
Safety Connect ........................... 428
Page 389 of 622

389
GX460_OM_OM60K80U_(U)5-1. Using the air conditio
ning system and defogger
5
Interior features
Heated steering wheel/seat heaters/seat
ventilators
Turns the heated steering wheel on/off
The indicator light comes on when the
heated steering wheel is operating.
: If equipped
Heated steering wheel and seat heater s heat the side grips of the steering
wheel and seats. Seat ventilators maintain good airflow by blowing air from
the seats.
CAUTION
●Care should be taken to prevent injury if anyone in the following categories comes in
contact with the steering wheel an d seats when the heater is on:
• Babies, small children, the elderly, the sick and the physically challenged
• Persons with sensitive skin
• Persons who are fatigued
• Persons who have taken alcohol or drugs that induce sleep (s leeping drugs, cold
remedies, etc.)
●Observe the following precautions to prevent the minor burns or overheating:
• Do not cover the seat with a blanket or cushion when using the seat heater.
• Do not use seat heater more than necessary.
NOTICE
●Do not put heavy objects that have an uneven surface on the seat and do not stick
sharp objects (needles, nails, etc.) into the seat.
●To prevent battery discharge, do not use the functions when the engine is off.
Heated steering wheel (if equipped)
Page 390 of 622

3905-1. Using the air conditioning system and defogger
GX460_OM_OM60K80U_(U)
●The heated steering wheel can be used when the engine switch is in IGNITION ON
mode.
●The heated steering wheel will automati cally turn off after about 30 minutes.
●If the indicator light flashes, press the switch to turn the heated steering wheel off and
then press the switch again. If the indicat or light still flashes, a malfunction may be
occurring. Turn the heated steering wheel off and have the vehicle inspected by your
Lexus dealer.
■Front seat
Turns the seat heater on
The indicator light comes on.
The higher the number of dots, the
warmer the seat becomes.
■Rear seat
For left second seat
For right second seat
High heating temperature
Low heating temperature
To turn on the seat heater, press “HI”
or “LO”.
The indicator light on “HI” or “LO”
switch indicates that the seat heater
is on.
Off
To turn off, press “OFF”.
The seat heaters can be used when the en gine switch is in IGNITION ON mode.
Seat heaters (if equipped)
1
2
3
4
5
Page 391 of 622

GX460_OM_OM60K80U_(U)
3915-1. Using the air conditioning system and defogger
5
Interior features
Heats the seat
The indicator light comes on.
The higher the number of dots, the
warmer the airflow becomes.
Blows air from the seat
The indicator light comes on.
The higher the number of dots, the
stronger the airflow becomes.
The seat heaters and ventilators can be used when the engine switch is in IGNITION
ON mode.
Seat heaters and ventilators (if equipped)
1
2
Page 439 of 622

GX460_OM_OM60K80U_(U)
4396-1. Maintenance and care
6
Maintenance and care
NOTICE
■Preventing damage to leather surfaces
Observe the following precautions to avoid damage to and deterioration of leather
surfaces:
●Remove any dust or dirt from leather surfaces immediately.
●Do not expose the vehicle to direct sunlight for extended periods of time. Park the
vehicle in the shade, especially during summer.
●Do not place items made of vinyl, plastic, or containing wax on the upholstery, as they
may stick to the leather su rface if the vehicle interior heats up significantly.
■When cleaning the inside of the windshield (vehicles with LDA [Lane Departure
Alert])
Be careful not to touch the camera sensor ( P. 2 2 8 ) .
If the camera is accidentally scratched or hit, LDA may not operate properly or may
cause a malfunction.
■Water on the floor
Do not wash the vehicle floor with water.
Vehicle systems such as the audio system may be damaged if water comes into contact
with electrical components such as the au dio system above or under the floor of the
vehicle. Water may also cause the body to rust.
■Cleaning the inside of the rear window
●Do not use glass cleaner to clean the rear window, as this may cause damage to the
rear window defogger heater wires or antenna. Use a cloth dampened with luke-
warm water to gently wipe the window cl ean. Wipe the window in strokes running
parallel to the heater wires or antenna.
●Be careful not to scratch or damage the heater wires or antenna.
Page 494 of 622

494
GX460_OM_OM60K80U_(U)6-3. Do-it-yourself maintenance
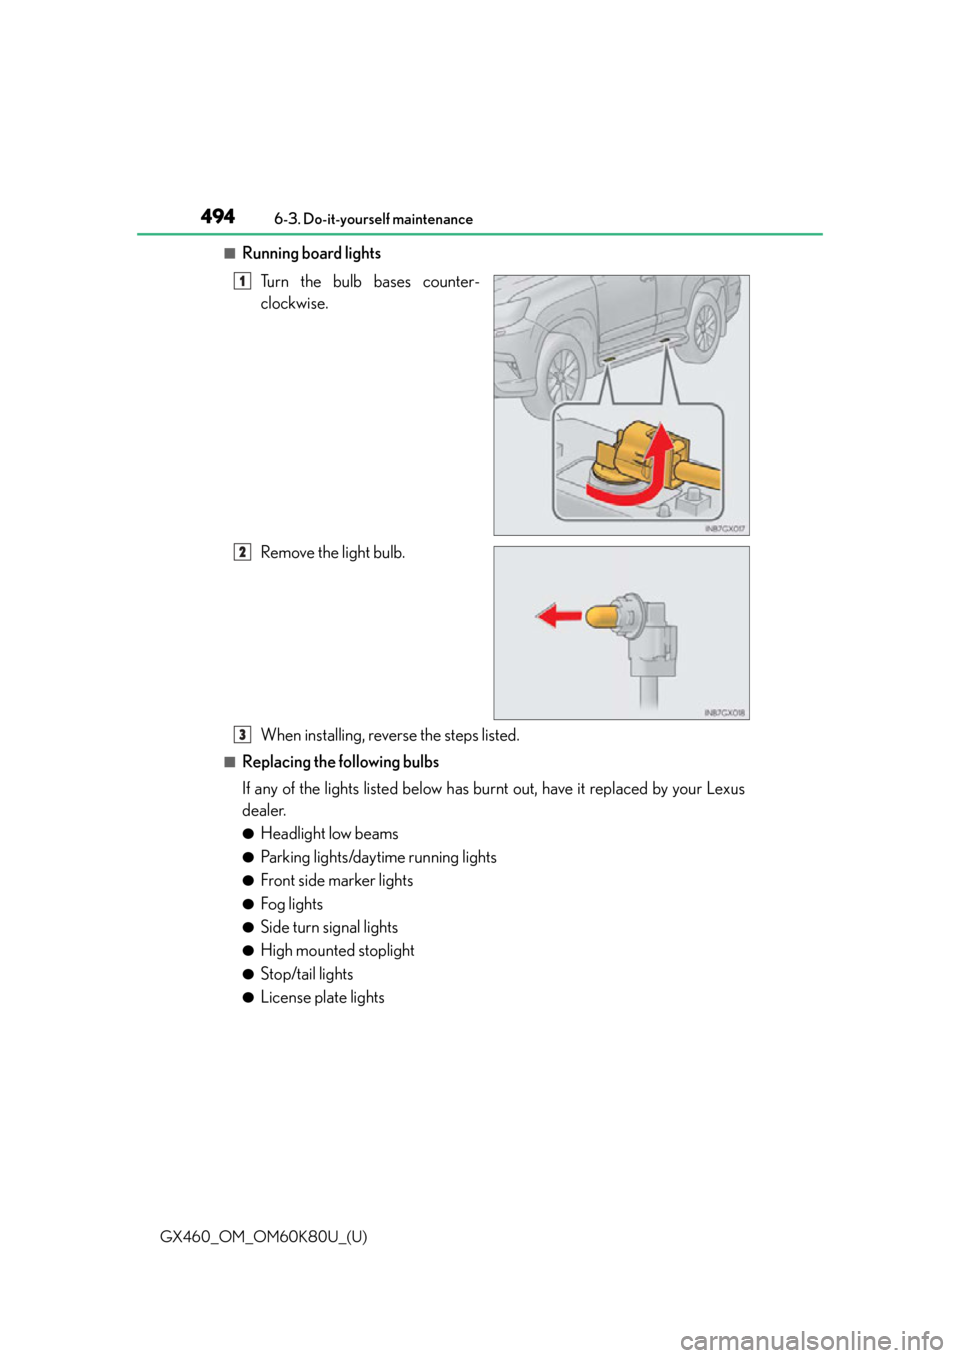
■Running board lights
Turn the bulb bases counter-
clockwise.
Remove the light bulb.
When installing, reverse the steps listed.
■Replacing the following bulbs
If any of the lights listed below has burnt out, have it replaced by your Lexus
dealer.
●Headlight low beams
●Parking lights/daytime running lights
●Front side marker lights
●Fog lights
●Side turn signal lights
●High mounted stoplight
●Stop/tail lights
●License plate lights
1
2
3
Page 495 of 622

GX460_OM_OM60K80U_(U)
4956-3. Do-it-yourself maintenance
6
Maintenance and care
■LED lights
The headlight low beams, parking lights/daytime running light s, front side marker lights,
fog lights, side turn signal lights, high moun ted stoplight, stop/tail lights and license plate
lights consist of a number of LEDs. If any of the LEDs burn out, take your vehicle to your
Lexus dealer to have the light replaced.
■Condensation build-up on the inside of the lens
Temporary condensation build-up on the inside of the headlight lens does not indicate a
malfunction. Contact your Lexus dealer for mo re information in the following situations:
●Large drops of water are built up on the inside of the lens.
●Wa t e r h a s b u i l t u p i nside the headlight.
CAUTION
■Replacing light bulbs
●Turn off the headlights. Do not attempt to replace the bulb immediately after turning
off the headlights.
The bulbs become very hot and may cause burns.
●Do not touch the glass portion of the light bulb with bare hands. When it is unavoid-
able to hold the glass portion, use and ho ld with a clean dry cloth to avoid getting
moisture and oils on the bulb.
Also, if the bulb is scratched or dropped, it may blow out or crack.
●Fully install light bulbs and any parts used to secure them. Failure to do so may result
in heat damage, fire, or water entering the headlight unit. This may damage the head-
lights or cause condensation to build up on the lens.
●Do not attempt to repair or disassemble light bulbs, connectors, electric circuits or
component parts.
Doing so may result in death or se rious injury due to electric shock.
■To prevent damage or fire
●Make sure bulbs are fully seated and locked.
●Check the wattage of the bulb before installin g to prevent heat damage.