Lexus GX460 2014 VOICE COMMAND SYSTEM OPERATION / LEXUS 2014 GX460 (OM60K80U) Owner's Manual
Manufacturer: LEXUS, Model Year: 2014, Model line: GX460, Model: Lexus GX460 2014Pages: 622, PDF Size: 8.61 MB
Page 21 of 622
21Pictorial index
GX460_OM_OM60K80U_(U)
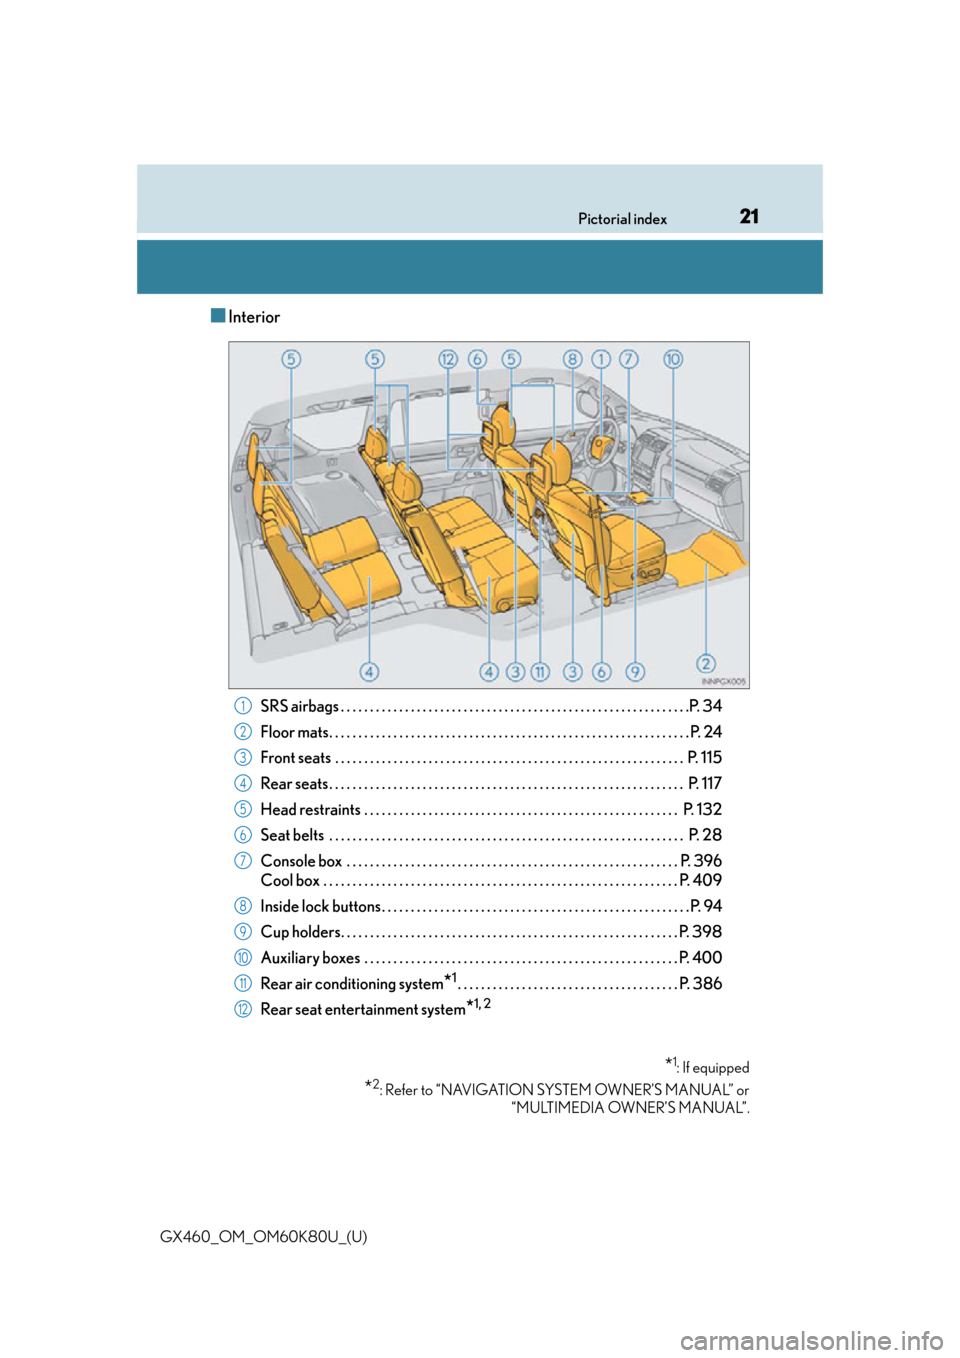
■Interior
SRS airbags . . . . . . . . . . . . . . . . . . . . . . . . . . . . . . . . . . . . . . . . . . . . . . . . . . . . . . . . . . . .P. 34
Floor mats. . . . . . . . . . . . . . . . . . . . . . . . . . . . . . . . . . . . . . . . . . . . . . . . . . . . . . . . . . . . . . P. 24
Front seats . . . . . . . . . . . . . . . . . . . . . . . . . . . . . . . . . . . . . . . . . . . . . . . . . . . . . . . . . . . . P. 115
Rear seats . . . . . . . . . . . . . . . . . . . . . . . . . . . . . . . . . . . . . . . . . . . . . . . . . . . . . . . . . . . . . P. 117
Head restraints . . . . . . . . . . . . . . . . . . . . . . . . . . . . . . . . . . . . . . . . . . . . . . . . . . . . . . P. 132
Seat belts . . . . . . . . . . . . . . . . . . . . . . . . . . . . . . . . . . . . . . . . . . . . . . . . . . . . . . . . . . . . . P. 28
Console box . . . . . . . . . . . . . . . . . . . . . . . . . . . . . . . . . . . . . . . . . . . . . . . . . . . . . . . . . P . 396
Cool box . . . . . . . . . . . . . . . . . . . . . . . . . . . . . . . . . . . . . . . . . . . . . . . . . . . . . . . . . . . . . P. 409
Inside lock buttons . . . . . . . . . . . . . . . . . . . . . . . . . . . . . . . . . . . . . . . . . . . . . . . . . . . . . P. 94
Cup holders. . . . . . . . . . . . . . . . . . . . . . . . . . . . . . . . . . . . . . . . . . . . . . . . . . . . . . . . . . P . 398
Auxiliary boxes . . . . . . . . . . . . . . . . . . . . . . . . . . . . . . . . . . . . . . . . . . . . . . . . . . . . . . P. 4 00
Rear air conditioning system
*1. . . . . . . . . . . . . . . . . . . . . . . . . . . . . . . . . . . . . . P. 386
Rear seat entertainment system
*1, 2
*1: If equipped
*2: Refer to “NAVIGATION SYSTEM OWNER’S MANUAL” or “MULTIMEDIA OWNER’S MANUAL”.
1
2
3
4
5
6
7
8
9
10
11
12
Page 22 of 622
22Pictorial index
GX460_OM_OM60K80U_(U)
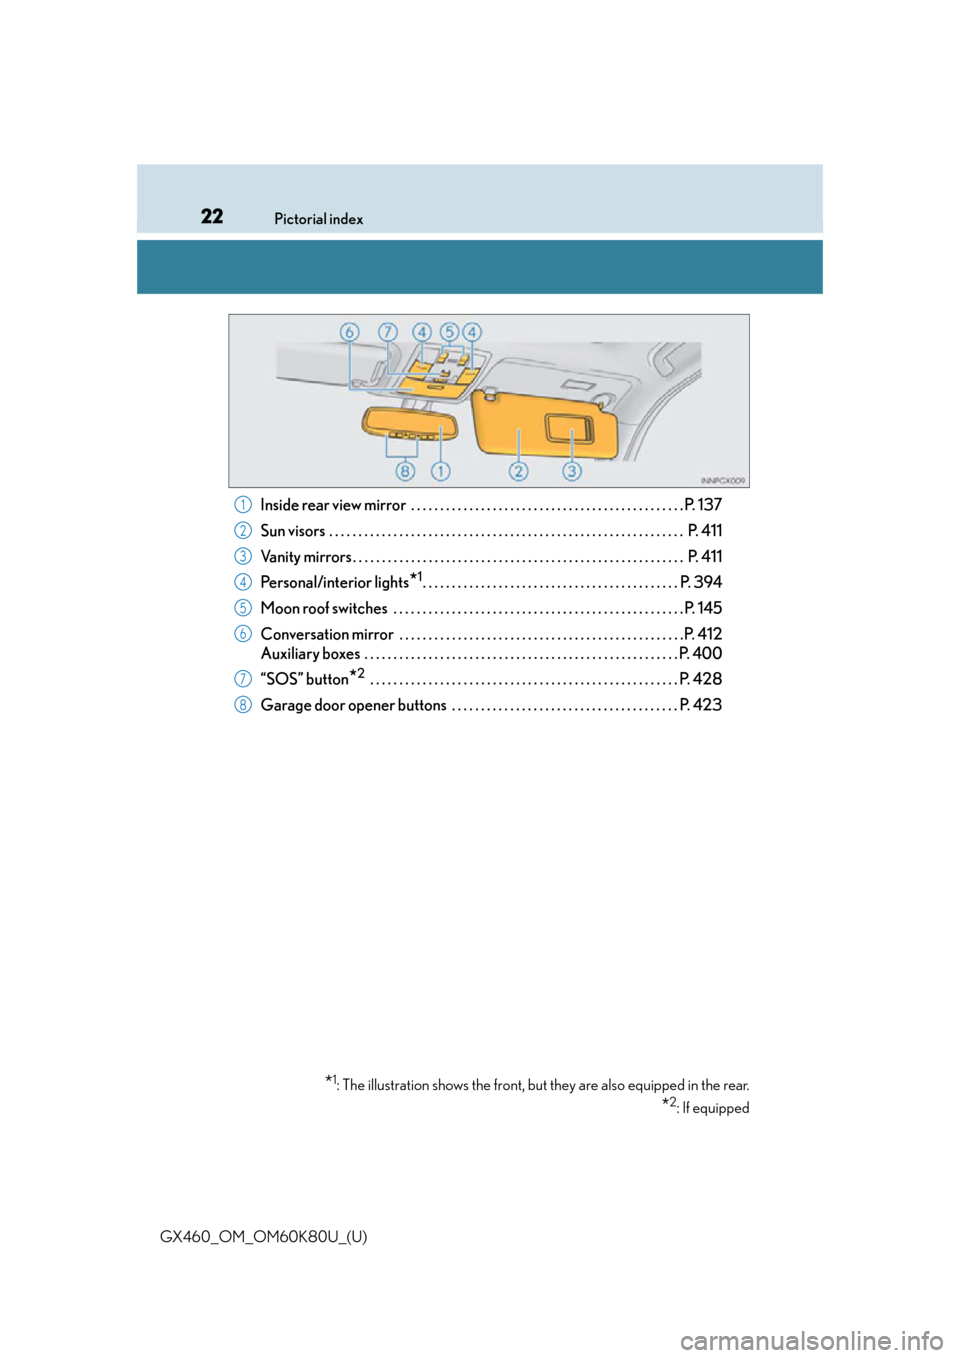
Inside rear view mirror . . . . . . . . . . . . . . . . . . . . . . . . . . . . . . . . . . . . . . . . . . . . . . . P. 137
Sun visors . . . . . . . . . . . . . . . . . . . . . . . . . . . . . . . . . . . . . . . . . . . . . . . . . . . . . . . . . . . . . P. 411
Vanity mirrors . . . . . . . . . . . . . . . . . . . . . . . . . . . . . . . . . . . . . . . . . . . . . . . . . . . . . . . . . P. 4 1 1
Personal/interior lights
*1. . . . . . . . . . . . . . . . . . . . . . . . . . . . . . . . . . . . . . . . . . . . P. 394
Moon roof switches . . . . . . . . . . . . . . . . . . . . . . . . . . . . . . . . . . . . . . . . . . . . . . . . . . P. 145
Conversation mirror . . . . . . . . . . . . . . . . . . . . . . . . . . . . . . . . . . . . . . . . . . . . . . . . .P. 412
Auxiliary boxes . . . . . . . . . . . . . . . . . . . . . . . . . . . . . . . . . . . . . . . . . . . . . . . . . . . . . . P. 4 00
“SOS” button
*2 . . . . . . . . . . . . . . . . . . . . . . . . . . . . . . . . . . . . . . . . . . . . . . . . . . . . . P. 428
Garage door opener buttons . . . . . . . . . . . . . . . . . . . . . . . . . . . . . . . . . . . . . . . P. 423
*1: The illustration shows the front, but they are also equipped in the rear.
*2: If equipped
1
2
3
4
5
6
7
8
Page 23 of 622

23
GX460_OM_OM60K80U_(U)
For safety and security1
1-1. For safe useBefore driving................................. 24
For safety drive............................... 26
Seat belts .......................................... 28
SRS airbags ..................................... 34
Front passenger occupant classification system.................. 45
Safety information for children ............................................51
Child restraint systems ............... 52
Installing child restraints ............. 56
Exhaust gas precautions ............ 65
1-2. Theft deterrent system Engine immobilizer system ....... 66
Alarm ................................................. 68
Page 24 of 622
241-1. For safe use
GX460_OM_OM60K80U_(U)
Before driving
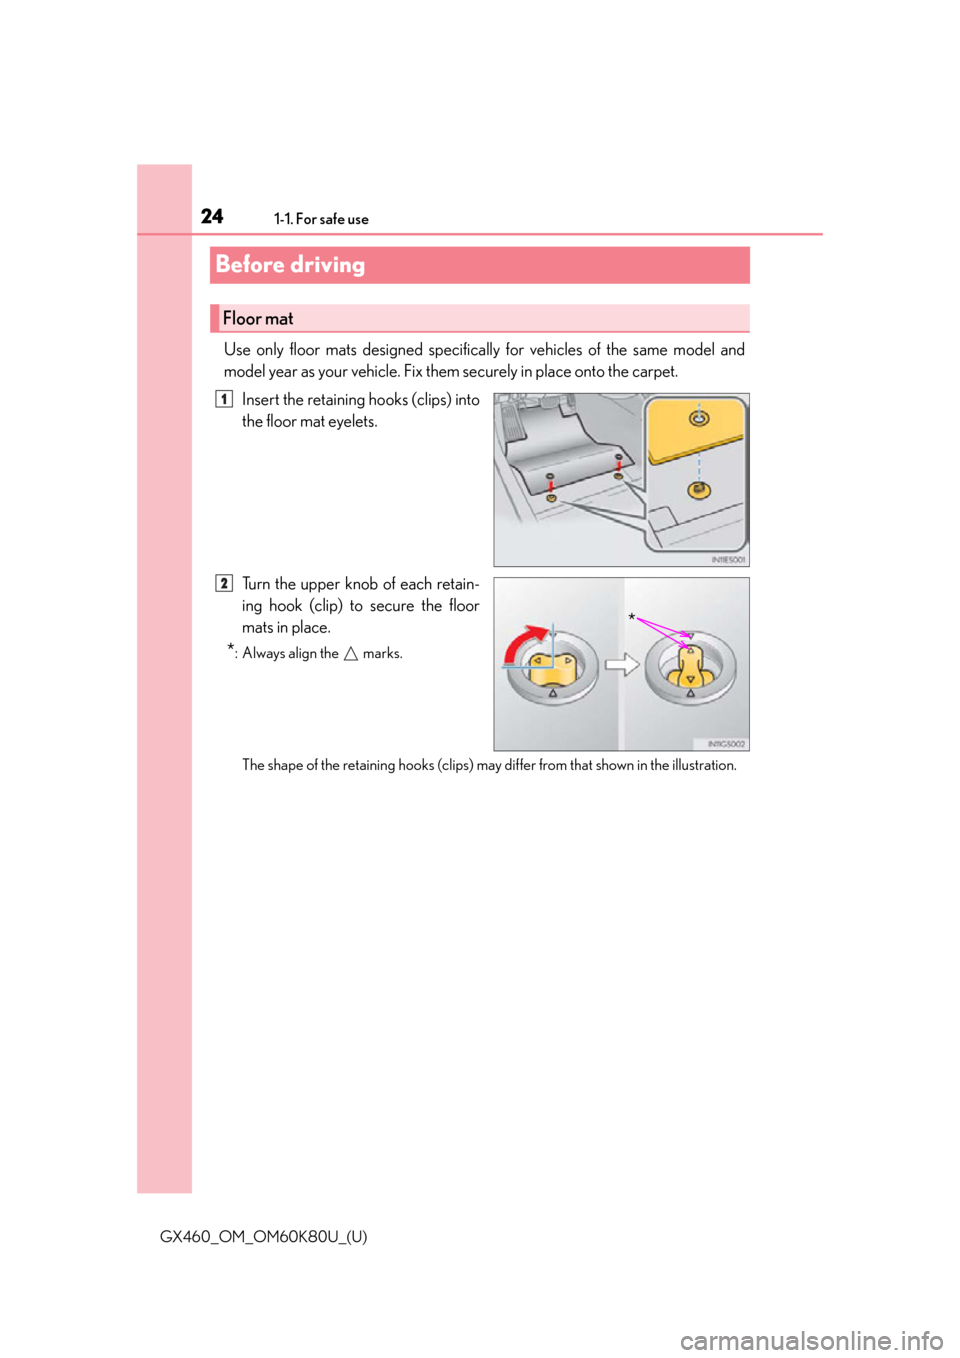
Use only floor mats designed specifically for vehicles of the same model and
model year as your vehicle. Fix them securely in place onto the carpet.
Insert the retaining hooks (clips) into
the floor mat eyelets.
Turn the upper knob of each retain-
ing hook (clip) to secure the floor
mats in place.
*: Always align the marks.
The shape of the retaining hook s (clips) may differ from that shown in the illustration.
Floor mat
1
*
2
Page 25 of 622
251-1. For safe use
GX460_OM_OM60K80U_(U)
1
For safety and security
CAUTION
Observe the following precautions.
Failure to do so may cause the driver’s floor mat to slip, possibly interfering with the ped-
als while driving. An unexpectedly high spee d may result or it may become difficult to
stop the vehicle, leading to an accident, or leading to death or a serious injury.
■When installing the driver’s floor mat
●Do not use floor mats designed for other models or different model year vehicles,
even if they are Lexus Genuine floor mats.
●Only use floor mats designed for the driver’s seat.
●Always install the floor mat securely using the retaining hooks (clips) provided.
●Do not use two or more floor mats on top of each other.
●Do not place the floor mat bottom-side up or upside-down.
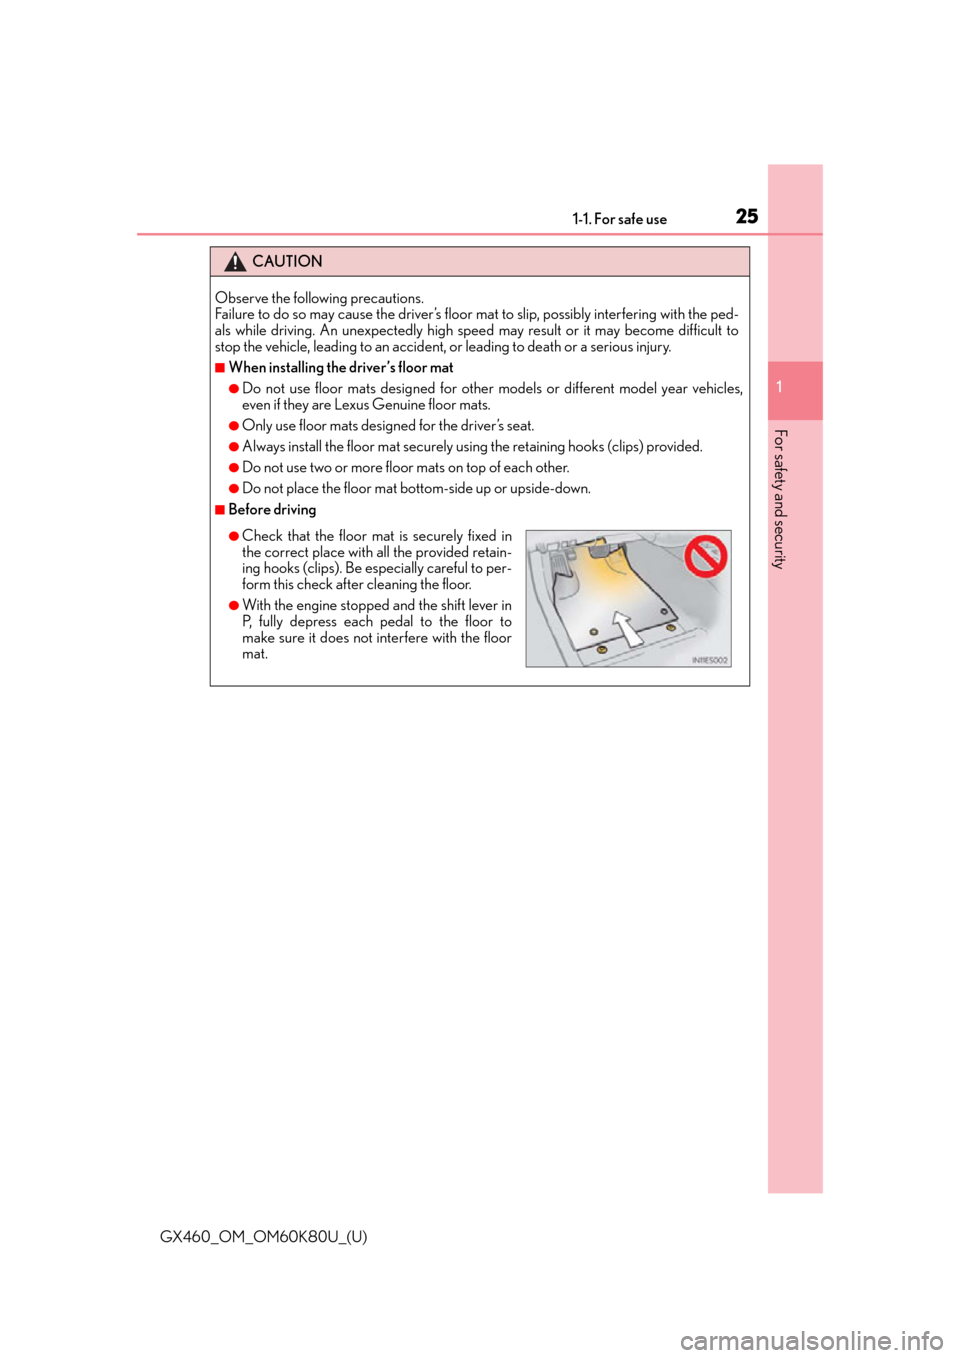
■Before driving
●Check that the floor mat is securely fixed in
the correct place with all the provided retain-
ing hooks (clips). Be especially careful to per-
form this check after cleaning the floor.
●With the engine stopped and the shift lever in
P, fully depress each pedal to the floor to
make sure it does not interfere with the floor
mat.
Page 26 of 622
261-1. For safe use
GX460_OM_OM60K80U_(U)
For safety drive
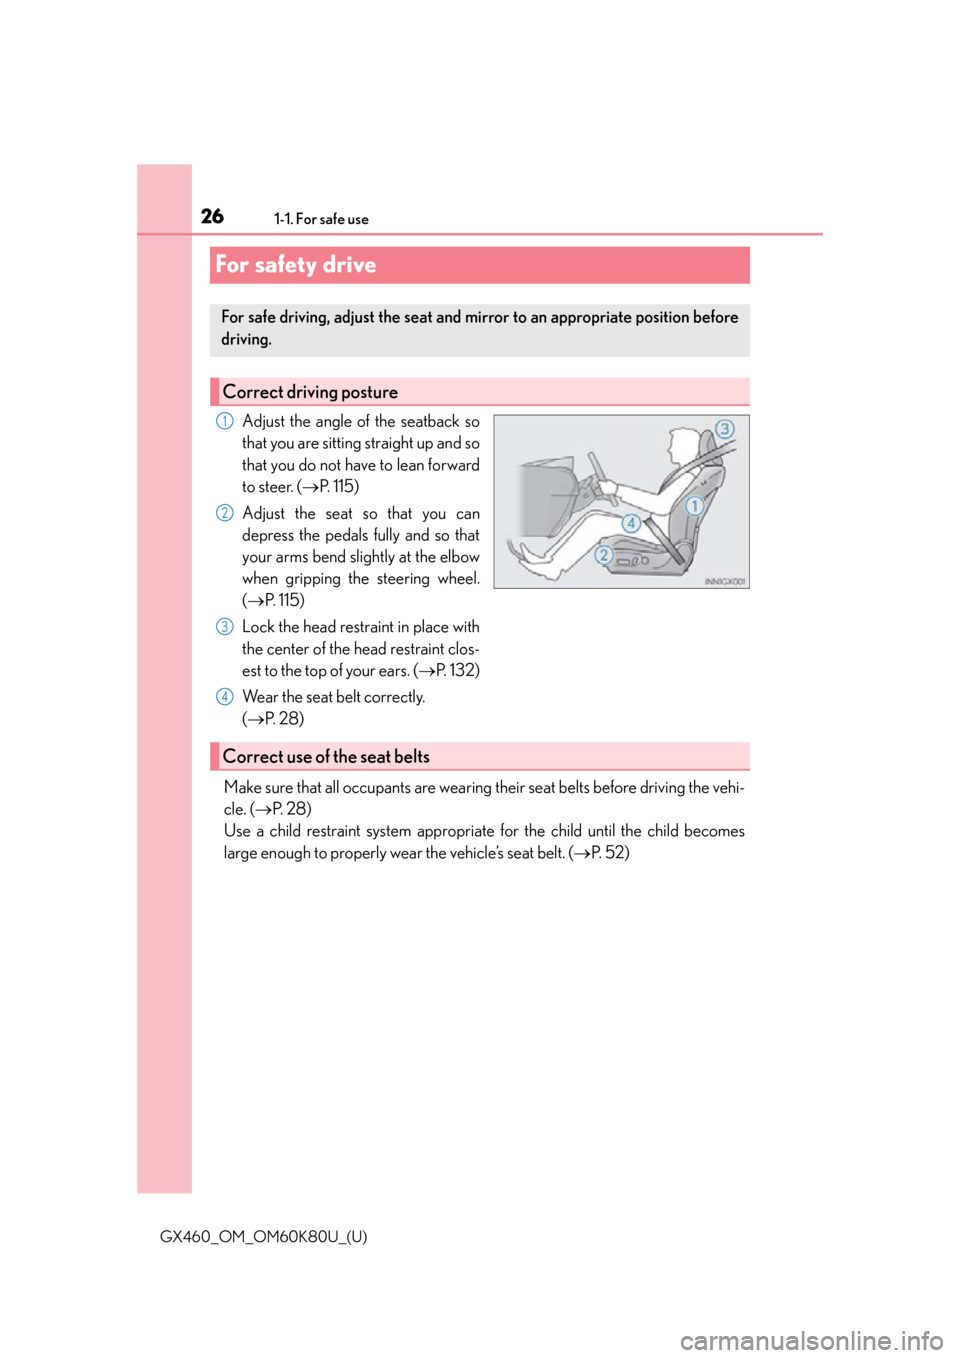
Adjust the angle of the seatback so
that you are sitting straight up and so
that you do not have to lean forward
to steer. (P. 115)
Adjust the seat so that you can
depress the pedals fully and so that
your arms bend slightly at the elbow
when gripping the steering wheel.
( P. 1 1 5 )
Lock the head restraint in place with
the center of the head restraint clos-
est to the top of your ears. ( P. 1 3 2 )
Wear the seat belt correctly.
( P. 2 8 )
Make sure that all occupants are wearing their seat belts before driving the vehi-
cle. ( P. 2 8 )
Use a child restraint system appropriate for the child until the child becomes
large enough to properly wear the vehicle’s seat belt. ( P. 5 2 )
For safe driving, adjust the seat and mi rror to an appropriate position before
driving.
Correct driving posture
1
2
3
4
Correct use of the seat belts
Page 27 of 622
271-1. For safe use
GX460_OM_OM60K80U_(U)
1
For safety and security
Make sure that you can see backward clea rly by adjusting the inside and outside
rear view mirrors properly. ( P. 137, 139)
Adjusting the mirrors
CAUTION
Observe the following precautions.
Failure to do so may result in death or serious injury.
●Do not adjust the position of the driver’s seat while driving.
Doing so could cause the driver to lose control of the vehicle.
●Do not place a cushion between the driver or passenger and the seatback.
A cushion may prevent correct posture from being achieved, and reduce the effec-
tiveness of the seat belt and head restraint.
●Do not place anything under the front seats.
Objects placed under the front seats may be come jammed in the seat tracks and stop
the seat from locking in place. This may lead to an accident and the adjustment mech-
anism may also be damaged.
●When driving over long distances, take regular breaks before you start to feel tired.
Also, if you feel tired or sleepy while drivin g, do not force yourself to continue driving
and take a break immediately.
Page 28 of 622
281-1. For safe use
GX460_OM_OM60K80U_(U)
Seat belts
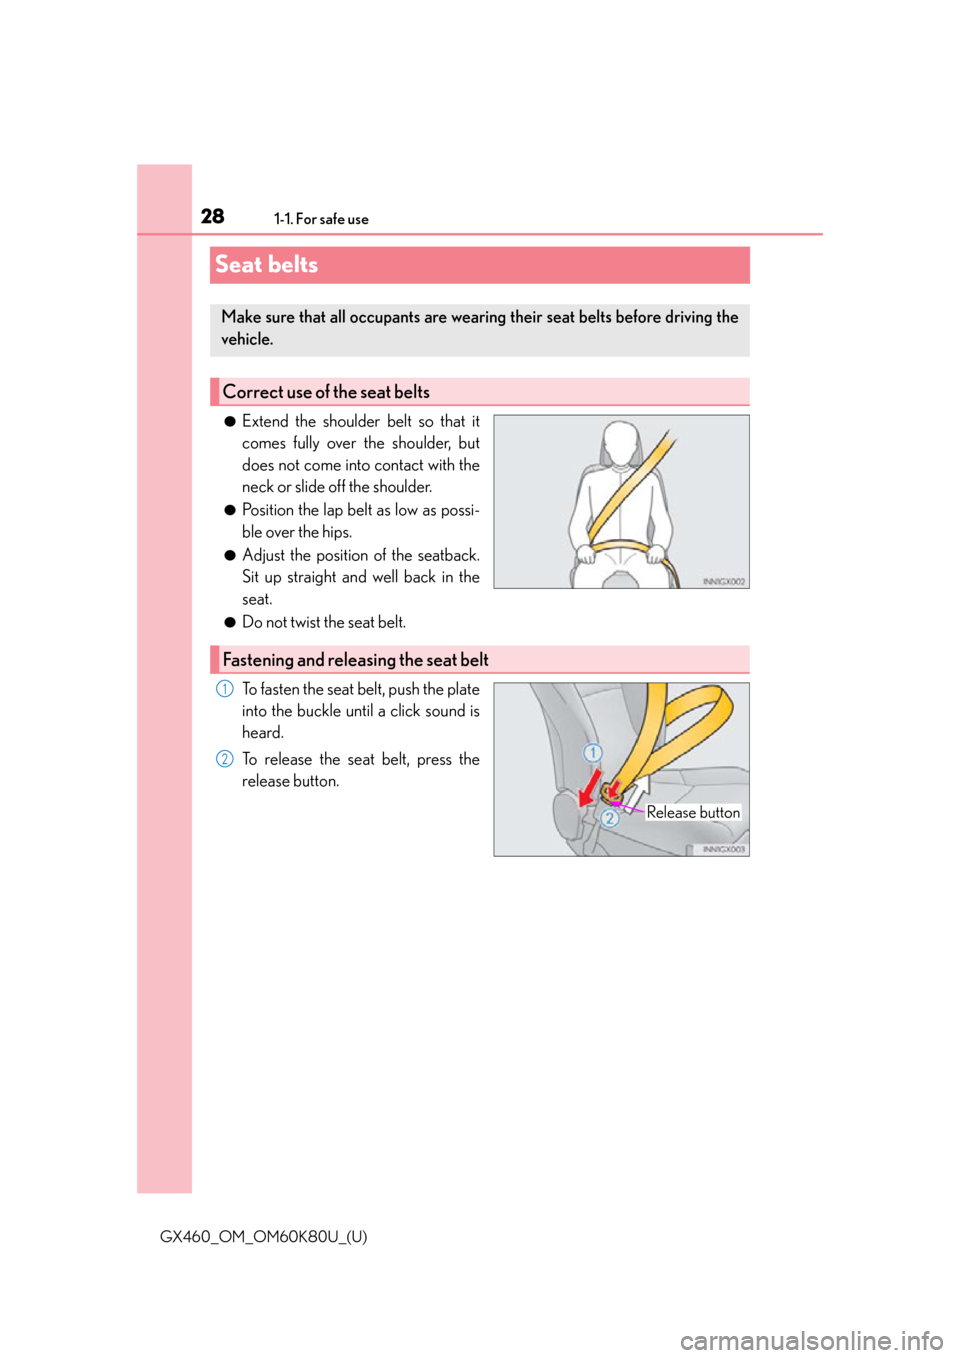
●Extend the shoulder belt so that it
comes fully over the shoulder, but
does not come into contact with the
neck or slide off the shoulder.
●Position the lap belt as low as possi-
ble over the hips.
●Adjust the position of the seatback.
Sit up straight and well back in the
seat.
●Do not twist the seat belt.
To fasten the seat belt, push the plate
into the buckle until a click sound is
heard.
To release the seat belt, press the
release button.
Make sure that all occupants are wearing their seat belts before driving the
vehicle.
Correct use of the seat belts
Fastening and releasing the seat belt
Release button
1
2
Page 29 of 622
291-1. For safe use
GX460_OM_OM60K80U_(U)
1
For safety and security
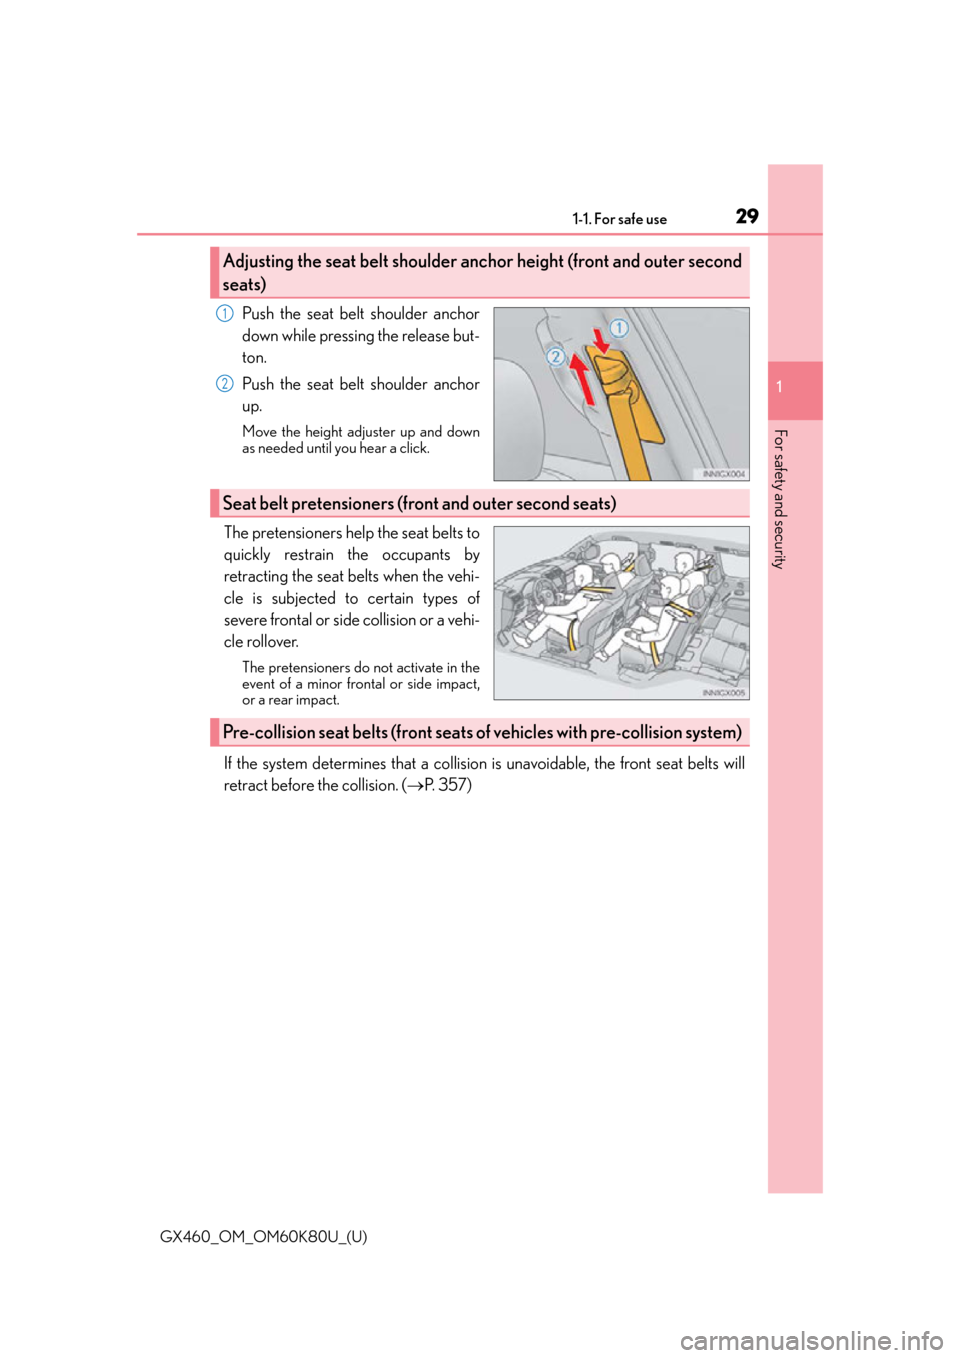
Push the seat belt shoulder anchor
down while pressing the release but-
ton.
Push the seat belt shoulder anchor
up.
Move the height adjuster up and down
as needed until you hear a click.
The pretensioners help the seat belts to
quickly restrain the occupants by
retracting the seat belts when the vehi-
cle is subjected to certain types of
severe frontal or side collision or a vehi-
cle rollover.
The pretensioners do not activate in the
event of a minor frontal or side impact,
or a rear impact.
If the system determines that a collision is unavoidable, the front seat belts will
retract before the collision. ( P. 3 5 7 )
Adjusting the seat belt shoulder anc hor height (front and outer second
seats)
1
2
Seat belt pretensioners (front and outer second seats)
Pre-collision seat belts (front seats of vehicles with pre-collision system)
Page 30 of 622
301-1. For safe use
GX460_OM_OM60K80U_(U)
■Emergency locking retractor (ELR)
The retractor will lock the belt during a sudden stop or on impact. It may also lock if you
lean forward too quickly. A slow, easy motion w ill allow the belt to extend so that you can
move around fully.
■Automatic locking retractor (ALR)
When an outer second seat passenger’s shou lder belt is completely extended and then
retracted even slightly, the belt is locked in that position and cannot be extended. This
feature is used to hold the child restraint syst em (CRS) firmly. To free the belt again, fully
retract the belt and then pull the belt out once more. ( P. 5 6 )
■Child seat belt usage
The seat belts of your vehicle were princi pally designed for persons of adult size.
●Use a child restraint system appropriate fo r the child, until the child becomes large
enough to properly wear the vehicle’s seat belt. ( P. 5 2 )
●When the child becomes large enough to properly wear the vehicle’s seat belt, follow
the instructions on P. 28 regarding seat belt usage.
■Replacing the belt after the pretensioner has been activated
If the vehicle is involved in multiple collisio ns, the pretensioner will activate for the first
collision, but will not activate for th e second or subsequent collisions.
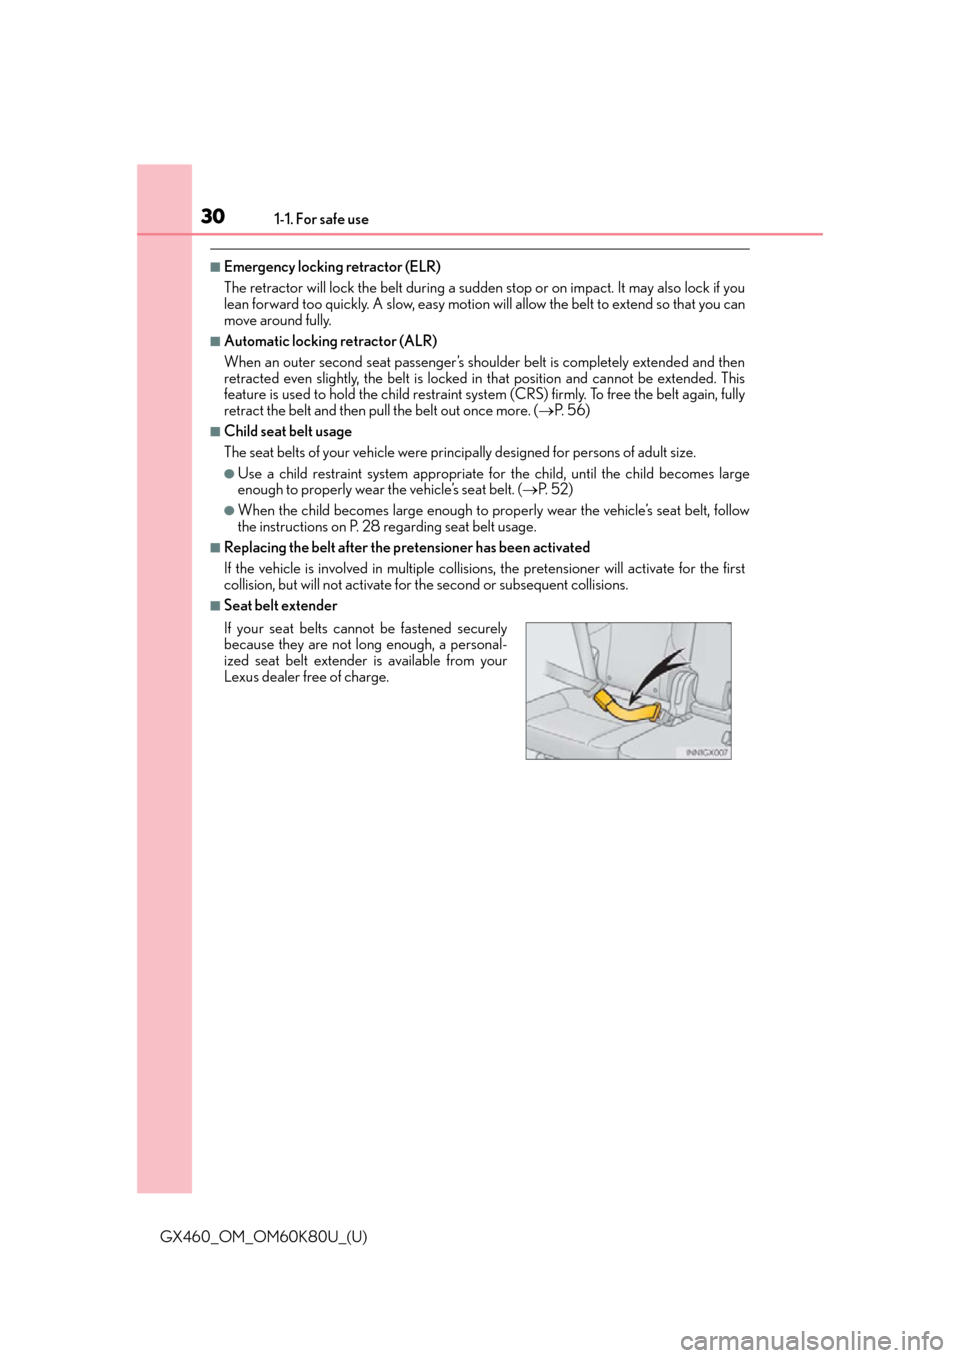
■Seat belt extender
If your seat belts cannot be fastened securely
because they are not long enough, a personal-
ized seat belt extender is available from your
Lexus dealer free of charge.