ECO mode Lexus GX460 2017 User Guide
[x] Cancel search | Manufacturer: LEXUS, Model Year: 2017, Model line: GX460, Model: Lexus GX460 2017Pages: 644, PDF Size: 20.93 MB
Page 85 of 644
83
GX 460 _O M_ OM6 0F 6 8U _(U )2. Instrument cluster
2
Instrument cluster
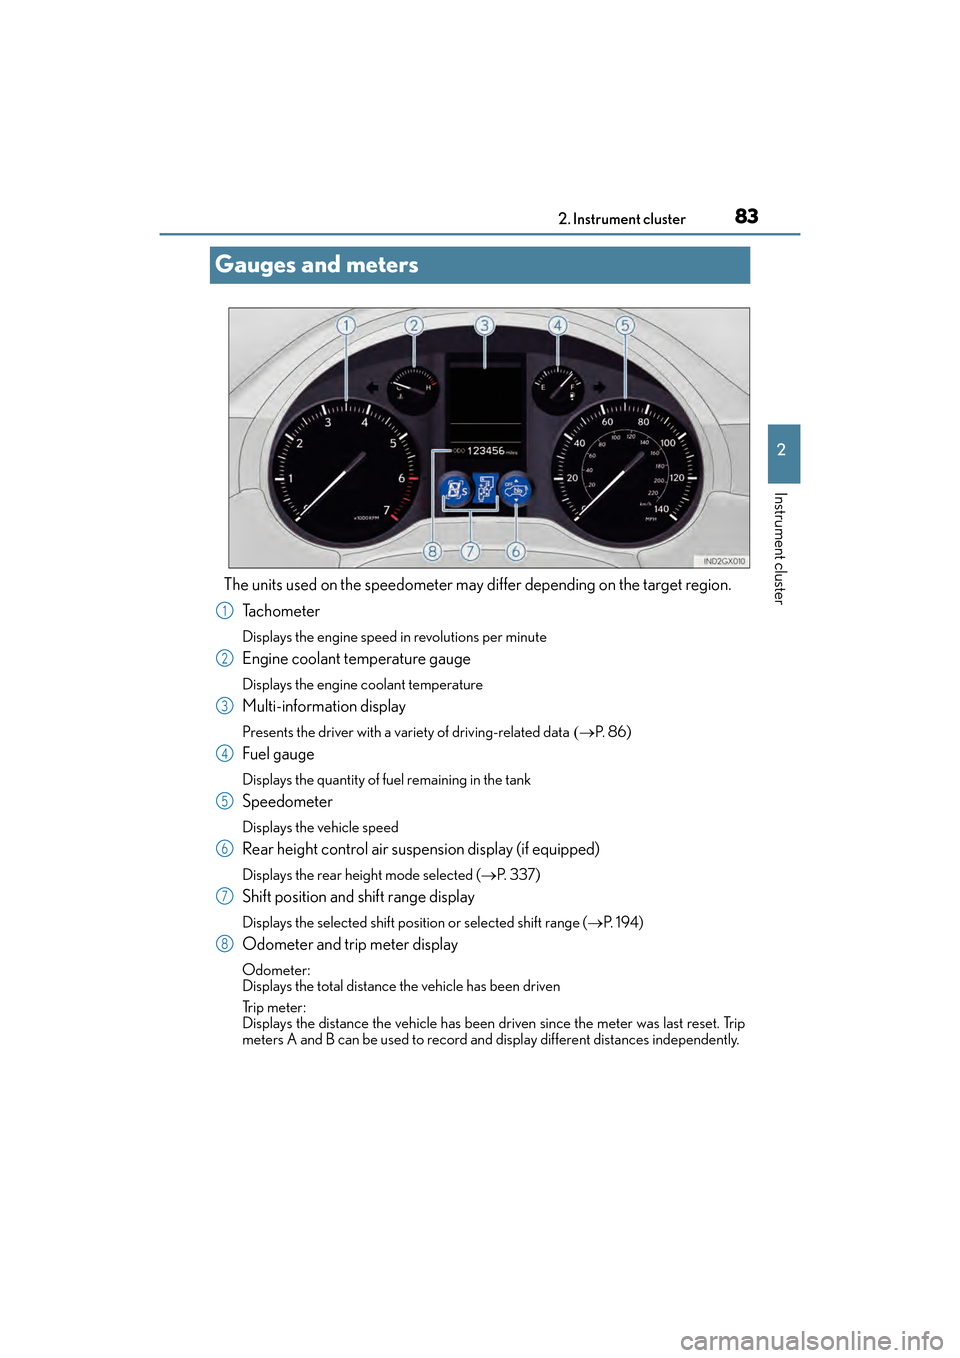
Gauges and meters
The units used on the speedometer may di
ffer depending on the target region.
Ta c h o m e t e r
Displays the engine speed in revolutions per minute
Engine coolant temperature gauge
Displays the engine coolant temperature
Multi-information display
Presents the driver with a variety of driving-related data (→P. 8 6 )
Fuel gauge
Displays the quantity of fuel remaining in the tank
Speedometer
Displays the vehicle speed
Rear height control air suspension display (if equipped)
Displays the rear height mode selected ( →P. 3 3 7 )
Shift position and shift range display
Displays the selected shift position or selected shift range ( →P. 1 9 4 )
Odometer and trip meter display
Odometer:
Displays the total distance the vehicle has been driven
Tr i p m e t e r :
Displays the distance the vehicle has been driven since the meter was last reset. Trip
meters A and B can be used to record and display different distances independently.
1
2
3
4
5
6
7
8
GX460_OM_OM60F68U_(U).book Page 83 Wednesday, June 8, 2016 6:37 PM
Page 87 of 644
GX 460 _O M_ OM6 0F 6 8U _(U )
852. Instrument cluster
2
Instrument cluster
â– The meters and display illuminate when
The engine switch is in IGNITION ON mode.
â– Instrument cluster brightness adjustment
The instrument cluster brightness levels when the tail lights are on and off can be
adjusted.
â– The brightness of the instrument cluster lights
When the tail lights are on, the brightness wi ll change. However, when the surroundings
are bright (daytime, etc.) turning on the tail lights will not change the instrument cluster
brightness.
In addition, the brightness of the instrument cluster lights is automatically adjusted based
on the light sensor detecting ho w bright the surroundings are.
â– When disconnecting and reconnecting battery terminals
The trip meter data will be reset.
If the trip meter was displayed last, the odometer will be displayed after resetting.
â– Customization
Setting of sensitivity of the ambient light se nsor used for dimming the meter lights can be
changed. (Customizable features: → P. 5 9 4 )
NOTICE
â– To prevent damage to the engine and its components
â—ŹDo not let the indicator needle of the tachometer enter the red zone, which indicates
the maximum engine speed.
â—ŹThe engine may be overheating if the engine coolant temperature gauge is in the red
zone (H). In this case, immediately stop the vehicle in a safe place, and check the
engine after it has cooled completely. ( →P. 5 6 4 )
GX460_OM_OM60F68U_(U).book Page 85 Wednesday, June 8, 2016 6:37 PM
Page 90 of 644

88
GX 460 _O M_ OM6 0F 6 8U _(U )2. Instrument cluster
â– Average fuel consumption and Eco
Driving Indicator Zone Display
(→ P. 9 0 )
Displays the average fuel consumption since the function was reset
• The function can be reset by pressing th e “ENTER” switch for longer than 1 second
when the average fuel consumption is displayed.
• Use the displayed average fuel consumption as a reference.
â– Average vehicle speed
Displays the average vehicle speed since the engine was started or the func-
tion was reset
The function can be reset by pressing the “ENTER” switch for longer than 1 second
when the average vehicle speed is displayed.
â– Elapsed time
Displays the elapsed time since the function was last reset
The function can be reset by pressing the “ENTER” switch for longer than 1 second
when the elapsed time is displayed.
â– Display off
A blank screen is displayed
■Multi-terrain Select (if equipped) ( →P. 3 0 8 )
■Intuitive parking assist (if equipped) ( →P. 2 4 4 )
■BSM (Blind Spot Monitor) (if equipped) ( →P. 3 5 7 )
■Second start mode ( →P. 1 9 5 )
Electronic features control contents
GX460_OM_OM60F68U_(U).book Page 88 Wednesday, June 8, 2016 6:37 PM
Page 92 of 644
90
GX 460 _O M_ OM6 0F 6 8U _(U )2. Instrument cluster
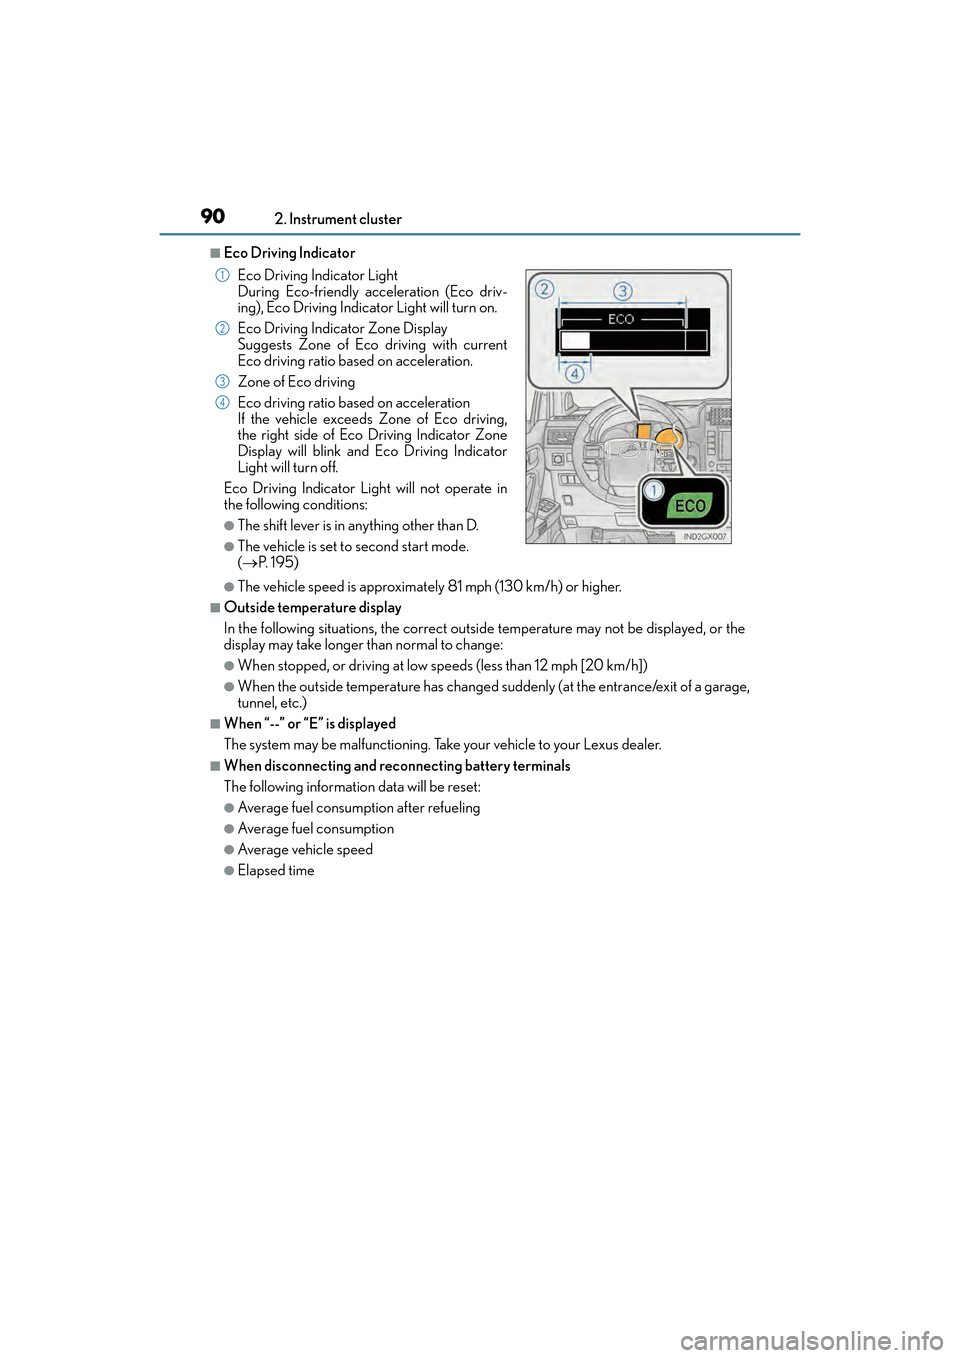
â– Eco Driving Indicator
â—ŹThe vehicle speed is approximately 81 mph (130 km/h) or higher.
â– Outside temperature display
In the following situations, the correct outside temperature may not be displayed, or the
display may take longer than normal to change:
â—ŹWhen stopped, or driving at low speeds (less than 12 mph [20 km/h])
â—ŹWhen the outside temperature has changed suddenly (at the entrance/exit of a garage,
tunnel, etc.)
■When “--” or “E” is displayed
The system may be malfunctioning. Take your vehicle to your Lexus dealer.
â– When disconnecting and reconnecting battery terminals
The following information data will be reset:
â—ŹAverage fuel consumption after refueling
â—ŹAverage fuel consumption
â—ŹAverage vehicle speed
â—ŹElapsed time Eco Driving Indicator Light
During Eco-friendly acceleration (Eco driv-
ing), Eco Driving Indicator
Light will turn on.
Eco Driving Indicator Zone Display
Suggests Zone of Eco driving with current
Eco driving ratio based on acceleration.
Zone of Eco driving
Eco driving ratio based on acceleration
If the vehicle exceeds Zone of Eco driving,
the right side of Eco Driving Indicator Zone
Display will blink and Eco Driving Indicator
Light will turn off.
Eco Driving Indicator Light will not operate in
the following conditions:
â—ŹThe shift lever is in anything other than D.
â—ŹThe vehicle is set to second start mode.
( → P. 1 9 5 )
1
2
3
4
GX460_OM_OM60F68U_(U).book Page 90 Wednesday, June 8, 2016 6:37 PM
Page 94 of 644
92
GX 460 _O M_ OM6 0F 6 8U _(U )2. Instrument cluster
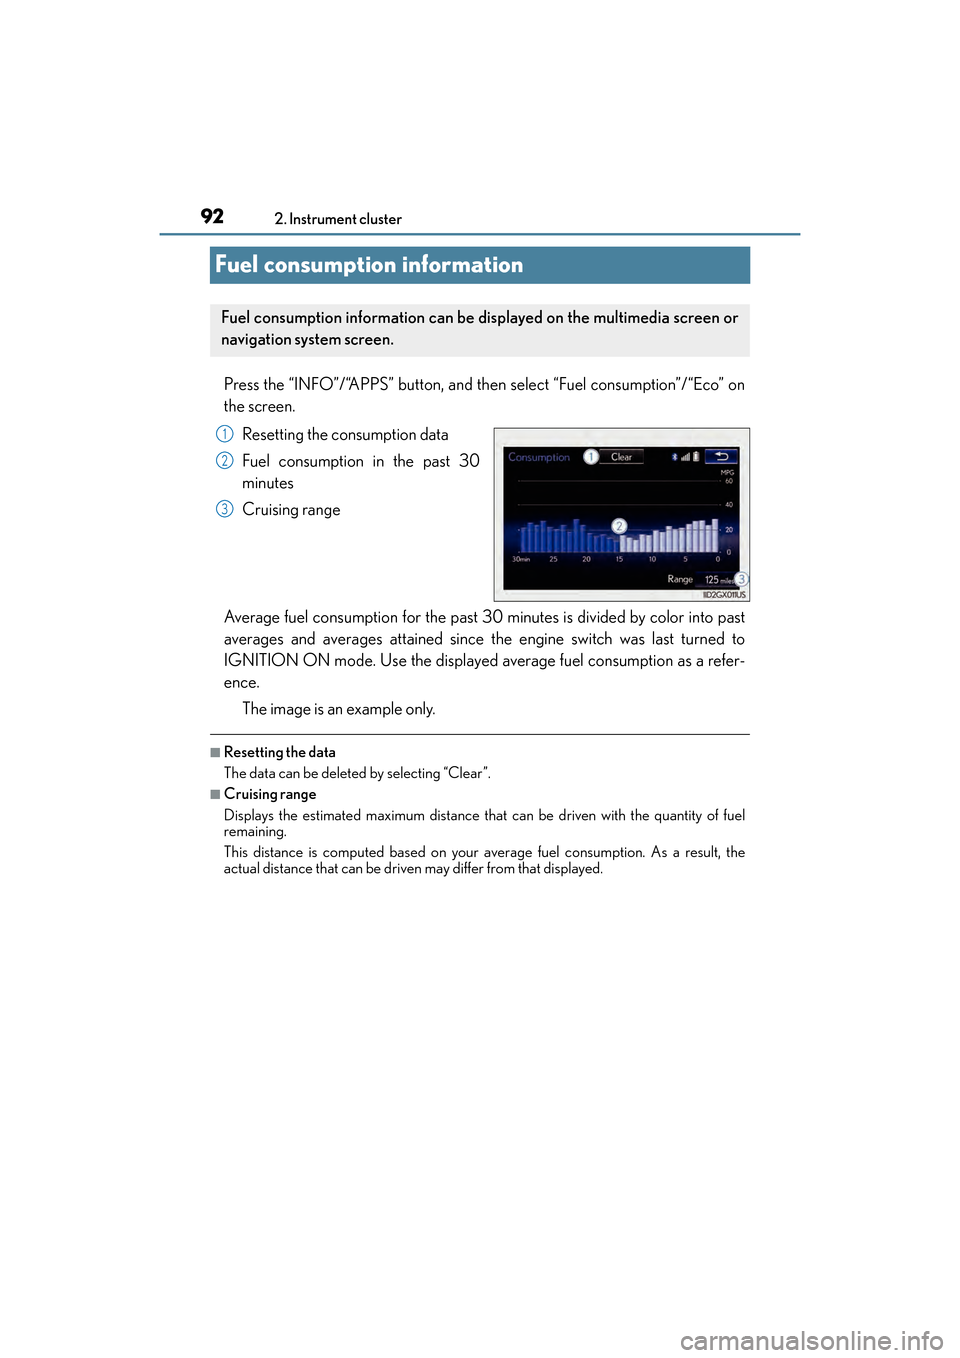
Fuel consumption information
Press the “INFO”/“APPS” button, and then select “Fuel consumption”/“Eco” on
the screen.
Resetting the consumption data
Fuel consumption in the past 30
minutes
Cruising range
Average fuel consumption for the past 30 minutes is divided by color into past
averages and averages attained since the engine switch was last turned to
IGNITION ON mode. Use the displayed average fuel consumption as a refer-
ence. The image is an example only.
â– Resetting the data
The data can be deleted by selecting “Clear”.
â– Cruising range
Displays the estimated maximum distance that can be driven with the quantity of fuel
remaining.
This distance is computed based on your average fuel consumption. As a result, the
actual distance that can be driven may differ from that displayed.
Fuel consumption information can be displayed on the multimedia screen or
navigation system screen.
1
2
3
GX460_OM_OM60F68U_(U).book Page 92 Wednesday, June 8, 2016 6:37 PM
Page 118 of 644
116
GX 460 _O M_ OM6 0F 6 8U _(U )3-2. Opening, closing and locking the doors
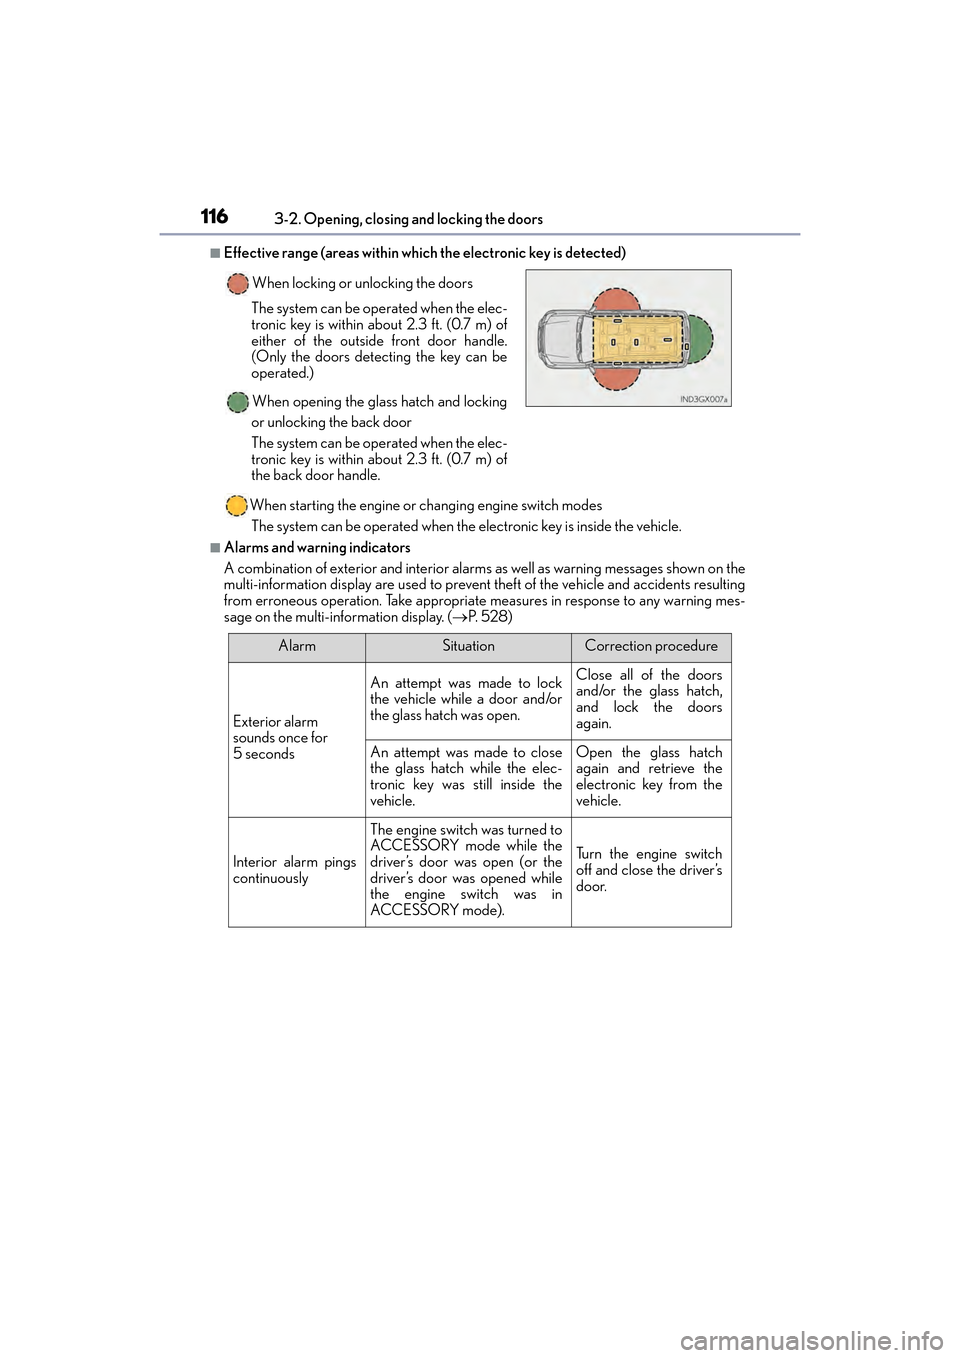
â– Effective range (areas within which the electronic key is detected)
When starting the engine or changing engine switch modesThe system can be operated when the electronic key is inside the vehicle.
â– Alarms and warning indicators
A combination of exterior and interior alarms as well as warning messages shown on the
multi-information display are used to prevent theft of the vehicle and accidents resulting
from erroneous operation. Take appropriate measures in response to any warning mes-
sage on the multi-information display. ( →P. 5 2 8 )
When locking or unlocking the doors
The system can be operated when the elec-
tronic key is within about 2.3 ft. (0.7 m) of
either of the outside front door handle.
(Only the doors detecting the key can be
operated.)
When opening the glass hatch and locking
or unlocking the back door
The system can be operated when the elec-
tronic key is within about 2.3 ft. (0.7 m) of
the back door handle.
AlarmSituationCorrection procedure
Exterior alarm
sounds once for
5 seconds
An attempt was made to lock
the vehicle while a door and/or
the glass hatch was open.Close all of the doors
and/or the glass hatch,
and lock the doors
again.
An attempt was made to close
the glass hatch while the elec-
tronic key was still inside the
vehicle.Open the glass hatch
again and retrieve the
electronic key from the
vehicle.
Interior alarm pings
continuously
The engine switch was turned to
ACCESSORY mode while the
driver’s door was open (or the
driver’s door was opened while
the engine switch was in
ACCESSORY mode).
Tu r n t h e e n g i n e s w i t c h
off and close the driver’s
door.
GX460_OM_OM60F68U_(U).book Page 116 Wednesday, June 8, 2016 6:37 PM
Page 120 of 644
118
GX 460 _O M_ OM6 0F 6 8U _(U )3-2. Opening, closing and locking the doors
â– Note for the entry function
â—ŹEven when the electronic key is within the effective range (detection areas), the system
may not operate properly in the following cases:
• The electronic key is too close to the
window or outside door handle, near the
ground, or in a high place when the doors are locked or unlocked.
• The electronic key is near the ground or in a high place, or too close to the rear
bumper center when the glass hatch is opened.
• The electronic key is on the instrument panel, luggage cover or floor, or in the door pockets or glove box when the engine is started or engine switch modes are
changed.
â—ŹDo not leave the electronic key on top of the instrument panel or near the door pockets
when exiting the vehicle. Depending on the radio wave reception conditions, it may be
detected by the antenna outside the cabin and the doors will become lockable from the
outside, possibly trapping the electronic key inside the vehicle.
â—ŹAs long as the electronic key is within th e effective range, the doors may be locked or
unlocked by anyone. However, only the doors detecting the electronic key can be used
to unlock the vehicle.
â—ŹEven if the electronic key is not inside the vehicle, it may be possible to start the engine
if the electronic key is near the window.
â—ŹThe doors may lock or unlock if a large amou nt of water splashes on the door handle,
such as in the rain or in a car wash, when th e electronic key is within the effective range.
(The doors will automatically be locked after approximately 60 seconds if the doors or
the glass hatch are not opened and closed.)
â—ŹIf the wireless remote control is used to lock the doors when the electronic key is near
the vehicle, there is a possibility that the door may not be unlocked by the entry func-
tion. (Use the wireless remote control to unlock the doors.)
â—ŹTouching the door lock sensor while wearing gloves may prevent lock operation.
â—ŹIf the door handle becomes wet while the electronic key is within the effective range,
the door may lock and unlock repeatedly. Place the electronic key in a location 6 ft. (2
m) or more away from the vehicle. (Take care to ensure that the key is not stolen.)
â—ŹIf the electronic key is inside the vehicle and a door handle becomes wet during a car
wash, a message may be shown on the multi-information display and a buzzer will
sound outside the vehicle. To turn off the alarm, lock all the doors.
â—ŹThe lock sensor may not work properly if it comes into contact with ice, snow, mud, etc.
Clean the lock sensor and attempt to operate it again, or use the lock sensor on the
lower part of the door handle.
â—ŹFingernails may scrape against the door during operation of the door handle.
Be careful not to injure fingernails or damage the surface of the door.
â—ŹA sudden approach to the effective range or door handle may prevent the doors from
being unlocked. In this case, return the door handle to the original position and check
that the doors unlock before pulling the door handle again.
â—ŹUnlocking the vehicle may take more time if another electronic key is within the effec-
tive range.
GX460_OM_OM60F68U_(U).book Page 118 Wednesday, June 8, 2016 6:37 PM
Page 127 of 644
GX 460 _O M_ OM6 0F 6 8U _(U )
1253-3. Adjusting the seats
3
Operation of each component
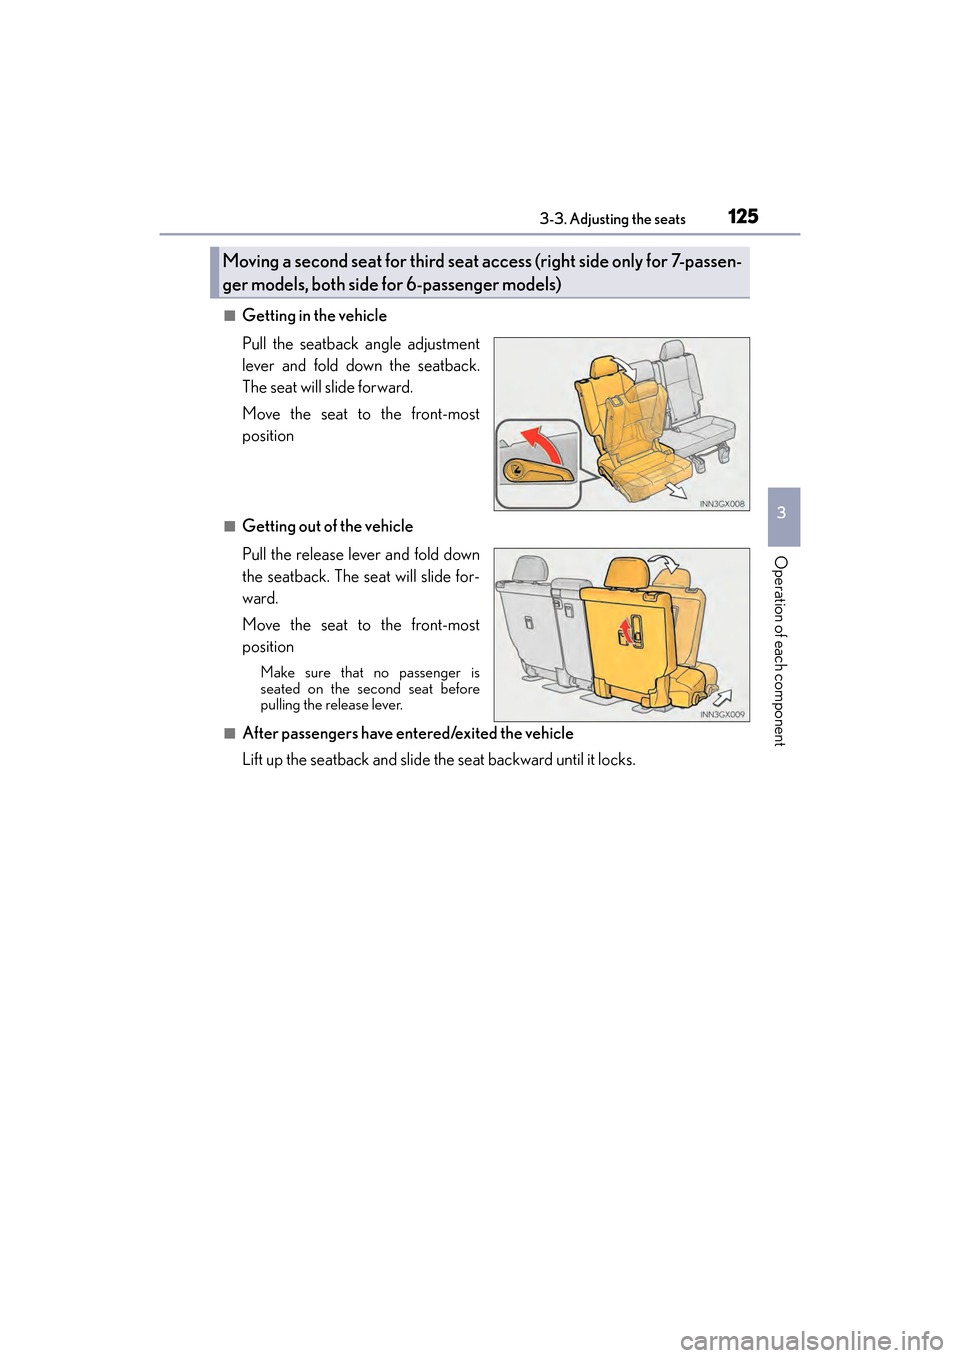
â– Getting in the vehicle
Pull the seatback angle adjustment
lever and fold down the seatback.
The seat will slide forward.
Move the seat to the front-most
position
â– Getting out of the vehicle
Pull the release lever and fold down
the seatback. The seat will slide for-
ward.
Move the seat to the front-most
position
Make sure that no passenger is
seated on the second seat before
pulling the release lever.
â– After passengers have entered/exited the vehicle
Lift up the seatback and slide the seat backward until it locks.
Moving a second seat for third seat access (right side only for 7-passen-
ger models, both side for 6-passenger models)
GX460_OM_OM60F68U_(U).book Page 125 Wednesday, June 8, 2016 6:37 PM
Page 129 of 644
GX 460 _O M_ OM6 0F 6 8U _(U )
1273-3. Adjusting the seats
3
Operation of each component
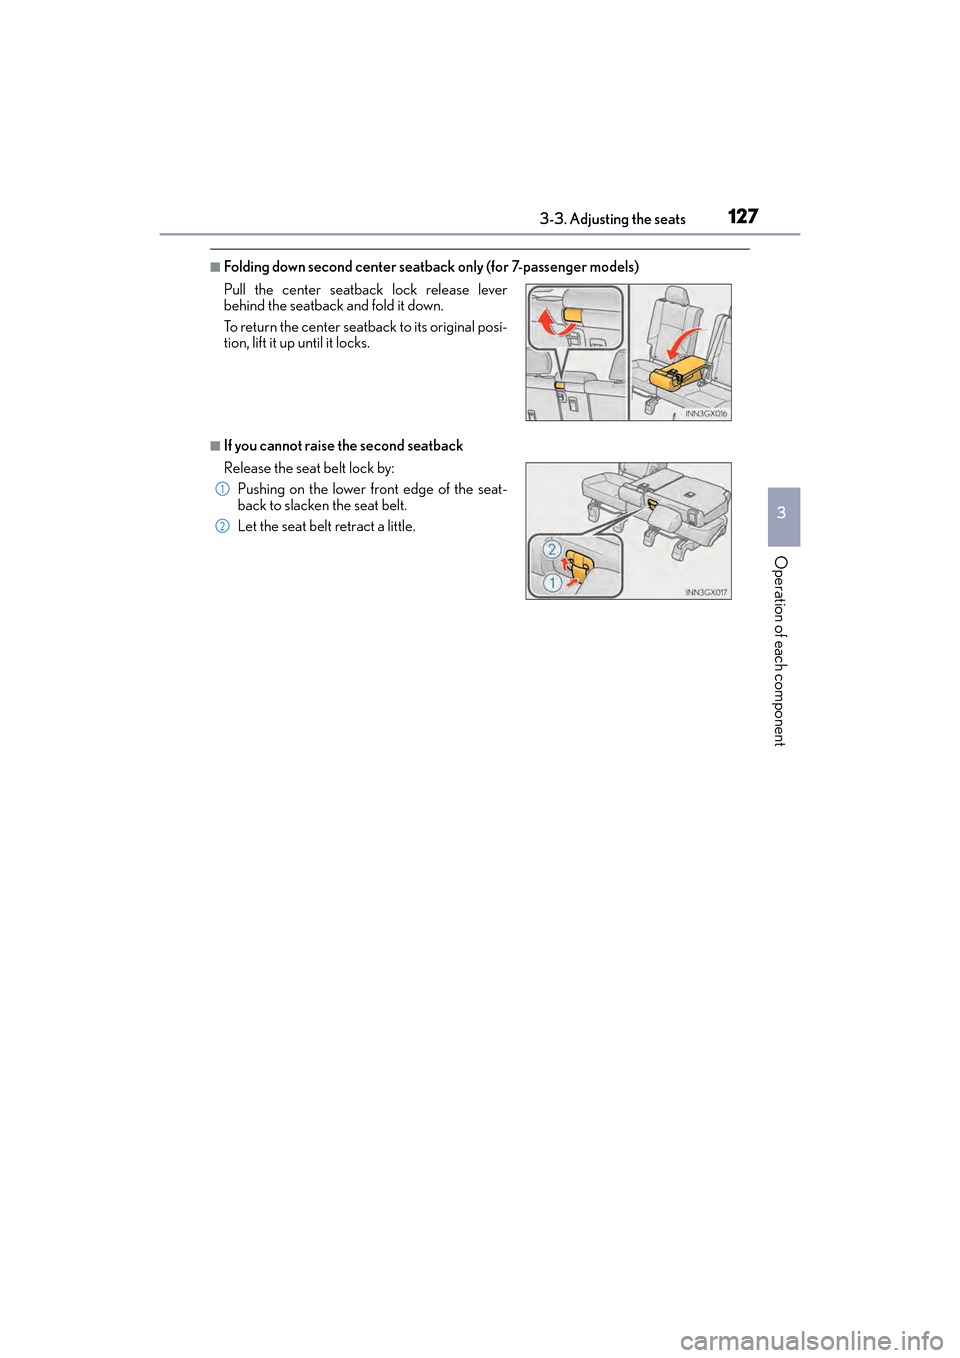
â– Folding down second center seatback only (for 7-passenger models)
â– If you cannot raise the second seatback Pull the center seatback lock release lever
behind the seatback and fold it down.
To return the center seatback to its original posi-
tion, lift it up until it locks.
Release the seat belt lock by:Pushing on the lower front edge of the seat-
back to slacken the seat belt.
Let the seat belt retract a little.
1
2
GX460_OM_OM60F68U_(U).book Page 127 Wednesday, June 8, 2016 6:37 PM
Page 135 of 644

GX 460 _O M_ OM6 0F 6 8U _(U )
1333-3. Adjusting the seats
3
Operation of each component
â– Enlarging the luggage compartment
The third seat can be used for sitting when it is in the position shown in step of the fold-
ing down the third seats. (→P. 1 3 0 )
This can be convenient for enlarging the luggage compartment, for instance when the
luggage is against the back of the seatback.
â– If the warning buzzer sounds continuously
If there is an abnormality in the system, the warning buzzer will sound continuously while
the engine switch is in IGNITION ON mode. In this case, take the following operations:
Press and hold .
Press and hold to stow the seat.
For each step, wait until the seat movement stops automatically and the two beeps sound
twice before removing your hand from the switch.
If the warning buzzer does not stop even after performing the above procedure cor-
rectly, perform the following operations:
Press and hold on the rear door side.
While holding , press forward on 5 times within 10 seconds and keep
holding until 3 beeps sound. The beep will then sound continuously again.
Repeat step and .
2
1
2
3
4
512
GX460_OM_OM60F68U_(U).book Page 133 Wednesday, June 8, 2016 6:37 PM